Porcupine Mountains Wilderness State Park Yurt Rentals - Snow Season
←
→
Page content transcription
If your browser does not render page correctly, please read the page content below
Porcupine Mountains Wilderness State Park
Yurt Rentals – Snow Season Great Lakes, Great Times, Great Outdoors
www.michigan.gov/dnr
INTRODUCTION
This manual provides you with important information concerning snow season (Dec. 1- April 30) rental of
the Porcupine Mountains Wilderness State Park yurt system. It is essential that all members of your party
read this information before embarking on a tour to any of the park’s yurts. In winter, any backcountry
travel by ski, snowshoe or on foot can be dangerous. You are responsible for yourself and your
group’s safety.
TRIP PLANNING
Carefully read this material and evaluate the abilities of yourself and your party. If you feel confident that
you have the skills and knowledge to undertake a yurt tour safely, follow these steps:
• Make reservations by calling 800-44-PARKS or online at: www.midnrreservations.com/
• Park maps and additional information can be obtained online at: www.mi.gov/porkies
• USGS maps are available online at: www.michigan.gov/dnr Access them from the menu list on the
left side of the DNR home page as follows: select publication & maps > online maps > topographic
quadrangles by name. The Government Peak quadrangle covers all of the park’s rental yurts. Other
quadrangles that offer coverage of the park are Bergland NE, Tiebel Creek, Carp River, Aldridge
Creek and White Pine.
• Call the park at (906) 885-5275 with questions you have.
• Make sure everyone in your party is properly prepared, including the possibility of spending the night
outdoors.
• Always tell a reliable party where you are going, what route you will use and when you will return.
• Know the weather forecast.
ROUTES TO YURT
• Pedestrian traffic and snowmobiles do not mix; Never Ski, Snowshoe or Walk on Snowmobile
Trails.
• Go on a day trip to familiarize yourself with surrounding landmarks and learn way-finding tricks that
will help you locate the yurt again. If you have any doubt of your way-finding skills, do not go.
• Before attempting any yurt tour you should be experienced in the use of a map and compass, and
carry both with you on the trip.
• Use common sense and err on the safe side. Keep your party together. Turn back if the weather
closes in or visibility becomes difficult. The yurt will be there for you to visit another day.
• Extreme snowfall or lack of snow can make ski trails and suggested routes difficult to follow. Be
prepared to use your map to plan alternate routes. Check with park staff before departing to verify the
best route.
• Snowmobile travel in the park is permitted only on designated snowmobile trails. Snowmobiles are
not permitted on hiking or ski trails.
• Do not travel in severe weather or after dark.
• NEVER TRAVEL ALONE!
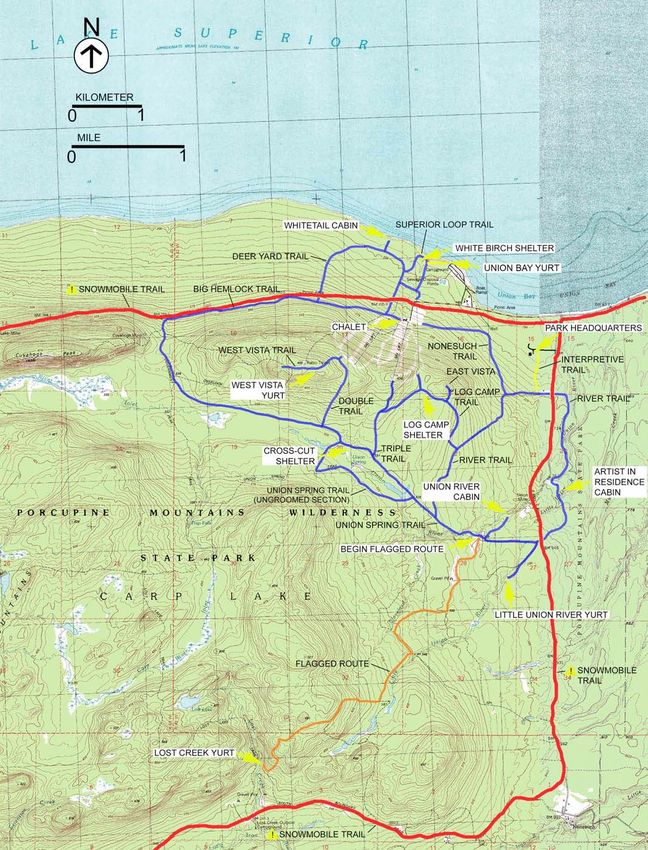
UNION BAY YURT– (N 46.82529°, W 89.64240°) Located off of the Superior Loop cross-country ski
trail, suggested route:
Route: Park your vehicle at the Whitetail parking lot located just west of the ski area entrance road.
Follow the Deer Yard cross-country ski trail north to the second junction with the Superior Loop cross-
country ski trail (a distance of 0.5 km/0.3 miles). This junction will have a Union Bay Yurt sign and a
cross-country ski trail map. Follow the Superior Loop ski trail to the next Union Bay Yurt sign along the
trail (a distance of 0. 25km/0.15 miles), from there follow the short, ungroomed trail leading to the yurt (a
distance of several hundred feet). (Total distance 0.8km/0.5 miles)LITTLE UNION YURT– (N 46.78455°, W 89.63242°) Located off of the River Trail cross-country ski trail, suggested routes: Route #1: Park your vehicle at the ski area upper lot, follow the Nonesuch Trail cross-country ski trail (which begins at the east end of the upper parking lot) to the junction with the River Trail cross-country ski trail (a distance of 2 km/1.25 miles), follow the River Trail to the Union Spring Trailhead (a distance of 3.5 km/2.2 miles if you turn left and follow the River Trail clockwise, or a distance of 5 km/3.1 miles if you turn right and follow the River Trail counter-clockwise), at the Union Spring Trailhead follow the signs to Little Union Yurt, which is 0.8 km/0.5 miles south of the trailhead. (Total distance 11.3 km/7.5 miles) Route #2: Park your vehicle at the designated overnight parking area at the Park Headquarters and follow the interpretive trail (which is ungroomed) to the River Trail cross-country ski trail (a distance of 1 km/0.6 miles), from here turn right on the River Trail and follow it counter-clockwise to the Union Spring Trailhead (5.5 km/3.4 miles), at the Union Spring Trailhead follow the signs to Little Union Yurt, which is 0.8 km/0.5 miles south of the trailhead. (Total distance 7.3 km/4.5 miles) Route #3: Park your vehicle at the designated overnight parking area at the Park Headquarters and follow the interpretive trail (which is ungroomed) to the River Trail cross-country ski trail (a distance of 1 km/0.6 miles), turn left on the River Trail and follow it clockwise from here to the Union Spring Trailhead (a distance of 3 km/1.8 miles), at the Union Spring Trailhead follow the signs to Little Union Yurt, which is 0.8 km/0.5 miles south of the trailhead. (Total distance 4.8 km/2.9 miles) WEST VISTA YURT – (N 46.81084°, W 89.66624°) Located off of the West Vista cross country ski trail, suggested routes: Route #1: Park your vehicle at the ski area upper lot and follow the Nonesuch Trail cross-country ski trail (which begins at the east end of the upper parking lot) to the junction with the River Trail cross-country ski trail (a distance of 2 km/1.25 miles), turn right on River Trail and proceed to the junction with the Union Spring Trail cross-country ski trail (a distance of 3 km/1.8 miles), turn right on the Union Spring Trail and follow it to the junction with the Double Trail cross-country ski trail (a distance of 2.5 km/1.6 miles), follow the Double Trail uphill to the West Vista Trail cross-country ski trail (a distance of 1 km/0.6 miles), follow the West Vista Trail to the yurt, which is marked by signs (a distance of 1 km/0.6 miles). (Total distance 9.5 km/5.85 miles) Route #2: Park your vehicle at the designated overnight parking area at the Park Headquarters, follow the interpretive trail (which is ungroomed) to the River Trail cross-country ski trail (1 km/0.6 miles), turn right on River Trail and follow to junction with Nonesuch Trail cross-country ski trail (a distance of 0.5 km/0.3 miles), turn left (uphill) and continue following the River Trail to the junction with the Union Spring Trail cross-country ski trail (a distance of 3 km/1.8 miles), turn right on the Union Spring Trail and follow it to the junction with Double Trail cross-country ski trail (a distance of 2.5 km/1.6 miles), turn right on the Double Trail and follow it uphill to the junction with the West Vista Trail cross-country ski trail (a distance of 1 km/0.6 miles), follow the West Vista Trail to the yurt, which is marked by signs, (a distance of 1 km/0.6 miles). (Total distance 9 km/5.5 miles) Route #3: Park your vehicle at upper lot of the ski area, pick up the Big Hemlock Trail cross-country ski trail by crossing in front of the chalet and continuing west; the trail begins just downhill from the loading area of the double chairlift. Follow the Big Hemlock Trail all the way around the mountain to the junction with the Double Trail cross-country ski trail (a distance of 7.25 km/4.5 miles), turn left on the Double Trail and follow it uphill to the junction with the West Vista Trail cross-country ski trail (a distance of 1 km/0.6 miles), follow the West Vista Trail to the yurt, which is marked by signs (a distance of 1 km/0.6 miles). (Total distance 9.25 km/5.7 miles) LOST CREEK YURT – (N 46.76241°, W 89.67683°) Located on the east side of Lost Creek in the southeast portion of the park. Winter access to this yurt can be very difficult, requiring a strenuous ski or snowshoe journey of approximately 10.1 km/6.3 miles, which may take 6 hours or more to complete. A designated snowmobile trail is 0.8km/0.5 miles south of the yurt, but snowmobiles are not permitted at the yurt, or in the park, except on designated snowmobile trails.
Winter travel to the Lost Creek yurt requires physical stamina, specialized equipment, and expert
way-finding and winter survival skills. Due to deep snow and steep hills, only expert backcountry
skiers and snowshoers should attempt to travel to the Lost Creek yurt. For safety reasons, and to
share the strenuous work of breaking trail in deep snow, always travel in a group.
The route suggested below includes 4.5 km/2.8 miles of travel on designated cross-country ski trails,
which may be packed and groomed, and 5.6 km/3.5 miles of travel on a flagged winter route marked only
with orange plastic flagging with reflective silver stripes. Only the first 1.6 km/1.0 miles of the flagged
route is likely to be packed or groomed, the remainder of the flagged route may be minimally packed or
not packed at all.
Be prepared for cross-country travel using map and compass in the event you lose or cannot
follow the flagged route. Be prepared with the necessary equipment and survival skills to spend
the night outdoors if you cannot reach or locate the yurt, or if you find the yurt unusable on your
arrival.
In the event of an emergency, assistance may be available from snowmobilers traveling on the South
Boundary Road snowmobile trail, which is approximately 0.8 km/0.5 miles south of the Lost Creek yurt.
Suggested route to Lost Creek Yurt: (Total distance 10.1 km/6.3 miles)
   1. Park your vehicle at the designated overnight parking area at the Park Headquarters and follow
      the interpretive trail (which is not packed or groomed) to the River Trail cross-country ski trail (a
      distance of 1 km/0.6 miles), from here turn left (east) and follow the River Trail “loop” clockwise
      approximately 4km/2.5 miles to the beginning of the flagged route to the Lost Creek yurt. This
      location is 1km/0.6 miles west of the Union Spring Trailhead and trail to the Little Union Yurt. It is
      marked with a sign that reads: “FLAGGED ROUTE TO LOST CREEK YURT.”
   2. From this point to the Lost Creek yurt you will be traveling on a winter route marked only with
      orange plastic flagging with reflective silver stripes. This route generally follows old logging roads,
      but a section of it travels through open forest. Only the first 1.6km/1.0 miles of the flagged route is
      likely to be packed or groomed, the remainder of the flagged route may be minimally packed, or
      not packed at all.
   3. Follow the flagged route to the Lost Creek Yurt a distance of approximately 5.6 km/3.5 miles.
      Along the way the route climbs 500 feet in elevation and several steep hills will be encountered.
      The Lost Creek yurt is on the east side of Lost Creek approximately 2.4 km/1.5 miles south of
      Lost Lake, and 0.8 km/0.5 miles north of the South Boundary Road, which is a designated
      snowmobile trail from December through March.
   4. Map and compass are required to travel the flagged route to the Lost Creek yurt. A GPS receiver
      may also prove valuable. Directional signs to the yurt are posted along the way, but these
      may become obscured by snow or fallen trees. Be prepared for cross-country travel in the
      event you lose your way or cannot follow the flagged route.
   5. Start early and allow ample travel time to reach your yurt. Daylight is short in the winter; sunset is
      just after 5:00 pm eastern time in December. Ski trails may not be packed or groomed and the
      flagged route is not groomed at all. Whether on skis or snowshoes, deep snow can slow your
      progress to one mile per hour or less.

ON THE TRAIL
Do not allow your party to become separated. All trip participants should have a park map, ski trail map,
compass and survival gear. A USGS quadrangle map of the area is also recommended. The
GOVERNMENT PEAK, MICH quadrangle includes the area containing all of the park’s yurts. NOTE:
USGS quadrangle maps depict rivers, lakes and topographic information in great detail, but do
not include the location of park yurts and cabins. In addition, park trails may not be correctly
located on USGS maps. Use USGS maps in conjunction with park maps.
Always travel in a group and stay together to stay safe. Travel at a pace that is comfortable for the
slowest member of the party. Remember, if one member becomes injured or exhausted, your entire party
will be affected. A slow, steady pace is the safest way of traveling in the wilderness. Take turns breaking
trail in deep snow.
CONDITION OF YURT UPON ARRIVAL
It is possible that a yurt can be damaged by extreme weather conditions, which are common in upper
Michigan. High winds, heavy snow fall, falling tree branches, and accumulation of snow on the yurt’s
walls could cause rips, tears and/or partial or total collapse. These possibilities point out the need to be
prepared with the necessary equipment and survival skills to spend the night outdoors if needed.
ITEMS AT THE YURT
At each yurt, you should find (2) bunk beds, (1) table, benches or chairs, (1) wood-stove, (1) wood rack,
(1) ash bucket, assorted silverware, plates, bowls, and cups, (1) water bucket, assorted cooking pots and
pans, miscellaneous kitchen equipment, (1) mop, (1) broom, (1) dust pan, (1) buck saw, (1) axe, (1)
dome opener, (1) snow shovel, (1) smoke alarm and (1) fire extinguisher. Located outside are a primitive
toilet, fire pit, picnic table, and woodpile. We cannot guarantee all of the items listed will be in the yurt or
in operable condition. Because of the remote location, it may take several days to replace/repair the
item(s); be prepared to survive without these items.
USING THE WOODSTOVE:
1. Do not cut or split wood on the yurt deck.
2. Place 1 or 2 sheets of loosely crumpled newspaper in the stove and cover with small pieces of
dry, finely split wood.
3. Light the newspaper and leave the door slightly ajar (1/8 inch) until all kindling is burning and a
hot coal bed is established.
4. Slowly add larger pieces of wood. Lay pieces lengthwise on the hot coal bed with a shallow
trench between so the air can flow directly into the trench and ignite the fuel above.
5. When the fire seems to be at its peak, large pieces of wood may be added. Once these pieces
catch fire, slowly close the door and adjust the draft on the door to the desired burning rate.
6. Airflow is the key to a good fire. Position the wood on your fire so as to maintain best airflow.
7. Do not overfill the stove with wood in an effort to keep it going all night. To keep the yurt warm
through the night you will need to get up and put wood into the stove every couple of hours.
8. A small, hot fire is more efficient than a large, smoldering fire.
9. Never store paper or other flammable materials near the woodstove.
10. Never burn garbage or plastic in the wood stove.
OPENING AND CLOSING YURTS
There is minimal staff to operate and maintain the yurts, so we trust that your group will assist us in
keeping them in good condition for the next group.
When You Arrive:
1. To remove snow, start by shoveling the deck and steps and then the snow away from the sides.
Be very careful not to tear the yurt fabric with the shovel.
2. The snow will likely slide off the yurt once it has warmed up. Do not try to shovel the yurt roof,
this may tear or damage it.
3. It is very important to keep the deck and steps snow and ice free so there is not a build up of ice
and compacted snow.
4. At the completion of your stay, replace the snow shovels on their hooks. If you leave them in the
yurt, the next party may not be able to dig out the yurt door.
5. Do not force open the plastic dome when covered by snow, frozen shut, or open it during
high winds. When closing the dome, do not over tighten it as this may cause it to crack allowing
water in.
When You Leave:
1. Sweep up all dirt, wood chips and snow from the yurt and outhouse.
2. Make sure plastic dome is securely shut.
3. Remove snow and ice from the entire entrance deck and steps.
4. Hang up the snow shovel outside.5. Make sure the woodpile is covered with the tarp.
6. Pack out all food and garbage.
7. Securely shut and lock yurt door.
SAFETY
Everything you do on a wilderness tour should be done carefully. In the wilderness you are
responsible for yourself and your group’s safety. Wilderness travel in winter requires everyone to
take personal responsibility to do everything they can to be safe. It is important to stay alert and to
constantly evaluate and minimize potential hazards. You and your party must come prepared. It is a
good idea to have someone on the trip with wilderness first aid skills. There is no ski patrol in the
backcountry and it’s an hour or more to the nearest hospital. The closest public telephone is at the Park
Headquarters; in case of an emergency use this phone to call 911. Cell phone coverage is poor across
most of the park, but you may be able to obtain coverage by going to higher ground.
SUGGESTED EQUIPMENT LIST
The equipment list below is a guide to help you prepare for a yurt trip. Remember, be prepared to spend
the night outdoors if you can not make it to the yurt, or if you find the yurt damaged or collapsed.
Dressing in layers is the best choice. As you get warm you can take off layers, and as you cool down
during breaks, you can put them back on. Select clothing that will wick away sweat keeping you feeling
dry and warm. Cotton clothing should not be worn because cotton holds moisture against your skin,
increasing the risk of hypothermia.
PERSONAL EQUIPMENT: GROUP EQUIPMENT:
sleeping bag yurt key and yurt permit
backpack cook stove and fuel
sunglasses avalanche shovel to dig
off-trail Nordic skis or snowshoes emergency shelter
ski poles toilet paper
Nordic ski boots or insulated pack boots paper towels
headlamp and small flashlight sun screen
lighter, matches in waterproof container, and fire starters tent or tarp to serve as
basic first aid kit
emergency shelter
group first aid kit
high-energy trail snacks
plastic emergency whistle
large water bottle
compass, ski trail map, park map and USGS quadrangle maps
small knife
toothbrush and paste
long underwear (top and bottom)
socks, wool or synthetic
gloves
wool or polar fleece mittens with waterproof shell
polar fleece or down jacket
long-sleeve shirt, wool, polar fleece or synthetic
long pants, wool, polar fleece or synthetic
knit hat, wool, polar fleece or synthetic
shell jacket and hood, breathable windproof/waterproof
shell ski pants, breathable windproof/waterproof
knee-high gaiters
slippers or down booties
personal medications
watch
1/22/09You can also read