PowerPoint 2016: Basics - Creating a Slide Show Presentation
←
→
Page content transcription
If your browser does not render page correctly, please read the page content below
PowerPoint 2016: Basics
Creating a Slide Show Presentation

                           training@health.ufl.edu
Microsoft PowerPoint 2016 Basics
                         Creating a Slide Show Presentation
                                                                    2.0 hour

                      This workshop assumes no experience with Microsoft PowerPoint.
Topics:
  ‐             Intro to PowerPoint                                                   ‐            Adding Content
  ‐             Creating a New Presentation                                           ‐            Applying Designs
  ‐             Slide Layouts                                                         ‐            Printing Presentations

What is PowerPoint? ........................................................................................................................ 1
PowerPoint 2016 Editing Window (Normal View) ........................................................................... 1
The Ribbon........................................................................................................................................ 1
Opening PowerPoint ........................................................................................................................ 2
Creating New Presentations ............................................................................................................. 2
PowerPoint Slides ............................................................................................................................. 3
Slide Layouts .....................................................................................................................................4
Applying A Theme.............................................................................................................................5
Text ................................................................................................................................................... 6
Formatting Bulleted Lists .................................................................................................................. 6
Adding Content.................................................................................................................................7
Tables................................................................................................................................................ 9
Charts ............................................................................................................................................... 9
SmartArt Graphics .......................................................................................................................... 10
Pictures ...........................................................................................................................................10
Clip Art ............................................................................................................................................10
Videos / Media ............................................................................................................................... 11
Viewing Presentations .................................................................................................................... 12
Slide Show Tab................................................................................................................................13
Changing the Order of Slides in a Presentation ............................................................................. 13
PowerPoint Help ............................................................................................................................. 13
Saving a Presentation ..................................................................................................................... 14
Save and Send to Others ................................................................................................................ 14
Printing your Presentation ............................................................................................................. 15
Types of Print Layouts .................................................................................................................... 15
Exiting PowerPoint ......................................................................................................................... 15

                                                                           1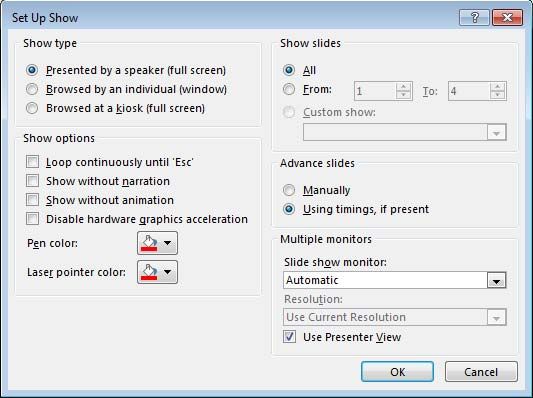
What is PowerPoint?
PowerPoint is a graphical presentation program used to organize and present
information. PowerPoint presentations consist of a number of individual pages or
"slides.” Slides may contain text, graphics, sound, movies, and other objects that can be
freely arranged.

Presentations can be printed, displayed live on a computer, or navigated through at the
command of the presenter. For larger audiences, the presentation is often projected onto
a large screen. Handouts, speaker notes, or outlines can also be produced from the slides.

PowerPoint 2016 Editing Window (Normal View)
The Normal View in PowerPoint features several commonly used Tabs, Panes, and Tools.
We’ll use Normal View as we create and design our presentation.

The Ribbon
The Ribbon replaces the menu bar seen in previous versions of PowerPoint. The Ribbon
groups items that are most likely to be used together. There are several frequently used
tabs, such as File, Home, Insert, Design and View. Clicking on each tab activates a group
of relative commands, menus, and buttons. There are also contextual tabs that only show
up only when needed, such as Text Box Tools, Picture Tools, Drawing Tools and Chart
Tools. To activate those tools, click on the associated object.

                                            1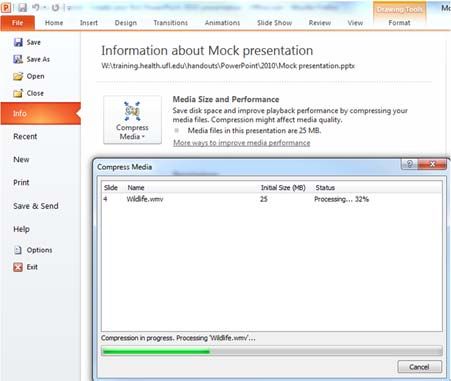
Opening PowerPoint
To open a PowerPoint 2016 presentation, click on the File tab in the upper left corner.
The most common choices for opening a presentation are:
New ‐ allows you to open a Blank presentation or you may choose from a
selection of Templates and Themes.
Open ‐ lets you navigate to an existing file to view and/or modify a presentation
that has already been created.
Recent – displays a list of your most recently created presentations and their file
locations.
Creating New Presentations
The New selection gives you several options:
Blank presentation creates a new presentation using default settings for text and
color. Theses slides will not include content or design elements.
Templates and Themes are used to create a new presentation based on pre‐
designed slide styles. These options also do not include content.
New from existing will use the formatting of a previously created presentation.
For this exercise, we’ll start with a Blank presentation. Select New, choose Blank
presentation and click on the Create icon.
2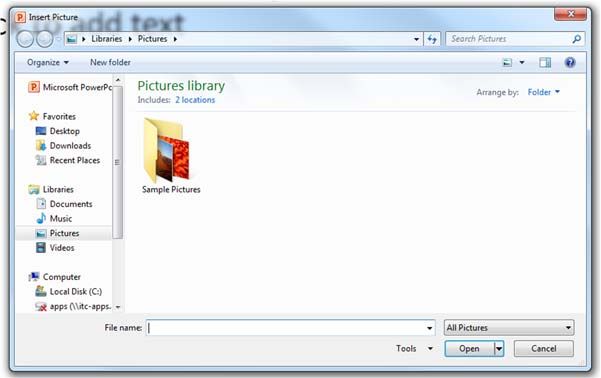
PowerPoint Slides
When you choose to create a blank presentation, PowerPoint will open a presentation
with a Title Slide. Once the Title Slide is open, you’ll see a slide with two placeholder text
boxes for a title and a subtitle. Click inside the placeholder box and type to add the title.
If you want a subtitle, click and type inside the smaller placeholder. If you don’t want a
subtitle, you can just ignore its placeholder box.

To add a New Slide, make sure you’re on the Home tab. The New Slide button will add
slides to your presentation.

The New Slide button has two parts:

           Clicking on the top part will automatically insert a new slide. If you have just
           reated a Title slide, the new default layout will be a Title and Content slide (for
           details, see the section on slide layouts).

           Clicking on the bottom will give you a choice of layouts. You can choose which
           layout you want for your next slide. Select a slide layout by clicking on its image
           in the Office Theme gallery.

                                              3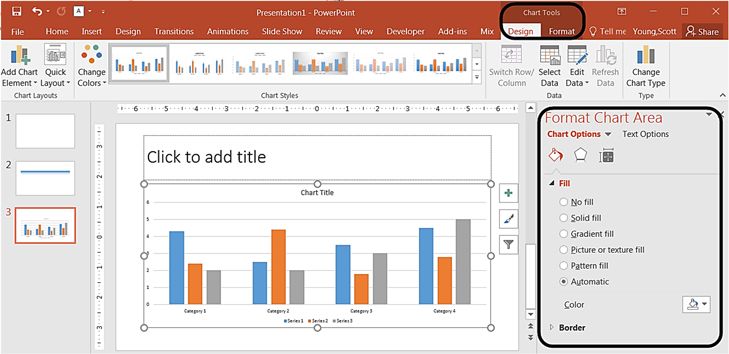
Slide Layouts
There are several standard slide layouts to
choose from when adding new slides.

A unique layout can be chosen by clicking
on the bottom half of the New Slide button
in the Home tab. When the layout gallery
opens, click on the style you want and a
new slide with that layout will appear in
your presentation.

Each layout caption describes the layout
type. Content can be text, tables, charts,
graphics, pictures, clip art, or video.

If you decide later that the layout you chose
doesn’t work well for a particular slide,
select the slide by clicking on it in the
Thumbnail pane. Next, click on the Layout
button in the Slides group of the Home tab.
Click on a new layout and it will change the
layout of the slide.

                                                4
Applying a Theme
Once a new presentation has been created, a design or color scheme can be added.
Remember to use color carefully to enhance your presentation, not detract from it. You
will want to maintain good contrast between the background color and the text color.
Consider using a light colored background and dark text (or vice versa), but avoid busy
backgrounds and primary colors. Use sans serif fonts like Arial, Calibri, and Helvetica for
titles and size them between 44 – 60 points. Sub‐headings should be between 32 – 40
points, and body text between 18 – 32 points. Try not to use more than two fonts.

PowerPoint has many pre‐set designs and themes that include complimentary colors and
fonts. To add a theme to a presentation, go to the Design tab in the ribbon. There are
several themes immediately available. To use one of the built‐in themes, just click on its
thumbnail.

On the right side of the Theme thumbnails, there’s a scroll bar and an Arrow Down
button, which will offer more designs, as seen below. If you’re online, you can get more
themes from Microsoft Office Online. (Your office program must be a genuine Office
product to get online templates).

If you don’t want to use a theme, you can add Background Styles. From this selection,
you can add some preset background styles that change according to the colors you’ve
chosen.

                                            5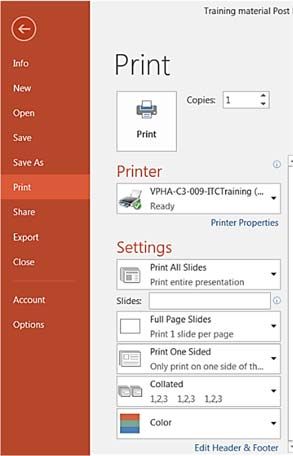
Using the Format Background feature, you can choose fill colors,
                     gradients, transparencies, textures, or pictures for your background.

                     When you have the desired background fill effect, select Close to
                     apply it to the selected slide or choose Apply to All to add the
                     background to all of the slides in the presentation.

                     Designs can be added to all of the slides or to selected slides. To select
                     multiple slides, click on a slide in the Thumbnail pane of the
                     navigation bar and then hold down the control key and click on any
                     other slides you want to apply the design to.

Text
Formatting Bulleted Lists
In PowerPoint, you can easily modify a slide’s default bulleted list. Click inside the text
box, and the Format tab will automatically be highlighted. Click on the drop down triangle
next to the Bullets button in the Paragraph group.

       Text in the form of a bulleted list
       is the default content of this slide
       layout. To add a bulleted list, just
       Click to add text and start typing.

                                                      Bullets Drop Down
                                                      Button

                                              6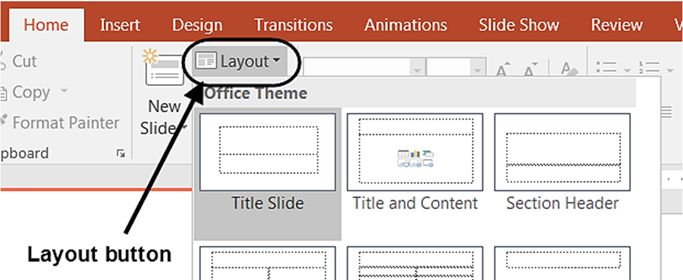
From the Bullets and Numbering menu you can make various changes to your list:
The bullet size relative to the text
The color of the bullet
The shape of the bullet using either a picture
or a character
You may also want to adjust line spacing
between paragraphs or lists. You can do this
through the Paragraph group of tools by
clicking the Line Spacing button and selecting
Line Spacing Options.
Indents and Spacing controls will
open in a separate dialog box.
7
Adding Content
Text is the default content of the slide below. The format for the default text is a bulleted
list. To add text, click and begin typing. To add other content, click on the icon within the
content group on the new slide. Each icon will open the appropriate dialog box or task
pane in the Drawing Tool
s contextual tab.
                                                                          Drawing Tools

The icons represent the six standard graphical elements that you might want to insert.

                              Table       Chart      SmartArt

                             Picture     Online        Video
                                        Pictures

Clicking on an icon will open the associated dialog box. Note that these icons, as well as
several other insertion options, are also displayed in the Insert tab on the Ribbon.

                                             8
Tables
Set the number of columns and rows as needed in the Insert Table dialog box and click
OK. Methods for editing and the design and layout of your table are located on the Table
Tools contextual tab.
Table Tools
Charts
Select the type of chart you want and click OK. Once inserted into the slide, you can click
on the chart to activate the Chart Tools contextual tab, where you’ll find tools for editing
chart data and changing layouts and styles.
9SmartArt Graphics
SmartArt graphics are shapes that are designed to represent the relationship between
things or people. You might use SmartArt for an organizational chart or a timeline.
SmartArt styles and layouts can be formatted in the SmartArt Tools contextual tab.
Pictures
Rather than using too much text on your slides, consider using pictures along with text
as a more interesting way to communicate your ideas. You can put lots of text into the
Notes Section and refer to that as you’re speaking.
When browsing for images, keep in mind that pictures imported from web sites can be
low resolution, and are typically used for on‐screen presentations and web pages. If
you’re going to print handouts, be sure to use images that are at least 180 dpi (dots per
inch).
Notes Section
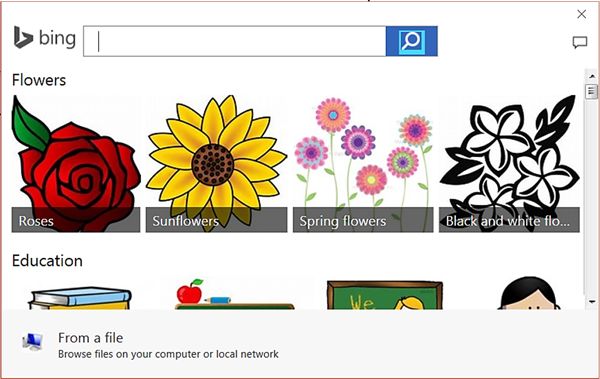
10Online Pictures
Online pictures have replaced the old Clip Art. When you click on the Online Pictures
button you get a search box. You can type in a word and press enter to search for a specific
image or you can click on the Bing Image Search icon to browse categories.
Videos / Media
You can embed a video or link to a video from
your presentation. If you want to limit the size
of your file, you can link to a video file on your
local drive or to a video file that you uploaded
to a web site, such as YouTube or Hulu.
All options to insert video or audio are
located on the Insert tab, in the Media
group.
11Viewing Presentations
There are four different ways to view your presentation in PowerPoint. The views can be
accessed using the buttons in the status bar, or by using the View Tab on the Ribbon.
Normal View displays a single slide as it
appears in the presentation, as well as
thumbnails and an outline tab, where you
can organize the structure. Speaker notes can
be added in the bottom section of this
window. This view is used to create and edit
slides.
Slide Sorter View shows thumbnails of your
slides. From this view you can reorder slides
by dragging and dropping them, or you can
set the timing for the slide show. You can also
hide slides in this view. Hiding a slide will
keep it in the file, but it will not show when
you view the presentation.
Notes Page View allows the speaker to
create notes to use during a presentation.
Each page corresponds to one slide. These
can be printed to assist the presenter during
the presentation. Use this view when you’re
composing speaking topics.
Reading View/Slide Show View displays the
slides as an audience will see them. Use the
arrows and icons on the lower right side of
the Status Bar to advance slides or switch
views.
Use the Esc key to return to Normal View.
12Slide Show Tab
The Slide Show Tab allows you to review the slide show from beginning to end or from
the current (active) slide. You can also control how the show will be presented and
rehearse timings in the Set Up Slide Show drop down box.
Use Presenter View
lets the speaker
read their notes as
they present, but
the audience will
only see the slides.
Changing the Order of Slides in a Presentation
In the slide sorter view, click and hold down the left mouse button and
drag the slide to a new location. You’ll see a line where the slide will be
placed when you release the mouse button. This can also be done in the
Thumbnail pane area of the Navigation bar.
Select slide 4 and drag it above slide 3.
PowerPoint Help
If you need help at any point while you’re creating or presenting a PowerPoint slide show,
you can press the F1 key on your keyboard to get content‐specific help.
13Saving a Presentation
You can save a file by clicking the File tab, choosing Save, typing a descriptive name into
the File Name window, and then clicking the Save button.
You can also use the
Save button on the
Quick Access Toolbar
in the top left corner.
Save
If others will need to open your file with previous versions of
PowerPoint, use the Save As option and select PowerPoint 97 – 2003
Presentation from the Save as type menu.
Save and Send to Others
If you need to send your presentation to
someone else, the best way to is to use the
Save & Send option. You can send an
attachment of your file using Send Using E‐
mail, but if you have large media files, such
as videos, you’ll need to compress those
first to make a smaller file. On the Home
Select the Info tab and click the Compress
Media button and choose Presentation
Quality. Note: Only available if you have
inserted media.
You also have the option to Package Presentation for CD. This allows you to add other
files or to add a PowerPoint Viewer so that the presentation can be run on a computer
that does not have the PowerPoint program. You can also add any linked files such as
video or audio.
14Printing your Presentation
PowerPoint offers several print options to help you prepare your presentation. You can
print slides, handouts, and/or notes to support your presentation.
Types of Print Layouts
Print All Slides prints out the entire presentation, one slide per page, usually
landscape. If you have color graphics on your slides and a large number of pages
to print, you may want to print in Grayscale or Pure Black and White.
Notes Pages will print one slide per page and have room for your presentation
notes (if you type them in).
You can print a text outline of your slides with the Outline option.
Handouts can be printed with one, two, three, four, six or nine slides per page.
When printing handouts with multiple slides per page, you also have the option
to print the pages horizontally or vertically.
Exiting PowerPoint
There are several ways to close your file and exit PowerPoint. From the File Button, click
Close, if you have not saved your presentation, PowerPoint will prompt you to save. Click
Yes to save your presentation and your changes, click No to discard your changes and
close the file.
To close the presentation and exit the program, choose Exit or use the X in the upper right
corner of the PowerPoint window. You’ll be prompted to save the presentation if any
changes have not been saved.
15You can also read