CTvox for iPhone & iPod touch
←
→
Page content transcription
If your browser does not render page correctly, please read the page content below
CTvox for iPhone & iPod touch
Version 1.3
Contents
Introduction .......................................................................................................................................... 1

Background ........................................................................................................................................... 1

    Volume rendering ............................................................................................................................ 1

    Transfer function ............................................................................................................................. 2

Installing CTvox ..................................................................................................................................... 3

Creating and transferring volume data................................................................................................. 3

    VXM file transfer using Dropbox ..................................................................................................... 4

    VXM file transfer using iTunes ......................................................................................................... 6

Using CTvox ........................................................................................................................................... 7

    Rendering view ................................................................................................................................ 7

    Transfer function editor................................................................................................................. 10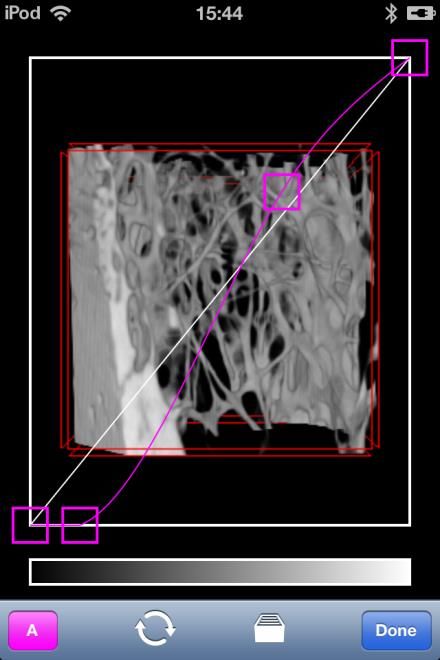
CTvox for iPhone & iPod touch 1.3 1
Introduction
The CTvox app brings 3D visualization of volumetric data using direct volume rendering to the iPhone
and iPod touch. Direct volume rendering is a visualization technique that allows intuitive and
interactive exploration of 3D voxel data by selectively introducing transparency and color. Examples
of 3D voxel data include (micro)CT and MRI scans and synthetic data resulting from numeric
computations.
Central to volume rendering is the concept of the transfer function: it governs the mapping of the
original scalar data to a voxel's transparency and emission color, which are determining for the
rendering's appearance.
The following section offers a more detailed theoretical background on these concepts. To get
started right away, skip to the section on installing CTvox, on creating and transferring volume data
or on using CTvox.
Background
Volume rendering
Volume rendering is a 3D visualization technique that works directly on the volume data, rather than
relying on a geometric model extracted from this data as is the case in surface rendering. It allows to
interactively make selected portions of the data more or less transparent, providing a way to see
through the data and thus reveal complex 3D relationships.
In volume rendering, every voxel of the volume data is assigned:
an emission color: the voxel emits light of a certain color and intensity. This color is
characterized by its red, green and blue components (or channels).
an opacity (opacity, also referred to as alpha, is the opposite of transparency). The
transparency of a voxel determines how much of the light from more distant voxels (along
the same line of sight) passes through.
The so-called transfer function determines how the original volume data (in the case of CT,
representing X-ray attenuation) is mapped to emission and opacity. By adequately mapping to
emission color, distinct features can be color-highlighted (in the case of CT, e.g. different material
types). By tuning the opacity mapping, the degree to which more distant features shine through and
thus contribute to the final rendering can be modified (in real time). Specific features can even be
totally suppressed by mapping the corresponding data values to full transparency (= zero opacity).
The concept of imaging mode is also determining for the appearance of the rendering. The
supported imaging modes are:
Surface
This mode corresponds to the general emission-absorption model described above.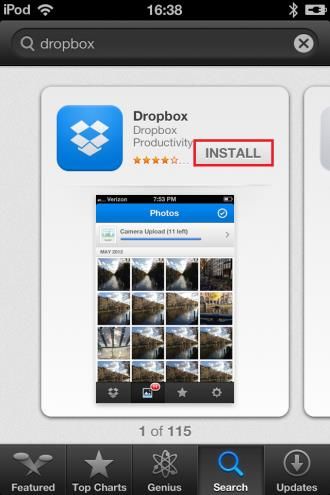
CTvox for iPhone & iPod touch 1.3 2
Maximum intensity projection
For every ray hitting the screen, only the most intense voxel along the ray is retained. Hence,
this mode automatically highlights the structures of maximum intensity.
Attenuation
In this mode, the emission contributions for every voxel along a ray hitting the screen, are
integrated; opacity doesn't come into play. Interpreting the emission color as an
attenuation, this mode corresponds to digitally reconstructing a radiograph (along the
current viewing direction), hence the name of the mode.
Transfer function
In volume rendering, every voxel in the volume data is assigned an emission color (the color the
voxel emits, determined by its red, green and blue components) as well as an opacity (opacity is the
opposite of transparency.) Both of course depend on the original volume data and the mapping is
governed by the so-called transfer function. The horizontal axis in the plot represents the original
scalar data (the x-ray attenuation), the vertical axis represents one of the transfer function
components (red, green, blue, luminance, opacity).
Modifying the opacity controls the visibility of the corresponding voxels and how much they obscure
more distant voxels. By setting the opacity for a given intensity range to zero (full transparency), the
corresponding voxels are effectively made invisible.
Two types of transfer functions exist:
The color channels are linked into a single intensity (or luminance) channel, which modulates
a user-specified base color. Only varying intensities of the specified base color or gray scales
(if the base color is white) will appear in the image.
The color channels vary independently (red, green and blue channels).
Multiple colors can be introduced in the image and are typically used to highlight various
elements of the volume data.
The following table illustrates both types of transfer functions:
CTvox for iPhone & iPod touch 1.3 3
Channels Rendering
luminance
opacity
red
green
blue
opacity
Installing CTvox
To install CTvox on your device, go through Apple’s App Store, in the usual fashion (the app is free of
charge.)
Creating and transferring volume data
Volume data for the CTvox app is stored in a VXM file. A VXM file contains both the volume data and
an associated transfer function.
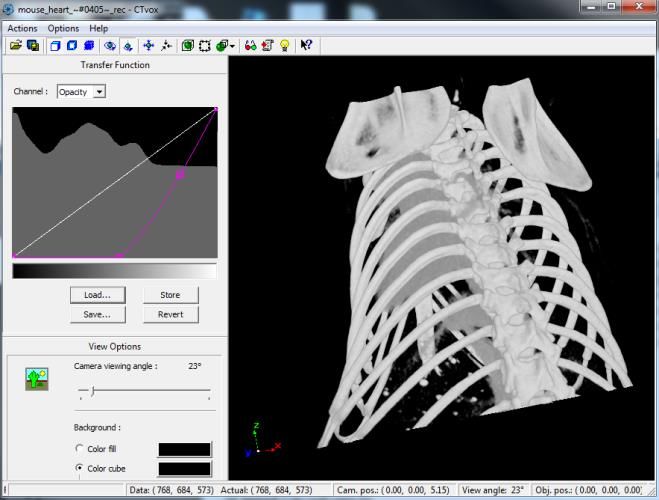
VXM files are generated using the companion CTvox application for the Windows desktop, shown
below.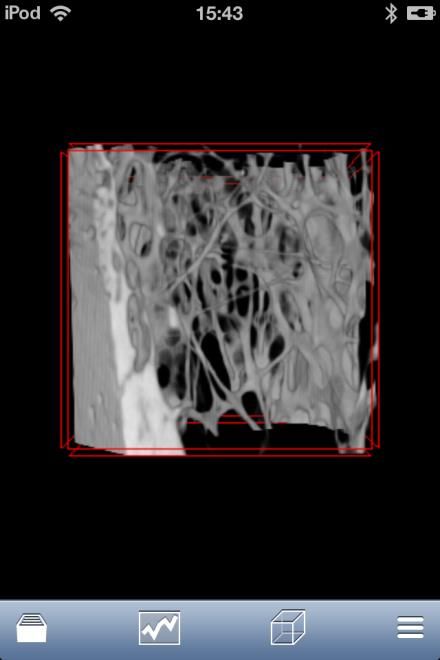
CTvox for iPhone & iPod touch 1.3                                                                        4

The desktop application can be downloaded free of charge from the Bruker microCT website, here.

After loading a dataset and editing the transfer function at your leisure, select Export as VXM Data...
from the Actions menu to generate the VXM file: the volume data will be adequately resized and a
snapshot of the transfer function included as well.

The easiest way to transfer a VXM file to your iPhone or iPod touch is to download it wirelessly using
the device itself. Any method will do: through the web browser, as an email attachment, using a
cloud storage app such as Dropbox, Google Drive or SkyDrive. Next, open the downloaded file: this
may be initiated automatically after download or may require you tapping the Share button       :
CTvox will launch and open the VXM file. From then on, the dataset is available for loading from
CTvox's storage.

A set of example datasets is available here.

In the following sections, we’ll first cover in more detail how to use Dropbox to transfer VXM files,
then describe an alternative method using iTunes.

VXM file transfer using Dropbox

Dropbox is one of several free cloud storage and file synchronization services. Files can be uploaded
to Dropbox's servers and then shared between any number of computers and mobile devices. As
such, it's ideally suited to transfer VXM files generated on your Windows PC using CTvox to your iOS
device.

Popular competitors offering a similar service include Google Drive and Microsoft's SkyDrive.

CTvox for iPhone & iPod touch 1.3                                                                       5

Signing up for the service can be done through the Dropbox website, as part of the Windows
installation or from within the various mobile apps. To create an account, you'll need to specify your
first and last name and an email address as id.

Visit the Dropbox website to download the Windows version of the software. Installing Dropbox on
your PC creates a special Dropbox folder in the file system. Files placed in this folder will
automatically be synchronized with the cloud storage and thus be accessible from any computer or
device connected to internet that supports Dropbox.

To install Dropbox on your iPhone or iPod touch, go through Apple's App Store, in the usual fashion.

When installation has completed, launch the Dropbox app and sign up or sign in, depending on
whether you've already created your account. Navigate to the desired VXM files in your Dropbox.

The screenshot below shows a Dropbox subfolder containing VXM files.

Tap a VXM file to download it to the device. When downloading has completed, the app reports that
it cannot display the VXM file.
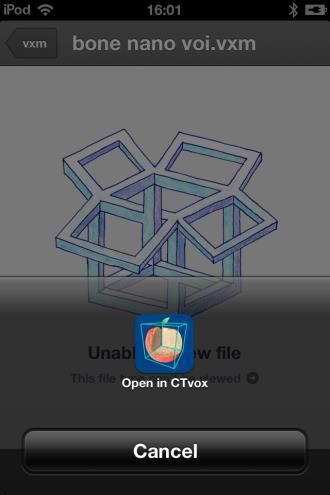
CTvox for iPhone & iPod touch 1.3 6
However, tapping the Share button offers to open the downloaded file using CTvox. As
previously mentioned, this will copy the dataset to CTvox's dedicated storage and launch CTvox to
open it. From then on, the dataset is available in the Open dataset view.
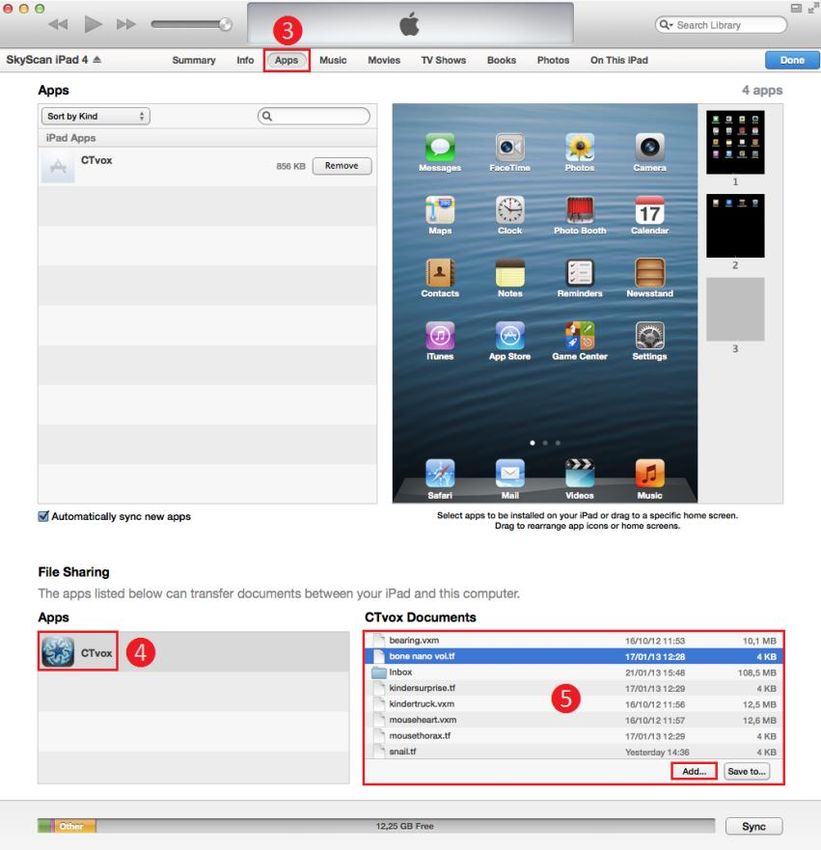
VXM file transfer using iTunes
As an alternative method, you can use iTunes (9.1 or later) to transfer VXM files (and TF files, for that
matter) to your iPhone or iPod touch. Here's how (the following screenshots were taken using
iTunes 11.0.1 on OS X):
1. Connect your device (physically) to your computer and launch iTunes.
2. Select your device.
3. Select the Apps tab and scroll to the bottom of the page.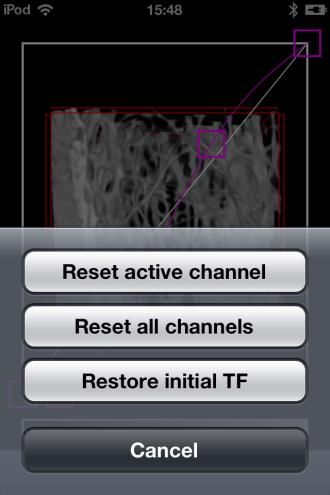
CTvox for iPhone & iPod touch 1.3                                                                     7

   4. The CTvox app should be listed under the File Sharing section. Select the CTvox app: the files
      associated with CTvox on your device will appear in the Documents pane on the right.
   5. Use the Add... button or drag and drop files onto the Documents pane to transfer them to
      the device.

Transferred VXM and TF files will now appear in the Open dataset and Load transfer function views,
respectively.

Using CTvox
Rendering view
When launched, the app opens to an empty rendering view, waiting for a dataset to be opened.

The toolbar contains the following buttons:

Tapping the Open dataset button      presents a list of the datasets in the app's storage.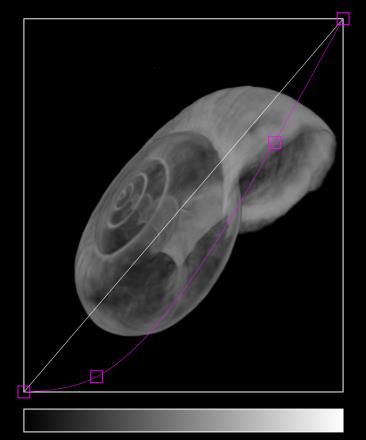
CTvox for iPhone & iPod touch 1.3 8
Tapping the Edit button in the navigation bar allows you to delete datasets from the storage: tap the
button to the left of a dataset, then confirm by tapping .
Tap a listed dataset to open it.
The following gestures are available to adjust the scene:
Dragging with a single finger rotates the volume.
Pinching moves the camera closer or further.
Dragging with two fingers translates the volume.
A long press followed by dragging moves the faces of the clipping box.
By default, volume and clipping box will move as one. Setting Control to Clipping box in the Clipping
options will cause the clipping box to move independently from the volume.CTvox for iPhone & iPod touch 1.3 9 The remaining Clipping options include switching between clipping and cutting action for the clipping box and showing/hiding the clipping box. A double tap in the rendering view will also switch control between volume and clipping box. The button groups the remainder of the settings: The Imaging mode specifies how light contributions from the various voxels are blended and is thus determining for the final appearance of the rendering (cfr. background item on volume rendering.) Tapping the Reset scene button resets the scene (orientation and translation of both volume and clipping box, size of the clipping box) as well as the Clipping options and Imaging settings. The following table summarizes the controls for the rendering view.
CTvox for iPhone & iPod touch 1.3                                                                        10

                 Touch/gesture                Effect
                 One finger drag              Rotation
                 Two finger drag              Translation
                 Pinch                        Camera distance
                 Long press + drag            Move face clipping box
                 Single tap                   Show transfer function editor
                 Double tap                   Toggle volume/clipping box control

Transfer function editor

A single tap in the rendering view or tapping the       button opens the transfer function editor: the
transfer function is overlaid on the rendering view and available for editing. As the transfer function
is modified, the rendering is updated in real time. A preview bar shows the resulting emission color.

Single tapping outside the plot or tapping the Done button closes the transfer function editor and
reverts to the rendering view.

The toolbar contains the following buttons:

The leftmost button is used to select the active channel, i.e. the one that’s being edited, and to set
channel-specific properties. The button displays the active channel (the opacity channel is
abbreviated as A, for alpha), its background reflects the selected base color.
CTvox for iPhone & iPod touch 1.3 11
Switching the active channel may switch the transfer function's type (cfr. background item on
transfer functions.)
When the transfer function's type is luminance-opacity, tapping the Base color row presents a color
picker to set the transfer function's base color.
The type of curve interpolating the markers for the active channel can also be specified: a jagged
polyline (useful to realize sharp transitions) or a smooth spline.
Use the following touches/gestures to edit the active curve:
A single tap adds a marker or moves an existing one.
Drag a marker to move it.
Double tap a marker to remove it.
The Reset button allows you to reset the active channel, all channels or revert to the original
transfer function included with the dataset.CTvox for iPhone & iPod touch 1.3 12 Transfer functions can be saved and subsequently reloaded. The file format used is the same as for the desktop version (TF files), hence transfer functions can be exchanged. Use the button to invoke the Load and Save transfer function views. The TF file extension is registered with CTvox, which means that TF files can be transferred to the app's dedicated storage by downloading them to the device and then requesting to open them in CTvox (cfr. Creating and transferring volume data.) From then on, they will show up in the Load transfer function popover. Tapping the Edit button in the navigation bar allows you to selectively delete transfer functions.
You can also read