Prezi: Presenting With Style
←
→
Page content transcription
If your browser does not render page correctly, please read the page content below
Prezi:
                           Presenting With Style

                               Instructor: Kyle W. Culpepper

                                          Media Center

          Here you will learn how to:
o   Setup a Prezi account
o   Basic layout
o   Keyboard shortcuts
o   Zoom in & out through canvas
o   Add text
o   Add frames
o   Move frames/text/images
o   Edit time line
o   Insert YouTube Video
o   Insert Audio to frame or whole production
o   Add and customize themes
Table of Contents:

Setup a Prezi account ----------------------------------------------------------------------------------- Page 1 -2

Basic layout ------------------------------------------------------------------------------------------------ Page 3-6

Keyboard shortcuts --------------------------------------------------------------------------------------- Page 7-8

Zoom in & out through canvas ---------------------------------------------------------------------------- Page 9

 Add text ----------------------------------------------------------------------------------------------------- Page 10

Add frames ----------------------------------------------------------------------------------------------- Page 11-12

Move frames/text/images --------------------------------------------------------------------------------- Page 13

Edit time line --------------------------------------------------------------------------------------------- Page 14-15

Insert YouTube Video --------------------------------------------------------------------------------- Page 16-17

Insert Audio to frame or whole production ------------------------------------------------------- Page 18-19

Add and customize themes -------------------------------------------------------------------------- Page 20-22

Prezi Quick Reference Guide
                                              Setup Prezi Account

                     Steps                                 What You See

Go to: www.prezi.com

Click: Sign up now

Click: Student & Teacher Licenses option

You will be directed to a better set of deals for
your future Prezi use

                                                                            7/24/2013
                                                                          Page 1 of 22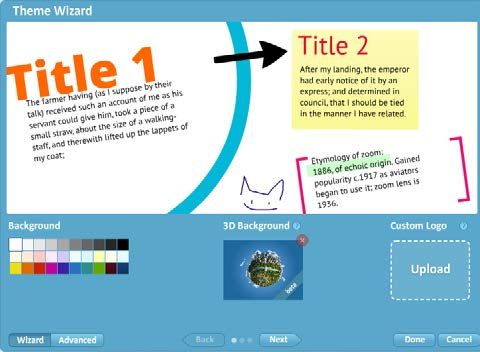
Click: Anywhere on the Enjoy Edu licensing
option

Note: You can upgrade at a later time to the
Pro Edu

Type: Your VSU email

Click: Continue

You will receive the following prompt

Go to: Your VSU email and follow the
directions provided via the Prezi email

Type: Your information

Click: The checkbox next to “I agree to the
terms of use.”

Click: Sign up

Note: You will be directed into your Prezi
account

                                                 7/24/2013
                                               Page 2 of 22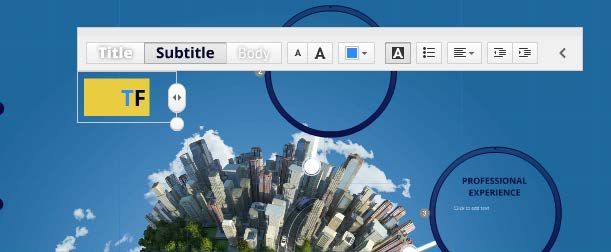
Prezi Quick Reference Guide
                                        Opening a New Prezi

                     Steps                            What You See

After logging into your prezi account at
http://prezi.com

Click: Your Prezis

Click: The blue New prezi button

                                                                       7/24/2013
                                                                     Page 3 of 22
Choose a template or blank prezi:

Templates can be used to give your
presentation guidance

For this guide we will use Resume, any option
will work fine to follow along

Click: Resume (or an alternate template
option) to highlight it

Click: Use Template

    -Or-

Click: Start blank prezi to let your creative
imagination flow

Welcome to your Prezi

Note: Depending on what template chosen
will determine what you will see

Note: If you chose the blank prezi option,
then you will see just a blank screen with all
of the features I will present in this section of
the guide

Brief Layout of Prezi Creation/Edit mode:

The window is your workspace, here you
will be able to drag, drop and add as you
please. This offers a what you see is what
you get feel. This mode allows you to see
the full span of what your whole
presentation

Note: Prezi will use the Pan and Zoom
technique for all transitions

                                                      7/24/2013
                                                    Page 4 of 22
Timeline:
Located on the left is a timeline.

Note: The order of each image represents the
flow of your presentation, top being first and
bottom being the last slide transition

Note: This is in reference to the Auto play
feature: There is not a way to control the
number of seconds per slide before the next
transition occurs. However, adding voice over
to each slide or adding a new transition to the
same location will further increase the
duration spent on that particular slide

Typical slide duration is 4 seconds if watching
presentation in auto play mode.

Edit Timeline: The pencil icon         if
clicked allows you to edit the direction your
transitions will flow

Present/Undo/Save:

Located on the top left

Present: Will allow you to watch from where
you are located

Preview window: At the top of the time line.      Preview window
The yellow box shows what part of your
project you are zoomed in at

Undo: Allows you to undo your mistakes

Save: Here you can manually save your work
or if you forget then auto save will work as it
will every minute your project is open

                                                                7/24/2013
                                                              Page 5 of 22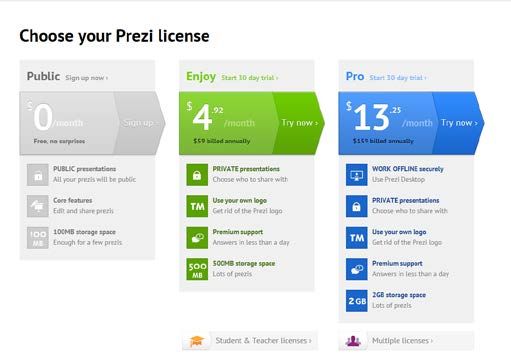
Tools: Located In the middle at the top, this
area offers three drop down menus

Frames & Arrows: Frames can be inserted
onto your workspace, which will
automatically be added to the time line as a
zoom in transition point. Arrows can help
direct the path a transition will go to, direct
where your text is pointing out, etc.

Insert: Attach files such as, images, videos
from YouTube, Background Music, PDF’s,
and etc.

Themes: Here you can either develop your
own custom theme for background, font text,
and other color schemes

Support/Share/Exit:

Options Tab: Here is a dropdown menu for
helpful resource material on how to use and
develop prezi material. Also, the ability to
change the final products screen ratio to be
used, plus the ability to turn on or off
keyboard shortcuts

Share: Here you can share your presentation
with others live using the Online presentation
option, download your presentation to bring to
your meeting as a backup if you cannot go
online, or work with a team of people to
accomplish one presentation

Exit: If you click this option then your prezi
will leave edit mode and send you to the link
your presentation is located at

                                                    7/24/2013
                                                  Page 6 of 22
Prezi Quick Reference Guide
                                               Keyboard Shortcuts

The following keyboard shortcuts will work if you have enabled
shortcuts.
Editing Shortcuts
  •   F - Draw frame, press again to change frame type (bracket, circle, rectangle or hidden)
  •   L - Load a file on your canvas (image, pdf, video, swf)
  •   S - Draw a shape, press again to change shape type (arrow, line, rectangle, circle, triangle)
  •   P - Go to Path mode
  •   1 - Zoom in
  •   2 - Zoom out
  •   3 - Rotate clockwise
  •   4 - Rotate counter clockwise
  •   Delete, Backspace - Delete selected object(s)
  •   Left, Right, Up, Down - Move the selection 1 pixels
  •   SHIFT + Left, Right, Up, Down - Move the selection 10 pixels
  •   CTRL + S - Save prezi
  •   CTRL + Z - Undo last action
  •   CTRL + Y - Redo last undone action
  •   CTRL + D - Duplicate selected object(s)
  •   CTRL + C - Copy selected object(s)
  •   CTRL + V - Paste copied object(s)
  •   CTRL + SHIFT + M - Toggle screen ratio between the values: 4:3, 16:9, and off.
  •   CTRL + SHIFT + C - Opens the Prezi CSS editor.
  •   Esc (Escape key) - Finish current action or close open dialog
  •   Space - Enters Present mode

Presenting Shortcuts
  •   Right, Left - Move Forward and Back along the Path
  •   Up, Down - Smart Zoom in or out
  •   B - Blackout the screen (move your mouse or press any other key to go back to presenting)
  •   Space - Advance along the path (only in Present mode fullscreen)
  •   HOLD X - When holding down the X key, you can pan around the canvas without clicking
  •   HOLD Z - When holding down the Z key, you can zoom in and out by moving the mouse up and
      down
  •   PageUp, PageDown - Move Forward and Back along the Path (not in full screen)
  •   Escape - End presentation

                                                                                                        7/24/2013
                                                                                                      Page 7 of 22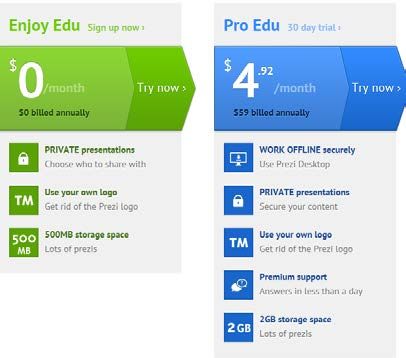
Steps              What You See

To enable keyboard shortcuts:

Click: Options tab

Select: On while inside of the Enable
shortcuts field

                                                         7/24/2013
                                                       Page 8 of 22
Prezi Quick Reference Guide
Zoom In/Out & Moving Around Canvas
Steps What You See
To zoom in and out simply:
Scroll: Your mouse back (zoom out) and
forward (zoom in)
-OR-
Mouse Over: The right side of your
presentation while in edit mode to have the
following icons appear
: The plus magnifying glass zooms in
while the negative signed magnifying glass
zooms out.
: The home icon will carry you to the
complete scale view of your work
: The lock screen icon keeps you from
zooming in and out.
Click & Hold: Point on canvas
Drag & Release: Mouse over desired location
to move too
7/24/2013
Page 9 of 22Prezi Quick Reference Guide
Add Text
Steps What You See
Click: Somewhere on the canvas
Note: A text box will appear with edit tools
above it
These are quick ways
to control font size
and color, which is
based on your base
theme being used
: Alters font size of all text in the
text box
: Alters text color of highlighted text
items
: Shows more text editing options such
as
• Textbox highlights
• Bullets
• Text alignment
• Text wrap
7/24/2013
Page 10 of 22Prezi Quick Reference Guide
Add Frames
Steps What You See
Frames help to make structured points in your
presentation become more focused. Also,
adding a frame will make a new transition
appear
Scroll: Down or up to the zoomed in location
you wish for your frame to appear
Click: Frames & Arrows tool
Select: Draw Circle Frame
Note: Your cursor will have a circle appear
above it
You can choose any of the Draw ___ Frame
options to do this
Click: Once to mark one point of your frame
Drag: Out a line in the direction you would
like your shape’s diameter to grow out too
Click: Again to mark the end point and create
your new frame
7/24/2013
Page 11 of 22After its creation it will default as a blank
frame
Click: The frame you just created from the
time line located on the left
You will be zoomed into that frames location
Note: Each frame has a designated number
assigned to it if located in the time line. When
you select a particular frame in this manner
more options will appear at the bottom of your
screen
• Alter the style of your
frame using these
options
• Quickly add a new
frame inside of your
frame using this option
7/24/2013
Page 12 of 22Prezi Quick Reference Guide
Move Frames/Text/Images
Steps What You See
To move a set of items:
Click: Once while zoomed out of a frame
containing a set of items you wish to move
Note: This will highlight the frame selected in
blue and a central option will appear that
looks like a hand with a + and – icon floating
around it
Click + Hold + Drag: The hand icon to any
location on the canvas
To move an individual item:
Click: Once on item you wish to move around
Note: Again this will cause the object to
appear highlighted with a central hand icon
Click + Hold + Drag: The hand icon to any
location on the canvas
7/24/2013
Page 13 of 22Prezi Quick Reference Guide
Edit Time Line
Steps What You See
The timeline is located on the left side of the
canvas
Each transition is given a numerical value
ordering from first to last/ top to bottom
To change the order of the transition:
Click: The edit icon
Drag: The slide you wish to reorder and place
in a separate location in the time line
Click: The edit icon to leave edit mode
7/24/2013
Page 14 of 22Note: While working in edit mode you will
see something much like the following:
An intricate network of one line flowing from
one frame/picture/video to the next.
It is simple to add a new path line to your
canvas:
Click: On the item you wish to transition to
next (This includes: Images/Frames/Text)
Note: This selected item will then become the
last transition in your time line
Reorder the step in which you transition to
that point by following the steps above
When finished selecting items:
Click: The edit icon again to go out of edit
mode
7/24/2013
Page 15 of 22Prezi Quick Reference Guide
Insert YouTube Video
Steps What You See
When you have selected a location that you
would like to insert your YouTube video at
simply:
Click: Insert tab
Select: YouTube video….
7/24/2013
Page 16 of 22Copy & Paste: URL into text box that
appears
Click: Insert
Drag: Video to desired location by using the
hand icon
Note: Be sure to add video into the time line
in order for this to auto play
7/24/2013
Page 17 of 22Prezi Quick Reference Guide
Insert Audio to Frame or Whole Presentation
Steps What You See
Audio can be added to the whole prezi
presentation or segments can be added to
individual frames inside your presentation
To Insert Audio Segment to A Frame:
Click: The slide you would like to have audio
be played over inside the time line
Click: Insert tab
Click: Add Voice-over to Path Step #....
Find: The audio file on your computer to
upload
Click: Open when you have selected the file
you wish to upload
7/24/2013
Page 18 of 22Note: You will see your audio file show up
next to the path step in your time line you
have added it to
Click: Done when finished
-OR-
Click: The trash icon if you wish to remove
the audio file
To Insert Audio To Whole Project:
Note: The audio you add to your presentation
will go in a continual loop. It will fade out
when you have path step audio clip setup on a
frame and fade back in after the clip has
finished playing. The audio will stop playing
for YouTube videos added to your
presentation.
Click: Insert tab
Select: Add Background Music….
Find & Select: the Audio File you wish to use
7/24/2013
Page 19 of 22Prezi Quick Reference Guide
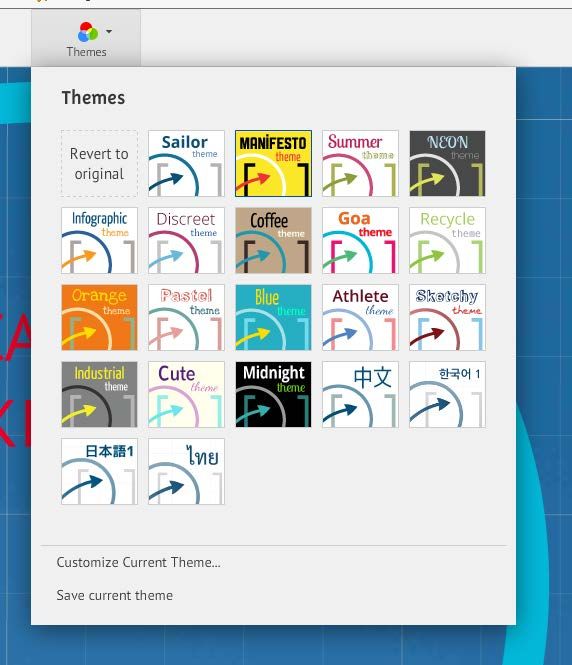
Customize Themes
Steps What You See
Click: Themes tab
There are several base themes you may
choose from. The Customize Current Theme
allows you to insert a 3D background for your
project to lay on top of.
Click: Customize Current Theme…
7/24/2013
Page 20 of 22Theme Wizard Window:
The top area displays all the settings you
alter from below
Change settings here
Background: This will change the canvas
layers color based on the pallet option you
click on
3D Background: Note this is not a needed
field, however, if used can make for a really
neat fly in effect during your presentation
Custom Logo: This will appear when viewing
the Prezi through present mode
Note: The recommended logo size is 250x100
pixels
Click: Next to view more settings
Title 1: Represents the heading of your
frames
Title 2: Represents your subheading of your
frames
Body: Is the general text that you will use
anywhere else in your Prezi
Click: On any of the titles or body to have a
drop down menu appear and change font style
for that body of text throughout your
presentation
Click: Next
7/24/2013
Page 21 of 22Note: For the shapes menu you can only alter
the color that the shape will come out as
throughout your entire presentation
Click: Done when you are finished selecting
your look
7/24/2013
Page 22 of 22You can also read