Introduction to Moodle for Teachers - Workbook Edition 3 July 2014 Document Reference: 3756-2014
←
→
Page content transcription
If your browser does not render page correctly, please read the page content below
Introduction to
Moodle for Teachers

Workbook

Edition 3
July 2014
Document Reference: 3756-2014
Introduction to Moodle for Teachers
Contents
1. Get started
Log in and access a course ............................................................................................. 1
Choose a course format .................................................................................................. 3
Add names and summaries to topics ............................................................................... 4
2. Add basic resources
Files ................................................................................................................................ 5
URLs ............................................................................................................................... 6
Images ............................................................................................................................ 7
Videos ........................................................................................................................... 10
Moodle pages................................................................................................................ 12
3. Improve the appearance of your course
Add labels ..................................................................................................................... 13
Move resources............................................................................................................. 14
Hide topics and resources ............................................................................................. 15
4. All about blocks
Hide and dock blocks .................................................................................................... 17
Add and delete blocks ................................................................................................... 18

   If you require this document in an alternative format, such as large print,
   please email IS.skills@ed.ac.uk.
   Copyright © IS 2014

   Permission is granted to any individual or institution to use, copy or redistribute this document
   whole or in part, so long as it is not sold for profit and provided that the above copyright notice
   and this permission notice appear in all copies.
   Where any part of this document is included in another document, due acknowledgement is
   required.
Introduction to Moodle for Teachers                                                    1

1. Get started
Log in and access a course
   1. Open a web browser and navigate to www.moodle.is.ed.ac.uk
   2. Log in using the vletst EASE username and password that you have been given.
   3. Click on My Home in the Navigation block on the left.

Moodle is divided into three columns. The columns on the left and right display small
boxes called blocks. Blocks display navigation links and supplementary information such
as the calendar and news.
The Navigation block is always at the top left – it provides a useful way to move around
within Moodle.
The Administration block appears under the Navigation block, this is essential for
administrating and editing your course.
The breadcrumb trail appears above the Navigation block and can be useful to find
your way around Moodle.
The middle column is the content area, which on the My home page displays all the
courses you have access to.

All Moodle teachers have access to the Staff Moodle Help course, which contains
resources to support people creating Moodle courses.

                                                                           1 Get started
2 Introduction to Moodle for Teachers
Tip: You can change the layout of the My home page, including which
courses are displayed in the Course overview, by clicking on the Customise this
page button.
4. Click on the Training Course to enter it.
If you are attending a training session you will have been given access to an empty
Training Course to use today. Please note that you will not have access to the Training
course after today, so if you want to save any of the content you create during the
training session you will need to download it before the end of the course – please ask
the instructor how to do this.
If you are working through this workbook in your own time you can use any Playground
course that you can access as a teacher. If you do not have access to a Playground
course please email is.helpline@ed.ac.uk and request that one is set up for you.
1 Get startedIntroduction to Moodle for Teachers 3
Choose a course format
There are six course formats available in Moodle:
Grid format – Replaces the topics with a grid of icons (one for each topic) with
short titles.
Single activity format – The course consists of a single activity, for example a
Quiz or SCORM package.
Social format – A forum is displayed on the course page.
Collapsed Topics – The course page is organised into topic sections that can be
expanded or collapsed.
Topics format – The course page is organised into topic sections.
Weekly format – The course page is organised into weekly sections, with the first
week starting on the course start date.
1. Ensure you are on the course home page. Go to the Administration block and
click on Edit Settings.
Here you can change your course’s name and summary information (although please
don’t change the name of the Training Courses).
1. Under Course start date choose today’s date.
2. Click to expand the Course format section. Under Format choose Topics
format.
3. Under Number of sections choose 3 from the menu.
4. Go to the bottom of the page and click on the Save changes button.
Tip: The Course layout option allows you to switch between displaying the
whole course on one page (Show all sections on one page) and displaying each
topic on a separate page (Show one section per page). The one section per page
option only becomes visible when editing is turned off.
1 Get started4 Introduction to Moodle for Teachers
Add names and summaries to topics
Each topic box has an area at the top where you can put a heading or title for that topic
section. As well as the numbered topics there is also an unnumbered section above
them that can be used for a subheading and general information about your course.
1. Click on Turn editing on in the Administration block. Alternatively, click on the
Turn editing on button at the top right of the content area.
2. In the main heading box at the top, click on the Edit summary button to access
the Summary page.
3. Un-tick the Use default section name box.
4. Type Polar Bears in the Section name box.
5. Type ‘Everything you ever wanted to know about polar bears.’ in the Summary
box.
6. Click on the Save changes button.
7. Rename the three topics as ‘Resources’, ‘Map’ and ‘Video’.
8. Turn editing off in the Administration block.
Your course will look something like this:
1 Get startedIntroduction to Moodle for Teachers 5
2. Add basic resources
Files
You can add any sort of file that you want your students to be able to download - for
example Word documents, PowerPoint presentations or PDFs.
1. Turn on editing.
2. Hover your mouse over the Resources topic, click on Add an activity or
resource.
3. Choose File (near the bottom of the list), click the Add button.
4. Enter the Name ‘Document 1’ and the Description ‘Test document’ for the file
you will be adding.
5. Drag a Word document file onto the blue arrow; release your mouse button when
the text changes to “Drop files here to upload”. Alternatively you can click on the
Add… button to choose a file to upload.
6. Click the Save and return to course button at the bottom of the page.
7. Find and click on the Document 1 you just added to the Resources topic.
8. Choose Open and check that the document opens in Word.
Tip: You can also add files by dragging and dropping them directly into a topic
on the course home page. This only works with editing on.
2 Add basic resources6 Introduction to Moodle for Teachers
URLs
1. Check that editing is still turned on.
2. Hover your mouse over the Resources topic, click on the Add an activity or
resource, choose URL and click Add.
3. Enter the Name ‘Polar Bears International website’ and the Description
‘Conservation through research, stewardship, and education’.
4. Enter www.polarbearsinternational.org in the External URL box.
5. Click to expand the Appearance section and choose In pop-up from the Display
menu.
6. Click the Save and return to course button at the bottom of the page.
Tip: You are advised to open external URLs in pop-ups because it is
considered to be the most accessible of the four available options.
Your Resources topic will now look like this:
It is good practice to tell people if a URL is going to open in a pop-up window – we will
add a label to do this in chapter 3.
2 Add basic resourcesIntroduction to Moodle for Teachers 7
Images
There isn’t a specific option to add an image in Moodle so we will add one using the
Label resource.
1. Open http://tiny.cc/arctic-map in a web browser and save the image
Polar_bear_range_map.png to your computer.
2. Go to your Moodle training course and check that editing is turned on.
3. Hover over the Map topic and click on Add an activity or resource. Choose
Label and click Add.
4. In the Label text editor click on the Insert/edit image icon.
5. Click on the Find or upload an image… link.
6. The File picker will open, click on Upload a file.
7. Click on the Browse… button, locate the Polar_bear_range_map.png file and
click Open.
8. Delete the text in the Author field so it is blank and change the Choose license:
drop-down menu to Public domain.
2 Add basic resources8 Introduction to Moodle for Teachers
This image came from the Wikimedia Commons website, where it is explicitly stated it is
in the public domain. Be aware of the copyright status of images downloaded from the
web.
9. Click on Upload this file.
10. Type ‘Map showing Polar Bears’ range in the Arctic’ as the Image description,
then click the Insert button.
Tip: It is important that you include a useful image description to improve
accessibility for visually impaired people using screen readers.
11. In the Label text editor, press return to create a new line under the image and
type ‘Map of Polar Bears’ Range’ as the image title.
Text below the image could also be used to display any copyright information.
12. Click the Save and return to course button at the bottom of the page. The map
image should be displayed in the second topic.
2 Add basic resourcesIntroduction to Moodle for Teachers 9
Note that the image is too big to fit on the page and a horizontal scroll bar has appeared.
Try to avoid horizontal scrolling in your courses, as it makes it more likely that students
will miss information.
13. Hover over the image and click on the Edit link that appears at the top right.
Choose Edit settings from the menu.
14. Click once to select the image in the Label text editor and resize it using the grab
handles.
15. Click Save and return to course.
Tip: Alternatively, you can resize the image by selecting it in the Label text
editor and clicking the Insert/edit image button. The Appearance tab allows you to
set the Dimensions of the image, as well as Alignment, padding (vertical and
horizontal space) and Border.
2 Add basic resources10 Introduction to Moodle for Teachers
Videos
1. Check that editing is turned on.
2. Hover over the Video topic, click on Add an activity or resource. Choose Label
and click Add.
3. In the Label text editor click on the Insert Moodle media icon.
The Moodle media icon is for adding video, sound & applets.
4. The Insert Moodle media window will appear. Click on Find or upload a sound,
video or applet... link.
5. The File picker window will appear. Choose YouTube videos.
6. Type in ‘polar bears’ into Search videos and click the Search button.
7. Select a video.
8. Click the Select this file button.
9. The video will be previewed in the next pop up window. Click the Insert button.
2 Add basic resourcesIntroduction to Moodle for Teachers 11
You can embed YouTube videos in your course as you are not making a copy of the
video, just linking to it. Make sure you consider the copyright of any other sort of video
you want to include.
A blue link to the video will appear in the Label text editor.
10. Click the Save and return to course button at the bottom of the page.
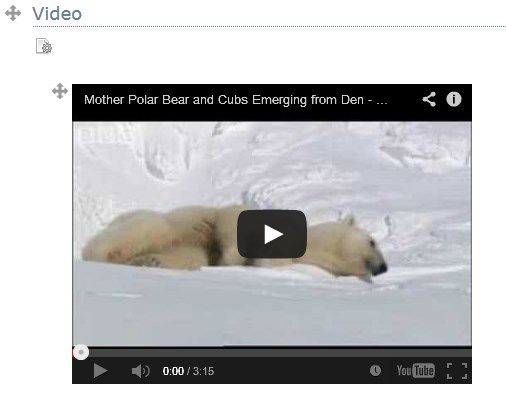
11. Play the video embedded in the Video topic.
2 Add basic resources12 Introduction to Moodle for Teachers
Moodle pages
A Moodle course does not have to be just the home page - you can add pages to the
topics. Pages are a useful way to add information without making the home page very
long. Reading lists, videos and images can all be put on their own page.
1. Check that editing is turned on.
2. Hover over the Resources topic and click on Add an activity or resource.
Choose Page and click Add.
3. Type ‘Reading List’ for the page Name and ‘Books to read’ as the Description.
4. In the Page content editor type ‘Andrew, M. (1990). Nanook the polar bear’.
5. Enter a new line and type ‘Wikipedia Polar Bear Article (this link opens in a new
window)’.
6. Select Wikipedia Polar Bear Article and click on the Insert/edit link button.
7. In Link URL type ‘http://en.wikipedia.org/wiki/Polar_bear’.
8. In the Target menu select Open in new window (_blank).
9. Click on the Insert button.
10. Click the Save and return to course button at the bottom of the page.
11. Click on the Reading List link to view the page.
2 Add basic resourcesIntroduction to Moodle for Teachers 13
3. Improve the appearance of your course
Add labels
1. Check that editing is turned on.
2. Hover over the Resources topic and click on Add an activity or resource.
Choose Label and click Add.
3. Type ‘The following link will open in a pop-up window:’ in the Label text editor.
You can change the font style, size and colour using buttons at the top of the Label text
editor – click on the Toolbar Toggle button to display them. These are similar to the
usual Microsoft Word formatting commands. However, think carefully before using lots of
different fonts and colours on your Moodle pages as it can be distracting for the reader.
Tip: If you want to have headings, use the heading styles in the Paragraph
drop-down menu as this improves accessibility.
If you know HTML you can use the Edit HTML Source button to edit the page in HTML.
4. Click on Save and return to course.
The Resources topic should look similar to this:
3 Improve the appearance of your course14 Introduction to Moodle for Teachers
Move resources
1. Check that editing is turned on.
2. Click and hold the Move (crossed arrows) icon next to the “The following
link…” label in the Resources topic.
3. Drag the link so that it is above the Polar Bears International website URL
before releasing it.
The Resources topic should now look like this:
3 Improve the appearance of your courseIntroduction to Moodle for Teachers 15
Hide topics and resources
Both whole topics and individual resources can be hidden in Moodle. This can be used
so that students cannot see areas you are working on. Students can’t see hidden
resources, but other teachers can.
1. Check that editing is turned on.
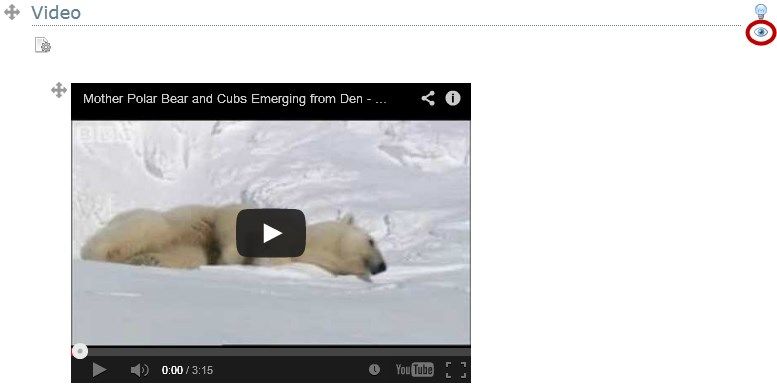
2. Hover your mouse over the Video topic and click the Hide topic (eye) icon at the
top right.
3. Hover the mouse over the Document 1 file in the Resources topic and click the
Edit link, choose Hide from the menu.
4. In the Administration block on the left, click Switch role to…, then Student.
3 Improve the appearance of your course16 Introduction to Moodle for Teachers
You are now viewing your course as a student – notice that neither the Video topic, nor
the Document 1 file link, is visible.
5. Click Return to my normal role in the Administration block.
6. Turn editing on again and click the Show icons next to the Video topic and the
test document file link to make them visible again.
Tip: By default hidden topics appear as “Not available”. To completely hide
hidden topics ensure you are on the course home page, then choose Edit settings
in the Administration block. Expand the Course format section and choose
Hidden sections are completely invisible from the Hidden sections menu.
3 Improve the appearance of your courseIntroduction to Moodle for Teachers 17
4. All about blocks
Blocks appear on the left and right sides of the main Moodle content. They usually take
information from another part of your course (such as a glossary or forum), or from an
external site (such as a RSS feed).
You can decide whether the block will appear in the left or right column, and can set the
order of blocks in each column. Students cannot add, delete or move blocks but they can
hide them or put them into the dock.
Some blocks need configuring before they will display information.
Hide and dock blocks
1. Click once on the Hide block icon at the top right of the Search forums block
(top right) to hide it. Click again to show it.
2. Click on the Move this to the dock icon in the Search forums block to dock it on
the left side of the screen.
3. Hover over Search forums in the dock and click on the Undock icon to move the
block back to the main area.
4 All about blocks18 Introduction to Moodle for Teachers
Add and delete blocks
1. Check that you are on the course home page and that editing is turned on.
2. Find the Add a block block at the bottom of the left column. Choose Course
Contents from the menu.
3. Hover over the Table of Contents block and click on the Actions (cog) icon.
Choose Configure Table of Contents block from the menu.
4. Expand the On this page section and choose Region: Right and Weight: -8.
The Region determines whether the block appears to the right or left of the content area.
The Weight determines where the block appears in the column. The lower the weight the
higher the block will appear in the column, relative to the weights of the other blocks in
the column. It is not recommended that you choose a position above the Navigation or
Administration blocks, as these important blocks need to be easy for users to find.
You can also set the block’s default region and weight in the Where this block appears
section. This affects how it appears on other pages.
5. Click the Save changes button.
The Table of Contents block should now appear at the top of the right column.
Tip: You can also move a block by dragging and dropping when editing is on
(click on Move icon the block’s blue header).
To delete a block:
1. Check that editing is turned on.
2. Hover over the header of the block you want to delete and click the Actions icon.
Choose Delete from the menu.
3. You will be asked if you are sure that you want to delete the block, click Yes.
4 All about blocksYou can also read