We Welcome You To Picnik - Online Photo Editing Guide
←
→
Page content transcription
If your browser does not render page correctly, please read the page content below

We Welcome You To

               Picnik - Online
             Photo Editing Guide

16/05/2008     Ashi Avalon - Picnik Image Editior Presentation   Page 1 of 19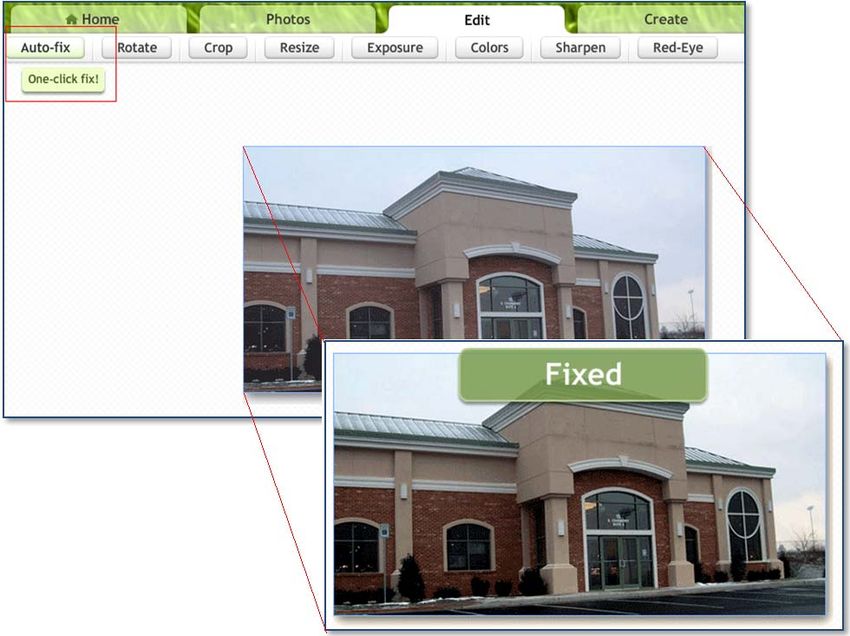
1) What Is Picnik?

Picnik is simple and easy to use Online Photo editing software.

Picnik enables you to easily edit, crop & resize your pictures to your specifications.

  16/05/2008                    Ashi Avalon - Picnik Image Editior Presentation          Page 2 of 19
2) Why Should You Use Picnik?

Picnik enables you to upload your images and easily edit, crop & resize your pictures to your
specifications right in your browser. You can then save these images and upload them to your
website. These images can be of your store, your people, your services or your products. They can
be uploaded to your website in your About Us section, your Product Catalog or any of your Custom
Tabs.

Picnik is a powerful Web Application Tool that offers a very user friendly interface and simple online
tools to edit your images with just a few clicks. Some of the following features are available with this
online editing tool:

Features of Picnik

   •   Edit your photos online without purchase of any Photo Editing Software.
   •   It does not require any download or installation.
   •   Very easy to use and no expertise required.
   •   Fix your photos in just one click.
   •   Use advanced controls to fine-tune your results.
   •   Crop, resize, and rotate in real-time.
   •   Astoundingly fast, right in your browser.
   •   Works on Mac, Windows, and Linux.

  16/05/2008                   Ashi Avalon - Picnik Image Editior Presentation           Page 3 of 19

3) How To Get Started With Picnik?

To Start with Picnik, type www.picnik.com in the address bar of your web browser and then on
clicking Enter Key, a landing page will appear with options to start Picnik.

We suggest you register and sign up for a free account

The Main Interface is broken down into five tabs:

   •   Home
   •   Photos
   •   Edit
   •   Create
   •   Save & Share

  16/05/2008                  Ashi Avalon - Picnik Image Editior Presentation   Page 4 of 19
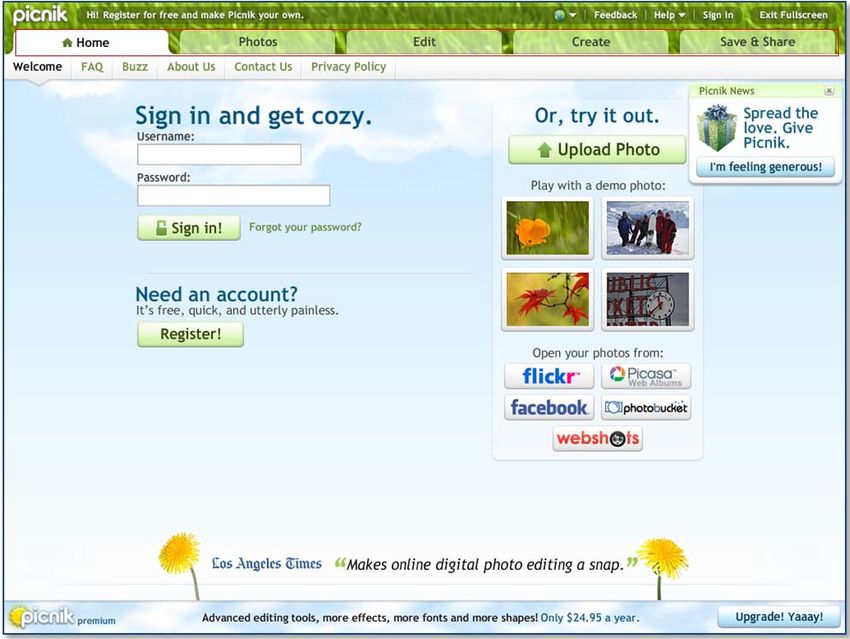
4) Picnik – Home Tab

Home Tab covers welcome section with general information, sign in options, recent news, FAQ etc…

  16/05/2008                 Ashi Avalon - Picnik Image Editior Presentation        Page 5 of 19
5) Picnik – Photos Tab

Photos Tab offers various options to upload your photos in Picnik for editing. You can upload photos
and make any necessary changes to improve the images for placement on your website.

You can upload pictures for editing from your computer’s hard drive or an On-line Album like Flickr
or Picasa. Picnik makes it quick and convenient to browse through your online albums or your
computer’s hard drive.

  16/05/2008                  Ashi Avalon - Picnik Image Editior Presentation         Page 6 of 19
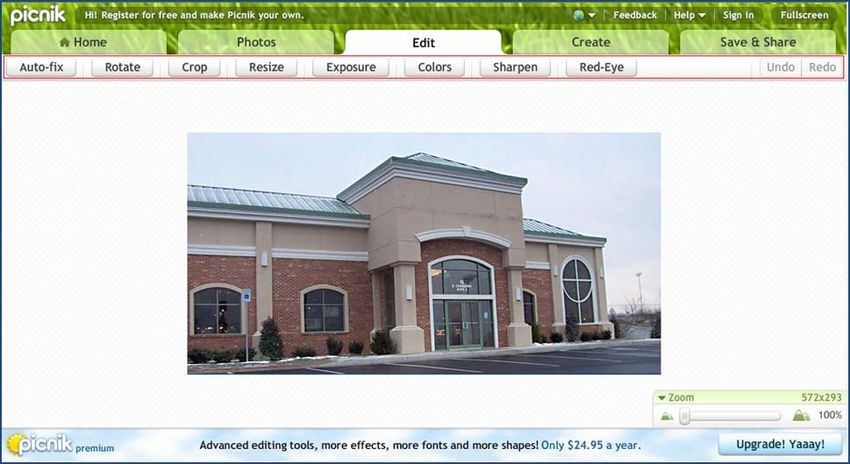
6) Picnik – Edit Tab

Once you specify the source location to get your desired photo, Picnik will start uploading the photo
and will take you directly to the Edit Tab.

Picnik's Edit and Create Tabs provide all the essential editing features that an unskilled or semi-
skilled user requires to edit their photos. In the Edit Tab, you will have various options along with
Auto Fix feature to rotate, crop or resize your photo. You can also fix or adjust exposure, colors,
sharpen and remove red-eye from your photos. If you choose Auto-fix feature then Picnik will
automatically fix your photo by optimizing colors and exposure. An Undo / Redo / Reset Options are
always available to reverse your previous actions. You can also use the Zoom Option, available at
the bottom right of all the sub-tabs, while editing your photos.

This tab is divided into the following 8 sub tabs:

   •   Auto-fix – The Auto-fix feature allows you to fix your photo automatically by a click of the
       mouse.

   •   Rotate – This feature allows you to rotate your photo by 90 degrees to the left or right or flip
       it horizontally or vertically. You can also straighten a crooked photo by using the slider or
       drawing a line with your mouse along an edge that should be straight.

   •   Crop – This feature allows you to cut the edges of your photos to improve them or just to
       make them fit in a given space. The Crop utility will also help you to convert your ordinary
       images to web compatible images by changing the dimensions of your image.

   •   Resize – This feature allows you to resize your pictures, you can enter a new width and/or
       height for your image to increase or decrease the dimensions of your photo. You can select
       either Use Percentage option or Keep Proportions option to give new dimensions to your
       photo.

   •   Exposure – This feature allows you to Auto-Fix the exposure of your photo or you can
       manually adjust the exposure and contrast with the help of simple sliders. You can also use
       the advanced features to control highlights, shadows and histogram of the light by using the
       brightness slider.

   •   Color – This feature allows you to use the Auto Colors option to give best suitable color
       impression to your photo or you can manually adjust saturation and temperature to further
       fine-tune your photo’s white balance and overall look.

   •   Sharpen – This feature allows you to drag the sharpness slider to sharpen your photo. The
       Advanced feature, which is available only with the Premium Version of Picnik, allows you to
       use Unsharp Mask sliders for finer control over your sharpening.

   •   Red-Eye – This feature allows you to remove the red eye effect on your photo.

  16/05/2008                    Ashi Avalon - Picnik Image Editior Presentation         Page 7 of 19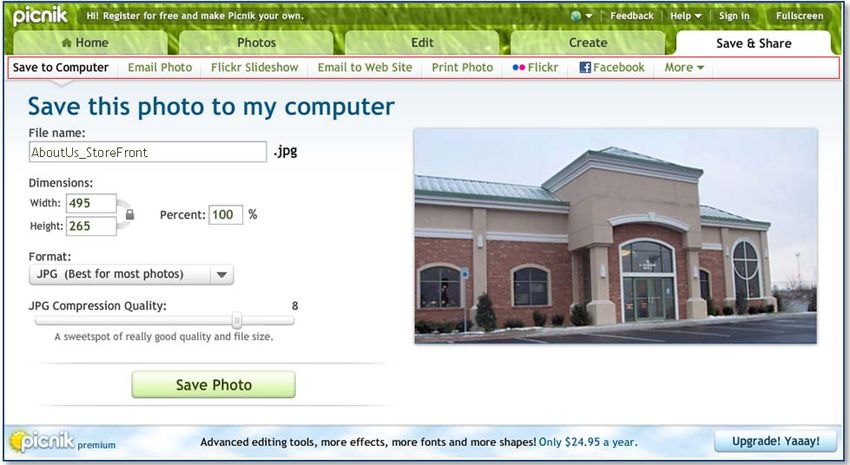
16/05/2008 Ashi Avalon - Picnik Image Editior Presentation Page 8 of 19
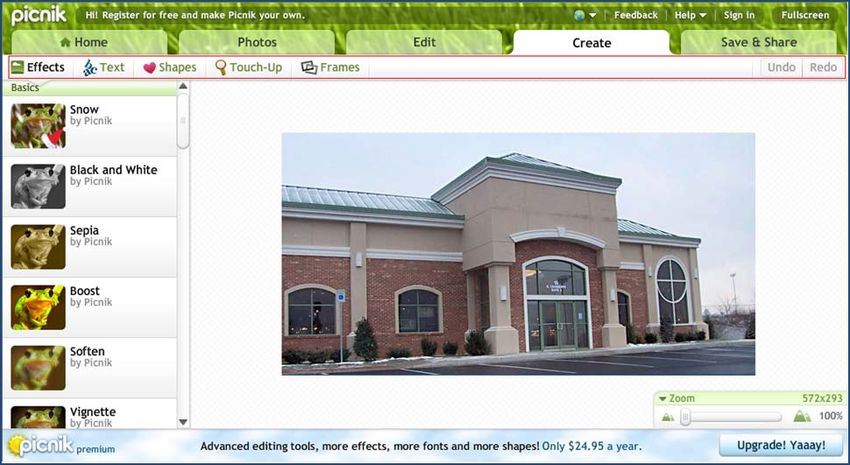
7) Picnik – Create Tab
The Create Tab allows you to give your photo an entirely new look with special effects, text, shapes,
touch-ups and frames.

This tab is divided into following 5 sub tabs:

   •   Effects – You can give various effects to your photo. These effects are available under 6
       categories: Basic, Camera, Color, Area, Artistic and Misc.

   •   Text – You can also add text in different font type, size and color to your photo. Font types
       are available under 7 categories.

   •   Shapes - You can insert various shapes to your photo. There are many different categories
       of shapes to choose from.

   •   Touch-Up – You can use the Touch-up options for teeth whitening and blemish fix are also
       available.

   •   Frames – You can also insert frames in the form of a border or rounded edges to your photo.
       There are 5 categories of frames to choose from.

  16/05/2008                    Ashi Avalon - Picnik Image Editior Presentation        Page 9 of 19
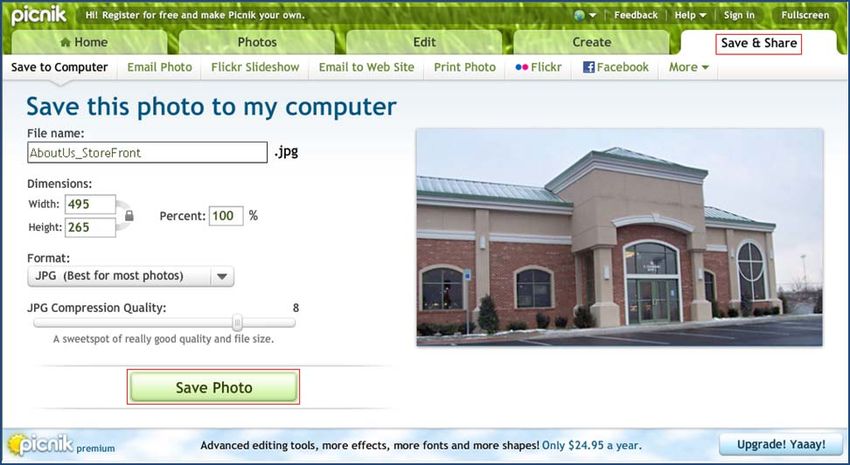
8) Picnik – Save & Share Tab

When you are done with editing your photo, click on the Save & Share Tab to save it. The Save &
Share Tab allows you to save your edited photo to your computer or directly to your Online album.
You can also email your photo or take a print out.

This tab is divided into following 8 sub tabs: (Bold Blue Choices are Recommended)

   •   Save to Computer – You can save your photo directly to your Computer by
       specifying the dimensions, format and compression quality.

   •   Email Photo – You can email your photo from Picnik to any email address along with
       subject and your message.

   •   Flickr Slideshow – You can make a slideshow of your photos available at Flickr.

   •   Email to Web Site – You can send your photo directly to your account at various Websites
       where you can keep your online Web Albums.

   •   Print Photo – You can directly take print out of your photo in various sizes from Picnik.

   •   Flickr – You can save your photo directly to your Flickr album.

   •   Facebook – You can connect directly to your Facebook album and save your photo.

   •   More – You can also connect directly to Picasa Web Albums, Photobucket and Webshots and
       save your photos there.

 16/05/2008                   Ashi Avalon - Picnik Image Editior Presentation          Page 10 of 19
9) Picnik – Our Recommendation With any other photo editing web service or software, you need to tweak multiple levels of grayscale, opacity, gradients, multiple layers and layer masks to achieve the same effects which you can get from Picnik with just a few simple clicks. Picnik remembers all the edits you've made, so you can access an infinite number of "undos" back to your original image. Even if you lose your online connection or your browser crashes while you are editing a photo, restarting Picnik again will load up your last edited photo. Pickin is a very valuable and easy to use online photo editing tool and we suggest you to use it to improve your photos which you want to upload on your Website. 16/05/2008 Ashi Avalon - Picnik Image Editior Presentation Page 11 of 19
10) Image Requirements For Your Website

To build your website, we require Images of your Company Logo, Pictures of the Interior & Exterior
of your Store, your People, your Products, your Services etc… as per the below specifications for the
proper setup and look of your Website. These pictures will help to inform your customers about your
store and build your brand.

                                                                                    Image
        Image Type                           Image Description                    Dimensions
                                                                                 (Width X Height)
                                          Website Logo
                                Your Company Logo is also used as Website
                              Logo. You may require some slight alterations
       Company Logo                                                                 450 X 66
                               to the size and layout of your Company Logo
                                so that it properly displays on your website.
                                  Images for About Us Page
                                  This image should portray the historical
   About Company Image                                                             160 X 130
                                   relation with your Store and Company.
                                 This image should portray the Company’s
 Company’s Promise Image          Customer Service to show Staff Member            160 X 130
                                       dealing with a Happy Customer.
                                 This image should portray the Company’s
 Company’s Service Image                                                           275 X 154
                               Technical Staff working on Jewelry Products.
                               This image should display the interior of your
 Company’s Products Image                                                          275 X 154
                                      Store, showing Jewelry Products.
                                 This image should cover your Store Staff
  Company’s People Image                                                           160 X 130
                                             Members in a group.
                              This image should portray the Company’s Main         495 X 264
 Main Store Exterior Image
                                                Store Exterior.

  16/05/2008                  Ashi Avalon - Picnik Image Editior Presentation         Page 12 of 19
11) Steps To Edit Images On Picnik For Your Website
Using the Crop and Resize tools you can easily convert your photo’s to the Ashi Avalon
recommended image formats.
• Open Picnik in your browser by entering www.picnik.com in browser’s address bar.
• Click on the “Start Picniking” Tab on the Top Right Hand Corner
• At Photos Tab on Picnik, upload the image which requires editing from your computer or from
other available sources.
Click on Photos Tab
Click on Get from Computer Tab
Click on Get Photo Button
16/05/2008 Ashi Avalon - Picnik Image Editior Presentation Page 13 of 19• After Click on “Get Photo” Locate the Picture you would like to Edit from your Computer.
• At Edit Tab on Picnik, you can use Crop and Resize tools to convert your image to the
Ashi’s recommended image format easily without any assistance.
You can also click on the “Auto-fix” Button to edit your picture
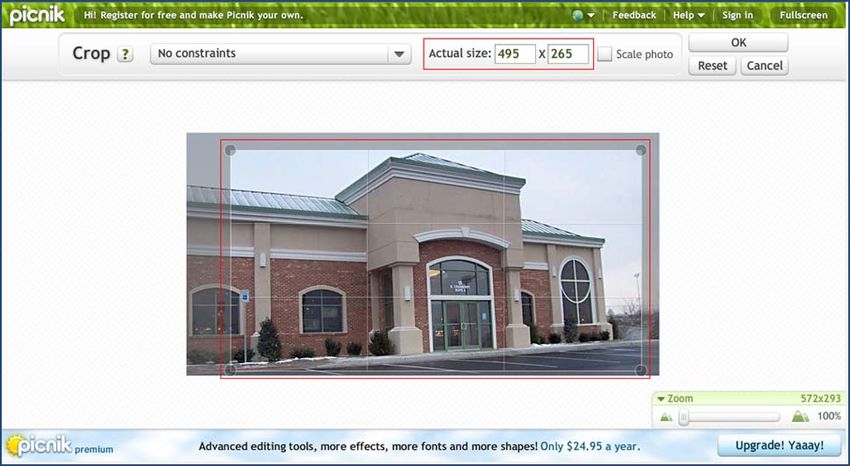
16/05/2008 Ashi Avalon - Picnik Image Editior Presentation Page 14 of 19Crop Option
• By using the Crop feature, you can cut the edges of your image to improve the look & impact
or just to make the picture fit in a given space. The Crop utility will help you to convert your
ordinary image to web compatible image by changing the dimensions of your image. For
example, if the actual size of your selected Main Store Exterior Image is 552 X 292 pixels
then you need to reduce it to 495 X 264 pixels for your website.
You have Two Options to reduce the size of your image under Crop section of Edit Tab:
Option 1:
You can enter 495 X 264 in Actual Size fields and then drag the selection grid on the image to
select your cropping area. This way, you can remove unwanted edges or portion of your
image and reduce the size of your image to the required specifications. On clicking the
OK button, you will get the cropped image in the required size.
16/05/2008 Ashi Avalon - Picnik Image Editior Presentation Page 15 of 19Crop Option
Option 2:
In case, you do not want to cut your image and would like to display the full image on your
website then you need to “compress” your image to 495 X 265 pixels. To get this compressed
size, you first need to check the Scale Photo option and then need to enter 495 X 264 in
Actual Size fields. Then you need to increase the selection grid of your image by dragging it
to the maximum possible so that you get the full image. On clicking the OK button, you will
almost get your full image in the required size.
16/05/2008 Ashi Avalon - Picnik Image Editior Presentation Page 16 of 19Resize Option
• If you want to display the full image on your website then you can also get your image in the
required size by using the Resize feature. If you use the Resize feature then you just need to
enter the New Dimensions 495 X 265 without selecting the options for Use Percentages or
Keep Proportions. The moment you enter your required dimensions, your image will be
displayed in the entered dimensions. On clicking the OK button, you will get full image in the
required size.
• By using Resize feature, you can also increase the size of the image but it is advisable that
you do not increase the size of the image as it may affect the clarity of your image, unless
the image you have is of medium or high resolution.
16/05/2008 Ashi Avalon - Picnik Image Editior Presentation Page 17 of 19• At Save & Share Tab on Picnik, you can save the changes in your image and download it on
your computer or save to other available sources. You can even directly Email this image to
any Email Address. You can save this image in various formats like JPG, PNG, GIF, BMP, PDF
and TIFF but it is advisable to save the image in JPG format. If you are saving this image on
your computer then on clicking the Save Photo button, image will be saved at your selected
location in your computer.
Now you are ready to email your picture to Ashi Avalon or upload your
edited images to your Website Via your Admin Console.
16/05/2008 Ashi Avalon - Picnik Image Editior Presentation Page 18 of 19In case of any queries, Please feel free to contact us at the email given below:
ASHI-ECOMMERCE@googlegroups.com
Thank You!
16/05/2008 Ashi Avalon - Picnik Image Editior Presentation Page 19 of 19You can also read