Chime for Teams Agent Training User Guide - September 2021
←
→
Page content transcription
If your browser does not render page correctly, please read the page content below
Chime for Teams Agent Training
User Guide

                          September 2021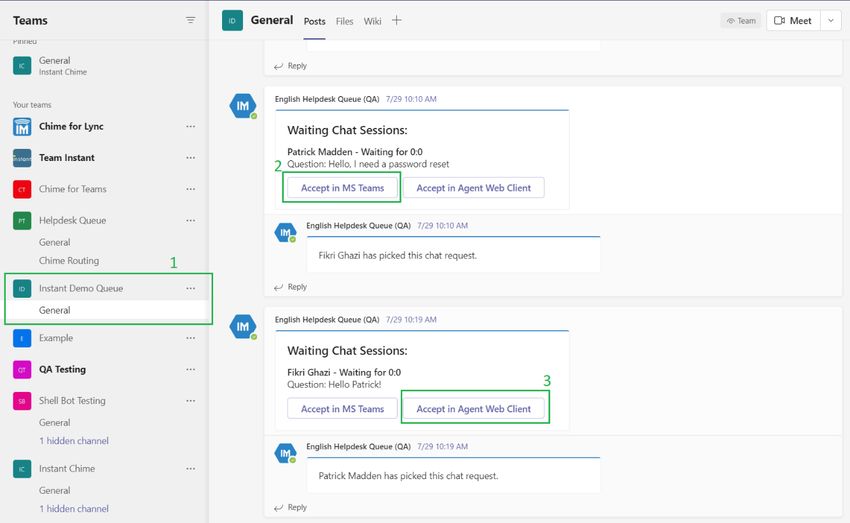
Copyright and Disclaimer
This document, as well as the software described in it, is furnished under license of the Instant
Technologies Software Evaluation Agreement and may be used or copied only in accordance with the
terms of such license. The content of this document is furnished for informational use only, is subject
to change without notice, and should not be construed as a commitment by Instant Technologies.
Instant Technologies assumes no responsibility or liability for any errors or inaccuracies that may
appear in this document. All information in this document is confidential and proprietary.

Except as permitted by the Software Evaluation Agreement, no part of this document may be
reproduced, stored in a retrieval system, or transmitted in any form or by any means, electronic,
mechanical, recording, or otherwise, without the prior written permission of Instant Technologies .

Copyright © 2005 – 2021 Instant Technologies, All rights reserved.

Trademarks
All other trademarks are the property of their respective owners.

Contact Information
See our website for Customer Support information.

http://www.instant-tech.com/

Page | 2
                                                      Copyright © 2021 Instant Technologies. All rights reserved.
                                                                                           September 13, 2021
                                                                                                    Rev 5 – PSM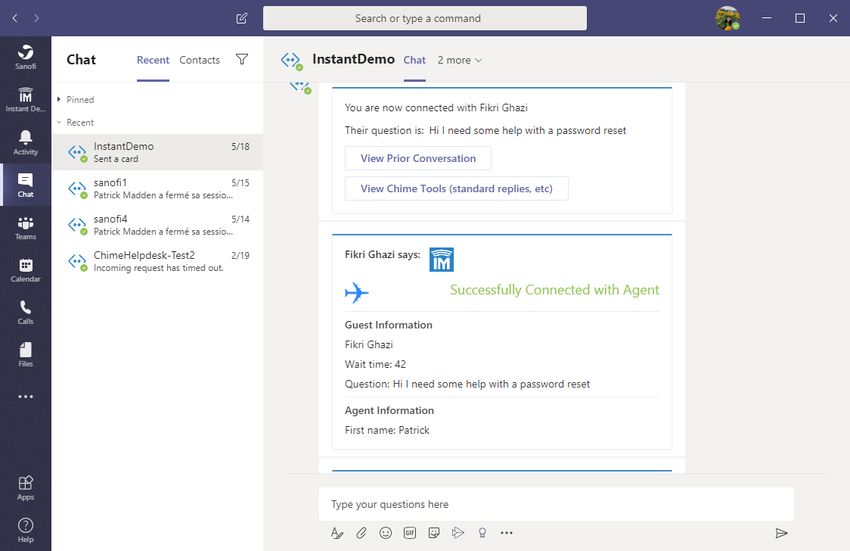
CONTENTS

Introduction.................................................................................................................................................... 4

How Does Chime Work? ............................................................................................................................... 4

Accessing the Chime Web Ui........................................................................................................................ 4

Agent Dashboard .......................................................................................................................................... 5

Accepting a Chat Request ............................................................................................................................ 5

   Accepting Chats in Teams......................................................................................................................... 6

   Accepting Chats in the Chime Web UI ...................................................................................................... 8

How to get to the Agent Context Window ..................................................................................................... 9

Using the Agent Context Window ............................................................................................................... 10

   Details ...................................................................................................................................................... 10

   History...................................................................................................................................................... 10

   Chat ......................................................................................................................................................... 11

   Replies ..................................................................................................................................................... 12

   QnA.......................................................................................................................................................... 13

   Files ......................................................................................................................................................... 13

   Notes ....................................................................................................................................................... 14

   Meta Data ................................................................................................................................................ 15

Concurrent Chats ........................................................................................................................................ 15

Using the Agent Translation Feature .......................................................................................................... 16

Enabling/Disabling yourself in Queues ....................................................................................................... 18

Queue-Specific Dashboards ....................................................................................................................... 19

      Active: .................................................................................................................................................. 19

      Monitoring Panel .................................................................................................................................. 19

      Agents Online ...................................................................................................................................... 20

      View History ......................................................................................................................................... 20

Page | 3
                                                                                     Copyright © 2021 Instant Technologies. All rights reserved.
                                                                                                                          September 13, 2021
                                                                                                                                   Rev 5 – PSM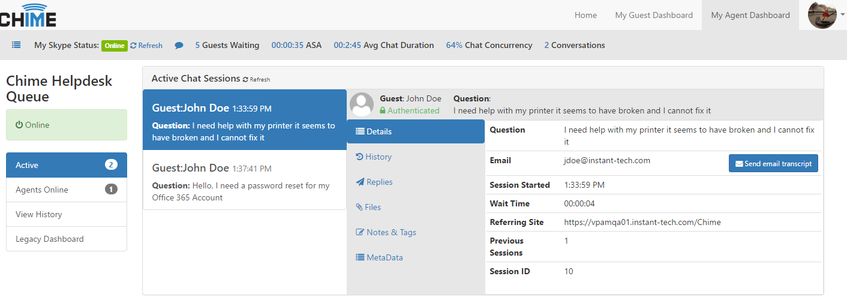
INTRODUCTION
This document is designed to help those who are configured as agents in the process of learning how to
use Chime. We will provide information on how to accept chat requests from customers, viewing the
agent dashboard and individual chat history, directions on how to install the agent context window, as well
as instructions for utilizing the context window and its various functions and features.
HOW DOES CHIME WORK?
Before you can start using Chime, it is good to know a little about how it is set up. The Admins and
Managers are able to create Queues where users will come in looking for help. Queues are a collection
of all the Agents who are able to assist with the Guests coming in looking for help. Queues can be split
up into different languages, regions, or assistance types, so as an agent you might be assigned to
multiple queues at once. Once you are assigned to a queue, you are able to accept chat conversations
from guests looking for help. You will be prompted to pick up Waiting chats, and once you accept, you
will be Connected with the user. Once you are connected, you can assist the guest. When you end the
chat it will be moved into the Completed state.
ACCESSING THE CHIME WEB UI
To perform many of the action’s agents have available, you will need to log into the Chime server’s Web
UI. You will need to be provided a link to the Web UI by your managers, as it is different for all
companies. The link may look something like this:
https://chime.server.com.Chime
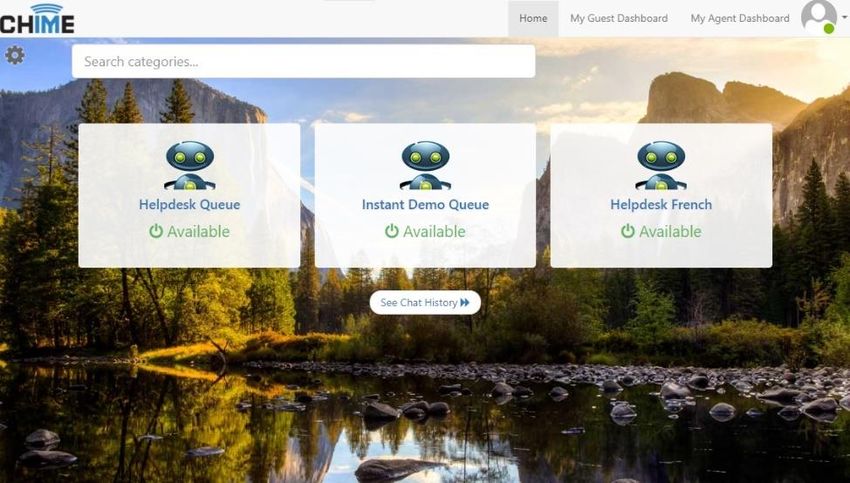
Once you log in through the Microsoft Login page, you will be able to use the Chime Web UI. When you
log in initially you will be on the Home page where you can see all the visible queues.
Figure 1: Chime Home
Page | 4
Copyright © 2021 Instant Technologies. All rights reserved.
September 13, 2021
Rev 5 – PSM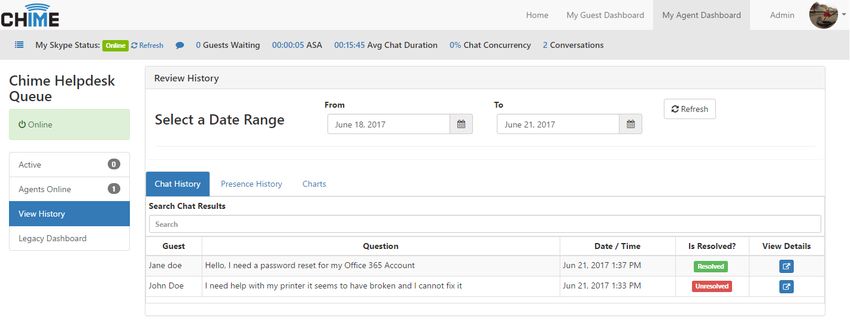
AGENT DASHBOARD

The Agent Dashboard is a tool that gives agents a lot of information about the chats that they have taken
and their statistics. On this dashboard you will be able to see any chat session that is routing, and you will
also be able to accept any chat session that starts Waiting.

To get to the Agent Dashboard, click the My Agent Dashboard link in the header of the Chime Web UI.

                                           Figure 2: Agent Dashboard

When you first navigate to the Agent dashboard, you will see information about any of your Active Chat
Sessions as well as a Monitoring Panel where you can track chat sessions that are Waiting or
Connected. To get information about a specific queue you are in, simply click the Menu button on the
left, then View Dashboard link for the queue you would like to see.

ACCEPTING A CHAT REQUEST

As an agent who will be helping customers or guests in Chime, you will have two different ways of
accepting chat conversations – either by using Microsoft Teams or the Chime Web UI. Below, we will
cover both sections individually and will talk about the features supported by each.

Page | 5
                                                         Copyright © 2021 Instant Technologies. All rights reserved.
                                                                                              September 13, 2021
                                                                                                       Rev 5 – PSM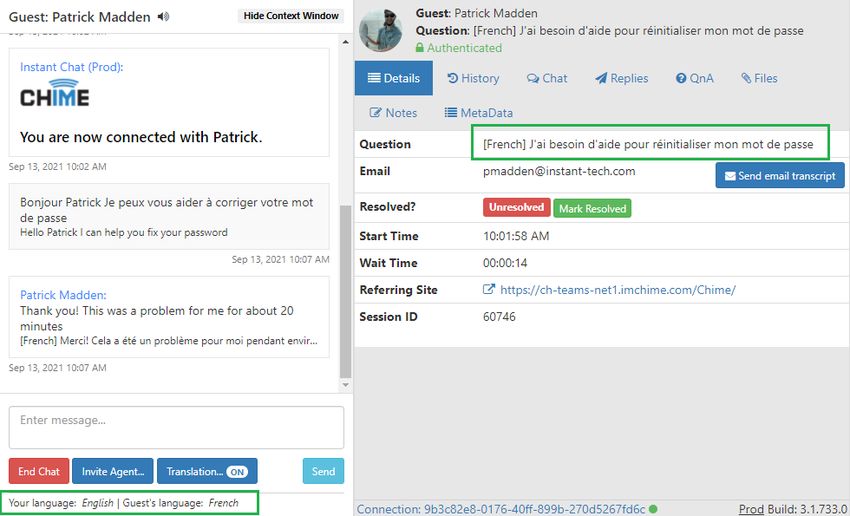
ACCEPTING CHATS IN TEAMS

As an agent using the Teams client, you will be added to the Team and channel for any of the queues
that you are in. If you go the Teams section on the left side of the Teams client, you can navigate to the
teams that you are in. Then go to the channel of the queue that you are in.

Once you are in the channel for the queue, you can wait until you see cards pop up with chats that are
waiting.

                                       Figure 3: Teams Routing Channel

These cards will be sent out and you have the option to either accept it in the Teams client by clicking the
Teams icon in the card, or by accepting in the Chime Web UI by clicking the icon with the IM logo on it.

After you accept the chat session, you will receive a notification in the chat panel of your Teams client.
Navigate to the new chat message and you can begin the chat session with the guest you just accepted.

Once you have opened the chat session from the guest, you will see a few messages that come through
informing you that you are connected to user. You can see the question they came in with, view prior
conversations, and use the Chime Tools.

Page | 6
                                                        Copyright © 2021 Instant Technologies. All rights reserved.
                                                                                             September 13, 2021
                                                                                                      Rev 5 – PSM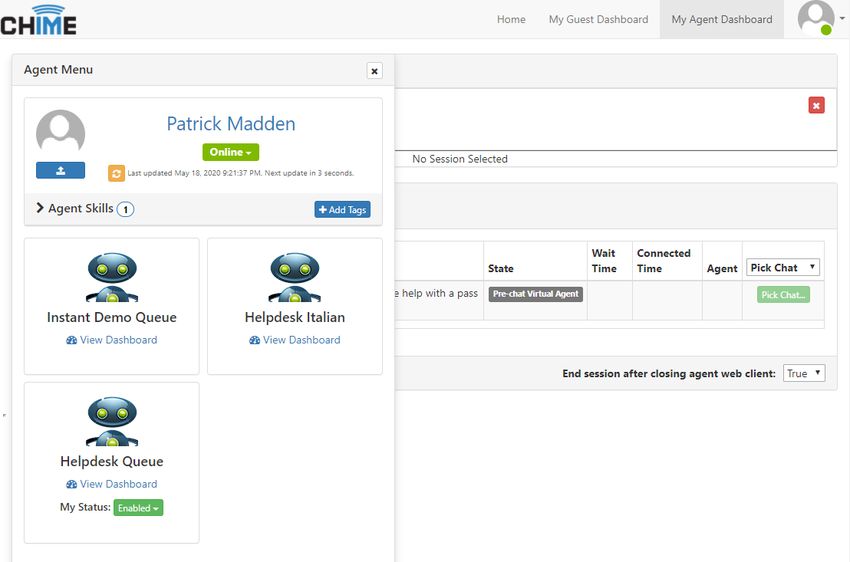
Figure 4: Chat accepted in Teams

The Chime Tools are a set of helpful resources that we pull together to help agents service chats. By
clicking the View Chime Tools button you will open up a page in the Chime Web UI that is the Agent
Context Window. This gives you useful tools to assist the guest - like seeing past issues they came in
with, sending standard replies, and file upload. This will be covered more in depth in the section: Using
the Agent Context Window.

                                       Figure 5: Chime Context Window

To end the chat session, either use the End Chat button that is attached to messages, or type in /end in
the chat session.

Page | 7
                                                        Copyright © 2021 Instant Technologies. All rights reserved.
                                                                                             September 13, 2021
                                                                                                      Rev 5 – PSM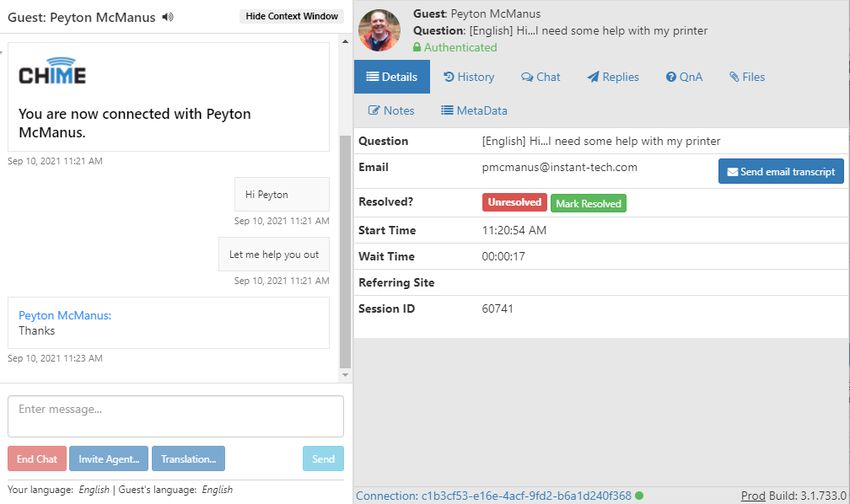
ACCEPTING CHATS IN THE CHIME WEB UI

Agents using the Chime Web UI to accept chats will want to monitor the Agent Dashboard to await new
chat sessions. There is a monitoring panel on the Agent Dashboard that lets you see any incoming chat
sessions and accept them once they move into the Waiting state.

                                      Figure 6: Pick Chat in Chime Web UI

As an agent waiting on the Agent Dashboard, there will be chats that might already be in the Waiting
state. To accept these chats, click the Pick Chat button on the right side of the Monitoring Panel table for
the chat session.

If a chat session routes to you, a notification will pop up on your screen showing the user coming in for
help, as well as the wait time, their question and buttons to accept the chat session. You can choose to
either accept the chat in the Teams Client (in that case you will need to open the chat conversation that is
set up there) or you can accept the chat using the Web Client.

                                        Figure 7: New Chat Notification

Page | 8
                                                         Copyright © 2021 Instant Technologies. All rights reserved.
                                                                                              September 13, 2021
                                                                                                       Rev 5 – PSM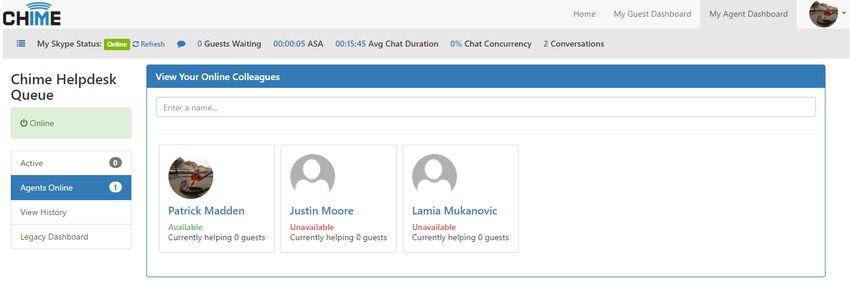
Note: When accepting the chat session through the web client you must make sure that you are also
logged into your Teams client and have the same account logged into Chime and Teams. All chats
opened in the Chime Web UI are also opened in Teams - and the accounts must match for this to work.

                                   Figure 8: Open Chat in Agent Web Client

Once you have accepted the chat request in the Chime Web UI, a new window will open in your browser
with an IM chat section on the left and the Agent Context Window to the right. You are now connected to
the guest and can begin helping them.

HOW TO GET TO THE AGENT CONTEXT WINDOW

The Agent Context Window (ACW) can be navigated to in a variety of ways. One of the easiest is to
navigate to your Agent Dashboard. If you are connected to a chat, the Active Chat Sessions panel will
have an entry for the chat. Click on the active session, and it will open up the ACW for you to use.

                                    Figure 9: Agent Active Chat Sessions

The ACW can be accessed from the Teams UI right after accepting a chat session. If you click the View
Chime Tools button, it will open up the ACW for the session you are connected to.

When using the Chime Web UI for a chat session, the ACW will be attached to the chat window. If you do
not see it, simply click the Show Context Window button on the top right of the chat UI.

Page | 9
                                                        Copyright © 2021 Instant Technologies. All rights reserved.
                                                                                             September 13, 2021
                                                                                                      Rev 5 – PSM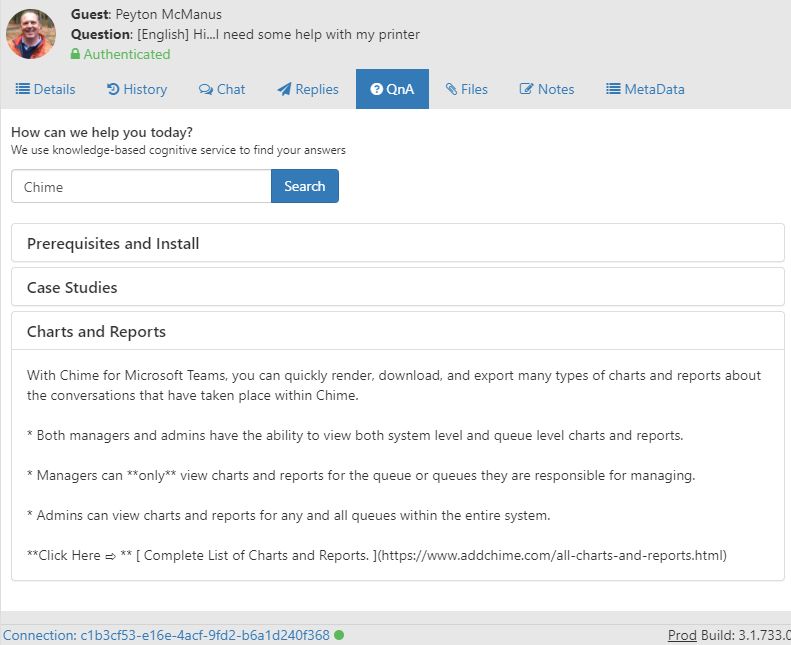
USING THE AGENT CONTEXT WINDOW

There are eight tabs in the agent context window: Details, History, Chat, Standard Replies, QnA, Files,
Notes & Tags, and MetaData. This section will go over each tab and all of the features and functions
available to agents in the context window.

DETAILS

The Details tab is the first tab that an agent sees in the context window when connected with a guest.
This window shows details about the guest or customer, such as their full name, question, contact
information, and wait time.

                                           Figure 10: Details Panel

HISTORY

The History tab shows the previous questions that the guest may have had. You will need to click the
Load History button to se the history of the user, then click on the View button to view previous chats
that the guest has had.

                                           Figure 11: History Panel

Page | 10
                                                         Copyright © 2021 Instant Technologies. All rights reserved.
                                                                                              September 13, 2021
                                                                                                       Rev 5 – PSM
CHAT
The Chat tab allows you to see the chat history of the current chat session. Sometimes Queues will have
a pre-chat workflow set up so that you can get additional information from the Guest coming in, in this tab
you would be able to review anything that happened in the pre-chat that might be helpful for you to
resolve the Guest’s issue.
Figure 12: Chat History Before the Agent Accepted
Page | 11
Copyright © 2021 Instant Technologies. All rights reserved.
September 13, 2021
Rev 5 – PSMREPLIES
In the Standard Replies tab, Agents have access to pre-made standard messages that have been added
to the Queue in which they are in. Click on the button to send a Standard Reply message to a
customer. Additionally, you can click on the Edit button to edit the Standard Reply before you send it.
Note: Standard Replies must be added to Queue Settings by a Manager or Administrator.
Figure 13: Standard Replies Panel
Page | 12
Copyright © 2021 Instant Technologies. All rights reserved.
September 13, 2021
Rev 5 – PSMQNA
The QnA tab allows you to access additional knowledgebase information that your service desk team
may have set up for your Queue. This could help to answer questions you may not be familiar with or you
can use it to send over a guide to the Guest on how to perform some fix for their issue.
Figure 14: QnA Tab
FILES
Any files that have been uploaded in the chat will be located in the Files tab. Agents have the ability to
send documents and pictures to customers, and customers can send files to agents as well. Click on the
Browse button to search for the file you want to send, then click the Upload button to send the file to a
guest. Click on the ‘Refresh’ button to reload the list of files, if any have been uploaded.
Figure 15: Files Panel
Page | 13
Copyright © 2021 Instant Technologies. All rights reserved.
September 13, 2021
Rev 5 – PSMNOTES
In the Notes section, agents can attach session tags to the session as well as add comments that will
show up in chat history. If your team is using session tags, they are useful to categorize how the chat
went. Some examples could be “Resolved issue” or “Added ticket” for example. To add a tag to the
session, click on the Session Tags drop-down menu and pick a tag that fits the nature of the chat
session. Then click the + button to attach the tag with the session.
Figure 16: Notes Panel
Add Comment describes what actions you took, or additional issues that the guest had. Ex: I gave him a
password reset and he is all set now, I gave her a license key for Microsoft Office…
Page | 14
Copyright © 2021 Instant Technologies. All rights reserved.
September 13, 2021
Rev 5 – PSMMETA DATA
The MetaData tab allows you to see additional information about the chat that might help such as the
entry point, referrerURL, or any skill tags that might be on the session. This tab is generally only used in
very specific scenarios where it is necessary and more useful for Managers and Reviewers to check after
the chat session.
Figure 17: MetaData Panel
CONCURRENT CHATS
Agents can receive multiple chats at once. The concurrent chat property is defined at an admin level, and
the maximum number of concurrent chats an agent can have is ten. Once an agent’s maximum
concurrent chat number is reached, they will no longer receive any chats until they close out of one or
more of their existing concurrent chats. For example, if an agent’s concurrent chat setting is two, and they
accept two chats, any additional chats will be routed to other agents who have not fulfilled their maximum
concurrent or max per day number.
Page | 15
Copyright © 2021 Instant Technologies. All rights reserved.
September 13, 2021
Rev 5 – PSMUSING THE AGENT TRANSLATION FEATURE
If your service desk plans to support multiple languages, Chime allows you to do live translation in the
chat session. Note: this live translation is currently only available on the Chime Web UI, so using the
Teams client will not allow you to use this feature.
If a guest comes into your chat session and is speaking a language you are not familiar with, Azure
Translation Services will give Chime information on what language they came in on and also allow you to
automatically translate your messages into their language.
Figure 18: Set Guest and Agent Languages
If you want to customize the Translation a bit more, click on the Translation button right below the chat
message bow. A window will open and allow you to choose if you want to use auto-language-detection,
what languages you want the guest to be translated to, and what language you want to be translated.
Figure 19: Guest Joins Chat Speaking French
Page | 16
Copyright © 2021 Instant Technologies. All rights reserved.
September 13, 2021
Rev 5 – PSMThere is also an option to choose if you want the guest to see that you are using translation by including
the original message you typed along with the translated message. Note: by default, Chime will send both
the message you enter and the translated message to the guest.
The image below shows what the messages will look like for the guest when the translation and original
messages are included, and then when only the translated version is sent.
Figure 20: Translated Messages Sent
If you would like to remove translation at some point during the chat session, click on the Translation
button, then click Turn Off Translation in the translation settings window.
Page | 17
Copyright © 2021 Instant Technologies. All rights reserved.
September 13, 2021
Rev 5 – PSMENABLING/DISABLING YOURSELF IN QUEUES
Some queues will allow Agents to set their Chime status on the Queue Dashboard. In the image below,
you can see that the Helpdesk Queue has a My Status option underneath the View Dashboard link and
the Instant Demo Queue does not have the My Status option underneath it. Some queues will support
this feature, and some will not. Using the My Status feature allows you to set your status for the Queue
as Enabled or Disabled. This feature is mainly used if you are going on break or need to be away from
your desk for an extended period of time.
Figure 21: Enable/Disable Status
To set your Enabled/Disabled status, first click the Menu button on the left side of the Agent Dashboard.
Next, select the Status you want to change in the dropdown picker.
The Enabled Status is what an Agent should be in most of the time. When in an enabled state, the Agent
can receive chats, and will actively be getting new chats after they end an existing chat.
Changing your status to Disabled in Chime does two things- it removes you from the pool of Active
agents who can receive chats and allows you to start a chat with the queue. This is mainly used if an
agent is away from their desk or needs to message their own queue for testing purposes.
Page | 18
Copyright © 2021 Instant Technologies. All rights reserved.
September 13, 2021
Rev 5 – PSMQUEUE-SPECIFIC DASHBOARDS
If you want more info on the chats you have with a specific queue, you can use the dashboard for a
specific queue. To do this, click the Menu button on the left side of the Agent Dashboard, then click View
Dashboard for the queue that you want the additional information. On the Dashboard, you will see five
tabs: Active, Monitoring Panel, Agents Online, View History, and Legacy Dashboard.
ACTIVE:
The Active tab shows information about the active chats you currently have. In this section you will be
able to look at the context window for any of the current chats you are in and use any of the features it
provides.
Figure 22: Active Sessions
Figure 23: Active Sessions Drilldown
MONITORING PANEL
The monitoring panel is very similar to the one on the Agent Dashboard, however, this one only shows
chat sessions from the queue that you are currently in instead of chat sessions from all the queues you
are in.
Page | 19
Copyright © 2021 Instant Technologies. All rights reserved.
September 13, 2021
Rev 5 – PSMAGENTS ONLINE
The Agents Online tab shows you which agents in the queue are Available to take chats and which ones
are Unavailable. This is helpful for agents to gauge how many chats they will be getting based on the
number of waiting guests and the number of other agents online in the queue.
Figure 24: Available Online Agents
VIEW HISTORY
The View History tab allows agents to look at previous chat sessions that they had and look at the
session details. You are able to add tags, comments and change from resolved/unresolved in this area.
To look through the details of a chat, simply click the View Details button on the row the chat is on.
Figure 25: Chat History
Page | 20
Copyright © 2021 Instant Technologies. All rights reserved.
September 13, 2021
Rev 5 – PSMYou can also read