Premium Coffee Maker With Integrated Grinder - Andrew James
←
→
Page content transcription
If your browser does not render page correctly, please read the page content below
Premium Coffee Maker
              With Integrated Grinder

 Thank you for your purchase. We hope that you are satisfied with
                your new Andrew James product.

To fully and safely enjoy the benefits of your new product, please read the
        manual fully before use and keep safe for future reference.

                                    1
Safety information
When using any electrical appliance, basic safety precautions should
always be followed, including the following;
• This appliance is intended for indoor, household use. Unintended
use or operation may result in personal injury, damage to property
or damage to the appliance that will void the warranty.
• This appliance can be used by children aged from 8 years and
above and persons with reduced physical, sensory or mental
capabilities or lack of experience and knowledge if they have been
given supervision and/or instruction concerning safe use of the
appliance and the understanding of hazards. Children shall not play
with the appliance. Cleaning and user maintenance shall not be
made by children unless they are older than 8 years old and
supervised.
• Keep the appliance and its cord out of reach of children less than 8
years old.
• Never handle or operate any appliance with wet or moist hands.
• Do not immerse appliance, cord or plug in water or other liquids.
Take care whilst cleaning.
• If the appliance has fallen in water do not reach for it, immediately
switch the appliance off at the mains and unplug it.
• Ensure that the cord is not in a position where it can be pulled or
tripped over accidentally. Never use the cord to carry or pull the
appliance. Do not let the cord hang over the edge of a table or
counter.
• Keep the cord away from heated surfaces.
• Do not use the appliance if it has malfunctioned, been dropped or
damaged in anyway. If the unit has been damaged take the unit for
examination and/or repair by an authorised service agent.
• Do not attempt to open the appliance, repair or modify the
appliance, use the appliance for unintended applications or use
accessory attachments not recommended by the manufacturer.
2Failure to follow these instructions may result in fire, electrical
shock, or risk of injury to persons.
• Do not place the appliance near a naked flame, hot gas or electric
burners, or any appliances generating heat.
• Always remove the plug safely from the socket after use. Do not
pull from the cord.
• Ensure that all packaging is removed before use.
Appliance specific safety information
• Before cleaning, attaching components or carrying out repairs on
the appliance always remove the cord from the electrical supply.
• The use of accessory attachments that are not approved by the
manufacturer is not recommended and may cause the appliance to
malfunction and injury to the user.
• Only ever use the grinder for grinding roasted coffee beans. Never
use it for any other ingredients.
• Do not use the appliance if it has a damaged container, please take
it to a service repair centre or call our customer service team for
repairs.
• When the appliance is in operation avoid contact with the moving
blades as they are sharp.
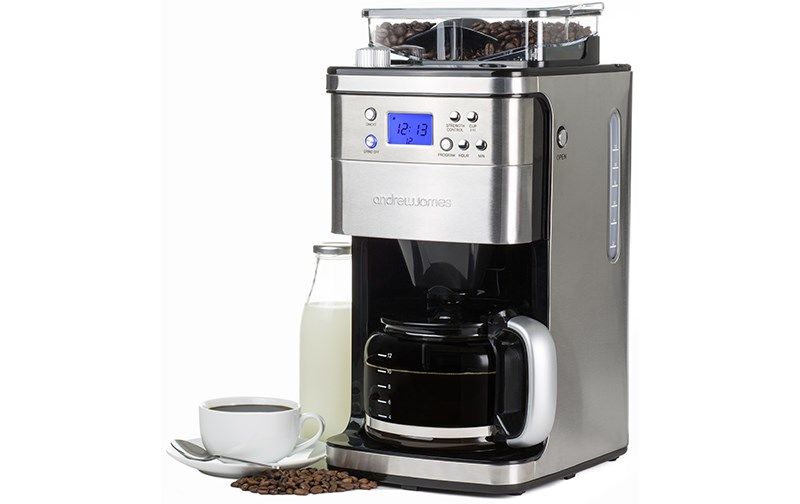
3Appliance components illustration
Coarse/Fine grind
control dial
Grinder cover
Filter
Grinder box
Water tank
Funnel
lid
Funnel Water gauge
support
Water tank
Funnel press key
Control panel
Tempered glass coffee pot
Control Panel
4Before first use
• Ensure that all parts and accessories are in working condition.
• Run only clean water through the appliance to remove any dirt. This can be done
by filling the water reservoir with water, plugging the appliance into to the mains
and following the steps found in the section of the manual “How to use”.
• Repeat the process at least twice to ensure the coffee machine is fully cleaned.
How to use
Open the water tank lid and pour the required amount of water into the water
tank, we recommend using the coffee pot to measure the amount of cups of
coffee you wish to make. The level of water can be indicated by the water gauge
on the right-hand side of the machine. Please note the coffee produced will be
less than the amount of water you originally put in the water tank therefore
always add 1 extra cup, for example if you wish to produce ten cups of coffee
add the equivalent of 11 cups to the water tank. Only use room temperature
water in this product.
Press the funnel key button once and place the funnel and coffee filter into the
funnel support and rotate until locked into place.
Lift off the coffee grinder cover and fill the grinder box with coffee beans
(maximum 200g of coffee beans). Place the grinder cover back on the grinder
box ensuring it is securely in place. Please make sure the coffee beans are dry
and fresh. It is not recommended that you use the grinder box for bean
storage—if they are left in the box they may get damp and block the machine.
Plug the appliances power cord into the electrical supply. The LCD display will
flash and now display 12: 00 automatically. Set the correct time by pressing the
hour and minute buttons
Select the amount of cups you wish the coffee machine to produce by pressing
the cup 2-12 button. The LCD display will now show the amount of cups you
want to produce ranging from 2-12, press the cups button to increase the
amount of cups in increments of two. If you do not select the required amount
of cups it will be set at a default of 12 cups.
Turn the coarse/fine grinder dial to choose how coarse you wish the ground
coffee to be. For a fine grind, turn the dial to the smallest dots, the bigger dots
represent a coarse grind.
Press the “Strength control” to increase or decrease the strength of the coffee
produced, the one bean symbol represents the weakest setting with the three
bean symbol the strongest.
5 Press the “On/Off” button once and wait for three seconds, the coffee will now
start grinding.
Once the grinding process has finished wait for three seconds and the coffee will
begin to brew, this is indicated in the LCD display by the letters “Brew”.
Once the brewing process has finished the “Brew” indication will disappear from
the LCD display. The coffee will be kept warm automatically by the appliance for
up to 35 minutes.
Making coffee with coffee powder
Open the water tank lid and pour the required amount of water into the water
tank, we recommend using the tempered glass coffee pot to measure the
amount of cups of coffee you wish to make . The level of water can be indicated
by the water gauge. Please note the coffee produced will be less than the
amount of water you originally put in the water tank therefore always add 1
extra cup for example if you wish to produce ten cups of coffee add the
equivalent of 11 cups to the water tank.
Press the funnel key button once and place the funnel and coffee filter into the
funnel support and rotate until locked into place.
Add the coffee powder to coffee filter using a measuring spoon.
Plug the appliances power cord into the electrical supply. The LCD display will
flash and now display 12: 00 automatically. Set the correct time by pressing the
hour and minute buttons.
Then select the amount of cups you wish the coffee machine to produce by
pressing the cup 2-12 button The LCD display will now show the amount of cups
you want to produce ranging form 2-12, press the cups button to increase the
amount of cups in two’s. if you do not select the required amount of cups it will
be set at a default of 12 cups.
Press the “Grind Off” button once, the button will now be illuminated blue. The
LCD display will now display the letters “BREW” and begin the brewing process.
Once the brewing process has finished the letters will disappear from the LCD
display. The coffee will be automatically kept warm for 35 minutes by the
appliance.
6Setting the automatic start function
1. Follow steps 1-7 in the section “How to use”
2. Set the current time and wait till the numbers stop flashing.
3. Press the programme button and set the time you wish the coffee making
process to begin.
4. Once the timer has been set (the numbers stop flashing in the LCD display press
the “programme” button again. The word “AUTO” will now be displayed in the
LCD display. The appliance will now be set in “Automatic” mode.
5. The coffee will now begin to brew at the pre-set time. This is indicated by the
illuminated “On / Off” button.
Please note: To cancel the Automatic start function at any time press the
“Program” button once. The “Program” sign will disappear from the LCD Display.
Cleaning and maintenance
• Use specific products for descaling at a ratio of 1/4 parts descaling product to
water and always fill the water tank to the maximum mark . Do not use vinegar
to descale the appliance. Run the machine through a normal brewing cycle using
only the descaling and water solution. Do not add any coffee beans whilst you
are descaling.
• Do not put any part of the appliance in the dishwasher.
• Clean the appliances bowl with soapy water and clean it with clear water.
• When cleaning the grinder always ensure the appliance is not plugged in.
• Clean the main body and grinder with a damp wet cloth and dry immediately.
• Do not immerse the appliance in water or any liquid for any reason.
• Clean the coffee filter and the funnel after each use. This will prevent the
machine from becoming blocked.
7Troubleshooting
Problem Reason Solution
Not plugged in Insert the mains plug
No symbol in the
No mains power Check the fuse/ mains socket
display
Display defective Contact customer service
Too many appliances Reduce the number of
The fuse in the fuse connected to the same appliances on the power
box blows power circuit circuit
No fault detected Contact customer service
Too much water in the
Do not overfill the water tank
Water runs out of water tank
the appliance Steam trapped behind
Wipe with a dry cloth
funnel support
The coffee runs Drip protector blocked Clean drip protector
very slowly into the
glass jug Appliance is scaled Descale the appliance
The coffee doesn’t
Glass jug lid is not
run into the glass Replace the cover
correctly fitted
jug
Strong build-up of
Descale the appliance several
steam whilst Appliance severely scaled
times
brewing coffee
The grind is too fine,
which means that the
water flows through very
Choose a coarser grind and/
Filter overflows slowly and backs up in the
or reduce the number of cups
when making 12 filter. This is made worse
in order to reduce the coffee
cups of coffee due to the maximum
and/or water volume
volume of coffee beans
used for 12 cups, and the
maximum water volume.
The water in the reservoir Make sure you are using
The coffee maker could be too cold room temperature water
doesn’t make the Following the instructions on
correct amount of Your machine could how to descale your machine,
cups require descaling these can be found in the
instruction manual
8UK & EU Guarantee
Your new Andrew James product comes with a 24 month guarantee and a 2 year
fixed warranty, effective from receipt confirmation. Your receipt or order number is
required as proof of purchase date so it is imperative that you keep it safe. This
guarantee only applies if the item has been used solely for the use intended, and all
instructions have been followed accordingly. Please note this product is for
domestic use only and not for commercial use.
Abuse of your product will invalidate the guarantee. Returned goods can only be
accepted if repackaged properly within the original colour product box, and
presented with the original receipt of sale/order number. This does not affect your
statutory rights.
Returned products must be cleaned and returned to us in as close to delivery
condition as possible.
If your product develops a problem within the first 12 months of the fixed warranty,
we will pay all shipping costs to have it returned to us. After 12 months the
customer will be liable for the cost of returning the product to us. We will then pay
to have the repaired/replaced item shipped back to the customer.
If you wish to return your item for a full refund, you have the right to do so within
the first 7 days. For our returns policy please go to:
www.andrewjamesworldwide.com
Customers are responsible for any taxes applied to our products when they are
shipped outside of the EU.
All of our prices are inclusive of VAT.
Once a product has been returned to us, we will aim to repair or replace it within 30
days of receipt.
The guarantee does not cover any defect arising from improper use, damage, build-
up of lime scale or repair attempts made by third-parties. Also, the guarantee does
not cover normal wear and tear of individual parts.
Electrical safety information
Always ensure the voltage on the rating label corresponds to the power supply
where the product is being used.
WARNING! This product must be connected to an earthed electrical power supply.
The green/yellow conductor in the supply cord must be connected to the Earth
terminal in the plug. The power supply must have an Earth connection.
Precautions should be followed for safe cable management and connection to the
power supply.
If a new mains plug needs to be fitted follow the fitting instructions supplied with
good quality BS1363A plugs. If in doubt consult a qualified electrician or appliance
repair agent.
9• Safely dispose of the old plug.
• Connect the brown lead to the live terminal “L” in the new plug.
• Connect the blue lead to the neutral “N” terminal.
• Connect the green/yellow lead to the earth “E” terminal
Recommended fuse: 13A
If an extension cable is required, it must have an earth conductor. To avoid
overheating the extension cable should be rated no less than 13A and be fully
unwound before use.
Do not attempt to modify electrical plugs or sockets or attempt to make an
alternative connection to the electrical supply.
Disposal of the appliance
Waste Electrical & Electronic Equipment (WEEE) Waste & Recycling
Disposal of Electrical and Electronic Waste
Non-household waste. This product must not be disposed of together with ordinary
household waste.
Separate collection of used products, batteries and packaging allows the recovery
and recycling of materials. Re-use of materials helps prevent environmental
pollution and reduces the demand for raw materials.
Local authorities, retailers and collection organisations may provide for separate
collection of electrical products, batteries and packaging.
Contact Details
Address: Andrew James UK Ltd, Lighthouse View, Spectrum Business Park, Seaham,
Durham, SR7 7PR, UK
Customer Service Telephone: 0191 377 8358
Email: customerservices@andrewjamesworldwide.com
Twitter: @andrewjamesltd Facebook: Andrew James
Copyright Andrew James
AJ001337 | 01/2019
www.andrewjamesworldwide.com
10FR
Cafetière électrique avec moulin à café intégré
Merci pour votre achat. Nous espérons que vous êtes satisfait de votre nouveau
produit Andrew James.
Pour profiter pleinement et en toute sécurité des avantages de votrenouveau
produit, veuillez lire entièrement le manuel avant utilisation et conservez-le pour
vous y référer ultérieurement.
Consignes de sécurité
Lorsqu’on utilise les appareils électriques, il faut suivre les consignes
de sécurité ci-dessous:
• Cet appareil est destiné à être utilisé par des personnes de plus de
8 ans et des personnes ayant les capacités physiques, sensorielles
ou mentales réduites, ou le manque d'expérience et de
connaissances, à moins qu'ils n'aient été donnés supervision ou des
instructions quant à l'appareil et ils comprennent tous les dangers.
Les enfants ne sont pas autorisés à jouer avec l’appareil. Le
nettoyage et l’entretien ne devraient pas être effectués par les
enfants à moins qu’ils aient plus de 8 ans. Garder l’appareil et le
cordon hors de la portée des enfants de moins de 8 ans.
• Veuillez s’assurer que la tension de votre maison correspond à la
tension indiquée sur l’appareil.
• Veuillez vérifier régulièrement qu’il n’y a pas de signes de
dommages sur le cordon d’alimentation ou sur la fiche. Si le cordon
d’alimentation ou la fiche est endommagé, il doit être remplacé par
un électricien ou un centre de service. Pour plus d’informations
veuillez contacter notre service clientèle.
• Cet appareil n’est conçu que pour l’utilisation domestique. Un
usage incorrect va invalider la garantie. Le fournisseur ne peut pas
être tenu pour responsable de blessures ou de dommages si
l’appareil est utilisé pour les fins autres que celles prévues.
• Un usage abusif peut aussi endommager l’appareil et causer des
blessures.
11• Ne jamais utiliser l’appareil s’il a fait tomber ou s’il y a des signes de
dommages sur l’appareil. Si l’appareil est endommagé il doit être
examiné/ réparé par un technicien autorisé.
• Ne jamais plonger le bloc moteur, la fiche ou le cordon
d’alimentation dans l’eau ou tout autre liquide.
• Si le cordon d’alimentation est endommagé il doit être remplacé
par le fabricant ou par une personne qualifiée pour éviter tout
danger.
• Ne jamais laisser l’appareil pendre d’une table ou d’un comptoir.
Veuillez positionner l’appareil en assurant qu’il ne peut pas vous
trébucher ou être tiré par inadvertance.
• Ne jamais laisser le cordon d’alimentation entre en contact avec les
surfaces chaudes ou les brûleurs chauds ou placer l’appareil dans
un four chaud.
• Il n’est pas recommandé d’utiliser une rallonge ou une multiprise
avec l’appareil. Si nécessaire veuillez utiliser une rallonge qui
correspond à la tension de l’alimentation pour éviter le surchauffe.
Ne jamais brancher tout autre appareil sur la rallonge. Veuillez
positionner la rallonge en assurant qu’il ne peut pas vous
trébuchera ou être tiré par des animaux ou des enfants.
• Toujours utiliser l’appareil sur une surface plane et stable. Ne
jamais placer l’appareil sur une surface chaude.
• Veuillez s’assurer qu’il y a assez d’espace autour de l’appareil
pendant l’opération.
• Toujours débrancher l’appareil en tout sécurité. Ne jamais tirer sur
le cordon pour débrancher l’appareil.
• Ne jamais toucher l’appareil avec les mains mouillées.
12Consignes de sécurité spécifiques
• Toujours débrancher l’appareil avant de le nettoyer ou réparer, ou
avant de monter des composants.
• L'utilisation d'accessoires non recommandés par le fabricant
pourrait causer le dépannage de l’appareil et les blessures à
l’utilisateur.
• N’utiliser que le moule à café pour broyer les graines de café
torréfié et ne pas pour d’autres ingrédients.
• Ne pas utiliser l’appareil s’il a des signes de dommage sur l’appareil.
Veuillez contacter un centre de services de réparation ou notre
services clientèles.
• Lorsque le moulin est en marche, éviter tout contact avec les lames
car ils sont très tranchantes.
Illustration des composants de l'appareil
Cadran café grossier /
Filtre fin Couvercle de
broyeur
Boîte du moulin
Entonnoir
Support
entonnoir
Indicateur de
niveau d’eau
Bouton de
l’entonnoir
Pichet en Panneau de
verre trempé commande
13Panneau de commande
Avant d’utiliser l’appareil
• Vérifier le bon état et le bon fonctionnement de toutes les parties.
• Faire fonctionner l’appareil avec l’eau propre seulement. Pour faire cela, remplir
le réservoir d’eau, brancher l’appareil, et suivre les étapes dans la section « Mise
en service ».
• Répéter ce processus au moins deux fois pour s’assurer que l’appareil est bien
Avant d’utiliser l’appareil
Ouvrir le couvercle du réservoir d’eau et remplir avec la quantité d’eau requise.
Nous recommandons d’utiliser le pichet en verre afin de mesurer le nombre de
tasses désirés. Le niveau d’eau est indiqué par l’indicateur sur le côté de
l’appareil (6). Veuillez noter que la quantité de café produit sera moins que la
quantité d’eau initialement mise dans le réservoir, donc veuillez ajouter une
tasse supplémentaire d’eau. Par exemple, si on veut 10 tasses de café,
introduire 11 tasses d’eau dans la machine. N’utiliser que de l’eau à la
température de la pièce avec ce produit.
Appuyer une fois sur le bouton de l’entonnoir et tourner le support entonnoir
vers la gauche. Mettre l’entonnoir et le filtre dans le support et tourner vers le
droit jusqu’à ce qu’il soit fixé à sa place originale.
Soulever le couvercle du moulin et remplir la boîte avec les graines de café
(200g de graines de café maximum) Remettre le couvercle du moulin en
s’assurant qu’il est solidement fixé en place.
Brancher l’appareil. L’écran ACL clignotera et affichera automatiquement « 12:
00 ». Régler l’heure en appuyant sur les boutons «hour» et «minute».
Sélectionner ensuite le nombre de tasses souhaité en appuyant sur le bouton
«cup 2-12». L’écran affichera maintenant le nombre de tasses - appuyer sur le
bouton «cups 2-12» afin d’augmenter le nombres de tasses par deux avec
chaque pression. Si on ne règle pas le nombre de tasses, l’appareil va être réglé
4 un défaut de 12 tasses. Tourner le bouton (9) pour choisir la finesse du café
moulu. Nous recommandons un réglage moyen.
14 Appuyer sur le bouton «Strength control» pour augmenter ou diminuer
l’intensité du café. Le symbole d’un grain de café représente le café le plus dilué
et le symbole de trois grains représente le café le plus fort.
Appuyer une fois sur le bouton «On/Off» et après 3 secondes, l’appareil
commencera à moudre les grain de café. Pour préparer les grains finement
moulus, tourner le cadran vers les petits points. Les points plus grands, sont pour
obtenir une texture granuleuse.
Après le broyage, attendre 3 secondes et l’appareil commencera à faire le café.
L’écran affichera le mot «Brew».
Quand le mot «Brew» disparaît, le brassage du café est terminé. Le café sera
gardé au chaud automatiquement pour 35 minutes.
Pour faire du café avec le café moulu
Ouvrir le couvercle du réservoir d’eau et remplir avec la quantité d’eau requise.
Nous recommandons d’utiliser le pichet en verre afin de mesurer le nombre de
tasses désirés. Le niveau d’eau est indiqué par l’indicateur sur le côté de
l’appareil. Veuillez noter que la quantité de café produit sera moins que la
quantité d’eau initialement mise dans le réservoir, donc veuillez ajouter une
tasse supplémentaire d’eau. Par exemple, si on veut 10 tasses de café, introduire
11 tasses d’eau dans la machine. Ajouter le café moulu dans le filtre à l’aide
d’une cuillère à mesurer.
Appuyer une fois sur le bouton de l’entonnoir et tourner le support entonnoir
vers la gauche. Mettre l’entonnoir et le filtre dans le support et tourner vers le
droit jusqu’à ce qu’il soit fixé à sa place originale.
Brancher l’appareil. L’écran ACL clignotera et affichera automatiquement « 12:
00 ». Régler l’heure en appuyant sur les boutons «hour» et «minute».
Sélectionner ensuite le nombre de tasses souhaité en appuyant sur le bouton
«cup 2-12». L’écran affichera maintenant le nombre de tasses - appuyer sur le
bouton «cups 2-12» afin d’augmenter le nombres de tasses par deux avec
chaque pression. Si on ne règle pas le nombre de tasses, l’appareil va être réglé 4
un défaut de 12 tasses.
Appuyer sur le bouton «Grind Off», le bouton s’allumera en bleu. L’écran
affichera maintenant le mot «BREW» et l’appareil commencera à broyer le café.
Une fois que le processus est terminé, le mot disparaîtra de l’écran. Le café sera
gardé au chaud automatiquement pour 35 minutes.
15Fonction de démarrage automatique
1. Suivre les étapes 1-6 dans la section «Mise en service».
2. Régler l’heure actuelle et attendre jusqu’à ce que les numéros arrêtent de
clignoter.
3. Appuyer sur le bouton de «program» et régler l’heure que l’appareil doit
commencer à faire du café.
4. Une fois que la minuterie soit réglé (les numéros arrêteront de clignoter)
appuyer encore une fois sur le bouton «program». Le mot «AUTO» apparaîtra
sur l’écran. L’appareil est maintenant sur le mode «automatique».
5. Le cafetière commencera à faire le café à l’heure réglé. Cela sera indiqué par
l’illumination du bouton «On/Off».
Veuillez noter: Pour annuler la fonction de démarrage automatique à tout moment,
appuyer encore une fois sur le bouton «program». Le symbole de «Program» va
disparaitre de l’écran.
Nettoyage et entretien
• Afin de détartrer l’appareil, remplir le réservoir avec de l’eau et d’un produit
détartrant et faire fonctionner l’appareil sans café. Il est recommandé de faire
cela au moins une fois par mois.
• Utiliser une volume de détartrant pour 4 volumes d’eau. Toujours remplir le
réservoir à son niveau maximale. Ne pas utiliser de vinaigre pour détartrer
l’appareil.
• Ne pas laver aucune partie de l’appareil au lave-vaisselle.
• Laver le pichet de l’appareil à l’eau savonneuse et rincer à l’eau propre.
• Toujours débrancher l’appareil avant de le nettoyer.
• Essuyer l’extérieur du corps de l’appareil avec un chiffon humide et sécher
immédiatement.
• Ne jamais en aucun cas immerger l’appareil dans l’eau ou tout autre liquide.
16Nettoyage et entretien
Panne Problème Solution
Débranché Brancher la fiche de réseau.
Aucun symbole appa- Vérifier le fusible/ prise de
Pas de tension du secteur
rait à l’écran courant
Veuillez vous adresser au ser-
L’écran est défectueux
vice clientèle
Trop d’appareils sont branchés Réduire le nombre d’appareils
au même réseau électrique au réseau électrique
Le fusible est grillé
Veuillez vous adresser au ser-
Aucun problème n’est détecté
vice clientèle
L’eau s’écoule de Ne remplir pas excessivement
Trop d’eau dans le réservoir
l’appareil le réservoir
Protection anti-gouttes est Nettoyer la protection anti-
Le café s’écoule très
bloquée gouttes
lentement dans le
L’appareil a des dépôts de cal-
pichet en verre Détartrer l’appareil
caire
Le café ne s’écoule
Le couvercle n’est pas bien
pas dans le pichet en Remplacer le couvercle
monté
verre
Forte accumulation de
L’appareil a des grands dépôts Détartrer l’appareil plusieurs
vapeur pendant la
de calcaire fois
préparation du café
La mouture est trop fine. Par
conséquent l’eau coule très
Choisir une mouture plus gros-
lentement et devient bouché
Le filtre déborde pen- sière et/ou réduire le nombre
dans le filtre. Ceci est exacerbé
dant la préparation de de tasses pour réduire la vo-
en raison du volume maximum
12 tasses de café lume de café et/ou la volume
de grains de café pour 12 tasses
d’eau
de café et du volume maximum
d’eau
Veuillez s’assurer que vous
utilisez l’eau de température
L’eau dans le réservoir pourrait
La cafetière ne fait ambiante
être trop fraiche
pas la bonne quantité Suivre les conseils pour détar-
de tasses Peut-être la machine doit être
trer la machine, ceux-ci se
détartrée
trouvent dans ce manuel d’uti-
lisation
17Garantie UK & UE
Cet appareil est couvert par une garantie de 24 mois à compter de la date d’achat.
Le reçu ou le numéro de commande est nécessaire comme preuve de paiement
donc il est essentiel de les garder en lieu sûr. La garantie ne s’applique que si
l’appareil est utilisé pour les fins prévue et si toutes les instructions ont été
respectées. Cet appareil n’est pas conçu pour une utilisation commerciale.
Une utilisation abusive va invalider la garantie. On ne peut accepter les
marchandises retournées que s’ils ont été emballés correctement dans l’emballage
d’origine avec le reçu/numéro de commande. Ceci n’affecte pas les droits
statutaires.
Les marchandises retournées devraient être nettoyées et retournées dans un état
aussi proche que possible de l'état d'origine.
En cas de défaillance au cours des 12 premiers mois de la garantie fixée, nous
payerons tous les frais d’envoie pour le retour. Après 12 mois le consommateur
sera contraint de payer le retour de ce produit. Nous à notre tour nous payerons
pour tous les frais de réparation et les frais de retour au consommateur.
Si le client souhaite retourner un produit pour un remboursement total, on a le
droit de le faire sous une période de 7 jours. Veuillez visiter notre site
www.andrewjamesworldwide.com pour voir notre politique de retour.
Les consommateurs sont responsable pour payer toutes taxes qui s’appliqueront
sur nos produits lorsqu’ils sont expédier hors l’UE.
TVA est appliqué sur tous nos prix.
Une fois que un produit nous a été retourné nous avons pour objectif de le réparer
ou de le remplacer sous une période 30 jours après avoir reçu le produit.
La garantie ne couvre aucun défaut causé par l’utilisation abusive, les dommages,
l’accumulation de calcaire, ou les réparations par un tiers. En outre l’usure normale
n’est pas couverte par la garantie.
18Mise au rebut du produit
Déchets d'Équipements Électriques et Électroniques (DEEE) Déchet & Recyclage
Traitement des déchets électriques et électroniques
Déchets non ménagers. Ce produit ne doit pas être éliminé avec les ordures
ménagères normales.
La collecte séparée des produits usages, des batteries et des emballages permet la
récupération et le recyclage des matériaux. La réutilisation des matériaux aide à
prévenir la pollution de l’environnement et réduit la demande de matières
premières.
Les autorités locales, les détaillants et les organismes de collecte peuvent prévoir
une collecte séparée des produits électriques, des piles et des emballages.
Informations de contact
Adresse: 2 Lighthouse View, Spectrum Business Park, Seaham, Co. Durham, SR7
7PR, UK
Assistance Clientèle Tel: +441913778358
Email: customerservices@andrewjamesworldwide.com
Twitter : @AndrewJamesFr Facebook : Andrew James France
AJ001337| 01/2019
www.andrewjamesworldwide.com
19DE
Vielen Dank für Ihren Kauf. Wir hoffen, dass Sie mit Ihrem neuen Andrew James
Produkt zufrieden sind.
Um das Potenzial Ihres neuen Produkts zu maximieren, lesen Sie bitte das
Handbuch vollständig durch und bewahren Sie für zukünftige Referenz auf.
Sicherheitshinweise
Beim Benutzen von elektrischen Geräten sollten folgende
Sicherheitshinweise stets befolgt werden:
• Dieses Gerät ist geeignet für die Benutzung durch Kinder ab 8
Jahren sowie Personen mit physischen, sensorischen oder
mentalen Einschränkungen oder Unerfahrenheit im Umgang mit
elektrischen Geräten, solange Sie von einem erfahrenen
Verantwortlichen beaufsichtigt oder über den Gebrauch und
mögliche Gefahren aufgeklärt werden. Kinder dürfen nicht mit dem
Gerät spielen, halten Sie das Gerät von Kindern unter 8 Jahren fern.
• Stellen Sie stets sicher, dass die Voltkennzahl des Gerätes der
Voltzahl Ihres Haushaltes entspricht.
• Überprüfen sie das Stromkabel und den Stecker regelmäßig auf
Schäden. Ein beschädigtes Stromkabel muss ausschließlich vom
Hersteller oder einem qualifizierten Elektriker ausgetauscht
werden; kontaktieren Sie im Zweifelsfall den Kundenservice.
• Nutzen Sie das Gerät ausschließlich zu seinem vorgesehenen
Zweck. Dieses Gerät ist nur für den Haushaltsgebrauch bestimmt.
Industrieller oder kommerzieller Gebrauch lässt die Garantie
verfallen. Der Hersteller ist nicht verantwortlich für Schäden oder
Verletzungen, die durch unsachgemäßen Gebrauch entstehen.
• Benutzen Sie das Gerät nicht, wenn es beschädigt ist; kontaktieren
Sie den Kundenservice.
• Tauchen Sie den Motorteil, Stecker oder das Stromkabel niemals in
Wasser oder andere Flüssigkeiten.
20• Achten Sie darauf, dass das Kabel nicht vom Tisch bzw. der
Arbeitsfläche herunterhängt, um versehentliches Herunterziehen
und Stolpern zu vermeiden.
• Halten Sie das Kabel fern von heißen Oberflächen. Halten Sie das
Gerät fern von heißen Kochflächen, Brennern und beheizten Öfen.
• Wir empfehlen, keine Verlängerungskabel zu verwenden. Sollte die
Verwendung jedoch unvermeidbar sein, so muss das Kabel dieselbe
oder eine größere Wattzahl als das Gerät aufweisen, um
Überhitzen zu vermeiden. Verwenden Sie keine weiteren Geräte an
diesem Verlängerungskabel und stellen Sie sicher, dass das Kabel
nicht von Kindern heruntergezogen werden kann oder eine
Stolpergefahr darstellt.
• Verwenden Sie das Gerät ausschließlich auf einer glatten, ebenen
und stabilen Oberfläche.
• Stellen Sie sicher, dass ausreichend Platz um das Gerät vorhanden
ist, wenn Sie es benutzen.
• Trennen Sie das Gerät stets auf sichere Art und Weise von der
Stromversorgung, ziehen Sie nicht am Stromkabel, um den Stecker
aus der Steckdose zu entfernen.
• Benutzen Sie das Gerät niemals mit feuchten Händen.
Gerätespezifische Sicherheitshinweise
• Trennen Sie das Gerät vor der Reinigung, dem Anbringen von
Zubehör und vor Reparaturen stets von der Stromversorgung.
• Die Verwendung von unautorisiertem Zubehör wird nicht
empfohlen und kann zu Fehlfunktion des Gerätes und Verletzungen
führen.
• Nutzen Sie das Mahlwerk nur zum Mahlen von Kaffeebohnen,
niemals für andere Lebensmittel.
• Verwenden Sie das Gerät nicht, falls der Tank beschädigt ist.
Kontaktieren Sie unseren Kundenservice.
• Vermeiden Sie bei eingeschaltetem Gerät Kontakt mit den
Schneideklingen, da sie sehr scharf sind.
21Gerätekomponenten Illustration
Mahlgrad Mahlwerk-
Kaffeefilter abdeckung
Mahlbehälter
Trichter Wasserstands-
anzeige
Trichterhalter
Wassertank
Glaskanne
Trichter-
Drucktaste
Bedienfeld
Bedienfeld
22Vor der ersten Nutzung
• Vergewissern Sie sich, dass alle Teile und Zubehör unbeschädigt sind.
• Lassen Sie Wasser zur Reinigung durch die Maschine laufen. Füllen Sie hierzu den
Wassertank mit Wasser, verbinden Sie das Gerät mit der Stromversorgung und
folgen Sie der Anleitung im Abschnitt “Verwendung des Gerätes”.
• Wiederholen Sie den Prozess insgesamt mindestens zweimal, um sicherzustellen,
dass das Gerät gereinigt ist.
Verwendung des Gerätes
Öffnen Sie den Wassertankdeckel und gießen Sie die benötigte Menge Wasser in
den Tank. Wir empfehlen, die Glaskanne zum Abmessen der gewünschten Menge
zu benutzen. Die Füllmenge wird durch die Wasserstandsanzeige angezeigt. Bitte
beachten Sie, dass die gefilterte Menge an Kaffee etwas geringer ist, als die
eingefüllte Wassermenge. Geben Sie daher stets eine Tasse Wasser mehr als
benötigt in den Wassertank. Verwenden Sie für dieses Gerät nur lauwarmes
Wasser (Raumtemperatur).
Drücken Sie die Trichter-Drucktaste und drehen Sie den Trichterhalter nach links.
Setzen Sie den Trichter und den Kaffeefilter (8) in den Trichterhalter und drehen
Sie ihn nach rechts, bis er einrastet.
Nehmen Sie die Abdeckung des Mahlwerks ab und füllen Sie den Mahlbehälter
mit Kaffeebohnen (maximal 200g Kaffeebohnen). Setzen Sie die Abdeckung auf
den Mahlbehälter, so dass sie sicher befestigt ist.
Stecken Sie den Gerätestecker in die Steckdose. Das LCD Display leuchtet auf und
zeigt “12:00” an. Stellen Sie die aktuelle Uhrzeit mithilfe der Stunden- und
Minutentasten ein.
Wählen Sie die gewünschte Menge an Tassen mit der “Cup 2-12” Taste. Das
Display zeigt die gewählte Menge an Tassen zwischen 2-12 an. Drücken Sie die
“Cup” Taste, um die Menge um jeweils zwei Tassen zu erhöhen. Falls die Taste
nicht gedrückt wird, so wird automatisch eine Menge von 12 Tassen vorgewählt.
Drehen Sie den Mahlgrad-Drehschalter, um einzustellen, wie fein der Kaffee
gemahlen werden soll. Wir empfehlen einen mittleren Mahlgrad.
Drücken Sie die “Strength control” Taste, um die Brühstärke des Kaffees
vorzuwählen. Eine angezeigte Kaffebohne symbolisiert die schwächste
Einstellung, drei Kaffeebohnen die stärkste Einstellung.
Drücken Sie die “On/Off” Taste und warten Sie für drei Sekunden, der Kaffee wird
nun gemahlen. Für einen feinen Mahlvorgang, drehen Sie das Einstellrad auf die
kleinsten Punkte. Die größeren Punkte stehen für einen groben Mahlvorgang.
Warten Sie nach Ende des Mahlvorgangs drei Sekunden, der Brühvorgang wird
nun gestartet und das LCD Display zeigt “Brew” an.
Die “Brew” Anzeige erlischt nach Beendigung des Brühvorgangs. Der Kaffee wird
automatisch für zwei Stunden warmgehalten.
23Kaffee mit Kaffeepulver aufbrühen
Öffnen Sie den Deckel des Wassertanks und gießen Sie die gewünschte Menge
Wasser in den Tank. Wir empfehlen, die Glaskanne zum Abmessen der
gewünschten Menge zu benutzen. Die Füllmenge wird durch die
Wasserstandsanzeige angezeigt. Bitte beachten Sie, dass die gefilterte Menge an
Kaffee etwas geringer ist, als die eingefüllte Wassermenge. Geben Sie daher stets
eine Tasse Wasser mehr als benötigt in den Wassertank. Geben Sie nun das
Kaffeepulver mithilfe eines Messlöffels in den Kaffeefilter.
Drücken Sie die Trichter-Drucktaste und drehen Sie den Trichterhalter nach links.
Setzen Sie den Trichter und den Kaffeefilter in den Trichterhalter und drehen Sie
ihn nach rechts, bis er einrastet.
Stecken Sie den Gerätestecker in die Steckdose. Das LCD Display leuchtet auf und
zeigt “12:00” an. Stellen Sie die aktuelle Uhrzeit mithilfe der Stunden- und
Minutentasten ein.
Wählen Sie die gewünschte Menge an Tassen mit der “Cup 2-12” Taste. Das
Display zeigt die gewählte Menge an Tassen zwischen 2-12 an. Drücken Sie die
“Cup” Taste, um die Menge um jeweils zwei Tassen zu erhöhen. Falls die Taste
nicht gedrückt wird, so wird automatisch eine Menge von 12 Tassen vorgewählt.
Drücken Sie die “Grind Off” Taste, die Taste leuchtet blau auf. Das LCD Display
zeigt nun “BREW” an und der Brühvorgang wird gestartet. Nach Beendigung des
Brühvorgangs wird der Kaffee automatisch für zwei Stunden warmgehalten.
Programmieren der Autostart-Funktion
1. Folgen Sie den Schritten 1-6 im Abschnitt “Verwendung des Gerätes”
2. Stellen Sie die aktuelle Uhrzeit ein und warten Sie, bis die Ziffern nicht mehr
blinken.
3. Drücken Sie die “Programme” Taste (18), um die gewünschte Startzeit zu
programmieren.
4. Drücken Sie nach Einstellen der Startzeit (die Ziffern blinken nicht mehr) erneut
die “Programme” Taste. Das Display zeigt nun “AUTO” an. Das Gerät befindet
sich im Autostart-Modus.
5. Der Brühvorgang startet zur gewählten Zeit. Dies wird durch Aufleuchten der
“On/Off” Taste angezeigt.
Hinweis: Zum Abbrechen der Autostart-Funktion drücken Sie die “Programme”
Taste erneut. Die “Program” Anzeige erlischt.
24Reinigung und Instandhaltung
• Lassen Sie zum Entkalken mindestens einmal im Monat Wasser und Entkalker
durch die Maschine laufen. Füllen Sie das Gemisch in den Wassertank (geben Sie
keine Kaffeebohnen in die Maschine) und folgen Sie der Anleitung unter
“Verwendung des Gerätes”.
• Verwenden Sie spezielle, für Kaffeemaschinen geeignete Entkalker in einem
Mischverhältnis von 1/4 mit Wasser und füllen Sie den Wassertank stets bis zur
maximalen Füllmenge auf. Verwenden Sie keinen Essig zur Entkalkung.
• Geben Sie keine Teile der Kaffeemaschine in die Spülmaschine.
• Reinigen Sie die Glaskanne mit Spülmittel und Wasser und spülen Sie sie
anschließend mit klarem Wasser aus.
• Stellen Sie bei Reinigung des Mahlwerkes stets sicher, dass das Gerät nicht mit
der Stromversorgung verbunden ist.
• Reinigen Sie die Geräteoberfläche und das Mahlwerk mit einem feuchten Tuch
und trocknen Sie sie gut ab.
• Tauchen Sie das Gerät nicht in Wasser oder andere Flüssigkeiten.
25Fehlerbehebung
Problem Ursache Lösung
Nicht eingesteckt Netzstecker einstecken
Kein Symbol erscheint
Kein Stromanschluss Sicherung/ Netzsteckdose prüfen
in der Anzeige
Defekte Anzeige Unser Kundendienst kontaktieren
Zu viele Geräte an der
Sicherung im gleichen Steckdose Weniger Geräte einstecken
Sicherungskasten angeschlossen
durchgebrannt
Kein Fehler feststellbar Unser Kundendienst kontaktieren
Wasser fließt aus das Zu viel Wasser im
Den Wassertank nicht überfüllen
Gerät heraus Wassertank
Der Kaffee fließt sehr Anti-Tropf Ventil blockiert Reinigen Sie das Anti-Tropf Ventil
langsam in die
Glaskanne ein Gerät ist verkalkt Das Gerät entkalken
Das Kaffee fließt nicht Der Deckel zum Glaskanne
Den Deckel ersetzen
in die Glaskanne ein ist nicht richtig montiert
Starke
Beschlagsbildung
Gerät stark verkalkt Das Gerät mehrmals entkalken
während der
Kaffeezubereitung
Der Mahlgrad ist zu fein.
Dies bedeutet, dass das
Wasser sehr langsam
Wählen Sie einen gröberen
Kaffeefilter überlauft durchfließt und im Filter zu
Mahlgrad und/oder die
während der einem Rückstau kommt. Dies
Tassenzahl reduzieren, um das
Zubereitung 12 wird verschlimmert durch
Kaffeebohnen– und
Tassen Kaffee das maximale Volumen
Wasservolumen zu reduzieren
Kaffeebohnen, das für 12
Tassen nötig ist und das
maximale Wasservolumen
Stellen Sie sicher, dass Sie Wasser
Die Kaffeemaschine Das Wasser im Wassertank mit Raumtemperatur verwenden
brüht nicht die könnte zu kalt sein
Folgen Sie die Hinweise für
gewünschte Anzahl Die Maschine benötigt Entkalkung Ihrer Maschine, diese
Tassen eventuell eine Entkalkung sind in dieser Gebrauchsanleitun
zu finden
26UK und EU Garantie
Ihr neues Andrew James Produkt besitzt eine Garantie von 24 Monaten, beginnend
ab Kaufdatum. Ihre Quittung oder Ordernummer gilt als Kaufnachweis, bewahren
Sie sie daher sicher auf. Diese Garantie ist nur gültig, solange das Produkt
bestimmungsgemäß gebraucht und die Bedienungsanleitung befolgt wurde. Bitte
beachten Sie, dass dieses Produkt nur zum Privatgebrauch bestimmt ist und nicht für
kommerzielle Zwecke genutzt werden darf.
Unsachgemäßer Gebrauch führt zum Verfall der Garantie. Zurückgeschickte Ware
kann nur sorgfältig verpackt im Originalkarton und mit original Quittung oder
Ordernummer akzeptiert werden. Dies hat keine Auswirkung auf Ihre gesetzlichen
Rechte.
Produkte müssen gereinigt und soweit wie möglich im original Lieferzustand
zurückgeschickt werden.
Sollte das Produkt innerhalb der ersten 12 Monate nach Kauf Defekte entwickeln, so
werden Rücksendungskosten von Andrew James abgedeckt. Nach 12 Monaten sind
Rücksendungskosten vom Kunden zu tragen, die Reparaturkosten und Rücksendung
zum Kunden werden von Andrew James abgedeckt.
Die Ware kann innerhalb von 7 Tagen nach Kaufdatum für eine Erstattung des
Kaufbetrages zurückgesendet werden. Weitere Details unserer Returns Policy finden
Sie unter: www.andrewjamesworldwide.com
Der Kunde ist verantwortlich für etwaige Steuern oder Gebühren, die bei Versand
außerhalb der EU anfallen.
Alle Preise sind inklusive Mehrwertsteuer.
Andrew James strebt an, zurückgeschickte Ware innerhalb von 30 Tagen nach Erhalt
zu ersetzen oder zu reparieren.
Die Garantie deckt folgendes nicht ab: Schäden, die durch unsachgemäßen
Gebrauch enstehen, Beschädigungen, Verkalkungen oder unautorisierte
Reparaturversuche. Normaler Gebrauchsverschleiß wird ebenfalls nicht von der
Garantie abgedeckt.
27Entsorgung des Gerätes
Elektro- und Elektronik-Altgeräte (WEEE) Abfall und Recycling (Elektro- und
Elektronikgeräte-Gesetz (ElektroG)
Entsorgung von Elektro- und Elektronikschrott
Nichthausmüll. Dieses Produkt darf nicht zusammen mit dem normalen Hausmüll
entsorgt werden.
Die getrennte Sammlung von gebrauchten Produkten, Batterien und Verpackungen
ermöglicht die Rückgewinnung und das Recycling von Materialien trägt dazu bei,
Umweltbelastungen zu vermeiden und die Nachfrage nach Rohstoffen zu
reduzieren.
Lokale Behörden, Einzelhändler und Sammlungsorganisationen können eine
getrennte Sammlung von elektrischen Produkten, Batterien und Verpackungen
vorsehen.
Kontakt Informationen
Adresse: 2 Lighthouse View, Spectrum Business Park, Seaham, Co. Durham, SR7
7PR, UK
Kundenservice: 0044 191 377 8358
Email: customerservices@andrewjamesworldwide.com
Twitter: @AndrewJamesDe Facebook: Andrew James Germany
Copyright Andrew James
AJ001337 | 01/2019
www.andrewjamesworldwide.com
28You can also read