PRIVILEGED IDENTITY 7.1 UPGRADE GUIDE - BEYONDTRUST
←
→
Page content transcription
If your browser does not render page correctly, please read the page content below

Privileged Identity 7.1
                                                          Upgrade Guide

©2003-2021 BeyondTrust Corporation. All Rights Reserved. Other trademarks identified on this page are owned by their respective owners. BeyondTrust is not a chartered bank or trust company, or   TC:6/21/2021
depository institution. It is not authorized to accept deposits or trust accounts and is not licensed or regulated by any state or federal banking authority.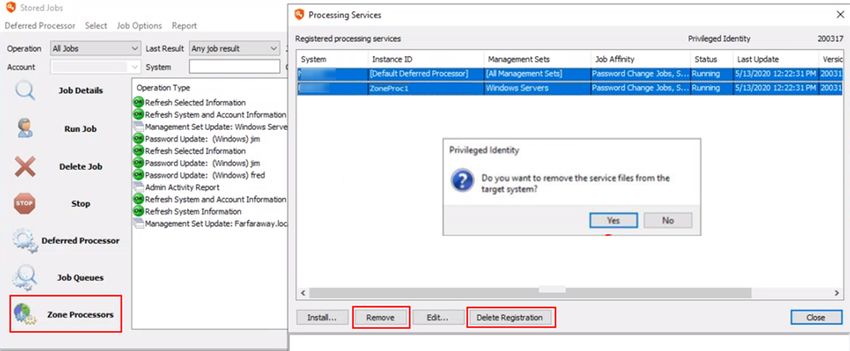
PRIVILEGED IDENTITY 7.1
                                                                                                                                                                                           UPGRADE GUIDE

                                 Table of Contents

                                      Upgrade Privileged Identity                                                                                                                  3
                                      Upgrade Roadmap                                                                                                                              4
                                          Preparation                                                                                                                              4

                                          Remove Existing Privileged Identity Components                                                                                           5
                                          Upgrade Privileged Identity Components                                                                                                   5
                                      Prepare for Upgrade                                                                                                                          8
                                          Document an Inventory of Your Existing Privileged Identity Environment                                                                   9
                                          Download the Privileged Identity Installer                                                                                             10
                                          Review Prerequisites and Install Required Software                                                                                     11
                                          Back Up Privileged Identity Data Store, Components, and Servers                                                                        13
                                          Perform Database Maintenance and Delete Stored Procedures and Views                                                                    15
                                      Remove Existing Privileged Identity Components                                                                                             17
                                          Remove Deferred Processors and Zone Processors                                                                                         18
                                          Remove All Web Application Instances and Web Services                                                                                  20
                                      Upgrade the Privileged Identity Components                                                                                                 22
                                          Upgrade the Management Console                                                                                                         23
                                          Upgrade the Web Application Instance                                                                                                   27
                                          Upgrade the Web Service                                                                                                                29
                                          Upgrade Scheduling Services                                                                                                            36

                                          Upgrade PowerShell                                                                                                                     39
                                          Upgrade Application Launcher and Session Recording Software                                                                            40
                                      Post Installation or Upgrade Steps                                                                                                         41
                                          CORS Support                                                                                                                           41
                                          SSL                                                                                                                                    42
                                          User Certificates                                                                                                                      42
                                          URL Redirects                                                                                                                          43
                                          Integrated Windows Authentication                                                                                                      43

SALES: www.beyondtrust.com/contact             SUPPORT: www.beyondtrust.com/support                 DOCUMENTATION: www.beyondtrust.com/docs                                                                   2
©2003-2021 BeyondTrust Corporation. All Rights Reserved. Other trademarks identified on this page are owned by their respective owners. BeyondTrust is not a chartered bank or trust company, or   TC: 6/21/2021
depository institution. It is not authorized to accept deposits or trust accounts and is not licensed or regulated by any state or federal banking authority.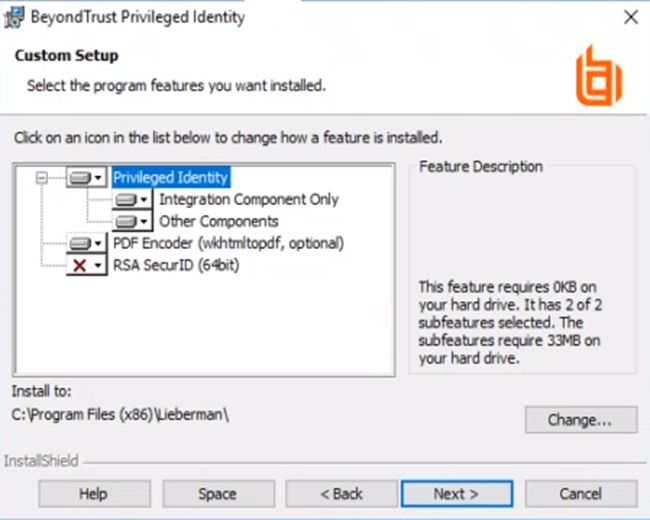
PRIVILEGED IDENTITY 7.1
                                                                                                                                                                                           UPGRADE GUIDE

      Upgrade Privileged Identity
      This guide describes how to upgrade Privileged Identity (PI) from a previous installation.

                   Note: For versions prior to 5.5.3.0, you must upgrade to version 5.5.3.0 before upgrading to the latest version. For version
                   5.5.3.0 and later, upgrade directly to the latest version.

                   For details on each release of Privileged Identity, please see the Privileged Identity Release Notes at
                   https://www.beyondtrust.com/docs/release-notes/privileged-identity/index.htm.

      Upgrade Preparation and Prerequisites

             l   Prior to upgrading, be sure to back up the program's database. During the upgrade, structures within the database are updated
                 and may not be compatible with older versions of the product.
             l   If the program database is running on SQL Server 2005 or older, the database will need to be re-hosted on SQL Server 2012 or
                 newer version prior to upgrading.
             l   If upgrading from version 4.83.4 or older and you are running the solution on a Windows 2003 Server, you must migrate the
                 installation to a Windows Server 2012 or later operating system. Privileged Identity is not supported on any version of Windows
                 Server prior to Windows Server 2012.
             l   Versions of the product prior to version 4.83.4 did not use ASP.NET. The ASP.NET IIS role must be installed and enabled prior to
                 upgrading to this version.
             l   Starting with version 5.5.2 of the product, Microsoft .NET Framework version 4.5.2 is a requirement for the web service, CLR
                 interop (Extension framework), SAML/DUO and some of the propagation types.
             l   Starting with version 5.5.2 of the product, the web service is a requirement for the web application to function. This also adds new
                 requirements to the host servers.

                   For more information on prerequisites prior to upgrading, please see Privileged Identity Installation Prerequisites at
                   https://www.beyondtrust.com/docs/privileged-identity/install/prerequisites/index.htm.

SALES: www.beyondtrust.com/contact             SUPPORT: www.beyondtrust.com/support                 DOCUMENTATION: www.beyondtrust.com/docs                                                                   3
©2003-2021 BeyondTrust Corporation. All Rights Reserved. Other trademarks identified on this page are owned by their respective owners. BeyondTrust is not a chartered bank or trust company, or   TC: 6/21/2021
depository institution. It is not authorized to accept deposits or trust accounts and is not licensed or regulated by any state or federal banking authority.
PRIVILEGED IDENTITY 7.1
                                                                                                                                                                                           UPGRADE GUIDE

      Upgrade Roadmap
      The following provides a roadmap for the steps necessary to upgrade Privileged Identity.

      Preparation

      Document an Inventory of Your Existing Privileged Identity Environment
      You will need a complete inventory of every server that is running one or more PI components during the upgrade process. Documenting
      every piece of your PI environment is crucial.

                   For more information, please see "Document an Inventory of Your Existing Privileged Identity Environment" on page 9.

      Download the Privileged Identity Installer
      Log into the BeyondTrust Customer Portal to download the Privileged Identity installer file.

                   For more information, please see "Download the Privileged Identity Installer" on page 10.

      Review Prerequisites and Install Required Software
      Understand the product requirements prior to installation by reviewing the release notes, prerequisites, host system requirements,
      database requirements, and service account requirements.
      Also, run the Prerequisites Checker on each PI component server and resolve any noted deficiencies.

                   For more information, please see "Review Prerequisites and Install Required Software" on page 11.

      Back Up Privileged Identity Data Store, Components, and Servers
      If there are any difficulties during or after upgrade and a rollback is required, the upgraded database may prevent previous functionality
      from working. The database and encryption key are required for disaster recovery purposes. The encryption key is the only way to recover
      PI data if PI itself is not available.

      The license key and recovery access password should be backed up in case you need to perform a fresh install of PI. Store the license
      key and recovery access password in a location outside of your PI environment (for example, external media or a server not used to host
      any PI components).
      Create and test backups of the servers that host one or more PI components in your environment.

                   For more information, please see "Back Up Privileged Identity Data Store, Components, and Servers " on page 13.

SALES: www.beyondtrust.com/contact             SUPPORT: www.beyondtrust.com/support                 DOCUMENTATION: www.beyondtrust.com/docs                                                                   4
©2003-2021 BeyondTrust Corporation. All Rights Reserved. Other trademarks identified on this page are owned by their respective owners. BeyondTrust is not a chartered bank or trust company, or   TC: 6/21/2021
depository institution. It is not authorized to accept deposits or trust accounts and is not licensed or regulated by any state or federal banking authority.
PRIVILEGED IDENTITY 7.1
                                                                                                                                                                                           UPGRADE GUIDE

      Perform Database Maintenance and Delete Stored Procedures and Views
      This step is optional; however, it is highly recommended. Perform SQL Server database maintenance, including SQL Server Index
      Defragmentation, SQL Server Index Tuning, and Privileged Identity App Data Store Maintenance in accordance with your organization’s
      data retention policies. Also run a query to remove stored procedures and views and remove the version tracking from the database.

                   For more information, please see "Perform Database Maintenance and Delete Stored Procedures and Views" on page 15.

      Remove Existing Privileged Identity Components

      Remove All Deferred Processors and Zone Processors
      Use the PI management console or Windows Services snap-in to stop and remove all of the deferred and zone processing services. This
      ensures that jobs will not be processed during the database upgrade and helps prevent any data loss or corruption.

                   Note: In product versions 5.5.2 and earlier, the Deferred Processing Service was called Enterprise Random Password
                   Manager Deferred Processing Service.

                   For more information, please see "Remove Deferred Processors and Zone Processors" on page 18.

      Remove All Web Application Instances and Web Services
      If upgrading from version 5.5.2 or earlier, the web site registration and naming process follows a different process than 5.5.2.1 or later.
      Failure to remove existing web sites will cause multiple registrations with different names to appear in the web site registration dialog and
      can cause your security and other settings not to take effect.

                   For more information, please see "Remove All Web Application Instances and Web Services" on page 20.

      Upgrade Privileged Identity Components

      Upgrade the Management Console
      The primary management console is the administrative component where most settings for Privileged Identity are configured. If you have
      multiple management consoles, upgrade your primary licensed management console first. Launch that console, and then upgrade any
      other secondary management consoles.

                     IMPORTANT!

         All Privileged Identity management consoles must be closed prior to running the upgrade installer.

SALES: www.beyondtrust.com/contact             SUPPORT: www.beyondtrust.com/support                 DOCUMENTATION: www.beyondtrust.com/docs                                                                   5
©2003-2021 BeyondTrust Corporation. All Rights Reserved. Other trademarks identified on this page are owned by their respective owners. BeyondTrust is not a chartered bank or trust company, or   TC: 6/21/2021
depository institution. It is not authorized to accept deposits or trust accounts and is not licensed or regulated by any state or federal banking authority.
PRIVILEGED IDENTITY 7.1
                                                                                                                                                                                           UPGRADE GUIDE

                   For more information, please see "Upgrade the Management Console" on page 23.

      Upgrade the Web Application Instance
      The web application is used by consumers and auditors. Consumers will retrieve secured passwords or establish sessions through a
      delegated and audited process. Auditors will be able to generate reports and audit settings.

                   For more information, please see "Upgrade the Web Application Instance" on page 27.

      Upgrade the Web Service
      The web service provides API-based functionality via a SOAP or REST-based URI and is required by the web application, PowerShell,
      federated logins (SAML/OAUTH), and application launcher modules. The web service is deployed from a separate installer or can be
      pushed from the management console with version 5.5.2.1 or later of the product.

                   For more information, please see "Upgrade the Web Service" on page 29.

      Upgrade Scheduling Services
      Upgrade the Deferred Processing Services as well as Zone Processors.

                   For more information, please see "Upgrade Scheduling Services" on page 36.

      Install One or More Zone Processors
      This step is optional. A zone processor is a remotely deployed scheduling service designated to perform specific jobs against a specific list
      of systems and devices (management set). Conversely, the default deferred processor is installed with the management console and will
      handle any configured jobs against any and all lists of systems. Zone processors are typically used in demilitarized zones (DMZs) or
      distributed networks where normal communication may not be allowed. Zone processors are also used to improve the job processing
      throughput of the entire solution. Zone processors may also require secondary installations of integration components and the cross-
      platform support library.

                   For more information, please see Deploy Zone Processors at https://www.beyondtrust.com/docs/privileged-
                   identity/deployment/deploy-zone-processors.htm.

      Upgrade the PowerShell Cmdlets
      PowerShell cmdlets extend the management of Privileged Identity to a command line scripting environment.

                   For more information, please see "Upgrade PowerShell" on page 39.

SALES: www.beyondtrust.com/contact             SUPPORT: www.beyondtrust.com/support                 DOCUMENTATION: www.beyondtrust.com/docs                                                                   6
©2003-2021 BeyondTrust Corporation. All Rights Reserved. Other trademarks identified on this page are owned by their respective owners. BeyondTrust is not a chartered bank or trust company, or   TC: 6/21/2021
depository institution. It is not authorized to accept deposits or trust accounts and is not licensed or regulated by any state or federal banking authority.
PRIVILEGED IDENTITY 7.1
                                                                                                                                                                                           UPGRADE GUIDE

      Upgrade Application Launching and Session Recording Components
      Application launching allows users to enter a privileged session without gaining access to the underlying credentials (password, key, etc.)
      using a secured host where session recording may also be enabled for the session.

                   For more information, please see "Upgrade Application Launcher and Session Recording Software" on page 40.

      Install the Syslog Forwarder Service
      This service is listed for syslog UDP traffic and retransmits it using SSL or TCP for greater security and reliability when forwarding events
      to loggers and SIEM products.

                   For more information, please see Using the Syslog Forwarder to Forward Syslog & MSMQ in the Privileged Identity Admin
                   Guide at https://www.beyondtrust.com/docs/privileged-identity/documents/pi-admin.pdf.

SALES: www.beyondtrust.com/contact             SUPPORT: www.beyondtrust.com/support                 DOCUMENTATION: www.beyondtrust.com/docs                                                                   7
©2003-2021 BeyondTrust Corporation. All Rights Reserved. Other trademarks identified on this page are owned by their respective owners. BeyondTrust is not a chartered bank or trust company, or   TC: 6/21/2021
depository institution. It is not authorized to accept deposits or trust accounts and is not licensed or regulated by any state or federal banking authority.
PRIVILEGED IDENTITY 7.1
                                                                                                                                                                                           UPGRADE GUIDE

      Prepare for Upgrade
      This section covers the following preparation steps required before upgrading your PI installation.

            1. Document a system inventory of your existing Privileged Identity environment.
            2. Download the Privileged Identity installer from the BeyondTrust Customer Portal.
            3. Review product release notes, prerequisites, and requirements for all Privileged Identity component servers.
            4. Run the Privileged Identity Prerequisites Checker on all component servers, and make updates where necessary.
            5. Backup the Privileged Identity data store, encryption key, license key, and the recovery access password.
            6. Perform maintenance on the data store and delete stored procedures and views.
            7. Back up servers and checkpoint virtual machines.

SALES: www.beyondtrust.com/contact             SUPPORT: www.beyondtrust.com/support                 DOCUMENTATION: www.beyondtrust.com/docs                                                                   8
©2003-2021 BeyondTrust Corporation. All Rights Reserved. Other trademarks identified on this page are owned by their respective owners. BeyondTrust is not a chartered bank or trust company, or   TC: 6/21/2021
depository institution. It is not authorized to accept deposits or trust accounts and is not licensed or regulated by any state or federal banking authority.
PRIVILEGED IDENTITY 7.1
                                                                                                                                                                                           UPGRADE GUIDE

      Document an Inventory of Your Existing Privileged Identity Environment
      You will need a complete inventory of every server that is running one or more PI components during the upgrade process. Documenting
      every piece of your PI environment is crucial.

                     IMPORTANT!

         If a component that you are unaware of is missed during the upgrade and allowed to connect to the upgraded Data Store, the result
         will be data corruption. In the worst case scenario you may lose some or all of your data (passwords, jobs, logs, etc.) and cause a
         production outage.

      Document system names, fully qualified domain names (FQDN), NetBIOS names, IP addresses, as well as which PI components or
      services that run on each system. For each zone processor, document its Job Types and Management Set Affinities. You will
      encounter fewer problems and make your upgrade more efficient if you have a complete understanding of your PI environment, including
      any other systems that PI may rely on, such as load balancers. Below is an example spreadsheet that documents a PI environment.

SALES: www.beyondtrust.com/contact             SUPPORT: www.beyondtrust.com/support                 DOCUMENTATION: www.beyondtrust.com/docs                                                                   9
©2003-2021 BeyondTrust Corporation. All Rights Reserved. Other trademarks identified on this page are owned by their respective owners. BeyondTrust is not a chartered bank or trust company, or   TC: 6/21/2021
depository institution. It is not authorized to accept deposits or trust accounts and is not licensed or regulated by any state or federal banking authority.
PRIVILEGED IDENTITY 7.1
                                                                                                                                                                                           UPGRADE GUIDE

      Download the Privileged Identity Installer
            1. Log into the BeyondTrust Customer Portal.
            2. Click Downloads.
            3. Under Categories, select File Downloads.
            4. Click the File Downloads link.
            5. From the Product list, select BeyondTrust Privileged Identity.
            6. From the Version list, select the most recent version.
            7. Click Submit.
            8. When the page refreshes, click the link in the automated response to download the installer. The file is named similar to this:
               PrivilegedIdentityInstaller_6.0.0.0_999999_9999_z9z99z9z99.exe.
            9. After the file downloads to the local Downloads folder, you can copy it to any folder on the server that hosts your primary
               management console.

SALES: www.beyondtrust.com/contact             SUPPORT: www.beyondtrust.com/support                 DOCUMENTATION: www.beyondtrust.com/docs                                                                  10
©2003-2021 BeyondTrust Corporation. All Rights Reserved. Other trademarks identified on this page are owned by their respective owners. BeyondTrust is not a chartered bank or trust company, or   TC: 6/21/2021
depository institution. It is not authorized to accept deposits or trust accounts and is not licensed or regulated by any state or federal banking authority.
PRIVILEGED IDENTITY 7.1
UPGRADE GUIDE
Review Prerequisites and Install Required Software
Understand the product requirements prior to installation by reviewing the following:
l Release notes for the release you are installing
l Privileged Identity Installation Prerequisites
l Host System Requirements
l Database Requirements
l Service Account Requirements
Run the Privileged Identity Prerequisites Checker on All Component Servers
Run the Prerequisites Checker on each PI component server and resolve any noted deficiencies, as follows:
1. Copy the PI Installer to each PI component server and perform the following steps on each PI component server.
2. Double-click the installer to extract it. When the extraction process is complete, the Privileged Identity Prerequisites Checker
displays.
3. Select the PI components that run on this server where you are
running the checker, and then click Next.
4. Compare each result to the requirement and resolve deficiencies
where necessary.
5. Click Cancel to close the checker and cancel the PI software
installation process.
SALES: www.beyondtrust.com/contact SUPPORT: www.beyondtrust.com/support DOCUMENTATION: www.beyondtrust.com/docs 11
©2003-2021 BeyondTrust Corporation. All Rights Reserved. Other trademarks identified on this page are owned by their respective owners. BeyondTrust is not a chartered bank or trust company, or TC: 6/21/2021
depository institution. It is not authorized to accept deposits or trust accounts and is not licensed or regulated by any state or federal banking authority.PRIVILEGED IDENTITY 7.1
UPGRADE GUIDE
Note: The Prerequisites Checker may not recognize the proper amount of RAM and number of CPU cores allocated to virtual
machines, in which case those warnings can be ignored.
Also, the Prerequisites Checker may display a warning if PI Identities (service accounts) do not have the dbcreator role on the
database. The dbcreator role is required only for new installations, so in the case of an upgrade, this warning can be ignored.
The optional ASP.NET Core IIS Module is required only if SAML/DUO authentication is used.
IMPORTANT!
If there are any remaining warnings or failures after running the Prerequisites Checker on every PI server, please stop your upgrade
and contact BeyondTrust Technical Support at support.beyondtrust.com for assistance.
SALES: www.beyondtrust.com/contact SUPPORT: www.beyondtrust.com/support DOCUMENTATION: www.beyondtrust.com/docs 12
©2003-2021 BeyondTrust Corporation. All Rights Reserved. Other trademarks identified on this page are owned by their respective owners. BeyondTrust is not a chartered bank or trust company, or TC: 6/21/2021
depository institution. It is not authorized to accept deposits or trust accounts and is not licensed or regulated by any state or federal banking authority.PRIVILEGED IDENTITY 7.1
UPGRADE GUIDE
Back Up Privileged Identity Data Store, Components, and Servers
Back Up the Data Store
Make a complete backup of the database(s) that contain your PI Data Store, following your database vendor’s documentation and your
organization’s backup procedure. Also, test your backup. Store the backup in a location outside of your PI environment. For example,
store it on external media or on a server not used to host any PI components.
Back Up the Encryption Key
The PI encryption key should not be needed for a successful upgrade; however, it should be backed up before making major changes,
because it is the only way to recover PI data if PI itself is not available.
1. In the PI management console, select Settings > Encryption
Settings.
2. Click Export Key to save a Windows registry edit file that contains
the key.
3. Store the backup key in a location outside of your PI environment.
For example, store it on external media or a server not used to host
any PI components.
Note: If using a hardware security module (HSM), be sure you
know the key store and PIN to access your HSM.
Back Up the License Key
The PI license key should not be needed for a successful upgrade; however, it should be backed up before making major changes,
because it is required to perform a fresh install of PI, if necessary.
1. In the PI management console, select Help > About.
SALES: www.beyondtrust.com/contact SUPPORT: www.beyondtrust.com/support DOCUMENTATION: www.beyondtrust.com/docs 13
©2003-2021 BeyondTrust Corporation. All Rights Reserved. Other trademarks identified on this page are owned by their respective owners. BeyondTrust is not a chartered bank or trust company, or TC: 6/21/2021
depository institution. It is not authorized to accept deposits or trust accounts and is not licensed or regulated by any state or federal banking authority.PRIVILEGED IDENTITY 7.1
UPGRADE GUIDE
2. Copy the System Name, which is the NetBIOS host name, and the
Serial Number, which is the license key.
3. Store the backup key in a location outside of your PI environment.
For example, store it on external media or a server not used to host
any PI components.
Back Up the Recovery Access Password
It allows you to view stored managed passwords in the management console. Your recovery access password is not stored in PI. To use
this password in break glass situations, you need to locate it from where you have it stored externally. Ensure you have the recovery
access password stored before upgrading your PI software.
Back Up Privileged Identity Servers and Checkpoint Virtual Machines
Create and test backups of the servers that host one or more Privileged Identity components in your PI environment. This includes, but is
not limited to:
l Primary and secondary management console servers
l Web service servers
l Web instance application servers
l All servers that host a zone processor
l All servers that host an additional deferred processor
l Load balancers, proxies, and other servers that do not host PI components but are required to access PI in your production
environment
SALES: www.beyondtrust.com/contact SUPPORT: www.beyondtrust.com/support DOCUMENTATION: www.beyondtrust.com/docs 14
©2003-2021 BeyondTrust Corporation. All Rights Reserved. Other trademarks identified on this page are owned by their respective owners. BeyondTrust is not a chartered bank or trust company, or TC: 6/21/2021
depository institution. It is not authorized to accept deposits or trust accounts and is not licensed or regulated by any state or federal banking authority.PRIVILEGED IDENTITY 7.1
UPGRADE GUIDE
Perform Database Maintenance and Delete Stored Procedures and Views
Perform SQL Server Database Maintenance
Performing maintenance on your PI Data Store is optional; however, it is
recommended. Perform SQL Server database maintenance, including SQL
Server Index Defragmentation and App Data Store Maintenance in
accordance with your organization’s data retention policies. These options
can be accessed from the Settings > Data Store Configuration menu in
the PI management console.
Delete Stored Procedures and Views
Run the following SQL Query against your PI database to ensure that stored procedures and views do not carry forward to your upgraded
database. The query removes stored procedures and views, and also removes the version tracking from the database. This triggers a
rewrite of the stored procedures the first time you launch your upgraded PI management console and it connects to the database.
DECLARE @procedureName varchar(500)
DECLARE cur CURSOR
FOR SELECT [name] FROM sys.objects WHERE type = 'p'
OPEN cur
FETCH NEXT FROM cur INTO @procedureName
WHILE @@fetch_status = 0
BEGIN
EXEC('DROP PROCEDURE ' + @procedureName)
FETCH NEXT FROM cur INTO @procedureName
END
CLOSE cur
DEALLOCATE cur
DECLARE @viewName varchar(500)
DECLARE cur CURSOR
FOR SELECT [name] FROM sys.objects WHERE type = 'v'
OPEN cur
FETCH NEXT FROM cur INTO @viewName
WHILE @@fetch_status = 0
BEGIN
EXEC('DROP VIEW ' + @viewName)
FETCH NEXT FROM cur INTO @viewName
SALES: www.beyondtrust.com/contact SUPPORT: www.beyondtrust.com/support DOCUMENTATION: www.beyondtrust.com/docs 15
©2003-2021 BeyondTrust Corporation. All Rights Reserved. Other trademarks identified on this page are owned by their respective owners. BeyondTrust is not a chartered bank or trust company, or TC: 6/21/2021
depository institution. It is not authorized to accept deposits or trust accounts and is not licensed or regulated by any state or federal banking authority.PRIVILEGED IDENTITY 7.1
UPGRADE GUIDE
END
CLOSE cur
DEALLOCATE cur
DELETE from tbl_RouletteDatabaseVersionInfo
To run the query:
1. In SQL Server Management Studio, right-click your PI database, and then select New Query from the menu.
2. Copy and paste the above query into the blank query window on the right.
3. Click Execute.
4. Close SQL Server Management Studio without saving the query.
SALES: www.beyondtrust.com/contact SUPPORT: www.beyondtrust.com/support DOCUMENTATION: www.beyondtrust.com/docs 16
©2003-2021 BeyondTrust Corporation. All Rights Reserved. Other trademarks identified on this page are owned by their respective owners. BeyondTrust is not a chartered bank or trust company, or TC: 6/21/2021
depository institution. It is not authorized to accept deposits or trust accounts and is not licensed or regulated by any state or federal banking authority.PRIVILEGED IDENTITY 7.1
UPGRADE GUIDE
Remove Existing Privileged Identity Components
Before installing a newer version of Privileged Identity, components of your existing installation must be removed. This section walks you
through removing the following PI components:
l Deferred Processor
l Zone Processors
l Web Application
l Web Service
SALES: www.beyondtrust.com/contact SUPPORT: www.beyondtrust.com/support DOCUMENTATION: www.beyondtrust.com/docs 17
©2003-2021 BeyondTrust Corporation. All Rights Reserved. Other trademarks identified on this page are owned by their respective owners. BeyondTrust is not a chartered bank or trust company, or TC: 6/21/2021
depository institution. It is not authorized to accept deposits or trust accounts and is not licensed or regulated by any state or federal banking authority.PRIVILEGED IDENTITY 7.1
UPGRADE GUIDE
Remove Deferred Processors and Zone Processors
Remove deferred processors and zone processors to ensure that jobs will not be processed during the database upgrade. This prevents
data corruption or loss of data. We recommend removing all processors as opposed to simply stopping them. System reboots are required
during the upgrade process which cause the processors to restart. Before removing the processors, ensure that jobs are not currently
running.
1. From the Actions pane in the management console, click Jobs, and then click Job Queues.
2. In the Job Queues dialog, select all items, and then click Get Job
Queue and Service Status.
3. Expand each service and check the status column for Currently
Running. The status should indicate No jobs are currently being
run by this processor.
4. If the status indicates a job is running, it is best to wait for the job to
finish or you may damage the job or cause other problems in your
network due to a partially complete job. Further, if a job is running,
also check the Queued Jobs column for each processor and note
how many jobs are in the queue to process. It is best to wait for the
jobs to finish or to take note of their Job IDs and disable them before
they are run so you may perform the upgrade.
Note: If a zone processor's job queue is not accessible from the
primary management console, you will need a secondary
management console in that zone processor's zone.
5. If the jobs list is empty or no jobs are currently running, close the
Job Queues dialog.
6. On every management console, from the Actions pane, click Jobs,
and then click Deferred Processor.
7. In the Deferred Processor dialogue, under the Deferred
Processor Controls, click Stop, then click Remove.
8. From the Actions pane, click Zone Processors.
9. In the Processing Services dialog, select each service one at a time, and then click Remove.
10. When prompted to remove the service files and service registry settings, click Yes for each prompt, and then click Delete
Registration.
Note: If there are any problems communicating with the services control manager on the remote systems, you should go to
each system, and then open the Services snap-in within Windows, locate RouletteSked${ZONE-NAME}, and stop the
service.
Also, if a remote zone processor was not deployed by the management console, you may not be able to remove it using the
management console. There is no way to tell in the console how a zone processor was deployed. If you are encountering
issues with removal, follow the steps below for removal by logging into the remote host system for that zone processor.
Remove Zone Processor Manually from Remote Host System
If the remote zone processor was not deployed by the management console, follow these steps:
SALES: www.beyondtrust.com/contact SUPPORT: www.beyondtrust.com/support DOCUMENTATION: www.beyondtrust.com/docs 18
©2003-2021 BeyondTrust Corporation. All Rights Reserved. Other trademarks identified on this page are owned by their respective owners. BeyondTrust is not a chartered bank or trust company, or TC: 6/21/2021
depository institution. It is not authorized to accept deposits or trust accounts and is not licensed or regulated by any state or federal banking authority.PRIVILEGED IDENTITY 7.1
UPGRADE GUIDE
1. Log into the host system for the remote zone processor.
2. Open Programs and Features.
3. Find the BeyondTrust Zone Processor installer and remove it.
4. From the Actions pane in the management console, click Jobs, and then click Zone Processors.
5. In the Processing Services dialog, select the zone processors in question one at at time, and then click Delete Registration.
IMPORTANT!
Failure to locate and permanently stop or remove ALL job processors may cause corruption in your PI Data Store and could result in
system-wide data loss and unrecoverable passwords after your Data Store has been upgraded.
SALES: www.beyondtrust.com/contact SUPPORT: www.beyondtrust.com/support DOCUMENTATION: www.beyondtrust.com/docs 19
©2003-2021 BeyondTrust Corporation. All Rights Reserved. Other trademarks identified on this page are owned by their respective owners. BeyondTrust is not a chartered bank or trust company, or TC: 6/21/2021
depository institution. It is not authorized to accept deposits or trust accounts and is not licensed or regulated by any state or federal banking authority.PRIVILEGED IDENTITY 7.1
UPGRADE GUIDE
Remove All Web Application Instances and Web Services
Remove Web Application Instances
1. On all servers hosting web components, open Services and stop the IIS Admin Service.
2. On all servers hosting web components, open Component Services and shut down the following applications:
l PWCWebComApp
l Lieberman ERPMWebService
l PWC Extenstion - Account Store (CLR)
l RSA SecureID
3. From the Actions pane, click Manage Web App.
4. In the Manage Web Application Instances window, right-click a
web application instance, and then select Make selected web
application settings the default. This stores the current web app
settings in the database, which saves time and reduces possible
upgrade errors when deploying the upgraded web app instances.
5. With web app settings now stored, select each web app instance one at a time, and then click Remove.
6. Click Yes when prompted with the Are you sure you want to remove these installations? message.
Remove Web Services
1. If the PI web service resides on the same server where your primary management console resides, take the following steps to
launch the web service install wizard. If the web service resides on remoter servers, go to step #2.
l Open the management console, and then click Manage Web App from the Action pane.
l In the Manage Web Application Instances dialog, click Install Web Service.
2. Copy the ERPMWebService.exe web service installation file for the currently installed PI version from your primary PI
management console server to each web service host server, and then double-click the file to start the web service install wizard.
3. Click Next on the Welcome screen.
4. Click Next on the Program Maintenance screen.
5. Click Remove on the Remove the Program screen.
6. If you see this information message during the removal process, this
indicates there is a component running in Component Services or in the
Application Pools in IIS Manager. Click OK. A system reboot will be
required.
7. Click Finish on the Installation Wizard Completed screen.
8. Repeat this process for all installations of the web service.
SALES: www.beyondtrust.com/contact SUPPORT: www.beyondtrust.com/support DOCUMENTATION: www.beyondtrust.com/docs 20
©2003-2021 BeyondTrust Corporation. All Rights Reserved. Other trademarks identified on this page are owned by their respective owners. BeyondTrust is not a chartered bank or trust company, or TC: 6/21/2021
depository institution. It is not authorized to accept deposits or trust accounts and is not licensed or regulated by any state or federal banking authority.PRIVILEGED IDENTITY 7.1
UPGRADE GUIDE
9. Close the primary management console.
SALES: www.beyondtrust.com/contact SUPPORT: www.beyondtrust.com/support DOCUMENTATION: www.beyondtrust.com/docs 21
©2003-2021 BeyondTrust Corporation. All Rights Reserved. Other trademarks identified on this page are owned by their respective owners. BeyondTrust is not a chartered bank or trust company, or TC: 6/21/2021
depository institution. It is not authorized to accept deposits or trust accounts and is not licensed or regulated by any state or federal banking authority.PRIVILEGED IDENTITY 7.1
UPGRADE GUIDE
Upgrade the Privileged Identity Components
In this section, we walk through installing the Privileged Identity software to upgrade the following components:
l Management Console
l Web Application Instance
l Web Service
l Scheduling Services
l PowerShell
l Application Launcher
SALES: www.beyondtrust.com/contact SUPPORT: www.beyondtrust.com/support DOCUMENTATION: www.beyondtrust.com/docs 22
©2003-2021 BeyondTrust Corporation. All Rights Reserved. Other trademarks identified on this page are owned by their respective owners. BeyondTrust is not a chartered bank or trust company, or TC: 6/21/2021
depository institution. It is not authorized to accept deposits or trust accounts and is not licensed or regulated by any state or federal banking authority.PRIVILEGED IDENTITY 7.1
UPGRADE GUIDE
Upgrade the Management Console
Performing an upgrade is very much like performing an initial installation except that all previous settings configured in the management
console are stored in the Data Store and will not need to be reconfigured.
After upgrading the management console and before performing any other steps, be sure to launch the management console at least
once. This step is required to upgrade the database.
If you have multiple management consoles, upgrade your primary licensed management console first. Launch that console, and then
upgrade any other secondary management consoles.
1. Launch the Privileged Identity installer.
2. Click Skip on the Prerequisites Checker.
3. On the Welcome screen, click Next.
4. Read the license agreement. If you agree, accept it, and then click
Next.
SALES: www.beyondtrust.com/contact SUPPORT: www.beyondtrust.com/support DOCUMENTATION: www.beyondtrust.com/docs 23
©2003-2021 BeyondTrust Corporation. All Rights Reserved. Other trademarks identified on this page are owned by their respective owners. BeyondTrust is not a chartered bank or trust company, or TC: 6/21/2021
depository institution. It is not authorized to accept deposits or trust accounts and is not licensed or regulated by any state or federal banking authority.PRIVILEGED IDENTITY 7.1
UPGRADE GUIDE
5. Verify the steps indicated on the Upgrade Check screen have been
taken before continuing with the upgrade, and then click Next.
6. Verify your User Name, Organization, and License are populated.
If not, re-enter any missing information. Click Next.
7. Select the features to install:
l BeyondTrustPrivileged Identity: (required) Installs the
Privileged Identity software.
l PDF Encoder: (recommended) Allows you to turn
compliance reports into PDF documents.
l RSA SecureID: If RSA multi-factor authentication is used
with Privileged Identity, select this option to install it.
Otherwise, leave this option unselected.
8. To change the installation location, click Change.
9. To make sure you don't exceed your available disk space, click
Space.
10. Click Next.
SALES: www.beyondtrust.com/contact SUPPORT: www.beyondtrust.com/support DOCUMENTATION: www.beyondtrust.com/docs 24
©2003-2021 BeyondTrust Corporation. All Rights Reserved. Other trademarks identified on this page are owned by their respective owners. BeyondTrust is not a chartered bank or trust company, or TC: 6/21/2021
depository institution. It is not authorized to accept deposits or trust accounts and is not licensed or regulated by any state or federal banking authority.PRIVILEGED IDENTITY 7.1
UPGRADE GUIDE
11. Choose the identity to run the CLR COM application. The default is
Network Service. The CLR COM Identity is used to provide
network and local system access for the solution to various cloud
services. Individual account stores (Azure, AWS, ESX, etc.) will be
configured with specific connection credentials when they are
enrolled. Options for the identity are:
l Interactive User: Use the same logon information as the
calling identity. This is an administrator-level account
because the calling identity will either be the admin running
the console or the deferred processor service account. This
option requires the least configuration but provides
significantly more privileges than is required.
l Network Service: (recommended) Use the network service
account. For this option you do not have to manage a
password or grant additional rights, although in some cloud
management cases, you may need to grant additional
permissions on the file system.
l Local Service: Use the local service account. For this option you do not have to manage a password or grant additional
rights, although in some cloud management cases, you may need to grant additional permissions on the file system. The
local service account has many more rights and privileges than the network service.
l This User: Use a specified username and password. This user could be a local account that is configured to never
authenticate to any other machine in the network (unlike network service or local service), but it does represent another
account to manage a credential for. In some cloud management cases, you may need to grant additional permission to it
on the file system. This account also needs Logon as a batch rights granted to it.
12. Click Next.
13. Click Install to begin the installation.
SALES: www.beyondtrust.com/contact SUPPORT: www.beyondtrust.com/support DOCUMENTATION: www.beyondtrust.com/docs 25
©2003-2021 BeyondTrust Corporation. All Rights Reserved. Other trademarks identified on this page are owned by their respective owners. BeyondTrust is not a chartered bank or trust company, or TC: 6/21/2021
depository institution. It is not authorized to accept deposits or trust accounts and is not licensed or regulated by any state or federal banking authority.PRIVILEGED IDENTITY 7.1
UPGRADE GUIDE
14. When you receive confirmation that the application has been
successfully installed, click Back to make any needed changes or
Finish to complete the installation.
15. Launch the primary management console to perform the database upgrade. After this step is complete, repeat steps 1-14 for all
other management consoles.
16. Continue the installation by upgrading the web application, then web service, and then the deferred and zone processors.
SALES: www.beyondtrust.com/contact SUPPORT: www.beyondtrust.com/support DOCUMENTATION: www.beyondtrust.com/docs 26
©2003-2021 BeyondTrust Corporation. All Rights Reserved. Other trademarks identified on this page are owned by their respective owners. BeyondTrust is not a chartered bank or trust company, or TC: 6/21/2021
depository institution. It is not authorized to accept deposits or trust accounts and is not licensed or regulated by any state or federal banking authority.PRIVILEGED IDENTITY 7.1
UPGRADE GUIDE
Upgrade the Web Application Instance
The Privileged Identity web application is the primary method for accessing stored credentials, whether managed or static, as well as
auditing access to those credentials. The web app also provides features such as the file store, the personal password store, privilege
escalation, and job management. In this section, we'll cover installation of the web app from the management console.
1. From the Actions pane, click Manage Web App.
2. On the Manage Web Application Instances dialog, click Install or
select Web App Instances > Install new instance from the menu.
3. On the Install Web Application dialog, select the target installation
system.
l Local system is the computer you're currently working on.
l If you choose Remote System, enter the remote system's
fully qualified domain name.
l Click Check System Compatibility. This checks that IIS
and the file system are accessible on the target system, and
that remote registry and Remote COM access are possible.
Resolve any access errors before continuing.
l You will receive prompt to specify connection credentials. To use the currently logged in user account, click No. To specify
a different account, click Yes, then enter the access credentials and click OK.
4. If the system compatibility check completes successfully, the Web Interface Files section is filled in automatically. If you need to
change any of this information, the following are the details:
l Install to target website: All root web sites on the target server are listed here. Choose the root web site to host the web
application.
l Web files destination path: This is where the web application files will be copied. The path is resolved from IIS on the
target server, which defaults to %inetpub%\wwwroot\PWCWeb.
5. Click Install.
6. You may receive a COM Account Confirmation warning. This appears if the COM account specified on the installation dialog is
different from the currently logged in user. The warning asks you to be sure that the account specified has data store access. If it
does not, the web app will fail to function until the access issue is resolved.
If you are sure about the account information, click Yes to continue. Alternatively, click No to change to a different account.
7. When the web application install is complete, a success prompt
appears. Click OK.
SALES: www.beyondtrust.com/contact SUPPORT: www.beyondtrust.com/support DOCUMENTATION: www.beyondtrust.com/docs 27
©2003-2021 BeyondTrust Corporation. All Rights Reserved. Other trademarks identified on this page are owned by their respective owners. BeyondTrust is not a chartered bank or trust company, or TC: 6/21/2021
depository institution. It is not authorized to accept deposits or trust accounts and is not licensed or regulated by any state or federal banking authority.PRIVILEGED IDENTITY 7.1
UPGRADE GUIDE
8. You are prompted to launch a browser to the web application. Click
No.
9. Click Close.
The Manage Web Application Instances dialog in the management console is populated with a list of all known web applications.
For additional steps and verifications, please see "Post Installation or Upgrade Steps" on page 41.
SALES: www.beyondtrust.com/contact SUPPORT: www.beyondtrust.com/support DOCUMENTATION: www.beyondtrust.com/docs 28
©2003-2021 BeyondTrust Corporation. All Rights Reserved. Other trademarks identified on this page are owned by their respective owners. BeyondTrust is not a chartered bank or trust company, or TC: 6/21/2021
depository institution. It is not authorized to accept deposits or trust accounts and is not licensed or regulated by any state or federal banking authority.PRIVILEGED IDENTITY 7.1
UPGRADE GUIDE
Upgrade the Web Service
Starting with Privileged Identity version 5.5.2, the web service is a requirement for the web application to function. In prior versions, the
web service was an optional component used only for PowerShell cmdlets, application launcher, session recording, and API access.
You must install the web service locally to its host; it cannot be pushed to a target system from the management console.
To install the web service on a separate host, copy the manual installer to the remote host and run it there. The manual installer is found in
the installation directory, typically C:\Program Files (x86)\Lieberman\Roulette\SupplementalInstallers\ERPMWebService.exe.
Follow the steps below to complete the install wizard.
To install the web service on the same machine as the management console:
1. From the Actions pane, click Manage Web App.
2. In the Manage Web Application Instances dialog, click Install
Web Service.
SALES: www.beyondtrust.com/contact SUPPORT: www.beyondtrust.com/support DOCUMENTATION: www.beyondtrust.com/docs 29
©2003-2021 BeyondTrust Corporation. All Rights Reserved. Other trademarks identified on this page are owned by their respective owners. BeyondTrust is not a chartered bank or trust company, or TC: 6/21/2021
depository institution. It is not authorized to accept deposits or trust accounts and is not licensed or regulated by any state or federal banking authority.PRIVILEGED IDENTITY 7.1
UPGRADE GUIDE
Follow the below steps to complete the install using the wizard:
1. On the welcome page, click Next.
2. On the COM+ Object Identity screen, choose an appropriate
identity and click Next. Valid identity options are:
l Network Service: Choose this option when using database
native authentication mode to connect to the database (for
example, SA).
l Interactive User: (not recommended) Choose this option
when you want the user calling the web service to pass their
authentication token to the database. This works when
using Integrated Windows Authentication but requires
considerably more security configurations in the program
data store.
l Specific User: (recommended, default) Choose this option
when using Integrated Windows Authentication to the
database or when you want to minimize rights granted to the
COM application. This is the most compatible option. Supply
the User name as DomainName\Username.
3. On the Web Installation Type screen, select the location in the
local IIS instance to install the web service to, and then click Next.
Valid options are:
l Virtual Directory: (recommended, default) This installs the
web service to a virtual directory called ERPMWebService,
located under the parent web site you'll select next. This is
the safest option to choose for both security and
configuration reasons.
l Site: Choose this option to install the web service to the root
web site. If there are multiple root web sites configured on
the host, you will be presented with a selection of root web
sites to choose from.
SALES: www.beyondtrust.com/contact SUPPORT: www.beyondtrust.com/support DOCUMENTATION: www.beyondtrust.com/docs 30
©2003-2021 BeyondTrust Corporation. All Rights Reserved. Other trademarks identified on this page are owned by their respective owners. BeyondTrust is not a chartered bank or trust company, or TC: 6/21/2021
depository institution. It is not authorized to accept deposits or trust accounts and is not licensed or regulated by any state or federal banking authority.PRIVILEGED IDENTITY 7.1
UPGRADE GUIDE
4. If you chose Virtual Directory on the Web Installation Type
screen, select a web site on Parent Site screen, and then click
Next.
5. If you chose Site on the Web Installation Type screen, configure
site options on the Web Site Configuration screen.
6. On the Authentication Type screen, select the authentication
method for connecting to the web service, and then click Next. Valid
methods include:
l Anonymous Auth with SSL: Choose this when SSL is
configured but Integrated Windows Authentication is not
used.
l Anonymous Auth without SSL: (not recommended)
Choose this when neither Integrated Windows
Authentication nor SSL are used. Application Launcher will
not work with this configuration.
l Integrated Auth with SSL: Choose this when SSL and
Integrated Windows Authentication are used.
l Integrated Auth without SSL: Choose this when
Integrated Windows Authentication is used but SSL is NOT
configured. Application Launcher will not work with this
configuration.
l SSL with User Certificates: Choose this when users must supply a user-based certificate (smart card, biometrics, etc.) to
authenticate to the web site and web service. This causes more overhead in the overall configuration and may cause
problems with some features.
SALES: www.beyondtrust.com/contact SUPPORT: www.beyondtrust.com/support DOCUMENTATION: www.beyondtrust.com/docs 31
©2003-2021 BeyondTrust Corporation. All Rights Reserved. Other trademarks identified on this page are owned by their respective owners. BeyondTrust is not a chartered bank or trust company, or TC: 6/21/2021
depository institution. It is not authorized to accept deposits or trust accounts and is not licensed or regulated by any state or federal banking authority.PRIVILEGED IDENTITY 7.1
UPGRADE GUIDE
7. On the Destination Folder screen, choose where to install the web
service, and then click Next. The default location is
%inetpub%\wwwroot\ERPMWebService, which automatically
grants all permissions required for proper hosting. Changing the
location may require additional configurations on the web server.
8. Click Install.
9. Click Finish to exit the install wizard. The web service page and
web service tester launches.
SALES: www.beyondtrust.com/contact SUPPORT: www.beyondtrust.com/support DOCUMENTATION: www.beyondtrust.com/docs 32
©2003-2021 BeyondTrust Corporation. All Rights Reserved. Other trademarks identified on this page are owned by their respective owners. BeyondTrust is not a chartered bank or trust company, or TC: 6/21/2021
depository institution. It is not authorized to accept deposits or trust accounts and is not licensed or regulated by any state or federal banking authority.PRIVILEGED IDENTITY 7.1
UPGRADE GUIDE
10. From the Web Service Tester, make note of the Web Service
REST URI, as it is required when configuring the web application. At
this point, the web service will be non-functional, as it also requires
settings. If the web service and web app are installed on the same
host, the web service requires no further configuration. Close the
Web Service Tester.
11. On the Manage Web Application Instances dialog, select the web
app, and then click Edit.
12. When prompted to confirm settings overwrite, click Yes.
13. On the App Options tab, find Web service URI for REST web
service endpoint at the lower right of the dialog. Paste in the web
service REST URI.
Note: If you have installed the web service on the same machine as the web app using the default settings, the web service
REST URI is virtually the same as the web app URL.
For example, let's say your server uses SSL on port 443 and your SSL certificate uses the fully qualified domain name of the
server (server.example.int). The web service adds onto that (/erpmwebservice/authservice.svc/REST), making the URI
https://server.example.int/erpmwebservice/authservice.svc/REST.
If you were behind a load balancer and the name of the load balanced cluster was securestore.example.com, the web
service URI would be https://securestore.example.com/erpmwebservice/authservice.svc/REST.
14. Click Test Connection to verify the settings.
15. Click OK. When prompted that the settings have updated, click OK again.
SALES: www.beyondtrust.com/contact SUPPORT: www.beyondtrust.com/support DOCUMENTATION: www.beyondtrust.com/docs 33
©2003-2021 BeyondTrust Corporation. All Rights Reserved. Other trademarks identified on this page are owned by their respective owners. BeyondTrust is not a chartered bank or trust company, or TC: 6/21/2021
depository institution. It is not authorized to accept deposits or trust accounts and is not licensed or regulated by any state or federal banking authority.PRIVILEGED IDENTITY 7.1
UPGRADE GUIDE
16. If the Privileged Identity web applications are behind a load balancer, the WebServiceConfig.json file located at
...\inetpub\wwwroot\PWCWeb\assets\ must specify the load balanced web service URI. For example:
{"WebServiceAddress":"https://FullyQualifiedWebServer/ERPMWebService/AuthService.svc/REST"}.
17. If you are load balancing the websites and using either SAML authentication or DUO MFA, you must install Microsoft .NET Core
Runtime - 3.1.1. as well as updating the appsettings.json files located at ...\inetpub\wwwroot\SAML and
...\inetpub\wwwroot\DUO with the load balanced web service URI.
IMPORTANT!
If you install to a virtual directory, the install process creates a virtual directory called ERPMWebService. This directory inherits the
authentication settings, SSL settings, and other settings from the parent web site. If the parent site is configured to use anonymous
authentication and the web service installer is configured to use Integrated Windows Authentication, the virtual directory is created
with faulty settings. To correct this, you must open IIS and reconfigure the authentication settings after install.
IMPORTANT!
If you install the web service on a machine that is NOT also hosting the web app, you must export the web app settings from the
management console and import them onto the web service host. Otherwise, the web service will fail to load. To export the settings
from the management console:
1. Click Manage Web App from the left action pane.
2. Select the desired web application instance from the list.
3. From the top tools menu, select Advanced > Export web app registry config. This exports a regedit file; save this locally.
4. You are prompted to generate the file for 64-bit Windows. Click Yes.
5. Copy the registry export to the target web service host and double-click the file to import it.
These steps provide the web service with the necessary information to connect to the data store, the hardware security module, the
encryption key, and other settings. Any time these settings change on the web app host, you must repeat these steps.
IMPORTANT!
If the web service and web app have different host systems, and if the systems are accessed through different URLs (specifically the
protocol, server name, or port), your web browser will block access to the web service, causing processes to malfunction.
To resolve this, enable cross-origin resource sharing (CORS). After you install the web service, open web.config and set
EnableCORS to true.
Your specific browser may require additional configuration and may not work in all configurations. Please refer to your browser's
documentation for more information on enabling CORS support.
For more information, please see the following:
l "Web Service Host Requirements" on page 1
l "Service Account Requirements" on page 1
SALES: www.beyondtrust.com/contact SUPPORT: www.beyondtrust.com/support DOCUMENTATION: www.beyondtrust.com/docs 34
©2003-2021 BeyondTrust Corporation. All Rights Reserved. Other trademarks identified on this page are owned by their respective owners. BeyondTrust is not a chartered bank or trust company, or TC: 6/21/2021
depository institution. It is not authorized to accept deposits or trust accounts and is not licensed or regulated by any state or federal banking authority.You can also read