Dell EMC Integrated Data Protection Appliance: Configuration Best Practices
←
→
Page content transcription
If your browser does not render page correctly, please read the page content below
Best Practices

 Dell EMC Integrated Data Protection Appliance:
 Configuration Best Practices
 Integrated Data Protection Appliance version 2.6

                                       Abstract
                                       This guide provides best practices for deploying and configuring the Dell EMC™
                                       Integrated Data Protection Appliance (IDPA) server.

                                       January 2021

H18637
Revisions
Revisions
Date Description
January 2021 Initial release for IDPA version 2.6
Acknowledgments
Author: Sandeep Rajagopal
The information in this publication is provided “as is.” Dell Inc. makes no representations or warranties of any kind with respect to the information in this
publication, and specifically disclaims implied warranties of merchantability or fitness for a particular purpose.
Use, copying, and distribution of any software described in this publication requires an applicable software license.
This document may contain certain words that are not consistent with Dell's current language guidelines. Dell plans to update the document over
subsequent future releases to revise these words accordingly.
This document may contain language from third party content that is not under Dell's control and is not consistent with Dell's current guidelines for Dell's
own content. When such third party content is updated by the relevant third parties, this document will be revised accordingly.
Copyright © 2021 Dell Inc. or its subsidiaries. All Rights Reserved. Dell Technologies, Dell, EMC, Dell EMC and other trademarks are trademarks of Dell
Inc. or its subsidiaries. Other trademarks may be trademarks of their respective owners. [2/4/2021] [Best Practices] [H18637]
2 Dell EMC Integrated Data Protection Appliance: Configuration Best Practices | H18637Table of contents
Table of contents
Revisions.............................................................................................................................................................................2
Acknowledgments ...............................................................................................................................................................2
Table of contents ................................................................................................................................................................3
Executive summary.............................................................................................................................................................5
Audience .............................................................................................................................................................................5
1 Introduction ...................................................................................................................................................................6
2 IDPA deployment preparation checklist .......................................................................................................................8
2.1 Install the Network Validation Tool .....................................................................................................................9
2.2 Default username and passwords on the IDPA .................................................................................................9
2.3 License activation .............................................................................................................................................10
2.3.1 In-product activation .........................................................................................................................................10
2.3.2 Manual activation ..............................................................................................................................................10
3 Network connectivity overview ...................................................................................................................................11
3.1 DP4400 .............................................................................................................................................................11
3.2 DP5800 .............................................................................................................................................................12
3.3 DP8300 and DP8800 ........................................................................................................................................13
4 Sizing overview...........................................................................................................................................................16
4.1 Scalability overview ..........................................................................................................................................16
5 Installation overview ...................................................................................................................................................17
5.1 Installing the IDPA preinstallation patch ...........................................................................................................17
5.1.1 Installing the IDPA preinstallation patch on the DataProtection-ACM..............................................................17
5.2 Connect to the ACM .........................................................................................................................................20
5.3 Network configuration wizard ...........................................................................................................................22
5.4 Install and deploy IDPA ....................................................................................................................................23
5.5 Troubleshooting ................................................................................................................................................27
5.5.1 Retry installation ...............................................................................................................................................27
5.5.2 Roll back Installation .........................................................................................................................................28
5.5.3 Accessing vCenter ............................................................................................................................................28
6 Use cases ...................................................................................................................................................................29
7 Upgrade IDPA software (DP4400) .............................................................................................................................31
7.1 Supported upgrade paths .................................................................................................................................31
7.2 Upgrade components .......................................................................................................................................31
7.3 Upgrade prerequisites ......................................................................................................................................32
7.4 Upgrade the appliance software .......................................................................................................................33
3 Dell EMC Integrated Data Protection Appliance: Configuration Best Practices | H18637Table of contents
7.5 Troubleshooting component software upgrades ..............................................................................................35
7.5.1 Retry upgrade process .....................................................................................................................................35
7.5.2 Avamar .............................................................................................................................................................35
7.5.3 vCenter .............................................................................................................................................................36
7.5.4 Upgrade log files ...............................................................................................................................................37
A Technical support and resources ...............................................................................................................................39
A.1 Document references for IDPA.........................................................................................................................39
A.2 IDPA training resources ....................................................................................................................................39
4 Dell EMC Integrated Data Protection Appliance: Configuration Best Practices | H18637Executive summary
Executive summary
This guide provides best practices for deploying and configuring the Dell EMC™ Integrated Data Protection
Appliance (IDPA) server.
As part of an effort to improve its product lines, Dell Technologies periodically releases revisions of its
software and hardware. Some functions that are described in this document might not be supported by all
versions of the software or hardware that are currently in use. The product release notes provide the most up-
to-date information about product features.
Contact a technical support professional for assistance with product functionality.
Audience
This document is intended for experienced system administrators or the Dell Technologies™ Professional
Services (PS) team to deploy and configure the IDPA server.
5 Dell EMC Integrated Data Protection Appliance: Configuration Best Practices | H18637Introduction
1 Introduction
The Dell EMC Integrated Data Protection Appliance (IDPA) is an all-in-one backup appliance. It reduces the
complexity of managing multiple data silos, point solutions, and vendor relationships by simplifying
deployment and management. The IDPA delivers powerful, enterprise-grade data protection capabilities for
small, midsize, and enterprise organizations at a low cost to protect.
The IDPA provides a solution for data protection administrators who are challenged by having to manage
independent and disconnected applications to configure and manage data protection and storage devices.
IDPA System Manager enables administrators to efficiently manage the IDPA components from a single user
interface—including monitoring, reporting, analytics, and search—to simplify the data protection experience.
The IDPA provides easy configuration and integration of data protection components in a consolidated
solution and offers the following:
• Simplified deployment and configuration
• Backup administration
• Deduplication
• Native cloud disaster recovery (DR) and Long-Term Retention (LTR)
• Instant access and restore
• Monitoring and analytics
• Search
• Scalability
• Unified support
Dell EMC Integrated Data Protection Appliance
During manufacturing, each internal component in IDPA is assigned an IP address for internal connectivity
and communications. During deployment, the system administrator or Dell EMC Professional Service (PS)
members configure IDPA components and the Dell EMC switch to communicate on a public network in the
customer environment. This process requires configuring the management interface of each component with
a customer-supplied public IP address.
The configured IDPA includes the following virtual machines in a vSAN:
• One virtual VMware® vCenter® Server Appliance (vCSA)
• One Appliance Configuration Manager (ACM) server
• Three VMware ESXi™ hosts (IDPA DP5800, DP8300, and DP8900 models only)
• Dell EMC Avamar Virtual Edition (AVE): IDPA DP4400 and DP5800 models only.
• AV Proxy
• IDPA System Manager
6 Dell EMC Integrated Data Protection Appliance: Configuration Best Practices | H18637Introduction
• Search servers:
- Three servers for DP8300 and DP8800 models (two Index Data servers and one Index Master
server)
- One server for DP4400 and DP5800 models, which acts as both the Index Data server and Index
Master server
• Data Protection Advisor (DPA) servers:
- DPA Application Server
- DPA Data Collection Agent
- DPA Datastore Server
• Cloud Disaster Recovery (CDRA) (optional component)
The vSAN provides the following benefits:
• Redundancy
• Failover and high availability
• Load balancing with virtual machines moved between ESXi hosts automatically
7 Dell EMC Integrated Data Protection Appliance: Configuration Best Practices | H18637IDPA deployment preparation checklist
2 IDPA deployment preparation checklist
Before you begin the deployment, the system administrator or Dell EMC Professional Services (PS) member
must complete the following requirements.
Prechecklist
Status Deployment prerequisites
□ The completed pre-engagement questionnaire (PEQ) is copied.
When the IP addresses for the IDPA components are reserved, the IP addresses
□ to the hostnames in the DNS server are assigned. Ensure that the hostnames
that are assigned to the point products are in lower case and do not have
underscores (_) or @ characters, which would cause the configuration to fail.
During the appliance configuration, the DNS server settings are configured
properly. After you configure the hostname and domain name of the point
products, you cannot modify the settings. You can modify the DNS server IP
□ address on the point products after the appliance is configured. Ensure that the
new DNS server has the same hostname and domain names that are associated
with the corresponding point product IP addresses. For more information about
modifying the DNS server IP address, see the KB article Integrated Data
Protection Appliance: How to change DNS entries in a deployed IDPA (537628).
□ The Network Validation Tool (NVT) is installed. Ensure that the NVT runs
successfully without errors before you schedule the onsite visit of a PS engineer.
□ The required cables and SFP/QSFP are available according to the customer
uplink requirement.
The engineer is aware of the customer’s uplink-related configuration of the IDPA
□ and Dell EMC switch. You must provide the switch configuration file to the PS
engineer before the onsite visit.
□ All required licenses (Data Domain, Data Protection Advisor, and Avamar) are
present with the customer before the PS engineer visit.
□ Power requirements for the IDPA rack are in place.
The following cables are present:
• USB (male) to serial (male)
• RJ45 (male) to serial (female)
□ • (Optional) null modem or serial cable if you encounter a problem that requires a
serial connection to the Data Domain system
• CAT6 Ethernet cable
□ The Putty application is installed on the PS engineer’s laptop.
□ The WinSCP application is installed on the PS engineer’s laptop.
The required network and firewall ports for installing IDPA are open on the
□ customer network. For more information, see the network ports content in the
IDPA Security Configuration Guide.
8 Dell EMC Integrated Data Protection Appliance: Configuration Best Practices | H18637IDPA deployment preparation checklist
2.1 Install the Network Validation Tool
The Network Validation Tool (NVT) for IDPA runs automated tests to validate the network configuration. You
must run the NVT for IDPA from a system on the management network. Before you install IDPA, complete the
network configuration for the data center. After the network requirements are met for the appliance, you must
install and run the NVT to validate the network requirements and deployment of the IDPA in the data center.
To download the NVT, and for more information about NVT, see the IDPA support page.
2.2 Default username and passwords on the IDPA
Table 2 summarizes the default usernames and passwords that a remote PS engineer requires to log in to
and to configure the IDPA.
Default username and passwords on the IDPA
Components Username Passwords
VMware ESXi hosts root Idpa_1234
VCSA vsphere.local\Administrator root Idpa_1234
Network switch admin Idpa_1234
Initial ACM password root Idpa_1234
Data Domain system sysadmin Idpa_1234
iDRAC root Idpa_1234
Avamar/NDMP accelerator root changeme
Use English characters when changing any of the default passwords.
Ensure that the password meets the following criteria:
• Maximum of 20 characters
• Minimum of nine characters
• Must not start with a hyphen (-)
• Contains at least one uppercase and one lowercase letter
• Contains at least one number
• Must not include common names and usernames like root or admin
• Contains at least one special character, such as:
- period (.)
- hyphen (-)
- underscore (_)
9 Dell EMC Integrated Data Protection Appliance: Configuration Best Practices | H18637IDPA deployment preparation checklist
2.3 License activation
To use all the features of the IDPA server, you must have a license file before deployment of the IDPA server.
You can activate the IDPA server using in-product activation or manual activation.
2.3.1 In-product activation
The in-product license activation enables the ACM to automatically download the licenses for Protection
Storage, Backup Server, and Reporting and Analytics products from the ELMS server.
Note: Ensure that the appliance is connected to a network with a working Internet connection to automatically
download the licenses.
After you download the licenses, the License tab on the IDPA Configuration page is not displayed. If the
licenses are not downloaded successfully during the network configuration, the License tab is displayed on
the IDPA Configuration page with a Check online for licenses button. You can click Check online for
licenses to download the licenses from the ELMS server.
Note: If the system is unable to download the licenses automatically from the ELMS server, an error message
displays, and you must manually activate the licenses.
2.3.2 Manual activation
The manual license activation feature enables you to upload and activate the licenses that you have
downloaded from the ELMS server.
The following are the prerequisites:
• Ensure that you have the email with the License Authorization Code (LAC) letter that you received
during the order-fulfillment process.
• The LAC letter includes the license authorization code (for initial activations, this letter is the serial
number of the appliance) that is associated with your order. The letter also includes instructions for
downloading software binaries, and instructions for activating the entitlements online through Dell
EMC Software Licensing Central. For more information, see the Software Licensing Central
Activation, Entitlements, Rehost, and Regeneration Guide.
To manually activate the licenses on the IDPA configuration page, complete the following actions.
1. In the Welcome page, select the optional components that you must install in the configuration, and
click Next.
2. In the License page, complete the following steps for each section (Browse on the Protection
Storage, Backup Server, and Reporting and Analytics).
a. Click the license section. The Open dialog box is displayed.
b. Select the license for the respective product, and click Open.
The licenses are activated, and a green checkmark appears next to Browse.
10 Dell EMC Integrated Data Protection Appliance: Configuration Best Practices | H18637Network connectivity overview
3 Network connectivity overview
The following tables detail the IP addresses required by IDPA for various components. These addresses can
be assigned either as a range of addresses or as individual, noncontiguous addresses. Using a range is the
preferred method because it simplifies the assignment and reduces the chance for errors while you enter the
IP addresses. When you use a range of IP addresses during the IDPA configuration, the IP addresses are
assigned in a standard order.
The following tables are separated to provide model-specific information about the IP address that must be
allocated to a component. The first column in each table lists the value that you must add to the first IP
address in the range.
3.1 DP4400
The IDPA DP4400 has the following tables.
• Table 3: IP address range assignments
• Table 4: Management IP address range assignments with dedicated backup network
• Table 5: Backup IP address range assignments with dedicated backup network
IP address range assignments
IP range allocation Example Components Assigned field
+0 192.0.2.1 vCenter VMware vCenter Server VM
+1 192.0.2.2 Protection storage DDVE management IP
+2 192.0.2.3 Protection storage DDVE backup IP 1
+3 192.0.2.4 Protection storage DDVE backup IP 2
+4 192.0.2.5 Backup application Avamar Virtual Edition Server IP
+5 192.0.2.6 Backup application Avamar proxy VM
+6 192.0.2.7 IDPA System Manager IDPA System Manager VM
+7 192.0.2.8 Reporting and Analytics Application server host VM
(optional)
+8 192.0.2.9 Reporting and Analytics Datastore server host VM
(optional)
+9 192.0.2.10 Search (optional) Index Master node host VM
+10 192.0.2.11 DD Cloud DR CDRA CDRA
(optional)
Note: For more information about the network and firewall ports that are used in IDPA, see the section
“Network ports” in the Dell EMC PowerProtect DP Series Appliance Security Configuration Guide.
11 Dell EMC Integrated Data Protection Appliance: Configuration Best Practices | H18637Network connectivity overview
Management IP address range assignments with dedicated backup network
Management IP
Component Assigned field
range allocation
+0 vCenter VMware vCenter Server VM
+1 Protection storage Management IP
+2 Backup application Avamar Virtual Edition Server IP
+3 Backup application Avamar proxy VM
+4 IDPA System Manager IDPA System Manager VM
+5 Reporting and Analytics Application server host VM
+6 Reporting and Analytics Datastore server host VM
+7 Search Index Master node host VM
+8 DD Cloud DR CDRA (optional) CDRA virtual appliance
Backup IP address range assignments with dedicated backup network
Backup IP range
Component Assigned field
allocation
+0 Protection storage DDVE backup IP 1
+1 Protection storage DDVE backup IP 2
+2 Backup application Avamar proxy VM
3.2 DP5800
The IDPA DP5800 has the following tables:
• Table 6: IP address range assignment
• Table 7: Management IP address range assignments for with dedicated backup network
• Table 8: Backup IP address range assignments with dedicated backup network
IP address range assignment
IP range allocation Component Assigned field
+0 Data Domain Data Domain management IP
+1 Data Domain Data Domain backup IP 1
+2 Data Domain Data Domain backup IP 2
+3 Data Domain Data Domain backup IP 3
+4 Backup application Avamar Virtual Edition Server IP
+5 Backup application Avamar proxy IP
+6 IDPA System Manager IDPA System Manager
+7 DP Advisor (optional) Application server IP
12 Dell EMC Integrated Data Protection Appliance: Configuration Best Practices | H18637Network connectivity overview
IP range allocation Component Assigned field
+8 DP Advisor (optional) Datastore server IP
+9 DP Advisor (optional) Agent IP
+10 Search (optional) Index Master node
+11 DD Cloud DR CDRA CDRA virtual appliance
(optional)
Management IP address range assignments for with dedicated backup network
Management IP range
Component Assigned field
allocation
+0 Backup application Avamar Virtual Edition Server IP
+1 Backup application Avamar proxy IP
+2 IDPA System Manager IDPA System Manager
+3 DP Advisor Application server IP
+4 DP Advisor Datastore server IP
+5 DP Advisor Agent IP
+6 DD Cloud DR CDRA CDRA virtual appliance
(optional)
+7 Data Domain Data Domain management IP
+8 Search Index Master node
+9 vCenter VMware vCenter Server VM
Backup IP address range assignments with dedicated backup network
Backup IP range
Component Assigned field
allocation
+0 Data Domain Data Domain management IP
+1 Data Domain Data Domain backup IP 1
+2 Data Domain Data Domain backup IP 2
+3 Data Domain Data Domain backup IP 3
+6 Avamar Avamar proxy IP
3.3 DP8300 and DP8800
The IDPA DP8300 and DP8800 have the following tables:
• Table 9: IP address range assignments
• Table 10: Management IP address range assignments with dedicated backup network
• Table 11: Backup IP address range assignments with dedicated backup network
13 Dell EMC Integrated Data Protection Appliance: Configuration Best Practices | H18637Network connectivity overview
IP address range assignments
IP range allocation Component Assignment field
+0 Data Domain Data Domain management IP
+1 Data Domain Data Domain backup IP 1
+2 Data Domain Data Domain backup IP 2
+3 Data Domain Data Domain backup IP 3
+4 Data Domain Data Domain backup IP 4
+5 Data Domain Data Domain backup IP 5
+6 Data Domain Data Domain backup IP 6
(DP8800 Only)
+7 Backup application Avamar proxy IP
+8 IDPA System IDPA System Manager
Manager
+9 DP Advisor (optional) Application server IP
+10 DP Advisor (optional) Datastore server IP
+11 DP Advisor (optional) Agent IP
+12 Search (optional) Index Master node 1
+13 Search (optional) Index data node 1
+14 Search (optional) Index data node 2
+15 DD Cloud DR CDRA CDRA virtual appliance
(optional)
Management IP address range assignments with dedicated backup network
Management IP
Component Assigned field
range allocation
+0 Backup application Management IP
+1 IDPA System Manager IDPA System Manager
+2 Search Index Master node
+3 Search Index data node 1
+4 Search Index data node 2
+5 Search Index data node 3
+6 DP Advisor Application server IP
+7 DP Advisor Data server IP
+8 DP Advisor Agent IP
+9 DD Cloud DR CDRA CDRA virtual appliance
(optional)
14 Dell EMC Integrated Data Protection Appliance: Configuration Best Practices | H18637Network connectivity overview
Backup IP address range assignments with dedicated backup network
Backup IP range
Component Assigned field
allocation
+0 Data Domain Data Domain Management IP
+1 Data Domain Data Domain backup IP 1
+2 Data Domain Data Domain backup IP 2
+3 Data Domain Data Domain backup IP 3
+4 Data Domain Data Domain backup IP 4
+5 Data Domain Data Domain backup IP 5
+6 Avamar Avamar proxy IP
+7 IDPA System IDPA System Manager
Manager
The DP8300 and DP8800 have the following IP address requirements:
• DP8300: 13 IP addresses which include the following
- 1 management IP address
- 5 backup IP addresses
• DP8800: 14 IP addresses which include the following:
- 1 management IP address
- 6 backup IP addresses
Note: For more information about the network and firewall ports that are used in IDPA, see the section
“Network ports” in the IDPA Security Configuration Guide.
15 Dell EMC Integrated Data Protection Appliance: Configuration Best Practices | H18637Sizing overview
4 Sizing overview
Sizing the IDPA is the most important activity to complete before the installation process. Sizing the appliance
provides the system administrator with a holistic view of the compute, bandwidth, and storage consumption
for the workloads that the customer wants to protect using the IDPA.
To facilitate the sizing process, the system administrator (SE) and Professional Service (PS) team members
can use the Solution Builder tool (Dell Technologies internal access only). This tool can generate the sizing
report for the IDPA based on customer inputs and workloads that would be protected using the IDPA.
4.1 Scalability overview
The IDPA models are designed to scale up to accommodate changing needs. See the section “Expanding
storage capacity” in the Dell EMC Integrated Data Protection Appliance Product Guide for more information
about how to add storage capacity.
• For the DP4400S model with a capacity from 8 TB to 24 TB, you can expand the storage capacity in
multiples of 4 TB increments up to 24 TB. By adding the disk expansion kit, you can also expand the
capacity beyond 24 TB in 12 TB increments.
• For the DP4400 model with a capacity from 24 TB to 96 TB, you can expand the storage capacity in
12 TB increments. You can expand the capacity up to a maximum of 96 TB.
• You can also expand the storage capacity of the DP5xxx and DP8xxxx models. For more information
related to storage capacity expansion, see the section “Storage capacity” in the Dell EMC Integrated
Data Protection Appliance Product Guide.
Table 12 details the configuration for the IDPA models.
Configuration of IDPA models
Model Minimum capacity Maximum capacity
DP4400 8 TB 24 TB
24 TB 96 TB
DP5800 96 TB 288 TB
DP8300 192 TB 720 TB
DP8800 624 TB 1 PB
16 Dell EMC Integrated Data Protection Appliance: Configuration Best Practices | H18637Installation overview
5 Installation overview
This white paper is designed for personnel who install, configure, and maintain the Integrated Data Protection
Appliance DP4400. It is assumed that the DP4400 appliance is already racked and stacked in the customer’s
data center before you proceed with the steps in this section.
Note: This procedure is applicable for the IDPA DP4400 model. The other models are preconfigured and
installed by the Professional Services (PS) team.
5.1 Installing the IDPA preinstallation patch
Before you configure the DataProtection-ACM virtual machine, install the latest IDPA preinstallation patch if it
is available.
For example: Idpa_pre_update_N.N.N-nnnnnn.zip
In this example, N.N.N is the latest preinstallation patch version, and nnnnnn is the build number.
Note: You must install the preinstallation patch before you connect to the DataProtection-ACM using a
browser for the initial configuration.
5.1.1 Installing the IDPA preinstallation patch on the DataProtection-ACM
The following steps describe how to install the preinstallation patch on the DataProtection-ACM.
1. To identify the current version of your IDPA, run the following command:
# rpm -qa | grep dataprotection
2. Go to https://www.dell.com/support/home/en-us/product-support/product/integrated-data-protection-
appliance/drivers to see if a preinstallation patch is available for your version of IDPA. If a
preinstallation patch is available, download it to your local folder.
3. Extract the contents of the file Idpa_pre_update_N.N.N.nnnnnn.zip.
The .zip file contains the Idpa_pre_update_N.N.N.nnnnnn.tar.gz patch and an associated ReadMe.txt
file. N.N.N is the latest preinstallation patch version, and nnnnnn is the build number.
Note: For more information about installing the preinstallation patch, see the ReadMe.txt file.
4. Open the WinSCP or SCP application on the service laptop, and connect to the DataProtection-ACM
by performing the following actions:
a. In the File protocol field, select SFTP.
b. In the Hostname field, enter 192.168.100.100 as the IP address of the DataProtection-ACM.
c. In the Port number field, specify the default port number 22.
d. In the Username field, enter root.
e. In the Password field, enter Idpa_1234.
f. Click Login.
17 Dell EMC Integrated Data Protection Appliance: Configuration Best Practices | H18637Installation overview
The following image shows a sample WinSCP session configuration window.
5. Create a temporary folder /tmp/patch.
6. Copy the Idpa_pre_update_N.N.N.nnnnnn.tar.gz file to the /tmp/patch directory.
7. Connect to the DataProtection-ACM by using Putty from the service laptop.
The following image shows the Putty configuration screen for DataProtection-ACM.
18 Dell EMC Integrated Data Protection Appliance: Configuration Best Practices | H18637Installation overview
8. At the login as prompt, type root.
9. At the Password prompt, type the password for the root user.
10. The default password for the root user is Idpa_1234.
11. Determine the DataProtection-ACM version, enter the following command:
rpm -qa | grep dataprotection
12. Ensure that the DataProtection-ACM version is earlier than dataprotection-N.N.N-nnnnn.x86_64. For
more information, see the ReadMe.txt file in the Idpa_pre_update_N.N.N.nnnnnn.zip file. N.N.N is the
latest IDPA version, and nnnnnn is the build number.
13. Change to the directory that contains the preinstallation patch file:
cd /tmp/patch
14. Extract the contents of the .tar.gz file:
tar -xvf Idpa_pre_update_N.N.N.nnnnnn.tar.gz
The contents are extracted to a subdirectory named Idpa_pre_update_N.N.N.nnnnnn.
15. Change the directory to Idpa_pre_update_N.N.N.nnnnnn.tar.gz directory:
cd /tmp/patch/Idpa_pre_update_N.N.N.nnnnnn/
16. Change permission of install.sh file:
chmod +x install.sh
17. Run the installation script file:
./install.sh
Messages are displayed on the screen during the installation process. If the following message
displays, disregard the message:
“warning: file /usr/local/dataprotection/var/configmgr/server_data/config/
InfrastructureComponents_Template.xml: remove failed: No such file or
directory” “warning: file
/usr/local/dataprotection/customscripts/Config.properties: remove failed:
No such file or directory”
18. Verify that the preinstallation patch installation completed successfully:
rpm -qa | grep dataprotection
19. Ensure that the DataProtection-ACM version is the latest version.
Note: If the following message is displayed, see the KB article IDPA 2.3.0.623733 Pre-Patch pre-requisites
and workarounds (535790) to resolve the error:
“Successfully validated build number of hotfix with current build number. This hotfix is not applicable at the
current state of ACM.“
20. Delete the file Idpa_pre_update_N.N.N.nnnnnn.zip, and delete the directory
/tmp/patch/Idpa_pre_update_N.N.N.nnnnnn.
19 Dell EMC Integrated Data Protection Appliance: Configuration Best Practices | H18637Installation overview
5.2 Connect to the ACM
This section describes how to connect to the ACM user interface and begin the configuration process. For a
seamless experience, enable both private and public network connections to your service computer.
Prerequisites:
• After powering on the appliance, wait 5 minutes for the startup to finish.
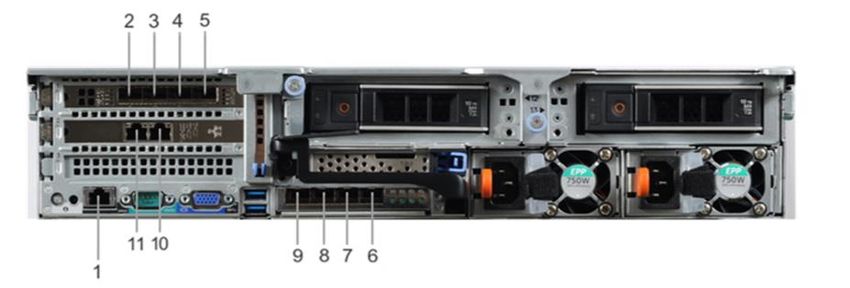
• Verify that the service computer is connected to the 1 GbE port (item 10 in Figure 2).
• On the service computer, record the IP address settings for the Ethernet interface that is connected to
the DP4400.
Note: The IDPA uses 192.168.100.xxx IP addresses for the internal components. Ensure that the
192.168.100 network is not used in your environment. If these network addresses are in use, contact Dell
Support for assistance.
DP4400 network and iDRAC connections
DP4400 port types
Callout number Port type
1 iDRAC
2 10 GbE (required)
3 10 GbE (required)
4 10 GbE (unused)
5 10 GbE (unused)
6 10 GbE (unused)
7 10 GbE (unused)
8 10 GbE (required)
9 10 GbE (required)
10 1 GbE
11 1 GbE (unused)
20 Dell EMC Integrated Data Protection Appliance: Configuration Best Practices | H18637Installation overview
Note the following points regarding the DP4400 ports:
• Ports 2 and 9 are a vSwitch0 network team. Ports 3 and 8 are a vSwitch1 network team and are used
during appliance configuration.
• Ensure that the four required 10 GbE ports (2, 3, 8, and 9) are connected to the access ports on the
switch in your network.
• If you select the Separate Management Network check box, ensure that you connect port 2 and 9
to the management VLAN and ports 3 and 8 to backup VLAN.
• If your switch ports that connect to the DP4400 are set to MTU 1500 but are running as MTU 1482
when the DD Series network interface cards are also running at MTU 1482, you might encounter an
error while adding the DD Series system as a back-end storage for Avamar. The IDPA DP4400 may
fail with the following error message: “Adding back-end storage. Exception occurred while performing
the Avamar Integration task. Failed to add Data Domain as Avamar back-end storage.”
- To resolve this problem, you must either remove the MTU or increase it to 1518 or higher. See
KB Article https://support.emc.com/kb/539946 for more details.
Perform the following steps to connect to the ACM:
1. On the service computer, assign the static IP address 192.168.100.98 and the subnet mask
255.255.255.0 for the Ethernet interface that is connected to the DP4400. A default gateway is not
required.
2. Verify that the ACM responds to a ping on the default ACM IP address of 192.168.100.100.
3. To connect to the ACM user interface using a browser, enter https://192.168.100.100:8543/.
4. Log in to the ACM with the default system account username and password:
- Username: root
- Password: Idpa_1234
5. Provide a new password that meets the following criteria:
Note: This password is assigned to all appliance components.
- The password must contain 9–20 characters and include at least one of each character type. The
following character type are supported:
> Uppercase letters (A–Z)
> Lowercase letters (a–z)
> Numbers (0–9)
> Special characters: period (.), hyphen (-), and underscore (_)
- The password must not include common names or usernames such as root or admin.
- The password must not begin with a hyphen (-) or end with a period (.).
6. The system logs you out after changing the password. Log back in with the new password.
7. On the End User License Agreement screen, accept the EULA. The Network Configuration wizard
appears.
21 Dell EMC Integrated Data Protection Appliance: Configuration Best Practices | H18637Installation overview
5.3 Network configuration wizard
After accepting the EULA, configure the initial connectivity to the DP4400 appliance.
Provide the information required in the following steps to configure the network.
Note: The IDPA supports both IPv4 and IPv6-enabled networks. However, you must manually configure the
dual stack networks.
1. Depending on the type of network you have selected (IPv4 or IPv6), provide the following information
to configure the network settings:
- IPv4 network Subnet mask: IP address mask that identifies the range of IP addresses in the
subnet where the appliance is connected.
- IPv6 network Prefix Length: IP address length that identifies the range of IP addresses where
the appliance is connected.
- Gateway IP Address: Default gateway IP address of the appliance.
- Primary DNS Server IP address: The primary DNS server for your network environment.
- Secondary DNS Server IP address: The secondary DNS server for your network environment.
- Domain name: The domain name for your network environment.
- Appliance Configuration Manager IP Address/Hostname: The IP address to assign to the
ACM. This address is the first of the 13 IP addresses, and it is reserved for the ACM.
- ESXi IP Address/Hostname: The IP address to assign to the ESXi server. This address is the
second of the 13 IP addresses, and it is reserved for ESXi.
- NTP server IP Address/Hostname: The NTP server IP address for your network environment.
If you want to configure the separate management and backup network, perform the following actions.
2. Click Separate Management Network check box to configure the separate management and backup
network settings.
a. Provide the following information to configure the Management network settings.
> Subnet mask: IP address mask that identifies the range of IP addresses in the subnet where
the appliance is connected.
> Gateway IP address: Default gateway IP address of the appliance.
> Primary DNS server IP address: The primary DNS server for your network environment.
> Secondary DNS server IP address: The secondary DNS server for your network
environment.
> Domain name: The domain name for your network environment.
> Appliance Configuration Manager IP Address/ Hostname: The IP address to assign to the
ACM. This address is the first of 13 IP addresses, and it is reserved for the ACM.
> ESXi IP Address/Hostname: The IP address to assign to the ESXi server. This address is
the second of 13 IP addresses, and it is reserved for ESXi.
> NTP server IP Address/Hostname: The NTP server IP address for your network
environment.
b. Provide the following information to configure the Backup network settings.
> Subnet mask: IP address mask that identifies the range of IP addresses in the subnet where
the appliance is connected.
> Gateway IP address: Default gateway IP address of the appliance.
22 Dell EMC Integrated Data Protection Appliance: Configuration Best Practices | H18637Installation overview
> Primary DNS server IP address: The primary DNS server for your network environment.
> Secondary DNS server IP address: The secondary DNS server for your network
environment.
> Domain name: The domain name for your network environment.
> Appliance Configuration Manager IPAddress/ Hostname: The IP address to assign to the
ACM. This address is the first of 13 IP addresses, and it is reserved for the ACM.
3. Click Submit.
After you complete the previous steps, note the following:
• After you configure basic networking, your web browser automatically redirects to the ACM IP
address assigned during network configuration.
Note: For automatic forwarding to work correctly, the computer you use to complete the configuration must be
connected to the same network as the configured ACM IP address.
• If you cannot have connections to both public and private networks simultaneously, disconnect from
the private appliance configuration network. Then, connect to the network that the ACM IP address is
on to complete the rest of the configuration.
• After the network configuration is complete, revert the network adapter IP address settings on the
service computer to their previous state.
• If the network configuration fails, click Rollback to revert all the settings. You must review the
settings, make changes if required, and configure the network settings again.
5.4 Install and deploy IDPA
This section describes how to install and deploy the IDPA. The user interface helps you set up IDPA and
prepare the appliance for use.
To install and deploy the IDPA appliance, complete the following steps.
Note: This procedure is applicable for the IDPA DP4400 model. The other models are preconfigured and
installed by the Professional Services (PS) team.
1. Open a browser and enter https://192.168.100.100:8543 to access the ACM UI.
2. Enter Username and Password in the respective fields and click Login. The Pre-Update Check
dialog box in the Change Appliance Password page is displayed.
3. Read the information that is displayed on the Pre-Update Check dialog box and click OK.
Note: Check if a preupdate patch is available on the Dell Support site for the version that you are installing.
23 Dell EMC Integrated Data Protection Appliance: Configuration Best Practices | H18637Installation overview
4. Enter information for the following sections, and click Submit.
Note: The password set in the following step applies to all components of the IDPA appliance. After you
change the password, the system automatically logs out and prompts you to log in with the new password.
- Change Appliance Password: Enter the password details in the following fields
> Current Password
> New Password
> Confirm Password
Note: The customer must maintain the following password. The Security Officer User information is not
maintained in ACM.
- Create Security Officer User: Enter the user details in the following fields:
> Username
> Password
> Confirm Password
The End User License Agreement page is displayed.
5. Read the End User License Agreement and click I agree in the page to continue the deployment.
The Network Configuration page is displayed.
6. In the Network Configuration page, if you want to configure the separate management network,
click the Separate Management Network check box. Then, enter the IP addresses for the separate
management and backup network settings.
For more information about the IP range for the separate management network, see the IDPA 2.6
Installation Guide.
7. In the Network Configuration page, you can select either IPv4 or IPv6-enabled networks.
Depending on the type of network you have selected (IPv4 or IPv6), provide the following information
to configure the network settings. Ensure that you read the prerequisites before you configure the
network settings.
- IPv4 network Subnet mask: IP address mask that identifies the range of IP addresses in the
subnet where the appliance is connected.
- IPv6 network Prefix Length: IP address length that identifies the range of IP addresses where the
appliance is connected.
- Gateway IP address
- Primary DNS server IP address
- Secondary DNS server IP address
- Domain Name
- Appliance Configuration Manager IP Address/Hostname
- ESXi IP Address/Hostname
- NTP server IP Address/Hostname
Network configuration is a one-time activity, and after it is configured, you cannot modify the
configuration without contacting Dell Support.
24 Dell EMC Integrated Data Protection Appliance: Configuration Best Practices | H18637Installation overview
Note: If the network configuration fails, click Retry to revert the changes.
After the configuration is completed, the system logs out, and you are redirected to the newly
configured ACM IP Address. You must log in to the ACM UI using your username and password.
8. Click Submit after you have specified all the required information.
Note: You can skip the Secure Remote Services configuration and configure it from the ACM dashboard
later.
9. In the Dell EMC Secure Remote Services configuration for Integrated Data Protection Appliance
page, perform the following actions.
a. Enter the Secure Remote Services Gateway IP.
b. Enter the online support credentials in the Username and Password fields.
c. Click Configure.
The IDPA Appliance configuration page is displayed.
10. In the IDPA Appliance configuration page, perform the following actions.
a. Click the prerequisites link available on the Welcome page, and read them before you continue.
b. In the Welcome page, select the Optional components that you want to install in the
configuration, and click Next.
Note: If you have selected IPv6 as your network, then the optional components Search and CDRA are not
available to install as they do not support IPv6-enabled networks.
11. If you are connected to the network with an Internet connection, the system automatically downloads
the licenses for Protection Storage, Backup Server, and Reporting and Analytics point products.
In-product activation is not supported on IPv6 enabled network. If you are not connected to the
network or the licenses are not downloaded from the ELMS Server, click Browse to locate and upload
the licenses manually.
12. The system validates the license file with the following checks.
> The maximum storage capacity for the appliance cannot be more than 24 TB in an appliance
with a capacity of 8 TB to 24 TB. The maximum capacity is 96 TB in an appliance with a
capacity of 24 TB to 96 TB. Depending on the appliance, you can upgrade the storage
capacity 8 TB–24 TB in increments of 4 TB, or 24 TB–96 TB in increments of 12 TB.
> The license file should not have the hash (#) character.
> The license must be in multiples of 4 TB.
13. Click Next.
14. In the General settings page, perform the following actions.
a. Verify the number in the Serial Number field, which is the Locking ID mentioned in the Dell EMC
software license activation notification email.
b. Select the Time zone from the list.
c. Select and enter the IP address in the IP address range (11) field.
25 Dell EMC Integrated Data Protection Appliance: Configuration Best Practices | H18637Installation overview
15. If you have configured the Separate Management Network, enter the IP addresses in the IP
address range (9) and IP address range (3) fields in the Management network settings and
Backup network settings sections, respectively. For more information, see the IDPA 2.6 Installation
Guide.
Note: The system automatically assigns 11 IP addresses in chronological order, which is based on the IP
address that you enter to configure the other components of the appliance. For example, if you enter
10.200.1.10 the system automatically generates a range of IP address from 10.200.1.10 to 20. If you do not
select the IP address range check box, you must manually configure and enter the IP addresses in the other
section.
16. Click Validate. The system validates the availability of the IP addresses and allocates them to the
IDPA components. To view the list of IP addresses allocated to the individual components, hover over
the green checkmark.
17. Click Next. The Customer information settings page is displayed.
18. If you have not selected the Separate Management Network check box, you can configure the
settings manually. To configure the settings manually, perform the following actions.
a. In the Protection storage configuration page, under the Data network section, enter valid IP
addresses for Backup IP 1 address and Backup IP 2 address.
b. In the Backup server page, enter valid IP addresses in the following.
> Avamar server IP address in the Backup node section
> Image Proxy IP address in the Integrated Data Protection Appliance backup section
c. In the IDPA System Manager page, enter the IP address in the Server IP Address field.
d. In the Reporting and Analytics page, enter the IP addresses in the Application server IP
address and Datastore server IP address fields.
e. In the Search page, enter the IP address in the Index Master Node IP address.
f. In the Cloud Disaster Recovery page, enter the IP address in the Cloud DR Add On IP
address.
Note: If you select the optional components in the Welcome page, the Reporting and Analytics, Search, and
Cloud Disaster Recovery pages are displayed during configuration.
The Configuration progress page is displayed. You can view the configuration progress for each
component along with the configuration progress for the appliance.
19. In the Customer information settings page, perform the following actions.
a. In the Customer information section, enter information in the mandatory fields.
> Enter the name of the company in the Company name field.
> Enter the name of the administrator in the Admin contact name field.
> Enter the contact number of the administrator Admin contact number field.
> Enter the location in the Location field.
> Enter the site ID in the Site ID field.
b. In the Email Configuration section, enter information in the mandatory fields.
Note: If you select the Email notification check box, the Email Configuration section is displayed.
26 Dell EMC Integrated Data Protection Appliance: Configuration Best Practices | H18637Installation overview
> Enter the SMTP server IP address in the SMTP server field.
> Enter the port number in the Port field. The Port field is auto populated and is the default
SMTP port.
> Enter the email address of the administrator in the Administrator email field.
> Click Test Email to send an email to the administrators email address.
20. Click Next.
21. In the Summary page, review the information that you entered and click Submit to start the
configuration.
22. In the Configuration progress page, perform the following actions after the installation and IDPA
configuration is complete.
a. Click Download Solution ID to download the solution ID.
b. Click Download Configuration to download the configuration.
c. Click Download configuration XML to download the configuration XML file.
d. View the Errors, Warnings, and Diagnostic report only if the configuration fails.
23. Click Finish.
The IDPA is installed and deployed. You are prompted to log in to the IDPA System Manager in a new
browser tab or window.
5.5 Troubleshooting
This section provides information about troubleshoot the installation failures using the following actions.
• Click Download log bundle to download the logs of the installation that can be analyzed or sent to
Technical Support.
• Click Retry to install the critical components that have failed to install from the point the installation
failed.
• Click Rollback to review or modify the settings if required on the Welcome page and then configure
the settings.
5.5.1 Retry installation
During the appliance deployment, if any of the critical components fail to install you can retry the installation of
the component from the point where the installation failed. To retry the installation, perform the following
actions.
1. Click Retry on the Configuration progress page. The Retry Configuration dialog box is displayed.
Note: The ACM reverts the changes that are made to the component that failed during installation and
resumes the appliance configuration.
2. Click Yes to continue the installation. The Configuration progress page is displayed. The
installation continues from the point where the installation failed.
Note: If the ACM is rebooting or the ACM web service is restarting during IDPA deployment the Retry option
is not available, you can only Rollback the installation.
27 Dell EMC Integrated Data Protection Appliance: Configuration Best Practices | H18637Installation overview
5.5.2 Roll back Installation
If the installation fails, you can roll back the installation and follow the wizard to set up and deploy the IDPA
appliance.
Prerequisite: Click Download log bundle to download the logs before you start the rollback.
The rollback feature reverts the changes that are made to the appliance configuration. You can review the
settings and start the appliance installation and configuration again. To roll back the appliance configuration,
perform the following actions.
1. Click Rollback on the Configuration progress page. The Rollback Configuration page is displayed.
Note: The ACM reverts the changes that are made to the appliance configuration.
2. Click Yes to continue the installation. The Configuration progress page is displayed. The system
reverts all the changes that are made to the appliance.
Note: You can see the details of the rollback progress of all the components on the Configuration progress
page.
After the rollback is successful, the Configuration Welcome page is displayed. To deploy and configure the
appliance from the Configuration Welcome page, follow step 8 through step 13 in section 5.4
5.5.3 Accessing vCenter
If you need to log in to vCenter to troubleshoot an issue encountered during installation, use the user
idpauser@localos and the common password for the IDPA. This user account has limited privileges but
has access to information that can help identify and address problems.
28 Dell EMC Integrated Data Protection Appliance: Configuration Best Practices | H18637Use cases
6 Use cases
IDPA supports many ecosystems. Table 14 depicts the workloads that IDPA supports out of the factory and
other workloads that require RPQ approval.
Supported use cases with IDPA
Use case DP4400S and DP4400 DP5800 DP8300 DP8800
Single vLAN Yes Yes Yes Yes
Flat network or no vLAN Yes Yes Yes Yes
Separated backup or RPQ RPQ RPQ RPQ
management (< 2.5)
Separated backup or Yes Yes Yes Yes
management (> 2.5)
Separated replication RPQ RPQ RPQ RPQ
Multiple backup networks using RPQ RPQ RPQ RPQ
separate NICs
Multiple backup networks using RPQ RPQ RPQ RPQ
vLAN tagging
Re-IP of IDPA components RPQ RPQ RPQ RPQ
Direct backups to DD Series Yes Yes Yes Yes
with DD Boost
Client-side NAT RPQ RPQ RPQ RPQ
VTL support (filed upgrade FC No RPQ RPQ RPQ
SLIC)
DDBEA support Yes Yes Yes Yes
BoostFS support Yes Yes Yes Yes
Third-party CIFS, NIFS direct RPQ RPQ RPQ RPQ
to embedded DD Series
Rerack IDPA into customer Yes RPQ RPQ RPQ
rack (all models)
Manage multiple IDPAs from Yes Yes Yes Yes
external DPC
Monitor/report multiple IDPAs Yes Yes Yes Yes
from external DPA
29 Dell EMC Integrated Data Protection Appliance: Configuration Best Practices | H18637Use cases
Use case DP4400S and DP4400 DP5800 DP8300 DP8800
Re-IP of IDPA system by Yes Yes Yes Yes
Professional Services
Physical NDMP accelerator Yes Yes Yes Yes
node (with initial setup)
30 Dell EMC Integrated Data Protection Appliance: Configuration Best Practices | H18637You can also read