Procedure & Checklist - Preparing SMRTbell Libraries using PacBio Barcoded Overhang Adapters for Multiplexing Amplicons
←
→
Page content transcription
If your browser does not render page correctly, please read the page content below
Procedure & Checklist - Preparing SMRTbell® Libraries
using PacBio® Barcoded Overhang Adapters for
Multiplexing Amplicons
Before You Begin
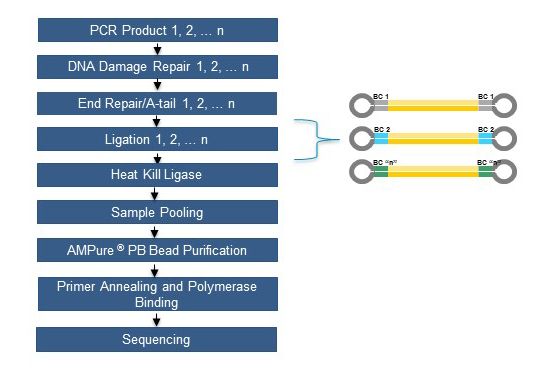
The procedure describes a workflow for constructing SMRTbell libraries from PCR products using PacBio
Barcoded Overhang Adapters. In this workflow, a barcode is introduced to each amplicon through ligation
with a hairpin adapter containing a 16-bp barcode. Once barcoded, amplicons can be pooled and purified
for sequencing on the Sequel System and Sequel II System.
Figure 1 below summarizes the barcoding workflow using Barcoded Overhang Adapters.
Figure 1: Barcoded overhang adapters are incorporated into the PCR amplicon through ligation during SMRTbell library
construction.
Page 1 Part Number 101-791-700 version 05 (June 2020)Required Materials
Item Where Used Vendor Part Number
(see below, “Barcoded
Barcoded Overhang Adapters Library Prep PacBio
Overhang Adapters”)
SMRTbell® Express Template Prep Kit 2.0 Library Prep PacBio 100-938-900
AMPure® PB Kit Purification PacBio 100-265-900
8- or 12-Multi-channel Pipette High-Throughput Pipetting Any MLS Vendor-specific
PCR 8-tube strips Tubes for reactions Any MLS Vendor-specific
96 well plate Tubes for reactions Any MLS Vendor-specific
Table 1. List of Required Materials and Equipment.
Barcoded Overhang Adapters
To perform this procedure, barcoded overhang adapters are required. There are 16 barcoded overhang
adapters that are commercially available from PacBio: PacBio Barcoded Overhang Adapter Kit 8A, Part
#101-628-400 and PacBio Barcoded Overhang Adapter Kit 8B, Part #101-628-500. We recommend
using both sets for multiplexing up to 16 samples.
If multiplexing projects require more than 16 samples (up to 96 samples), we offer a list of barcoded
overhang adapter sequences that you can order from an oligo synthesis provider. The list contains
sequences (5’3’) of barcoded overhang adapters along with their recommended synthesis scale and
purification method. The annealing procedure for forming SMRTbell hairpins are available in the “Annealing
PacBio SMRTbell Overhang Adapters” section of this procedure.
Planning Multiplexing Experiments using Barcoded Overhang Adapters
Consider the following steps when planning experiments:
1. Review the next section below that describes Best Practices for Generating High-Quality PCR
Products for PacBio Sequencing.
2. Accurately assess the sizes of the amplicons that are being multiplexed. Pool amplicons of similar
size (within +/- 15% of the mean size).
3. Determine the number of different amplicon samples to be multiplexed. We recommend initially
starting with a low number of amplicon samples to multiplex. As you become more experienced with
the workflow and understand the sequencing coverage performance of your amplicons, you may
decide to increase the level of multiplexing.
4. Estimate the input requirement per amplicon for library construction. See the “Estimating input
requirements for library construction” section below.
5. Determine the appropriate concentration of AMPure PB beads to use for the purification steps. See
the “Recommendations for using AMPure PB beads purification” section below.
Page 2 Part Number 101-791-700 version 05 (June 2020)Best Practices for Generating High-Quality PCR Products for PacBio
Sequencing
Clean, target-specific PCR products are extremely important for obtaining high-quality sequence data.
Non-specific products can represent a substantial percentage of the sequencing reads if they are not
removed. To minimize the presence of non-specific products, consider the following recommendations for
generating high-quality amplicons suitable for SMRTbell library preparation and sequencing.
1. Begin with high-quality nucleic acids and work in a clean environment.
a. If extracted nucleic acids must be stored, freeze at high concentrations in appropriately-buffered solutions.
b. To minimize possible contamination and degradation caused by multiple freeze/thaw cycles, sub-
aliquot DNA into smaller volumes for storage. For DNA samples, DNAStable® Plus from
Biomatrica may be used to help preserve extracted DNA.
c. Set up PCR reactions in an environment free from sources of non-specific primer and template
contaminants; ideally a laminar flow hood, using dedicated pre-PCR pipettor, tips and reagents.
2. Use PCR reagents and conditions for generating target-specific, full-length amplicons.
a. Use the highest-fidelity polymerase compatible with your PCR amplification system.
b. Use desalted or HPLC-purified oligos; damaged bases at the ends of the amplicons cannot be
repaired by DNA Damage Repair enzymes.
c. Optimize PCR conditions to minimize total time spent at high (>65°C) temperatures, particularly
during denaturation.
d. PCR extension time should be long enough to ensure complete extension, taking into
consideration the polymerase used and target amplicon size. For mixed samples with similar
targets, it is important to complete extension at every step to avoid generating chimeric products in
subsequent steps. As a general guideline, use extension times of one minute per 1000 base pairs
(e.g. 3 minutes for a 3 kb product).
3. Use the lowest number of cycles required for obtaining adequate yields (ng) of PCR products to
proceed with SMRTbell library construction. Avoid over-amplification.
4. If non-specific products are present, optimize PCR conditions or perform AMPure PB Bead-based
size selection to enrich for PCR amplicons with the desired target size (see recommendations
below).
Estimating Input Requirements for Library Construction
Refer to Table 2 below for DNA input requirements for library construction.
1. The values in the “Minimum Input per Amplicon into DNA Damage Repair” column are the
recommended minimum DNA input amounts (ng) required for each amplicon sample to go into the
first enzymatic reaction step (DNA Damage Repair).
Amplicon Size Minimum Input per Amplicon into DNA Target DNA mass (ng) After
(bp) Damage Repair (ng) Pooling*
250-500 10 ng per amplicon for ≥25-plex 250
501-1000 10 ng per amplicon for ≥25-plex 250
1001-3000 50 ng per amplicon for ≥10-plex 500
3001-10000 100 ng per amplicon for ≥10-plex 1000
*This is the minimum amount of SMRTbell library required after ligation reactions are pooled. See “Pooling” section.
Table 2. Input DNA Mass Required Per Amplicon for Multiplexing using Barcoded Overhang
Adapters. (See “Pooling Page 9)”.
2. The values in the “Target DNA Mass (ng) after pooling” is the recommended minimum amount of
SMRTbell library after pooling of ligation products.
3. The volume of amplicon DNA sample required for the DNA Damage Repair reaction step is 5 µL.
Concentrate the sample with AMPure PB, or dilute in 1x Elution Buffer, as necessary.
Page 3 Part Number 101-791-700 version 05 (June 2020)Recommendations for AMPure PB Bead Purifications
When using this procedure, it is highly recommended to purify amplicon samples before SMRTbell library
construction to remove PCR reagents, buffers, primer dimers and short non-specific PCR products.
Depending on the size of the desired amplicon, the concentration of AMPure PB beads required for
purification varies. Use the table 3 below to determine the appropriate concentration of AMPure PB beads
to use.
Amplicon Size AMPure PB Bead Ratio
250-500 bp 1.8X
500-1000 bp 1.0X
1-3 kb 0.60X
3-10 kb 0.45X
15 kb 0.45X
Table 3. AMPure PB Bead Recommendations Based on Amplicon Size.
Using a Multi-Channel Pipette
When working with a large number of reactions, we highly recommend using a multi-channel pipette to
transfer small aliquots of master mixes to a 96-well PCR plate or PCR tubes.
1. Prepare master mixes according to the instructions in the DNA Damage Repair, End-Repair/A-tailing
and Adapter Ligation sections of this procedure, or use the Express Amplicon Master Mix Calculator.
2. Transfer aliquots of the master mix into an 8-tube strip using a single channel pipette (e.g., 1/8th of the
master mix volume to each of the eight wells of the strip tube). Each tube can accommodate up to
200 µL of liquid.
3. Using an 8-channel pipette, transfer the required reaction volume of the master mix from the 8-tube
strip into the appropriate sample wells of a 96-well plate.
4. Repeat until all required reaction wells in the sample plate are filled.
Page 4 Part Number 101-791-700 version 05 (June 2020)Concentration of PCR Products by AMPure PB Beads (If necessary)
It is highly recommended to purify each amplicon sample before library construction to remove PCR reagents,
buffers, or primer dimers.
STEP Concentrate DNA Notes
1 Add the appropriate volume of AMPure PB beads to the amplicons. See Table 3 for
recommended AMPure PB bead concentrations. The required volume depends on
insert size.
Note that the beads must be brought to room temperature before use and all
AMPure PB bead purification steps should be performed at room temperature.
Before using, mix the bead reagent well until the solution appears homogenous.
Pipette the reagent slowly since the bead mixture is viscous and precise volumes are
critical to the purification process.
2 Pipette mix 15 times. It is important to mix well.
3 Quickly spin down the tube (for 1 second) to collect the beads.
Incubate the mix on bench top for 5 minutes at room temperature.
4
Spin down the tube (for 1 second) to collect beads.
5
Place the tube in a magnetic bead rack until the beads collect to the side of the tube
6
and the solution appears clear. The actual time required to collect the beads to the
side depends on the volume of beads added.
With the tube still on the magnetic bead rack, slowly pipette off cleared supernatant
7
and save in another tube. Avoid disturbing the beads.
If the DNA is not recovered at the end of this procedure, you can add equal volumes
of AMPure PB beads to the saved supernatant and repeat the AMPure PB bead
purification steps to recover the DNA.
Wash beads with freshly prepared 80% ethanol.
8
Note that 80% ethanol is hygroscopic and should be prepared FRESH to achieve
optimal results. Also, 80% ethanol should be stored in a tightly capped polypropylene
tube for no more than 3 days.
– Do not remove the tube or plate from the magnetic rack.
– If using tubes, use a sufficient volume of 80% ethanol to fill the tube (1.5 mL for
1.5 mL tube or 2 mL for 2 mL tube).
– If using tube strips, use ~200 μL of 80% ethanol.
– Slowly dispense the 80% ethanol against the side of the tube opposite the
beads.
– Do not disturb the beads.
– After 30 seconds, pipette and discard the 80% ethanol.
9 Repeat step 8.
10 Remove residual 80% ethanol.
– Remove tube from magnetic bead rack and spin. Both the beads and any
residual 80% ethanol will be at the bottom of the tube.
– Place the tube back on magnetic bead rack and allow the beads to separate.
– Pipette off any remaining 80% ethanol.
11 Check for any remaining droplets in the tube. If droplets are present, repeat step 10.
Page 5 Part Number 101-791-700 version 05 (June 2020)12 The minimum volume required for elution is 6 μL. Use 1 μL for sample QC (step 14
below) and 5 μL for the first enzymatic reaction (DNA Damage Repair). For each
amplicon sample to be processed, the 5 μL aliquot must contain the recommended
amount of DNA listed in Table 2. If you suspect that the PCR product is too
concentrated, elute in a higher volume of Elution Buffer.
Add the Elution Buffer to the beads. Pipette mix 15 times. It is important to mix well.
13 – Place at 37°C for 15 minutes to elute the DNA from the beads.
– Spin the tube down, then place the tube back on the magnetic bead rack.
– Let beads separate fully. Then without disturbing the beads, transfer
supernatant to a new 1.5 ml Lo-Bind tube.
– Discard the beads.
Verify DNA amount and concentration using a Qubit quantitation platform.
14 – Measure the DNA concentration using a Qubit fluorometer.
– Using 1 μL of the eluted sample, make a 1:10 dilution in EB.
– Use 1 µL of this 1:10 dilution to measure the DNA concentration using the
Qubit dsDNA HS Assay kit according to the manufacturer’s
recommendations.
The remaining 9 μL of 1:10 diluted sample may be used for sizing QC by Bioanalyzer.
Actual recovery per μL and total available sample material:
15
Page 6 Part Number 101-791-700 version 05 (June 2020)Reagent Handling
Several tubes in the kits (shown in Table 4 below) are sensitive to temperature and vortexing. We highly
recommend that you:
• Never leave tubes at room temperature.
• Work on ice at all times when preparing master mixes.
• Finger tap followed by a quick spin prior to use.
Reagent Where Used
DNA Damage Repair Mix v2 DNA Damage Repair
End Prep Mix End-Repair/A-tailing
Barcoded Overhang Adapters Ligation
Ligation Mix Ligation
Ligation Additive Ligation
Ligation Enhancer Ligation
Table 4: Temperature Sensitive Reagents.
Annealing PacBio SMRTbell Overhang Adapters
Use the below procedure to resuspend lyophilized overhang adapter oligos and to self-anneal resuspended
oligos to form SMRTbell hairpins suitable for library construction.
Prepare 10X Annealing Buffer:
1. Prepare 10X Annealing Buffer (Formulation: 100 mM Tris-HCl, 1 M NaCl, pH 7.5)
Resuspend Lyophilized Oligos:
1. Spin the tubes for 10 seconds at maximum speed.
2. Resuspend oligos in nuclease-free 10 mM Tris HCl pH 7.5 to a final concentration of 170 µM.
3. Cap and vortex for 1 minute to ensure everything is dissolved.
4. Place the resuspended oligos on ice for 30 minutes prior to use.
Prepare PacBio Barcoded Overhang SMRTbell Adapters for Self-Annealing:
1. Prepare a 17 µM working stock using 10X Annealing Buffer and nuclease-free water (molecular
biology grade). Final concentration of Annealing Buffer is 1X.
2. Measure the final concentration using UV/Vis Nanodrop of Qubit.
Note: Accuracy of the final concentration can be improved by targeting a higher initial working
stock concentration (10-20%) and adjusting down to the final concentration using the measured
concentration of the initial working stock.
Self-Anneal PacBio Barcoded Overhang SMRTbell Adapters:
1. Anneal the 17 µM working stock as follows:
• Incubate in a thermal cycler at 95°C for 5 minutes,
• Then transfer the tubes or plates at room temperature (25° C) for 30 min.
• Hold at 4° C.
2. Spin down tubes or plates at maximum speed for 1 minute.
3. Store all annealed adapter preparations at -15 to -25° C
Note: Annealed working stocks can be prepared in advance and stored without requiring
additional reannealing. Store at -20° C for long term storage.
Page 7 Part Number 101-791-700 version 05 (June 2020)SMRTbell Library Construction
The required input DNA amount per sample for SMRTbell library construction depends on the amplicon
size. Refer to Table 2 to estimate the amount of DNA required for your specific amplicon samples. Prepare
master mixes according to the instructions in the DNA Damage Repair, End-Repair/A-tailing and Adapter
Ligation sections below, or use the Express Amplicon Master Mix Calculator.
DNA Damage Repair
The volume of template required for the DNA Damage Repair reaction is 5.0 μL. This volume must contain
the required input DNA mass for each sample for multiplexing (see Table 2). Prepare the DNA Prep
Master Mix below and pipet 2.5 μL into each PCR tube or sample plate well. For convenience, the
Express Amplicon Master Mix Calculator can also be used for the preparation of the master mix solution.
1. Prepare the DNA Prep Master Mix according to the table below. Note that the master mix volumes in
the table below include a 25% overage.
Reagent Tube Cap For 1-8 Plex 12 Plex 16 Plex 24 Plex 48 Plex 96 Plex
Color 1 rxn
DNA Prep Buffer 0.75 7.5 11.3 15.0 22.5 45.0 90.0
Nuclease-free Water 1.36 13.6 20.4 27.2 40.8 81.6 163.2
NAD 0.13 1.3 2.0 2.6 3.9 7.8 15.6
DNA Damage Repair Mix v2 0.26 2.6 3.9 5.2 7.8 15.6 31.2
Total Volume 2.50 25.0 37.5 50.0 75.0 150.0 300.0
Note: Do not pipet sub-microliter volumes. For2. Using a multi-channel pipette, add 2.5 μL of End-Repair/A-tailing master mix to the DNA Damage Repair
reactions for a total of 10.0 µL.
3. Pipette mix 10 times. It is important to mix well.
4. Spin down the reaction mixture contents with a quick spin.
5. Incubate at 20°C for 30 minutes.
6. Incubate at 65°C for 30 minutes, then return the reaction to 4°C. Proceed to the next step.
Adapter Ligation
1. Prepare the Adapter Ligation Master Mix (without the barcoded adapter) according to the table below.
Note that the master mix volumes in the table below include a 10% overage.
Reagent Tube Cap For 1-8 Plex 12 Plex 16 Plex 24 Plex 48 Plex 96 Plex
Color 1 rxn
Ligation Mix (µL) 5.00 44.0 66.0 88.0 132.0 264.0 528.0
Ligation Additive (µL) 0.17 1.5 2.2 2.9 4.4 8.8 17.6
Ligation Enhancer (µL) 0.17 1.5 2.2 2.9 4.4 8.8 17.6
Total Volume 5.30 46.9 70.4 93.9 140.8 281.6 563.2
Note: Do not pipet sub-microliter volumes. ForPurification of SMRTbell Templates
For AMPure PB bead concentration guidelines, refer to Table 3.
STEP AMPure PB Bead Purification 1 Notes
1 Add the appropriate volume of AMPure PB beads to the pooled amplicons. See Table
3 for recommended AMPure PB bead concentrations. The required volume depends
on insert size.
Note that the beads must be brought to room temperature before use and all AMPure
PB bead purification steps should be performed at room temperature.
Before using, mix the bead reagent well until the solution appears homogenous.
Pipette the reagent slowly since the bead mixture is viscous and precise volumes are
critical to the purification process.
2 Mix the bead/DNA solution thoroughly by pipette mixing 15 times. It is important to
mix well.
3 Quickly spin down the tube (for 1 second) to collect the beads.
4 Incubate samples on bench top for 5 minutes at room temperature.
5 Spin down the tube (for 1 second) to collect beads.
6 Place the tube in a magnetic bead rack to collect the beads to the side of the tube.
7 Slowly pipette off cleared supernatant and save (in another tube). Avoid disturbing
the beads.
8 Wash beads with freshly prepared 80% ethanol.
Note that 80% ethanol is hygroscopic and should be prepared FRESH to achieve
optimal results. Also, 80% ethanol should be stored in a tightly capped polypropylene
tube for no more than 3 days.
– Do not remove the tube from the magnetic rack.
– Use a sufficient volume of 80% ethanol to fill the tube (1.5 mL for a 1.5 mL
DNA LoBind tube).
– Slowly dispense the 80% ethanol against the side of the tube opposite the
beads.
– Do not disturb the beads.
– After 30 seconds, pipette and discard the 80% ethanol.
9 Repeat step 8.
10 Remove residual 80% ethanol.
– Remove tube from magnetic bead rack and spin. Both the beads and any
residual 80% ethanol will be at the bottom of the tube.
– Place the tube back on magnetic bead rack and allow beads to separate.
– Pipette off any remaining 80% ethanol.
11 Check for any remaining droplets in the tube. If droplets are present, repeat step 10.
12 Immediately add 100 μL of Elution Buffer volume to your beads. Pipette mix 15
times. It is important to mix well.
– Elute the DNA by letting the mix incubate at 37 ºC for 15 minutes. This is
important to maximize recovery of high molecular weight DNA.
– Spin the tube down, then place the tube back on the magnetic bead rack.
– Let beads separate fully. Then without disturbing the beads, transfer
supernatant to a new 1.5 ml Lo-Bind tube.
– Discard the beads.
Page 10 Part Number 101-791-700 version 05 (June 2020)STEP AMPure PB Bead Purification 2 Notes
1 Add the appropriate volume of AMPure PB beads to the pooled amplicons. See
Table 3 for recommended AMPure PB bead concentrations. The required volume
depends on insert size.
Note that the beads must be brought to room temperature before use and all
AMPure PB bead purification steps should be performed at room temperature.
Before using, mix the bead reagent well until the solution appears homogenous.
Pipette the reagent slowly since the bead mixture is viscous and precise volumes
are critical to the purification process.
2 Mix the bead/DNA solution thoroughly by pipette mixing 15 times. It is important to
mix well.
3 Quickly spin down the tube (for 1 second) to collect the beads.
4 Incubate samples on bench top for 5 minutes at room temperature.
5 Spin down the tube (for 1 second) to collect beads.
6 Place the tube in a magnetic bead rack to collect the beads to the side of the tube.
7 Slowly pipette off cleared supernatant and save (in another tube). Avoid
disturbing the beads.
8 Wash beads with freshly prepared 80% ethanol.
Note that 80% ethanol is hygroscopic and should be prepared FRESH to achieve
optimal results. Also, 80% ethanol should be stored in a tightly capped
polypropylene tube for no more than 3 days.
– Do not remove the tube from the magnetic rack.
– Use a sufficient volume of 80% ethanol to fill the tube (1.5 mL for a 1.5
mL DNA LoBind tube)
– Slowly dispense the 80% ethanol against the side of the tube opposite the
beads.
– Do not disturb the beads.
– After 30 seconds, pipette and discard the 80% ethanol.
9 Repeat step 8.
10 Remove residual 80% ethanol.
– Remove tube from magnetic bead rack and spin. Both the beads and any
residual 80% ethanol will be at the bottom of the tube.
– Place the tube back on magnetic bead rack and allow beads to separate.
– Pipette off any remaining 80% ethanol.
11 Check for any remaining droplets in the tube. If droplets are present, repeat step 10.
12 Immediately add 50 μL of Elution Buffer volume to your beads. Pipette mix 15
times. It is important to mix well.
– Elute the DNA by letting the mix incubate at 37 ºC for 15 minutes. This is
important to maximize recovery of high molecular weight DNA.
– Spin the tube down, then place the tube back on the magnetic bead rack.
– Let beads separate fully. Then without disturbing the beads, transfer
supernatant to a new 1.5 ml Lo-Bind tube.
– Discard the beads.
13 Verify DNA amount and concentration using a Qubit quantitation platform.
– Measure the DNA concentration using a Qubit fluorometer.
– Using 1 μL of the eluted sample, make a 1:10 dilution in EB.
– Use 1 µL of this 1:10 dilution to measure the DNA concentration using a Qubit
fluorometer and the Qubit dsDNA HS Assay kit according to the manufacturer’s
recommendations.
The remaining 9 μL of 1:10 diluted sample may be used for sizing QC by a
BioAnalyzer system.
14 Actual recovered DNA SMRTbell concentration (ng/µl): __________________
Total recovered DNA SMRTbell amount (ng): _____________________
Page 11 Part Number 101-791-700 version 05 (June 2020)Prepare SMRTbell Library for Sequencing
Sequel System:
• For primer annealing, follow the instructions in SMRT Link Sample Setup. Use Sequencing Primer v4 for
primer annealing.
• For polymerase binding, follow the instructions in SMRT Link Sample Setup. Use Sequel Binding Kit 3.0
for polymerase binding
• For detailed recommendations for sequencing specific amplicon library insert size ranges, refer to
the Quick Reference Card – Diffusion Loading and Pre-Extension Time Recommendations for the
Sequel System here.
Sequel II System:
Amplicons ≥3 kb:
• For primer annealing, follow the instructions in SMRT Link Sample Setup. Use Sequencing Primer v4 for
primer annealing.
• For polymerase binding, follow the instructions in SMRT Link Sample Setup. Use Sequel II Binding Kit
2.0 for polymerase binding.
• For complex cleanup, PacBio recommends using AMPure PB beads.
• For detailed recommendations for sequencing amplicon libraries >3 kb, refer to the Quick Reference
Card – Diffusion Loading and Pre-Extension Time Recommendations for the Sequel II System here.
Amplicons• If using ProNex beads for complex cleanup, the instructions provided in the “Purification of
Polymerase Bound SMRTbell® Complexes” section of the SMRT Link Sample Setup calculation
worksheet should be modified by following the changes indicated below:
ProNex Beads
Bring to 100 µl
100 µl
ProNex Beads
ProNex Beads
2X volume or 200 µL
ProNex Beads
30 µL or more
@ 37°C
Page 13 Part Number 101-791-700 version 05 (June 2020)Demultiplex barcoded Samples
To demultiplex barcoded samples we recommend using the following support FASTA file:
Sequel_96_barcodes_v2 (contains a list of 96 PacBio barcode sequences).
Revision History (Description) Version Date
Initial release. 01 June 2019
Updated to include reference to 96 barcoded overhang adapter sequences and annealing 02 July 2019
procedure.
Changed Binding Time for Sequel II System from 4 hours to 1 hour. Updated Sequencing 03 April 2020
instructions for Sequel and Sequel II Systems.
Added “Sequel II System” to first paragraph. 04 April 2020
Updated required materials table on page 2. 05 June 2020
For Research Use Only. Not for use in diagnostic procedures. © Copyright 2018 - 2020, Pacific Biosciences of California, Inc. All rights reserved. Information in this
document is subject to change without notice. Pacific Biosciences assumes no responsibility for any errors or omissions in this document. Certain notices, terms,
conditions and/o r use restrictions may pertain to your use of Pacific Biosciences products and/or third p arty products. Please refer to the applicable Pacific
Biosciences Terms and Conditions of S ale and to the applicable license terms at http://www.pacificbiosciences.com/lice nses.html. Pacific Biosciences, the Pacific
Biosciences logo, PacBio, S MRT, SMRTbell, Iso-Seq and Sequel are trademarks of Pacific Biosciences. BluePippin and SageELF are trademarks of Sage
Science, Inc. NGS-go and NGSengine are trademarks of GenDx. FEMTO Pulse and Fragment Analyzer are trademarks of Agilent Technologies. All other trademarks are the
sole property of their respective owners.
Page 14 Part Number 101-791-700 version 05 (June 2020)You can also read