Baxter Elastomeric Pumps - CLINICIAN GUIDE
←
→
Page content transcription
If your browser does not render page correctly, please read the page content below
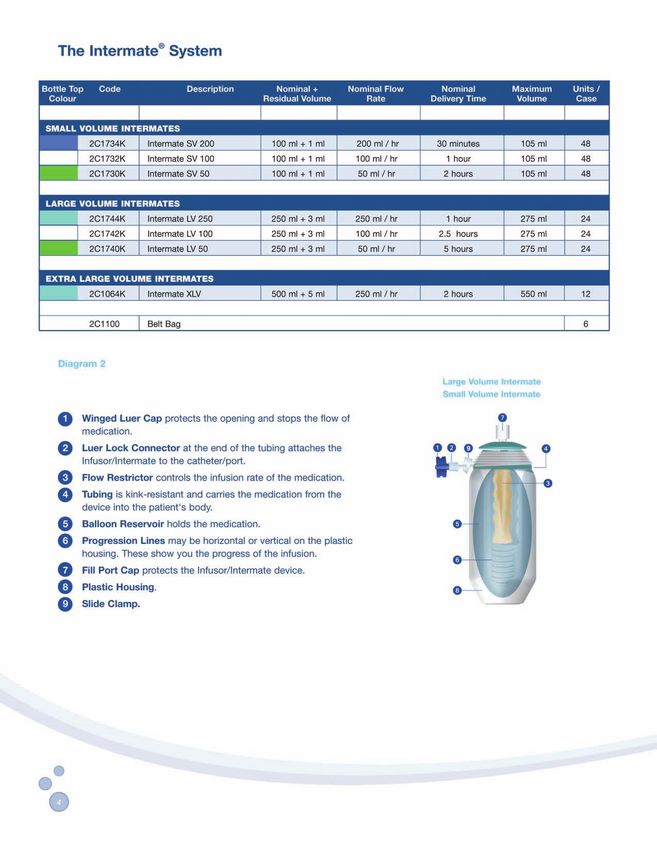
Baxter
Elastomeric
Pumps
CLINICIAN GUIDE
Portfolio Overview:
Baxter Elastomeric Pumps are non-electronic medication pumps designed to provide ambulatory infusion therapy.
Medication is delivered to the patient as the elastomeric “balloon” consistently deflates and gently pushes solution through
the IV tubing and into the catheter/port.
The elastomeric technology promotes patient recovery and improves patient quality of life by allowing ambulatory treatment
without the inconvenience of programming, power sources or alarms.
Baxter offers two different Elastomeric Pumps that operate using the same base technology:
Infusors:
•   Offer duration infusion times from 12 hours to 7 days.
•   Designed for ambulatory infusion of: Infusional Chemotherapy, Pain Management & Chelation Therapy.
•   Available in a variety of volumes and flow rates.
•   Multi-rate and Patient Control Module (PCM) formats available.
•   SV Infusors (other than SV1 – 2C1701KP) flow within +/- 12.5% of the labelled flow rate.
•   LV & SV1 Infusors flow within +/- 10% of the labelled flow rate.
    *Please refer to Package Insert or the ‘Consider These 5 Conditions’ section of this booklet, as some
    environmental factors can affect the accuracy of the above flow rate parameters.

Intermates:
•   Offer duration infusion times from 30 minutes to 5 hours.
•   Designed for ambulatory infusion of: Antibiotic & Antiviral medications.
•   Available in a variety of volumes and flow rates.
•   Flow within +/- 15% of the labelled flow rate.
    *Please refer to Package Insert or the ‘Consider These 5 Conditions’ section of this booklet, as some
    environmental factors can affect the accuracy of the above flow rate parameters.

Small Volume (SV) Devices: Small Elastomeric Reservoirs that can hold 105 to 130 ml of solution.
Large Volume (LV) Devices: Large Elastomeric Reservoirs that can hold 275 to 300 ml of solution.
Extra Large Volume (XLV) Devices: Extra large Elastomeric Reservoirs that can hold 550 ml of solution.

Indications:                                                       Pump Features & Benefits:
•   Infusional Chemotherapy
                                                                   •   Ambulatory Design – No Cords, Outlets, Batteries or IV
•   Pain Management                                                    Poles
    • Continuous Peripheral Nerve Block (CPNB)
    • Continuous Wound Infusion (CWI)                              •   Lightweight & discreet design
•   Antibiotic/Antiviral Therapy (i.e. Cystic Fibrosis,            •   Single-use disposable
    Osteomyelitis, HIV)                                            •   Latex-Free
•   Iron Chelation                                                 •   Silent Operation
                                                                   •   No programming required

Administration Routes:                                             •   Built-in flow regulator eliminates rate manipulation
                                                                   •   Easy to Use
•   Intravenous (IV)
•   Intra-arterial                                                 The Baxter Elastomeric Pump offers patients a medication
•   Subcutaneous                                                   delivery system that is comfortable, portable and adaptable
                                                                   to both their therapy and lifestyle needs.
•   Epidural
* Baxter Elastomeric Pumps are safe to use on all central access
lines, including PICCs.

2
The Infusor System

                                                                                                                                                      Portfolio Overview
Bottle Top   Code                  Description       Nominal +               Nominal Flow             Nominal        Maximum            Units /
 Colour                                            Residual Volume              Rate                Delivery Time     Volume            Case

JACKSON DEVICES (SMALL VOLUME)
       2C1073KJP   Half Day Infusor                 60 ml + 1.5 ml             5 ml / hr               12 hours        65 ml              12
       2C1071KJP   Single Day Infusor               48 ml + 1.5 ml             2 ml / hr                1 day          65 ml              12
       2C1075KJP   Two Day Infusor                  96 ml + 2.5 ml             2 ml / hr                2 days        105 ml              12
       S2C1083KJP Infusor for Desferioxamine        48 ml + 1.5 ml             1 ml / hr               2.5 days       65 ml               12
       2C1080KJP   Multi-day Infusor                60 ml + 1.5 ml            0.5 ml / hr               5 days        65 ml               12
       2C1082KJP   Seven Day Infusor                84 ml + 2.5 ml            0.5 ml / hr               7 days         95 ml              12

SMALL VOLUME INFUSORS
        2C1702KP  Infusor SV 2                       96 ml + 1 ml              2 ml / hr                2 days        130 ml              12
        2C1701KP  Infusor SV 1                       96 ml + 1 ml              1 ml / hr                4 days        130 ml              12

MULTI-RATE INFUSORS
        2C1154KP    Infusor SV 1, 2, 3                96 ml + 1 ml           1, 2, 3 ml / hr        96-48-32 hours    130 ml              12
        2C1155KP    Infusor LV 2, 3, 5               240 ml + 3 ml           2, 3, 5 ml / hr       120-80-48 hours    300 ml              12

REGIONAL ANALGESIA MULTI-RATE INFUSOR WITH PREATTACHED PATIENT CONTROL MODULE
       2C1811K     Infusor LV 5, 7, 12    240 ml + 3 ml 5, 7, 12 ml / hr 48, 34, 20 hours                             300 ml              6

LARGE VOLUME INFUSORS
        2C1063KP  Infusor     LV   10                240   ml   +   3   ml     10 ml / hr               1 day         300   ml            12
        2C1156KP  Infusor     LV   7                 272   ml   +   3   ml      7 ml / hr              39 hours       300   ml            12
        2C1009KP  Infusor     LV   5                 240   ml   +   3   ml      5 ml / hr              48 hours       300   ml            12
        2C1008KP  Infusor     LV   2                 240   ml   +   3   ml      2 ml / hr               5 days        300   ml            12
        2C1087KP  Infusor     LV   1.5               252   ml   +   3   ml     1.5 ml / hr              7 days        300   ml            12

BASAL / BOLUS INFUSORS                             Residual Volume
         2C1955KJP      Basal / Bolus Infusor**         1.5 ml                Basal 0.5 ml         Maximum 5 days     65 ml               12
                        Bolus 2 ml
         2C1976KJ       Basal / Bolus Infusor**         2.5 ml                Basal 2 ml           Maximum 2 days     96 ml               6
                        Bolus 2 ml
          ** Must be used with Patient Control Module
         2C1079K        PCM 0.5 mL                                                                                                        12
         2C1067K        PCM 2.0 mL                                                                                                         6
         2C1100         Belt Bag                                                                                                           6

   Diagram 1
                                                                                             Large Volume Infusor      Jackson Device
                                                                                             Small Volume Infusor
                                                                                                                              1.
     1   Winged Luer Cap protects the opening and stops the flow of
         medication.
                                                                                                                                   2.
     2   Luer Lock Connector at the end of the tubing attaches the
         Infusor/Intermate to the catheter/port.
     3   Flow Restrictor controls the infusion rate of the medication.
     4   Tubing is kink-resistant and carries the medication from the
         device into the patient's body.
     5   Balloon Reservoir holds the medication.                                                                         5.

     6   Progression Lines may be horizontal or vertical on the plastic
         housing. These show you the progress of the infusion.
     7   Fill Port Cap protects the Infusor/Intermate device.
     8   Plastic Housing.
                                                                                                                            7.

                                                                                                                                                  3

The Infusor System
                  CONSIDER THESE 5 CONDITIONS
The following factors will further impact delivery time
Ensure that patients are provided and instructed on accompanying patient guide
                       CLINICAL INFORMATION                               PRACTICAL GUIDANCE
                     The Infusor flow rate is most                 Keep Luer Lock Connector at a constant

1                    accurate at 33.3˚C or 92˚F.*
                     Flow rate will decrease ~ 2.3% per
                     1˚C decrease in temperature.
                                                                   temperature during infusion.
                                                                   Do NOT expose Infusor to extreme heat or forced
                                                                   re-warming.
                                                                   If Infusor is refrigerated, remove it from the
                     Flow rate will increase ~ 2.3% per
                                                                   refrigerator and allow the device to reach room
                     1˚C increase in temperature.                  temperature prior to use.
                     *Half Day Infusor (2C1073KJP), LV10           * How to achieve the correct temperature
                     Infusor (2C1063KP) and LV1.5                  during infusion:
                     (2C1087KP) Infusor are designed to            A temperature of 33.3˚C or 92˚F is achieved when
                     operate at optimum flow rate when             the Luer Lock Connector is taped to a central (i.e.
                     Luer Lock Connector is at 31.1˚C or           torso) location on the patient’s skin.*
                     88˚F.                                         A temperature of 31.1˚C or 88˚F is achieved when
                                                                   the Luer Lock Connector is taped to a peripheral
                                                                   (ie. limbs) location on the patient’s skin.*

                     The Infusor flow rate is most                 The viscosity of the solution may be affected by

2                    accurate with a diluent solution
                     of 5% Dextrose.
                                                                   the temperature of the solution (drug &/or diluent),
                                                                   and the concentration of the solution thereby
                                                                   impacting the flow rate.
                     An Infusor filled with 0.9% Sodium
                     Chloride (NaCl) as a diluent will flow
                     ~10% faster than labelled rate.

                     To ensure an accurate flow rate,              A catheter smaller than 22 gauge will decrease

3                    the access system should be 22
                     GAUGE or larger when using an
                     Infusor.
                                                                   the labelled flow rate.
                                                                   Ensure that patient’s catheter is patent before
                                                                   connecting Infusor.

                     Infusor flow rate is most                     Infusors flow faster if underfilled.

4                    accurate when filled to the
                     labelled nominal volume.
                                                                   Use aseptic technique throughout the filling
                                                                   process.
                     Infusors flow faster than labelled flow       In context of a surgical procedure, do not place
                     rate if UNDERFILLED (filled to < 81%          the Infusors into a sterile field. The fluid path is
                     of optimal fill volume).                      sterile whereas the outside of the device is not.

                     Flow rate is most accurate when               Once connected to the patient’s catheter/port,

5                    the balloon reservoir and the Luer
                     Lock Connector are at the same
                     height.
                                                                   instruct the patient to keep the top of the Infusor
                                                                   as close to the level of the Luer Lock Connector
                                                                   as possible.
                     Flow rate can decrease ~ 0.5% per             Provide a carrying case to assist patients in
                     2.5 cm if the balloon reservoir is            meeting this requirement.
                     below the Luer Lock Connector.
                     Flow rate can increase ~ 0.5% per
                     2.5 cm if the balloon reservoir is
                     above the Luer Lock Connector.

                                                                                                                          5
The Intermate System
                  CONSIDER THESE 5 CONDITIONS
The following factors will further impact delivery time
Ensure that patients are provided and instructed on accompanying patient guide
                       CLINICAL INFORMATION                                PRACTICAL GUIDANCE
                     The Intermate flow rate is most               Keep Intermate at a constant temperature during

1                    accurate at 21.1˚C
                     or 70˚F.
                                                                   infusion.
                                                                   Do NOT expose Intermate to extreme heat or
                                                                   forced re-warming.
                     Flow rate will decrease ~ 2.3% per
                                                                   If Intermate is refrigerated, remove it from the
                     1˚C decrease in temperature.
                                                                   refrigerator and allow the device to reach room
                     Flow rate will increase ~ 2.3% per            temperature prior to use.
                     1˚C increase in temperature.
                                                                   Ensure that the Intermate remains close to the
                                                                   body and at room temperature (approx. 21.1˚C or
                                                                   70˚F) while in use.

                     The Intermate flow rate is most               The viscosity of the solution may be affected by

2                    accurate with a diluent solution
                     of 0.9% Sodium Chloride (NaCl).
                                                                   the temperature of the solution (drug &/or diluent),
                                                                   and the concentration of the solution thereby
                                                                   impacting the flow rate.
                     An Intermate filled with 5% Dextrose
                     as a diluent will flow ~10% slower
                     than labelled rate.

                     To ensure an accurate flow rate, the          A catheter smaller than 18 gauge will decrease

3                    access system should be 18 GAUGE
                     or larger when using an Intermate.
                                                                   the labelled flow rate.
                                                                   Ensure that patient’s catheter/port is patent before
                                                                   connecting Intermate.

                     Intermate flow rate is most                   Intermates flow faster if underfilled.

4                    accurate when filled to the
                     labelled nominal volume.
                                                                   Use aseptic technique throughout the filling
                                                                   process.
                     Intermates flow faster than labelled          In context of a surgical procedure, do not place
                     flow rate if UNDERFILLED (filled to           the Intermate into a sterile field. The fluid path is
                     < 81% of optimal fill volume).                sterile whereas the outside of the device is not.

                     Flow rate is most accurate                    Once connected to the patient’s catheter/port,

5                    when the balloon reservoir and
                     the Luer Lock Connector are at
                     the same height.
                                                                   instruct the patient to keep the top of the
                                                                   Intermate as close to the level of the Luer Lock
                                                                   Connector as possible.
                                                                   Provide a carrying case to assist patients in
                     Flow rate can decrease ~ 0.5% per
                                                                   meeting this requirement.
                     2.5 cm if the balloon reservoir is
                     below the Luer Lock Connector.
                     Flow rate can increase ~ 0.5% per
                     2.5 cm if the balloon reservoir is
                     above the Luer Lock Connector.

6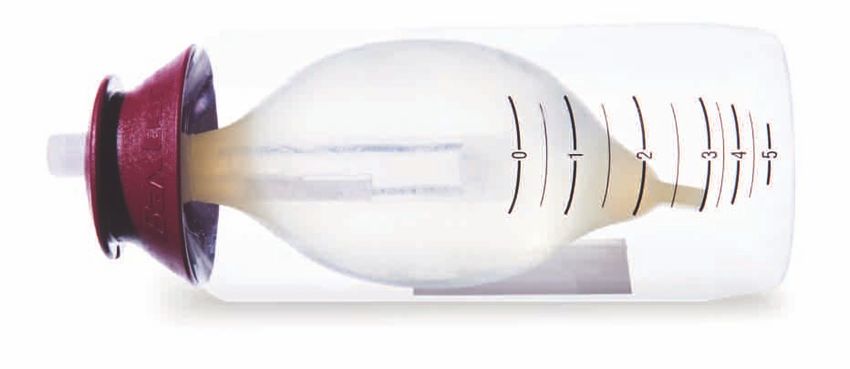
Pharmacy:
1) Jackson Device Filling Instructions:

1                     Ensure Winged Luer Cap is          8
                      fastened to distal end of                                       Attach a luer adaptor or
                      tubing. Remove paper tubing                                     stopcock to the Jackson
                      tape from the Jackson Device                                    Device Luer Lock Connector.
                      tubing.

2                                                        9                            Attach a 10 ml syringe to the
                      Draw up required drug and                                       other side of the stopcock or
                      diluent syringes. Remove all                                    luer adaptor. Ensure the
                      the air from the syringes.                                      stopcock is in the ‘open’
                                                                                      position.

3                     Remove Fill Port Cap retaining     10                           Pull back syringe plunger to
                      it for later use. Beginning with                                create suction. Continue to
                      the diluent filled syringe,                                     apply suction to the distal end
                      gently insert the tip of the                                    until fluid is observed in the
                      syringe into the Fill Port and                                  syringe.
                      turn clockwise to lock.* (Do
                      not attach a needle to the                                      Visually confirm that the
                      syringe as this will damage the    11
                                                                                      contents of the Jackson
                      Fill Port.)                                                     Device are flowing and that the

                                                                                                                               Pharmacy
                                                                                      tubing is clear of air before
4                     Place the end of syringe                                        use. Replace Winged Luer
                      plunger on work surface.                                        Cap.
                      Keeping the unit vertical, grasp
                      syringe barrel and push slowly
                      downward on the syringe to
                      gradually force fluid into the
                      Elastomeric Reservoir. Do not
                      grasp the Jackson Device
                      Housing during filling.

5
                      Remove the syringe from the
                      Fill Port. Replace the Fill Port
                      Cap and lock by twisting in a
                      counter clockwise direction.*

6                     Remove the Winged Luer Cap
                      retaining it for later use. This
                      will allow the solution to move
                      through the tubing and purge
                      air from the system. Allow
                      three drops of diluent to fall
                      onto a 70% alcohol swab to
                      visually confirm that the
                      contents of the Jackson
                      Device are flowing.

7                     If the device is flowing, attach
                      the Winged Luer Cap.
                      Continue filling the device
                      (step 2-4) until all required
                      solution has been added.                *Caution: Gently lock syringe
                      Upon removal of the final               or Fill Port Cap.
                      syringe, replace the Fill Port          Overtightening can result in                 Re-Use
                      Cap and lock by twisting in a           damage to Fill Port.
                      counter clockwise direction.* If        Use aseptic technique                    Do not re-use the
                      the Jackson Device is not               throughout the procedure.                Jackson Device.
                      flowing follow steps 8-11.

                                                                                                                           7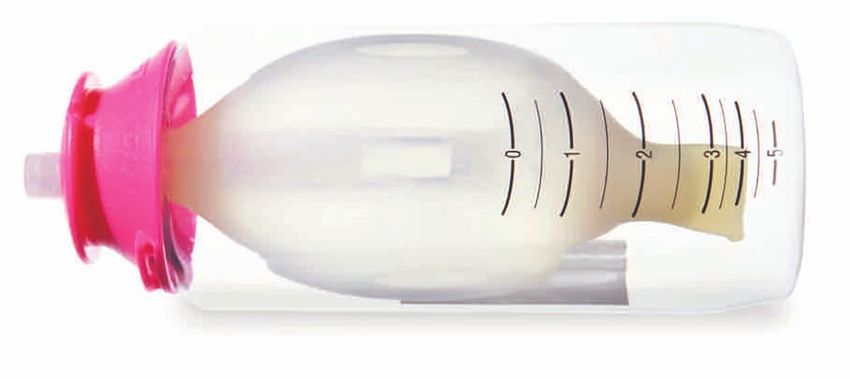
Pharmacy:
2) Infusor SV & LV Filling Instructions:

    1                                                     8                            Remove Winged Luer Cap
                       Draw up require drug and                                        retaining it for later use. Luer
                       diluent in syringes. Remove all                                 lock a syringe tip connector or
                       air from syringes.                                              stopcock to the distal end of
                                                                                       the Infusor tubing.

    2                  Remove paper tubing tape           9
                                                                                       Luer lock a 10 ml syringe to
                       from the Infusor tubing. Ensure
                                                                                       the syringe tip connector or
                       Winged Luer Cap is fastened
                                                                                       stopcock. Ensure the stopcock
                       to distal end of tubing (Luer
                                                                                       is in the ‘open’ position.
                       Lock Connector).

    3                  Remove Fill Port Cap, retaining    10                           Pull back syringe plunger to
                       it for later use. Beginning with
                                                                                       create suction until fluid is
                       the diluent filled syringe,
                                                                                       observed in the syringe. Once
                       gently insert the tip of the
                                                                                       fluid is observed close the
                       syringe into the Fill Port and
                                                                                       stopcock, then, remove the
                       turn clockwise to lock.* (Do
                                                                                       syringe. Remove the syringe
                       not attach a needle to the
                                                                                       tip connector or the stopcock
                       syringe as this will damage the
                                                                                       from the tubing.
                       Fill Port.)

    4                  Place end of syringe plunger       11                           Allow three drops of diluent to
                       on work surface. Keeping the                                    fall onto a 70% alcohol swab
                       unit vertical, grasp syringe                                    to visually confirm that the
                       barrel and push slowly                                          Infusor is flowing. Re-attach
                       downward on the syringe to                                      Winged Luer Cap.
                       gradually force fluid into the
                       Elastomeric Reservoir. Do not
                       grasp the Infusor device           12
                                                                                       Remove Fill Port Cap retaining
                       Housing during filling.                                         it for later use. Insert tip of
                                                                                       drug filled syringe into Fill Port
    5                                                                                  and turn clockwise to lock.*
                       Remove the syringe from the
                       Fill Port. Replace the Fill Port
                       Cap and lock by twisting in a                                   Place end of syringe plunger
                                                          13
                       counter clockwise direction.*                                   on work surface. Keeping the
                                                                                       unit vertical, grasp syringe
                       Remove the Winged Luer Cap                                      barrel and push slowly
    6                                                                                  downward on the syringe to
                       from the distal end of the
                       tubing and retain for later use.                                gradually force fluid into the
                       This will allow the solution to                                 Elastomeric Reservoir. Repeat
                       move through the tubing and                                     with remaining syringes until
                       purge air from the system.                                      all required solution has
                       Allow three drops of diluent to                                 been added.
                       fall onto a 70% alcohol swab
                                                          14                           Upon removal of the final
                       to visually confirm that the                                    syringe, replace the Fill Port
                       Infusor is flowing. Re-attach                                   Cap and lock by twisting in a
                       the Winged Luer Cap.                                            counter clockwise direction.*
                                                                                       Wind the tubing around the
    7                  If the Infusor is flowing,                                      top of the infusor, securing it in
                       re-attach the Winged Luer Cap                                   place.
                       and go to step 12. If the
                       Infusor is not flowing, follow
                       steps 8-11.                             *Caution: Gently lock syringe
                                                               or Fill Port Cap.
                                                               Overtightening can result in                  Re-Use
                                                               damage to Fill Port.
                                                               Use aseptic technique                     Do not re-use the
                                                               throughout the procedure.                     Infusor.

8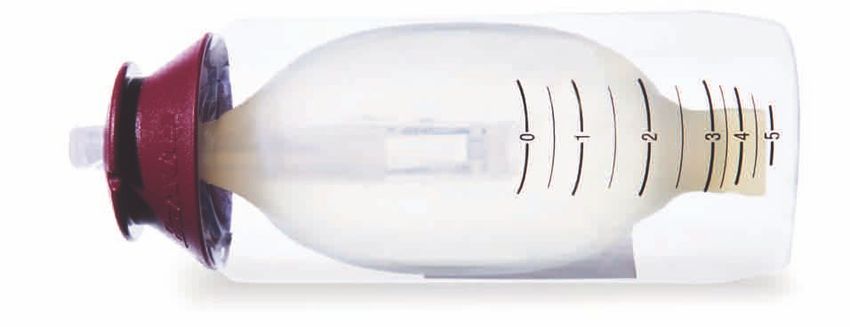
Pharmacy:
3) Multi-rate Infusor Filling Instructions:

1                                                           9                            Using the Rate Adjustment
                                                                                         Tool, turn counter-clockwise to
                       Remove the Fill Port Cap and                                      change the rate to the middle
                       retain for later use.                                             labelled rate to continue
                                                                                         priming the Multirate Infusor.
                                                                                         Visually confirm flow of fluid. If
                                                                                         the Multirate Infusor is not
2                                                                                        flowing follow steps A – D of
                                                                                         the Force prime procedure.
                       Remove all air from a 60 ml
                       syringe.
                                                            10                           Using the Rate Adjustment
                                                                                         Tool, change rate to the
                                                                                         highest labelled rate to
3                                                                                        continue priming the Multirate
                                                                                         Infusor. When priming is
                       Insert tip of filled syringe into                                 complete, visually confirm flow
                       Fill Port and turn gently to                                      of fluid and adjust the
                       lock.*                                                            Multirate Infuor System to
                                                                                         prescribed flow rate.
                                                                                         Adjustment tool should be
4                      Place the end of syringe                                          removed after the clinician has
                       plunger on work surface.                                          set the flow rate as it is not
                       Keeping the unit vertical, grasp                                  intended to be provided to the
                       syringe barrel or flanges and                                     patient. Replace the Winged
                       push slowly downward on the                                       Luer Cap.
                       syringe to gradually force fluid
                       into the Elastomeric Reservoir.      Force Prime Procedure:
                       Do not grasp the Multirate
                       Infusor device Housing during        A
                       filling. To fill the Multriate                                    Attach a luer adaptor or
                       Infusor to the desired volume,                                    stopcock to the Multirate
                       steps 2-4 may need to be                                          Infusor Luer Lock Connector.
                       repeated.

5
                                                            B
                       After the Multirate System is                                     Attach a 10 mL syringe to the
                       filled, remove syringe.                                           other side of luer adaptor (or
                                                                                         stopcock).

6
                                                            C
                       Replace the Fill Port Cap.*                                       Pull back syringe plunger to
                                                                                         create suction.

7
                                                            D                            Visually confirm flow of fluid
                       Remove the Winged Luer Cap                                        from Luer Lock Connector
                       and retain for later use.                                         before using Multirate Infusor
                                                                                         System. Ensure all air is
                                                                                         purged from the delivery
                                                                                         tubing. Replace the Winged
8                      Insert the Rate Adjustment                                        Luer Cap.
                       Tool into the Multirate Infusor
                       Control Module. Using the                 *Caution: Gently lock syringe
                       Rate Adjustment Tool, change              or Fill Port Cap.
                       the rate to the lowest labelled           Overtightening can result in               Re-Use
                       rate to initiate priming.                 damage to Fill Port.
                       Medication will automatically             Use aseptic technique             Do not re-use the Multirate
                       begin to purge air from the               throughout the procedure.              Infusor System.
                       system. Visually confirm flow
                       of fluid. If the Multirate Infusor
                       is not flowing, follow steps A –
                       D of the Force prime
                       procedure.
                                                                                                                                 9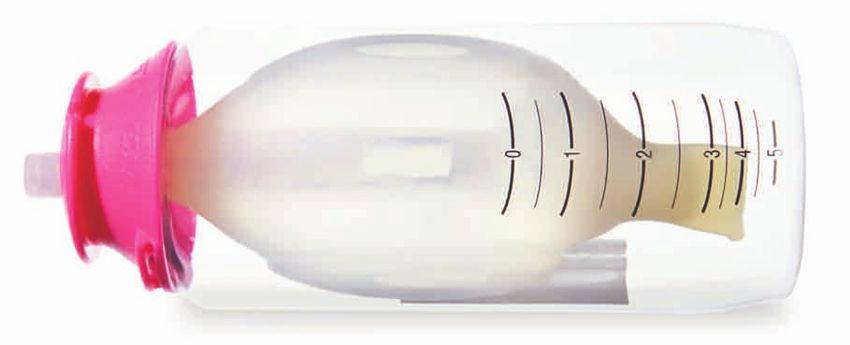
Pharmacy:
4) Regional Analgesia Infusor Filling Instructions:

 1                                                          9    Remove the Rate Adjustment
                       Do not remove PCM shipping                Tool from the Regional
                       tab until system is primed.               Analgesia Infusor System
                       Confirm that the flow rate                tubing and insert into the
                       module setting is at 0.                   Multirate Control Module.
                                                                 Using the Rate Adjustment
                                                                 Tool, change the rate to the
 2                                                               lowest-labelled rate to initiate
                                                                 priming. Medication will
                       Ensure all air is removed from
                                                                 automatically begin to purge
                       syringe or filling device.
                                                                 air from the system. Visually
                                                                 confirm fluid is past the Y
                                                                 connector. If the Regional
 3                                                               Analgesia Infusor is not flowing
                                                                 follow steps A – D of the Force
                       Remove the Fill Port Cap and              prime procedure.
                       retain for later use.
                                                            10   Using the Rate Adjustment
                                                                 Tool, turn counter-clock wise
                                                                 to change the rate to middle
 4                                                               labelled rate to continue
                                                                 priming the Regional Analgesia
                       Insert the tip of the filled              Infusor. Visually confirm flow of
                       syringe or filling device into the        fluid. If the Regional Analgesia
                       Fill Port and turn to lock.*              Infusor is not flowing follow
                                                                 steps A – D of the Force prime
                                                                 procedure.
 5                     Place end of syringe plunger
                       on work surface. Keeping the         11   Using the Rate Adjustment
                       unit vertical, grasp syringe              Tool, change the rate to the
                       barrel or flanges and push                highest labelled rate to
                       slowly downward on the                    continue priming of the
                       syringe to gradually force fluid          Multirate Infusor. Visually
                       into the Elastomeric Reservoir.           confirm flow of fluid. If the
                       Do not grasp the Regional                 Regional Analgesia Infusor is
                       Analgesia Infusor device                  not flowing follow steps A – D
                       Housing during filling. To fill           of the Force prime procedure.
                       the Regional Analgesia Infusor
                       to the desired volume, steps         12
                       3-5 may need to be repeated.              Change the flow rate of the
                                                                 flow control module to “0” with
 6                                                               the rate adjustment tool.
                       After the Regional Analgesia
                       Infusor system is filled, remove
                       the syringe or filling device.       13   Observe air and fluid flow into
                                                                 unclamped tubing and PCM
                                                                 through clear base. Visually
 7                                                               confirm all air is purged
                                                                 through delivery tubing and
                       Replace the Fill Port Cap.*               fluid is flowing from distal end
                                                                 luer lock. Force prime PCM if
                                                                 fluid is not flowing from PCM.

 8                                                          14
                       Remove the Winged Luer Cap                Replace and tighten Winged
                       and retain for later use.                 Luer Cap.

10
Pharmacy:
4) Regional Analgesia Infusor Filling Instructions (continued):
15 Remove PCM Shipping Tab
from PCM before connecting
device to patient. Pull up on
Shipping Tab to remove. Do
not push down on Shipping
Tab. Failure to remove
Shipping Tab will cause
continuous infusion through
PCM line and patient may
receive higher than intended
basal dose of medication.
Force Prime Procedure:
A To force prime the Multirate C Pull back syringe plunger to
module: First, close the Slide
create suction until fluid flow is
clamp, and attach a luer
visually confirmed (into PCM
adaptor or stopcock to the
reservoir when force priming
Regional Analgesia Infusor
the PCM).
Luer Lock Connector. To force
prime PCM: First, set the Flow
Control Module to “0”, and D Visually confirm flow of fluid
attach a luer adaptor (or from Luer Lock Connector
stopcock) to Luer Lock before using Multirate Infusor
Connector. System. Ensure all air is
purged from the delivery
B tubing. Replace Winged Luer
Attach a 10 mL syringe to the Cap. If Multirate module is
other side of luer adaptor (or primed, open the Slide Clamp.
stopcock).
*Caution: Gently lock syringe
or Fill Port Cap.
Overtightening can result in Re-Use
damage to Fill Port.
Use aseptic technique Do not re-use the RA
throughout the procedure. Infusor System.
11Pharmacy:
5) SV & LV Intermate Filling Instructions:
1 9 To prime the delivery tubing,
remove the Winged Luer Cap.
Close the Slide Clamp. Note: Failure to prime set at
time of filling may result in
flow rate difficulties.
2 10 Open the Slide Clamp and let
With the delivery tubing in the delivery tubing prime.
place, remove the Fill Port Cap Visually confirm the flow of
and retain for later use. medication in the tubing and
expel the air before use.
3 Draw up required diluent and 11
After the delivery tubing has
drug syringes. Expel all air
primed, make certain the Slide
from syringes. Do not attach
Clamp is in the ‘closed’
a needle to the syringes or
position.
you will damage the Fill Port.
4 12
Gently insert the syringe tip
Reattach the Winged Luer
into the Fill Port and turn it
Cap.
clockwise to lock.*
5 Use steady downward
pressure on the syringe
flanges or the syringe barrel.
The steady downward
pressure on the syringe will
gradually push fluid into the
Elastomeric Reservoir. Steps
3-5 may need to be repeated.
6
After the Intermate is filled,
remove the syringe.
7
Gently twist the syringe
counter-clockwise to separate
from the Intermate.
8
Lock the Port Cap onto the Fill
Port by carefully twisting in a
clockwise direction.*
*Caution: Gently lock syringe
or Fill Port Cap.
Overtightening can result in Re-Use
damage to Fill Port.
Use aseptic technique Do not re-use the
throughout the procedure. Intermate.
12Volume:
The flow rate of Baxter Elastomeric Pumps is most accurate when filled to the labeled nominal volume.
• Infusors and Intermates flow faster than labelled flow rate if underfilled (filled to < 81% of nominal fill volume).
• Nominal flow rate is achieved by utilizing the fill volumes listed in the Directions for use.
Solution Viscosity:
Infusors:
• The Infusor flow rate is most accurate with a diluent solution of 5% Dextrose.
• An Infusor filled with 0.9% Sodium Chloride (NaCl) will flow ~10% faster than labelled rate.
Intermates:
• The Intermate flow rate is most accurate with a diluent solution of 0.9% Sodium Chloride (NaCl).
• An Intermate filled with 5% Dextrose will flow ~10% slower than labelled rate.
Storage Instructions:
The Infusor/Intermate may need to be stored either in the refrigerator or at room temperature depending upon the
medication being administered.
When stored in a refrigerator please ensure that the Infusor/Intermate is brought to room temperature before use. Do not
use any external heat source to bring the Infusor/Intermate to room temperature.
REFRIGERATOR STORAGE:
• Ensure the area of the refrigerator where you store the Infusor/Intermate is clean and separate from food products.
• Keep the Infusor/Intermate within the plastic pouch provided or a zip loc bag when storing in a refrigerator.
ROOM TEMPERATURE STORAGE:
• Ensure storage area is clean.
• Keep out of direct sunlight.
• Keep away from extreme heat sources such as an oven or heater.
13Nursing:
Connecting the Device:
Connecting the Infusor or Intermate to the catheter/port:
1 REMOVE THE WINGED LUER 5
Store the Winged Luer Cap in
CAP FROM THE END OF THE
the bag the Infusor/Intermate
INFUSOR OR INTERMATE
came in. (You may need it
TUBING. Check to make sure
later).
that liquid has moved to the
end of the tubing.
2 6
REMEMBER, unclamp the
catheter and open any clamp
Replace the Winged Luer Cap.
on the device so that the fluid
can start flowing.
3 Flush the IV line as per 7 Place the Infusor or Intermate
institution protocol. Make sure either in its carrying bag, in a
that the patient’s catheter is beltbag or pocket where it
clamped, then remove and won’t fall out or get damaged.
discard the catheter end cap. Ensure the top of the device is
carried as close to the level of
4 While still holding the IV line, the Luer Lock Connector as
pick up the Infusor/Intermate possible.
tubing, remove the Winged
Luer Cap and connect the
device tubing to the catheter
with a quarter clockwise turn.
Tape the Luer Lock Connector
securely to the patient’s skin
(Infusor only).
How Should the Device be Carried?
• The Luer Lock Connector (refer to Diagram 1) should always be taped to the patient’s skin at approximately the same
level as the top of the device (i.e. Fill Port Cap – refer to Diagram 1) of the Infusor/Intermate in order to maintain a
consistent flow rate.
• Flow rate is most accurate when the Elastomeric Reservoir and the Luer Lock Connector are at the same height.
• Flow rate can decrease 0.5% per 2.5 cm if the Elastomeric Reservoir is below the Luer Lock Connector.
• Flow rate can increase 0.5% per 2.5 cm if the Elastomeric Reservoir is above the Luer Lock Connector.
• Provide a carrying case to assist patients in keeping the top of the device as close to the level of the Luer Lock
Connector as possible.
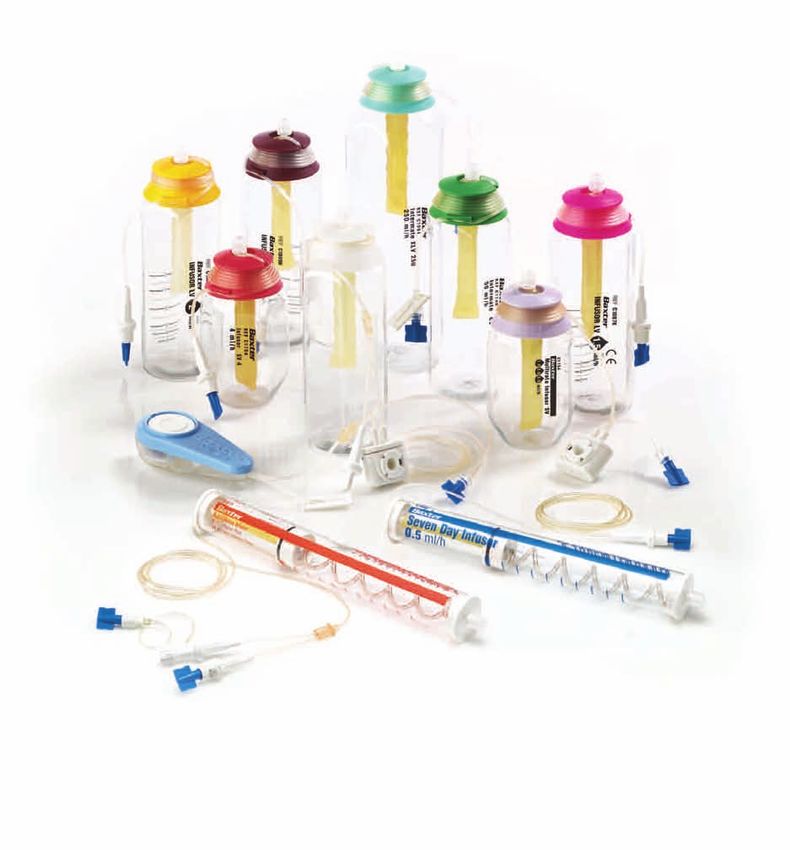
14Monitoring Infusion Progress
• Since the Infusor/Intermate delivers medication at a slow rate the elastomeric “balloon” reservoir will appear to be
shrinking over several hours or days.
• Ensure that the IV tubing is not clamped or kinked.
• Utilize progression lines on the Infusor/Intermate housing to monitor infusion progress over time.
• Infusion is complete when the “balloon” is completely deflated and all eight indicator bumps (four on either side of
balloon) on the inside of the device are clearly visible (refer to Diagram 3).
Diagram 3
1 Indicator Bumps
2 Progression Lines
2
Nursing
15Diagram 4 Infusion Progression - LV5 (2C1009KP) Delivering accurate infusion. Continuously. 12 HRS INFuSed 24 HRS INFuSed 36 HRS INFuSed 16
Diagram 5

Infusion Progression - LV1.5 (2C1087KP)
Delivering accurate infusion. Continuously.

2 dayS INFuSed

4 dayS INFuSed

6 dayS INFuSed

                                              17
Patient FAQ’s:
Bathing
• The Infusor/Intermate device should not be submerged or exposed to a direct stream of water.
• Place the Infusor/Intermate in a plastic bag OR on a flat surface outside the shower/bath.
Sleeping
• Place the Infusor/Intermate at approximately the same level to where the device connects to
your catheter/port.
• The device can be placed on its side under your pillow.
Exercise
• It is acceptable to exercise with the Infusor/Intermate as long as the product remains close to
room temperature and is not exposed to water. Follow your healthcare provider guidelines.
Pets
• The device is safe to use around pets, but ensure that it is protected from chewing and playing.
Environment
• The Infusor/Intermate can be utilized during everyday activities (e.g. cooking) as long as the
device is in a location where it can remain at room temperature and is not exposed to extreme
heat/cold.
• Keep device out of direct sunlight.
Travel
• It is safe to travel on planes that have pressurized cabins.
If you have any questions about what you’ve read here, please contact us at 1-888-719-9955.
18Making a Meaningful Difference
in Patients’ Lives.
Baxter Corporation 4 Robert Speck Pkwy, Suite 700, Mississauga, Ontario L4Z 3Y4 Canada
Baxter is a trademark of Baxter International Inc. Baxter is registered in the U.S. Patent and Trademark Office.
Copyright 2010, Baxter Corporation. All rights reserved. MDFT21-01/11EYou can also read