PROVIDER PORTAL Santé Physicians - Sante Physicians
←
→
Page content transcription
If your browser does not render page correctly, please read the page content below

PROVIDER PORTAL
      Santé Physicians

  1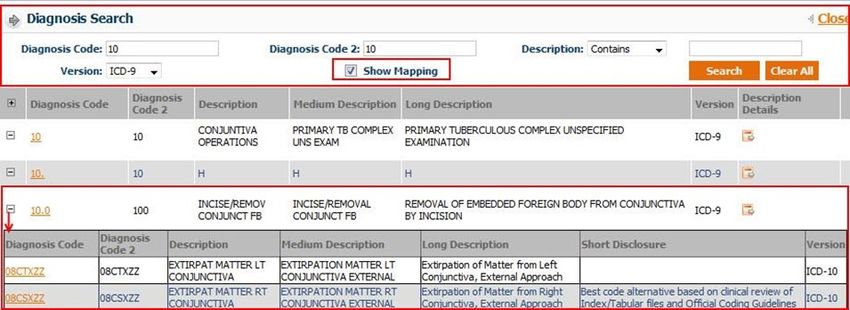
2
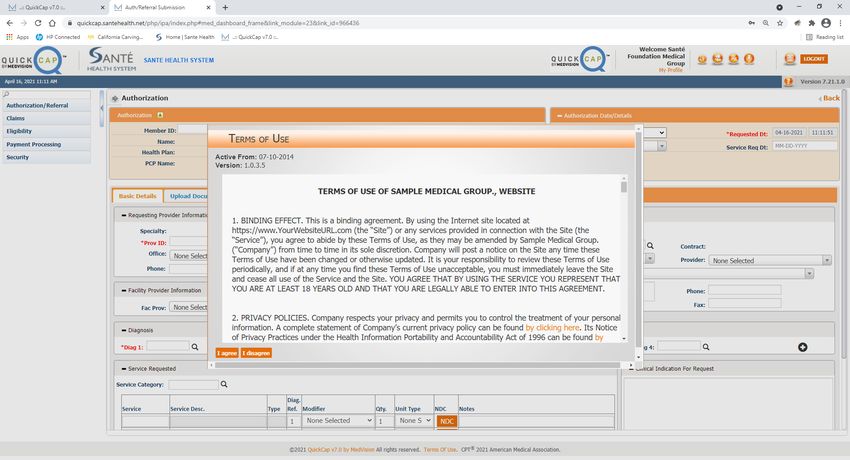
Table of Contents

PROVIDER PORTAL
  SUBMITTING A NEW PROVIDER PORTAL REQUEST         1
AUTHORIZATION/REFERRAL
  SUBMITTING A NEW AUTHORIZATION                   4
  CHECKING THE STATUS OF AN AUTHORIZATION          18
CLAIMS
  SUBMITTING A NEW CLAIM                           21
  CHECKING THE STATUS OF A CLAIM                   32
COMMUNICATION
  COMMUNICATION                                    34
CUSTOMER SERVICE
  CUSTOMER SERVICE REQUEST                         35
  SEARCHING CUSTOMER SERVICE REQUEST               37
EDI SERVICES *refer to the supplemental handouts
ELIGIBILITY
  VERIFYING ELIGIBILITY                            38
INFORMATION
  CODE REFERENCE - CPT                             40
  CODE REFERENCE - ICD                             42
  CODE REFERENCE - MODIFIER                        44
PDR
  SUBMIT PDR                                       45
PAYMENT PROCESSING
  CLAIMS EOB                                       48
REPORTS
  PCP REPORTS                                      51

                                  3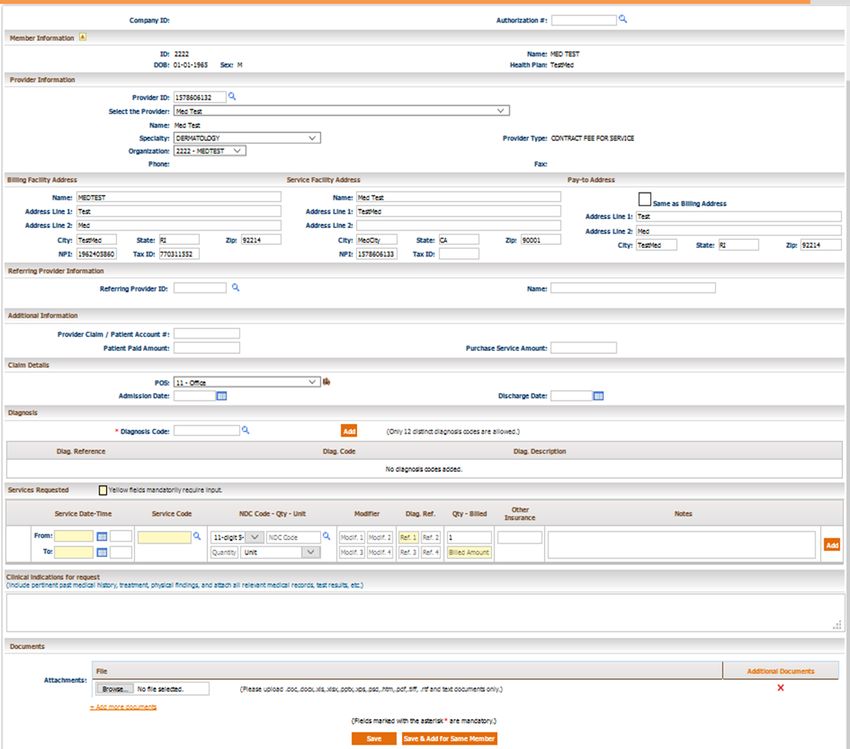
INTRODUCTION

The Provider Portal is a robust tool which allows users to both
submit and view data, as well as, communicate directly with the
organization. Within the portal, the user can perform key tasks
including submitting authorization, viewing authorization and
claims status. It also gives the user a platform to verify eligibility of
patients. In addition, the portal allows the user to upload claims in
837P format and download in 835 format.

This allows the user to print the explanation of benefits (EOBs) on-
demand.

Each of these functions and features will assist in making your day-
to-day operations more efficient and effective. Here at Santé, we
are confident that with our new portal, you will be able to focus
on providing the best quality care for your members.

                                    4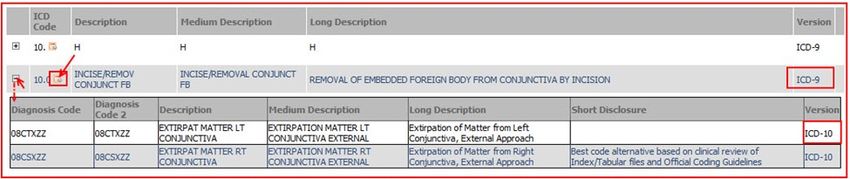
Provider Portal
From the Santé website, users are able to submit a provider portal
request.

Submitting a provider portal request
Step 1: Go to www.santephysicians.com, click on the New User.

Step 2: Enter all the applicable mandatory information.
Note: Please make sure to fill in all required fields (*) before you
click submit.

                                   1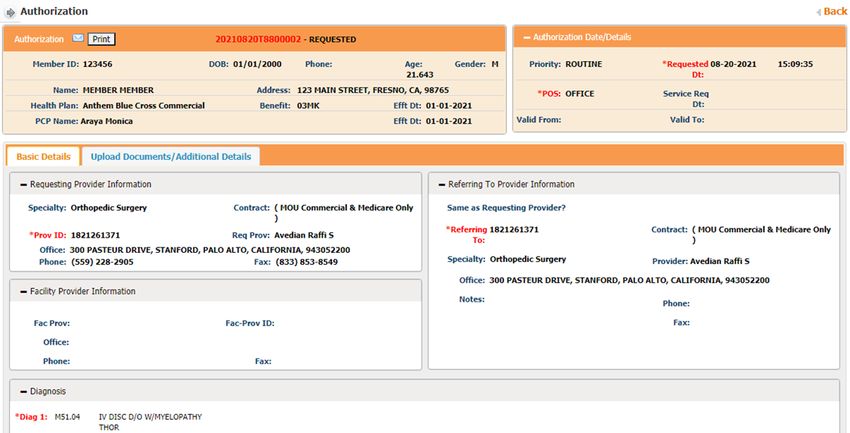
Your request will be sent to Santé for review. If approved, you will
receive an email confirmation with your username and password.

Step 3: Login to the QuickCap Provider Portal with your username
and temporary password.

                                 2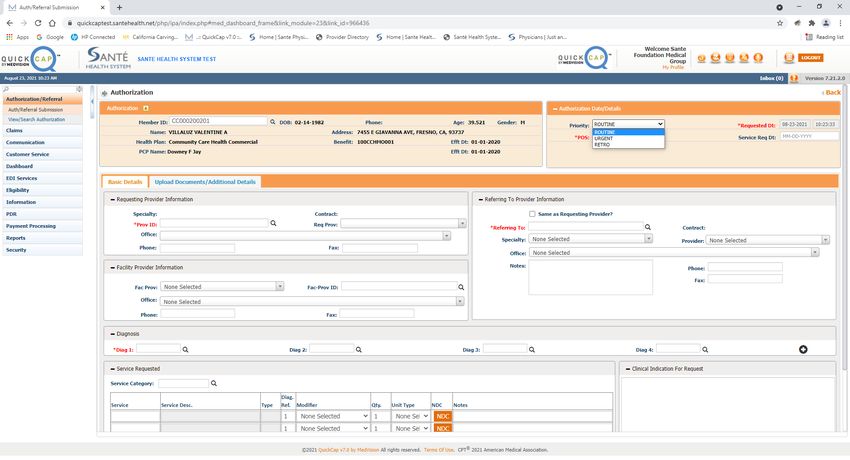
Step 4: Click Agree on the Terms of Use.

Step 5: Create your new password, confirm your password and
create your secret questions for security measures if you need to
update or change your password in the future.

Step 6: You are now ready to navigate the new provider portal.

                                3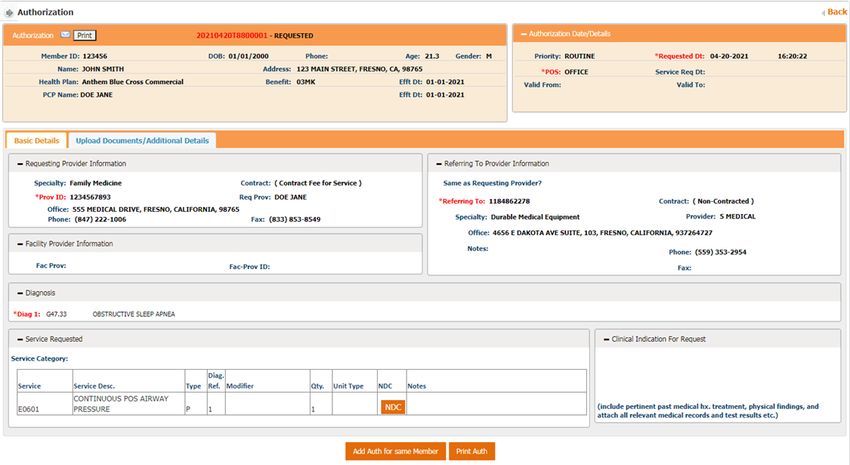
Authorization/Referral
From the Authorization/Referral module, users are able to submit
new authorizations and referrals and also check the status of an
existing authorization.

                          │Authorization/Referral Module

Submitting a new authorization
Step 1: From the drop-down menu of the Authorization/Referral
module, select Auth/Referral Submission submodule.
To submit a new authorization, follow the steps below:

                                  4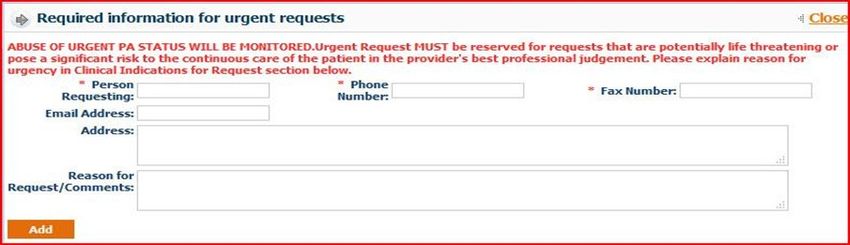
The screen will display as shown below. On this screen, there are
three subsections to add an authorization.
Step 2: The first section is the Member Section. Users can enter the
member’s information in one of two ways:
Enter the Member ID for the specific member. The system will
begin suggesting members once the user has entered part of
an ID. Users can then select the correct ID to add the
member’s information to the screen.
5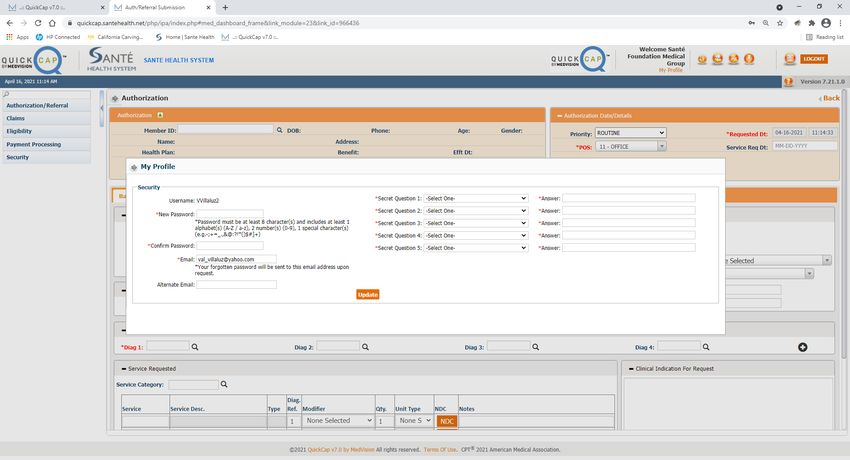
Or users can click on the Magnifying Glass icon to search for
the member. The Member Lookup screen will open. From this
screen, users can search using a combination of Member ID,
Health Plan, Name, and DOB to find the record. Double click
the correct record to add it to the authorization request.
Step 3: The details for the selected member will be populated on
the screen. The system will default the Requesting Provider
information matching the organization and provider logged in.
6Step 4: The user can select the Priority and the Place of Service for
the request.
Within the Priority dropdown menu you will have two options
which will trigger a popup screen to appear or additional
options.
○ Urgent: If selected, the Required Information for Urgent
Requests screen will open. Enter the necessary
information and click the Add button to complete this
step.
○ Retro: If the services have already been provided, users
should select Retro. A new field, Retro Date, will appear
and require date entry.
7Step 5: The section to the right of the Member Details is the
Authorization Date/ Details. The Requested Date is non-editable
and will always default to the date of submission.
The Service Requested Date, displayed in the Service Req. Dt
field should be entered as the date that the service should be
performed, scheduled for, or for the authorization to become
effective. This date will be reviewed by Santé Physicians
internal staff and is subject to their discretion.
Step 6: The Basic Details tab displays the Requesting Provider
Information. This will default to the provider that is logged into the
system. This screen includes the Specialty, Contract Type, Provider
ID, Requesting Provider Name, and the Contact Information.
8 If the requesting provider needs to be changed, users can
search for a new provider by clicking the Magnifying Glass
icon on the right of the Provider ID field. The Provider Search
screen will open as shown below. Search the provider by
entering any of the available information.
Click the Provider ID indicated in orange to populate the
details of the requesting provider on the authorization request.
If the provider has multiple offices, users can select the correct
office from the dropdown menu.
9Step 7: The next section, Referring to Provider Information, allows
users to enter the information for the provider that member is
being referred to.
For self-referrals, select the Same as Requesting Provider
checkbox. This will auto-populate the information from the
Requesting Provider screen.
To search for a Referring To Provider, click the Magnifying Glass
icon beside the Referring To field. The Provider Search screen
will populate as shown in the above section. Users can search
for the specific provider.
Click the correct Provider ID to enter the details of the referring
provider on the authorization request.
10 Select the Referring to Office from the dropdown menu.
Step 8: This step is optional. Users can enter Facility Provider
Information for the request, if needed.
Step 9: The next section, Diagnosis, is where users will enter all
diagnosis details for a request.
Enter all ICD-10 codes related to the request in the Diagnosis
Code field.
○ If the user knows the ICD-10 code, they can enter it into the field
and press tab on their keyboard. The system will populate the
description to the right in the Diag. Description field. The system
will auto suggest codes if they are partially entered.
○ To search for the diagnosis code, click the Magnifying Glass icon
by the Diagnosis Code field. The Diagnosis Search screen will
populate, as shown below.
11 From the Diagnosis Search screen:
○ Enter either the diagnosis code or description to search for the
code.
○ Users can view the mapping between versions by selecting the
Show Mapping checkbox.
○ Click the Search button.
○ Click the + icon to the left of each code to view the mapping.
○ Select the desired code by clicking on the correct Diagnosis
Code shown in orange.
Note: Users can add 12 distinct diagnosis codes.
12Step 10: The next section is used to enter the CPT/HCPCS codes for
the requested services.
To utilize the CPT/HCPCS Code option, users can enter the
service code or search for the service code by clicking F2 on
the keyboard.
After the code is entered, the description will auto populate
into the Service Desc field.
13 Users can enter the Diagnosis Reference. The system will
default automatically to 1, which indicates that the code is
linked to the first ICD code from the Diagnosis section. Users
can change the digit corresponding to which diagnosis code
the service should reference.
Users can add any modifiers if needed. Modifiers can be
selected from the dropdown menu or manually enter the
code.
Users can enter a quantity for the service and select the unit
type. If none is selected, it will default to None and for 1 for the
Quantity.
Press tab on the keyboard to go to the next CPT (service) line.
14Step 11: The next section is Clinical Indication for Request. In this
section, users can add the member’s past medical history,
physical findings, service notes being requested, or attach all
relevant medical records and test results.
Step 12: The second information tab is Additional Details. Within
this tab, three more sections will appear. The first section includes
fields to enter Guardian Name, Language preference, Cell/Phone
Number, and Medical Record Number (MR#).
Step 13: The first section is Documents. Users can upload and
attach documents to the referral request. Users are also able to
fax documents to the organization. To upload documentation
and submit it electronically with the referral request:
15 Select the Category and Priority of the document.
Click Browse to find the file from the computer directory.
Upload documents in the following formats: .doc, .docx, .xls,
.xlsx, .pptx, .xps, .psd, .htm, .pdf, .tiff, .rtf, and text.
Click the Add Additional Documents button to add multiple
documents.
Once users click Save, the document will send with the referral
automatically.
Note: Supporting documentation is required. Failure to submit
could delay the completion of your request.
Step 14: After verifying the data entered, users can save the
request.
To submit the referral request, click Save.
To submit the referral request and add another request for the
same member, click Save and Add for Same Member.
Note: When an authorization or referral request is submitted, users
will receive a notification detailing the authorization request
number with the status. Then on the Authorization screen, the
recently submitted authorization number will be displayed
automatically on the header portion.
16Step 15: Users have the option to Print Auth on the lower section of
the screen once it is saved. This feature allows users to print
authorization requests. The popup window gives options to print
and export the request.
Export Options: There are several options that the reports can be
exported to:
Crystal Reports (RPT) Word 97 – 2003
PDF Word 97 – 2003 Editable
Excel 97 – 2003 Rich Text Format (RTF)
Excel 97 – 2003 Data Only Character Separated Values
Excel Workbook Data Only (CSV)
XML
17Checking the status of an authorization
Step 1: From the drop-down menu of the Authorization/Referral
module, select View/Search Authorization.
Step 2: The Authorization/Referral Status Search screen will display
as shown below:
18Step 3: The first section is where users search for authorizations.
Enter search criteria in any of the available fields. The search
results will display in the results section below.
Step 4: Click the (+) icon on the left column of the result table to
view the services requested in the authorization. The service
information will be visible.
Step 5: The status of the authorization (requested, approved,
denied) is displayed in the Authorization No. Status column.
Step 6: To view all of the information for a specific authorization,
click on the row for the authorization. This will redirect users to the
Authorization/Referral Status Search screen with all of the
authorization details.
19Note: This screen is only for viewing purposes. Only a few sections
are enabled.
Step 7: To add additional details to the current authorization
request, click the Additional Details button. The Additional Details
screen will populate as shown below.
20Claims
From the Claims module, users are able to submit a new claim,
view and search for previously submitted claims.
Submitting a new claims
To submit a new claim, follow the below:
Step 1: From the Claims list, select Provider – Provider - Claim
Submission .
│Provider - Claim Submission Submodule
Step 2: The screen will display as shown below. Look up the
member for which you want to add claim for, using Member ID or
Last Name, DOB and HealthPlan, by adding details in search and
clicking on search icon.
21Step 3: Once you have the member record in result field, click on
Submit Claim button at the left-hand corner of the member
record.
Step 4: Once the button is clicked, the system will re-direct to the
screen to add claims. Please refer to the image on the next page
as to how the screen will look now. There is a total of 10 sections to
fill in.
22Step 5: Below are the steps to add details to the claim:
Add Authorization Number on the claim. You can click on the
magnifying glass to look up an authorization from the system.
Click on Auth# to select the auth for this claim.
Basic Member Information will automatically populate, based
on the member we selected initially before we clicked Submit
Claim.
Under Provider Information section, you can choose the
rendering provider for the claim. Provider can be selected
using two options:
○ Provider ID search using magnifying glass, to look up
provider using filters. Once you have the provider in the
result grid, click on the ID to select the provider.
23○ Select the Provider drop down. This will show you all
providers under your organization.
○ Once you have selected the provider, all other details will
be auto-populated.
○ If you wish to change the specialty of the provider (In case
the provider is multi-specialty), click on the specialty drop
down.
○ If you wish to change the organization (Billing entity), you
can click on the drop down to choose from different
organizations linked to this provider.
24 Addresses – Billing, Service and Pay to
○ These addresses will auto-populate based on the provider
and organization selected. However, if you wish to
manually override it, you can.
Additional Information section will let you add additional
details on this claim like:
○ Patient Account #
○ Patient paid amount
○ Purchase service amount
Claim Details will let you enter the POS of this claim.
○ When the POS added is an inpatient POS, it lets you add
the admit and discharge date.
Note: In case of inpatient claim, it is mandatory to add Admit
date.
○ When the POS is Ambulance, the ambulance icon gives
you a pop-up to add ambulance details. Fill in the details
and click OK to save the ambulance details.
25 Diagnosis field lets you add 12 distinct diagnosis on the claim.
You can either type in the diagnosis code (Tab Out) and click
add OR you can look up the diagnosis code using the
magnifying glass.
Services lets you add all the details for procedures to be billed
on this claim.
26○ Below are the details you can add on the service line
Service From and Service To date and time (Advised to
add time for Anesthesia claims).
Service code/Procedure code. You can type in or look
up from the magnifying glass icon. Click on the code to
add on claim.
NCD Code – QTY – Unit. (Mandatory to add for all J
codes)
You can add NDC code in different formats. Format
can be selected from the drop down.
27 Once you have selected the format, you can add
your NDC code or look up using the magnifying
glass.
QTY is the space provided to define the number of
quantity for the drug specified on NDC code.
Unit, lets you choose the unit for the code.
Modifier code lets you add four modifiers on each
service line.
28 Diagnosis code ref, lets you add the diagnosis code
indicator for each service line. Please add numeric
value in this to indicate the diagnosis code place value
you would like to add.
QTY is the quantity for the procedure code you want to
bill.
Billed is the billed amount for this procedure code.
Other Insurance is the amount received from Primary
insurance if this is a secondary claim, etc.
Notes lets you add s service level notes if needed. Any
significant details for this line item can be sent here.
ADD icon adds these details and makes these fields
blank again for the next line item.
29○ Once all details are added, you can see the detail lines
added and their total below them.
Note: To delete a line item added in error please click on the
Cross icon at the right end of each service line. To merely
update the details, click on the edit icon to the left of the
service line.
Clinical Indication is a section where you can add additional
details to be submitted on the claim. This can contain patient’s
history, medical findings or any relevant records.
Documents let you attach any relevant document about the
claim being submitted. You can attach files with the type as
mentioned on the screen.
○ To add document, click on Browse, to select a file from
your machine.
○ To add more than one document, click on the link for +add
more document.
30○ To delete a document attached before submitting a claim,
you can click the cross on the right.
Step 6: Once all the details are added, click on Save to submit the
claim for processing. You can also use Save & add for same
member if you wish to add another claim for the same member.
Note: Once the claim is saved, it will give you a pop up with a
claim number as shown below. You can click on OK to go back to
the screen. If you wish to print the submitted claim as CMS 1500,
click on PRINT CLAIM.
31Checking the status of a claim
To verify the status of a claim, follow these steps:
Step 1: From the Claims list, select Claims Search/Status.
│The Claims Search/Status submodule
Step 2: The screen will display as shown below. On this screen,
there are three subsections to search claims by.
Step 3: Based on the criteria users have input, the search results will
display in Claim Details section, as shown below.
The Status can be found on the right side in the last box. The
adjustment code and net amount on the claim is not finalized
and is subject to change until the Status is Paid.
32Step 4: To view and print the claim in CMS 1500 format, click the
Print CMS 1500 button.
Step 5: If the claim is in a Paid status, there will be an additional
button for Show EOB.
33Communication
From the Communication module, users are able to communicate
with any QuickCap user including group/department such as
customer service, claims, utilization management, etc.
│The Communication Module
34Customer Service
From the Customer Service module, users are able to add and
view existing customer service requests for their organization.
│The Customer Service Module
Adding Customer Service Requests
From this screen, users are able to add customer service requests
into the portal. Once an external user submits a request, internal
users can review the request.
Step 1: From the Customer Service list, select Customer Service
Request.
Step 2: Click Add.
Step 3: The Customer Service Request – Add screen will populate.
Users can fill in the information below to submit a request.
Regarding: This drop-down menu allows users to select the
purpose of the submission.
35 Priority: This allows users to select the severity between low,
medium, or high.
Pref. Comm: This field represents the best way to contact back
in case follow up is needed. The selection includes Fax, Email,
and Phone.
Reason: This field indicates what the user was calling in regards
to. Depending on the field selected above from the Call
Regarding field, the Reasons will change.
Problem/Description: Users can add a description to explain
further the purpose of this request. This information will assist
the representative reviewing the request.
Attachment: Users can attach any documents that would aid
the representative in completing the request.
Step 4: Click Save to submit the request. A customer service
request reference number will be given upon saving the request.
This can be used later to check for updates.
36Searching Customer Service Requests
External users can check in the portal to view the status of
previously submitted requests.
Step 1: From the Customer Service list, select Customer Service
Request. The Customer Service Inquiry screen will open.
Step 2: Enter search criteria.
Step 3: Click Search to show the results. Click the Reference
Number associated to the request to open the entire request.
Users can update or add information to an existing request at this
time.
37Eligibility
From the Eligibility module, users are able to verify a member’s
eligibility and report any discrepancies.
│The Eligibility Module
Verifying Eligibility
To verify Eligibility for a member, follow the below:
Step 1: From the Eligibility list, select Member Verification.
│The Member Verification submodule
Step 2: The screen will display as shown below by clicking on the
search icon.
38Step 3: Users can search for members in two different ways:
Search by entering the Member ID for the specific person.
Search by entering the Last Name, Date of Birth, and Gender
of the member; all three fields must be completed.
○ Users can add the Health Plan, First Name, SSN, and Service
Date for a more detailed search.
Step 4: Select Verify Eligibility. If the member exists in the system,
their details will be displayed as shown below.
To view additional details about the member’s eligibility, click
the magnifying glass (first icon) under Details.
To print the member’s eligibility, click the Print button (second
icon) under Details.
39Information
From the Information module, users are able to search and view
the code references for ICD codes, CPT codes, and modifiers.
Code Reference—CPT
From this screen, users are able to search and view CPT codes.
Step 1: QuickCap Portal -> Left Panel -> Information -> Code
Reference-CPT
Step 2: The CPT Search screen will display as shown below.
40Step 3: Users can search for codes either by entering the CPT
Code or by entering the Description.
Note: It is necessary to enter data in at least one field. It is better
to search with less specific descriptions as the search function will
find more possible matches.
Step 4: Click the Find CPT button. The search results will display as
shown below.
1. To view more details regarding the CPT code, click the CPT
Description Details icon. The CPT Description screen will
populate as shown below.
2. To view the NCCI Edits, click the View link for the specific row.
The NCCI Edits screen will be populated in a separate screen.
41Code Reference - ICD
From this screen, users are able to search and view ICD codes.
Step 1: QuickCap Portal -> Left Panel -> Information -> Code
Reference-ICD
Step 2: The ICD Search screen will display as shown below.
Step 3: Users can search for codes either by entering the ICD
Code (ICD-9 or ICD-10) or by entering the description.
Note: It is necessary to enter data in at least one field. It is better to
search with less specific descriptions as the search function will
find more possible matches.
Step 4: Users are able to select an ICD-version in the Version field.
This allows the system to search by ICD-9, ICD-10, or include both
in the search results.
Step 5: User should select the Show Mapping button if they would
like to have the comparable ICD code map between ICD-9 and
ICD-10.
42Step 6: Click the Find ICD button. The search results will display as
shown below.
Step 7: Click the (+) icon to view the mapping details.
Step 8: To view more details about the ICD code, click the ICD
Description Details icon. The ICD Description screen will populate
as shown below.
43Code Reference - Modifier
From this screen, users are able to search and view modifier
codes.
Step 1: QuickCap Portal -> Left Panel -> Information -> Modifier
Step 2: The Modifier Search screen will display as shown below.
Note: Users can search either by entering the Modifier Code or by
entering the description. Users can also search by directly clicking
the Find Modifier button.
44PDR
From the PDR module, users are able to submit a provider dispute
resolution.
Submit PDR
Step 1: From the PDR Module, select PDR Submission/Search.
Step 2: Click on the Add.
45Step 3: The Submit - PDR screen will populate. Users can fill in the
information below to submit a request.
Disputed Claim # - the user must provider a claim number that
is being disputed.
PDR Submission Date - a system generated date based when
the day of submission.
Additional Information need to be filled out including:
○ Member ID
○ Member DOB (Date of Birth)
○ Last Name
○ First Name
46 Submitter Contact Information
○ Name
○ Preferred Communication (Email or Fax)
○ Phone Number
○ Fax Number
○ Email
Additional Files - submitter will be able to submit additional files
Billing Address - completed provider billing address
Detail - including reason for PDR and PDR Category.
Step 4: Once all the details are added, click on Save to submit the
PDR for review.
47Payment Processing
From the Payment Processing module, users are able to generate
Explanation of Benefits (EOBs) for members claims that have been
submitted and paid for.
│The Payment Processing Module
Claims EOB
To print a claims EOB, follow these steps:
Step 1: From the Payment Processing list, select Claims EOB.
│The Claims EOB submodule
The screen will display as shown below.
Step 2: Enter the specific member’s name that you want to
generate the EOB for.
Note: Users can skip this search criteria if they want to generate
EOBs for multiple members from an organization.
48Step 3: Enter the correct organization name or search the
organization by clicking the magnifying glass icon. The
Organization Search screen will be displayed as below. Only
organizations that users are affiliated with will show in the search
screen.
Search the organization by entering any of the available
information.
Select the organization by clicking the Organization ID.
Step 4: Enter the check number that the EOB was paid with. If the
user does not know the check number, they can search for the
check by clicking the Retrieve Check button. The Check No
Search screen will display as shown below.
Search the check by entering either the check number or by
entering date ranges. To search for all checks ever paid,
leave the fields blank and click the Search button.
Select the check by clicking on the Check No.
49Step 5: By entering the check number, the Paid Date field will be
populated with the dates automatically. Click the Display EOB
button and the EOBs will be generated as shown below.
To print the report, click the Print icon.
To export the report, click the Export icon. An Export dialogue
box will be populated as shown below.
Select which file format to save the report in.
Click the Export button. The report will be exported in the
selected file format.
50Reports
From the Reports module, users are able to generate different
type of special reports.
│The Reports Module
PCP Reports
Step 1: From the Reports list, select Claims PCP Reports.
│The PCP Reports submodule
Step 2: Based on the screen below, a user can run different types
of reports that suits their needs.
51Members (Export to Excel) - list of all the members assigned to a
specific PCP in excel format.
Members - list of all the members assigned to a specific PCP in
standard report format.
Members Never Seen by PCP - list of all the members assigned to
a specific PCP that hasn’t seen the PCP.
Hospital Admission - list of all the members assigned to a specific
PCP that has been admitted to the hospital. This report is based on
hospital claims in the system.
Urgent Care Visits - list of all the members assigned to a specific
PCP that has visited an urgent care provider. This report is based
on the urgent care claims received in the system.
Specialty Utilization - list of all the members assigned to a specific
PCP that has visited a specialist provider. This report is based on
the specialty claims received in the system.
ER Visit Paid, Unpaid & Both- list of all the members assigned to a
specific PCP that has been admitted to the emergency room. This
report is based on the ER claims received in the system.
52Notes
____________________________________________
____________________________________________
____________________________________________
____________________________________________
____________________________________________
____________________________________________
____________________________________________
____________________________________________
____________________________________________
____________________________________________
____________________________________________
____________________________________________
____________________________________________
____________________________________________
____________________________________________
____________________________________________
____________________________________________
____________________________________________
____________________________________________
____________________________________________
53ABOUT THIS USER GUIDE
This user guide is an active document and every effort is made to
ensure its consistency. While Santé takes every precaution in
preparing this document research, development, and
compilation, Santé assumes no responsibility or liability for errors or
omissions as variations may be observed from the time of
publishing, compared to the application release dates. This
document is subject to change at any moment and Santé will try
its best to communicate such change.
For questions and inquiries, please email Santé Physician Services
at PhysicianServices@santehealth.net.
541
Local (559) 228-5400
 Toll Free (800) 652-2900
www.santephysicians.com

           2
You can also read