Record without limitations or fees - User's Guide
←
→
Page content transcription
If your browser does not render page correctly, please read the page content below

User’s Guide

Record without limitations or fees.

Important Software Notice
        As with all software controlled products, unexpected behavior could arise if the user
        tries to perform operations in a non-routine manner. This product, like almost any
        other high tech product, is subject to bugs and hence Channel Master CANNOT
        AND DOES NOT GUARANTEE OR WARRANT THAT ALL FEATURES, SUCH AS
        PARENTAL CONTROLS, WILL WORK AS INTENDED UNDER ALL CIRCUMSTANCES.
        Channel Master endeavors to improve such conditions and will periodically download
        improvements.

        Equipment and Software Covered by this Guide
        This User Guide covers the Channel Master® DVR+™ receiver and software model
        Channel Master DVR+. This User Guide may cover other devices not listed here.

        Document Number: 199646
        Document Version: 1.0

        Channel Master is a registered trademark and DVR+ is a trademark of Channel Master
        L.L.C.

        All product names, trade names, or corporate names mentioned in this User Guide are
        acknowledged to be the proprietary property of the registered owners.

        VUDU and the logo are trademarks of VUDU, Inc. and are used by permission.

        Manufactured under license from Dolby Laboratories. Dolby and the double-D symbol
        are trademarks of Dolby Laboratories.

        The terms HDMI and HDMI High-Definition Multimedia
        Interface, and the HDMI Logo are trademarks or                                       ®
        registered trademarks of HDMI Licensing LLC in the
        United States and other countries.

Publishing Information
Copyright © 2013. Channel Master, Gilbert, Arizona 85233. All rights reserved.
The information in this User Guide may change without notice. Revisions may be issued to tell you
about such changes.
Important Safety Instructions
1     Read these instructions.
2     Keep these instructions.
3     Heed all warnings.
4     Follow all instructions.
5     Do not use the apparatus near water.
6     Clean only with a dry cloth.
7     Do not block any ventilation openings. Install in accordance with the manufacturer’s instructions.
8     Do not install near any heat sources such as radiators, heat registers, stoves, or other apparatus (including amplifiers)
      that produce heat.
9     Do not defeat the safety purpose of the polarized or grounding-type plug. A polarized plug has two blades with one
      wider than the other. A grounding-type plug has two blades and a third grounding prong. The wide blade or the third
      prong are provided for your safety. If the provided plug does not fit into your outlet, consult an electrician for replacement
      of the obsolete outlet.
10    Protect the power cord from being walked on or pinched, particularly at plugs, convenience receptacles, and the point
      where they exit from the apparatus.
11    Only use attachments/accessories specified by the manufacturer.
12    Unplug the apparatus during lightning storms or when unused for long periods of time.
13    Refer all servicing to qualified service personnel. Servicing is required when the apparatus has been damaged in any
      way, such as the power supply cord or plug is damaged, liquid has been spilled or objects have fallen into it, the
      apparatus has been exposed to rain or moisture, does not operate normally, or has been dropped.
14    Do NOT expose the remote control batteries to excessive heat such as fire or sunshine.
15    WARNING: To reduce the risk of fire or electric shock, do not expose this apparatus to rain, moisture, dripping or
      splashing.
16    The power adapter must remain easy to unplug from the power socket once the equipment is installed.
17    Some safety related markings can be found on the bottom of the apparatus.
18    CAUTION: Danger of explosion if battery is incorrectly replaced. Replace only with the same or equivalent type.

Installation
    • Locate the power adapter and receiver indoors in an open, well-ventilated area. Do not place them in an enclosure (such
      as a cabinet) without proper ventilation.
    • Place the receiver on its feet on a firm, stable, horizontal surface.
    • Unplug the power adapter from the power socket during installation and follow all connection instructions.
    • Only connect the original power adapter to the receiver. Other power adapters may damage the circuitry and cause a fire
      risk.
    • Do NOT place heavy objects on the receiver or power adapter.
    • Keep plastic packaging and small parts away from babies and children.

Protect from water
    • Do NOT place objects filled with liquids, such as vases or drinks, on or near the power adapter or receiver.

General Precautions
    • Do NOT remove the power adapter cover due to risk of electric shock from live parts inside.
    • Do NOT allow objects to drop or be pushed inside the receiver, for example by children.
    • Do NOT place naked flames such as lighted candles on or near the receiver or power adapter.

Equipment Care
    • Unplug the power adapter from the power socket before cleaning.
    • If the power adapter or receiver is damaged, unplug it from the power socket and have it checked by qualified personnel
      before operating it any further.

                                                                                                                            III
Warning and Attention Symbols

You must be aware of safety when you install and use this system. This User’s Guide provides various procedures. If you
do some of these procedures carelessly, you could injure or kill yourself or damage equipment or property. Some other
procedures require special attention.

                   The Class II equipment symbol means the equipment has additional insulation and does not need
            to be grounded.

For Your Safety

                      Warning: To reduce the risk of fire
            or electric shock, do not expose this
            appliance to rain or moisture.

                    Alternating Current (AC)

                    Direct Current (DC)

                       Indoor Use Only

                       USB Connector

          WARNING: DO NOT INGEST BATTERY, CHEMICAL BURN HAZARD. The remote control supplied with this
           product contains a coin cell battery. If the coin cell battery is swallowed, it can cause severe internal burns in just 2
 hours and can lead to death. Keep new and used batteries away from children. If the battery compartment does not close
 securely, stop using the product and keep it away from children. If you think batteries might have been swallowed or placed
 inside any part of the body, seek immediate medical attention.

      IV
Table of Contents

                     INTRODUCTION                            1
   Safety Instructions            20 :: Setting audio options
                                  21 :: Getting program info
  Introduction
                                  21 :: Adjusting languages
03 :: What’s included
                                        and captioning
04 :: Controls and connectors
                                  22 :: Using VUDU™ service
05 :: Setting up your DVR+
06 :: Using the remote control     Menus and Options
                                  24 :: DVR+ Main Menu
  Getting Started
                                  25 :: SEARCH
10 :: Turning on your DVR+
                                  25 :: DVR
10 :: Programming the remote
                                  26 :: GUIDE
12 :: List of Remote Codes
                                  26 :: SETTINGS
16 :: Recording on your DVR+
16 :: Playing a recording           Troubleshooting
16 :: Deleting a recording        29 :: Issues and Actions
17 :: Managing recordings           FCC, Warranty, OSS
17 :: Locking a recording         32 :: FCC Statement
  Using the DVR+                  33 :: Limited Warranty
20 :: Changing channels           36 :: OSS Notices
20 :: Controlling the audio

                                                                 V
Chapter 1

            :: Introduction
            What you’ll find in this chapter:

            •   What’s included with your DVR+
            •   Controls and connectors
            •   Setting up your DVR+
            •   Using the remote control.

                                                 Introduction ::   1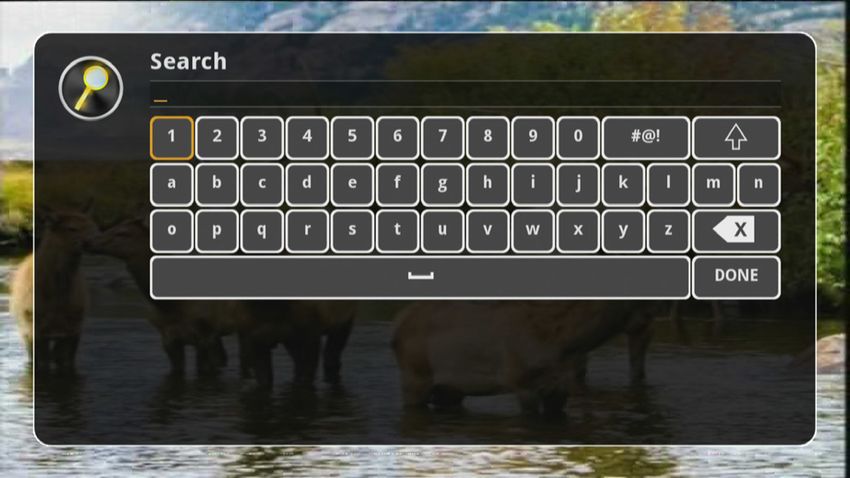
Introduction
Your new Channel Master DVR+ receiver
Thank you for purchasing your new Channel Master DVR+ High           The VUDU Service
Definition digital video receiver and recorder.
                                                                     Access to rent or buy
                                                                     VUDU movies on-demand
The DVR+ receiver is a state-of-the-art, high definition (HD),
                                                                     using your DVR+ receiver
digital video recorder (DVR) combining subscription-free, Over
                                                                     requires an account with
The Air (OTA) digital television reception with the flexibility of
                                                                     the VUDU service. You
recording for later playback. It is the complete entertainment
                                                                     can browse for available
solution: an advanced, HD digital video recorder combining OTA
                                                                     movies and then sign up
reception and recording with access to Internet-enabled TV
                                                                     directly from within the
entertainment such as on-demand VUDU™ movies.
                                                                     online application on the
                                                                     DVR+ receiver. Or you
                                                                     may use a web browser to
Internet features
                                                                     visit www.vudu.com and
Note that to access DVR+ Internet-enabled features, you must
                                                                     select the Sign Up link to
connect to a high-speed broadband Internet service. A download
                                                                     get started.
speed of 2 Mbps or more is highly recommended in order to
enjoy on-demand high-definition movies, such as VUDU.
                                                                     If you already have a
                                                                     VUDU account, then you
Using this guide                                                     can sign in to it from your
This guide is intended to help you use your new Channel Master       DVR+ receiver; or if you
DVR+ receiver. It describes the controls and connections required    have an account with
to set up and get started using the device, as well as providing     Walmart.com, you can
lists of numbered tasks for using its many features. The flow of     use that username and
these tasks may be illustrated using a ribbon, as shown below.       password to get started.

Start task with   Continue with Step 2.
Step 1.
                                           Follow with Step 3.
                                                                      Finish task with Step 4.
                                                                      Task completed.

2      :: Introduction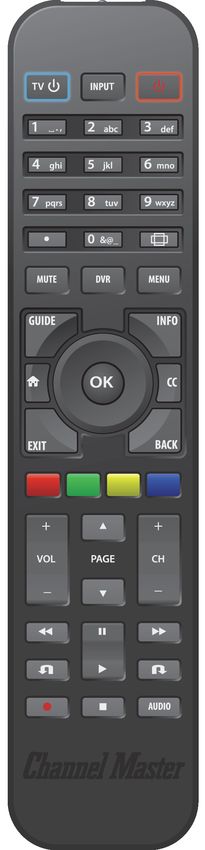
Quick Start Guide

     Record without limitations or fees.

Quick Start Guide

                                                       What is included with your DVR+

                                                       Unpack the box and familiarize yourself with each item:
  Stop Sheet
                                                       •       The Channel Master DVR+ digital video recorder

                                                       •       Quick Start Guide

                                                       •       “Read This First” Stop Sheet

                                                       •       AC Power Supply

                                                       •       Remote control (Two CR2032 batteries included)

 Power Supply

Remote Control

                                                                                         Introduction ::         3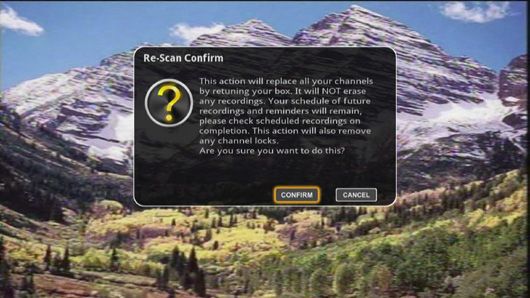
Front Panel Controls
The front panel of your Channel Master DVR+ receiver features the following:
• IR Receiver to receive infrared signals from your remote control. Please do not cover or obstruct.
• Status LED to provide a visual indication of whether your DVR+ receiver is turned on (bright blue)
    or in standby mode (dim blue). The bright blue light turns red when the DVR+ receiver is actively
    recording a program or event.
• Power button to activate your DVR+ (if it is standby mode) or put it in standby (if it is active).

                                               IR Receiver                Status LED             Power Button
                                          Receives IR signals        Red—Active Recording Turns power on/off;
                                              from remote.              Bright Blue—On      push and hold
                                         Do not cover or obstruct     Dim Blue—Standby         to reset

Rear Panel Connections
The rear panel of your DVR+ receiver has a number of different connectors you should note.

•   RF IN to connect a coaxial cable for an Over-The-Air (OTA) television antenna (REQUIRED).
•   OPTICAL port to connect a digital audio cable for multichannel sound output.
•   HDMI port to connect a High-Definition Multimedia Interface cable for digital audio/video output.
•   ETHERNET to connect a LAN cable to your router for broadband Internet service. Note that this
    optional connection (or a wireless connection using the optional USB Wi-Fi adapter) is required if
    you wish to access Internet-enabled services such as VUDU.
•   Two USB 2.0 ports to connect the optional USB WiFi adapter and/or external hard-disk/flash
    drive for expanded DVR storage.
•   IR port to connect the extension cable for an optional Infrared (IR) receiver. This increases the
    flexibility of where you can install your DVR+ and still have it respond to remote control signals.
                                                                          USB 2.0 Ports
                                                 HDMI® Output            Connects to external
                           Antenna                  Provides high-      hard drive/flash drive          IR
                       Connects over-the-air    definition digital audio and optional USB        Connect (optional)
                            antenna              and video to the TV        Wi-Fi adapter        IR extension cable

                                Digital Audio                    Ethernet                   Power
                              Optical connection to a     Connects to the broadband       Provides AC
                             high-quality digital sound   home network (required for     power to DVR+
                                 decoding system           extended program guide
                                                           and internet applications)

    WARNING: Only use the power supply included with your DVR+ to connect it to the AC outlet.

4      :: Introduction
Connecting and setting up your DVR+ receiver
1 Connect the antenna to the receiver.
RF IN
Connects over-the-air
(OTA) TV antenna
2 Connect the receiver to the TV. HDMI® Output
Provides high-definition digital
audio and video to the TV
Note: Only use
a good-quality,
shielded HDMI
cable.
3 Connect the small end of the power cord to the receiver input and plug
the other end into an AC outlet. Turn on the TV and select the correct
input.
Power Input
Provides power
to DVR+
4 Remove plastic battery tab from remote control by pulling it out.
Firmly pull
straight out
5 Follow the on-screen Setup Wizard instructions, using the remote control.
(See the following pages for more instructions on using your remote.)
Introduction :: 5Using your DVR+ remote control
Input
Selects the TV input
(see Programming the
Remote Control,
page 10)
On/Standby
TV On/Standby DVR+ power on/standby
(see Programming the
Remote Control, Numeric Keypad
page 10) Choose channel directly
by its number or navigate
Period the program guide
Used to enter
sub-channel numbers Zoom
Format SD picture to the
Mute desired width of program
Silence audio output from Menu
the TV (see Programming View Main Menu for
the Remote Control, advanced options and
page 10) settings
DVR Info
Displays recorded events Displays channel and
Guide program information
View program guide Closed Captions (CC)
Home Toggles closed captions
Returns to home screen on/off
from Internet apps Back
Exit Return to previous guide
Close menu or guide page, menu, or channel
and return to viewing Colored Buttons
Navigation Use varies depending on
Choose options in menus, feature
DVR recordings, guide, Channel
settings and info bar View previous/next
Volume channel
Increase/decrease TV
volume (see Programming Page
the Remote Control, Navigate guide or text
page 10) pages
Playback Control
Rewind/Pause/Fast
Forward/Skip Back/Play/ Audio
Skip Forward//Stop Displays all audio/audio
description channels
Record
Record current program
or guide selection
6 :: IntroductionMute/unmute
(see Programming
the Remote
Control, page 10)
View program/
channel
Browse up/
information
down to next
numbered
channel
Increase/decrease
sound volume
(see Programming Pause a
the Remote program
Control, page 10)
Play a program
Rewind
Fast forward
Skip backward Skip forward
Record remainder
of current program
or a program Stop
scheduled for the
future in the guide
To move through the
program guide, use the Record selected program
following buttons:
-2.5 hours
Next page of channels
Search
-1 day
Previous page of channels
+1 day
Introduction :: 78 :: Introduction
Chapter 2

            :: Getting Started
            What you’ll find in this chapter:

            •   Turning on your new Channel Master DVR+
            •   Programming the remote to control your TV
            •   Recording a program using your DVR+
            •   Playing back a recorded program
            •   Deleting a recorded program on your DVR+
            •   Managing your recorded programs
            •   Locking a recording with a password.

                                                  Getting Started ::   9
Getting Started
Turning on your new DVR+ receiver
When you switch on your DVR+ receiver for the first time, it
may take a minute for two for the unit to power up and display
the Setup Wizard. This will guide you through the steps to set
up your receiver and scan for subscription-free, over-the-air
channels.
Highlight and
Validate connections
select your
are hooked up correctly Highlight and
Language & A Channel Scan will
and then press OK to Online channels from select your Zip
Country. Press begin automatically.
continue. Code, Time
OK to continue. After it is complete, the your Internet connection
Zone & Setting.
next Step is displayed. are listed. Press
OK to continue. Press OK to
finish setup.
Programming the DVR+ remote control If some channels are
The remote is capable of controlling basic functions of most TVs duplicated/unacceptable
(volume up/down, mute/unmute TV sound, TV power on/off, and
In some areas with multiple
change current input). To program the remote control to operate
transmitters nearby, there
your TV, you may use either of the following methods:
may be duplicate channels.
If there are duplicate over-
• Easy Scan as described on the following page.
the-air channels in your
• Code Entry as described on pages 12-15.
local area, they will be listed
in the channel 100-199
range in the guide.
If a channel’s transmission
is marginal (for example,
macroblocking or audio
issues) and cannot be
improved (see page 20),
then you may consider
10 :: Getting Started deleting it (see page 28).Programming your remote using Easy Scan
1 Turn on your TV.
2 Point the DVR+ remote control at the TV.
Press and hold down both CH+ and VOL- on
the remote simultaneously for at least two
seconds. The blue TV button LED gives two
slow flashes to indicate successful entry into
setup mode.
3 Press INPUT. The TV button LED comes on.
4
Press TV POWER repeatedly until the TV
switches off.
5 Press INPUT. The TV button LED gives two
slow flashes to indicate that the code has been
stored successfully.
Turn on your TV. Hold down CH+ and
VOL- on DVR+ remote
for 2 sec until TV Press the INPUT Press INPUT. TV
button flashes twice. button. Press the TV button flashes twice.
Power button
until TV is off.
Getting Started :: 11Programming your remote using Code Entry
To program the remote with a 4-digit numerical code, use the steps below.
Note: Where several codes are listed for a manufacturer, it may be necessary to repeat the
sequence below with each code until the correct one is found.
1 Hold down both the CH+ and VOL- keys simultaneously for at least two
seconds. The blue TV button LED gives two slow flashes to indicate
successful entry into the setup mode.
2
Using the numbered keys (keypad) on the remote control, enter the
4-digit code for your TV manufacturer within 30 seconds. The blue TV
button LED flashes for each entry.
Note: Remote codes for TVs are listed on pages 13-15.
After the fourth digit entry, the blue TV button LED gives two slow
flashes to indicate that the code has been successfully programmed.
3
In the event of an error, the blue TV button LED gives four rapid flashes.
If this occurs, then you will need to begin the code entry process again.
When you successfully program a code that turns your TV on and
controls its volume and inputs, write down this code in the spaces
provided.
Remote Code:
Hold down CH+ and
VOL- on DVR+ remote
for 2 sec until TV
button flashes twice. Enter remote code listed Repeat until code works
for your TV brand. TV
button flashes twice. with your TV. Write down
this code.
Remote Codes
The table on the following pages contains the manufacturer codes for programming
the remote control to operate your TV. If your TV brand is not listed or if the codes
listed for it do not work, the DVR+ remote may not be able to control your TV. In
some cases, codes may operate some, but not ALL the buttons shown in this guide.
12 :: Getting StartedAbex 0401 4021 Clairtone 0011 4261 5401
Acer 3291 4001 Classic 0191 1891 1941 4841 ESA 1381
Acme 0471 CLP 0061 Fisher 1161 1261 1531 1581 1911
ADA 0461 CLP Classic 0001 0041 0161 3481 5001
ADC 1431 1661 Coby 2511 2521 2531 2541 2551 Fluid 2401 2421 2431
Admiral 0371 0681 1441 1661 3351 5091 5191 Fujitsu 0901 1711 4241 4341
4991 Color Voice 1431 Funai 0701 0931 1381 1711 1941
Advent 0581 0631 0871 2131 Colortyme 0001 1221 1431 2191 4731 4761
2891 3261 4931 Concerto 0001 1221 Futuretec 1941 2191
Adventura 0151 Concierge 1771 1781 Gateway 0501
Aiko 1011 4321 Contec 0011 1911 1941 2191 GE 0001 0041 0051 0141 0261
Aiwa 0411 0651 0931 1411 4731 Cornea 1471 0361 0791 0811 1221 1421 1691
4801 Craig 1941 2191 1921 1951 2111 2151 3421 3431
Akai 0331 0351 0781 1901 3111 Crosley 1961 4011 4921
3215 4141 4151 4461 5141 5171 Crown 1941 2191 Gilbralter 0001 1771 1781
Alleron 1711 CTX 1441 Goldstar 0001 0251 0611 0761
Amark 1441 Curtis Mathes 0001 0261 0351 0931 1181 1221 1501 1911 4731
Ames 1275 1191 1221 1261 1311 1421 1551 GPX 4701
Amtron 2191 1661 1691 3421 4011 4941 5351 Gradiente 0001 2291 3661 3951
AMW 0645 0825 5371 3961
Anaba 1375 CTX 1941 2191 Grundy 1711 2191
Anam National 0271 1941 2151 Cybervision 3511 Guestvision 1861
2191 2331 3431 Daewoo 0001 0221 0251 0591 GVision 4871
AOC 0001 0011 0251 0391 0611 0721 0831 0971 1011 1081 1221 Haier 0671 0861 0921 1741 3831
0891 1221 4221 4261 1231 1251 1431 1501 1521 1551 4851
Apex 0045 0191 0245 0375 0425 1561 1941 2181 4321 4681 Hallmark 0001 1221
0431 0671 1025 1105 1891 2911 Daytron 0001 1221 Hannspree 5451 5461 5291
4841 5111 Dell 0981 1401 2041 3441 3601 Harvard 2191
Archer 1441 3811 Hauppauge 3791
Aspect 1271 Diamond Vision 1211 1611 2001 Hello Kitty 5391
Audiovox 2191 2451 4031 4051 4771 4811 Hewlett Packard 3491 4881
4521 Digimate 4301 Hisense 0671 2081 2211 3671
Aurora 3061 Digistar 0381 0581 0871 1061 4381 4391 4671 5331
Axion 0881 2451 2471 3811 3881 3901 Hitachi 0001 0841 0931 1041
Bang & Olufsen 1591 Dimensia 1421 1691 3421 1221 1271 1341 1371 1481 1661
Belcor 0001 DISH Network 5491 1721 1751 1801 1911 1981 2051
Bell & Howell 1261 1421 1661 Disney 0371 1101 3341 3621 4121 4331 4731
1691 3421 Distar 3231 Hyundai 4651
Benq 1741 1761 2221 3871 Dukane 1271 1981 ILO 1141 1381 1971 2391 2481
Blue Sky 3511 3921 Dumont 0001 1771 1781 3215 3691 4231 5031 5141 5171
Bradford 2191 Durabrand 0371 0861 0921 1381 IMA 2191
Broksonic 0211 0371 0851 1631 2271 2291 5121 Infinity 1171 1961 4791
4951 Dynasty 1941 Infocus 3421
Brokwood 0001 Dynex 0371 2891 3141 3161 5311 Initial 2481 4231 4821 5031 5041
Candle 0001 0151 0961 1221 Electroband 0011 1901 Insignia 0371 0581 0701 0871
Capehart 0391 4221 Electrohome 0001 1221 1921 0921 1241 1381 2241 2271 2891
CCE 3721 2151 3431 2921 3761 3841 4371 4721 4761
Celebrity 1901 Elektra 1661 5051 5061 5181
Celera 0191 Element 2401 4111 5361 5411 Integra 1841
Centrios 1361 Elite Video 0901 Inteq 1771 1781
Centurion 1221 Emerson 0001 0021 0031 0041 ISymphony 3041
Cetomer 0001 1631 2901 2961 0271 0281 0291 0371 0441 0451 Janeil 0151
Cetronic 1941 0691 0701 0731 0741 0851 0931 JBL 1961
Changhong 0191 1891 4841 1221 1251 1261 1371 1381 1451 JC Penney 0001 0051 0251 0261
Chimei 3071 1461 1551 1611 1631 1681 1701 0351 0791 0811 0961 1221 1311
Cineral 3511 4321 1711 1931 1941 2171 2191 2361 1421 1451 1691 1911 1921 1951
Citizen 0001 0351 0371 0961 2761 3451 4701 4731 4751 4761 3421 3451 4011
1011 1221 1311 1381 1661 1941 4831 4911 5231 5221 5341 JCB 1901
2191 4321 Envision 0001 0071 1221 3751 Jensen 0001 1221 2271
Getting Started :: 13JVC 0311 0481 0771 0901 0941 1691 3421 Prima 0381 0581 0631 0871 2451
1281 1481 1801 1911 2381 2751 Moteva 1261 3661 3011
4121 4201 5071 5281 Motorola 1441 2151 3431 Princeton Graphics 1301 1441
Kawasaki 4741 MTC 0001 0011 0251 0351 1221 Prism 0051
Kawasho 0001 1221 1901 1311 Proscan 0261 0811 1421 1691
Kaypani 0391 4221 Multitech 2191 2061 2301 3421 4011
KEC 2191 1941 Multivision 0081 Proton 0001 0391 0641 1221 1911
Kenwood 0001 1221 Myron & Davis 2101 2231 4211 4221 4271
KLH 0191 NAD 0001 0401 1221 1311 4021 Protron 3731 4301
Kloss Novabeam 0151 1021 NEC 0001 0251 0341 1221 1431 Proview 2401 2421 2431
Kogi 4871 1801 1841 2151 3431 4401 Pulsar 0001 1771 1781
Konka 0471 0521 0751 1241 Net TV 0121 0501 Pyle 3331
1671 2121 2191 2241 2371 4621 Nexxtech 0871 1201 Quasar 0051 0201 1091 1491 1571
4901 4971 5441 Nikkei 1941 1831 1881 1961 2151 3431 3551
KTV 0011 1491 1681 1941 2191 Nikko 0001 1011 1221 4321 4691 5201
Kurazai 1661 Niko 3581 Radio Shack 0001 0141 0341 0931
KWorld 2931 Norcent 0511 0671 2181 1001 1221 1261 1421 1571 1691
Lasonic 1211 1611 4811 NTC 1011 4321 1701 1911 1941 2111 2191 3421
Legend 0581 Olevia 2431 2771 2781 2791 3081 3551 4731 4921
LG 0001 0131 0251 0611 0761 5151 5161 RCA 0001 0051 0091 0141 0251
0931 1181 1221 1471 1501 1911 OnCommand 1861 3991 0261 0361 0551 0811 0891 1001
3001 3021 3091 3221 3281 3311 OnKing 1941 1131 1221 1331 1371 1421 1521
3811 4731 5271 5501 5511 Onkyo 3101 1691 1851 1921 2011 2061 2111
LiquidVideo 0881 1111 Onwa 1941 2191 2151 2251 2301 2851 2951 3421
LodgeNet 1421 1661 1691 2091 Optimus 0201 0401 1571 1881 3431 3571 4011 4921
3421 4091 3551 4021 4691 5201 Realistic 0001 0141 0341 0931
Loewe 1871 1961 Optoma 2441 3121 1001 1221 1261 1421 1571 1691
Logik 1421 1661 1691 3421 Optonica 0341 1441 1701 1911 1941 2191 3421 3551
Luce 0301 Orion 0281 0371 1771 1781 4731
Luxman 0001 1221 Panasonic 0051 0201 0951 1091 Rhapsody 0011
LXI 0001 0261 0811 0931 1221 1491 1571 1651 1831 1881 1961 Runco 1771 1781 1841
1261 1311 1421 1691 1961 3421 2151 2711 2801 3381 3401 3431 Sampo 0001 0121 0391 0501 1221
4011 4731 3551 3771 4691 4781 4861 5201 1911 4221
Magnasonic 1711 5481 Samsung 0001 0101 0251 0261
Magnavox 0001 0321 0681 0701 Philco 0001 0251 0321 0961 1021 0331 0351 0531 0571 0711 0781
0961 1021 1171 1221 1801 1961 1221 1671 1801 1961 2151 2321 1191 1221 1311 1501 1911 2071
2321 4191 4641 4761 4791 4991 2941 3431 3931 2141 2721 2741 2961 3301 3321
Majestic 1421 1661 1691 3421 Philips 0001 0161 0181 0321 0421 3471 3561 4011 4941 4961 5471
Manhattan 5381 0541 0661 0701 0791 0911 0961 5521
Marantz 0001 1221 1841 1961 1021 1151 1171 1381 1391 1601 Samsux 1221
Maxent 0501 1741 1801 1961 2151 2321 3031 Samtron 0351
Medion 1101 1141 2351 3131 3151 3171 3371 3391 3431 Sansui 0211 0371 1631 5551
Megatron 0001 1221 1271 3541 3591 3861 3911 3971 3981 Santeca 0171
MEI 0011 4191 4761 4791 Sanyo 0001 0801 1051 1161 1261
Memorex 0001 0211 0371 1161 Philips-Magnavox 0181 0681 0911 1531 1581 1911 2871 2881 2981
1221 1261 1421 1631 1661 1691 1171 1961 2321 3591 4791 4991 2991 3051 3481 5001 5241 5251
1711 2401 3421 4251 5001 Pilot 0001 5261
MGA 0001 0251 1221 1581 Pioneer 0001 0401 1221 1371 1511 Sceptre 3521 4071 5111
1711 1801 1911 1921 1841 1981 4021 4661 Scotch 0001 1221
Midland 0051 0261 0811 1691 Piva 2411 5021 Scott 0001 0021 0281 1221 1711
1771 1781 4011 Planar 4251 1941 2191 3215 5141
Mintek 4231 Polaroid 0191 0581 1241 2081 Sears 0001 0211 0261 0351 0701
Minutz 1951 2271 2311 2401 2451 3741 4631 0811 1221 1261 1291 1311 1381
Misakai 1381 5131 1421 1531 1581 1691 1711 1911
Mitsubishi 0001 0251 1221 1581 Portland 0001 0251 1011 1081 1961 2021 3421 3481 4011 4761
1711 1801 1811 1921 2701 3271 1221 1551 Selectron 2471 2491 2501
Monivision 0491 Precision 0621 Semp 3611
Montgomery Ward 1421 1661 Price Club 0351 Sharp 0001 0341 0461 0681 0691
14 :: Getting Started1221 1291 1441 2031 2201 2261 Videocon 4061
2731 3181 3191 3201 3461 4751 Vidtech 0001 0251 1221
4991 5421 Viewsonic 0501 1981 3751 3801
Shogun 0001 4281 5301
Signature 1421 1661 1691 2171 Viking 0151
3421 Viore 2831 2841 3681 5431
Signet 2811 2821 2861 Visteon 3411
Simpson 0961 Vizio 1471 1741 2021 2901 3651
Sonic 0011 3741 3851 4081 5561 5571 5581
Sony 1071 1641 1731 1901 2161 5591 5601 5611 5621 5631 5641
2741 3531 3891 4101 4981 5321 5651 5661 5671 5681 5691 5701
Soundesign 0001 0961 1221 1711 5711
1941 2191 Wards 0001 0021 0251 0321 0341
Sova 3631 4431 0791 0961 1021 1221 1321 1421
Soyo 4611 5101 1661 1691 1711 1951 1961 3421
Spectra 1611 Westinghouse 0111 1901 2281
Specravision 2341 3241 3251 3711 3851
Squareview 1381 White Westinghouse 0601 0931
SSS 0001 1941 2191 1081 1501 1521 1551 3641 4731
Star Sight 0061 Yamaha 0001 0251 1221 1571 3551
Starlite 2191 Zenith 0001 0061 0131 0371 0681
Superscan 0701 1291 2021 4761 0691 0931 0941 0991 1011 1031
Supersonic 0241 4701 1081 1171 1181 1191 1221 1251
Supra 0001 1991 1271 1471 1631 1661 1751 1771
Supremacy 0151 1781 1791 2171 2291 3501 4201
Supreme 1901 4321 4731 4751 4791 4941 4991
SVA 0671 2101 5211 5271 5281
Sylvania 0001 0321 0371 0701
0931 0961 1021 1221 1381 1801
1821 1961 2321 2761 3701 4731
4761
Symphonic 0021 0701 0931 1381
2191 4731 4761
Syntax 2431 5151 5161
Tandy 1441
Tatung 1141 1741 2151 3431
TCL 0091 1421 1691 1851 2011
2061 2111 2301 2851 3421 3431
3571 4921
Technics 0051
Techwood 0001 0051 1221
Teknika 0001 0151 0251 0351 0961
1011 1221 1311 1421 1571 1661
1691 1711 1911 1941 2191 3421
3551
Telecaption 0821
Telerent 1421 1661 1691 3421
Tera 0001 0641
Tevion 1141
TMK 0001 1221
Toshiba 0211 0231 0341 0351 0821
1121 1191 1261 1311 1351 1541
1571 1621 1801 1841 1911 2691
3211 3551 4891 4941 5081 5531
Trutech 2461 3821 4551
Universal 0791 1951
Venturer 3781
Victor 1481 4121
Getting Started :: 15Recording a program using your DVR+
To record the current program you are watching on live TV, press
RECORD on the remote control,
OR
To record a future event, press GUIDE on the remote. Use the
navigation wheel to highlight the desired program, and then press
RECORD on the remote control.
If more than one program with the same title is recorded, a folder
is automatically created. To watch a program in the folder, first
highlight and select the folder, then View Folder Content, and then
the individual program. You can also delete all content in a folder by
deleting the folder itself.
Note: The Channel Master DVR+ receiver still records your
programs when the receiver is in standby.
Playing back a recorded program on your DVR+
Press DVR on the remote.
Use the navigation wheel to highlight the program.
Press OK on the remote.
Select one of the displayed options and press OK:
• Play Recording (which plays back the event from the beginning)
• Resume Playback (if you have previously played back a portion)
• Delete
• Options
Deleting a recorded program on your DVR+
Press DVR on the remote.
Use the navigation wheel to highlight the program.
Press OK on the remote.
Select Delete from the displayed options and press OK.
Select the option to Confirm the deletion and press OK.
16 :: Getting StartedManaging recorded programs on your DVR+
• Schedule / History / Recordings
• Sort A-Z or by date/time
• Delete
• Search
Pause
Rewind Fast
forward
Skip Skip
backward forward
Play
Stop
Locking a recording with a password
Press DVR on the remote.
Use the navigation wheel to highlight the program.
Press OK on the remote.
Select Options.
Select Lock to lock the recording. A locked recording
cannot be deleted until it is unlocked with a PIN.
If you have not set a PIN (numeric password), then you
must enter and confirm one in order to lock a recording.
If the recording has previously been locked, you need to
enter the current PIN to unlock it. Then you can delete it.
Note: If you lose or forget your PIN, then please visit
support.channelmaster.com using your computer.
Getting Started :: 1718 :: Getting Started
Chapter 3

            :: Using the DVR+
            What you’ll find in this chapter:

            •   Changing channels
            •   Controlling the audio
            •   Setting digital audio options
            •   Getting program information
            •   Adjusting languages and captioning
            •   Using the live pause feature on DVR+
            •   Using Internet-enabled online apps.

                                                  Using the DVR+ ::   19
Using the DVR+ receiver
Changing channels
You can change channels on your DVR+ receiver in several ways. If channels are missing
When you are viewing live TV you can: If there are subscription-
• Press the CH+ or CH- button on the remote control, OR free over-the-air channels
• Enter the channel number using the numeric keypad. in your local area that you
• Press GUIDE on the remote to view the list of all currently do not see listed in the
available channels. Then highlight a current program on a DVR+ program guide,
different channel, press OK and select Watch this program. then try the following:
• Press MENU
on the remote.
• Navigate on the left to
select SETTINGS.
• Scroll the list to select
Technical Information.
Controlling the sound from your TV • Scroll the list to select
• Press the VOL+ or VOL- button on the remote control to Signals and Network.
raise or lower the volume on your TV. • Verify that your Signal
• Press the MUTE button on the remote control to turn off the Strength and Signal
sound on your TV; press MUTE again or VOL+ or VOL- to Quality are both at
restore the sound. least 30.
Note: You must program you new Channel Master DVR+ remote • If not, then readjust
to control the VOL+ or VOL- and MUTE functions of your TV. See your OTA antenna.
pages 10-15 for more information on programming your remote. If one channel is missing,
perform a Manual Scan
Controlling digital audio from the Tuning submenu.
Your new DVR+ receiver offers several digital audio features to If several channels are
enhance your enjoyment of many programs and events. Most of missing, then perform a
these options are in the Digital Audio Setup submenu within the Full Re-Scan instead.
TV & Audio Setup menu under Settings:
Press MENU Navigate on the left to
on the remote. SETTINGS and press OK.
Scroll the list of Settings to
Scroll the list of items to
highlight TV & Audio Setup
highlight Digital Audio Setup
and press OK.
and press OK.
20 :: Using the DVR+Setting your digital audio options
Many programs and events, especially those broadcast with high-definition video, also feature
multiple audio channels to enhance the enjoyment through your home theater. The following options
on your DVR+ can be used with other compatible equipment:
• HDMI can be set to Stereo only if you are not connecting the HDMI output of your DVR+ to
a device capable of multi-channel surround sound. The default setting for this output is Auto
Stereo/Surround, which will output the best audio option present in the broadcast.
• Optical Digital Audio can be set to Stereo only if you are not connecting the OPTICAL output of
your DVR+ to a device capable of surround sound. The default setting for this output is Multi-
channel, which is supported by most equipment which will accept optical digital audio input(s).
• Midnight Mode helps you keep from disturbing others in your home by compressing the
dynamic range (that is, how big a difference there is between the loudest and quietest sounds)
of the digital audio output signal. The default setting for this mode is On.
Getting program information on your DVR+
A banner is displayed across the bottom of the screen for a few seconds whenever you change
channels on your DVR+. This banner shows details about the current channel and programming.
With this banner displayed, you can press the navigation buttons (up, down, right, and left) on
the remote control to browse current or future program information for the next highest or lowest
channel, or display the current or future programs scheduled on the current channel.
When watching live TV, pressing the INFO button on the remote control displays an info banner
at the bottom ot the screen. Pressing INFO again dismisses the banner. When you highlight a
program on now or scheduled in the future displayed in the Program Guide, a box of more detailed
information will be displayed about the highlighted program. Pressing INFO again dismisses the box.
You can also use information screens to help set a new recording or stop a recording in progress:
• Press the record button on the remote control to start recording a highlighted program on now,
or to set a recording for a future program.
• Press the record or the stop button again on a current program to stop a recording in progress.
Adjusting languages and captioning
There are dedicated buttons on the DVR+ remote control to help you set preferences for your audio
language and enable or disable closed captioning. While watching video using your DVR+:
• Press AUDIO on the remote and highlight the language for your audio. Some available
languages may not be broadcast in stereo; changing digital audio options cannot override this.
• Press CC on the remote to turn on Closed Captions if they are currently off; press the button
again to turn Closed Captions back off if they are currently on.
Using the DVR+ :: 21Using the live pause feature on your DVR+
While viewing programming on a channel, pressing the PAUSE button on your remote control
activates an automatic memory buffer, capturing as much as 15 minutes of live TV. You can:
• Use the rewind, fast forward, skip back, skip forward, pause, and play functions of your remote
control on the buffered programming. Note that you cannot move backward past the last DVR+
activation or channel change, or forward into the future.
• The live TV buffer is reset when you change channels or put your receiver into standby mode.
• If you install an external USB hard-disk drive, the live TV buffer is automatically started on
each channel change and the capacity of the buffer is extended to as much as two hours of
programming.
Using the VUDU service on your DVR+
For simplicity and ease of use, access to the Internet-enabled VUDU on-demand movie application
is integrated into the Program Guide available on your DVR+. By accessing the channel 200 range
(see page 20 on how to change channels) from your guide, the information banner or other screens,
you exit from any over-the-air TV broadcast and enter the VUDU online application running on the
DVR+. (You must select the Confirm option when prompted.) The DVR+ receiver will be placed in
standby mode and recordings that you have set up or are in progress will continue uninterrupted.
Access to rent or buy VUDU movies on-demand using your DVR+ requires an account with the
VUDU service. There are several methods you may use to get started, depending on whether you
already have a VUDU username and password:
• If you do not have a VUDU or Walmart.com account, then you can browse for available movies
on the service and sign up directly from within the Internet application on your DVR+ receiver.
• You also may use a computer to visit www.vudu.com, and then select the Sign Up link to get
started.
• If you know your username and password for your existing VUDU account, you may sign in to it
directly on your DVR+ receiver.
• If you have an account on Walmart.com, then you can use that username and password to get
started.
22 :: Using the DVR+Chapter 4
:: Menus and Options
What you’ll find in this chapter:
• DVR+ Main Menu
• SEARCH
• DVR
• GUIDE
• SETTINGS
• Deleting an unwanted channel
• Setting up network connectivity
• Updating your DVR+ software.
Menus and Options :: 23Menus and Options
DVR+ Main Menu
The Main Menu on your DVR+ receiver is accessed by pressing Menu Navigation
the MENU button on the remote control and is displayed arranged
Your DVR+ receiver’s
vertically along the left-hand side of your TV screen.
menu screens can be
navigated easily using
the “D-pad” control in the
center of your remote.
Pressing on the top center
of the pad moves the
cursor or highlight up;
pressing on the bottom
center moves it down;
Main Menu Items pressing the right-hand
The following items appear on, and can be highlighted and side moves right; pressing
selected from, the DVR+ Main Menu: the left-hand side moves
left. Finally, pressing the
• SEARCH—to find a program to watch or record. OK button in the center
• DVR—to manage and play back your recordings. of the pad will select the
• GUIDE—to browse what’s on now and is scheduled to be currently highlighted item
broadcast in the future. Highlighting and selecting a program (like a program name) or
or event from the guide displays a pop-up options submenu. option (like Confirm or
• SETTINGS—to set your user preferences and change a Cancel) on your screen.
variety of options available on your DVR+ receiver.
24 :: Menus and OptionsSEARCH
Your DVR+ receiver’s Search function allows you to enter one or more keywords associated with
programs or events you would like to find in the electronic Program Guide. After selecting SEARCH
from the DVR+ Main Menu, use the navigation buttons on your remote to highlight and select
characters, including letters and numbers, that spell out the keyword(s) you wish to find.
DVR
A Digital Video Recorder allows you to record your favorite shows, series and events without using
tapes or a VCR. Selecting DVR from the Main Menu accesses the following screens and sub-menus:
• Recordings—also accessible directly from the remote control by pressing the DVR button. This
shows the DVR Recordings screen listing all existing recorded programs and events.
• Schedule—accesses the DVR Scheduled Recordings screen showing programs or events
that you have scheduled to record in the near future. Also accessed from the DVR Recordings
screen by pressing the Blue remote button.
• Recording History—accesses the DVR Recording History screen showing programs or events
that you have scheduled to record in the past. Also accessed from the DVR Scheduled
Recordings screen by pressing the Blue remote button.
• DVR Setup submenu—contains the Recording Setup, Playback Setup, Re-initialize HDD, and
Check Disk screens. Also accessed from the DVR Recording History screen by pressing the
Blue remote button.
Recording Setup Playback Setup Re-Initialize HDD Check Disk
• Set the default start early Set default Skip Fwd Reboot, erase and Reboot the disk
and end late times (0’-10’) and Back times (10-60’’) restore disk to new and report errors
Menus and Options :: 25GUIDE
Selecting GUIDE from the Main Menu or pressing the GUIDE button on the remote control
displays the Program Guide of the DVR+ receiver on your screen. From the guide, you can:
• Change channels to watch (or watch and record) a program on now.
• Set the DVR+ receiver to record a program on now or one scheduled in the future.
• Set a reminder for the time of a program that you want to be sure you do not miss.
SETTINGS
Selecting SETTINGS from the Main Menu displays the SETTINGS menu, containing the
following sub-menus and screens:
• Languages—to change the default language for the display of menus, the language
of the Primary Audio (can also be changed using the AUDIO button on the remote
control), as well as enabling/disabling Closed Captioning and setting a variety of other
options related to displaying on-screen captions.
• TV & Audio Setup—to change the default Display Setup (to match your TV resolution),
the Digital Audio Setup and HDCP (High-Definition Copy Protection) Setup, if applicable.
• Parental Control—to protect access based on channel or ratings. A numeric password,
or PIN, must be set (or entered) and confirmed to enable this feature or change settings.
• User Preferences—to change the degree of Transparency of menu or guide screens.
The default setting is Medium; High is more transparent, Low less so, and Solid is off.
26 :: Menus and Options• Network Setup—to view or change the status and information about Internet
connectivity, including setup of the optional USB WiFi adapter (see page 28).
• Power Options—to change the Inactivity Standby setting from the default of 4 hours
to either 5 or 6 hours (the Off setting is not recommended).
• Technical Info—to view information about your current DVR+ software version,
the status of the OTA and/or network signal, the availability of any downloadable
software updates (see page 29), the notices for related open-source software, or
the screen detailing set-top box (STB) health.
• Tuning—to review currently available OTA channels, manually scan for one (or
more) additional channels, or fully re-scan all channels (for example, after you have
repositioned or replaced your OTA antenna for better broadcast TV reception).
• Time & Date—to set or change your Zip (Postal) Code, Time Zone and Country;
enable or disable the automatic time-setting option and Daylight Savings Time
(DST); and set the current time of day, as well as the date, month and year.
• Factory Reset—to access options to fully Factory Reset your DVR+ (erasing any
user preferences you have changed from the factory default settings) or only VUDU
Reset (erasing any VUDU online movie service account information you entered).
Menus and Options :: 27Deleting an unwanted channel
Pressing the MENU button, highlighting and selecting the SETTINGS menu, followed by the
Tuning submenu, then Channels displays the list of scanned-in channels on your DVR+ receiver.
If you need to delete a channel (for example, it is a duplicate of another channel or it is one that
you never watch), then:
• Highlight the channel in the list that you want to delete.
• Press the red color button on your remote control. A confirmation message is displayed.
• Highlight and select CONFIRM to delete the highlighted channel from the list.
Setting up network connectivity
Pressing the MENU button, highlighting and selecting the SETTINGS menu, then the Network
Setup submenu, displays on your screen the current status of your Internet, wired and wireless
network connectivity as well as related items and screens. From here, you can:
• Enable (On) or disable (Off) Internet Connectivity. By default, connectivity is enabled.
• View or choose your Connection Type, either Wired (the default selection for using an
Ethernet cable) or Wireless (for using an optional USB WiFi adapter; please visit
www.channelmaster.com for details).
• View IP Connection Settings and disable (or re-enable) the Automatic Setup of the DVR+
Internet connection. If you select Enable (which is selected by default), the DVR+ receiver
expects that it will be assigned its IP settings by a DHCP server (or DHCP-enabled router)
residing on your local network. If you select Disable, then you will need to assign these
settings manually yourself (for advanced users only).
• View or edit your Wireless Setup, if you chose Wireless as the Connection Type. (If Wired
is selected as the Connection Type, the Wireless Setup item is unavailable.) To change
Wireless Connection Settings, select Network Setup and choose to Scan for available
wireless networks (if your network’s SSID/name is publicly broadcast), or choose Manual (if
your network SSID/name is not publicly broadcast).
• If you chose Scan, do the following:
– Highlight and select the appropriate wireless network SSID/name from the displayed list.
– Then use the on-screen keyboard to enter the WiFi network password (sometimes
referred to as a key or passphrase).
– Select DONE and the DVR+ receiver will try to connect to the specified network. Wait for
confirmation that the connection is successful.
• If you chose Manual, do the following:
– Highlight and select Network Name and use the on-screen keyboard to enter the (hidden)
SSID/name.
– Select DONE and then choose the network’s Security Protocol (Open, WEP, WPA, or
WPA2).
– Finally, select Key and use the on-screen keyboard to enter the WiFi network password
or passphrase.
– The DVR+ receiver will try to connect to the specified network. Wait for confirmation that
the connection is successful.
28 :: Menus and OptionsUpdating your DVR+ software
By pressing the MENU button, highlighting and selecting the SETTINGS menu, followed by the
Technical Info submenu, and then Software Updates, you can:
• Manually Check for downloads. Note that a DVR+ receiver with an active connection to the
Internet will periodically check for downloads automatically.
• When new downloadable software is available, a pop-up message is displayed. Follow the
on-screen instructions to download and install the update.
• Wait for your DVR+ receiver to restart automatically and begin updating software. Do not
turn off or remove power from the DVR+ receiver until the entire update process has been
successfuly completed.
• This process may take as long as 5 minutes, after which the DVR+ receiver will restart again
running the updated software. You can now operate your DVR+ receiver normally.
To update your DVR+ receiver’s software manually (for example, your DVR+ receiver is not
Internet connected), you must:
• Ensure you have an empty USB flash-memory (or thumb) drive formatted as FAT or FAT32.
Then download the software update file from the www.channelmaster.com/website and
save it on the flash drive.
• Ensure that your DVR+ receiver is turned on (and not in standby mode), and then insert the
drive with the update into one of the USB ports on the DVR+ rear panel.
• Wait for your DVR+ receiver to detect the updated software and display the version
information. When prompted by the pop-up message, select CONFIRM to begin installing
the update. See page 34 for more information about messages you may see displayed.
• Wait for your DVR+ receiver to restart automatically and begin updating software. Do not
turn off or remove power from the DVR+ receiver until the entire update process has been
successfuly completed.
• This process may take as long as 5 minutes, after which the DVR+ receiver will restart again
running the updated software. You can now operate your DVR+ receiver normally.
Menus and Options :: 29Chapter 5
:: Troubleshooting
What you’ll find in this chapter:
• Possible issues
• Suggested actions.
Troubleshooting :: 31Troubleshooting
Signal Issues • Verify the coax cable to the over-the-air antenna is connected to both
the RF IN port on the back of the receiver (hand-tighten only) and
also to the over-the-air antenna.
• Verify your antenna has not been moved out of proper alignment.
This can cause signal loss on some or all channels.
• Reset the receiver by pressing and holding the POWER button
located on the front panel. Verify that the LED is red or bright blue.
• If reset doesn’t work (the LED is dim blue), then place the receiver in
standby (press the POWER button), unplug it from the outlet for 15
seconds, then plug it back in. Press the button to turn it back on.
• If you see image pixelization, verify your signal strength and quality
by pressing the MENU button, highlighting and selecting the Settings
menu, theTechnical Info submenu and then Signals and Network.
• The DVR+ is only capable of receiving digital TV channels and will
not tune to a channel that is still broadcasting analog TV signals.
• Visit antennaweb.org on a computer to find out which channels in
your area are broadcasting digital TV signals.
Program Guide • Verify the DVR+ receiver is connected to broadband Internet service
(recommended) in order to access an extended guide for as much
Issues as 14 days of programming. You can view current information about
this connection by pressing the MENU button, highlighting and
selecting the Settings menu, and then the Network Setup submenu.
• When extended guide data is available over your network
connection, both the guide screen and also info banner will display
“Powered by Rovi.” You can use the color buttons on the remote
control to navigate within the program guide (see page 7).
• Verify your extended guide data is up to date. Typically, this data
is updated every 24 hours. You can view when the guide was last
updated by pressing the MENU button, highlighting and selecting the
Settings menu, the Technical Info submenu and then STB Health.
• If your DVR+ receiver is not connected to the Internet, then the
DVR+ populates the program guide with data from the broadcast
signals. Each channel decides how to populate this data, so the
amount varies. Your receiver displays as much as possible.
Online Apps • Verify your DVR+ is connected to the network either by a wired
connection (using an Ethernet cable) or a wireless connection (using
Issues (network the optional USB WiFi Adapter). Press the MENU button, highlight
and select the Settings menu and then the Network Setup submenu.
connection is • Verify that you can access the Internet from other devices connected
required) to the same network. If there are problems accessing the Internet,
check your network equipment (for example, the WiFi router
or access point). Verify the connections are correct using the
documentation provided with the equipment.
32 :: Troubleshooting• If your network equipment appears to be working correctly, but
you still cannot access the Internet from devices connected to the
network, contact your Internet service provider for assistance.
• To enjoy high-quality video streaming from online applications such
as VUDU, a 2 Mbps minimum connection speed is recommended. If
you are not sure of your connection speed, check with your Internet
service provider.
Remote • Ensure the batteries are functional; when you press a button on the
remote control, the POWER button (or TV POWER button) should
Control Issues light up briefly.
• Ensure the batteries are installed as indicated on the diagram inside
the battery compartment, and that you have pulled out the arrow-
shaped piece of plastic to remove it from the compartment for first
use of the remote. Old (discharged) batteries should be replaced
with (2) fresh CR2032 batteries.
• Ensure you are holding the remote control with the lens at the top of
the remote pointing directly at the front of your DVR+.
• Ensure that the IR window in the center of the DVR+ front panel is
not covered or obstructed. If your DVR+ receiver is installed in a
location without a clear line-of-sight to the remote, you can obtain
an optional IR extender; visit support.channelmaster.com for more
information on this and other accessories.
• If the remote controls your DVR+ but not your TV, then ensure the
remote is set up correctly to control your TV (see pages 11-13). You
will need to do this whenever you change batteries.
Recording • Your DVR+ receiver must be powered on or in standby mode when a
program or event is scheduled for it to be recorded.
Issues • If your external disk cannot be detected by DVR+ software or is not
working correctly, first try the Check Disk option on the DVR Setup
submenu of the DVR menu. This will reboot the drive.
• If you would like to keep more recordings than there is space on
internal memory, consider purchasing a USB external hard-disk
drive for additional storage and connecting it to one of the USB ports
on your DVR+ rear panel (see page 4). When an external drive is
connected, additional DVR features are made available such as
recording two programs at once and pausing live TV.
• View issues causing DVR timers to fail (such as insufficient tuners,
recording capacity or signal strength) by pressing the MENU button,
highlighting and selecting the DVR menu, then Recording History.
• Verify that event timers are set as DVR timers, not as Reminder
timers. Confirm an event recording is set up by looking for a red
triangle on the corner of the guide listing for the event.
• Verify that there is sufficient storage space for your recordings. You
can delete any watched recordings to save space.
• To enable simultaneous recording of programs on two different
channels, connect an external USB hard-disk drive. For more details,
visit www.channelmaster.com.
Troubleshooting :: 33Audio Issues • If your DVR+ receiver’s audio sounds distorted, then you can:
– Try a different channel to see if the fault lies in the transmission
of the signal.
– Try to see if the fault lies with your reception of the channel’s
signal(s) by ensuring that your over-the-air antenna is installed
and aimed correctly (for example, away from tall buildings and
metal obstacles).
– Verify the strength and quality of your OTA signal by pressing
the MENU button, highlighting and selecting the Settings menu,
followed by the Technical Info submenu, then Signals & Network.
– Verify the cables between your antenna and DVR+ receiver, as
well as the HDMI cable between your DVR+ receiver and TV, are
connected correctly.
– If the audio issue persists, change the HDMI audio output for
the DVR+ receiver to Stereo Only by pressing the MENU button,
highlighting and selecting the Settings menu, followed by the TV
& Audio Setup submenu, then Digital and Audio Setup.
Software • If you are manually updating your DVR+ software using a USB
flash-memory drive, you may see one of the following messages
Update displayed after inserting the drive into a USB port:
– EHD Insufficient Disk Size. Some flash-memory drives have
Issues multiple small partitions, or even zero partitions. Try reformatting
the drive to have a single primary partition, or you may want to
try using a different flash drive.
– A USB download has been detected which is already present
on your device. In this case, your DVR+ receiver has been
updated to the same version of software as you have on the
flash drive. It is up to date, so no update is needed.
Parental • I change the channel and a Locked Channel message is
displayed requesting the PIN (password). Parental Control has
Control been activated and the channel has been locked. See page 26.
• I change the channel and a Parental Lock Activated or Rating
Issues Locked message is displayed requesting the PIN (password).
The program or event currently on this channel has been locked.
See page 26.
• I choose a program or event in the guide and a message is
displayed requesting a PIN (password). Parental Control has
been activated and the channel or the program or event has
been locked. See page 26.
34 :: TroubleshootingChapter 6
:: FCC, Warranty, OSS
What you’ll find in this chapter:
• FCC Statement
• Limited Warranty
• Open Source Software Notices.
FCC, Warranty, OSS :: 35FCC Statement, Limited Warranty, OSS The following FCC Statement applies to DVR+ Note: This equipment has been tested and found to comply with the limits for a Class B digital device, pursuant to part 15 of the FCC Rules. These limits are designed to provide reasonable protection against harmful interference in a residential installation. This equipment generates, uses and can radiate radio frequency energy and, if not installed and used in accordance with the instructions, may cause harmful interference to radio communications. However, there is no guarantee that interference will not occur in a particular installation. If this equipment does cause harmful interference to radio or television reception, which can be determined by turning the equipment off and on, the user is encouraged to try to correct the interference by one or more of the following measures: • Reorient or relocate the receiving antenna. • Increase the separation between the equipment and receiver. • Connect the equipment into an outlet on a circuit different from that to which the receiver is connected. • Consult the dealer or an experienced radio/TV technician for help. Do not make changes or modifications to this equipment. This could void the user’s authority to operate the equipment. 36 :: FCC, Warranty, OSS
You can also read