The Complete Educator's Guide to Using Skype effectively in the classroom
←
→
Page content transcription
If your browser does not render page correctly, please read the page content below
The Complete Educator’s Guide to Using
                                                                                             Skype effectively in the classroom

                               The Complete Educator’s Guide to Using
                                  Skype effectively in the classroom

Increasingly, educators globally are transforming their classroom using Skype to
create powerful, authentic, motivating learning experiences for their students.

From connecting with classrooms in other locations to learning about each others’
culture to connecting with content experts – educators are extending learning
beyond classroom walls.

So how do you use Skype effectively with your class?

Hopefully this will help!

Here’s our educator’s guide on everything you need to know about Skype from……
  Setting up your account ________________________________________________________________________ 1
     A. Installing Skype and creating your Skype username ____________________________________________________ 1
     B. Setting up your Skype Profile _________________________________________________________________________ 2
     C. Updating your Privacy Options _______________________________________________________________________ 3
     D. Configuring your Audio and Video settings _____________________________________________________________ 4
        Equipment for personal Skype calls: __________________________________________________________________ 4
        Equipment for Skype calls in classrooms: ______________________________________________________________ 4
     E. Adding People To Your Skype Account ________________________________________________________________ 5
  Using your Skype account _______________________________________________________________________ 6
     A. Skype Status _______________________________________________________________________________________ 6
     B. Sending or Receiving an Instant Message _____________________________________________________________ 6
     C. Calling someone who’s on Skype _____________________________________________________________________ 7
  Using Skype in your Classroom___________________________________________________________________ 8
     A. Setting up the equipment ____________________________________________________________________________ 9
     B. Using the microphone and video _____________________________________________________________________ 10
     C. Being part of the audience __________________________________________________________________________ 10
     D. Using the Chat window _____________________________________________________________________________ 10
     E. Finding classes and content experts to connect with ___________________________________________________ 10

Setting up your account
Skype is a free application that allows you to call people from all over the world using the Internet.

When you contact another person that uses Skype you talk or chat for free.
Best of all you can tell when another user is online and what their status is so you know if they are available.

A. Installing Skype and creating your Skype username
Before you can use Skype you must install it on your computer and set up a
Skype account.

Here’s how you do it:
   1. Download and install Skype from the Skype website
        (http://www.skype.com/intl/en/get-skype/)
   2. Once installed open Skype and you’ll see a start-up screen
   3. Click on Don’t have a Skype Name?
   1. Follow the directions to create a new Skype account and username
        then click Sign In

       Remember first impressions count! Choose your username carefully.
 Choose a username that makes it easier for others to find you and conveys the right
                           impression of who you are.
© Sue Waters                                   April, 2011                                                    Page 1 of 10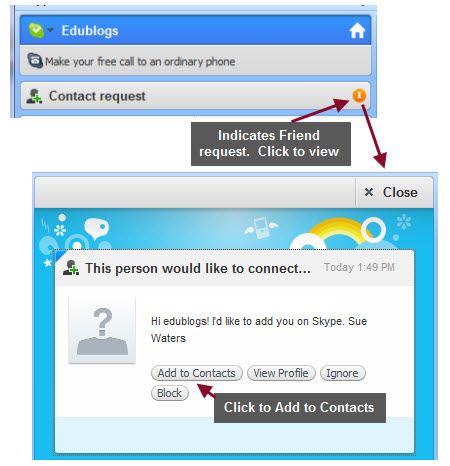
The Complete Educator’s Guide to Using
                                                                                      Skype effectively in the classroom

B. Setting up your Skype Profile
Before adding contacts to your Skype account it is important to set up your Profile.

The more relevant the information you include in your Profile the easier it will be for others to ensure they’re connecting
with the right person.

To change your Profile you need to:

    1. Click on the Profile tab or select Skype > Profile >
       Edit Your Profile from the menu bar

    2. Change Your Picture by clicking on Choose picture from file or select Skype > Profile > Change Your
       Picture from the menu bar

                It’s harder to locate the correct contact
                without a profile picture and you’re less
                likely to added as contact if you’re using the
                default avatar.

    3. Add your Country/Region, State/Province, City, Time, website (if applicable), gender and language by clicking
       on each field or using the drop down menu.

    4. Complete your About Me information.

© Sue Waters                                 April, 2011                                                 Page 2 of 10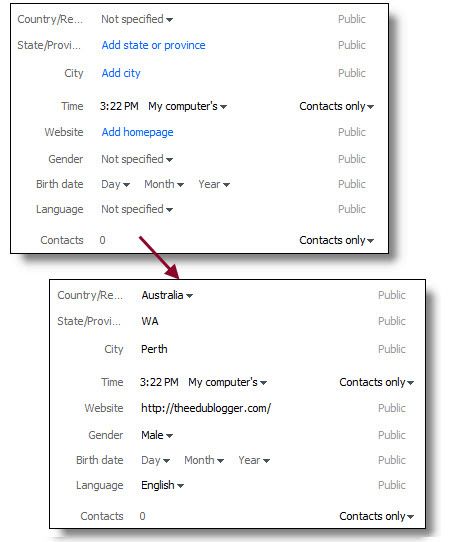
The Complete Educator’s Guide to Using
                                                                                  Skype effectively in the classroom

    5. You can check how others will see your profile information
       by clicking on the Public profile and Contacts only
       buttons at the top of your Profile page.

            Public Profile is what people see when they search for your Skype contact details.
            Contacts Only are what people who have been added to your Skype account can see.

C. Updating your Privacy Options
Your privacy settings control who can contact you via Skype, how long your IM history is kept and is used to manage
blocked users. It’s worth adjusting these before getting started using Skype.

By default, only the people on your Contact list are able to:
    • See your profile picture
    • Application share their screen
    • Video talk with you
    • Send IM’s

While anyone on Skype who searches for you can add you as a contact or call you.

To change your privacy settings select Skype > Privacy in the menu bar.

What privacy options you choose is entirely up to you!

However, if you want to minimize unwanted calls from anyone you might want to change it to “Allow calls from ….
people in my Contact list only”

© Sue Waters                                 April, 2011                                            Page 3 of 10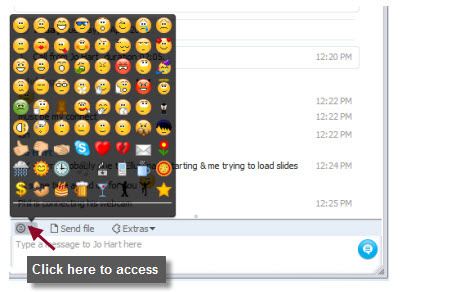
The Complete Educator’s Guide to Using
                                                                                    Skype effectively in the classroom

D. Configuring your Audio and Video settings

It’s best to make sure your audio and video is set up properly before using Skype to make calls.

There’s nothing more annoying frustrating than the other person not being able to hear your voice and/or you not being
able to hear theirs.

To make calls you’ll need to have either:
   • Headset with microphone
   • Microphone with speakers

Equipment for personal Skype calls:

    •   In built microphone and speakers on laptops work fine but you may need to adjust the sound setting to prevent
        the other person hearing their own voice feedback by your computer
    •   Comfortable headset with microphone is recommended if you’re planning to use a lot and for extended periods
    •   Headset choice is very personal however I use Logitech Laptop Headset H555. Cheap headsets work just as
        well
    •   Alternatively, use a cheap desktop microphone with speakers
    •   Web camera (optional) – dependent on whether you like to video talk

Equipment for Skype calls in classrooms:

    •   Desktop microphone
    •   Speakers
    •   Web camera
    •   Interactive white board for display or a data projector if video
        conferencing with another class

Once your Skype equipment is connected to your computer all you need to do
is configure your Audio settings by going to Call > Audio Settings in the menu
bar.

Now just select your Microphone and Speakers from the drop down options.

Repeat the same process to set up your web cam using the Video Settings options.

Testing your Audio, Sound and Video quality is as simple as:

    1. Click on Echo / Sound Test Service

© Sue Waters                                 April, 2011                                             Page 4 of 10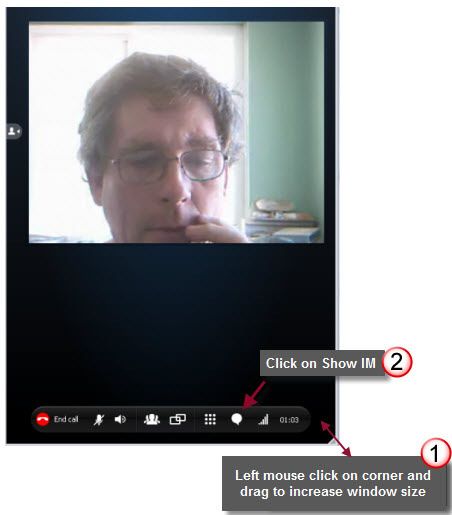
The Complete Educator’s Guide to Using
                                                                                  Skype effectively in the classroom

    2. Click on Call

    3. Now follow the instructions to test your set up using Skype’s
       automatic sound test service
    4. If you don’t hear any sound you’ll need to check your set up
    5. Alternatively, you can click Check Settings to the right of Call.

E. Adding People To Your Skype Account

To contact people you will need to add their username to your Skype account.

The easiest way of finding someone’s Skype username is to contact them to ask:

    1. If you could add them to your Skype account
    2. For their username

However, you can easily search for friends’ Skype account using their email address or
name.

You add people to your account by:

    1. Select Contacts > Add a Contact in the menu bar or click on Add Contact.
    2. Enter their full name, email address or Skype name.
    3. If the Skype account of the person you wish to add is displayed, click Add below
       the contact.
            Clicking on their Avatar displays all their profile information
            If more than one Skype account matches your search, click on view to check
            out all matches found.

    4. Before the contact can be added, you must send a contact request to that person. Enter some text to introduce
       yourself and click Send request.

© Sue Waters                                April, 2011                                            Page 5 of 10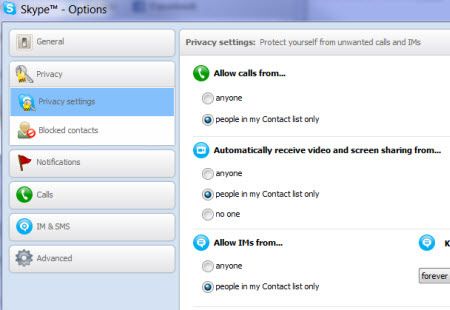
The Complete Educator’s Guide to Using
                                                                                     Skype effectively in the classroom

    5. The contact will be added to your contact list, but will
       appear offline until they accept your request.

    6. Once the person agrees to your request, they will be
       added to your Contact list. You can then make free calls
       and video calls to that person, and send instant messages
       and files to each other.
    7. Occasionally they won’t receive your notification to add to
       their contact list – in this situation just ask them to also
       add your username to their account.

Using your Skype account

A. Skype Status

Best part of Skype is you can tell when another user is online
and what their status is so you know if they are available.

Some one’s Skype status is showing Available or Away from
keyboard are normally near their computer.

However, it good etiquette to send a person a short Instant
message and waiting to see if they reply rather than calling them as it might not be convenient, you might be interrupting
their work flow or they may not have their audio configured.

Once you’ve engaged in a IM conversation then you can nicely ask them if
they mind or if it is convenient to use voice.

Changing your Status is as simple as:

    1. Click on drop down menu next to your status
    2. Select your new Status

B. Sending or Receiving an Instant Message

Sending an Instant message is as easy as:

    1. Find the person or group you want to message from your contact list.
    2. Their username will load in the main window and you just click inside the conversation box.
    3. Now type your short message and click the blue Send message button, or press Enter on your keyboard.

If someone IMs you, your Recent tab will turn orange and will show a
number to to indicate how many new IM you have received.

You’ll also see an orange dot against the person’s name in your contact
list who has sent the IM.

To check newly received IM:
    1. Click the Recent tab. You’ll see a list of contacts who have
       recently contacted you using IM.
© Sue Waters                                 April, 2011                                               Page 6 of 10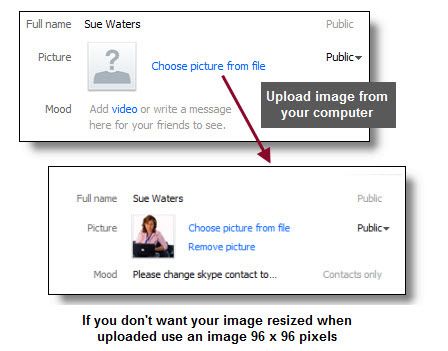
The Complete Educator’s Guide to Using
Skype effectively in the classroom
2. Unread messages are indicated by the person’s name shown
in bold with a number next to their name.
3. Click on the person’s name to open up the main window and
view the conversation.
4. 4. Type your reply inside the conversation box and click the
blue Send message button, or just press Enter on your
keyboard.
Other useful things you can do in an instant message include:
1. Add more people to the conversation to create a group IM
• Click on Add People
• Choose their names from the Contact list and click Select
• Now click Add
2. Use emoticons or add small pictures to show how you are feeling
3. Send documents, photos or videos
4. Use Extra features like play games and personalise your Skype. Read more about Extras here
(https://support.skype.com/en/faq/FA907/What-are-Extras-and-how-can-I-use-
them?frompage=search&q=extras&fromSearchFirstPage=fals ).
C. Calling someone who’s on Skype
Remember it good etiquette to send a person a short Instant message and waiting to see if they reply before calling
them as it might not be convenient, you might be interrupting their work flow or they may not have their audio
configured.
Once you’ve engaged in a IM conversation then you can nicely ask them if they mind or if it is convenient to use voice.
Calling someone who’s on Skype is as easily as:
1. Find the person you want to call by looking in your contact list.
2. Check their Skype status and if they are available click their name. You will see their details in the main window.
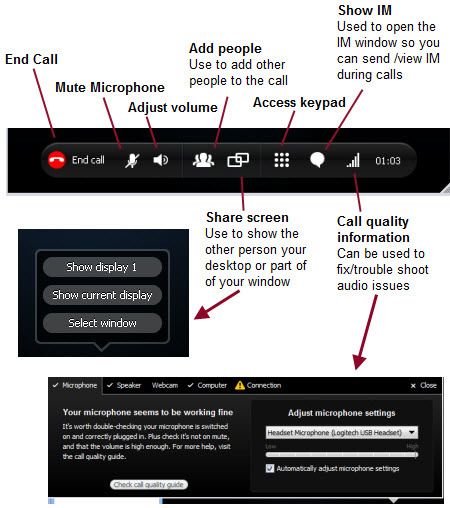
3. Click the green Call button. You should hear ringing. If you don’t hear the other person or they can’t hear you,
click the call quality icon in the call bar.
© Sue Waters April, 2011 Page 7 of 10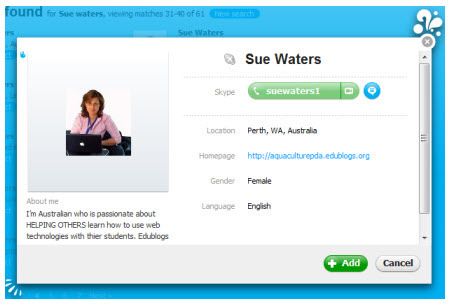
The Complete Educator’s Guide to Using
                                                                                  Skype effectively in the classroom

    4. Hover your mouse over the main window during a call brings up the Skype menu items which you use to access
       different Skype features.

    5. To hang up, click the End call button.

Using Skype in your Classroom
Using Skype with your students does require new skill sets to developed.

For good video quality students need to think more about impact of:

        Their own movement
        Their movement of objects
        Where they place objects to display to the other class.

For good audio quality students needs to:
       Be confident
       Think about what they want to say
       Speak clearly and loudly enough
       Slow down their speech and avoid use of language specific to their country unless they explain what the term(s)
       means

© Sue Waters                                April, 2011                                             Page 8 of 10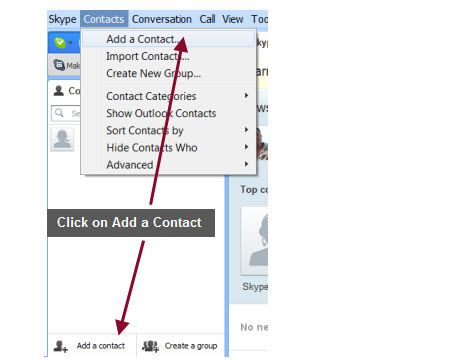
The Complete Educator’s Guide to Using
                                                                                    Skype effectively in the classroom

The keys to an effective skype classroom session include take the time to:

        Practice all skills before the Skype session
        Decide what outcomes you want to achieve and plan the Skype session including the questions, what you want
        to discuss and show before you start
        Allocate students different job roles for during the Skype session such as webcam operator, microphone
        manager, speaker, photographer, film session, IM writers, live bloggers, data recorders

It’s also worth keeping parents and families informed of why and how you’re using Skype in the classroom so they feel
comfortable with the process.

Check out these documents Keith Ferrell uses to explain the process to his familiess:
   1. Rationale for using Skype in the classroom (http://edtechideas.com/2011/04/05/rationale-for-using-skype-in-the-
       classroom/)
   2. parent permission slip (https://docs.google.com/document/d/1Gzr7hoK55yLm2v6YHXewf27r5pzl1cli0yLx-
       ULSy7c/edit?hl=en&authkey=CMvU7-YL)

For detailed information on planning and running a Skype session refer to Silvia Tolisano’s:

    1. Skype jobs for Students (http://langwitches.org/blog/2010/04/11/skype-jobs-for-students/ )
    2. Assessment of learning via Skype (http://langwitches.org/blog/2010/11/20/assessment-of-learning-via-skype/) –
       excellent explanation of pre-activities, during skype call activities and post activities
    3. A few tips for student filming in the classroom (http://langwitches.org/blog/2010/09/01/a-few-tips-tricks-for-
       student-filming-in-the-classroom/)

Equipment for Skype calls in classrooms:
      Desktop microphone
      Speakers
      Web camera
      Interactive white board for display or a data projector if video conferencing with another class

Below are tips adapted with permission from:

    1. Sue Wyatt’s Improving our Skype Calls (http://wyatt67.edublogs.org/2008/12/20/improving-our-skype-calls/)
    2. Ann Mirtchin’s Using Skype in the classroom (http://murcha.wordpress.com/2008/12/06/using-skype-in-
       education/)

A. Setting up the equipment

        If using a webcam where the videoconferences is projected onto an interactive white board for display or via a
        data projector locate the webcam beside the board, so the speaker can see both the webcam and class they
        are speaking to.
        Have a chair near the microphone for speakers to sit on.
        Have the webcam on eye-level with the speaker so they don’t have to look up or down at the webcam as this
        will distort the view of the class watching.
        Set up the desks for students not at the microphone, so they can still be seen by the class you are speaking to.
        Ensure everything is set up from the start including any objects you want to share.
        Do a test Skype call with the other teacher before the day so you can both trouble shoot any video and sound
        issues.
        Test the equipment before starting class.
        If you experience issues with the call during the session try switching off the video to see if that helps.
        Have a management plan for discipline problems before commencing — so you can intervene quickly if
        needed.

© Sue Waters                                April, 2011                                                  Page 9 of 10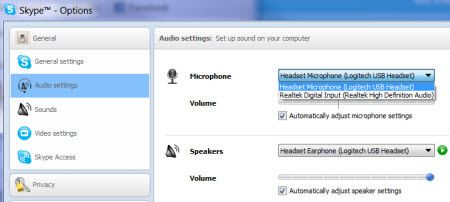
The Complete Educator’s Guide to Using
                                                                                       Skype effectively in the classroom

B. Using the microphone and video

        Speak clearly and try to slow down your normal speech. It
        takes time to adjust to some accents — talking slower
        helps.
        Speak fluently with no small talk or swearing.
        Avoid language that is only from your country unless you
        explain the meaning to your viewers.
        When it is your turn to talk, make sure you know what you
        are going to talk about. Try to explain rather than give a
        one or two word answer.
        Show confidence when speaking – this might mean a few
        rehearsals for some students.
        If using a desk microphone, hold it straight and speak
        straight into it, not swinging it side to side
        Minimize too much movement of objects or people as this
        can cause blurring
        Left mouse click on the corner of the main window and
        drag to increase the window size to enlarge the video and
        then click on the Show IM icon so you can send IM and
        watch the video.
        If not using IM, then just click on Full screen to enlarge the
        video stream.

C. Being part of the audience

        Be quiet when someone is speaking on the microphone.
        Listen attentively when you are not the speaker, as you might know the answer to the question being asked by
        the other class.
        Ideally only one person should speak at a time
        Don’t sit friends near each other as they will tend to distract each other when not the speaker.
        Sit where you can see and hear the conversation but where it is also easy to get up and go to the microphone.

D. Using the Chat window

IM is excellent for feedback and questions.

It’s especially ideal when connecting with classes that English isn’t their first language, or when sound quality isn’t good
— it’s a great way of typing in key phrases to ensure information is being understood.

        Use IM to send a quick message to check the other class is ready before calling.
        Allocate students to be in charge of the IM conversation during the video conference and provide them clear
        guidelines of their role.

E. Finding classes and content experts to connect with

Here’s where you’ll find some connections to get you started:

1. Skype other Classrooms! - http://theedublogger.com/want-to-connect-with-other-classrooms/
2. Around the World with Skype – http://langwitches.wikispaces.com/Around+The+World+With+Skype scroll down
   page
3. Skype in the Classroom website - http://education.skype.com/

.

© Sue Waters                                  April, 2011                                               Page 10 of 10
You can also read