Sharpening chisel and plane blades 2020 - Friedrich Kollenrott
←
→
Page content transcription
If your browser does not render page correctly, please read the page content below
Friedrich Kollenrott
Sharpening chisel and plane blades 2020
freehand – fast – in top quality
Translation: C. Langfelder

                                       These instructions are intended to help all those who struggle to
                                       keep their tools at peak sharpness or who think there must be a
                                       better way of keeping them sharp.
                                       Woodworkers who nowadays chose to use unpowered hand
                                       tools for challenging projects are predominantly DIY enthusiasts,
                                       ie, people without specialist training. Where do they look for the
                                       necessary expertise, where do they find the information that they
                                       require?
                                       There are books, periodicals, courses – but above all the
                                       Internet. It’s where people interested in a common topic meet, it’s
                                       where they discuss things, and it’s where you’ll find an endless
                                       amount of information – from dreadful through useful to
                                       remarkably good stuff – also about sharpening tools. Sharpening
                                       has to be a topic of interest for anyone working with hand tools,
                                       because dull tools don’t work at all and poorly sharpened tools
                                       are a handicap. Only properly sharpened tools let you experience
                                       their full potential.

Sharpening chisel and plane blades is not really difficult. But what complicates the start for newcomers
is the unbelievable variety of sharpening tools, working techniques and processes. Every hand tool user
will eventually develop from these a more or less individual sharpening method. What I am describing
and illustrating in this book is neither the best method nor the only right method, but quite simply my
method. I leave it to you to decide what is worth testing and possibly adopting. I often take the opportu-
nity of pointing out alternatives.
“Learning to sharpen” does not mean mimicking rhythmical movements on a whetstone. The first step is
to understand the essence of sharpening. How do chisel and plane blades cut? What do you have to
observe when sharpening to achieve a perfect cutting edge? How do you reduce sharpening time
without compromising on quality? This is where this guide starts off. Then it shows and explains in detail
the practical aspects of sharpening various blades. And how to restore blades in poor condition to
working order. Different sharpening tools and accessories are also discussed in some detail.
I thank all those who in chats and discussions about the sharpening of hand tools1 came up with ideas
and suggestions and directed me to new and often exciting insights.
Above all I want to thank my dear wife Ingrid for her support and her patient tolerance throughout the
drawn-out process of writing this guide.

Schladen am Harz, March 2020            Friedrich Kollenrott

1
    Above all here: http://www.woodworking.de/cgi-bin/forum/webbbs_config.pl

F. Kollenrott: Sharpening chisel and plane blades 2020 Publication/copyright: www.fine-tools.com         1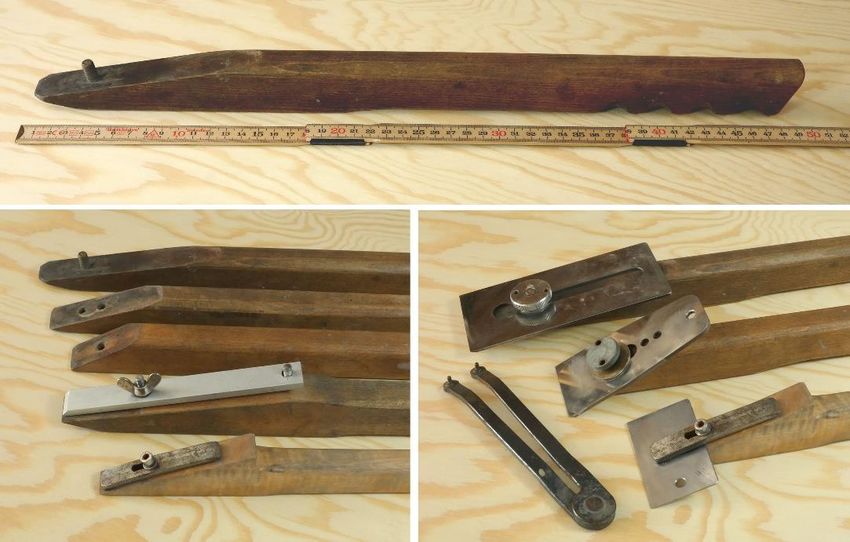
Contents
1 Woodworking with hand tools – including sharpening ..................................................................... 4
2 Sharpening chisel blades and plane blades: the basics .................................................................. 5
2.1 How do chisel and plane blades cut? ....................................................................................... 5
2.1.1 Cutting with a chisel .............................................................................................................. 5
2.1.2 Cutting with a plane .............................................................................................................. 5
2.2 The cutting edge and the principle of sharpening ..................................................................... 6
2.2.1 Sharp, dull, damaged............................................................................................................ 6
2.2.2 Principle of sharpening chisel and plane blades on bench stones ........................................ 7
2.3 Speeding up and improving sharpening – with microbevel and back bevel .............................. 8
2.3.1 Microbevel ............................................................................................................................ 8
2.3.2 Back bevel (on planes only!) ................................................................................................. 9
2.4 Techniques for sharpening with microbevel and back bevel................................................... 10
2.4.1 Regrinding the bevel (on a blade that is to be given a straight cutting edge! ...................... 10
2.4.2 Producing the microbevel (for a straight cutting edge!)....................................................... 12
2.4.3 Honing the back (mandatory for chisel blades)................................................................... 13
2.4.4 Honing the back bevel (only for plane blades, and here for a straight cutting edge:........... 13
2.5 Summary: why backs and whetstones have to be flat ............................................................ 14
3 This is what it looks like! Sharpening with water stones ................................................................ 15
3.1 Sharpening chisel blades........................................................................................................ 15
3.2 Sharpening plane blades with a straight edge (for a curved edge see Chap. 3.3).................. 19
3.3 Sharpening plane blades with a cambered (slightly curved) cutting edge .............................. 22
3.4 If necessary: refinishing the back ........................................................................................... 24
3.4.1 Is the back acceptable? ...................................................................................................... 24
3.4.2 Grinding the back flat on a bench stone ............................................................................. 24
3.4.3 Honing the back of a chisel blade after grinding ................................................................. 26
3.4.4 Do backs stay permanently flat? ......................................................................................... 26
4 Special cases: gouges, chipbreakers, scrub plane cutters, router plane cutters ........................... 27
4.1 Sharpening gouges ................................................................................................................ 27
4.1.1 Sharpening tools for gouges ............................................................................................... 27
4.1.2 Grinding the bevel of gouges (bevel outside) ..................................................................... 27
4.1.3 Working on the inside of gouges when sharpening ............................................................ 28
4.2 Preparing (and adjusting) the chipbreaker for plane blades ................................................... 30
4.3 Sharpening the blade of a scrub plane ................................................................................... 31
4.4 Sharpening the cutter of a router plane .................................................................................. 31
5 Sharpening equipment and accessories ....................................................................................... 32
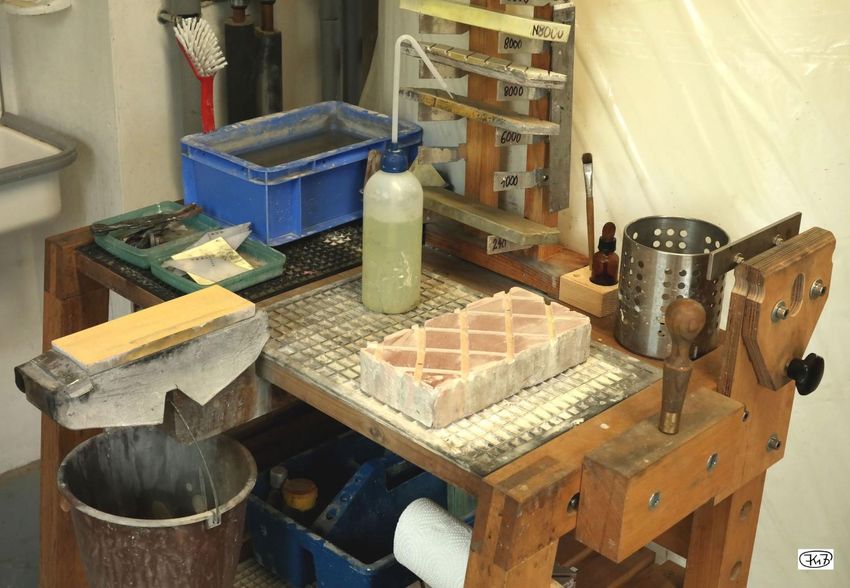
5.1 My sharpening centre ............................................................................................................. 32
5.2 Water stones .......................................................................................................................... 33
5.2.1 General notes on water stones ........................................................................................... 33
5.2.2 Bench stones for sharpening chisel and plane blades ........................................................ 34
5.2.3 My water stones (in spring 2020) ........................................................................................ 36
5.3 Angle gauges for dressing prior to freehand grinding/honing ................................................. 37
5.4 Holders for grinding and honing plane blades ........................................................................ 37
F. Kollenrott: Sharpening chisel and plane blades 2020 Publication/copyright: www.fine-tools.com 2
5.5        Further technical aids ............................................................................................................. 39
       5.5.1      Magnifying glasses – and how to use them ........................................................................ 39
       5.5.2      Permanent magnets ........................................................................................................... 39
6      Keeping whetstones and honing stones true and flat .................................................................... 40
    6.1        Clinkers?................................................................................................................................. 40
    6.2        A DIY reference surface: lapping the clinkers flat ................................................................... 40
       6.2.1      Lapping basics .................................................................................................................... 40
       6.2.2      Lapping rectangular clinkers ............................................................................................... 40
       6.2.3      Lapping virgin clinkers ........................................................................................................ 41
       6.2.4      Reconditioning clinkers that are not flat or not flat anymore ............................................... 44
    6.3        Dressing whetstones, honing stones and roughing stones on clinkers................................... 44
7      Steels used for chisel and plane blades ........................................................................................ 46
    7.1        Tool steel ................................................................................................................................ 46
    7.2        Steel types for hand tools ....................................................................................................... 46
    7.3        Heat treatment of tool steels ................................................................................................... 47
    7.4        Criteria for a steel’s suitability ................................................................................................. 48
    7.5        Steel types used by manufacturers ........................................................................................ 49
8      Any more questions? (FAQs) ........................................................................................................ 50
    8.1        I don’t feel like sharpening. Can’t I use a sharpening service? ............................................... 50
    8.2        What about sharpening with a machine? ................................................................................ 50
    8.3        By hand – sure, but freehand? Why not use a sharpening guide? ......................................... 51
    8.4        Is there a video showing the sharpening techniques presented in this guide? ....................... 51
    8.5        What are the alternatives to synthetic water stones? ............................................................. 51
    8.6        How can you save time when sharpening very thick blades? ................................................. 53
    8.7        What angles to chose for bevels, microbevels, back bevels? ................................................. 54
    8.8        Can one go over the top with sharpening? And how often is often enough? .......................... 55
    8.9    How do you flatten grinding and honing stones, if you don’t have any clinkers or don’t want to
    use them in the first place? ................................................................................................................. 56
    8.10       How do you refurbish blades that are in a bad state? ............................................................. 56
       8.10.1         Restoring the back of a blade ......................................................................................... 57
       8.10.2         Restoring the bevel ......................................................................................................... 58
    8.11       Why do you need a cambered cutting edge on plane blades? ............................................... 58
    8.12       What to consider when sharpening Japanese blades ............................................................ 59
    8.13       What about the grit grade specifications according to FEPA or JIS? ...................................... 61
    8.14       How much time should sharpening take? ............................................................................... 61
    8.15       Can you resharpen blades with just a honing stone? ............................................................. 62
    8.16       What can you do to prevent scratches on the back? .............................................................. 62
    8.17       Why are the backs of brand new blades often not flat enough? ............................................. 62
    8.18       Can the back of a chisel blade stay permanently flat? ............................................................ 63
9      The finishing touch ........................................................................................................................ 65

Significant changes in this version (2020) compared to previous version (2019): Chap. 6.2                                                             new

F. Kollenrott: Sharpening chisel and plane blades 2020 Publication/copyright: www.fine-tools.com                                                          3
1       Woodworking with hand tools – including sharpening
Nowadays many people who use hand tools such as chisels, planes, scrapers and hand saws for
ambitious carpentry work are neither poor nor backward, but privileged.
The times of unrelenting, heavy physical work in the woodworking trades are fortunately long past and it
will be the rare woodworker who will do completely without some support from machines and power
tools. But the number of people who enjoy doing some jobs in the traditional way “by hand” is clearly on
the increase, above all among amateurs for whom productivity is not a primary aim. They will, for in-
stance, smooth wooden surfaces with a hand plane or fashion traditional wood joints, such as dovetail
and mortise or tongue-and-groove joints, using a hand saw and chisel. They get pleasure and
satisfaction from such handiwork and more than likely they’ll be more than a little proud of their skill.
Using hand tools for most or some operations certainly does not mean that you are lowering your sights
when it comes to quality. On the contrary, you will be able to
•    create workpieces that are more attractive to look at and touch than fully machined equivalents.
•    work with amazing precision and – given the necessary skill and ambition – test and apply the
     virtually infinite possibilities and variants of craftsmanship evolved over many centuries.
•    tackle bigger projects in a much smaller and modestly equipped workshop than would be possible
     with an entirely machine-based operation that would require very extensive equipment and a large
     working area.
If you are new to working with hand tools you must be satisfied with modest success. But from the very
start you will profit from other benefits of unpowered hand tools:
•     Using them subjects woodworkers and the environment to much less noise and dust than is
      possible with machines.
• It is nearly impossible to injure yourself seriously with these tools (while many woodworking
      machines are inherently highly dangerous).
• They are impressive examples of sustainability: no energy consumption, no consumables,
      recyclable, nearly infinite service life....
If you want to work with hand tools, you must learn not only how to use them but also how to sharpen
them properly. In most cases, chisel blades, plane blades and scrapers must be sharpened even before
you use them for the first time, and then regularly during subsequent use. Only handsaws (not covered
here) can be bought perfectly sharpened, and types with industrial replacement blades are very
popular.2
For my part (born in 1947, mechanical engineer and teacher, pensioner) I was already dabbling in
woodwork at a very early age. And even then I always tried to sharpen my hand tools – I can well
remember a coarse, black and deeply hollowed oil stone. As time went by I added power tools and
simple machines. But I only managed to achieve woodwork of truly presentable quality after the 1990s
when I changed for good to working with traditional hand tools on a workbench. Sharpening the tools –
as ever by hand and by now with Japanese water stones – caused me problems for a long time,
because regrettably I had neither an instructor nor clear instructions. I never quite got on terms with a
sharpening guide that I used for some time. But then I discovered the microbevel on the English-
language Internet. This was it! At once freehand sharpening became simpler and much faster, and the
quality of the sharpening result improved and became more reliable. I’ve stayed with this approach –
freehand and with microbevels – ever since and have improved it as I went along.
In my small workshop I build practical furniture (“practical” is a very important criterium for me), utensils,
toys and similar things. My starting point is usually sawn timber, ie, roughly sawn boards and planks. My
collection of new and old hand tools is wide and varied. Stationary woodworking machines include a
circular table saw (which I really use only for ripping) and a bench pillar drill; a pole lathe can be erected
when necessary. A key piece of equipment in my workshop is the ever-ready sharpening centre where I
can return dulled chisel blades, plane blades and scrapers to full use within a matter of minutes.
I first published a sharpening guide in 2004, and I’ve revised it several times since then. The aim is to
help all those who – like myself many years ago – experience difficulties with sharpening their blades.

2
    I also sharpen my own saws.

F. Kollenrott: Sharpening chisel and plane blades 2020 Publication/copyright: www.fine-tools.com            4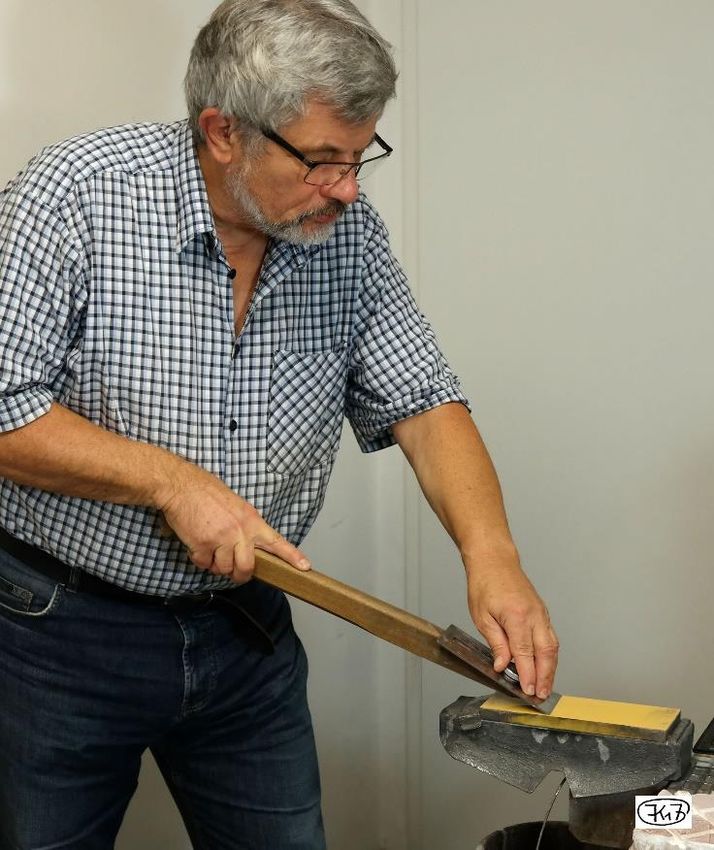
2       Sharpening chisel blades and plane blades: the basics
2.1     How do chisel and plane blades cut?
2.1.1    Cutting with a chisel
A chisel blade (Fig. 1 left) has a bevel on one side and a flat back on the other. These two surfaces
intersect to form the acute-angled wedge with its sharp cutting edge. The most important feature of the
wedge is its wedge angle β (beta) that includes the back and bevel. For most chisel blades this angle is
around 30°.
                                                     Fig. 1: How a chisel blade cuts
                                                      1: back
                                                      2: bevel
                                                      3: cutting edge
                                                      4: mortising
                                                      5: paring, sliding on the bevel
                                                      6: paring, sliding on the back
                                                      v: movement of blade
                                                      β (beta): wedge angle of cutting edge
                                                      You can use a chisel for mortising (the edge is
                                                      driven into the wood by hammer blows to separate it
                                                      and force it apart) or for paring (the blade slides on
                                                      the wood and lifts off a chip that is deflected via the
                                                      leading face of the wedge, also referred to as the
                                                      rake face.
                                                      If the blade slides on the bevel (the back acts as
                                                      rake face), the depth of cut can be varied by raising
                                                      or lowering the handle. If it slides on the back (the
                                                      bevel acts as rake face), the cut is exactly straight
                                                      ahead.
Precise paring depends on the guiding function of the long, flat back extending all the way to the cutting
edge. Chisels with bevels on both sides are carving tools, not suitable for joinery.
2.1.2    Cutting with a plane
A plane blade also has a back, a bevel and a wedge with wedge angle β. However it is not held by
hand, but clamped into a plane on a slanting surface called a bed. The sole of the plane slides over the
workpiece, so that the blade is guided at a constant angle and with a constant cutting depth (= shaving
thickness).
                                                                             Fig 2: How a plane blade
                                                                             cuts
                                                                             left: plane with bevel down
                                                                             right: plane with bevel up
                                                                             (also called a BU or low
                                                                             angle plane)
                                                                                 1: sole of plane
                                                                                 2: rake face
                                                                                 3: clearance face
                                                                                 4: chipbreaker (optional)
                                                                                 s: shaving thickness
                                                                                 v: direction of movement
                                                                                 α (alpha): clearance angle
                                                                                 β (beta): wedge angle
                                                                                 ε (epsilon): bedding angle
                                                                                 δ (delta): cutting angle
The cutting process is quite different to that with a chisel, the crucial difference being the presence of a
clearance angle.

F. Kollenrott: Sharpening chisel and plane blades 2020 Publication/copyright: www.fine-tools.com            5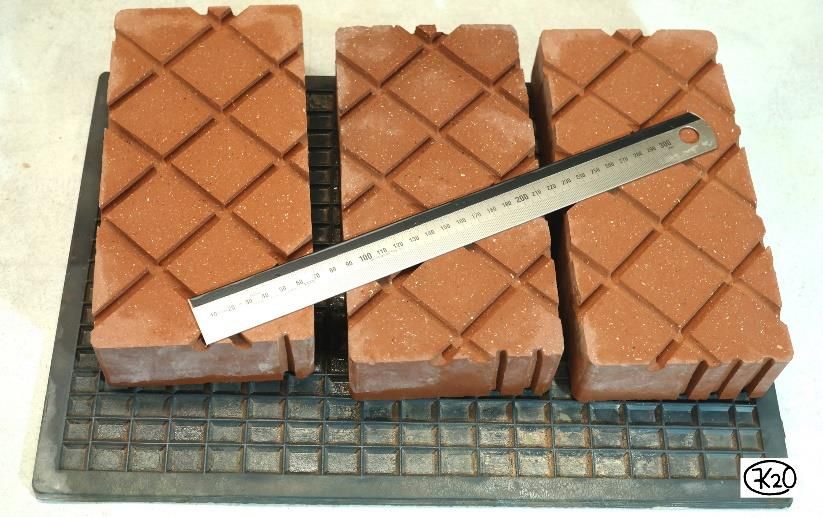
Plane with bevel down (Fig 2 left):
This is the traditional design, found more commonly on both wooden and steel planes. The blade is
fixed in the plane with its bevel facing down. The separated shaving slides over the back of the blade
which acts as rake face. The bevel does not come into contact with the workpiece, it acts as clearance
face. The wedge-shaped gap between bevel and cut surface is the clearance angle α (alpha).
The clearance angle avoids any unnecessary friction between the material and the cutting edge. When
planing wood this angle should not be much less than 10°3, so that the wood springing back after the cut
does not rub against the clearance face. A sufficiently large clearance angle is a prerequisite for a good
chip removal rate both for hand and machine tools.
Plane with bevel up (Fig. 2 right):
Now the blade is fixed with the bevel facing up. The wedge looks the same as for the plane with the
bevel facing down, and the cutting process from the shaving’s point of view is also identical, but the rake
face is now the bevel of the plane blade and the clearance angle is between workpiece and back. These
planes are also called low angle planes with reference to the flat configuration of the blade (small bed-
ding angle ε). The plane’s body with its thin wedge-shaped bed is always made of metal.

2.2     The cutting edge and the principle of sharpening
2.2.1    Sharp, dull, damaged
Chisel or plane blades for fine woodworking must be much sharper than machine tools4. How sharp?
The simplest definition is: sharp enough to shave with. This sharpness can be achieved if both surfaces
have a microfinished, almost a polished, surface where the bevel and back meet at a wedge angle β
(beta) of, say, 30°. They then form a perfect, sharp cutting edge (Fig. 3 left), which in the (theoretical)
ideal case would be absolutely sharp-edged without any radius formation, ie, with a curvature radius of
zero.
                                                                         Fig. 3: State of cutting edge
                                                                         left: sharp blade
                                                                         centre: much enlarged: blade
                                                                         corner with dull (rounded) cutting
                                                                         edge
                                                                         right: ditto, with dull and
                                                                         damaged cutting edge
                                                                         1: back
                                                                         2: bevel
                                                                         3: sharp cutting edge
                                                                         4: dull cutting edge
                                                                         5: dull and damaged cutting
                                                                            edge
                                                                         β: wedge angle
A blade this sharp will cut wood effortlessly. Once it has been in use for some time, the force you need
to apply becomes noticeably greater and the cutting edge will no longer lift a thin shaving as readily as
before. It is dull. If used carefully and gently, then the cutting edge has become dull simply through wear
and tear. The soft but abrasive wood has attacked the hard steel and removed material (Fig. 3 centre).
This has caused the cutting edge to become minimally rounded and roughened – it is no longer sharp.
But if the cutting edge was overloaded or came in contact with hard foreign bodies (for instance, through
mortising or planing wood with knots or mineral contaminants), the cutting edge will show additional
evidence of damage such as notches or deformations (Fig. 3 right). These will leave visible marks on
any surface cut with the blade.
You can see whether a cutting edge is sharp and undamaged or not, even without a magnifying glass. A
perfect cutting edge is invisible – there’s simply nothing to see; it’s actually a non-existent thing. It be-
comes visible only once the cutting edge is either dull or damaged.

3
 This is far more than in metal working, because wood is more elastic than metal.
4
 Tools for wood must be far sharper because the cutting speed is much lower and the driving power
very low. The sharpness of the blade is especially important when planing. Only a truly sharp plane
works well. And how do you achieve a sharp plane? Quite simply by sharpening the blade of a dull
plane.

F. Kollenrott: Sharpening chisel and plane blades 2020 Publication/copyright: www.fine-tools.com           6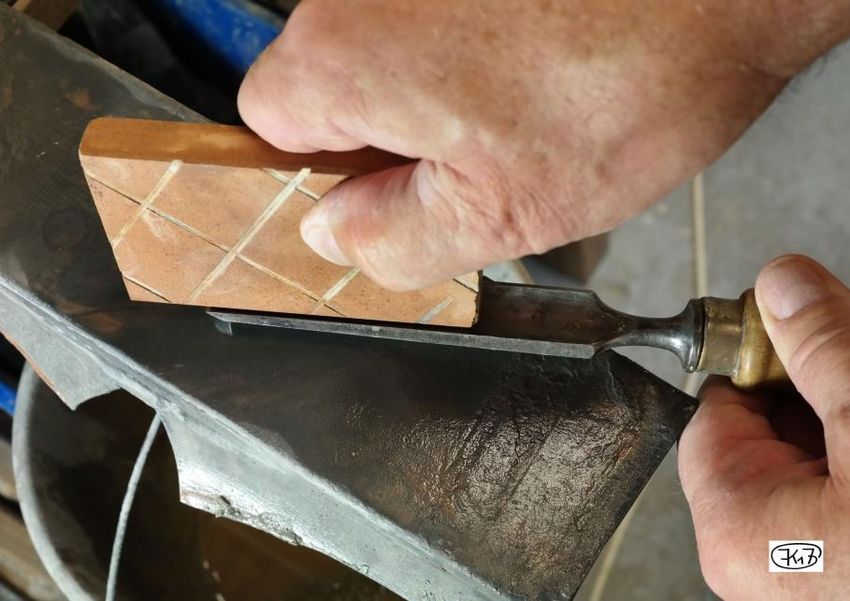
Fig. 4: Cutting edge of a 13 mm wide
                                                              skew chisel
                                                              (viewed from the back)
                                                              In good light against a darker background
                                                              a dull cutting edge held at the correct angle
                                                              will appear as a fine, uniformly bright line.
                                                              Damaged points on the edge often show
                                                              up lighter or sparkling.
                                                              This cutting edge is slightly dull and clearly
                                                              damaged. In this light the back appears
                                                              much more scratched than it actually is.

2.2.2      Principle of sharpening chisel and plane blades on bench stones
Good quality chisel and plane blades are very hard and as such can only be worked on by grinding and
certainly not with a steel file! The typical grinding tool for sharpening by hand is a block-shaped, flat
bench stone, called this because it is used lying on a flat surface or bench5.
You sharpen the blade by regrinding the bevel. This means that a thin layer of steel is removed. In
effect, the old cutting edge is removed to reveal a new, sharp one. The blade ends up negligibly shorter,
but the geometric relationships at the cutting edge (Fig. 1 and 2) are left completely unchanged.

                                                          Fig 5: Sharpening principle: corner of a
                                                          blade
                                                          showing the layers on the bevel that are to be
                                                          ground away (highly magnified)
                                                          1: back
                                                          2: bevel
                                                          3: cutting edge, dull (worn)
                                                          4: nick
                                                          a: material removal at the bevel to eliminate
                                                             wear at the cutting edge
                                                          b: material removal at the bevel to eliminate a
                                                             nick in the cutting edge
                                                          β: wedge angle

If the blade was merely dull (worn), the layer to be ground away is very thin, just a few hundredths of a
millimetre (Fig. 5 layer a). But if you are repairing damage to the cutting edge, then more must be
ground away (layer b). To save sharpening time and to maximize the service life of the blade you
should never grind off more than necessary.
                                                            Fig. 6: Sharpening principle: grinding on a
                                                            bench stone
                                                            1: back
                                                          2: bevel
                                                          3: whetstone
                                                          F: applied force
                                                          v: grinding movement
                                                          β: wedge angle

                                                          Press the bevel of the blade onto the stone
                                                          and move to and fro, making sure you hold it
                                                          at the correct angle (wedge angle β) to the
                                                          stone.

5
    Choose a hard-wearing, moisture-proof work surface, definitely not your workbench!

F. Kollenrott: Sharpening chisel and plane blades 2020 Publication/copyright: www.fine-tools.com          7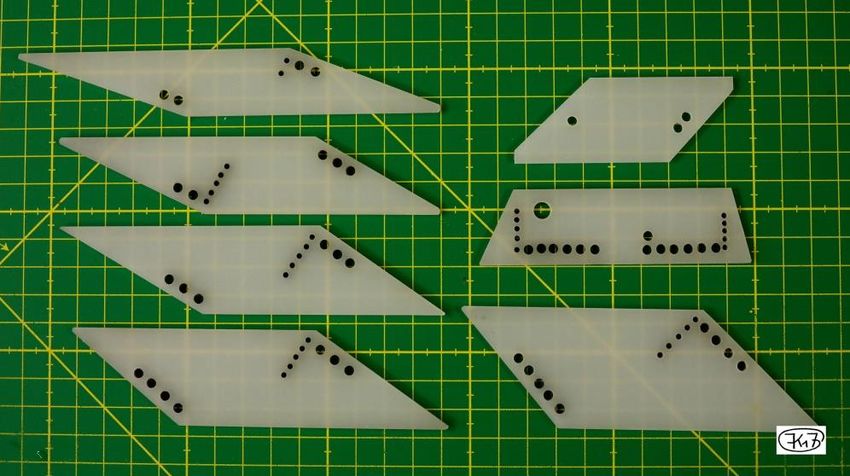
This creates a freshly ground area – and a new cutting edge. Quite simple in principle – in practice,
however, somewhat more complicated, because the stone that is used to create the fine surface for a
good cutting edge has only a very small removal rate6. You will also need to do something about the
burr that usually develops – exactly along the line where you want your cutting edge to be.

That is why it is good practice to sharpen in three stages:
In the first stage the bevel is ground with a coarser whetstone (about J800 to J10007 grit) until all
signs of wear and damage have been removed from the cutting edge.
In the second stage the bevel is honed, ie, ground a second time, but this time with a very fine honing
stone (about J3000 to J10000 grit) that leaves a fine surface finish.
In the third stage the back is honed to remove all unavoidable scratches and any small signs of
damage from the cutting edge, as well as the very fine burr that usually forms when the bevel is honed.

2.3      Speeding up and improving sharpening – with microbevel and back bevel
Sharpening as described above involves honing the entire surface area of both the bevel and the back.
There is absolutely nothing wrong with sharpening a blade in this fashion, but it has drawbacks.
•     Honing the whole bevel area to a high quality takes time and is only straightforward if you guide the
      blade precisely during sharpening. This is quite a feat if you sharpen freehand and sometimes
      things go wrong (eg, you fail to pick up the whole cutting edge).
•     When honing the back, you can remove only a very thin layer – because of the large area and the
      fine stone. You are unlikely to remove deeper scratches, caused perhaps by errant coarse grains.
      These scratches will increase in number and will form tiny notches if they continue to the cutting
      edge. If you want a truly perfect cutting edge you will either have to spend a lot of time honing the
      back or remove these scratches thoroughly from time to time, and that involves regrinding and then
      again honing the back.
You can avoid this laborious process:
Regardless of the length and thickness of the blade, the actual cutting process takes place right in front,
at the cutting edge. In other words, it is enough if only there (ie, over the first tenths of a millimetre)
the geometry and surface finish satisfy the requirements for a good cutting edge. It is quite sufficient to
hone just this narrow area in front at the cutting edge! This is made possible by a microbevel and a
back bevel.

2.3.1      Microbevel
                                                         Fig. 7: Microbevel – how to produce it and what
                                                         it looks like
                                                         above: honing the bevel only near the cutting
                                                         edge
                                                         1: back
                                                         2: bevel, ground
                                                         3: producing the microbevel
                                                         4: honing stone
                                                         For a wedge angle (at the cutting edge!) of, say,
                                                         β = 30° I start by grinding a bevel of 25° and then
                                                         I regrind this coarsely ground cutting edge on a
                                                         honing stone at 30°. Beginning at the cutting
                                                         edge and increasing in width as I continue with
                                                         the honing, this creates the narrow, microfinished
                                                         microbevel. Even a microbevel just a few tenths
                                                         of a millimetre wide will reliably remove all traces
                                                         of grinding with the coarse whetstone at the cut-
                                                         ting edge.
                                                         below: ground bevel and honed microbevel on a
                                                         12 mm wide chisel sharpened by hand.
                                                         Width of the microbevel: here approx. 0.3 mm

6
    Removal rate = removed volume of material per time.
7
    Whetstone grit grades see Chap. 5.2.

F. Kollenrott: Sharpening chisel and plane blades 2020 Publication/copyright: www.fine-tools.com           8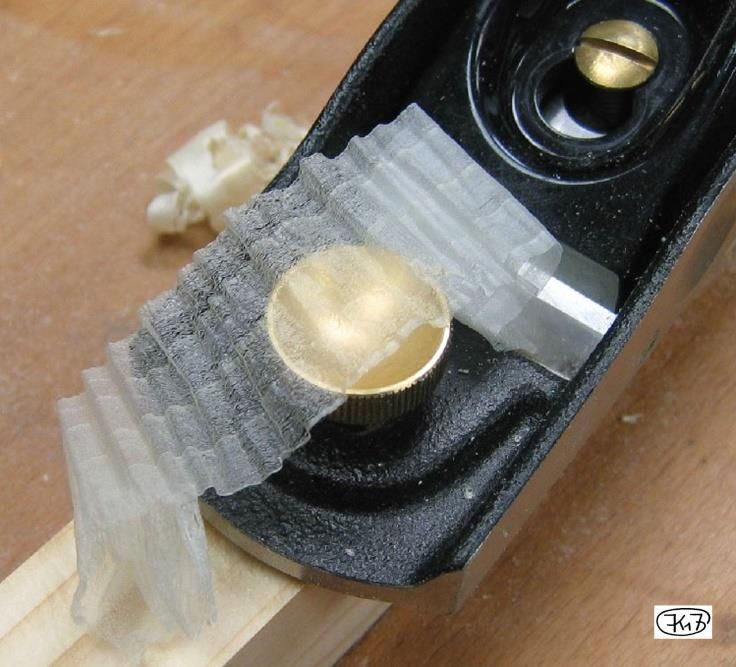
Only a tiny amount of steel has to be removed for creating a microbevel – this takes just a few seconds
even with a very fine honing stone.
Moreover, no special effort is needed to keep the microbevel free of bigger scratches, because coarser
grains or chips will not stick to its underside (as is the case with a larger area).
Another advantage is that you can increase the wedge angle on a chisel with a microbevel without
having to regrind the whole blade. For instance, a cutting edge with 30° wedge angle is overtaxed for
mortising in hard wood: no problem, simply add a 35° microbevel to the existing 25° bevel. And next
time you sharpen the chisel for another, less strenuous job you simply reinstate the 30° microbevel.
And finally: producing a microbevel substantially reduces the precision with which the blade has to be
guided compared with the case where the entire area of bevel has to be honed. This is especially
welcome for people who sharpen by hand.
But remember: the microbevel must always be narrow, only then will you enjoy fast results in high
quality!
Summing up the benefits of a narrow microbevel:
•   Honing, even with an extremely fine stone, takes a fraction of the time that would otherwise be
    needed
•   The quality of the microbevel and hence also of the cutting edge is especially good.
•   A chisel can temporarily be given a microbevel with a more robust cutting edge without extra effort.
•   The microbevel greatly simplifies sharpening by hand.
2.3.2    Back bevel (on planes only!)
Because the back of plane blades (as opposed to those on chisels) is not used to guide the cutting
motion (see Chap. 2.1), there is no need for it to be flat all the way to the cutting edge.
To make the task of sharpening a plane blade easier you can also produce a small microfinished bevel
at a flat angle on the back. This is called a back bevel.
Instead of having to hone the larger area (of the back) all you need to produce now is a minute edge
(the back bevel a few tenths of a millimetre wide); again, with all the benefits of significant time savings
and reliably good quality.
Like the microbevel, the back bevel must always be narrow, only then will you enjoy fast results in
high quality!
                                                            Fig. 8: Plane blade with microbevel and
                                                            back bevel
                                                            1: back
                                                            2: ground bevel
                                                            3: cutting edge
                                                            4: honed back bevel
                                                            5: honed microbevel
                                                            β: wedge angle (at the cutting edge)
                                                            β´: angle between ground bevel and ground
                                                                back
                                                            Δβ: angle difference between microbevel and
                                                                 ground bevel and back bevel and back,
                                                                 respectively.

                                                            Bevel widths and angle differences are
                                                            exaggerated in the drawing.

The back bevel will normally not come into conflict with the chipbreaker (on bevel down planes),
because if correctly produced, it is much narrower than the usual spacing between cutting edge and
chipbreaker. Problems can, however, occur if the chipbreaker is placed very close to the cutting edge
(for more details see Chap. 4.2).

Producing a back bevel on blades for bevel up planes and a 12° bedding angle is also no problem. Δβ =
3° (relative to the back) leaves a 9° clearance angle, which is always ample.

F. Kollenrott: Sharpening chisel and plane blades 2020 Publication/copyright: www.fine-tools.com           9
The cutting edge of a sharpened plane blade with a microbevel and back bevel not only looks like a
razor blade, it can also be just as sharp as can be seen in the photo.
                                                             Fig 9: Low angle block plane with a “5-
                                                             second shaving”8
                                                             Wood: spruce.
                                                             The blade used here has a microbevel and
                                                             back bevel, both honed with an 8000 grit
                                                             stone.

                                                             The practical value of such a fine shaving is
                                                             limited and it cannot be produced with every
                                                             type of wood; but the photo shows what is
                                                             possible with a really well sharpened blade.

Summing up: benefits of a narrow back bevel (with existing microbevel):
•       The time spent on sharpening is once more reduced, because the honing operation now takes less
        time and it is never again necessary to refinish the whole back to remove scratches
•       A microbevel (on the bevel side) and a back bevel (on the back side), both freshly honed to a high
        quality give you a truly perfect cutting edge!
A variant for bench planes: plane blade with cambered cutting edge
The reliably straight cutting edge, obtained by producing a microbevel and back bevel, looks handsome
but is not ideal for bench planes – ie, everything from a smoothing to a jointer plane. These plane
blades should be given a minimally cambered cutting edge with a protruding centre.
•       Detailed information on the benefits of a cambered cutting edge on plane blades: Chap. 8.11.
•       How I sharpen a plane blade to produce a cambered cutting edge: Chap.3.3.

2.4        Techniques for sharpening with microbevel and back bevel
This section covers the basic techniques for sharpening blades with a microbevel and possibly a back
bevel and draws attention to important considerations. Simple, routine sharpening9 of chisel and plane
blades with a straight cutting edge is described fully in Chap. 3.1 and 3.2.
Routine sharpening entails the following work steps (in the sequence shown):
Chisel blades: regrind bevel – create microbevel – hone back
Plane blades: regrind bevel – create microbevel – hone back bevel
2.4.1       Regrinding the bevel (on a blade that is to be given a straight cutting edge!
    State of bevel before:                            State of bevel after:
    •    Ground                                       •   Wedge angle (β', see Fig. 8) “sufficiently
    •    With microbevel (without only if the blade       accurate”; more on this later
         is to be changed to one with a microbevel)   •   Microbevel has disappeared, palpable burr
                                                          along the whole length of the cutting edge
                                                      •   Ground cutting edge straight and at right angles
                                                          to the longitudinal side (or symmetrical axis) of
                                                          the blade, equivalent for skew blades
When regrinding the bevel, it is vital that the grinding tool is flat (freshly dressed stone or
diamond plate)

8
 Takes five seconds to drop to the floor from your outstretched hand.
9
 “Routine sharpening” refers to a blade that is dull and must be resharpened, but is otherwise perfectly
acceptable.

F. Kollenrott: Sharpening chisel and plane blades 2020 Publication/copyright: www.fine-tools.com             10
I sharpen freehand and that’s what I describe here; the alternative would be to use a sharpening guide
(also called sharpening jig) about which more in Chap. 8.3.
To determine the correct angle β´ between the back of the blade and the surface of the stone I use a
small angle gauge (see Chap. 3.1 and 5.3) and keep the blade steady at this angle as best I can while
grinding. Chisel blades are easy to hold and guide 10 with the handle in your right hand (see Fig. 10). For
plane blades, which are often very short, I use wooden holders (see also Chap. 3.2 and 5.4). When
grinding I press the blade firmly onto the stone in front near the cutting edge with one or more fingers of
my left hand (shown in the drawing by the force vector F).
Fig. 10: Freehand regrinding
the bevel of a chisel blade
above: holding the blade,
movement forward-back
1: whetstone
2: chisel blade
F: applied force
v: grinding movement
below: bevel ground freehand
3: bevel, curved lengthwise
L: longitudinal direction of bevel
Q: transverse direction of bevel
β‘: wedge angle, ground
(angle in front at the cutting
edge)
The curvature of the bevel is
exaggerated in the drawing!
My preferred grinding movement11 is the simplest of all: in straight paths forward-back, with a small
lateral shift from stroke to stroke and from the left edge of the stone across to the right edge, ie, in a zig-
zag movement. In this way I use the full width as well as the full length of the stone. If I hold the blade
so that its cutting edge is a little bit skew to the edges of the stone, I can with a wide blade even go
beyond the ends of the stone and in doing so ensure more uniform wear (Fig. 10 top right).
When grinding freehand it is not possible to keep the angle between the blade and the stone really
steady, the resultant bevel will always be a little curved in the longitudinal direction (Fig 10 below). This
has no effect on the function of the blade, all that matters is that the wedge angle in front at the cutting
edge is sufficiently accurate. How accurate is that? For instance, if the bevel is ground at 25° and the
microbevel (also freehand) is honed at 30°, then the two areas should be neatly separated from each
other. And this is doable, I at any rate have no problems with it.
Pressing the bevel onto the flat whetstone reliably ensures that the bevel will not be curved and that the
cutting edge will be ground straight. It’s only with very narrow blades that you might tend to wobble and
the cutting edge will get a kink.
If necessary, the rectangularity of the cutting edge (to the long side) can be corrected slightly by rotating
the handle of blade. With wider blades you can additionally apply one-sided pressure on the stone.
I continue grinding until I can feel a burr along the whole length of the cutting edge. Then I can
be sure that I’ve completely removed the old cutting edge and no section of it has accidentally survived.
10
That is, if they are normal length. The ultra-short butt chisels look cute, but are far from optimal for
accuracy – whether in use or during sharpening.
11
I have tried various regimes, including the so-called “lying 8-pattern” (no good for me). The left-right
movement that is rightly recommended for producing the microbevel (see Chap. 2.4.2) is not suitable
for regrinding the bevel, the removal rate is simply too small.
F. Kollenrott: Sharpening chisel and plane blades 2020 Publication/copyright: www.fine-tools.com 112.4.2 Producing the microbevel (for a straight cutting edge!)
State of microbevel before (after regrinding the State of microbevel after:
bevel):
• Non-existent (burr left from grinding the • Microbevel over the whole length of the
cutting edge along its whole length) cutting edge (full width of blade), a few tenths
of a millimetre wide (see Fig. 7)
• Microfinished surface, coarser structure left
by grinding in front at the cutting edge
completely removed
Important: the honing tool must be flat, eg, a freshly dressed stone or lapping plate or diamond
plate checked for flatness.
If you don’t want to work freehand, you can naturally produce the microbevel using a honing guide.
Sharpening freehand, I again align the blade with an angle gauge when producing the microbevel. The
blade then touches the stone only along the previously ground cutting edge, as shown in Fig. 11,
above. There is a wedge-shaped gap with an angle Δβ (typically 5°) between the bevel and the honing
stone. Along the line of the ground cutting edge the honing stone produces the minutely narrow micro-
bevel. The blade should be held as steady as possible, as it was for grinding the bevel.
The movement for producing the microbevel can be the same as for grinding the bevel, ie, forward-
back. For honing there exists an extremely interesting alternative, viz. left-right or side sharpening12,
where the cutting edge is moved over the stone much like a skate blade on ice.
Fig. 11: Producing the microbevel:
forward-back or left-right
above: aligning the blade with the stone
1: back
2: bevel (ground on a flat stone, ie, not curved
in transverse direction)
3: honing tool, eg, stone, flat
β´: wedge angle, ground
Δβ: difference of angle between bevel and
future microbevel
below: movement for producing the
microbevel:
4: forward-back movement
5: left-right movement
v: honing movement
Sharpening freehand as I do, a curved left-
right movement as implied here is simpler and
more ergonomical for me than a straight
movement. The application is shown in Fig.
20.
Both movement regimes work well for me, but
forward-back is distinctly faster (and preferred
by me13), while left-right probably results in
superior sharpness, judging by the shaving
performance.
If you apply pressure in the centre you end up with a uniformly wide microbevel.
12
http://www3.telus.net/BrentBeach/Sharpen/sidesharpen.html
13
Certainly for a straight cutting edge. For a cambered cutting edge (Chap. 3.3) I find left-right is better.
F. Kollenrott: Sharpening chisel and plane blades 2020 Publication/copyright: www.fine-tools.com 122.4.3 Honing the back (mandatory for chisel blades)
State of back before (after producing the State of back after:
microbevel):
• Fine surface (as left by a honing stone) but • Honed to a microfinish including the corners,
possibly slightly scratched, with minor signs at worst still very slightly scratched
of wear in front at the cutting edge and a very • Free of traces of wear (fine finish right up to
small burr (from producing the microbevel) the cutting edge!)
• No burr on the cutting edge
Important: the honing tool must be flat, eg, a freshly dressed stone or lapping plate or diamond
plate checked for flatness:
Fig. 12: Honing the flat back on a bench
stone
1: chisel blade
2: honing stone, flat
F: applied force
v: path of blade over the stone (example)
Place the blade with back flat on the stone,
press down firmly near the cutting edge and
then move the blade over the stone, prefer-
ably in a zig-zag path as shown in Fig. 12, or
across if you prefer.
Important is that the blade is guided by the
flat face of the stone; be careful that your
right hand (on the handle) does not press the
blade down or lift it up!
Honing the back is complete once the first one or two centimetres from the cutting edge and including
the corners are uniformly microfinished (in line with the fineness of the honing stone used). You should
not be able to see any visible signs of damage (scratches, wear) on the cutting edge.
2.4.4 Honing the back bevel14 (only for plane blades, and here for a straight cutting edge:
This is the one operation where I do not work freehand, but guide the blade with a small tool.
State of back bevel before (after producing the State of back bevel after:
microbevel):
• At most a very narrow remnant, with signs of • Back bevel over the whole length of the
wear and possibly a very small burr cutting edge (full width of blade), a few
tenths of a millimetre wide
• Microfinished surface of the back bevel,
coarser structure left at the cutting edge by
grinding completely removed
• No burr, no signs of damage on the cutting
edge
Important: the honing tool must be flat, eg, a freshly dressed stone or lapping plate or diamond
plate checked for flatness.
Place the plane blade (with its back down) on the freshly dressed honing stone and raise the rear end
so that only the cutting edge is in contact with the stone and the back is at an angle of Δβ (= 3° or 5°) to
the surface of the honing stone. The blade must be held at this flat angle while you move it over the
stone.
14
Once the microbevel is finished, traces of the back bevel will mostly still be visible. This doesn’t
matter, but it is the reason why I write about honing the back bevel and not about producing a (new)
back bevel.
F. Kollenrott: Sharpening chisel and plane blades 2020 Publication/copyright: www.fine-tools.com 13Most sharpening guides do not allow for such a small angle. When I hone a back bevel, I put a perma-
nent magnet on the back of the blade that slides on a small plastic strip placed on the stone. The angle
is determined by the thickness of the magnet and its distance from the bevel. The honing movement
can be forward-back or left-right, it’s arbitrary for this particular operation.
Fig 13: Blade aligned for
honing the back bevel
1: back, ground, flat
2: bevel, ground
3: microbevel, honed, narrow
4: honing stone, flat
5: sliding block (permanent
magnet)
6: sliding face (plastic)
v: honing movement
(here forward-back)
β´: wedge angle, ground
Δβ: angle between back and
back bevel
2.5 Summary: why backs and whetstones have to be flat
Because so much depends on it, I’d like to summarise once more why flatness is so important.
Honing completely flat backs:
Only if the back and honing stone are both perfectly flat, will you successfully and effortlessly remove
the burr (left after processing the bevel/microbevel) along the full length of the cutting edge. Working
with these perfectly flat surfaces also makes it easy to remove a tiny amount of material along the full
length of the cutting edge in order to remove minor damage. And you can be sure the sharpening result
will be acceptable. By contrast, a crooked back or a crooked stone (or both in a worst-case scenario)
turns blade sharpening into a lottery; the quality of the cutting edge produced is always a matter of luck.
Honing microbevels and back bevels:
Here it is important to reliably remove all traces of the roughly ground bevel face at the cutting edge or
scratches and signs of wear on the back. This should be achievable in a short time even with a fine-
grained stone, ie, by removing a minimal amount of steel.
For instance, if a microbevel with a 5° angle difference to the ground bevel is 0.3 mm wide, then mate-
rial removal at the cutting edge will be 0.03 mm deep; this will certainly be enough to eliminate anything
that might reduce the quality of the cutting edge. Material removal of constant depth along the whole
cutting edge (detectable by a uniform width of the microbevel) is only possible if the previously ground
bevel is straight (ie, was produced on a flat whetstone), and also if the honing stone that was used to
produce the microbevel was flat. If these conditions are met, you are close to reaching your goal of
producing a continuous microfinished and flawless microbevel, significantly under 0.3 mm wide, at the
cutting edge. And getting there in as short a time as possible.
The same applies to the back bevel: it will only be uniformly wide (and deep), if both the back and the
honing stone are perfectly flat.
Making sure that the whetstone and the back are both flat enough takes some effort. The effort will be
rewarded by rapid sharpening and a reliably high quality of the cutting edge. On balance you will find
that it pays off.
That leaves the question: “What is “sufficient flatness”? (there is no such thing as “absolutely flat”!)
• What degree of flatness do I need for routine sharpening: Chap. 3.4.1.
• How to flatten whetstones and honing stones and keep them flat: Chap. 6.
F. Kollenrott: Sharpening chisel and plane blades 2020 Publication/copyright: www.fine-tools.com 143 This is what it looks like! Sharpening with water stones
From here on I won’t make any references to alternative sharpening tools.
3.1 Sharpening chisel blades
If you’re a novice at sharpening by hand, chisel blades are the right place to start. Please note that I’m
right-handed; this is reflected in the descriptions, explanations and illustrations.
State of the blade before sharpening:
• The blade is dull and possibly shows signs of damage at the cutting edge.
• The back is acceptable as described in Chap. 3.4 (otherwise it must be reconditioned before you
can start sharpening, see same chapter).
• You know the bevel and microbevel angles that you want to grind and/or hone. I have blades with
different geometries so I have labelled each one (with a spark recorder).
Fig. 14: Old English chisel blade
labelled:
ground bevel 25°
microbevel 30°
Step 1: Grinding the bevel
The whetstone or honing stone should be thoroughly wet, as should the clinker used for flattening them.
I use a squirt bottle with water to which I have added detergent and wet them repeatedly (I won’t men-
tion this at every step).
Before grinding: dress the whetstone (every time!) (see Chap. 6.3)
The whetstone must be flat, otherwise you will experience problems during subsequent honing. With
narrow chisel blades stone flatness is not critical, with wide blades you should take it quite seriously. It
may be necessary to dress the stone again from time to time during during long grinding sessions.
Aligning and holding the blade:
I use small home-made gauges of plastic for aligning the blade (more on gauges: Chap. 5.3).
Fig. 15: Aligning the blade on the
stone using an angle gauge
(here: to 25°)
Holding the chisel with your right hand,
place the blade on the stone. Position
the angle gauge with your left hand and
then slide the back of the blade under
the slope of the gauge. If you now vary
the angle between the blade and the
stone by gently lifting and lowering the
handle, you will sense exactly when the
back fits closely against the gauge; the
angle is now right.
Keeping this angle constant, put the gauge aside and press one or two fingers of your left hand onto the
back of the blade – and off you go. Movement: forward-back (see Fig. 16).
In order to keep the angle close to constant as you move the chisel over the length of the stone, I
suggest that you adopt a special movement pattern. What I do is to stand with my left foot slightly
forward, ie, in the “orthodox fighting position” and then move my upper body and arm more or less in
unison forward and back; effectively I am rocking forward and backward, starting from the legs up. I
must admit it looks a bit funny.....
F. Kollenrott: Sharpening chisel and plane blades 2020 Publication/copyright: www.fine-tools.com 15Fig. 16: Grinding a chisel blade on a
bench stone
Points to observe during grinding:
• The bevel must be pressed firmly
onto the stone.
• The angle between stone and blade
must be held as constant as
possible.
• The rectangularity of the blade
(between cutting edge and side)
must be ensured, or produced by
corrective measures.
• The stone should be used over its
whole face so that wear is as even
as possible.
When grinding in a forward movement (away from the body) I apply more pressure when pressing the
blade onto the stone than when pulling backwards. If the cutting edge is at right angles I press uniformly
in the centre. If the cutting edge is skew, I correct this by rotating the blade (right or left as appropriate)
with my right hand (on the handle). For minor corrections the bevel should continue to make contact
over its full face; you don’t want a kink in the bevel. Only if major corrections are required will you need
to grind a completely new bevel face, starting from the corner of the cutting edge that protrudes too far.
If the angle between the blade and the stone changes, you will hear it and feel it – the thicker the blade,
the more pronounced this will be15. You should also observe how the grindings move up the back on the
forward movement. If no grindings appear, the microbevel hasn’t been removed yet, the ground bevel
face doesn’t yet reach all the way to the cutting edge. Or you’re busy decreasing the bevel angle. If
grindings appear in quantity, it means you’re grinding predominantly in front at the cutting edge, ie,
you’re increasing the bevel angle
Time to stop grinding the bevel:
• As soon as the grinding pattern is uniform and the bevel is not curved too much in the longitudinal
direction (observe reflections from a lamp or similar on the still wet bevel and wobble the blade a bit
from side to side to see roughly how curved or straight the bevel is)..
• + The rectangularity is correct. On chisel blades it is enough to judge by eye.
• + The microbevel has been removed completely (feel the burr along the whole cutting edge).
• + There are no more defects visible on cutting edge..
The burr (grinding burr) is a very narrow, thin and sharp metal edge with a hook-like profile, that curves
away from the ground surface. It is created mainly because steel right at the cutting edge, ie, at the
thinnest part of the acute-angled wedge, is deflected instead of being ground right away (Fig. 17 left).
Fig. 17: Grinding burr
left: creating a burr during grinding
1: blade
2: bevel
3: whetstone
4: burr
v: grinding movement
right: checking for the presence of a burr
note: check by moving your finger like this
(arrow)
The burr is tiny, you can hardly see it – but you’ll certainly feel it if you draw the tip of your finger along
the back across the cutting edge (Fig. 17 right). The burr indicates that steel was actually ground away
at the cutting edge – where you can feel a burr you can be certain that the old cutting edge was
removed, and that is all that matters.
15
I find the grinding sensation somewhat irritating on laminated blades, because the grindings in front
(at the cutting edge) give you quite a different feedback than at the back, where the steel is softer.
F. Kollenrott: Sharpening chisel and plane blades 2020 Publication/copyright: www.fine-tools.com 16Step 2: Removing the burr
Generally, I remove the burr prior to honing (but this is not a must!) because of the risk of it scratching
the microbevel or later the back. I use a honing stone for this (but do not specially dress it for this
operation) and draw the cutting edge once16 across it with a swiping movement (Fig. 18), taking care to
press the cutting edge only very, very lightly onto the stone, finishing with blade standing nearly at right
angles on the stone’s surface.
Fig. 18: Removing the burr prior to grinding the
bevel
1: blade with burr, starting position (end position
right, dashed line)
2: honing stone
3: removed burr
The burr is bent over towards the back and at the
same time separated at its root by the grinding
action of the honing stone.
The cutting edge suffers no damage that would not
be removed by the subsequent production of the
microbevel!
Step 3: Producing the microbevel
Essential: Prior to honing dress the honing stone and rinse (each time!)
The honing stone must not only be flat, but also free of contaminating coarser grains. That is why it
must be carefully rinsed after dressing (Chap. 7.1.2). I rinse the stone in a container of water, and if I
want to be extra fussy I scour it with a small brush. The ready-to-use stone should appear uniformly
light-coloured and clean, without any visible contamination.
Now it is time to produce the microbevel. Use the gauge to align the blade on the honing stone at 30°. In
this position it will touch the stone only with the ground cutting edge (see Chap. 2.4.2, Fig. 11).
First variant: forward-back movement (the usual method, just like grinding the bevel)
Fig. 19: Start producing the
microbevel
If you were to press the blade onto the
stone at this point and move it forward it
would cut into the honing stone17.
To make sure of avoiding this, you start
with a pulling movement (back). Press
the blade firmly onto the stone. It will
leave a distinct dark trace, indicating
that steel has been removed and that a
microbevel (albeit a very, very narrow
one) is being produced.
Now comes the critical challenge for a narrow blade on a soft stone: how to perform the forward
movement without cutting into the stone. The answer is to apply only the slightest pressure on the
forward movement, and now it helps to reduce the angle by a tiny amount.
This problem never, or only rarely, occurs with harder honing stones, but it is nonetheless important not
to let your concentration lapse, because a deep nick in the stone is annoying.
To produce a microbevel with an 8000 grit stone on a chisel with an easy-to-sharpen, medium-width
blade takes about 5 strokes (five times forward and back)..
16
Once your finger test tells you the burr is gone, that’s it. Otherwise repeat.
17
The blade tends to cut into the stone more readily if it is very narrow and the stone is soft (as is the
case with my 8000 grit Naniwa). If the problem recurs frequently, a harder honing stone may be the
answer.
F. Kollenrott: Sharpening chisel and plane blades 2020 Publication/copyright: www.fine-tools.com 17You can also read