Silo Sauna Installation & Owner's Manual
←
→
Page content transcription
If your browser does not render page correctly, please read the page content below
Silo Sauna
 Installation &
Owner’s Manual

     Revised May, 2012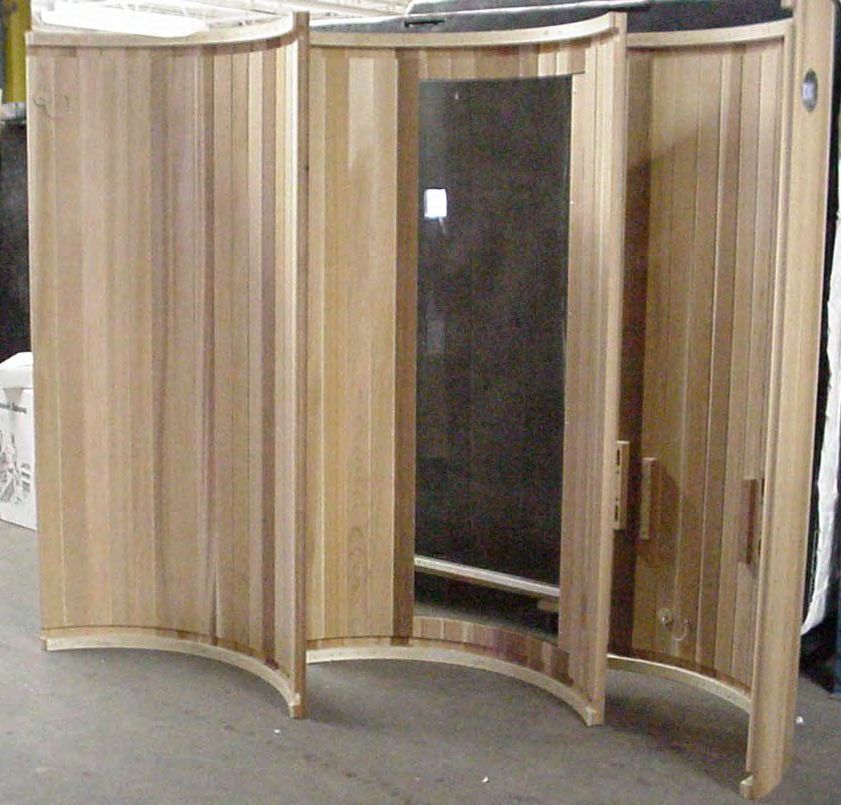
Read this entire manual through to the end before proceeding with the assembly.
CHECK YOUR BOXES
Be sure to immediately check your boxes against your shipping list and bill of lading. Examine for any damage and
report it to the shipping company immediately. Notify your dealer or Almost Heaven Saunas if there needs to be a repair
or replacement of damaged or missing materials.
ELECTRICAL REQUIREMENTS
All electrical wiring must be performed by A QUALIFIED LICENSED ELECTRICIAN. Please do not attempt to do the
hook-up by yourself. Because of the heat involved in the sauna, it is required that you use copper wire with 90ºC
insulation. Do not use aluminum wire to make the connection. Consult with an electrician so you can determine the
requirements for your particular situation. All wiring must conform to all national, state and local codes and regulations.
When installing a sauna, special electrical requirements will necessitate the hiring of an electrician. The costs of this can
vary greatly depending on a number of factors. These may include how far away from your electrical service box you
locate your sauna, what part of the country you live in, the cost of materials, and other factors. We always recommend
that you get quotes from 2 or 3 different licensed electricians before you begin installation in order to get the best possi-
ble service.
LOCATING THE SAUNA
Because the customary sauna experience involves a heating-cooling-resting regimen, it is important to plan ahead
before installing your sauna. Our method of construction affords the widest number of possible choices because an Al-
most Heaven Sauna room can be placed in either an indoor or outdoor setting. If you Silo Sauna is placed outdoors, the
optional roof cap is suggested.
You will probably shower during or after each sauna bath, so consider having a shower installed nearby. Besides the
shower, you may want to have a lounging area set aside for relaxing after your sauna bath. Make sure the floor or
ground is level and can support the weight of the sauna (which can exceed 1,000 lbs. when filled with people). A
reinforced concrete pad or wood deck is always best for outdoor installations, but be sure that the surface you use is
both level and firm.
Verify that both the inlet and outlet vents will remain unobstructed. For indoor installations be sure that both vents open
into the same room or space.
BASIC TOOLS
You should have the following tools:
Wrench-adjustable, box, open end (10mm, 3/4", 1/2” and 7/16”)
Cordless drill for driving screws
Rubber Mallet
Sandpaper – 120 Grit
Screwdrivers (Phillips and Flathead)
Framing Square
5/16” drill bit
Pencil
Utility knife
Level
3/16” drill bit
To help speed up the installation, substitute deep well socket wrenches for the 3/4”,1/2”, and 7/16”
wrenches and a reversible power drill for the screwdrivers.
2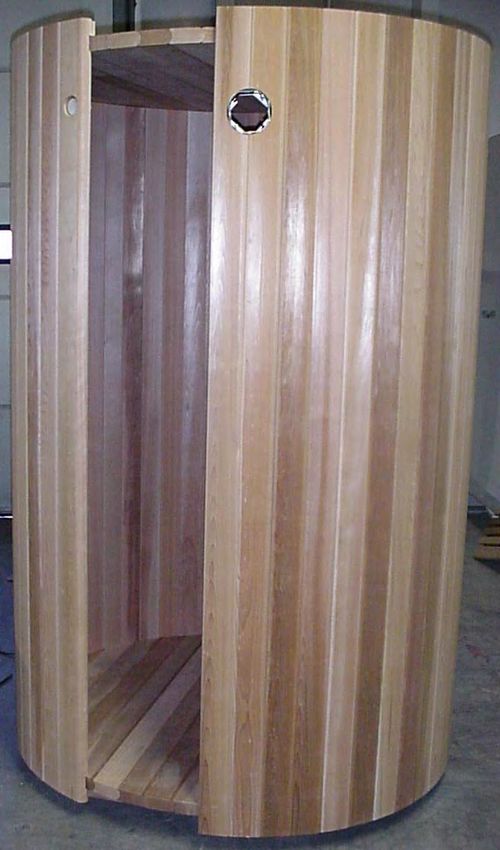
FLOOR OF SAUNA
Place the floor panel, joists down on a flat surface. (See Figure 1)

                                                                       Figure 1

FIRST AND SECOND WALL PANELS
The Silo Sauna has three wall panels. They are labeled as follows:
        (A) Panel with electrical box, and heater fence braces
        (B) Panel with door
        (C) Panel with top outlet vent.

                                                                                  A

                                                                                  B
               C

                                                             3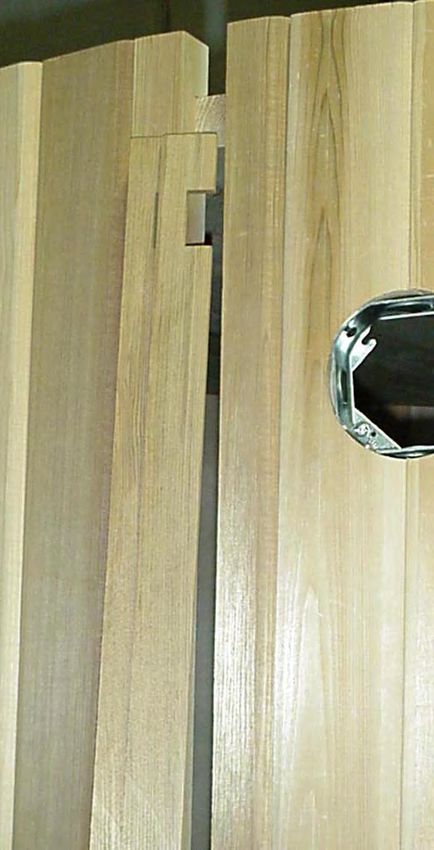
(A) Locate the first panel (A) and place it near the floor so that the Inlet Vent at the bottom of the wall panel (under the
heater fence braces) lines up to the Floor Drain hole. Lift into place. The edges of the floor and ceiling fit into the
groove in the wall panels. To ensure a good fit, tap into place with a rubber mallet. You do not need to use any nails
yet.

 Inlet Vent

                                                                                                                   Secure
                                                                                                                   wall to
Floor Drain
                                                                                                                   Floor.
                                                         When in place,
                             STEP 1                      wall panel A will
                                                          look like this.                   STEP 2

  (B) Locate the second wall panel (B) and lift into place to the left of panel (A) (if you are facing the wall from inside
  the sauna). Fit the two wall panels together as snugly as possible, then tap into place with a rubber mallet. Temporar-
  ily tack the bottom of the wall panels A&B into the floor panel by hammering a couple 2” nails through each wall panel
  and partially into the floor panel from outside the sauna. You will need to remove the nails later, so do not hammer
  them all the way in.

                                                                               When in place, the first and
                                                                               second wall panels will look like this.

SAUNA CEILING
Locate the round ceiling panel and lift parallel to grooves on the top of wall panels A and B. Make sure the cross sup-
ports are facing up. Slide ceiling panel into place as shown in figure 2. Pound tightly into place with rubber mallet. Se-
cure temporarily by hammering a couple 2” long nails through wall panels A and B and partially into the ceiling panel
from the outside of the sauna. You may need to slightly adjust the walls later, so do not hammer the nails all the way in.

                                                                                 Figure 2

                                                             4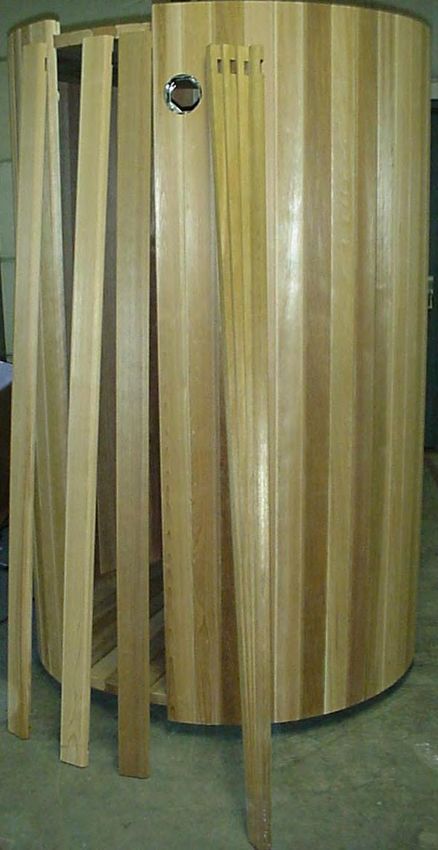
THIRD WALL PANEL
Locate the third wall panel (C) and lift into place to the left of panel (B) (if you are facing the wall from inside the sauna).
Fit the two wall panels together as snugly as possible, then tap into place with a rubber mallet. Secure wall panel (C)
temporarily by tacking the wall into place using 2” long nails as done in steps two and three. You may need to remove
these nails later, so do not hammer the nails all the way in.

                                                                                 After all three wall panels
                                                                                 are in place, the sauna
                                                                                 should look like this.

FILLING THE GAP
When all three wall panels are in place, there will be about a 14” gap remaining. Use the extra wood staves to fill this
gap (see figures 3 & 4). Two of the staves have been sawn vertically into varying widths. Use a combination of these
to make the gap as small as possible. When the hoops are tightened (Step 6), this gap will close.

                                   Figure 3                                       Figure 4
                                                               5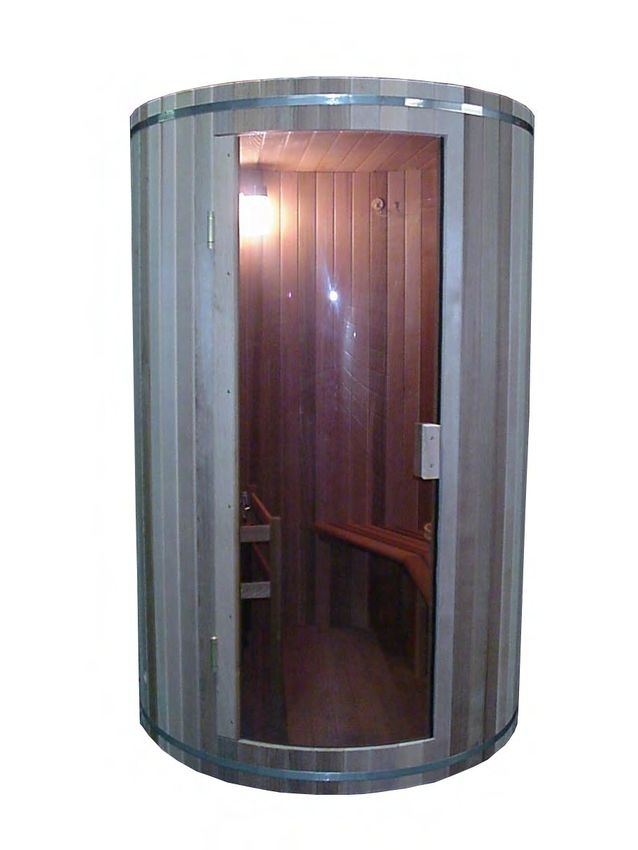
BAND ASSEMBLY
Prepare to install the Band Assemblies by using the nails previously installed to hold the wall panels in place.

        The two Band Assemblies are made up of the following components:
               (2) Stainless Steel Bands with brackets
               (4) ½” Nuts
               (4) Black vinyl caps
               (2) 4 3/4” Threaded Rods

                                                                                 Figure 5

Place bands around sauna, resting on the nails. Insert threaded rod through buckles. Tighten the bands so that they do
not slip down once you have removed the temporary nails, but loosely enough that you can still adjust the height of the
bands. At this point you may remove the temporary nails and adjust the height of the bands. The bottom of the top band
should be placed at 2 1/2” below the top of the staves, and the bottom band should be placed at 2” above the bottom of
the staves. The bands should cover the holes where the temporary nails were.

NOTE: A small board is useful when positioning the bands. Use it to tap the bottom and top edges of the band
to move it up or down.

                                                     Figure 6

                                                             6
The outside of your sauna should now look like the one pictured below.

DOOR HANDLE
Install door handle on both the inside and outside of the door. Remove the screws already in the handle, then line up the
holes in the handle with the holes in the door. Reinsert the screws and tighten securely to glass (Figure 7).

                                                                              Figure 7
                                                           7
SEAT INSTALLATION
Locate the six 2x4x14 ½” seat support pieces. Secure first support to the first board from the edge of the door (right
side). Space five of the supports according to figure 8, and secure by nailing to the sauna wall with two, 2” nails in each
support. Place the bench on the five wood supports, and attach it to the four outer supports by installing screws be-
tween the slats (one screw in each support). See figure 9. To reduce the risk of splitting the wood, pre-drill screw holes
with a 1/8” drill bit. Finally, install the sixth seat support in the front, center of the seat, using two screws.

                              3-stave space            5-stave space

                                                                                                              5-stave space

Seat Supports.
Secure by nail-
ing to wall with
two, 2” nails in                                                                                              3-stave space
each support.

                                                             Figure 8

                                                                          Figure 9
                                                                               Seat Support

  Heater

                                                                                              Attach seat by driving
                                                                                              screws between slats.

           Door

                                                            8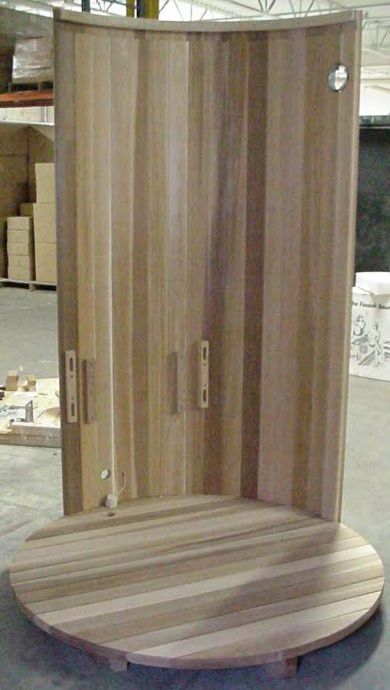
HEATER
Mount the heater as shown in the manufacturer’s instructions. The heater should be positioned to the left of the door
(opposite the sauna seat). The heater should be positioned no lower than 6-1/2 inches from the floor. The lower the
heater is, the hotter the temperature will be at the benches. All the necessary hardware is supplied with the heater. Do
not attempt to wire the heater yourself. Contact a licensed electrician.
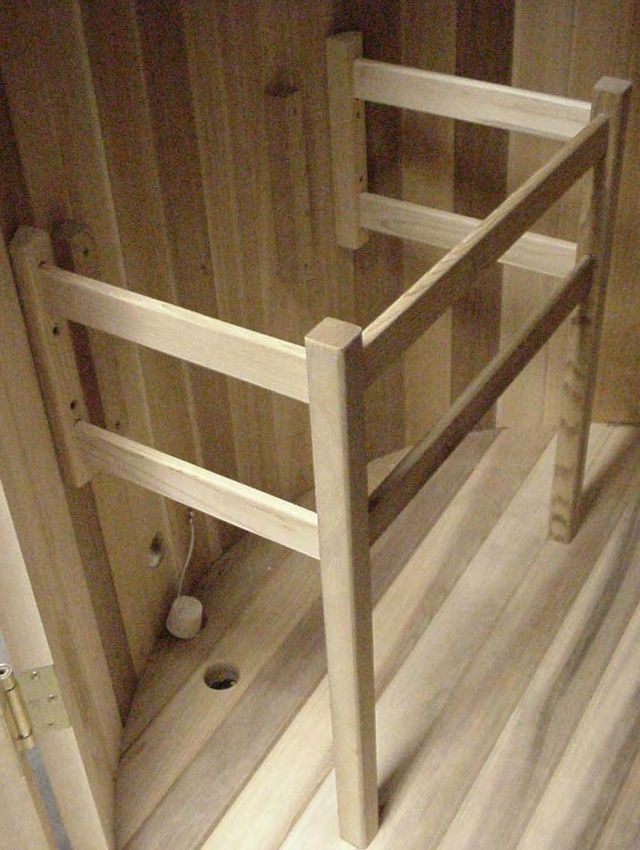
HEATER FENCE ASSEMBLY AND INSTALLATION
The Heater Fence is necessary to ensure that bathers in the sauna do not accidentally contact parts of the heater that
could burn them. It consists of two precut, vertically notched posts and six horizontal rails that must be assembled be-
fore it is installed to the wall next to the heater.
STEP 1
STEP 3
STEP 2
Note the beveled ends on the fence rails. These are to be inserted into the corner posts. The square ends of the rails
go into the wall-mounted fence posts. Assemble the fence before attaching it to the wall by placing the rails into the slots
in the posts and securing them using the supplied 1” nails . You may want to put a small amount of glue into the slots.
Be sure to nail at an angle so that the points will not go through the post. Countersink all nails.
Once the fence is assembled, attach it to the wall over the heater by sliding the wood slats into the pre-cut holes (as
shown in Step 3).
9
LIGHT

Have a licensed electrician mount and wire the light fixture (on a separate circuit)
into the electrical box mounted on Wall Panel (A).

Do not install your light switch inside the sauna. Rather, install the switch inline on
either the outside of the sauna, in the house or in some other exterior location. If a
switch is desired inside the sauna, then it is recommended that you order the spe-
cial light upgrade from Almost Heaven Saunas that has an integral switch. No
special type of light bulb is required, but the heat of the sauna will shorten the life of
a normal bulb. An appliance bulb, such as those used in a kitchen oven, will last            Attach the lamp holder to
longer than a standard bulb. Most people prefer subtle, low wattage lighting in the          the box with the provided
                                                                                             self tapping screws
sauna.

Do not exceed the wattage recommended by the light’s manufacturer. Do not use compact florescent bulbs (also known
as CFL bulbs), as the heat of the sauna exceeds the temperatures recommended by florescent bulb manufacturers.

OPERATION

After the sauna has been installed, sweep down the inside to remove any sawdust and wood shavings, and then vacuum
completely. Using a damp cloth and warm water, wipe down the entire sauna including the benches to remove any re-
maining dirt, dust and debris. Rinse off the sauna rocks and install them in the heater in accordance with the heater man-
ufacturer’s instructions. Improper placement of heater rocks can result in lower than desired heat temperatures. Turn
the heater on to the maximum setting and operate it for about 30 minutes with the door propped open. Then close the
door and allow your sauna to come up to the desired temperature.

If the sauna wood has absorbed moisture in storage, the staves may become loose after the intense heat causes the
wood to cure. It may be necessary to retighten the stainless steel bands periodically if this occurs. The red cedar will
swell, especially if left in the open rain, and this will further tighten the seal of the wood.

The controls of the sauna heater are mounted at the bottom of the heater. The left dial is the temperature setting and
the right dial is the combined timer on-off switch. Please refer to the manual that came with your heater for full heater
operational instructions.

When operating the heater, always begin by turning the timer fully clockwise. The heater should come on as indicated by
the light, and operate for one hour and then shut off automatically.

Since you most likely will use your sauna as both a "wet sauna" and a "dry sauna", you should install the sauna rocks
that have been included with the heater, following the manufacturers instructions. These stones are necessary if water
will be sprinkled on the heater to create the "wet sauna", and they will produce more consistent heating in the dry mode
(without the use of water). It is common for a stone to occasionally crack during initial heating. If excess amounts of wa-
ter are used during sauna, prop door open for 30 minutes after use to let the humidity escape.

The amount of ventilation in the sauna can be adjusted by means of the vent located toward the top of the sauna near
the door. It is important to have adequate fresh air flowing through the sauna, and this flow can be adjusted with the
movable vent cover. If the sauna is located outdoors you should keep the vent closed when the sauna is not in use to
prevent insects and rodents from entering the sauna.

                                                               10
TREATING THE SAUNA
Western Canadian Red Cedar is naturally resistant to the elements. Left untreated, the exterior of an outdoor sauna will
eventually become silvery-gray in color, and it is fine to let the sauna weather naturally in this way. At any point in the
future you can pressure wash (low pressure only!) your sauna to bring back most of the original red cedar color.
If you want to retain the rich, natural color of the red cedar, your local paint store can recommend an outdoor stain for
red cedar. A clear stain will retain the full natural color of the cedar. Be sure that it has a UV inhibitor in the stain so that
it will best resist the effects of sunlight. Be sure to follow the directions from the stain manufacturer for application in-
structions. Never treat the inside of the sauna, and never use varnish or paint on the exterior of the sauna.
ELECTRICAL
Typical wiring requirements for up to 30 feet distance from the breaker box are as follows:
4.5kw and 6.0kw heaters require 10-2 w/ground, copper only wire, and 30amp non-GFCI breaker.
8.0kw heaters require 8-2 w/ground, copper wire only and 40amp non-GFCI breaker.
NOTE: All wiring must be done by a licensed electrician according to national and local electrical codes. Be sure to
check the instructions on your particular heater to verify electrical requirements as your heater may have been pur-
chased from a different source than Almost Heaven Saunas.
DOOR HINGE ADJUSTMENT
The tension on the sauna door hinges needs to be set in order for the door to close on its own. Look for the small hinge
box that is included with your sauna kit. The hinges have been installed on the sauna, but the box contains both the hex
wrench and set pins needed to adjust your door tension.
After the sauna is assembled, and with the door closed, take the hex wrench and insert it in the top of the hinge. Once
the wrench is fitted into the hex opening, turn the hex wrench clockwise (toward the wood wall and away from the glass)
to tighten the hinge tension. You will feel the tension as you tighten. While leaving the hex wrench inserted and the ten-
sion held in place, insert the set pin into the hinge as shown. Repeat the process with the other hinge as each hinge
must be tightened to the same degrees of tension.
The door should close gently on its own without slamming shut. If it does not, then repeat the process to each hinge to
increase the tension further. Save the hex wrench in case future tightening is needed.
Tighten tension and insert set pin Once set pin is in place, remove wrench
ACCESSORIES
Mount the thermometer on the opposite wall as the heater and no lower than 6" from the peak of the ceiling.
A wooden bucket and ladle are provided for you to sprinkle water over the hot sauna rocks.
Mount the optional robe hook and magazine rack where desired.
Optional accessory items are available from Almost Heaven Saunas.
11TAKING A SAUNA BATH
The sauna as we know it comes from Finland. Taking a sauna bath induces excessive perspiration, which cleanses the
skin. It stimulates circulation and reduces muscular tension. It can also be an excellent relaxational or social activity.
Not to be confused with a steam bath, a sauna is a dry heat bath. The relative humidity rarely exceeds 30% even in a
wet sauna. This is because the sauna is made of porous wood and absorbs moisture. This makes higher temperatures
more tolerable.
Shown below are the steps that are involved in taking a traditional bath. You may or may not want to adhere to this
regimen.
TRADITIONAL STEPS IN TAKING A SAUNA BATH
STEP #1 - Set your heater so that the sauna room achieves the desired temperature, usually between 150º F and 170º
F. As a novice, you should begin at the lower end of this range and work your way up to the higher temperatures over
several sauna baths.
STEP #2 - Remove all clothing (except maybe your swimsuit), eyeglasses, contact lenses, jewelry, etc. Take a quick
shower with warm water and soap, or a quick dip in your hot tub.
STEP #3 - Enter the sauna initially for about 5 to 15 minutes. Bring a towel into the sauna onto which you can sit or lay.
Leave the sauna room once you have begun to perspire freely.
STEP #4 - Now you may take a cold plunge in your swimming pool, shower or snow bank. After that, relax and cool
down for another 10 to 20 minutes.
STEP #5 - Re-enter the sauna. On this return visit you may wish to sprinkle small amounts of water onto the rocks
creating bursts of steam. If the water spills through the heater and onto the floor, you are using too much, although this
will not hurt the heater or the sauna.
STEP #6 - After your final visit to the sauna, relax for at least 20 minutes. Shower with soap and warm water. Finish
your shower with cooler water to close the pores of your skin. Dress only after you have cooled down completely.
NOTE: Whatever your sauna regimen, it is important that you keep your self hydrated by drinking plenty of water!
MAINTAINING YOUR SAUNA
Inside the sauna, certain areas will eventually darken due to normal use and the effects of perspiration. This can be
minimized, but not eliminated. Occasionally scrub down the inside with baking soda and water to remove the odor and
stains of perspiration. Light sanding can also be effective but should be kept to a minimum.
Almost Heaven Saunas, LLC
Mailing Address Shipping Address
P.O. Box 190 HC66, Box 465-A
Macatawa, MI 49434 Highway 219 North
Renick, WV 24966
Sales 888-355-3050
Fax 616-335-2905
Email service@almostheaven.com
Web www.almostheaven.com
12You can also read