Software Development Kit for iOS and Android - Bomgar
←
→
Page content transcription
If your browser does not render page correctly, please read the page content below
SOFTWARE DEVELOPMENT KIT FOR IOS AND ANDROID

        Software Development Kit for iOS and Android
        With Bomgar's software development kit for mobile devices, a developer can integrate your mobile app with Bomgar to provide
        faster support for your app. The Bomgar mobile SDK is a library which, when included in your application, enables remote access
        and troubleshooting of your app.
        To obtain the mobile SDK package, contact your account manager or submit a request to Sales at www.bomgar.com/contact. The
        Bomgar mobile SDKs support Android 4.0 + and iOS 8.2+.

        Once you have embedded the Bomgar SDK into your app, your app
        can integrate with the Bomgar Appliance, allowing you to support your
        app in-depth. Your application can leverage each of these features
        through the APIs offered by the SDK.
        In-App Session Start
        Start a session from within the app using a session key or an issue
        code name.
        Chat
        Chat with your remote customer without leaving your app.
        Application Screen Sharing
        View your app on the remote device.
        Custom Special Actions
        Send custom commands to your app to speed your support processes.
        Using the SDK, connect a special action to any operation your app can
        perform, such as activating debug mode in the app, switching to a
        setting screen, extracting a log file, changing a general setting, clearing
        a local cache, and so forth.
        File Transfer
        Transfer files to and from the remote device. Access the app's
        sandbox.*
        Custom System Info
        Get custom information about your app (version, last sync time, memory footprint, etc.) and the remote device (GPS location, battery
        strength, etc.). Any information the app can access can be sent to the representative console as system information.*

        *The available functionality depends on the permissions of the app. File transfer to the device's internal storage on Android requires
        that the app have permission to access it. Additionally, if, for example, sending GPS information back from either platform via
        custom system information, the app must have permission to access the GPS so it can provide the information to the Bomgar SDK.
        Any data generated in or available to the app can be sent via custom system information.

CONTACT BOMGAR info@bomgar.com | 866.205.3650 (US) | +44 (0) 1628 480 210 (UK/EMEA) BOMGAR.COM                                                                                                              1
© 2018 Bomgar Corporation. All rights reserved worldwide. BOMGAR and the BOMGAR logo are trademarks of Bomgar Corporation; other trademarks shown are the property of their respective owners.   TC: 5/11/2018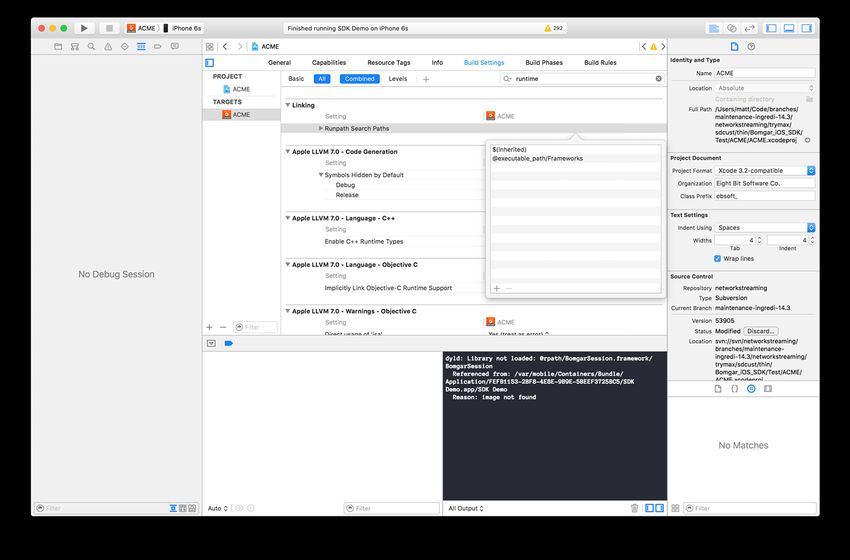
SOFTWARE DEVELOPMENT KIT FOR IOS AND ANDROID

        Getting Started with the iOS SDK
        The BomgarSession framework provides an API, allowing you to connect to a Bomgar Appliance and start a support session inside
        any native iOS application. You can start a session using either a session key entered by the user or using a predefined issue code
        name created by one of your Bomgar Appliance's administrators.

          Note: Previous versions of the BomgarSession framework required an embedded framework called
          ThinProtocolEmbedded.framework. This is not longer required. If you previously included a reference to this framework per
          the instructions in a previous version, you can delete it.

        The best way to integrate the SDK into your application depends on your development needs, mainly on whether or not you need to
        use the simulator. This is due in part to the fact that Apple does not allow an app to be submitted to the app store if the app contains
        a framework that includes code for the x86_64 architecture, and this architecture is required to run code in the iOS simulator.
        The following sections walk you through integrating the Bomgar SDK into your project for development either using only physical
        devices or using both physical devices and the simulator.

          IMPORTANT

          The configuration for supporting only physical devices is much simpler to use. If you do not need to support development in the
          simulator, Bomgar highly recommends supporting only physical devices.

          Development for Physical Devices

             1. When you expand the archive that contains
                BomgarSession.framework, locate the BomgarSession
                folder, which contains two sub–folders, Debug and Device.
                Each folder contains a separate build of
                BomgarSession.framework. Since you will need to configure
                only the project for running physical devices, focus on the build
                in the Device folder. Drag the BomgarSession.framework file
                from the Device folder into your Xcode project.

             2. In the project navigator, go to Your Project > Your Target > Build Phases.
             3. If not already there, add a Copy Files step at the end.
                   a

CONTACT BOMGAR info@bomgar.com | 866.205.3650 (US) | +44 (0) 1628 480 210 (UK/EMEA) BOMGAR.COM                                                                                                              2
© 2018 Bomgar Corporation. All rights reserved worldwide. BOMGAR and the BOMGAR logo are trademarks of Bomgar Corporation; other trademarks shown are the property of their respective owners.   TC: 5/11/2018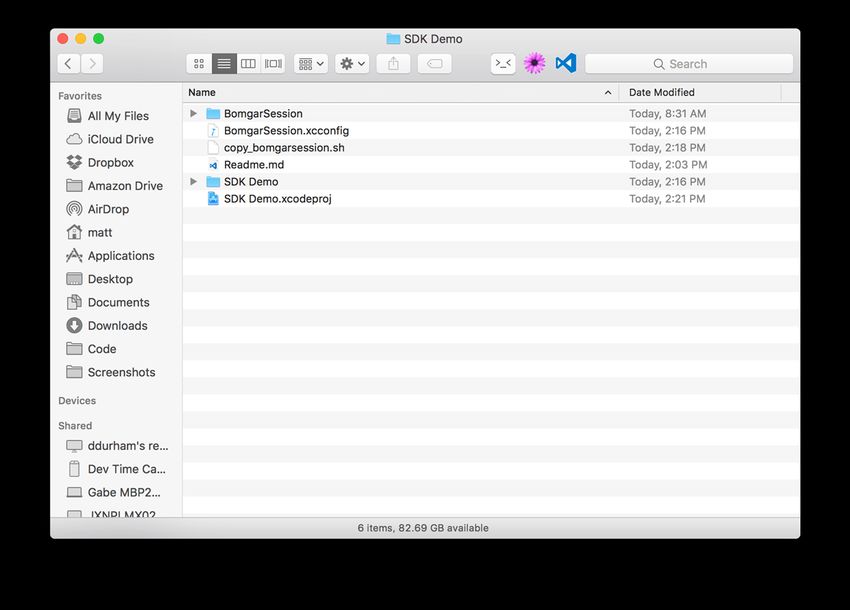
SOFTWARE DEVELOPMENT KIT FOR IOS AND ANDROID

             4. Set the destination to Frameworks and drag
                BomgarSession.framework from the project navigator into the
                file list. You should see something similar to the screenshot.

             5. Alternatively, you can drag BomgarSession.framework to the General > Embedded Binaries. Xcode should link the
                framework and add a copy files task to your Build Phases. If you use this method, under Build Phases, you should still have
                a similar configuration for your target.
                   a

             6. When building your app, if your project does not contain any
                Swift code, you must tell Xcode to include the Swift libraries. To
                do this, click on Build Settings for your target.

          Note: If your project contains Swift code, you can skip step 7.

             7. Under Build Options, you should see a key called Always Embed Swift Standard Libraries. To narrow the list, search for
                Always Embed.
             8. Set this value to Yes. You are now ready to import BomgarSession and to connect your app to your appliance.

          Development for Both Physical Devices and Simulators

        Summary of process
        When building against a physical device or when creating a release, link against the Device/BomgarSession.framework. When
        building for the simulator, link against Debug/BomgarSession.framework. This is accomplished by using an xcconfig file and a

CONTACT BOMGAR info@bomgar.com | 866.205.3650 (US) | +44 (0) 1628 480 210 (UK/EMEA) BOMGAR.COM                                                                                                              3
© 2018 Bomgar Corporation. All rights reserved worldwide. BOMGAR and the BOMGAR logo are trademarks of Bomgar Corporation; other trademarks shown are the property of their respective owners.   TC: 5/11/2018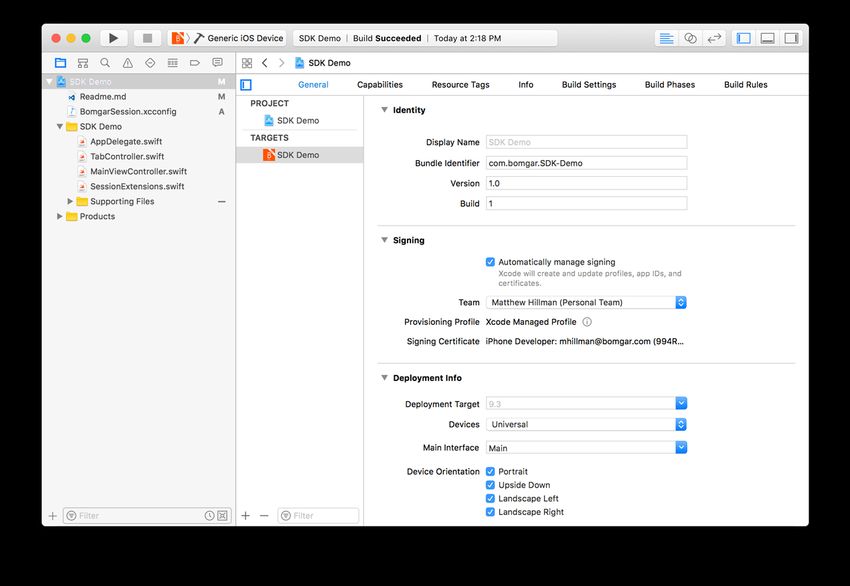
SOFTWARE DEVELOPMENT KIT FOR IOS AND ANDROID

        custom build script to embed and sign the framework. The following instructions assume you do not currently have any xcconfig
        files assigned to your configurations.
        If you are already using xcconfig files, simply copy the settings from the resource file into your configuration or enter #include
        "BomgarSession.xcconfig" at the top of your config file. If this configuration style does not work for you, there are other options
        you can use. For example, you can create separate targets for the simulator and device builds and link the correct framework
        version to each target, following the steps in the previous section.

          Note: The demo apps, provided in the SDK Demo bundle, use this configuration. You can view those projects for reference.

             1. When you expand the archive that contains BomgarSession.framework, locate the BomgarSession folder, which
                contains two sub–folders, Debug and Device. Each of these folders contains a separate build of
                BomgarSession.framework, and both builds are needed. Drag the BomgarSession folder into the same folder as your
                Xcode project.

          Note: The configuration files being used are written with the assumption that this folder structure is in this specific location.

             2. There is a ConfigurationResources archive that contains two files. You need two of them for this configuration,
                BomgarSession.xcconfig and copy_bomgarsession.sh. Copy these two files into your app’s project structure.

          Note: Although it is not strictly required, these instructions assume the files were copied into the same directory as your Xcode
          project.

             3. Drag BomgarSession.xcconfig into your Xcode project. The
                folder structure should look similar to the screenshot.

CONTACT BOMGAR info@bomgar.com | 866.205.3650 (US) | +44 (0) 1628 480 210 (UK/EMEA) BOMGAR.COM                                                                                                              4
© 2018 Bomgar Corporation. All rights reserved worldwide. BOMGAR and the BOMGAR logo are trademarks of Bomgar Corporation; other trademarks shown are the property of their respective owners.   TC: 5/11/2018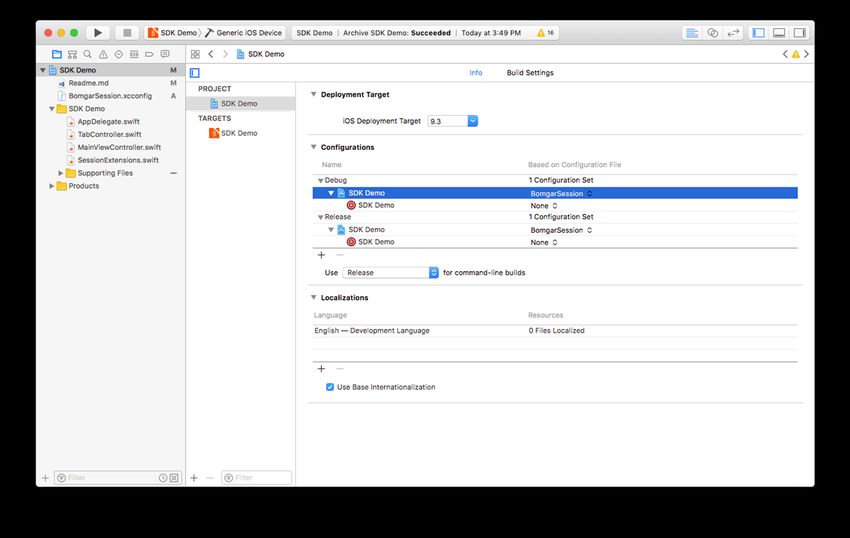
SOFTWARE DEVELOPMENT KIT FOR IOS AND ANDROID

             4. Your Xcode project structure should look similar to the
                screenshot.

             5. Now you must tell Xcode about the xcconfig file just added to the project. In the Project Navigator, go to Your Project >
                Your Project > Info.
             6. Under Configurations, expand the Debug section, and you should see your project with all of its targets nested below it.
             7. On the right, click the dropdown for the project itself and select BomgarSession from the list.
             8. Repeat this same process for the Release configuration. Your
                project should look similar to the screenshot.

             9. In the Project Navigator, go to Your Project > Your Target > Build Phases.
           10. At the end of the list, add a Run Script phase.
           11. The Shell field should default to /bin/sh. In this script box, place the path to the copy_bomgarsession.sh script as the
               only line.
           12. Since the script was placed in our directory, you should see the
               script box contain "${PROJECT_DIR}/copy_
               bomgarsession.sh". Your build phases should look similar
               the following.

          Note: The build phase is renamed to Embed BomgarSession for
          clarity.

        You are now ready to import BomgarSession and to connect your app
        to your appliance.

CONTACT BOMGAR info@bomgar.com | 866.205.3650 (US) | +44 (0) 1628 480 210 (UK/EMEA) BOMGAR.COM                                                                                                              5
© 2018 Bomgar Corporation. All rights reserved worldwide. BOMGAR and the BOMGAR logo are trademarks of Bomgar Corporation; other trademarks shown are the property of their respective owners.   TC: 5/11/2018
SOFTWARE DEVELOPMENT KIT FOR IOS AND ANDROID

          Other Customization Options

        In addition to the assets used to configure your project, the ConfigurationResources bundle also contains a Localized.strings
        file. This file contains all of the user-facing strings used by the SDK. If you need to localize your app into a language other than
        English, you can include this file as a resource in your app and localize it in Xcode, as needed.

          Troubleshoot the iOS SDK Implementation

               l   If you were using a previous version of BomgarSession, you may have imported  into
                   your project . This is no longer needed and must be removed to compile the current version of BomgarSession.

               l   If you see an @rpath error when launching your app on a
                   device, make sure the runtime search paths include
                   @executable_path/Frameworks. Here is a screenshot of the
                   error as well as the proper values in the Build Settings.

               l   If you see memory errors coming from the framework itself (i.e. EXC_BAD_ACCESS), make sure arm64 is in your Valid
                   Architectures list.

          Install Documentation from Docset Archive File

        To read through more documentation about the iOS SDK, follow these steps.

             1. Extract the archive.
             2. Drag the .docset file to ~/Library/Developer/Shared/Documentation/DocSets/.
             3. Restart Xcode.
             4. The Bomgar docset should now show up in Xcode Organizer's Documentation tab.

CONTACT BOMGAR info@bomgar.com | 866.205.3650 (US) | +44 (0) 1628 480 210 (UK/EMEA) BOMGAR.COM                                                                                                              6
© 2018 Bomgar Corporation. All rights reserved worldwide. BOMGAR and the BOMGAR logo are trademarks of Bomgar Corporation; other trademarks shown are the property of their respective owners.   TC: 5/11/2018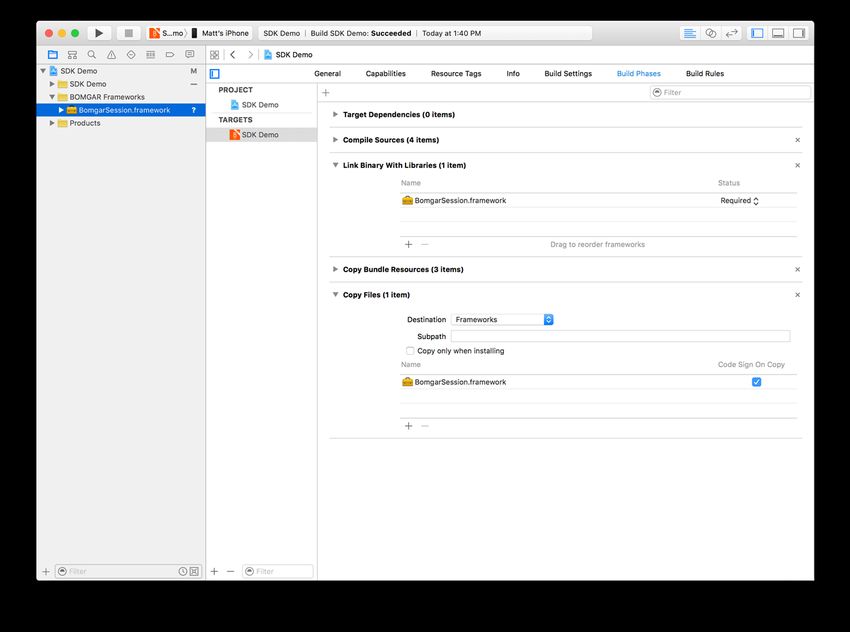
SOFTWARE DEVELOPMENT KIT FOR IOS AND ANDROID

        Getting Started with the Android SDK
          Note: The Bomgar SDK uses an Android API level of 15 and newer.

             1. To import the Bomgar SDK, add libs/BomgarSDK.jar to your project as a library.

          Note: The SDK jar contains compiled native libraries for armeabi-v7a, arm64-v8a, mips, x86, and x86_64 architectures. This
          also includes the jar in a project, which builds its own native libraries. Unless the libraries are manually loaded, the use of other
          architectures may cause problems.

             2. The SDK also uses the Renderscript Support Library. Projects including the jar need to add the following:

                          l   "renderscriptSupportModeEnabled true" in build.gradle for gradle builds (Android Studio)

                          l   "renderscript.support.mode=true" in project.properties for ant builds (Eclipse plugin)

             3. Within the app code, embed your companyid. To obtain this value, navigate to /login > Status > Information and review the
                Company API Name field, or issue the get_api_info command. Please see API Command: get_api_info at
                www.bomgar.com/docs/remote-support/how-to/integrations/api/command/get_api_info-request.
             4. There are three steps for connecting to the Bomgar Appliance through the Android SDK.
                        a. Create an instance of BomgarSession using the factory method BomgarSessionSingleton (Application,
                           String, String, int, BomgarSessionDelegate).
                        b. Start a session using one of the session start methods found in BomgarSession.
                         c. Manage the running session activity using BomgarSession.setRunningActivity (Activity).

          Required Permissions

        In order for the Bomgar SDK to fully function, the host application must be granted certain permissions. Depending on the target api
        level of your application, the process differs due to the introduction of Runtime Permissions in Android 6.0. See the notes at the end
        of this section for information relevant to the SDK and runtime permissions.
        Regardless of API level, the following permissions must be added to the manifest file in order for the SDK to provide full
        functionality.

               l   android.permission.INTERNET
               l   android.permission.ACCESS_NETWORK_STATE
               l   android.permission.KILL_BACKGROUND_PROCESSES
               l   android.permission.READ_PROFILE
               l   android.permission.READ_PHONE_STATE
               l   android.permission.READ_CONTACTS
               l   android.permissions.GET_ACCOUNTS
               l   android.permissions.WRITE_EXTERNAL_STORAGE
               l   android.permissions.READ_EXTERNAL_STORAGE

CONTACT BOMGAR info@bomgar.com | 866.205.3650 (US) | +44 (0) 1628 480 210 (UK/EMEA) BOMGAR.COM                                                                                                              7
© 2018 Bomgar Corporation. All rights reserved worldwide. BOMGAR and the BOMGAR logo are trademarks of Bomgar Corporation; other trademarks shown are the property of their respective owners.   TC: 5/11/2018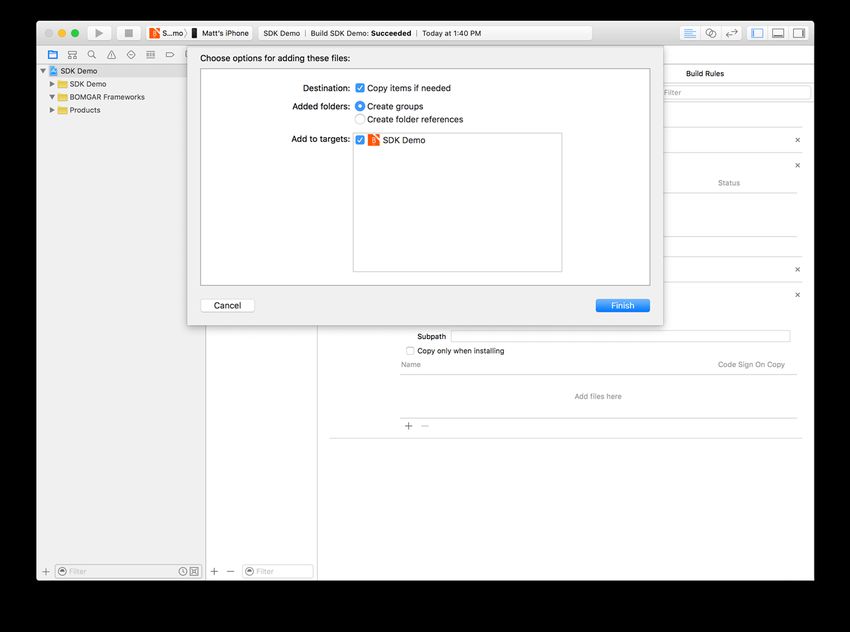
SOFTWARE DEVELOPMENT KIT FOR IOS AND ANDROID

        If your application uses system privileged screen scraping, input injection, and process list collection, the following permissions are
        required.

          Note: The APK must be signed with the device firmware's signature to grant these permissions.

               l   android.permission.ACCESS_SURFACE_FLINGER
               l   android.permission.READ_FRAME_BUFFER
               l   android.permission.INJECT EVENTS
               l   android.permission.REAL_GET_TASKS
               l   android.permissions.CLEAR_APP_USER_DATA

        To use Bomgar InSight, the following permission must be placed in the application manifest along with the uses-feature entry.

          Note: The uses-feature entry is a requirement only if the application can be used without the presence of a hardware
          camera.

               l   android.permission.CAMERA
               l

        If your application targets API level 23 or higher, it must account for the new Runtime Permissions. A system prompt appears asking
        the user to allow each permission group. There are four permission groups that encompass the required permissions. The groups
        should be requested (and ideally allowed) before the Bomgar sessions are started in order for the sessions to collect necessary
        system information and provide full functionality. The four groups are listed below and can also be inferred from the required
        permissions list.

               l   PHONE
               l   CONTACTS
               l   STORAGE
               l   CAMERA

        If Proguard is being used on the application, the following Proguard rules must be used to preserve necessary parts of the SDK
        from obfuscation.

               l   -keep class com.bomgar.android. ** {*; }
               l   -dontwarn com.bomgar.android.**

          Review Documentation and Sample Project

        For more information about the SDK, please see docs > index.html in the SDK bundle.
        For a working example of the Android SDK, please reference the Android Paint project provided with the SDK binary.

CONTACT BOMGAR info@bomgar.com | 866.205.3650 (US) | +44 (0) 1628 480 210 (UK/EMEA) BOMGAR.COM                                                                                                              8
© 2018 Bomgar Corporation. All rights reserved worldwide. BOMGAR and the BOMGAR logo are trademarks of Bomgar Corporation; other trademarks shown are the property of their respective owners.   TC: 5/11/2018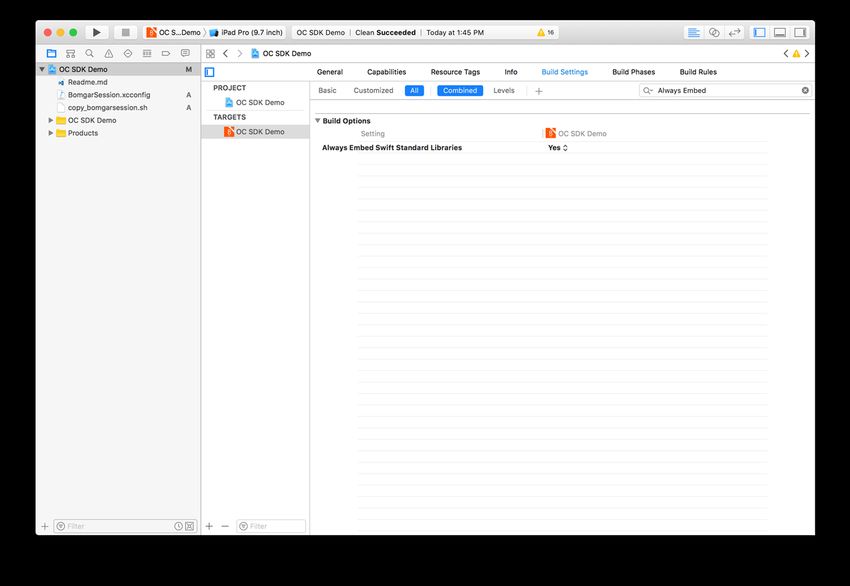
You can also read