Solar & Storage DigiCon - Booth Builder Guide - Solar and Storage Digicon
←
→
Page content transcription
If your browser does not render page correctly, please read the page content below
Solar & Storage DigiCon
Booth Builder Guide
BOOTH SETUP – GETTING STARTED

Your booth is your face on the SSDC and you want it to reflect your Corporate Identity as well as your commitment to safe
business and advancement in digitalization. The booth has two layers: the background image and the activity interface. While
the background image contains all static, graphic elements, the activity interface is the layer which contains the links and
content you wish to make available.
You will want to start with creating the background image. Here, there are no restrictions or limits to your creativity. However,
keep in mind that you want the wording, imagery and colors to be as user friendly as possible, so do not overcrowd your
booth. Simple and effective is the motto. Do not hesitate to log into the SSDC and check out other booths for inspiration.

Solar & Storage DigiCon – Partner Guide

BACKGROUND IMAGE

The background image can be created with Photoshop or any other image modification software. You can create a booth from
scratch particularly for the SSDC, use a previous rendering from a physical or other digital trade fair, or use one of our
templates. If you choose to use one of our templates, we will send you the respective Photoshop file for you to adjust colors,
add products or change the scenery.
The final image is in 2D and must be either jpg or png in 1680x1050 px. The quality and appeal of the image are very
important!

The background image should contain the logo and any objects that will not move, such as modules, walls, windows, people,
decoration and so on.

•    Include the logo in the background file for better quality and more flexibility with the positioning. Within the backend it
     can be linked to your company website.
•    Products such as modules, inverters, storage systems or racks can be added to the booth to give it a more individual flair.
•    Roll-ups and further screens. Add more space to market your products by adding screens or roll-ups. Screens are
     particularly nice to use for project images that will rotate. In this case, only include the outline of the television and leave
     the inner screen white. Roll-ups can be useful to add company key facts or list services. If you have physical products to
     offer, I advise to use the products over roll-ups and screens.
•    You want to add mascots or colleagues? Go ahead! The background image is your space to adapt freely. You can even
     change the scenery and add an image of your head office for example.

Solar & Storage DigiCon – Partner Guide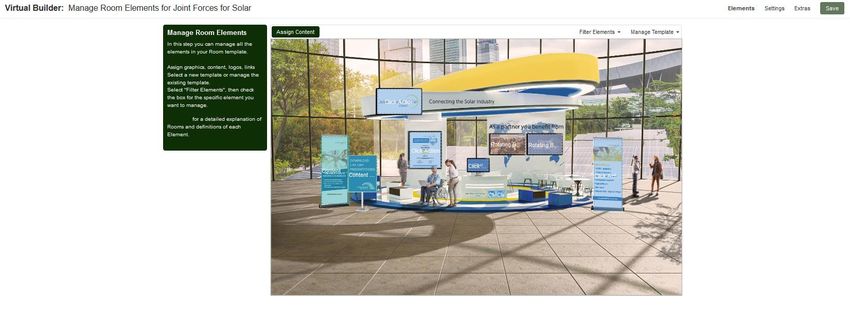
BACKGROUND IMAGE - AVAILABLE TEMPLATES

1                                             2

3
                                                  4

    Solar & Storage DigiCon – Partner Guide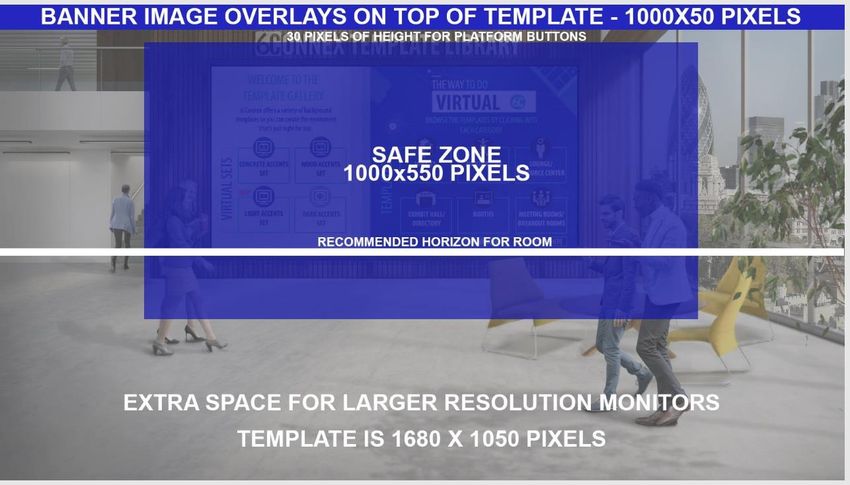
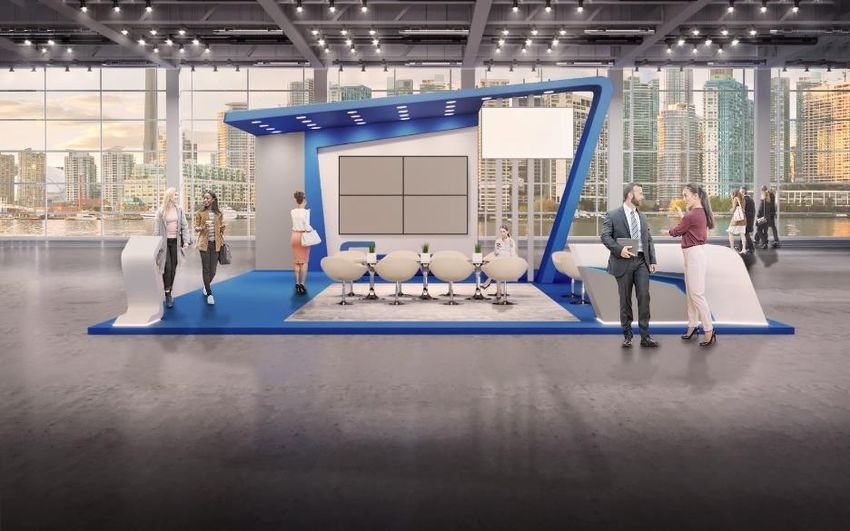
BACKGROUND IMAGE - AVAILABLE TEMPLATES

5                                             6

7
                                                  8

    Solar & Storage DigiCon – Partner Guide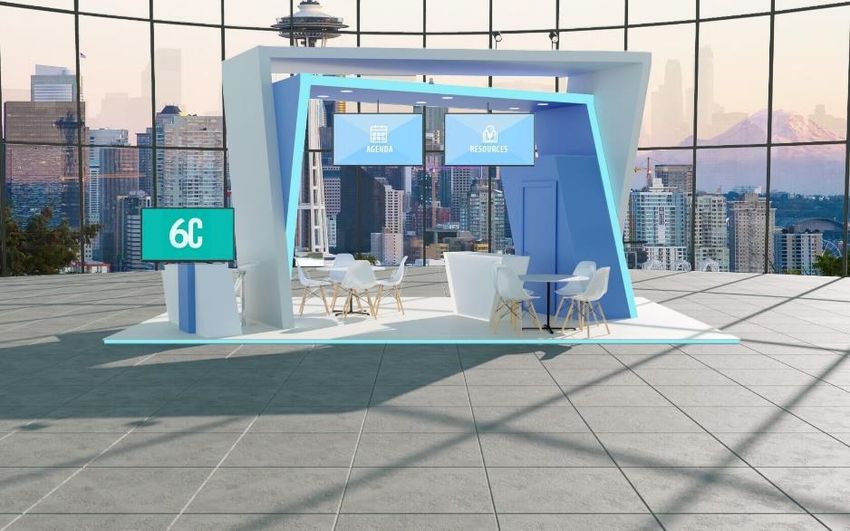
THE SAFE ZONE

The SSDC is accessible from different devices with different resolutions. To ensure that even at the poorest resolution your most
relevant content is visible, please ensure that these items are located in the Safe Zone. This area is what will be visible at any
screen and browser resolution.
All further information and design extras can be located outside the Safe Zone. The margins are as follows:
30 px to the top of the screen, 340 px to each the left and right, 870 px to the bottom.
We recommend to adjust the browser zoom settings to 75 to 90% for the full experience. These reocmmendations are also
extended to the attendees.

  Solar & Storage DigiCon – Partner Guide
CONTROL PANEL

Once you created your background image, send it to your project manager for a quality check. In a next step you can upload the
image to your Access Control Panel – the backend of the SSDC. You will receive your login credentials from your project manager.

         At the Content Library
         you upload all the
         content for the Content
         Windows, such as
         videos, pdfs, audio, and                                                               Here you modify the content of
         so on.                                                                                 your booth, assign
                                                                                                representatives, adjust
                                                                                                language settings, or update
                                                                                                the background image.

           Access the data of the                                      You can add surveys created
           visitors who interacted with                                with Survey Monkey or other
           elements at your booth. The                                 platforms and integrate them
           available data includes all of                              into the SSDC.
           the information shared at the
           registration.

  Solar & Storage DigiCon – Partner Guide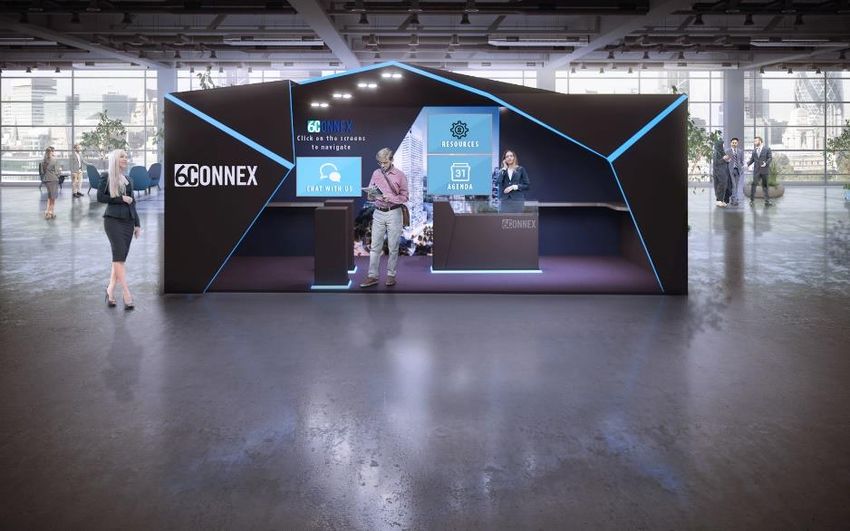
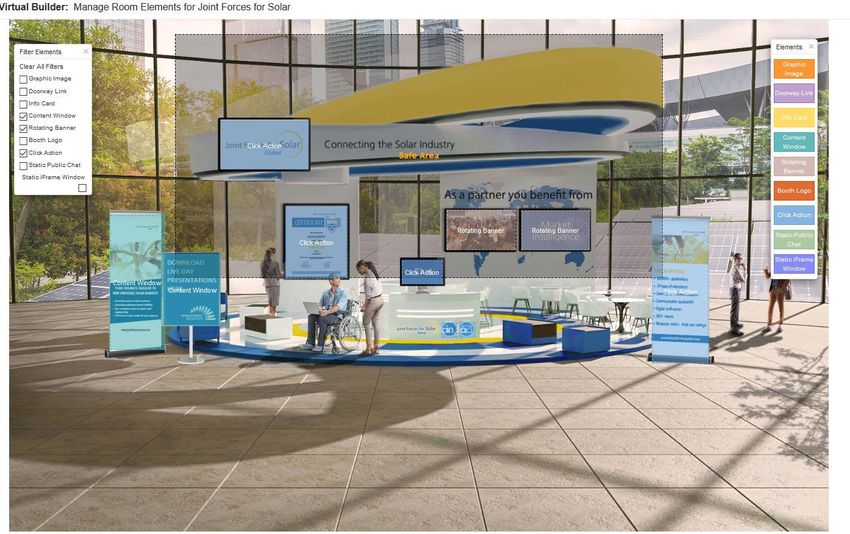
VIRTUAL BUILDER

Generally, you will already find a test booth in your account. Visit Virtual Rooms and you will see a list with your booths. The
number of booths is limited to one (1). If you wish to have more than one booth, for example one booth for each language setting
(English, German and Spanish), please let you partnership manager know. You can active all three language settings for one booth.
To access the Virtual Builder and manage the content of your booth, click Edit on the far right. The Virtual Builder will open in a
separate tab.
In the Virtual Builder you can manage and edit General Setting, Extras, change the background image and adjust the elements
(clickable windows).

  Solar & Storage DigiCon – Partner Guide
UPLOADING THE BACKGROUND IMAGE

To upload the background image, click on
Manage Template – Change Template

You have two options:
(1) Choose a template
(2) Upload the background image you created

As the templates in the Control Panel don’t give you many options
to personalize your booth, you will want to upload your own
background image by clicking “Change”.

You can change your background image in the future from here.
Your settings and changes will not be lost (even though the system
will tell you so – this only happens when you switch between
templates, or option 1 and 2). Upload the image, click OK and then
Save*.

If there are changes that need saving, the Save button will appear
more saturated and include a *.

Solar & Storage DigiCon – Partner Guide
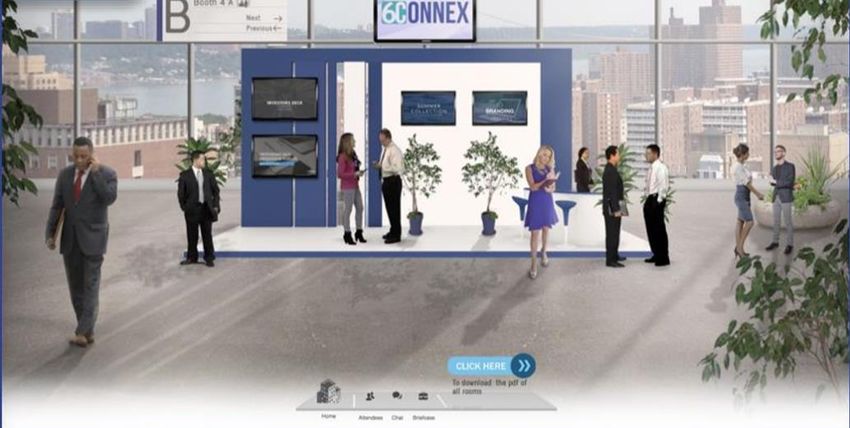
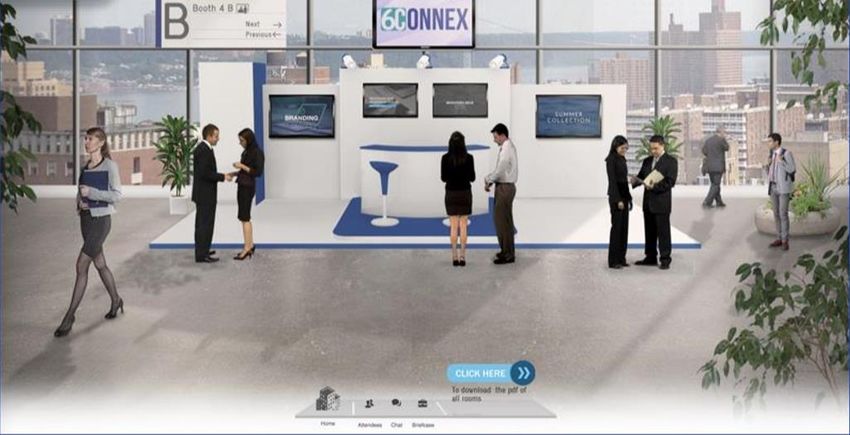
EDITING YOUR BOOTH

You can now add the activity layers to the visuals. Click “Manage Template” and choose “Edit Template” to add elements as such
listed below.

                            Standard /
 Element                                    Information and Usability
                             Optional

 Doorway Link                 Standard      A link to another room within the virtual environment, such as a booth, auditorium, help desk.

                                            A graphic image of any size; set the size by adjusting the size of the window. Graphic Images may be layered with
 Graphic Image                Standard
                                            other elements, such as click action elements.

                                            A list of content items. Name the content window and select content items to appear within the list. Please note that
                                            all content items need to be uploaded into the Content Library first. Here you can categorize them as Download (refers
 Content Window               Optional      to all documents, that attendees shall be able to download), Links, Videos. Options include auto-open of a content
                                            window or a specific content item such as documents or videos. Content windows can be layered with Graphic
                                            Images. You can use multiple content windows across the booth.

                                            A banner of any size; set the size by adjusting the size of the window. Banners may click to external URLs, to internal
 Rotating Banner              Optional
                                            rooms/content items/settings or to a survey.

                                            A hot spot that triggers an action. Click actions include external URLs, specific content items, public chats, and virtual
                                            badge swipes (virtual business card drop off). Multiple configuration options are available with each type of click
 Click Action                 Optional
                                            action, and some click action types can bet set to auto-launch when an attendee enters a room. You can use multiple
                                            click action windows across the booth.

! Content Windows and Click Action are transparent windows, so they must be layered on top of a visual, such as an icon, image
or product.
Continue to the next slide for visuals.

  Solar & Storage DigiCon – Partner Guide
EDITING YOUR BOOTH Solar & Storage DigiCon – Partner Guide
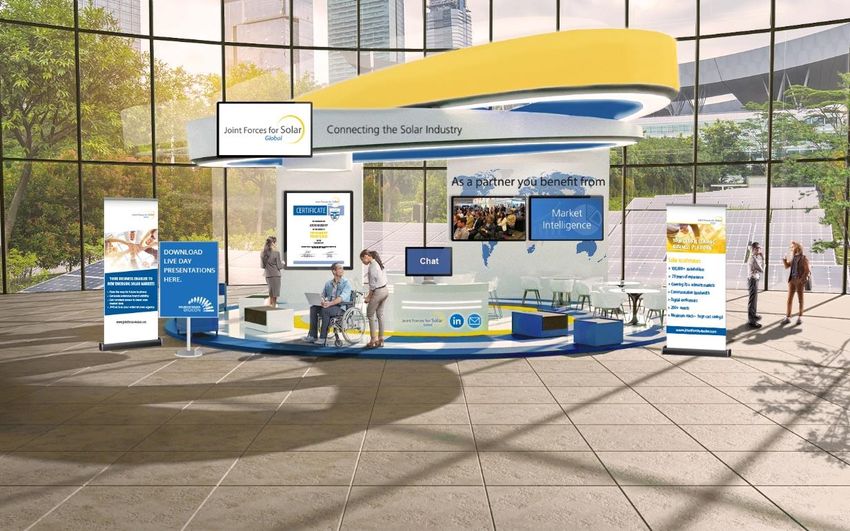
CLICK ACTION

Click Actions are single-action elements. They can be sued to are
redirect visitors to external links such as your homepage or social
media channels, open elements such as the Briefcase or Public Chat.
You can auto-launch a target, it will then open automatically upon
entry to the booth. As you can only include one pop-up at a time,
chose one that will be representative for your company and products.
In most cases you will want to have your company Intro Video as the
only pop-up window.

The Click Action window offer the “Swipe Virtual Badge”. This is a
virtual business card drop-off that allows attendees to send you their
details and let you know they want you to get in touch with them.
Please note that this option does not include a possibility to add a
text, so it is advised to let the attendee know where they can leave a
message for you. An example for such a text (you will be asked to
enter it, when you choose the option in the Click Action) is:

“Thank you for dropping your business card. We received an email
with your name and email address and will get back to you shortly.
Want to leave us a message as well? Go to “Info Card /
Representatives" at the top right of the booth and click on the email
icon next to a representative.”

 Solar & Storage DigiCon – Partner Guide
CONTENT WINDOW

Here you can insert Content Items,
materials such as videos or documents.
You can add as many Content Items as
you want to each Content Window in
various formats. It is necessary to upload
the document or file to the Content
Library first and then select it when
clicking on the Content Window. To find
out how to upload content to the
Content Library, proceed to the next
slide.

Once you added the Content Item to the Content Library open the respective
Content Window and then Add Category. You need to add a category to be
able to upload any content. You can include several categories, which will later
show up in the environment as filter options in the Content Window. Once you
saved your category, you can add content. You can delete and add content at
anytime.

Solar & Storage DigiCon – Partner Guide
CONTENT LIBRARY

At the “Content Library” you will upload all the content you
wish to add to your booth. This content includes videos, pdfs,
images, links, audio and so on. Choose a Display Name that
clearly states what people can expect to find when clicking
on the link. Avoid special characters, abbreviations or
number combinations.

Also choose the respective content folder with your company
name. This allows the admins to find the content in case of
any support required as well as support with the tracking
and metrics.

If you want your content to be available in all three
language settings, don’t forget to enable all three. Please
keep in mind that 90% of registrants choose English as a
language setting irrespective of their country of business.

When you choose the content type (choose download for
pdfs and datasheets), you must click “Upload” once more.
Then, click Submit.

 Solar & Storage DigiCon – Partner Guide
GO LIVE!

Once you uploaded all your content and links, get in touch with your partnership manager for a final quality check. Once everything
has been checked and approved, the booth will be linked and published. All visitors to the SSDC will then be able to see and
interact with your booth.

Once your booth is live, we will promote your presence at the SSDC with a post and within the bi-weekly newsletter sent to all
registrants. We encourage you to share an image of your booth with your network via social media, newsletters and your website
as well.

Please keep in mind that you cannot publish your booth or any changes yourself, you will always have to send a quick note to your
partnership manager. We will always be happy to do so during our working hours, so do not hesitate to keep the content and
design at your booth updated.

Also watch the video to this guide and check out your partner guide for information about events, speaking opportunities,
communication and marketing activities.

We look forward to seeing your booth live!

 Solar & Storage DigiCon – Partner Guide
THE TEAM

SALES & MANAGEMENT

                             DANIEL FUCHS                                          PARAG BHAMRE
                             Vice President                                        Partner | International Projects

                             T: + 49 228 97143-45                                  T: + 49 228 97143-0
                             M: + 49 173 526 1672                                  M: + 971 54 4427195
                             fuchs@jointforces4solar.com                           bhamre@jointforces4solar.com
                             d.fuchs@eupd-research.com                             p.bhamre@eupd-research.com

OPERATIONS

AMELIE MEIXNER                                       CHRISTOPHER BRAUN              REBECCA CORDES
Partnerships & Project Manager                       Digital Event Manager          Senior Art Director
meixner@jointforces4solar.com                        (Live Streaming)               cordes@360concept.de
                                                     braun@jointforces4solar.com

Solar & Storage DigiCon – Partner Guide
You can also read