Sonos PLAYBAR Product Guide
←
→
Page content transcription
If your browser does not render page correctly, please read the page content below

®
Sonos PLAYBAR
  Product Guide
THIS DOCUMENT CONTAINS INFORMATION THAT IS SUBJECT TO CHANGE WITHOUT NOTICE. No part of this publication may be reproduced or transmitted in any form or by any means, electronic or mechanical, including but not limited to photocopying, recording, information retrieval systems, or computer network without the written permission of Sonos, Inc. Sonos and all other Sonos product names and slogans are trademarks or registered trademarks of Sonos, Inc. Sonos Reg. U.S. Pat. & Tm. Off. Sonos products may be protected by one or more patents. Our patent-to-product information can be found here: sonos.com/legal/patents iPhone®, iPod®, iPad® and iTunes® are trademarks of Apple Inc., registered in the U.S. and other countries. Windows® is a registered trademark of Microsoft Corporation in the United States and other countries. Android® is a trademark of Google, Inc. Manufactured under license from Dolby Laboratories. Dolby and the double-D symbol are trademarks of Dolby Laboratories. Amazon, Kindle, Kindle Fire, the Amazon Kindle logo and the Kindle Fire logo are trademarks of Amazon.com, Inc. or its affiliates. MPEG Layer-3 audio decoding technology licensed from Fraunhofer IIS and Thomson. Sonos uses MSNTP software, which was developed by N.M. Maclaren at the University of Cambridge. © Copyright, N.M. Maclaren, 1996, 1997, 2000; © Copyright, University of Cambridge, 1996, 1997, 2000. All other products and services mentioned may be trademarks or service marks of their respective owners. November 2014 ©2004-2014 by Sonos, Inc. All rights reserved.
Sonos PLAYBAR®
Flood any room with epic, full-theater HiFi sound and wirelessly stream all the music on earth through one easy-to-use
player.
• Sophisticated 9-speaker design
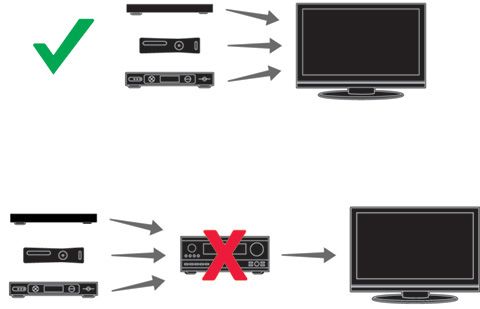
• Connects to your TV using a single optical cable and plays everything that's connected to the TV, including cable boxes
and game consoles
• Can be placed flat on a TV stand or mounted horizontally above or below the TV
• Compatible with Dolby® Digital and stereo
It takes just a few minutes to get your PLAYBAR up and running—turn to page 1 to get started. Once you’ve got it set up, you
can add additional Sonos products any time.
Note: One Sonos product must be connected to your broadband router. If the PLAYBAR will
not be located near your router, you can connect a Sonos BRIDGE™ or any Sonos player
(purchased separately) to the router instead.
What’s in the Box
• Sonos PLAYBAR
• Power Cord
• 5 ft. /1.5m TOSLINK Optical Audio Cable
• Ethernet Cable
• Quick Start Guide
• Important Product Information Booklet
What’s Required
Television requirements
The PLAYBAR is compatible with any television that has an optical digital audio output.
Home network requirements
Note: Your network must have a high-speed Internet connection, as the Sonos system is
designed to provide you with free, online software updates. Your Sonos system must be
registered to receive these updates so be sure to register during the setup process. We do
not share your e-mail address with other companies.
• High-speed DSL/Cable modem, or fiber-to-the-home broadband connection for proper playback of Internet-based
music services. (If your Internet service provider only offers Satellite Internet access, you may experience playback
issues due to fluctuating download rates.)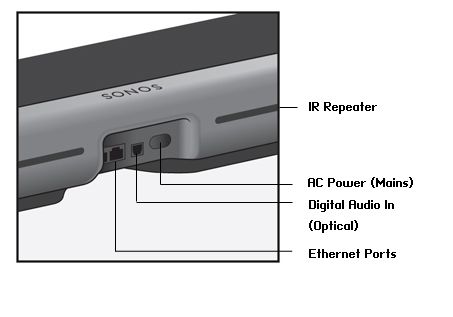
2                                                                                                                Product Guide

    • If your modem is not a modem/router combination and you want to take advantage of Sonos' automatic online
      updates, or stream music from an Internet-based music service, you must install a router in your home network. If
      you do not have a router, purchase and install one before proceeding. If you are going to use the Sonos Controller App
      on an Android™ or iOS device, or you are setting up Sonos wirelessly, you will need a wireless router. Please visit our
      Web site at http://faq.sonos.com/apps for more information.
Note: Sonos communicates over a 2.4GHz home network supporting 802.11 b/g wireless
technology. 5GHz networks are not supported in a completely wireless Sonos setup.

    • Connect a Sonos BRIDGE, BOOST or player to your router if:
      • You have a larger home where the WiFi performance isn’t reliable and you want to strengthen the wireless
         performance of your Sonos system.
      • Your WiFi network is already in high demand with streaming video and web surfing and you want to create a
        separate wireless network exclusively for your Sonos speakers.
      • You want to pair a SUB™ and/or a pair of PLAY:1® or PLAY:3™ speakers with your PLAYBAR to create a 3.1 or 5.1 home
        theater setup.
      • Your home network is 5GHz only (not switchable to 2.4GHz).
    • For best results, you should connect the computer or NAS drive that contains your personal music library collection to
      your home network router using an Ethernet cable.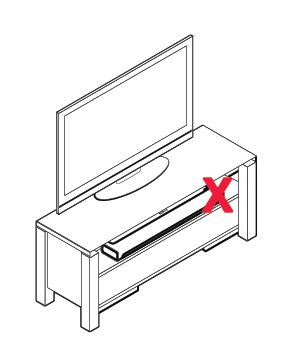
Sonos PLAYBAR                                                                                                            3

Before You Begin
Prior to installing the Sonos PLAYBAR, make sure all external components, such as your cable box, DVD player, etc. are
connected directly to your TV.
If you have any existing home theater or surround sound equipment, disconnect it from your television.
4                                                                                                                                 Product Guide

PLAYBAR Front

Note: The grill cloth is not removable. Tampering with the cloth may damage your PLAYBAR.

 Play/Pause                                        Toggles between playing and pausing the audio.
                                                        • When the TV is on, press once to mute the audio
                                                        • When the TV is off, press once to restart the music source that was in use prior to
                                                           the TV audio; press twice to skip to the next track (if applicable to the selected
                                                           music source)
 Status Indicator Light                            Indicates the status of the PLAYBAR.
                                                   When the PLAYBAR is in normal operation, the LED is white. If desired, you can adjust this
                                                   setting so the white light does not display. See "White status light" on page 15 for more
                                                   information.
                                                   For a complete list of status indications, go to http://faq.sonos.com/led.
 Volume Up (+)                                     Press these buttons to adjust the volume up and down.
 Volume Down (-)

 IR (InfraRed) Sensors / Signal Lights             The IR sensor receives the signals sent by a remote control.
                                                   When the PLAYBAR receives a volume or mute command, the IR signal light displays
                                                   momentarily. If desired, you can adjust this setting so the light never displays. See "IR
                                                   signal light" on page 14 for more information.
Sonos PLAYBAR 5
PLAYBAR Back
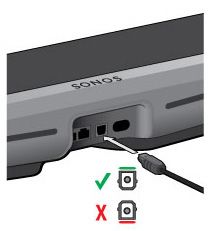
Ethernet Ports (2) You can use an Ethernet cable to connect the PLAYBAR to your home network.
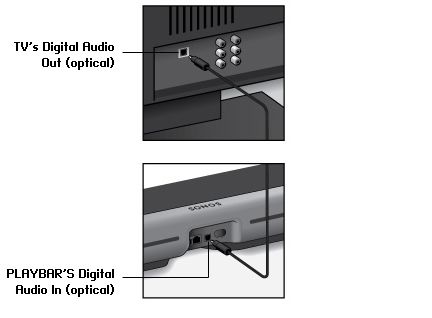
Digital Audio In (Optical) Use an audio optical cable (supplied) to connect the Sonos PLAYBAR’S digital audio input
to the optical digital output on your television. Take care not to bend or twist the cable.
The PLAYBAR’s digital audio in and the optical
cable end are ’D-shaped’—be sure to align for
proper insertion.
AC Power (Mains) Input Use only the supplied power cord to connect to a power outlet (using a third party power
cord will void your warranty). Be sure to use the proper power adapter for your country.
Push the power cord firmly into the PLAYBAR until it is flush with the surface.
IR Repeater Allows the commands from your remote control to reach your TV if the PLAYBAR is
positioned in front of the TV. This setting is on by default, but can be turned off. See "IR
repeater" on page 14 for more information.6 Product Guide
Selecting a Location
The PLAYBAR’s flexible design allows for multiple orientations. You can wall mount it above or below your television or place it
on a tabletop. See the guidelines below for more information.
Tabletop
• Lay the PLAYBAR horizontally and flat on its feet.
• Do not place vertically or upright on its side.
• To preserve audio quality, ensure the connector panel faces toward the TV—Sonos logo should be closer to your TV.
• There is no placement restriction between the TV and PLAYBAR as long as the television’s IR is not blocked. The PLAYBAR
IR repeater is designed for at least 2" (50mm) distance, but may work at a closer distance.
• Do not place the PLAYBAR in a cabinet or on a walled shelf. Both ends of the PLAYBAR should be at least 1 ft. (30cm)
from a wall or other obstruction.
Wall mounting
The PLAYBAR can be mounted above or below your television using the PLAYBAR Wall Mount Kit (purchased separately).
Please turn to page 22 for detailed wall-mounting instructions.Sonos PLAYBAR 7
Setting Up the PLAYBAR
The PLAYBAR is compatible with Sonos software versions 4.0 and later. If you are adding the PLAYBAR to an existing Sonos
system, be sure to check for software updates before adding the PLAYBAR to your Sonos system.
1. Carefully unpack the package contents.
2. Choose a location for the PLAYBAR. Refer to "Selecting a Location" on page 6 for help with this step.
3. Remove the protective cap from each end of the optical audio cable.
4. Connect the optical audio cable (supplied) from your TV’s digital audio out (optical) to the PLAYBAR’s digital audio in
(optical) being careful not to twist or bend the cable. The PLAYBAR’s digital audio in and the optical cable are ’D-
shaped’—be sure to align for proper insertion.
IMPORTANT: Be sure to remove
the protective caps from each
end of the supplied optical
audio cable before inserting.
5. Attach the power adapter to the PLAYBAR and apply power. Be sure to push the power cord firmly into the PLAYBAR until
it is flush with the surface.
The status indicator light on the right side of the unit will begin to flash.8 Product Guide
6. (OPTIONAL) If you are setting up your PLAYBAR with a SUB and/or surround speakers, position them in your room, apply
power and connect a Sonos BRIDGE, BOOST or player to your router.
(You will be prompted to add these components to your Sonos system after the PLAYBAR is added.)
If you purchased a Sonos SUB, place the SUB
wherever it best fits your room—standing up or
lying flat. You can place it in a corner, against the
wall, behind, under, or next to any piece of furniture
on any kind of floor surface.
If you purchased Sonos PLAY:1 or PLAY:3 surround speakers, place the
speakers to the left and right of your main viewing position, level with
or behind the main viewing position. They can be placed either
horizontally or vertically, but make sure both speakers have the same
orientation.
Note: Expandable PLAYBAR home theater setup
For a 3.1 home theater experience, pair a SUB with your PLAYBAR.
For a 5.1 home theater experience, pair a SUB and a pair of PLAY:1 or PLAY:3 speakers with
your PLAYBAR.
If you are expanding your PLAYBAR home theater setup, be sure you have a BRIDGE, BOOST or
Sonos player wired directly to your router.Sonos PLAYBAR 9
7. Using a handheld Sonos controller (including Sonos CONTROL, iPad®, iPhone®, iPod touch®, Android® smartphone or
tablet, Kindle Fire™), open the app and follow the online prompts to set up your Sonos system.
If you don’t have a Sonos controller app installed, download it from the application store on your device.
Note: Sonos does not recommend using the Sonos Controller for Mac or PC to set up your
PLAYBAR.
If you are setting up a new Sonos system, when prompted, add your Sonos products in the following order:
a. Add the Sonos product that’s connected to your router.
b. Add the PLAYBAR (if it is not the product connected to your router.)
c. Add any additional Sonos products you purchased.
If you are adding to an existing Sonos system:
a. First check for software updates—the PLAYBAR is compatible with Sonos software versions 4.0 and later.
b. Add the PLAYBAR to your Sonos system by selecting Add a Player or SUB from the Settings menu on a handheld
controller.
c. Add any additional Sonos products you purchased.
You may be prompted to update the new Sonos product(s) after you add them to your Sonos system.
Thick walls, 2.4 GHz cordless telephones, or the presence of other wireless devices can interfere with or block the
wireless network signals from your Sonos system. If you experience difficulty after positioning a Sonos product, try one
or more of the following resolutions—relocate the Sonos product; change the wireless channel your music system is
operating on; connect a Sonos product to your router if your setup is currently wireless.
If you’d like additional assistance:
• If you need help turning off your TV speakers, see page 27 for more information.
• If you need help configuring a remote control to work with your PLAYBAR, see page 10 for more information.
• If a message appears on the TV whenever you adjust the volume up and down, it may be possible to eliminate it. If you
are using a cable remote, see page 26. If you are using a universal remote, see page 27 for additional help.
• If you want to play music through the PLAYBAR, see page 20 for more information.
PLAYBAR Settings
Follow the steps below if you wish to make changes to any PLAYBAR settings or the way the PLAYBAR works with your
television.
• Remote Control Setup
• Equalization
• Recalibrating the Audio
• TV Dialog Settings
• Speech Enhancement
• Night Sound10 Product Guide
• TV Autoplay
• IR Signal Light
• IR Repeater
• White Indicator Light
• Room Name
• Add SUB / Remove SUB (if SUB is present)
• Add / Remove Surround Speakers (if surround speakers are present)
Remote control setup
During PLAYBAR setup, you were guided through the process of configuring a remote control. If you did not configure one
then, or wish to use a different remote control with your PLAYBAR, follow the steps below.
If you are configuring a new remote because a distracting message appears on the television whenever you adjust the
volume, please go to "Eliminating annoying messages on your TV when using a cable, satellite, or set top box remote" on
page 26, or "Eliminating annoying messages on your TV when using a universal remote" on page 27.
Using a handheld Sonos controller
1. Select Room Settings from the Settings menu.
2. Select the room your PLAYBAR is located in.
3. Select TV Setup and Control -> Remote Control Setup.
If a remote control is already configured for use with your PLAYBAR you will be asked if you want to replace it.
4. Pick up the remote control you wish to begin using with the PLAYBAR.
5. Point the remote at the PLAYBAR and press the Volume Up button on the remote control.
• If the remote control is recognized, click Done. You can now use that remote to control the volume and mute settings
on your PLAYBAR.
• If the remote control is not recognized, you will be prompted to make additional button presses to complete the setup
process.
Using the Sonos Controller for Mac or PC
1. Select Manage -> Settings (PC) or Sonos -> Preferences (Mac).
2. Select Room Settings if it is not already highlighted on the left.
3. Choose the room the PLAYBAR is located in from the Room Settings for drop-down.
4. Select the TV Setup tab.
5. Click Remote Control Setup.
6. Pick up the remote control you wish to begin using with the PLAYBAR, and then click Next.
7. Point the remote at the PLAYBAR and press the Volume Up button on the remote control.
• If the remote control is recognized, click Done. You can now use that remote to control the volume and mute settings
on your PLAYBAR.
• If the remote control is not recognized, you will be prompted to make additional button presses to complete the setup
process.Sonos PLAYBAR 11
If a message appears on the television whenever you adjust the volume up and down, please see "Eliminating annoying
messages on your TV when using a cable, satellite, or set top box remote" on page 26 or "Eliminating annoying messages on
your TV when using a universal remote" on page 27.
Equalization (EQ)
During the PLAYBAR setup process you were guided through the audio calibration process. If desired, you can change the
sound settings (bass, treble or loudness) for the Sonos PLAYBAR. Bass boosts lower frequencies, treble boosts higher
frequencies, while loudness boosts certain frequencies, including bass, to improve the sound at low volume.
Any manual EQ changes you make will be reset whenever you go through the audio recalibration process (see page 11 for
more information).
Using a handheld Sonos controller
1. From the Settings menu, select Room Settings.
2. Select the room you want to adjust.
3. Select Equalization.
4. Choose one of the following options:
• Drag your finger across the bass or treble sliders to make adjustments.
• Select On or Off to adjust the Loudness setting.
Using the Sonos Controller for Mac or PC
1. Select Manage -> Settings (PC) or Sonos -> Preferences (Mac).
2. Select Room Settings if it is not already highlighted on the left.
3. Choose the room the PLAYBAR is located in from the Room Settings for list, and then select the EQ tab.
4. Choose one of the following options:
• Click and drag the bass or treble sliders to make adjustments.
• Click the Loudness checkbox to turn the loudness setting on or off.
5. Close the Settings window when changes are complete.
Recalibrating the audio
If you have a SUB and/or Sonos surround speakers associated with your PLAYBAR, you may wish to make some adjustments
after initial setup. You will likely wish to recalibrate the audio if you move any Sonos products in the room.
If you made any manual adjustments to EQ settings, these will be reset during the recalibration process.
Using a handheld Sonos controller
1. From the Settings menu, select Room Settings.
2. Select the room that is associated with the surround components. It appears as Room (+SUB) or Room (+LS+RS) or
Room (+SUB+LS+RS) on the Room Settings menu.
3. Select Advanced Audio -> Recalibrate Audio.
4. Follow the prompts to optimize your audio performance.12 Product Guide
• If you have a SUB associated with your PLAYBAR, you will be asked to choose between 2 test sounds:
• Press Play to compare the volume of two test sounds, A and B, and then select No Difference, A is louder or
B is louder. If you don’t hear a noticeable difference, select No Difference.
• Press Play to listen to a test sound, and then select the level you prefer.
• If you have surround speakers associated with your PLAYBAR, you will be asked to answer some room configuration
questions.
Using the Sonos Controller for Mac or PC
1. Select Manage -> Settings (PC) or Sonos -> Preferences (Mac).
2. Select Room Settings.
3. Select the room that is associated with the surround components. It appears as Room (+SUB) or Room (+LS+RS) or
Room (+SUB+LS+RS) on the Room Settings menu.
4. Select the Basic tab, and then select Recalibrate Audio.
5. Follow the prompts to optimize your audio performance:
• If you have a SUB associated with your PLAYBAR, you will be asked to choose between 2 test sounds:
• Press Play to compare the volume of two test sounds, A and B, and then select No Difference, A is louder or
B is louder. If you don’t hear a noticeable difference, select No Difference.
• Press Play to listen to a test sound, and then select the level you prefer.
• If you have surround speakers associated with your PLAYBAR, you will be asked to answer some room configuration
questions.
TV dialog settings
Using a handheld Sonos controller
1. From the Settings menu, select Room Settings.
2. Select the room the PLAYBAR is located in.
3. Select Advanced Audio -> TV Dialog Settings.
4. Audio Delay (Lip Sync). Drag your finger across the slider to increase or decrease the sound delay if the image and the
sound are not in sync.
Using the Sonos Controller for Mac or PC
1. Select Manage -> Settings (PC) or Sonos -> Preferences (Mac).
2. Select Room Settings if it is not already highlighted on the left.
3. Choose the room the PLAYBAR is located in from the Room Settings for drop-down.
4. Select the TV Dialog tab.
5. Click and drag the Audio Delay (Lip Sync) slider to increase or decrease the sound delay if the image and the audio are
not in sync.
6. Close the Settings window when changes are complete.Sonos PLAYBAR 13
Additional TV sound options
Speech Enhancement
The Speech Enhancement setting makes the TV dialog easier to hear. Touch the icon on your Sonos controller’s Now
Playing screen to turn this setting on or off. (If the setting isn’t visible, make sure the room with the PLAYBAR is selected.)
Night Sound
The Night Sound setting adjusts the audio for night time viewing so you can reduce the volume and still experience proper
balance and range. At lower volumes, quiet sounds are enhanced and the intensity of loud sounds is reduced. Touch the icon
on your Sonos controller’s Now Playing screen to turn this setting on or off. (If the setting isn’t visible, make sure the room
with the PLAYBAR is selected.)
TV autoplay
When TV Autoplay is set to On, TV audio automatically plays through the PLAYBAR when you turn on your television—if music
is playing when the TV is turned on, the music immediately stops and the PLAYBAR switches to TV audio. Additionally, if the
PLAYBAR is in a room group when the TV is turned on, it automatically drops from the group. This setting is On by default.
Using a handheld Sonos controller
1. From the Settings menu, select Room Settings.
2. Select the room the PLAYBAR is located in.
3. Select TV Setup and Control -> TV Autoplay.
4. Select On or Off.
Using the Sonos Controller for Mac or PC
1. Select Manage -> Settings (PC) or Sonos -> Preferences (Mac).
2. Select Room Settings if it is not already highlighted on the left.
3. Choose the room the PLAYBAR is located in from the Room Settings for drop-down.
4. Select the TV Setup tab.
5. Check the TV Autoplay checkbox to turn this setting on, uncheck to turn it off.
6. Close the Settings window when changes are complete.
Ungroup on autoplay
As with any Sonos player, you can group and ungroup the PLAYBAR with other rooms. If ungroup on autoplay is checked, any
Sonos rooms that are grouped with the PLAYBAR when the TV is turned on will automatically drop from the group. This
setting is Yes by default.
Using a handheld Sonos controller
1. From the Settings menu, select Room Settings.
2. Select the room the PLAYBAR is located in.
3. Select TV Setup and Control -> Ungroup on Autoplay.14 Product Guide 4. Select Yes or No. Using the Sonos Controller for Mac or PC 1. Select Manage -> Settings (PC) or Sonos -> Preferences (Mac). 2. Select Room Settings if it is not already highlighted on the left. 3. Choose the room the PLAYBAR is located in from the Room Settings for drop-down. 4. Select the TV Setup tab. 5. Check the Ungroup on Autoplay checkbox to turn this setting on, uncheck to turn it off. 6. Close the Settings window when changes are complete. IR signal light A light displays on the PLAYBAR when an IR signal is being sent. If desired, you can adjust this setting so the IR light never displays. This setting is On by default. Using a handheld Sonos controller 1. From the Settings menu, select Room Settings. 2. Select the room the PLAYBAR is located in. 3. Select TV Setup and Control -> IR Signal Light. 4. Select On or Off. Using the Sonos Controller for Mac or PC 1. Select Manage -> Settings (PC) or Sonos -> Preferences (Mac). 2. Select Room Settings if it is not already highlighted on the left. 3. Choose the room the PLAYBAR is located in from the Room Settings for drop-down. 4. Select the TV Setup tab. 5. Check the IR Signal Light checkbox to turn this setting on, uncheck to turn it off. 6. Close the Settings window when changes are complete. IR repeater When the PLAYBAR is placed in front of your TV on a tabletop, it may block the IR sensor on your TV. The IR repeater setting allows the PLAYBAR to repeat the signal to your TV. This setting is On by default. Using a handheld Sonos controller 1. From the Settings menu, select Room Settings. 2. Select the room the PLAYBAR is located in. 3. Select TV Setup and Control -> IR Repeater. 4. Select On or Off.
Sonos PLAYBAR                                                                                                                 15

Using the Sonos Controller for Mac or PC
1. Select Manage -> Settings (PC) or Sonos -> Preferences (Mac).
2. Select Room Settings if it is not already highlighted on the left.
3. Choose the room the PLAYBAR is located in from the Room Settings for drop-down.
4. Select the TV Setup tab.
5. Check the IR Repeater checkbox to turn this setting on, uncheck to turn it off.
6. Close the Settings window when changes are complete.

White status light
A white light displays on the side of the PLAYBAR to indicate that the unit is functioning in normal operation. If desired, you
can turn this indicator light off so that when the PLAYBAR is in normal operation the white light does not display. This setting
is On by default.
If the Status indicator light begins to flash orange, go to http://faq.sonos.com/led for additional information.

Using a handheld Sonos controller
1. From the Settings menu, select Room Settings.
2. Select the room you want to change.
3. Select White Status Light.
4. Select On or Off.

Using the Sonos Controller for Mac or PC
1. Select Manage -> Settings (PC) or Sonos -> Preferences (Mac).
2. Select Room Settings if it is not already highlighted on the left.
3. Choose the room you want to change from the Room Settings for drop-down.
4. From the Basic tab, click the White Status Light On checkbox to turn the light on or uncheck to turn it off.

Changing room names
Using a handheld Sonos controller
1. From the Settings menu, select Room Settings.
2. Select the room you wish to change.
3. Select Room Name.
16                                                                                                             Product Guide

4. Select a new name from the list and touch OK, or select Enter New to type a unique name.

Using the Sonos Controller for Mac or PC
1. Select Manage -> Settings (PC) or Sonos -> Preferences (Mac).
2. Select Room Settings if it is not already highlighted on the left.
3. Choose the room you wish to change from the Room Settings for drop-down list.
4. Choose a new name from the Room Name list.

Sonos SUB
Adding a Sonos SUB
You can pair a SUB with the PLAYBAR to add to your cinematic experience.

Using a handheld Sonos controller
1. From the Settings menu, select Room Settings.
2. Select the room the PLAYBAR is located in.
3. Select Add SUB.
4. Follow the prompts to add the SUB to your Sonos system.

Using the Sonos Controller for Mac or PC
1. Select Manage -> Settings (PC) or Sonos -> Preferences (Mac).
2. Select Room Settings if it is not already highlighted on the left.
3. From the Basic tab, select Add SUB.
4. Follow the prompts to add the SUB to your Sonos system.

SUB settings
Follow the steps below if you wish to make any changes to the SUB settings.

Using a handheld Sonos controller
1. From the Settings menu, select Room Settings.
2. Select the room the PLAYBAR and SUB are located in. It appears as Room (+SUB) on the Room Settings menu.
3. Select Advanced Audio -> SUB Settings.
4. Choose one of the following:
     • SUB: Choose On or Off to turn the sound from the SUB on and off.
     • SUB Level Adjustment: Drag your finger across the slider to increase or decrease the volume of the SUB. (You can use
       this setting to match the subwoofer level to the level of your main speakers.)
     • Placement Adjustment (phase): Select On or Off.
Sonos PLAYBAR 17
Using the Sonos Controller for Mac or PC
1. Select Manage -> Settings (PC) or Sonos -> Preferences (Mac).
2. Select Room Settings if it is not already highlighted on the left.
3. Choose the room the PLAYBAR and SUB are located in from the Room Settings for drop-down. It appears as Room
(+SUB).
4. Select the SUB tab.
5. Choose one of the following:
• SUB: Check to turn the sound from the SUB on; uncheck to turn it off.
• SUB Level Adjustment: Click and drag the slider to increase or decrease the volume of the SUB. (You can use this
setting to match the subwoofer level to the level of your main speakers.)
• Placement Adjustment (phase): Check to turn on; uncheck to turn it off.
Removing a SUB
Using a handheld Sonos controller
1. From the Settings menu, select Room Settings.
2. Select the room the SUB is associated with. It appears as Room (+SUB) on the Room Settings menu.
3. Select Remove SUB.
4. Choose one of the following settings:
• If you want to associate the SUB with a different Sonos player, select Choose Room for SUB and then select another
room.
• If you are not going to use the SUB right now, select Don’t use SUB. It will appear on the Rooms menu as SUB (unused)
until you select it and associate it with another Sonos player.
Using the Sonos Controller for Mac or PC
1. Select Manage -> Settings (PC) or Sonos -> Preferences (Mac).
2. Select Room Settings if it is not already highlighted on the left.
3. Choose the room the PLAYBAR is located in from the Room Settings for drop-down list.
4. From the Basic tab, click Remove SUB.18 Product Guide
Surround Speakers
Adding surround speakers
You can easily pair two PLAY:1 or PLAY:3 products with a PLAYBAR to function as left and right surround channels in your
Sonos surround sound experience. You can either configure surround speakers during the setup process or follow the steps
below to add them later.
• Make sure the Sonos players are the same—you cannot combine a PLAY:1 and a PLAY:3 to function as surround
speakers.
• Pairing surround speakers with your PLAYBAR requires a wired connection so make sure you have a BRIDGE, BOOST or
Sonos player connected to your router with an Ethernet cable before proceeding.
• Be sure to follow the instructions below to set up your surround speakers. Do not create a room group or stereo pair as
these will not achieve the left and right surround channel functionality.
Using a handheld Sonos controller
1. From the Settings menu, select Room Settings.
2. Select the room the PLAYBAR is located in.
3. Select Add Surround Speakers.
4. Follow the prompts to add first a left and then a right surround speaker.
Using the Sonos Controller for Mac or PC
1. Select Manage -> Settings (PC) or Sonos -> Preferences (Mac).
2. Select Room Settings if it is not already highlighted on the left.
3. From the Basic tab, select Add Surround Speakers.
4. Follow the prompts to add first a left and then a right surround speaker.
Surround settings
The default setting is determined by the calibration process. If you wish to make a change, you can follow the steps below.
Using a handheld Sonos controller
1. From the Settings menu, select Room Settings.
2. Select the room the PLAYBAR and surround speakers are located in. It appears as Room (+LS+RS) on the Room Settings
menu.
3. Select Advanced Audio -> Surround Settings.Sonos PLAYBAR 19
4. Choose one of the following:
• Surrounds: Choose On or Off to turn the sound from the surround speakers on and off.
• Surround Level Adjustment: Drag your finger across the slider to increase or decrease the volume of the surround
speakers.
• Music Playback: Choose Ambient (default; subtle, ambient sound) or Full (enables louder, full range sound). This
setting applies only to music playback, not TV audio.
Using the Sonos Controller for Mac or PC
1. Select Manage -> Settings (PC) or Sonos -> Preferences (Mac).
2. Select Room Settings if it is not already highlighted on the left.
3. Choose the room the PLAYBAR and surround speakers are located in from the Room Settings for drop-down.
4. Select the Surrounds tab.
5. Choose one of the following:
• Surrounds: Check to turn the sound from the surround speakers on; uncheck to turn it off.
• Surround Level Adjustment: Click and drag the slider to increase or decrease the volume of the surround speakers.
• Music Playback: Choose Ambient (default; subtle, ambient sound) or Full (enables louder, full range sound). This
setting applies only to music playback, not TV audio.
6. Close the Settings window when changes are complete.
Removing surround speakers
Using a handheld Sonos controller
1. From the Settings menu, select Room Settings.
2. Select the room the surround speakers are associated with. The room name appears as Room (+LS+RS) on the Room
Settings menu.
3. Select Remove Surround Speakers.
4. Select Next to drop the surround sound speakers from your surround system. If these were newly purchased players,
they will appear as Unused on the Rooms menu. If the players existed in your household previously, they revert back to
their previous state.
You can now move them to another room for individual use. If you want to add them back as surround speakers, see "Adding
surround speakers" on page 18 for help.
Using the Sonos Controller for Mac or PC
1. Select Manage -> Settings (PC) or Sonos -> Preferences (Mac).
2. Select Room Settings if it is not already highlighted on the left.
3. Choose the room the PLAYBAR is located in from the Room Settings for drop-down list. The room name appears as
Room (+LS+RS).
4. From the Basic tab, click Remove Surround Speakers. If these were newly purchased players, they will appear as
Unused in the Rooms pane. If the players existed in your household previously, they revert back to their previous state.20 Product Guide
Playing Music
The PLAYBAR doubles as an all-in-one Sonos player that allows you to stream all the music on earth. You can use any Sonos
controller to select music—simply touch to select from the music menu on a handheld controller, or click to
select from the MUSIC pane within the Sonos Controller for Mac or PC.Radio
Note: If TV Autoplay is set to On, the PLAYBAR automatically stops playing music and
switches to TV audio whenever the TV is turned on. For more information, see "TV autoplay" on
page 13.
Radio
Sonos includes a radio guide that provides immediate access to thousands of free Internet radio stations and broadcast
programs. You can easily find radio stations from all over the world—music, news, and variety programming, including
archived shows and podcasts.
To select a radio station, simply select Radio and choose a station.
Music services
A music service is an online music store or online service that sells audio on a per-song, per audiobook, or subscription basis.
Sonos is compatible with several music services - you can visit our Web site at
www.sonos.com/howitworks/music/partners for the latest list. (Some music services may not be available in your country.
Please check the individual music service’s Web site for more information.)
If you are currently subscribed to a music service that’s compatible with Sonos, simply add your music service user name and
password information to Sonos as needed and you’ll have instant access to the music service from your Sonos system.
1. To add a music service, touch Add Music Services from the Sonos music menu on your handheld controller.
2. Select the Sonos-compatible music service you would like to add.
3. Select Add Account, and then follow the on-screen prompts. Your login and password will be verified with the music
service. As soon as your credentials have been verified, the music service displays on the Sonos music menu.
Free music service trials are available in some countries. (Please check the individual music service’s Web site for more
information.) If there is a music service trial visible on the Music Services menu, simply touch it to select. Touch Add
Account -> I’m new to [music service], and then follow the prompts to activate the music trial. After the trial period is up,
you will need to subscribe to the music service to keep the music playing.
Local music library
The Sonos system can play music from any computer or network-attached storage (NAS) device on your home network
where you have shared music folders. During the setup process, you are guided through the process of accessing your local
music library (such as your iTunes library). Over time, you may wish to add or remove folders from this list.Sonos PLAYBAR 21
To make changes to your local music library, select the Settings menu from a handheld Sonos controller and then choose
one of the following options:
• To add a new music folder, select Manage Music Library-> Music Library Setup -> Add New Share.
• To remove a music folders, select Manage Music Library -> Music Library Setup. Touch the share you wish to remove
and then select Remove.
The Sonos system indexes your local music so you can view your music collection by categories (such as artists, albums,
composers, genres, or tracks.) If you add new music, simply update your music index to add this music to your Sonos music
library.
• To update your music library, select Manage Music Library -> Update Music Index Now. If you’d like your music library
to update automatically each day, select Schedule Music Index Updates and then select an update time.
Wireless iTunes playback
You can select and play music and podcasts stored on any iPad, iPhone, or iPod touch that’s on the same network as your
Sonos products. Playback is perfectly synchronized, in any or every room of your home. Simply choose This iPad, This
iPhone, or This iPod touch from the Sonos app on your iOS device to make audio selections and then you can use any Sonos
controller to control playback.
Wireless playback requires Sonos Controller App for iPhone or iPad version 3.8.3 or higher and devices running iOS software
version 6.0 or later.
Wireless playback from Android devices
You can select and play music stored on any Android device that’s on the same network as your Sonos products. Playback is
perfectly synchronized, in any or every room of your home. Simply choose This Mobile Device from the Sonos app on your
Android smartphone or tablet to make audio selections and then you can use any Sonos controller to control playback.
Wireless music playback is compatible with Sonos software update 4.1.1 and higher, and any device running Android 2.1 and
higher. (Wireless playback of podcasts is supported on Android 2.2 and higher.)
Google Play Music (Android devices)
You can play music to your Sonos system directly from the Google Play Music app on any Android device. This feature is
available for both Standard and All Access Google Play Music customers.
To play music directly from the Google Play Music app to your Sonos system, you must have both the Google Play Music app
and the Sonos Controller App installed on your mobile device. Sonos playback from Google Play Music is compatible with
Sonos software update 4.3 and higher, and with any device running Android 2.3 and higher.
Simply open the Google Play Music app and connect to a Sonos room or room group to start the music. When you are
finished, disconnect the Sonos room from the app.22 Product Guide
Wall Mounting
PLAYBAR can be wall mounted above or below your wall-mounted television using the PLAYBAR Wall Mount Kit. To preserve
audio quality, ensure the connector panel faces away from the TV when mounted—the Sonos logo should be farther from
your TV.
Note: It is recommended that you connect the power and audio cables to the PLAYBAR
before mounting on the wall.
What you will need
• PLAYBAR Wall Mount Kit (sold separately)
• Masking tape
• An awl or other pointed tool
• A Phillips head screw driver
• Power drill with Phillips head attachment
1. Hold the PLAYBAR wall mount template (included in the wall mount kit) in the desired position on your wall. The PLAYBAR
can be mounted either above or below your television.
2“(50mm)
For best audio performance, be
sure the connector panel faces
AWAY from the TV when
mounted.
1 “(25mm)
IMPORTANT: For optimal audio performance, Sonos recommends:
When mounting below a television, allow 1 inch (25mm) clearance between the PLAYBAR and
the TV.
When mounting above a television, allow 2 inches (50mm) clearance between the PLAYBAR
and the TV.
2. Use a level (included in wall mount kit) to ensure the template is horizontally level, and then tape the template securely
to the wall.Sonos PLAYBAR 23
3. Use an awl or other sharp object to punch 4 small holes through 4 of the marked locations on the template. (If additional
reinforcement is desired, 2 spare screws and anchors are included in the wall mount kit.) Placement may vary but holes
should be located toward the corners, away from center.
4. Remove the template from the wall.
5. Drill pilot holes.
Because the anchors and screws are designed to be self-starting, this step is optional. However pre-drilling will result in
a more accurate installation. Refer to the table below for more information.
Wall Material Pre Drill Use Wall Anchors Use Screws
Wood Stud with 1/8” (3mm) bit No Yes
Drywall (no stud) with 3/16” (4.5mm) bit Yes Yes
Hard wallboard or double board with 3/16” (4.5mm) bit Yes Yes
Plaster with 1/4” (6.5mm) bit Yes Yes
Concrete or Brick with 1/8” (3mm) bit Yes Yes24 Product Guide
6. Insert and secure the wall anchors (supplied in the wall mount kit).
• If you are drilling into wood stud, do not use the wall anchors.
• If you are drilling into Sheetrock, screw the wall anchors into the drywall with a Phillips head screwdriver until the head
is flat against or slightly below the wall surface, being careful not to overtighten.
Note: The anchors can be installed using a screw gun or a regular power drill with a Phillips
head screwdriver attachment. If you are drilling into sheetrock, the surface of the drywall
may distort slightly or dimple as the anchor is installed. This is not unusual.
7. Fasten the PLAYBAR bracket to the wall using the screws supplied in the wall mount kit. Use the level to verify accuracy a
final time, and then tighten the screws securely.
Note: If using wall anchors, continue to drill for a few seconds even after it appears the
screw is secure— the anchor will likely spin a little as the anchor expands inside the wall.Sonos PLAYBAR 25
8. Hang the PLAYBAR securely on the two (2) bracket pegs.
Basic Troubleshooting
Warning: Do not open the product as there is a risk of electric shock. Under no
circumstances should the product be repaired by anyone other than an authorized Sonos
repair center, as this will invalidate the warranty. Please contact Sonos Customer Support for
more information.
The grill cloth is not removable. Tampering with the cloth may damage your PLAYBAR.
If a problem occurs, you can try the troubleshooting suggestions listed below. If one of these doesn’t remedy the problem, or
you are not sure how to proceed, please contact the Sonos Customer Support team and we’ll be happy to help.
• Customer Support
• Visit our PLAYBAR reference section at http://moreinfo.sonos.com/PLAYBAR
• Visit our Web site at www.sonos.com/support
• Email us at support@sonos.com
PLAYBAR not detected during setup
• Did you allow Sonos to check for updates? The Sonos PLAYBAR requires software version 4.0 or later.
• Is the power cord properly seated? Be sure to push the power cord firmly into the PLAYBAR until it is flush with the
surface.
• If either of these is not the problem, a network issue may be preventing the PLAYBAR from connecting to your Sonos
system. Try moving the Sonos products closer together.26 Product Guide
Eliminating annoying messages on your TV when using a cable, satellite, or set
top box remote
After you disable your TV speakers, your television might display an annoying or confusing message when you adjust the
volume on the PLAYBAR. This could be a message reminding you that your TV speakers are off, or a volume indicator
unrelated to the sound from your PLAYBAR. If you have a programmable remote control, you can try the steps below. These
steps will configure your remote control to send volume commands that are only recognized by the PLAYBAR so the message
no longer appears when you increase or decrease the volume.
You will need to refer to the printed instructions that came with your remote control, or browse the on-screen help menu on
your cable/satellite/set-top box as the specific details will vary. If you cannot locate the instructions for your remote, search
the "Reference Links" on page 32. If your device or service provider is not listed there, please contact your cable service
provider for additional help.
Identify an unused device key
Your remote control can likely control a variety of devices. The device keys are usually located at the top of the remote and
labeled TV/Cable/CBL/STB/DVD/AUX. Identify a device key that is not currently being used (for example, the AUX key).
If your remote will not allow additional devices to be programmed, you might wish to purchase a universal remote to make it
easier to control all your devices. Sonos recommends a Logitech® Harmony® universal remote. See page 27 for more
information.
Program the unused device key
Programming the unused device key will add new volume commands to your remote control.
To perform this step you will need to refer to the printed instructions that came with your remote control or browse the on-
screen help menu on your cable/satellite/set-top box as the specific details will vary by manufacturer. If you cannot locate
the instructions, try searching the "Reference Links" on page 32 or contact your cable service provider for additional help.
• From the list of codes that can be programmed, select a Sonos code if it appears in the list.
• If Sonos does not appear in the list, select a code for any manufacturer brand other than your TV or other devices
connected to the TV. For example if you own a Vizio TV and a Samsung Blu-ray player, choose a Panasonic code from
the list.
• DO NOT initiate an automated search for a code.
Lock your remote control to the new volume commands
Locking volume control to the new device will ensure your remote always sends the new volume commands.
This feature is likely referred to as volume lock or volume punch through in the instructions that accompanied your remote
control.
Configure your PLAYBAR to work with these new volume commands
See "Remote control setup" on page 10 for help with this step.
Verify that the problem is solved
If the problem persists, try repeating the steps above, choosing a different manufacturer brand when programming the
unused device key.Sonos PLAYBAR 27
Eliminating annoying messages on your TV when using a universal remote
After you disable your TV speakers, your television might display an annoying or confusing message whenever you adjust the
volume on the PLAYBAR. This could be a message reminding you that your TV speakers are off, or a volume indicator
unrelated to the sound from your PLAYBAR. Try the steps below to configure your universal remote so this message no longer
appears when you increase or decrease the PLAYBAR’s volume.
If you do not own a universal remote, Sonos recommends you purchase a Logitech® Harmony® remote.
If you are using a Logitech universal remote
If this remote is a new purchase, you will first need to set up a Logitech user account and install the Harmony Remote
software. Then follow the steps below to add the PLAYBAR as a new device.
1. Use the USB cable provided by Logitech to connect your Harmony remote to your computer.
Note: If this remote is a new purchase, you will need to set up a Logitech user account and
install the Harmony Remote software before proceeding.
2. Launch the Logitech Harmony Remote software or go to www.logitech.com\myharmony and login to your account.
(Where you are directed depends on the Logitech universal remote model you purchased.)
3. Select the Add Device setting.
4. Choose one of the following options:
• If you are using Logitech Harmony Remote software:
• Select Sonos as the manufacturer, and enter PLAYBAR as the model name/number. If the Sonos PLAYBAR is not in
their database, you will be asked to add it.
• Confirm that you've entered the information correctly, and then save your changes.
• If you are using My Harmony Web site:
• Type Sonos as the manufacturer and PLAYBAR as the model name. If the Sonos PLAYBAR is not in their database,
you will be asked to confirm your entry or make another choice.
• Confirm that you've entered the information correctly, and then save your changes.
If you are using another universal remote
Please follow the instructions on page 26, “Eliminating annoying messages on your TV when using a cable, satellite, or set
top box remote”.
Turning Off Your Television’s Speakers
During the setup process you are prompted to turn off your TV speakers so the sound comes only through the PLAYBAR.
While Sonos cannot provide instructions for every television model, please try the steps below.
If you cannot find the correct setting to turn off your TV speakers, please consult the owner’s guide that was packaged with
your television.
1. Select the Menu or Setup button on your television’s remote control (not your cable remote control).
An on-screen menu will appear.28 Product Guide
2. Select the menu option that controls your television’s audio functions.
Note: This menu selection is most often labeled Audio, Sound, Tools, or Options or may
display as a musical note icon.
3. Select the appropriate setting to turn off your TV speakers. Depending on your TV make and model, choices may include:
• Off / On
• External Speaker / Television Speaker
• Audio System / Television Speaker
The choice in bold will turn the TV speakers off.
• If none of these are applicable to your television, look for a setting that switches your TV output between variable and
fixed and try switching the setting.
Can’t turn off TV speakers
You should make every effort to turn off your TV’s internal speakers. However some brands, including Toshiba and Dynex,
may not include this setting. If you are unable to turn off the TV speakers, follow the steps below.
1. Using the volume control buttons on your television, turn the TV volume all the way down. Do not use the Mute button.
2. From this point forward use only the volume buttons on your Sonos controller to adjust the PLAYBAR’s volume.Sonos PLAYBAR 29
Indicator Light Explanations
Indicator Lights Player State Sonos Product Additional Information
Solid white Powered up and associated with a BRIDGE, BOOST, If desired, when the product is in normal operation,
Sonos system CONNECT™, SUB, you can turn the white status indicator light on or off
CONNECT:AMP™, DOCK, by selecting White Status Light from the Room
PLAY:1, PLAY:3, Settings menu.
PLAY:5®, PLAYBAR (The SUB indicator will reflect the same setting as
the player it is paired with.)
Flashing white Powering up BRIDGE, BOOST,
CONNECT, SUB,
CONNECT:AMP, DOCK,
PLAY:1, PLAY:3, PLAY:5,
PLAYBAR
Flashing green Powered up, not yet associated with BRIDGE, BOOST, For a SUB, this may indicate the SUB is not yet paired
a Sonos system CONNECT, SUB, with a player.
CONNECT:AMP, DOCK,
PLAY:1, PLAY:3, PLAY:5,
PLAYBAR
Solid green Volume set to zero or muted CONNECT,
CONNECT:AMP, PLAY:1,
PLAY:3, PLAY:5,
PLAYBAR
Slowly flashing green Surround audio is off or PLAY:1, PLAY:3, SUB Applicable for player configured as a PLAYBAR
SUB audio is off surround speaker, or for a SUB paired with a PLAYBAR
Solid orange During wireless setup, this occurs CONNECT, SUB, If the orange light is on AND the player’s volume
while the Sonos open access point is CONNECT:AMP, PLAY:1, level automatically reduces, this indicates the player
temporarily active. PLAY:3, PLAY:5, is in warning mode.
If you are not setting up your Sonos PLAYBAR • Press the Pause button to stop the audio
system, this may indicate warning • Check the vent slot for adequate cooling
mode. • Check the room temperature to make sure it’s
less than 104°F/ 40° C
• If the player is in direct sunlight, provide
shade
• Allow the player to cool for several minutes
and then press Play to restart the audio
• If the problem does not resolve, please
contact Customer Support
Rapidly flashing Playback / Next Track failed CONNECT, Indicates either playback or next track was not
orange CONNECT:AMP, PLAY:1, possible
PLAY:3, PLAY:5,
PLAYBAR30 Product Guide
Indicator Lights Player State Sonos Product Additional Information
Flashing orange During SonosNet setup, this occurs BRIDGE, BOOST,
after a button press while the CONNECT, SUB,
product is searching for a household CONNECT:AMP, DOCK,
to join. PLAY:1, PLAY:3, PLAY:5,
PLAYBAR
Slowly flashing orange Fault mode CONNECT, If the lights are flashing orange and white AND the
and white CONNECT:AMP, PLAY:1, volume automatically mutes, this indicates the
PLAY:3, PLAY:5, player is experiencing a fault condition.
PLAYBAR, SUB • Press the Pause button to stop the audio
• Check the room temperature to make sure it’s
less than 104°F/40° C
• If the player is in direct sunlight, provide
shade
• Allow the product to cool for several minutes
and then press Play to restart the audio
• If the problem does not resolve, please
contact Customer SupportSonos PLAYBAR 31
Important Safety Information
Please read these instructions and heed all warnings. Keep them in a convenient location and make sure everyone in the
household is aware of them.
Location
• Do not place the unit where it will be exposed to excessive heat (e.g., radiators, heat registers, stoves), direct sunlight,
or a dusty environment (e.g., woodworking shop.)
• Do not place the unit where it will be exposed to flammable liquids and/or fumes.
• Do not place the unit in a small confined space (e.g., closet or cabinet, under a bed or sofa) where ventilation is
restricted. Both ends of the PLAYBAR should be at least 1 ft. (30cm) from a wall or other obstruction.
• Protect the power cable from being walked on or pinched, particularly at plugs, convenience receptacles, and the point
where it exits the product. The mains cord should be readily available to disconnect the power.
• The product should not be used near water—avoid close proximity to a bathtub, kitchen sink, laundry tub, wet
basement, swimming pool, etc.
• If the unit is being wall-mounted, use the PLAYBAR Wall Mount Kit (purchased separately) and follow the instructions
carefully. Improper or inadequate installation could cause your device to fall, resulting in personal injury.
Proper Ventilation
• Leave one inch of open space around the sides and above the unit to ensure proper ventilation.
• Ventilation should not be impeded by covering the ventilation openings with items such as tablecloths, curtains, or
papers.
• Do not let foreign objects into the unit. If a foreign object should get into the unit, unplug the unit and contact Sonos
for servicing guidance.
Usage
• Do not operate or handle the product with wet hands.
• Do not place any object on top of the product (e.g. vase, coffee cup, potted plant, books, magazines, etc.)
• Only use attachment/accessories specified by Sonos.
• Unplug the power cord during lightning storms or when unused for long periods of time.
• Never disassemble or modify the product in any way.
• If the PLAYBAR is wall-mounted, never hang from the PLAYBAR or the wall mount bracket.
• If the PLAYBAR is wall-mounted, perform safety checks on a regular basis to ensure screws remain tightened securely.
Cleaning & Maintenance
• Keep the PLAYBAR fabric free from dust, pet hair, and other fine particles.
• To clean the fabric, use a vacuum with a hose or non-moving bristle attachment. Do not vacuum with a rotating bristle
attachment.32 Product Guide
• A lint brush can be used to smooth out visible lines in the fabric. Do not clean fabric with a lint roller.
• Clean non-fabric portions of the PLAYBAR only with a dry, soft cloth. Household cleaners or solvents may damage the
finish on your Sonos products.
• Do not use chemical solvents (e.g. alcohol, benzene, paint thinner) or other flammable cleaning liquids.
• Refer all servicing to Sonos qualified service personnel. Servicing is required when the unit or the power cord has been
damaged in any way, if liquid or other foreign matter has fallen into the ventilation openings, or the unit has been
exposed to rain or moisture.
Warning: To reduce the risk of fire or electric shock, do not expose this apparatus to rain or
moisture.
Reference Links
If you need assistance with your television or one of the devices connected to your TV, you will find several user guides
available online at http://tv.manualsonline.com/.
If you can’t find what you are looking for, try one of the cable service provider links below to access additional help.
AT&T
www.att.com/esupport/
BRIGHT HOUSE NETWORKS
http://support.brighthouse.com
BT VISION
http://www.bt.com/help/home
CABLEVISION (OPTIMUM)
www.optimum.net/Support/Guides
CABLENET
http://cablenet.com.cy/faqs/
CHARTER
www.myaccount.charter.com/customers/support.aspx
COMCAST
http://customer.comcast.com/help-and-support/cable-tv
COX
www.cox.com/support/digitalcable/hdtv/
CYFROWY POLSAT
www.cyfrowypolsat.pl/
DIRECT TV
http://support.directv.com/
DISH NETWORK
www.mydish.com/support/manualsSonos PLAYBAR 33
KABEL DEUTSCHLAND
www.kabeldeutschland.de/info-service/
RCN
www.rcn.com/help
SKY DIGITAL
www.sky.com/helpcentre/
TIME WARNER CABLE
www.timewarnercable.com/support/
VERIZON
www22.verizon.com/Support/Residential/tv.htm
VIRGIN MEDIA
http://help.virginmedia.com/system
PLAYBAR Specifications
Feature Description
Audio
Amplifier Nine Class-D digital amplifiers perfectly tuned to match the speakers and acoustic
architecture.
Speakers Nine amplified speakers—six midrange and three tweeters.
PLAYBAR’s automatic equalization means the system self-adjusts for rich, seamless
performance.
3.0 Home Theater PLAYBAR’s nine-speaker design plunges you into the cinematic action with huge waves of
sound that capture every whisper and footfall. The player connects to your TV with a single
cable and plays all sources, including satellite boxes and game consoles.
3.1 Home Theater Pair PLAYBAR with SUB, and with the push of a button you can add spine-curling bass to your
cinematic experience—wirelessly.
5.1 Home Theater Add PLAY:1 or PLAY:3 speakers to your PLAYBAR and SUB for a true surround sound experience.
Sleek and understated with wireless control, this deeply immersive home theater experience
wraps you in crystal-clear, state-of-the-art Sonos sound.
System Requirements TV with optical audio output, broadband Internet, one Sonos product wired to router, and a
Sonos Controller App.You can also read