Z-E2055 - INFOTAINER USER MANUAL EN - Zenec

Page created by Armando Romero
 
CONTINUE READING
Z-E2055 - INFOTAINER USER MANUAL EN - Zenec
Z-E2055

  INFOTAINER
USER MANUAL
         EN
Z-E2055 - INFOTAINER USER MANUAL EN - Zenec
Device user manual for ZENEC media system

We are delighted that you have chosen a product from ZENEC.                                                                                                   BLUETOOTH (HANDS-FREE SYSTEM)............................................................................................36
                                                                                                                                                              CONTROL AND OPERATION BAR (RIGHT)..................................................................................... 37
Please read this operating manual before you start your new ZENEC system. In this device user                                                                 DEVICE MANAGER.............................................................................................................................38
manual you will find important instructions and information for the safe operation of the ZENEC                                                               PAIRING...............................................................................................................................................39
system, and to help you make the most of its technical advantages.                                                                                            BLUETOOTH SETUP...........................................................................................................................40
                                                                                                                                                              BLUETOOTH STATUS BAR................................................................................................................40
All the information in this manual corresponds to the state at the time of going to press, and applies
                                                                                                                                                              ACCEPTING/ENDING INCOMING CALLS (VIA DEVICE)................................................................ 41
only to ZENEC systems in original condition. On account of possible updates to device software, the
                                                                                                                                                              OUTGOING CALL VIA NUMERIC PAD.............................................................................................. 41
illustrations and features shown in this operating manual may be different from your ZENEC system.
                                                                                                                                                              OUTGOING CALL VIA PHONEBOOK................................................................................................ 41
Differences in the information, illustrations or features cannot form a basis for any claims.
                                                                                                                                                              BLUETOOTH MENU............................................................................................................................ 42
If you sell your vehicle with the ZENEC system still fitted, please ensure that this operating manual                                                         PHONEBOOK......................................................................................................................................43
stays with the vehicle, and that any personal data like a phonebook stored in the device is deleted.                                                          CALL LISTS.........................................................................................................................................44
                                                                                                                                                              FAVORITES..........................................................................................................................................45

                                                                                                                                                              SETUP OPERATIONS.........................................................................................................................46
                                                                                                                                                              DISPLAY ICON (BRIGHTNESS)......................................................................................................... 47
                                                                                                                                                              SETUP OF SOURCES.........................................................................................................................48
                                                                                                                                                              MISC SETUP........................................................................................................................................49
                                                                                                                                                              AUDIO SETUP......................................................................................................................................50
  CONTENTS
                                                                                                                                                              VOLUME SETUP.................................................................................................................................. 51
SAFETY INSTRUCTIONS...................................................................................................................04                      QUICK AUDIO SETUP (BAL/FAD/SUBWOOFER/LOUDNESS/BASS BOOST)............................. 52
TURN DEVICE ON AND OFF .............................................................................................................05                        AUDIO SETUP: EXPERT MODE.........................................................................................................53
ANTI-THEFT PROTECTION................................................................................................................05                       AUDIO VOLUME – BASE LEVEL SETUP..........................................................................................54
MULTIFUNCTION STEERING WHEEL CONTROLS.........................................................................06                                              BALANCE / FADER.............................................................................................................................55
Z-E2055 (FRONT PANEL)................................................................................................................... 07                   EQUALIZER.........................................................................................................................................56
MAIN MENU ICONS.................................................................................................................................08            X-OVER SETUP...................................................................................................................................57
MEDIA AUDIO SOURCES ..................................................................................................................09                      SUBWOOFER SETUP.........................................................................................................................58
INPUT SOURCES................................................................................................................................. 10             TIME ALIGNMENT...............................................................................................................................59
STATUS BAR....................................................................................................................................... 11          TFT DISPLAY CONFIGURATIONS.....................................................................................................60
SEARCH AND INPUT FUNCTION...................................................................................................... 12                            CAR (VEHICLE) SETUP...................................................................................................................... 61
                                                                                                                                                              AIR CONDITIONING (AC INFO) .........................................................................................................62
UKW (FM) RADIO................................................................................................................................ 13             DYNAMIC INDICATION OF THE SEAT HEAT...................................................................................63
FM BAR GRAPH MODE...................................................................................................................... 14                    INPUT SETUP......................................................................................................................................64
MANUAL FM STATION SEARCH....................................................................................................... 15                            SYSTEM SETUP..................................................................................................................................65
UKW SETUP (FM)................................................................................................................................ 16             CAR INFORMATION (VEHICLE STATUS)................................................................................... 66-67
DAB+ RADIO SETUP....................................................................................................................... ...17                 CLOCK TIME........................................................................................................................................68
DAB+ ENSEMBLE AND STATION LIST............................................................................................ 18                                 SOFTWARE VERSION .......................................................................................................................69
DAB+ SETUP....................................................................................................................................... 19          PASSWORD......................................................................................................................................... 70
DAB+ STATIONS-PRESETS...............................................................................................................20
USB / BT A2DP / IPOD (AUDIO) MEDIA............................................................................................ 21                             INSTALLATION NOTES...................................................................................................................... 71
USB / BT A2DP / IPOD (AUDIO) MEDIA CONTROL AND OPERATION BAR................................22                                                                REMOVAL WORK AND PREPARATION........................................................................................... 71
BT-MUSIC (A2DP) ..............................................................................................................................23              OVERVIEW ACCESSORIES............................................................................................................... 72
iPOD (AUDIO)...................................................................................................................................... 24         COMMISSIONING.................................................................................................................................72
PLAYLIST (AUDIO) ............................................................................................................................. 25             CONNECTION DIAGRAM Z-E2055...............................................................................................73-74
SMART PLAYLIST (AUDIO)................................................................................................................26                      ABBREVIATIONS / GENERAL........................................................................................................... 75
FAV PLAYLIST (AUDIO)...................................................................................................................... 27                 STATUTORY RIGHTS AND WARRANTY.....................................................................................76-77
VIDEO MEDIA: HARDDISK................................................................................................................28
PLAYLIST (VIDEO)..............................................................................................................................29
HDMI.....................................................................................................................................................30
CAMERA.............................................................................................................................................. 31
ANDROID AUTO.............................................................................................................................32-33
APPLE CARPLAY................................................................................................................................34
APPLE CARPLAY OPERATION.........................................................................................................35

2 Rev.B                                                                                                                                                                                                                                                                                                      3 Rev.B
Z-E2055 - INFOTAINER USER MANUAL EN - Zenec
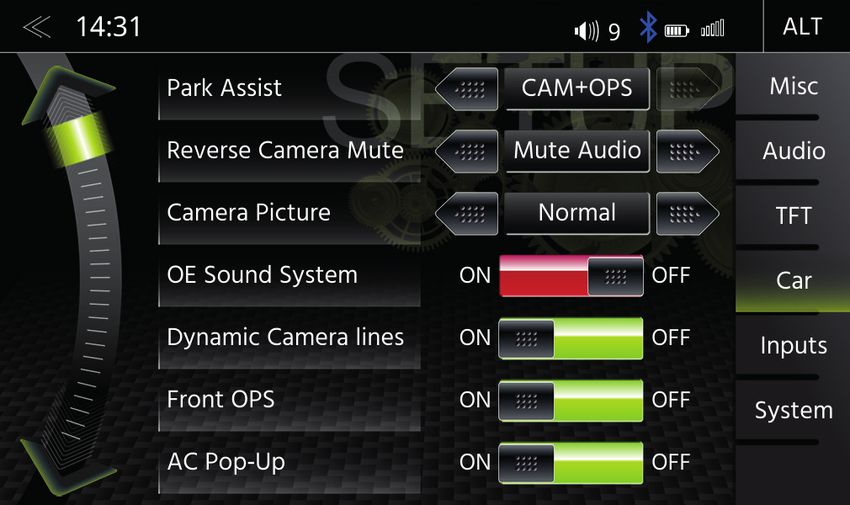
SAFETY INSTRUCTIONS                                                                                      TURN ON / OFF

                                                                                                         Manual On / Off Z-E2055
     CAUTION
                                                                                                                   Press the power button (fig. S/7 ), to turn the ZENEC system on, press and hold the power
  If the driver of the vehicle is distracted, this may lead to an accident or injury. Operating the                button to switch off the device.
  ZENEC system can distract attention from the general traffic situation! Equally, connecting,
  changing or inserting data media can distract the driver from the general traffic situation.
                                                                                                         Automatic On / Off
     CAUTION                                                                                             Vehicles without CAN bus:
  Always choose loudspeaker settings such that acoustic signals coming from outside can always           The device automatically switches on/off by ignition signal.
  be heard in the vehicle (e.g. signal horns or sirens).                                                                                                                                                           GERÄTEBEDIENUNG – Z-E3726
                                                                                                         Vehicles with CAN/Stalk interface:
                                                                                                         Switching on the ignition will activate the ZENEC system.
                                                                                                                                            GRUNDSÄTZLICHE            The boot process can take up to 1.5
                                                                                                                                                                   BEDIENUNG
     CAUTION                                                                                             minutes. This may result in some delay until the system is ready. The ZENEC system is shut down by
                                                                                                                                            EIN-/AUSSCHALTEN
  Incorrect installation or commissioning of the ZENEC system may cause damage to the ZENEC              switching off the ignition, or removing the ignition key.
                                                                                                                                                    Manuelle Ein-/Ausschaltung
  system or to the vehicle electronics. Only let qualified specialists authorized by ZENEC install the
  device.
                                                                                                                                                                Drehregler links gedrückt halten, bis sich das ZENEC-System ein- oder ausschaltet
                                                                                                                                                                (Abb. S/01 )
                                                                                                              NOTE
      CAUTION                                                                                              Use of the multifunction steering wheel and
                                                                                                                                          Automatische     other vehicle functions will require a vehicle-specific
                                                                                                                                                       Ein-/Ausschaltung
                                                                                                           CAN/Stalk interface. Further information may be obtained from an authorized ZENEC dealer.
  This ZENEC system is intended solely for operation at an on-board voltage of 12 V DC. Operating                                                    Fahrzeuge mit CAN-Bus Anbindung: Bei Einschalten der Zündung wird das ZENEC-System
  the ZENEC system at any other voltage can cause damage to the ZENEC system or to the vehicle                                                        aktiviert. Der Bootvorgang kann max. 1,5 Minuten in Anspruch nehmen. Dies kann zur Folge
                                                                                                                                                      haben, dass das System nur mit Verzögerung einsatzbereit ist. Das Ausschalten des ZENEC-
  electrical system.
                                                                                                                                                      Systems wird durch das Ausschalten der Zündung oder Abziehen des Zündschlüssels aktiviert.

                                                                                                                                                        HINWEIS
                                                                                                                                                    Für eine Nutzung des Multifunktionslenkrads sowie weiterer Fahrzeugfunktionen wird ein
      CAUTION                                                                                                                                       fahrzeugspezifisches CAN/Stalk Interface benötigt. Weitere Informationen erhalten Sie bei einem
                                                                                                                                                    autorisierten ZENEC-Fachhändler.
  Taking apart or modifying the ZENEC system can result in damage to the device or the vehicle.
  Opening the device or modification by a person not authorized by ZENEC will render warranty            ANTI-THEFT PROTECTION
  claims null and void.                                                                                                                             DIEBSTAHLSICHERUNG
                                                                                                         The ZENEC system is equipped Das
                                                                                                                                        with  an anti-theft protection function. If this is active, on restarting
                                                                                                                                            ZENEC-System ist mit einer Diebstahlschutzfunktion ausgestattet. Ist diese aktiv, werden Sie nach
  In the event of a malfunction or defect please contact an authorized ZENEC dealer. Unauthorized        the ZENEC system after interruption  of der
                                                                                                                                                 theStromversorgung
                                                                                                                                                      power supply          you will    be asked       to enter your          password.
                                                                                                                                        Trennung                      bei erneutem  Einschalten des ZENEC-Systems       aufgefordert, das von
  repairs will render warranty claims null and void.                                                                                                Ihnen hinterlegte Password einzugeben.
                                                                                                         To change the password:                    Um das Passwort zu ändern:

      CAUTION                                                                                                                                       Bedienungsanleitung  Einstellungen  Geräte Konfiguration  Help  Passwort
                                                                                                         Device User Manual → Setup → Device Setup → Password
  The connection and charging leads of external mobile devices can get in the way of the driver.
  Please run these so that the driver's freedom of movement is not hindered.                                                                              HINWEIS
                                                                                                                                           Bewahren Sie das
                                                                                                                                           Passwort sorgfältig auf.
                                                                                                              NOTE                         Bei einem Verlust des
                                                                                                                                           Passworts muss das
                                                                                                           Keep your password safe. If theZENEC-System
                                                                                                                                             password           is
                                                                                                                                                            ausgebaut
                                                                                                           lost the ZENEC system must beund     zur Freischaltung des
                                                                                                                                              uninstalled,
                                                                                                                                           Diebstahlschutzes   an den
                                                                                                           and sent back in to ZENEC Service        to
                                                                                                                                           ZENEC-Service
                                                                                                                                           eingesendet werden.
                                                                                                           unblock the anti-theft protection. This
                                                                                                                                           Dieser      service
                                                                                                                                                   Dienst ist
                                                                                                           is not free!                    kostenpflichtig!

                                                                                                         See detailed information at page 70
                                                                                                                                                      Z-E3726                                                                                               5

4 Rev.B                                                                                                                                                                                                                                               5 Rev.B
Z-E2055 - INFOTAINER USER MANUAL EN - Zenec
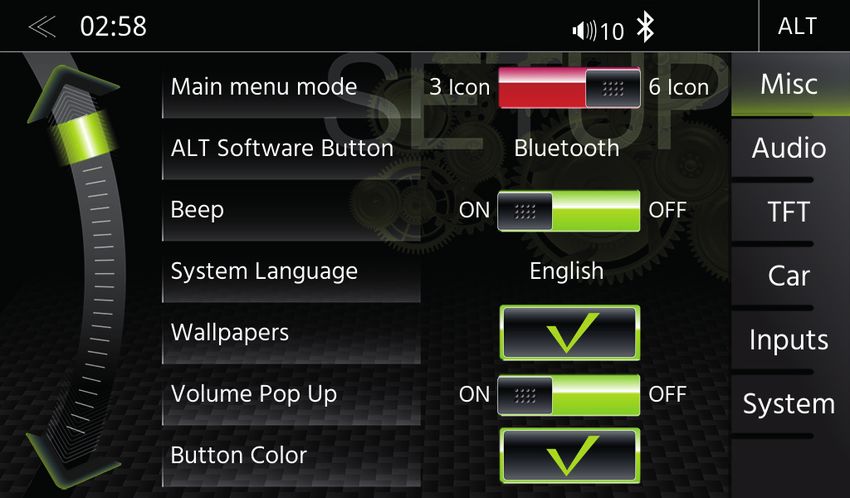
MULTIFUNCTION STEERING WHEEL                                                      Z-E2055 (FRONT PANEL)




                          





                                                                                                                                                         
                                                                                  Device Front Panel Control Options

 Item     Icon   Function                                                          Item       Icon       Function

   1             Reduce volume                                                       1                   Internal Bluetooth microphone

   2             Increase volume

                                                                                     2                   Press, or press and hold to decrease the playback volume
    3            Mute

                 Radio source    Press to choose the next radio station.
                                                                                     3                   Press, or press and hold to increase the playback volume
   4      |     Media           Press to choose the next track/title.
                 source          Press and hold to fast forward.
                                                                                                         Tap to jump back to main menu
                                                                                     4
                 Radio source    Press to choose the previous radio station.                             Press and hold jump to audio settings
   5      |
                 Media           Press to choose the previous next track/title.
                 source          Press and hold to fast rewind.                                          Tap to start the Android and CarPlay voice control. Tap once more to
                                                                                     5
                                                                                                         cancel the voice control.Tap and hold to restart the voice input.
   6             Accept call

   7             Reject / End call                                                   6                   Press to mute device, press and hold to turn device ON or OFF

   8             Voice (not supported)
                                                                                     7                   Reset pin to perform hardware reset

6 Rev.B                                                                                                                                                                         7 Rev.B
Z-E2055 - INFOTAINER USER MANUAL EN - Zenec
MAIN MENU ICONS                                                                                MEDIA AUDIO SOURCES

You can navigate through main menu pages by swiping or tapping on the orange page markers in   You can access / enter connected internal or external sources by tapping on the main icon according
the bottom area of each page.                                                                  to the following list.

 Function             Icon       Operation                                                      Function              Icon       Operation

 USB                             Tap to enter USB source                                        USB                              Tap to enter USB source

 CarPlay                         Tap to start Apple CarPlay                                     CarPlay                          Tap to start Apple CarPlay

 Android Auto                    Tap to start Android Auto                                      BT-Music                         Tap to open BT-Music source

 DAB+                            Tap to open DAB+ radio source                                  DAB+                             Tap to open DAB+ radio source

 HDMI                            Tap to open HDMI source                                        Tuner FM                         Tap to open FM radio source

 CAMERA                          Tap to open the camera source                                  Android Auto                     Tap to start Android Auto

8 Rev.B                                                                                                                                                                                     9 Rev.B
Z-E2055 - INFOTAINER USER MANUAL EN - Zenec
INPUT SOURCES                                                                                      STATUS BAR (”INFO BAR”)

                                                                                                                       Screenshot fehlt

To select and open external sources like HDMI, Camera, AV/IN, CarPlay or Android Auto, they need   The „info bar in the upper hand screen area shows TA, volume and time but also contains two
to be paired or physically connected to the device.                                                important controls for device operation: BACK (left side) and ALT (right side).

Input Sources

 Function              Icon       Operation                                                         Function              Icon       Operation

                                                                                                    Back                             Tap to jump one level up or back
 HDMI                             Tap to open HDMI source

                                                                                                    Clock Time                       Display of time (no interaction possible)

 Camera                           Tap to enter camera source
                                                                                                    Traffic
                                                                                                                                     Traffic announcement (if function is set to active)
                                                                                                    Announcement

 Android Auto                     Tap to start Android Auto                                         Volume                           Shows the current playback volume

                                                                                                                                     Tap to select / start a previously assigned function
                                                                                                    ALT
 CarPlay                          Tap to start Apple CarPlay                                                                         Settings → Misc → ALT Software button

 AV/IN                            Tap to open AV/IN source

     NOTE
  Icons in the main menu remain greyed out for sources not connected to device.

10 Rev.B                                                                                                                                                                                         11 Rev.B
Z-E2055 - INFOTAINER USER MANUAL EN - Zenec
SEARCH AND INPUT FUNCTION                                                                       UKW (FM) RADIO

The keyboard for search and input is based on the Linux OS system layout. The system language   The FM RDS source menu offers a control-/operating section on the right hand side, for fast and
selection will automatically assign QUERTY or QWERTZ layout.                                    convenient adjustments during the FM radio playback.
                                                                                                Center Section of Display
 Function              Icon      Operation                                                       Function              Icon       Operation
                                                                                                                                  Tap to start the auto FM station search, running up in the
 Search input                    Input box                                                       Station forward
                                                                                                                                  frequency band
 area                            Tap to reopen the keyboard
                                                                                                 Station                          Station Name / Station Frequency
                                 Tap to delete a number, letter or sign
 Delete                                                                                                                           Tap to start auto FM station search, running down in the
                                 Press and hold to delete the full string                        Station back
                                                                                                                                  frequency band

                                                                                                 Cover                            Shows radio station graphics or cover picture of artist
 Back                            Tap to end the search or the input
                                                                                                 Info display                     Finger swiping left and right to access stored FM stations
                                                                                                 area                             previous / next
 List view                       Tap to show all search results/- full list
                                                                                                Control- and Operating Section
                                                                                                 Function              Icon       Operation
 Close                           Tap to close the keyboard                                       FM / DAB
                                                                                                                                  Tap to switch to DAB
                                                                                                 Switch

                                                                                                 Info                             Tap to show station information

                                                                                                 Frequency
                                                                                                                                  Tap to open FM station frequency bar
                                                                                                 Scale

                                                                                                 Preset                           Tap to show the stored FM station list

                                                                                                 Tuner Setup                      Tuner settings

                                                                                                 AS                               Tap to start FM auto station search

                                                                                                                                  Tap to activate or de-activate the auto switching of RDS traffic
                                                                                                 TA
                                                                                                                                  announcements
12 Rev.B                                                                                                                                                                                       13 Rev.B
Z-E2055 - INFOTAINER USER MANUAL EN - Zenec
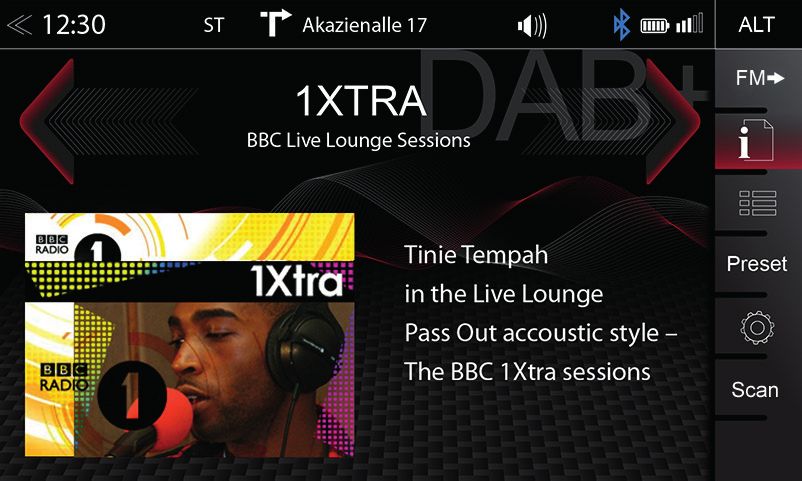
FM BAR GRAPH MODE                                                                                    MANUAL FM STATION SEARCH

The FM setup mode (press gear icon) allows to assign two different operation modes to both station   When you tap to the frequency display area, the numeric input keyboard opens for a direct station
frequency arrows: manual steps in 100kHz, or auto scan (stopping at next station). See page 18.      frequency input.

 Function                 Icon      Operation                                                         Function                Icon       Operation

 Station Frequency                  Tap to start manual 100kHz jump, or FM station auto search        Station
                                                                                                                                         Tap to auto seek / manual seek up, depending on setting
 UP                                 up                                                                Frequency UP

 Station                                                                                              Station
                                    Tap to open the direct frequency input mode keyboard                                                 Tap to open and close direct station frequency input via keypad
 Frequency                                                                                            Frequency
                                                                                                      Station Frequency
 Station Frequency                  Tap to start manual 100kHz jump, or FM station auto search                                           Tap to auto seek / manual seek down, depending on setting
                                                                                                      DOWN
 DOWN                               down
                                    Press and hold to slide the frequency pointer of the bar graph    Scale                              Radio frequency scale display
 Bar Graph Scale                    into any position. Tap to set a desired frequency value on the
                                    scale                                                                                                Tap to delete a number
                                                                                                      Delete
                                                                                                                                         Press and hold to delete the full text string

                                                                                                      Keypad                             Direct frequency input option

                                                                                                      OK                                 Touch to confirm frequency

                                                                                                     Control- and Operating Section
                                                                                                      FM / DAB
                                                                                                                                         Tap to switch to DAB
                                                                                                      Switch

                                                                                                      Information                        Tap to show station information

                                                                                                      Frequency
                                                                                                                                         Tap to open FM station frequency bar
                                                                                                      Scale

                                                                                                      Preset                             Tap to show the stored FM station list

                                                                                                      Tuner Setup                        Tap to change settings for Tuner FM

                                                                                                                                         Tap to activate or de-activate the auto switching of RDS traffic
                                                                                                      TA
                                                                                                                                         announcements
14 Rev.B                                                                                                                                                                                            15 Rev.B
Z-E2055 - INFOTAINER USER MANUAL EN - Zenec
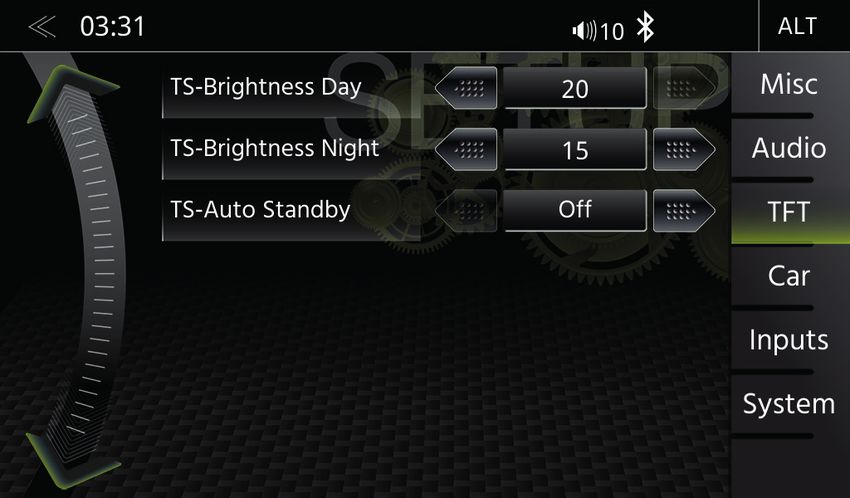
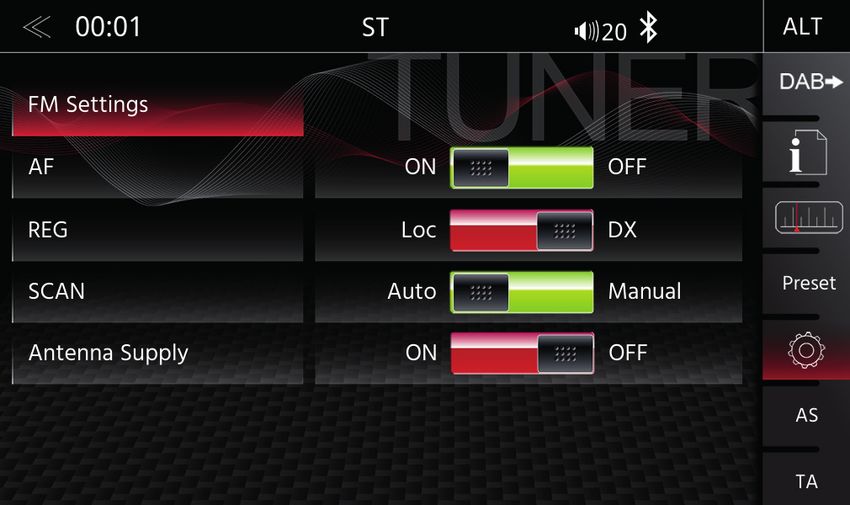
UKW SETUP (FM)                                                                                     DAB+ RADIO SETUP

Here you can set important FM RDS based settings such are AF and REG.                              The DAB+ source menu offers a control- + operating section on the right side of the display, allowing
                                                                                                   for simple and convenient direct adjustments in the playback menu.

 Function             Icon      Operation                                                           Function               Icon       Operation
                                                                                                                                      Tap to jump to next station
 AF                             Alternative Frequency ON / OFF                                      Station up
                                                                                                                                      Press and hold to jump to next Ensemble

 REG                            Setting to keep AF in the regional (local) station tuning mode.     Station                           Station Name / Ensemble info

                                Setting to choose the automatic or manual station frequency                                           Tap to jump to previous station
 SCAN                                                                                               Station down
                                search.                                                                                               Press and hold to jump to previous Ensemble

                                Tap to activate or de-activate the auto switching of RDS traffic
 TA                                                                                                 Slideshow                         Radio station artwork / artist display (”MOT Slideshow”)
                                announcements
 FM
                                Tap to turn the 12V phantom power supply of the FM antenna          Info Display
 antenna socket                                                                                                                       Finger swiping left and right to switch between Preset stations
                                socket on the device backside ON or OFF                             Area
 phantom power
                                                                                                   Control- and Operating Section

                                                                                                    Function               Icon       Operation
                                                                                                    UKW / DAB+
                                                                                                                                      Tap to switch between FM / DAB +
                                                                                                    Switch

                                                                                                    Info                              Tap to show station information - main display

                                                                                                                                      Tap to open the station list (showing all currently receivable
                                                                                                    List
                                                                                                                                      radio stations in the environment)

                                                                                                    Preset                            Tap to show the stored DAB station list

                                                                                                    Setup                             Tap to change settings for DAB+ functions

                                                                                                                                      Tap to start full station search.
                                                                                                    Scan                  Scan
                                                                                                                                      Press and hold to delete the station list and start station search
16 Rev.B                                                                                                                                                                                           17 Rev.B
Z-E2055 - INFOTAINER USER MANUAL EN - Zenec
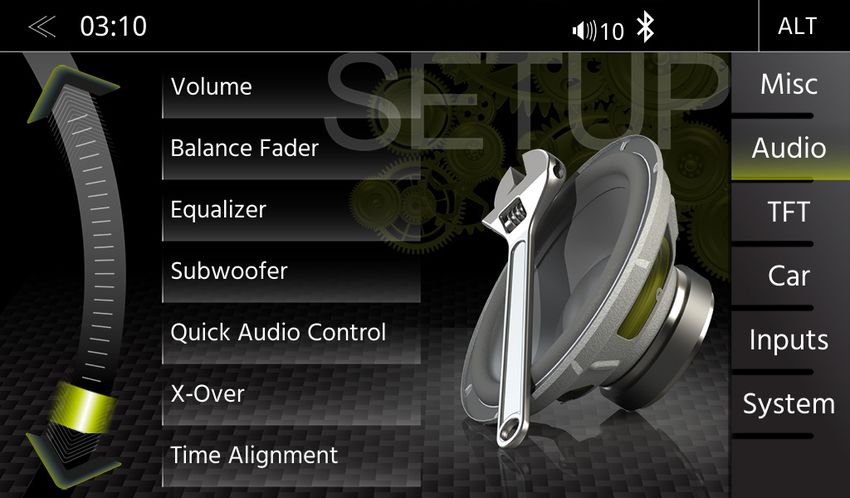
DAB+ ENSEMBLE AND STATION LIST                                                                            DAB+ SETUP

Once the first DAB+ band scan has completed, device will show all DAB+ Ensembles and radio                The setup page for the DAB+ tuner allows to define important functions such as DABDAB service
stations of sufficient signal strength. The ensemble list and content can be updated via using the scan   following. Or to activate the phantom power supply voltage of the DAB antenna socket.
button.

 Function              Icon      Operation                                                                 Function                Icon       Operation
 Ensemble list                   Tap to open an Ensemble, showing the assigned DAB+ radio
 selection                       station list                                                              Comfort Scan                       Tap to turn the comfort scan ON or OFF
                                 Press and hold to move the slider of the Ensemble list up and
 List scrolling
                                 down                                                                      DAB-DAB
                                                                                                           Service                            Tap to turn DAB-DAB station following ON or OFF
 Back                            Tap to jump one level back or up                                          Following

                                                                                                           DAB
                                                                                                                                              Displays the current DAB Firmware version
                                                                                                           Firmware

                                                                                                           DAB
                                                                                                                                              Tap to turn the 12V phantom power supply of the DAB
                                                                                                           antenna socket
                                                                                                                                              antenna socket on the device backside ON or OFF
                                                                                                           phantom power

A tap on each Ensemble opens the related DAB+ station list of the respective Ensemble. The station
list content follows exactly the original Ensemble display format and list sequence.

 Function               Icon       Operation
 Radio station
                                  Tap to select one particular radio station out of the list
 selection

 List scrolling                   Press and hold to move the slider of the station list up and down

18 Rev.B                                                                                                                                                                                            19 Rev.B
DAB+ STATIONS-PRESETS                                                                                USB / BT A2DP / iPOD (AUDIO) MEDIA

Select a previously stored DAB+ radio station by tapping on the station preset button.               Various types of information shown in the source menu of the audio playback by (USB, BT A2DP,
                                                                                                     iPOD, etc.).

 Function               Icon       Operation                                                          Function                Icon      Operation

 Previous
                                   Tap to switch to previous preset page                              Album, Art /                      If a cover is stored on the music media, it can be displayed.
 page
                                                                                                      Cover                             This function is not supported for BT Audio playback.

 Next
                                   Tap to switch to next preset page
 page                                                                                                 Interpret                         Information about the artist

                                   Tap to select a stored DAB+ station. Press and hold the station    Track                             Information about the track
 Stores                            to save the actual radio station on any of the station preset
                                   buttons                                                            Album                             Information about the album

                                                                                                      Genre                             Information about the genre or any other special infos

                                                                                                                                        Tap to skip to the previous track
                                                                                                                                        Press and hold to start fast reverse
                                                                                                      Back
                                                                                                                                        Swipe to the left to skip forwards to the next track

                                                                                                      Play                              Tap to play a track

                                                                                                      Pause                             Tap to pause at a track

                                                                                                                                        Tap to skip to the next track
                                                                                                                                        Press and hold to start fast forward
                                                                                                      Forward
                                                                                                                                        Swipe to the right to skip back to the previous track

                                                                                                      Playback Time
                                                                                                                                        Tap or slide to skip within a track
                                                                                                      Line

20 Rev.B                                                                                                                                                                                          21 Rev.B
USB / BT A2DP / iPOD (AUDIO) MEDIA CONTROL AND OPERATION BAR                                         BT MUSIC (A2DP)

The control and operation bar on the right side of the audio playback media menu continues to play   The A2DP RVC interface offers Play, Pause and Skip control of previously paired smartphones in
lists, favorites, and external USB memory.                                                           audio playback mode. The iD3-Tag meta data display is possible only when tag data is contained in
                                                                                                     the streamed music track.

 Function               Icon      Operation                                                              NOTE
                                  Tap to display the folder and list                                  The listed functions depend on the paired mobile phone, installed software versions and the
 Playlist                                                                                             degree of compatibility.
                                  This function is not supported for BT Audio playback.

                                  Tap to add a track to own playlist
 Smart Playlist
                                  This function is not supported for BT Audio and iPod

                                  Tap to add a track to FAV playlist
 Favorites
                                  This function is not supported for BT Audio and iPod

 Video  Audio                  Tap to switch between audio or video playback. This function is
 Source                           not supported for BT Audio and iPod

                                  Tap to turn on the random play feature within the folder that is
 Shuffle
                                  playing

                                  Tap to automatically repeat a track or a complete music
 Repeat
                                  collection

                                  Touch to jump to next available source
 Source
                                  (Available sources USB, iPod and BT-Music)

22 Rev.B                                                                                                                                                                                            23 Rev.B
iPOD (AUDIO)                                                                                         PLAYLIST (AUDIO)

The order of the Artist display of is given by the sorting sequence on the mobile Apple device and   There are different playlists. We generally differentiate between the standard and special playlists
can not be changed or adapted in any way.                                                            (Smart Playlist and Favorites Playlist).

                                                                                                      Function               Icon       Operation
                                                                                                      Folder
                                                                                                                                        Tap to go to the next higher level
                                                                                                      (uppermost)
                                                                                                                                        Touch to go to the highest folder level
                                                                                                      Folder
                                                                                                                                        Hold to go to the hard disk overview (root)

                                                                                                      Song                              Listing by song

                                                                                                      Interpret                         Listing by artist

                                                                                                      Album                             Listing by album

                                                                                                      Smart Playlist                    Tap to access the Smart Playlist (Shows created Playlists)

                                                                                                      FAV List                          Tap to access the FAV playlist

                                                                                                      Search                            Tap to open search keypad

                                                                                                                                        Scroll in the list:
                                                                                                      Scroll                            Touch and hold to move the slider up or down
                                                                                                                                        Tap and hold your finger on the list to move the list up or down

24 Rev.B                                                                                                                                                                                             25 Rev.B
SMART PLAYLIST (AUDIO)                                                                                   FAV PLAYLIST (AUDIO)

This function allows you to manage the playlists which created by the Smart Playlist function. The       This playlist feature allows you to add a song easily and quickly to a fixed favorite playlist.
playlists can be renamed.

 Function                Icon        Operation                                                            Function                 Icon         Operation
 Playlist name                                                                                            Playlist name                         No function, text field only.
                                     Tap to go to the next higher level
 field                                                                                                    field                                 Note: The name of the FAV playlist can not be changed.

                                     Tap to edit a playlist (editing mode)                                Delete                                Tap to delete a FAV playlist song

                                     Tap to delete a playlist
 Playlist                                                                                                                                       Scroll in the list:
 editing mode                                                                                             Scroll                                Touch and hold to move the slider up or down
                                     Tap to rename a playlist                                                                                   Tap and hold your finger on the list to move the list up or down.

                                     Tap to cancel playlist edit mode

                                     Tap to edit a song within a playlist (editing mode)

                                     Tap to delete a playlist song
 Song
 editing mode                        Tap to move a playlist song
                                     (Add a song to another playlist)

                                     Tap to cancel edit mode

                                     Scroll in the list:
 Scroll                              Touch and hold to move the slider up or down
                                     Tap and hold your finger on the list to move the list up or down.

26 Rev.B                                                                                                                                                                                                   27 Rev.B
VIDEO MEDIA: HARDDISK                                                                                 PLAYLIST (VIDEO)

For video playback via USB, parking cable must be connected during the device installation. Without   Playlist (Video) displays the video files on the USB data carrier with their file name. In this list sliding
this connection, the screen remains black.                                                            up or down is easily possible.

 Function              Icon       Operation                                                            Function                 Icon       Operation

 Jump inside                      Tap to skip directly to the desired position                                                             Touch to go to the highest folder level
                                                                                                       Folder
 Title                            Slide to reach the desired position                                                                      Hold to go to the hard disk overview (root)

 VideoAudio                    Tap to switch between audio or video playback. This function is      Back                                Tap to skip back to the previous section
 Source                           not supported for BT Audio and iPod
                                                                                                                                           Tap to play a film or a video
                                                                                                       Play / Pause
 Back                             Tap to skip back to the previous section                                                                 Tap to pause a film or a video

                                                                                                       Forward                             Tap to skip forward to the next section
 Play                             Tap to play a film
                                                                                                                                           Tap to turn on the random play feature within the folder that is
                                                                                                       Shuffle
 Pause                            Tap to pause a film                                                                                      playing

                                                                                                       Repeat                              Tap to automatically repeat a film or complete video collection
 Forward                          Tap to skip forward to the next section

                                                                                                       Video  Audio                     Tap to switch between audio or video playback. This function is
                                  Tap to display the folder and list
 Playlist                                                                                              Source                              not supported for BT Audio and iPod
                                  This function is not supported for BT Audio
                                  Tap to turn on the random play feature within the folder that is
 Shuffle
                                  playing                                                                                                  Scroll in the list:
                                                                                                       Scroll                              Touch and hold to move the slider up or down
 Repeat                           Tap to automatically repeat a film or complete video collection                                          Tap and hold your finger on the list to move the list up or down

                                                                                                           CAUTION
                                                                                                        Playing video files while driving is not permitted by the law. For this reason the screen will
                                                                                                        switched off when the vehicle moves, with the playback of sound only.

28 Rev.B                                                                                                                                                                                                   29 Rev.B
HDMI                                                                                                 CAMERA

Tap to the HDMI icon starts the A / V source, if a compatible HDMI source connected, for example a   Tapping the camera icon starts the manual camera mode, if a CVBS capable camera is connected
videogame, smartphone, tablet, notebook.                                                             to the camera input of the unit. The original camera system with auto switching function and CAN-
                                                                                                     data based dynamic grid lines is supported.

 Function              Icon       Operation                                                           Function              Icon       Operation

 HDMI                             Tap to open HDMI source mode                                        Camera                           Tap to open camera source

 AV/IN                            Tap to open the A/V IN source

30 Rev.B                                                                                                                                                                                         31 Rev.B
USING ANDROID AUTO                                                                                          ANDROID AUTO OPERATION
                                                                                                                                                                             

                                                                                                                                                                                                    

                                                                                                                   

With Google Android Auto, you are be able to access compatible apps and online services of your
Android smartphone in your motor home and operate them intuitively with the display of your ZENEC
device or the voice assistant from Google.                                                                                                                                           
USING ANDROID AUTO                                                                                            Item        Icon      Operation

PREPARATION:                                                                                                   1                     Android Auto user interface
• Download the Android Auto app from the Google Play Store.
• Connect the Android smartphone with the USB 1 connector of the ZENEC device.                                 2                     Navigation
• To use the hands-free function of Android Auto, connect the Android smartphone with the ZENEC
  device via Bluetooth. Please pay attention to chapter „Bluetooth (Hands-free System) → Pairing“.             3                     Telephony
INITIAL OPERATION:
1. For the initial operation, the vehicle must not be in motion and the hand brake must be put on.             4                     Open Android Auto user interface
2. Tap to the Android Auto icon in the main menu of the ZENEC device to choose the Android Auto
   source.                                                                                                     5                     Media playback
3. Follow the dialogue on the display of the ZENEC device to install Android Auto and to configure the
   start behaviour. It is possible to change the selected start behaviour in the setup operations anytime      6                     Open ZENEC main menu
   later. Please pay attention to chapter „Setup Operation → Misc → Launch Android Auto“.
4. After the initial operation has been completed successfully, the Android Auto user interface appears
                                                                                                               7                     Activate Android Auto voice control
   on the screen of the ZENEC device.

                                                                                                               8                     Smartphone status information (can vary depending on the model)

                                                                                                                   NOTE
                                                                                                             ● Android Auto may not be available on all devices and is not available in all countries and
                                                                                                               regions.
                                                                                                             ● To use Android Auto with your Android Smartphone, at least Android 5.0 (Lollipop) or a higher
                                                                                                               version of the Android operation system must be installed on your smartphone.
                                                                                                             ● To use Android Auto on your ZENEC device, you have to adjust time and date on your ZENEC
                                                                                                               device correctly. Please pay attention to chapter „Setup Operations → System →
                                                                                                               Clock & Date Setup“.
                                                                                                             ● For more detailed information about Android Auto, please visit
                                                                                                               https://www.android.com/auto/ and https://support.google.com/androidauto#topic=6348027

32 Rev.B                                                                                                                                                                                                33 Rev.B
APPLE CARPLAY                                                                                           APPLE CARPLAY OPERATION

                                                                                                               

                                                                                                               

                                                                                                               

CarPlay is an optimal co-pilot inside the car, on safer way to use your iPhone in the car. CarPlay                                                   
takes the things you want to do with your iPhone while driving and puts them on your car’s built-in
display. You can get directions, make calls, send and receive messages, and listen to music, all in a
way that allows you to stay focused on the road. Just connect your iPhone and go.
                                                                                                          Item        Icon       Operation

                                                                                                           1                     Tap to display the home screen of CarPlay
USING APPLE CARPLAY
PREPARATION:
• Connect the compatible iPhone with the BACKSIDE USB-1 connector of the ZENEC device.
• Bluetooth will be automatically establish on BACKSIDE USB first time connection.                         2                     Tap to open the ZENEC main menu
• Unlock your iPhone.

INITIAL OPERATION:                                                                                         3                     Tap any of the APP icon to start the application
1. For the initial operation, the vehicle must not be in motion and the hand brake must be put on.
2. Tap to the CarPlay icon in the main menu of the ZENEC device to choose the CarPlay source.
3. After the initial operation has been completed successfully, the CarPlay user interface appears on
   the screen of the ZENEC device.                                                                         4                     iPhone status information

                                                                                                               NOTE
                                                                                                         ● CarPlay isn`t available on older iPhones..
                                                                                                         ● To use CarPlay with your iPhone, at least iOS 7.1.x or a higher version of the Apple operation
                                                                                                           system must be installed on your phone.
                                                                                                         ● For more detailed information about Apple CarPlay, please visit
                                                                                                           https://www.apple.com/de/ios/carplay/

34 Rev.B                                                                                                                                                                                             35 Rev.B
CONTROL AND OPERATION BAR (RIGHT)
 BLUETOOTH (HANDS-FREE SYSTEM)

ABOUT THIS CHAPTER
This chapter describes how to operate and use the hands-free system. In addition, all the equipment
variants and functions of the ZENEC BT system are described.

SAFETY INSTRUCTIONS

     CAUTION
  Using the mobile phone with the hand while driving is not permitted. Only enter data or make
  changes via the ZENEC system when the traffic situation allows such actions.

     CAUTION
  Network coverage depends on a number of factors – such as the network provider, or the              The vertical control and operation bar on the right area of the Bluetooth page serves to invoke device
  geographical position of the vehicle. Tunnels, underpasses, parking garages, or street canyons      manager, or access phone book, favorites, call logs, numeric keypad, Bluetooth settings and Scan
  in cities may lead to interruption of the connection. Thermal glazing or metallic stickers on the   (BT device search).
  windows of the vehicle may also disrupt the connection.
                                                                                                       Function               Icon       Operation

                                                                                                       Device
                                                                                                                                         Tap to access the device manager view
                                                                                                       manager

                                                                                                                                         Tap to access the phonebook of the currently paired mobile
                                                                                                       Phonebook
                                                                                                                                         phone

                                                                                                       Favorites                         Tap to access the stored favorites

                                                                                                       Call logs                         Tap to access the call logs

                                                                                                       Numeric pad                       Tap to open the numeric keypad

                                                                                                       Bluetooth
                                                                                                                                         Tap to change the most important settings for BT operation
                                                                                                       setup

                                                                                                       SCAN (Search)                     Tap to search a new Bluetooth device

36 Rev.B                                                                                                                                                                                             37 Rev.B
DEVICE MANAGER                                                                                         PAIRING

The BT function on the device must be activated to invoke connection process. Please pay attention     To connect a smartphone to the Zenec device via Bluetooth, first step is to successfully complete the
to the smartphone manufacturer's instructions regarding device pairing.                                pairing process.
                                                                                                       Via ZENEC system

 Function             Icon       Operation                                                              Function              Icon       Operation

 Device                                                                                                                                  Tap to the SCAN icon to initiate a search for BT devices. Re-tap
                                 Tap to pair, disconnect, or manage mobile devices
 manager                                                                                                Scan                             to stop the search and show the device-list. Select from the list
                                                                                                        (Search)                         the desired mobile device that you want to synchronize with the
                                                                                                                                         ZENEC system. Once device is selected, follow the instructions.

 Function             Icon       Operation
                                                                                                        Code                             Standard Code*: 0000

 Pair                            Tap to reconnect a paired Bluetooth device
                                                                                                           NOTE
                                                                                                        *For mobile devices that do not support the SSP standard
 Disconnect                      Tap to disconnect a paired Bluetooth device
                                                                                                       Via the mobile device
                                 Tap to delete a Bluetooth device from the list (requires the device    Function              Icon       Operation
 Delete
                                 to be disconnected)
                                                                                                                                         Make sure that the ZENEC system is in Device Manager view
                                                                                                        Search                           otherwise the ZENEC system will not be visible to others. Follow
                                                                                                                                         the instructions of the device manufacturer on pairing.
        Icon      Meaning

                  This icon indicates that the paired Bluetooth device supports HSP/HFP, and can       Auto Connect
                  be used via the hands-free system.
                                                                                                       Once a mobile device has been connected with the ZENEC system, it will be automatically paired
                                                                                                       when the ZENEC system is started. On being briefly disconnected the ZENEC system will attempt to
                                                                                                       establish a new connection.

                                                                                                           NOTE
                                                                                                        On pairing for the first time, be sure to permanently enable the connection confirmation on your
                                                                                                        mobile device, otherwise malfunctions may occur during the Auto Connect process.

38 Rev.B                                                                                                                                                                                             39 Rev.B
BLUETOOTH SETUP                                                                                      ACCEPTING/ENDING INCOMING CALLS (VIA DEVICE)

On the Bluetooth setup page you can adjust settings for Bluetooth operation. Press the appropriate
button / field to change any of the listed settings.

 Function               Icon      Operation                                                           Function                   Icon            Operation

 Bluetooth                                                                                            Accept                                     Tap the green handset to accept the call
                                  Tap to change settings for BT operation
 Settings

 Auto                                                                                                 Reject                                     Tap the red handset to reject the incoming call
                                  ON / OFF
 Connection

 Contacts                         1. by first name of contact                                         End                                        Tap the red handset to end the call
 Order                            2. by surname of contact

 Microphone
                                  Tap to set the Mic. gain from 0 to 12
 Gain
                                                                                                     DIAL A CALL USING NUMERIC PAD
 Bluetooth
                        BT        Unique ZENEC BT device address.                                    In the control-/operation panel touch the        numeric pad.
 Adress
                                                                                                     Key in the desired phone number in full using the numeric pad. To set up the connection, touch      .
                                  ON / OFF
 Auto                                                                                                The display now changes to the call connection view.
                                  ON = Automatic call acceptance (after 3 ring tones) activated
 Answer
                                  OFF = Automatic call acceptance deactivated
 Auto Load
                                  ON / OFF
 Phonebook                                                                                           DIAL A CALL USING PHONEBOOK

BLUETOOTH STATUS BAR                                                                                 In the control-/operation panel touch the        phonebook.
      Icon      Function                                                                             From the phonebook list select a call partner and set up a connection by touching      .
                                                                                                     After touching a contact you will be directed to the contact details view.
                Mobile phone currently connected

                Battery capacity of the mobile phone currently connected                                 NOTE
                                                                                                       Depending on the mobile phone and phonebook entries, the first synchronization can take up
                Signal strength of the current mobile network                                          several minutes.

40 Rev.B                                                                                                                                                                                              41 Rev.B
BLUETOOTH MENU                                                                                    PHONEBOOK

 Function               Icon           Operation                                                  Contacts

                                       Touch to pass the call from the hands-free system to the
 Discrete
                                       mobile phone or vice versa

 Mute
                                       Voice output muted/- unmuted
 conversation

                                       Tap to show the numeric pad
 Numeric pad                           Necessary in case asked to enter a further number during
                                       the call (telephone call center etc.)

 Back                                  Tap to jump back to the previous level

                                                                                                  After successful pairing of the smartphone with subsequent phone book synchronization, the device
                                                                                                  will show you the full contact list. You can add contacts directly to Favorites if you like.
     NOTE
  To be able to use the phonebook or call lists without any problems, make sure that during the
  pairing process you confirm data access enable to the mobile phone.                              Function           Icon       Operation

                                                                                                   Search                        Tap to open the contact search keypad

                                                                                                                                 Scroll in the list:
                                                                                                   Scroll                        Touch and hold to move the slider up or down, showing letters by
                                                                                                                                 the alphabet.

                                                                                                                                 Tap to jump to the contact list.
                                                                                                   Phonebook                     Up to 1000 contacts per paired mobile phone can be synchronized;
                                                                                                   Contacts                      it makes no difference whether the contacts are stored in
                                                                                                                                 the phonebook or on the SIM card.

                                                                                                   Favorites                     Tap to to show phone numbers of the respective contact entry

                                                                                                   Call /
                                                                                                                                 Tap the green handset to set up/- start the call
                                                                                                   Accept

                                                                                                                                 Tap to add a new Favorite
                                                                                                   Add Favorite
                                                                                                                                 Re-tap to remove a Favorite

                                                                                                   Re-sync.                      Re-synchronisation of the whole phonebook

42 Rev.B                                                                                                                                                                                     43 Rev.B
CALL LISTS                                                                                         FAVORITES

If a compatible mobile phone is connected, call lists from the mobile phone will be synchronized   On this page you can link eight or more phone numbers to become favorites. You can select any of
with the BT hands-free system (process can take some minutes, depending on the number of           the phone numbers in the phonebook and save them as Favorites; the only exceptions are e-mails
contacts). Once sync process has completed you will be able to access the following logs:          and addresses.

 Function                Icon         Operation                                                        NOTE
                                                                                                    All Favorites are visible to every user of the device as they are saved in device memory.
 Call logs                            Tap to see all call logs

                                                                                                    Function               Icon         Operation
 Missed Calls                         Tap to see the missed calls only
                                                                                                    Stored
                                                                                                                                        Tap to set up/- start a connection with a stored Favorite
                                                                                                    Favorite
 Received Calls                       Tap to see the received calls only

                                                                                                                                         Tap to add a new favorite
 Dialed Calls                         Tap to see the dialled (outgoing) calls only                  Assign New
                                                                                                    Favorite
                                                                                                                                         Select desired number from phonebook and confirm
                                                                                                                                          with this    icon

 Function                Icon         Operation
                                                                                                    Delete                              Tap to remove a stored Favorite
 Missed                               Entries with this icon refer to calls that you missed

 Incoming                             Entries with this icon refer to accepted incoming calls
                                                                                                       NOTE

 Contacted                            Entries with this icon refer to outgoing calls                A change of data on the mobile phone will not sync automatically with the stored Favorites.
                                                                                                    Should you want to change phone numbers this change must be manually transferred to
                                                                                                    Favorites by deleting the exisiting Favorite and re-assigning the new number.

44 Rev.B                                                                                                                                                                                            45 Rev.B
SETUP OPERATIONS                                                                                  DISPLAY ICON

This chapter describes all the parameter and setting functions of the ZENEC system. Please note    With the display icon, the LCD TFT screen picture brightness can be dimmed or switched off (standby)
that settings or changed parameters can have a direct influence on the everyday use of the ZENEC   in two steps. This is done by tapping the icon.
system.

 Function              Icon       Operation                                                         Function               Icon      Operation

                                                                                                                                     Tap to dim or brighten up TFT screen ( 100% → 50% → 0%
 Setup                            Tap to access the setup mode                                      Disp
                                                                                                                                     “standby” )

46 Rev.B                                                                                                                                                                                        47 Rev.B
SETUP OF SOURCES                                                                                         MISC SETUP

When you tap the setup icon, you will enter this setup source page, which offers six different sources   In the Misc menu page, you can configure diverse settings for the display mode with 3 or 6 icons,
you can adjust for personal preferences.                                                                 ON/OFF of the beep sound, as well as the LED color of the lighting of the buttons or sensor buttons
                                                                                                         on the device front.

 Function               Icon       Operation                                                              Function               Icon      Operation

 Misc                              Tap to access diverse device settings                                  Misc                             Tap to access basic settings view

                                                                                                          Main Menu
                                                                                                                                           Tap to switch to 3 Icon or 6 Icon main page display layout
                                                                                                          Mode
 Audio                             Tap to access sound settings
                                                                                                                                           Touch to link source or function to ALT (HMI) button
                                                                                                          ALT Software
                                                                                                                                           (CAM/Mute/Apple CarPlay/Android Auto/Tuner/EQ/Setup/BT-
                                                                                                          Button
 TFT                               Tap to access display settings                                                                          Music/BT/ DISP/iPod/USB/HDMI)
                                                                                                                                           ON / OFF
                                                                                                          Button
                                                                                                                                           Off = acoustic acknowledgment disabled
                                                                                                          sounds
 Car                               Tap to access car settings (Park Assist etc.)                                                           On = acoustic acknowledgment enabled

                                                                                                          OSD Language                     Tap to change the menu language

 Inputs                            Tap to access TFT inputs settings
                                                                                                          Button Color                     Tap to adjust hard key or sensor field illumination

 System                            Tap to access system settings                                          Wallpapers                       Tap to change the background image

                                                                                                                                           ON / OFF
                                                                                                          Volume
                                                                                                                                           Off = visual volume pop-up disabled
                                                                                                          Pop-Up
                                                                                                                                           On = visual volume pop-up enabled

                                                                                                          Apple                            CarPlay / iPod
                                                                                                          Connectivity                     USB 1 Port definition for iPod or CarPlay usage

                                                                                                                                           ON / OFF
                                                                                                          EasyDrive
                                                                                                                                           Off = EasyDrive Mode disabled
                                                                                                          Mode
                                                                                                                                           On = EasyDrive Mode enabled

48 Rev.B                                                                                                                                                                                                49 Rev.B
AUDIO SETUP                                                                                           VOLUME SETUP

In the Audio menu page, you can adjust settings around the sound, e.g. Volume of the sources,         In the Audio menu -> Media Volume, you can customize the basic settings of each source
loudness, bass and treble, etc.. The "Expert Mode" view extends the setting options by few points.    individually.

 Function               Icon       Operation                                                           Function            Icon       Operation

 Audio                            Tap to access and configure audio settings                                                          Main volume change requires upper setting position set to "Select".
                                                                                                       Media
                                                                                                                                      Setting = manually adjusted volume
                                                                                                       Volume
                                                                                                                                      Last = last volume set before switching off
                                  Tap on one of the presets to change profile (Pop / Classic / Rock
                                  etc.)
 Presets
                                  All changes made in the Expert Mode at the Equalizer will be                                        BT Call volume change requires upper setting position set to
                                  stored under the preset “User”.                                      BT Call                        "Select".
                                                                                                       Volume                         Setting = manually adjusted volume
                                  Tap to enable or disable expert mode. Tap to make advanced                                          Last = last volume set before switching off
 Expert Mode
                                  sound configurations.

                                                                                                      Fine adjustment of the volume of all "Gain" sources
 Volume                           Tap to set initial and source volume levels
                                                                                                       Function               Icon       Operation
                                                                                                       BT Music Gain                     Fine adjustment of BT Music volume
 Audio                                                                                                 FM Tuner Gain                     Fine adjustment of FM volume
                                  Tap to access quick audio settings (Loudness / Bass Boost etc.)
 Control
                                                                                                       DAB Tuner Gain                    Fine adjustment of DAB volume

                                                                                                       USB Gain                          Fine adjustment of USB volume

                                                                                                       iPod Gain                         Fine adjustment of iPod volume

                                                                                                       A/V IN Gain                       Fine adjustment of A/V IN volume

                                                                                                       HDMI Gain                         Fine adjustment of HDMI volume

50 Rev.B                                                                                                                                                                                             51 Rev.B
QUICK AUDIO SETUP (BAL / FAD / SUBWOOFER / LOUDNESS / BASS BOOST)                                   AUDIO SETUP: EXPERT MODE

In this menu, you can adjust the Balance / Fader, Loudness and Subwoofer level of the speakers in   In the Audio Setup menu page with the Expert Mode set to “ON”, you can change audio relevant
the vehicle.                                                                                        settings. Such as Equalizer, Crossover, Time Alignment, etc. Please refer to the listings on the
                                                                                                    following pages.

 Function                  Icon           Operation
                                                                                                     Function               Icon       Operation
 Left/
                                          15 > 0 < 15                                                Expert Mode                      Tap to enable or disable expert mode
 Right

 Front/                                                                                              Volume                           Tap to set start and source volume
                                          15 > 0 < 15
 Rear

                                                                                                     Balance/Fader                    Tap to set fader or balance
 Loudness                                 ON / OFF

                                                                                                     Equalizer                        Tap to set the 8-BAND equalizer
 Bass Boost                               ON / OFF

                                                                                                     X-Over                           Tap to make settings for the crossover

 Subwoofer                                -6 < 0 >6                                                  Subwoofer                        Tap to set subwoofer settings

                                                                                                     Quick Audio                      Tap to make general quick audio settings (Loudness / Bass
                                                                                                     Control                          Boost etc.). Can be accessed by long press of the Home button.

                                                                                                     Time
                                                                                                                                      Tap to adjust the time alignment
                                                                                                     Alignment

                                                                                                    Volume Setup: see page 51

52 Rev.B                                                                                                                                                                                         53 Rev.B
AUDIO VOLUME – BASE LEVEL SETUP                                                             BALANCE / FADER

                                                                                                                BAL               FAD

In the audio menu, you can adjust the basic volume values of the various audio sources.     In this Expert Mode menu page, you can adjust the balance and faders. Press and hold the green
                                                                                            dot of the crosshair to move sound center position into any desired position.

                                                                                             Function                  Icon          Operation
 Function              Icon       Operation
                                                                                             Left/
                                                                                                                                     15 < 0 > 15
 Volume                           Tap to set the system main startup volume                  Right

                                                                                             Front/
                                                                                                                                     15 < 0 > 15
 Media Volume                     Tap to set the media playback volume                       Rear

 BT Call                                                                                     Crosshair                               Press and hold to move green dot into desired position
                                  Tap to set the volume of the Bluetooth handsfree volume
 Volume

54 Rev.B                                                                                                                                                                               55 Rev.B
EQUALIZER                                                                                               X-OVER SETUP

In this Expert Mode menu page, you can set the 8-band graphical equalizer. Press and hold the indivi-   In this Expert Mode menu, you can adjust the High-pass transition frequencies of the front and rear
dual band level sliders to move it up or down for a level change.                                       speakers. The factory default is OFF for front and rear speakers.

 Function              Icon       Operation                                                              Function                 Icon           Operation

                                  Tap to set the desired BAND                                                                                    Tap to set the high pass filter for front speaker
                                                                                                         HPF (Front)
                                                                                                                                                 OFF/ 50 Hz /63 Hz/80 Hz/100 Hz/120 Hz

 Band
                                  Touch and hold to change the setting of the selected band              Slope                                   12/24 dB/Oct.

                                                                                                                                                 Tap to set the high pass filter for rear speaker
                                                                                                         HPF (Rear)
                                                                                                                                                 OFF/ 50 Hz /63 Hz/80 Hz/100 Hz/120 Hz

                                                                                                         Slope                                   12/24 dB/Oct.

56 Rev.B                                                                                                                                                                                             57 Rev.B
SUBWOOFER SETUP                                                                                    TIME ALIGNMENT

In this Expert Mode menu, you can adjust Phase, Gain, and Low-pass transition frequencies of the   In this menu you can set the time delay correction for the loudspeakers in your vehicle.
subwoofer. The default settings are Phase 0 °, GAIN "0", LPF OFF.
                                                                                                    Function                Icon          Operation
                                                                                                                                          Selection of desired unit
 Function              Icon       Operation                                                         Unit                                ms = time
                                                                                                                                          cm = distance
                                  Tab to set the low pass filter                                                                          Tap to select the desired speaker
 LPF
                                  OFF/ 240 Hz/ 160 Hz/ 120 Hz/ 85 Hz/ 55 Hz                         Speaker                             (FL / FR / RL / RR / SW)

                                                                                                                                          ms = 0.0 < > 20          in approx. 0.1 ms steps
                                  SUBWOOFER ONLY                                                    Delay
 Phase                                                                                                                                    cm = 0 < > 680           in approx. 3 cm steps
                                  0/180° (inverted phase)

                                                                                                   The distance between the ears and the speaker system installed in the vehicle varies considerably
                                  Touch to set the GAIN                                            due to the given arrangement of the factory mounting location. This menu gives you the option to
 Gain
                                  -6 < > 6                                                         delay the audio signal at each of the speakers so that you have a ”center stage” effect.
                                                                                                   Set your central listening position. Measure the distance from this position to each speaker.
                                                                                                   Now you need to add the corresponding delay - depending on the speaker with highest distance - to
                                                                                                   move the speakers to same distance from selected position. Enter these distance to let all speakers
                                                                                                   have the same distance. You can fine tune values by “ear” after the distances from listening position
                                                                                                   to each speaker have been entered, simply by adjusting the left front speaker delay until center stage
                                                                                                   position is reached.

58 Rev.B                                                                                                                                                                                           59 Rev.B
TFT DISPLAY CONFIGURATION                                                                         CAR (VEHICLE) SETUP

In the TFT Setup menu you can make screen settings that control the day/night brightness of the   In the Car Setup menu, you can set how the ZENEC device interacts with optional components such
TFT LCD display screen.                                                                           as cameras and parking assist of the vehicle.

 Function              Icon        Operation                                                       Function            Icon       Operation

                                                                                                   Car (vehicle)                  Tap to access vehicle configurations
 TFT
                                   Tap to adjust display configuration
 configuration                                                                                     Reverse                        Tap to set the muting function when parking aid is active.
                                                                                                   Camera Mute                    OFF / reduced Volume / MUTE Audio
 TS-Brightness                     Day adj range                                                                                  Touch to set the parking aid display source.
 Day                               0 ~ 20                                                                                         OFF / CAM / OPS / OPS & CAM:
                                                                                                                                  • OFF = The function is turned off permanently.
                                                                                                                                  • CAM = If a rear view camera is connected, the camera picture
 TS-Brightness                     Night adj range                                                 Park Assist                      will be displayed automatically.
                                                                                                                       CAM
 Night                             0 ~ 20                                                                                         • OPS = Indicates the optical parking system depending on the
                                                                                                                                    vehicle configuration.
 TS-Auto                           Tap to enable or disable TFT Auto Standby function and Auto                                    • OPS & CAM = Indicates a combined picture of the rear view
 Standby                           Screen shutdown. TFT goes into standby after selected time.                                      camera and the optical parking system.
                                                                                                   OE Sound
                                                                                                                                  ON / OFF
                                                                                                   System
                                                                                                   Dynamic
                                                                                                                                  ON / OFF
     NOTE                                                                                          Camera lines
  Using the DISP button you can set the display brightness to three levels                                                        ON / OFF
  ( 100% → 50% → 0% ).                                                                           Front radar                    Indicates the optical front parking system depending on the
                                                                                                                                  vehicle configuration.
                                                                                                                                  ON / OFF
                                                                                                                                  Off = Air conditioning pop-up window does not appear during
                                                                                                   AC Info
                                                                                                                                  adjusting
                                                                                                   (Pop-up)
                                                                                                                                  On = Air conditioning pop-up window does appear during
                                                                                                                                  adjusting
                                                                                                   Car Info
                                                                                                                                  ON / OFF (Fig. S/66-67)
                                                                                                   (Pop-up)
                                                                                                   Camera
                                                                                                                                  Tap to invert the CAM picture (Normal / Invert)
                                                                                                   Picture

60 Rev.B                                                                                                                                                                                       61 Rev.B
AIR CONDITIONING (AC INFO)                                                                              DYNAMIC INDICATION OF SEAT HEAT

                                                                                                        Function                 Icon      Operation
                                                                                                        Temperature                        Indication of actual air flow:
                                                                                                        arrows                             Frontwindow – Center – Leg room
                                                                                                                                           Blue   ca. LOW – 20.0 C
                                                                                                        Temperature                        Yellow ca. 20.0 – 24.0 C
                                                                                                                                           Red    ca. 24.0 – HIGH

                                                                                                        Ventilator setting                 The digit shows the fan level.

                                                                                                                                           Indication of current seat heating level.
                                                                                                        Seat heater
                                                                                                                                           In addition to the digit, the seat heating level will be indicated in
                                                                                                                                           three different colour gradations.
If AC Info is enabled, changes induced by manual operations the air conditioning will be displayed by
the ZENEC system.                                                                                                                          The seat heating level will be displayed in combination with a
                                                                                                        Setting
                                                                                                                                           digit.

 Function               Icon      Operation
                                  On = Switch for ventilation is minimum adjusted to level 1
 Ventilation
                                  Off = Switch for ventilation is adjusted to level 0
 Rear window
                                  Rear window heating switched on or off                                    NOTE
 heating
                                                                                                         All functions related to the air conditioning are only status indications. It’s not possible to operate
 Windshield                                                                                              the air conditioning with the ZENEC system.
                                  Defrost function switched on or off
 heating
                                                                                                         The effective range of functions is depending on the vehicle manufacturer, vehicle type and
 Air conditioning                 Air conditioning switched on or off
                                                                                                         vehicle configuration. The ZENEC system supports all listed functions above. Differences from
 Recirculating air                                                                                       this information, features or functions cannot be used for claims.
                                  Recirculating air operation switched on or off
 operation
                                  Synchronous the temperature settings for driver and passenger
 Dual
                                  side

 Auto                             Automatic adjustment of temperature

62 Rev.B                                                                                                                                                                                                   63 Rev.B
INPUT SETUP                                                                                          SYSTEM SETUP

In the Input Setup menu, you can adjust the image settings of the connected video sources, such as   In the System Setup menu page, you can make various system settings, such as: Adjust the Clock
Reverse Cameras. Contrast, brightness, color saturation and hue can be adjusted.                     Time, Load Factory settings, Initiate Software Updates or set a Password.

 Function              Icon       Operation                                                           Function             Icon       Operation

                                 Tap to adjust image setup configuration of connected external        System                          Tap to access various system settings
 Inputs
                                 video sources (e.g. rear view camera., etc.)
                                                                                                      SW Versions
                                                                                                                                      Tap to access detailed software version information
                                                                                                      Info
 Brightness                       0 ~ 24

                                                                                                      Load Factory                    Tap and confirm to reset the ZENEC system to factory default
 Contrast                         0 ~ 24
                                                                                                      Clock Time
                                                                                                                                      Tap to adjust clock time
                                                                                                      Setup
 Saturation                       0 ~ 24                                                              Software                        Tap and confirm to initiate a software update.
                                                                                                      Update                          www.zenec.com → Support → Softwareupdates

 Hue                              0 ~ 24                                                              Password                        OFF = password protection disabled
                                                                                                      Function                        ON = password protection enabled

                                                                                                      Password                        Tap and confirm to store a password

64 Rev.B                                                                                                                                                                                        65 Rev.B
CAR INFORMATION (VEHICLE STATUS) - PAGE I                                                              CAR INFORMATION (VEHICLE STATUS) - PAGE II

The CAR information (vehicle status)page shows several special values, operations and informations
of the vehicle, by the ZENEC system.                                                                   The vehicle door status page visually shows several special operations and information
                                                                                                       of the doors, lights, car-trunk and engine bonnet, by the ZENEC system.
 Function              Icon       Operation

 CAR                                                                                                    Function              Icon       Operation
                                  Tap to open the CAR Info page
 Information
                                                                                                        Vehicle status                   Tap to show the current CAR Information
                                  Tap to show the vehicle door status
                                  (Visual status display of all doors, lights, car-trunk and the en-
 Vehicle door                                                                                                                            Show the vehicle door status
                                  gine bonnet)
 status                                                                                                                                  (Visual status display of all doors, vehicle lights, car-trunk and
                                  - OPEN / CLOSED                                                       Vehicle door
                                  - ON / OFF                                                                                             the engine bonnet)
                                                                                                        status
                                                                                                                                         - OPEN / CLOSED
 Vehicle status                   Tap to show the current CAR Information                                                                - ON / OFF

 Digital speed                    Show the current driving speed
 meter                            (km/h)
 Battery power                    Information about the current battery power level
 (Status)                         (Volts)
 Outside
                                  Shows current outside temperature
 temperature
                                  Safety information about the seat belt status.
 Seat belt info                   - Red = seat belt open
                                  - Grey = seat belt closed
                                  Information about the parking brake status „applied/ open”
 Parking brake
                                  - Red = parking brake ON
 status
                                  - Grey = parking brake OFF
 Tank level                       Information about the current petrol level
 indicator                        (Litres)
                                  Petrol warning indicator, if the petrol level drops below 9 litres
 Petrol
                                  - Red = petrol level 0 ~ 9 litres
 indication
                                  - White = petrol level 9 litres >
 Current
                                  Show the current vehicle mileage status
 mileage status
                                  Information about the current engine speed
 Engine speed
                                  (RPM)

66 Rev.B                                                                                                                                                                                                67 Rev.B
You can also read