3 Reusing a Presentation and Adding Media and Animation
←
→
Page content transcription
If your browser does not render page correctly, please read the page content below
Microsoft PowerPoint 2013

3                            Reusing a Presentation
                             and Adding Media and
                             Animation
                                                 Microsoft product screenshots used with permission from Microsoft Corporation.

                            Objectives
                            You will have mastered the material in this chapter when you can:
                        • Color a photo                                                                                                      • Insert and edit a video clip
                        • Add an artistic effect to a photo                                                                                  • Insert audio

                        • Align paragraph text                                                                                               • Control audio and video clips
                                                                                                                                             • Insert entrance, emphasis, and exit effects
                        • Change views
                                                                                                                                             • Control animation timing
                        • Ungroup, change the color of, and
                          regroup an illustration                                                                                            • Change theme colors
                                                                                                                                             • Change a theme and variant on one slide
                        • Copy a slide element from one slide to
                          another                                                                                                            • Print handouts
    Copyright 201 Cengage Learning. All Rights Reserved. May not be copied, scanned, or duplicated, in whole or in part. Due to electronic rights, some third party content may be suppressed from the eBook and/or eChapter(s).
Editorial review has deemed that any suppressed content does not materially affect the overall learning experience. Cengage Learning reserves the right to remove additional content at any time if subsequent rights restrictions require it.
Microsoft PowerPoint 2013

                               3                          Reusing a Presentation
                                                          and Adding Media and
                                                          Animation
BTW                                                Introduction
Using Media in
                                                   At times, you will need to revise a PowerPoint presentation. Changes may include
Presentations
PowerPoint makes it easy                           inserting and adding effects to photos, altering the colors of photos and illustrations,
to insert media into a                             and updating visual elements displayed on a slide. Applying a different theme, changing
presentation. Well-produced                        fonts, and substituting graphical elements can give a slide show an entirely new look.
video clips add value when
they help explain a procedure
                                                   Adding media, including sounds, video, and music, can enhance a presentation and
or show movement that                              help audience members retain the information being presented. Adding animation can
cannot be captured in a                            reinforce important points and enliven a presentation.
photo or illustration. A sound
can emphasize an action.
Before you insert these files
on a slide, however, consider
whether they really add any                        Project — Presentation with Video, Audio,
value to your overall slide
show. If you are inserting                         Animation, and Photos with Effects
them just because you
can, you might want to                             The project in this chapter follows graphical guidelines and uses PowerPoint
reconsider your decision.                          to create the presentation shown in Figure 3â•›–â•›1. The slides in this revised
Audiences quickly tire of
extraneous movement and
                                                   presentation, which discusses Watch for Motorcycles, have a variety of audio and
sounds on slides, and they                         visual elements. For example, the photos have artistic effects applied that soften
will find these media clips                        the photos and help the audience focus on other elements on the slides. The car
annoying. Keep in mind that
the audience’s attention
                                                   clip has colors that blend well with the background. The bullet list is animated
should focus primarily on                          with entrance, emphasis, and exit effects. The video has been edited to play only
the presenter; extraneous or                       the portion with Watch for Motorcycles and has effects to add audience interest.
inappropriate media files may                      Motorcycle sounds integrate with the visual elements. Overall, the slides have
divert their attention and, in
turn, decrease the quality of                      myriad media elements and effects that are exciting for your audience to watch and
the presentation.                                  hear.

                                                                                                                                                       PPT 146

             Copyright 201 Cengage Learning. All Rights Reserved. May not be copied, scanned, or duplicated, in whole or in part. Due to electronic rights, some third party content may be suppressed from the eBook and/or eChapter(s).
         Editorial review has deemed that any suppressed content does not materially affect the overall learning experience. Cengage Learning reserves the right to remove additional content at any time if subsequent rights restrictions require it.
Microsoft PowerPoint 2013

                                                                                                                         title placeholder
            artistic effect
                                                                                                                         moved
            applied to picture
            background

                                                          modified clip

          (a) Slide 1 (Title Slide with Picture Background,
                  Modified Clip, and Animated Clip)

                                                                                                     animated
                                                                                                     placeholder

                                                                                                                                                                     clip copied
                                                                                                                                                                     to Slide 1

                                                                                                                                                                           (b) Slide 2 (Bulleted List)

                                                                                      artistic effect
                                                                                      applied to picture
                                                                                      background
                                                                                                                                   Video courtesy of Susan Sebok

                                                                                             video inserted
                                                                                             and formatted

          (c) Slide 3 (Picture Background and Video Clip)

                                                                                                                                                                                                                                                 Video courtesy of Susan Sebok

                                                                                                           video plays
                                                                                                           full screen

                                                                                                                                                                   (d) Slide 4 (Video Playing Full Screen)
                                                                                                                  Figure 3â•›– â•›1
                                                                                                                       PPT 147

    Copyright 201 Cengage Learning. All Rights Reserved. May not be copied, scanned, or duplicated, in whole or in part. Due to electronic rights, some third party content may be suppressed from the eBook and/or eChapter(s).
Editorial review has deemed that any suppressed content does not materially affect the overall learning experience. Cengage Learning reserves the right to remove additional content at any time if subsequent rights restrictions require it.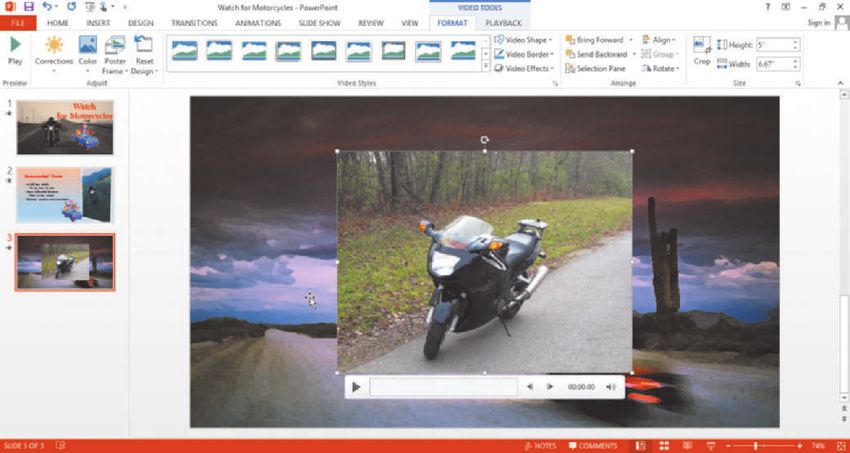
PPT 148 PowerPoint Chapter 3 Reusing a Presentation and Adding Media and Animation

For an introduction to                            Roadmap
Windows and instruc-
                                                        In this chapter, you will learn how to create the slides shown in Figure 3â•›–â•›1 on
tion about how to
perform basic Windows                             the previous page. The following roadmap identifies general activities you will perform
tasks, read the Office                            as you progress through this chapter:
and Windows chapter                                     1.     insert         and add effects to photos, including changing colors and styles.
at the beginning of
                                                        2.     modify placeholders                                on the slides by moving and changing sizes.
this book, where you
can learn how to resize                                 3.     modify            and copy an illustration to customize its appearance.
windows, change screen                                  4.     add media                 files to slides.
resolution, create fold-
ers, move and rename                                    5.     animate slide content                                with entrance, emphasis, and exit effects.
files, use Windows Help,                                6.     customize slide elements by changing a theme and variant on one slide and
and much more.                                                 changing the theme colors.

                                                        At the beginning of step instructions throughout the chapter, you will see an
One of the few differ-                            abbreviated form of this roadmap. The abbreviated roadmap uses colors to indicate
ences between Win-
                                                  chapter progress: gray means the chapter is beyond that activity; blue means the
dows 7 and Windows
8 occurs in the steps to                          task being shown is covered in that activity, and black means that activity is yet to be
run PowerPoint. If you                            covered. For example, the following abbreviated roadmap indicates the chapter would
are using Windows 7,                              be showing a task in the 5 ANIMATE SLIDE CONTENT activity.
click the Start button,                                                                    1 insert & add effects          |   2 modify placeholders           |   3 modify & copy illustrations
type PowerPoint                                                                            4 add media       |   5 animate slide content          |   6 customize slide elements
in the ‘Search programs
and files’ box, click                                   Use the abbreviated roadmap as a progress guide while you read or step through
�PowerPoint 2013, and                            the instructions in this chapter.
then, if necessary, maxi-
mize the PowerPoint
window. For detailed
steps to run PowerPoint                           To Run PowerPoint
in Windows 7, refer to
the Office and Windows                                  If you are using a computer to step through the project in this chapter and
chapter at the begin-                             you want your screens to match the figures in this book, you should change your
ning of this book. For a                          screen’s resolution to 1366 3 768. For information about how to change a computer’s
summary of the steps,                             resolution, refer to the Office and Windows chapter at the beginning of this book.
refer to the Quick Refer-
                                                        The following steps, which assume Windows 8 is running, use the Start screen
ence located at the back
of this book.
                                                  or the search box to run PowerPoint based on a typical installation. You may need to
                                                  ask your instructor how to run PowerPoint on your computer. For a detailed example
                                                  of the procedure summarized below, refer to the Office and Windows chapter.

                                                   1         Scroll the Start screen for a PowerPoint 2013 tile. If your Start screen contains a
                                                             PowerPoint 2013 tile, tap or click it to run PowerPoint and then proceed to Step 5; if
                                                             the Start screen does not contain the PowerPoint 2013 tile, proceed to the next step
                                                             to search for the PowerPoint app.

                                                   2         Swipe in from the right edge of the screen or point to the upper-right corner of the
                                                             screen to display the Charms bar and then tap or click the Search charm on the Charms
                                                             bar to display the Search menu.

                                                   3         Type PowerPoint as the search text in the Search text box and watch the search
                                                             results appear in the Apps list.

                                                   4         Tap or click PowerPoint 2013 in the search results to run PowerPoint.

                                                   5         If the PowerPoint window is not maximized, tap or click the Maximize button on its
                                                             title bar to maximize the window.

            Copyright 201 Cengage Learning. All Rights Reserved. May not be copied, scanned, or duplicated, in whole or in part. Due to electronic rights, some third party content may be suppressed from the eBook and/or eChapter(s).
        Editorial review has deemed that any suppressed content does not materially affect the overall learning experience. Cengage Learning reserves the right to remove additional content at any time if subsequent rights restrictions require it.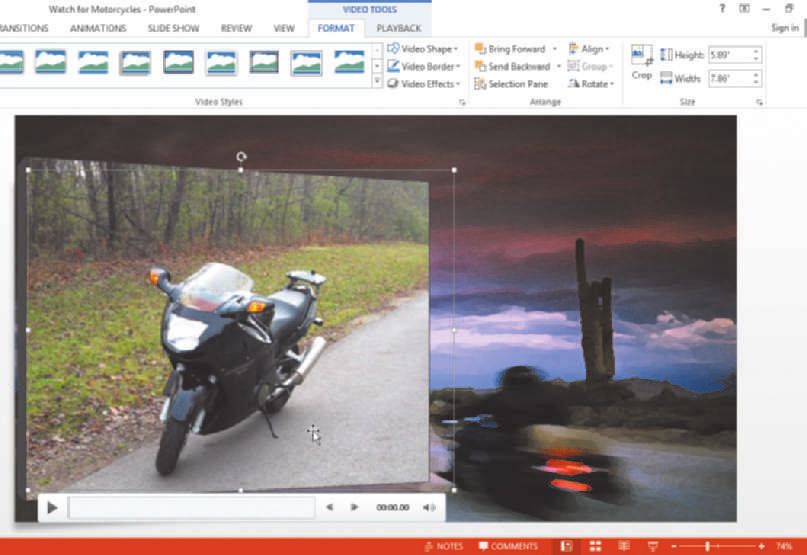
Reusing a Presentation and Adding Media and Animation PowerPoint Chapter 3 PPT 149
PowerPoint Chapter 3
6 If necessary, navigate to the PowerPoint files location (in this case, the PowerPoint
folder in the CIS 101 folder [or your class folder]). Visit www.cengage.com/ct/
studentdownload for detailed instructions or contact your instructor for information
about accessing the required files. Open the presentation, Motorcycle, from the Data
Files for Students.
7 Save the presentation using the file name, Watch for Motorcycles.
Inserting Photos and Adding Effects
The Watch for Motorcycles presentation consists of three slides that have some text,
a clip art image, a formatted background, and a transition applied to all slides. You will
insert a photo into one slide and then modify it and another photo by adding artistic For an introduction to
effects and recoloring. You also will copy the clip art from Slide 2 to Slide 1 and modify Office and instruction
the objects in this clip. In Chapter 2, you inserted photos, made corrections, and added about how to perform
styles and effects; the new effects you apply in this chapter will add to your repertoire basic tasks in Office
of photo enhancements that increase interest in your presentation. apps, read the Office
and Windows chapter
In the following pages, you will perform these tasks:
at the beginning of this
1. Insert the first photo into Slide 1. book, where you can
2. Recolor the Slide 1 photo. learn how to run an ap-
plication, use the ribbon,
3. Add an artistic effect to the Slide 3 photo. save a file, open a file,
4. Send the Slide 1 photo back behind all other slide objects. exit an application, use
Help, and much more.
To Insert and Resize a Photo into a Slide
without Content Placeholders
The first step is to insert a photo into Slide 1. This photo is available on the Data
Files for Students. Visit www.cengage.com/ct/studentdownload for detailed instructions
or contact your instructor for information about accessing the required file.
The following steps insert a photo into Slide 1.
1 With Slide 1 displaying, tap or click INSERT on the ribbon to display the INSERT tab BTW
and then tap or click the Pictures button (INSERT tab | Images group) to display the Organizing Files
Insert Picture dialog box. and Folders
You should organize
2 If necessary, navigate to the photo location (in this case, the PowerPoint folder in the and store files in folders
CIS 101 folder [or your class folder]). so that you easily can
find the files later. For
3 Tap or click Highway Motorcycle to select the file. example, if you are taking
an introductory computer
4 Tap or click the Insert button (Insert Picture dialog box) to insert the photo into class called CIS 101, a good
Slide 1. practice would be to save
all PowerPoint files in a
5 Drag the sizing handles to resize the photo so that it covers the entire slide. You can PowerPoint folder in a CIS
tap or click the Height and Width arrows (PICTURE TOOLS FORMAT tab | Size group) to 101 folder. For a discussion
of folders and detailed
adjust the picture size (Figure 3â•›–â•›2 on the next page). examples of creating folders,
refer to the Office and
Windows chapter at the
beginning of this book.
Copyright 201 Cengage Learning. All Rights Reserved. May not be copied, scanned, or duplicated, in whole or in part. Due to electronic rights, some third party content may be suppressed from the eBook and/or eChapter(s).
Editorial review has deemed that any suppressed content does not materially affect the overall learning experience. Cengage Learning reserves the right to remove additional content at any time if subsequent rights restrictions require it.
PPT 150 PowerPoint Chapter 3 Reusing a Presentation and Adding Media and Animation

                                                                                                                                                                                                                                              dimensions of
                                                                                                                                                                                                                                              resized photo

                                   photo inserted
                                   and sized to
                                   cover entire slide

   Note: To help you locate screen
   elements that are referenced in the
   step instructions, such as buttons and
   commands, this book uses red boxes
   to point to these screen elements.

                                                                                                           Figure 3â•›–â•›2

                                                   Adjusting Photo Colors
BTW                                                       PowerPoint allows you to adjust colors to match or add contrast to slide
Touch Screen                                       elements by coloring photos. The Color gallery has a wide variety of preset formatting
Differences                                        combinations. The thumbnails in the gallery display the more common color
The Office and Windows
interfaces may vary if you are
                                                   saturation, color tone, and recolor adjustments. Color saturation changes the intensity
using a touch screen. For this                     of colors. High saturation produces vivid colors; low saturation produces gray tones.
reason, you might notice that                      Color tone affects the coolness, called blue, or the warmness, called orange, of photos.
the function or appearance
of your touch screen differs
                                                   When a digital camera does not measure the tone correctly, a color cast occurs, and,
slightly from this chapter’s                       as a result, one color dominates the photo. Recolor effects convert the photo into a
presentation.                                      wide variety of hues. The more common are grayscale, which changes the color photo
                                                   into black, white, and shades of gray, and sepia, which changes the photo colors into
                                                   brown, gold, and yellow, reminiscent of a faded photo. You also can fine-tune the color
                                                   adjustments by tapping or clicking the Picture Color Options and More Variations
                                                   commands in the Color gallery.

                                                                                                                                      1 insert & add effects          |   2 modify placeholders          |   3 modify & copy illustrations

To Color a Photo                                                                                                                      4 add media       |   5 animate slide content          |   6 customize slide elements

      The Office theme and text on Slides 1 and 2 are simple and fulfill the need to communicate the
presentation’s safety message. The photos on Slides 1 and 3, in contrast, help set the tone of riding on an open
road and enjoying the freedom that biking brings. You may want to add an effect to photos. Why? An effect
adds variety to the presentation and helps enhance ordinary photos. The following steps recolor the Slide 1 photo to
coordinate with the brown colors of a highway and barren desert landscape.

             Copyright 201 Cengage Learning. All Rights Reserved. May not be copied, scanned, or duplicated, in whole or in part. Due to electronic rights, some third party content may be suppressed from the eBook and/or eChapter(s).
         Editorial review has deemed that any suppressed content does not materially affect the overall learning experience. Cengage Learning reserves the right to remove additional content at any time if subsequent rights restrictions require it.
Reusing a Presentation and Adding Media and Animation PowerPoint Chapter 3 PPT 151

                                                                                                                                                                                                                                                 PowerPoint Chapter 3
  1                                                                                                          Color button

  • With Slide 1 displaying and
       the Highway Motorcycle photo
       selected, tap or click the Color
       button (PICTURE TOOLS FORMAT
       tab | Adjust group) to display the
       Color gallery (Figure 3â•›–â•›3).
                                                                                                                                                                                                                            pink borders
       Why does the Adjust group look                                                                                                                                                                                       indicate
Q&A

                                                                                                                                                                                                                            current color
                                                                                       Color
       different on my screen?                                                         gallery
                                                                                                                                                                                                                            saturation,
                                                                                                                                                                                                                            color tone,
       Your monitor is set to a different                                                                                                                                                                                   and color
       resolution. See the Office
       and Windows chapter for an
       explanation of screen resolution
       and the appearance of the ribbon.
                                                                                                                                                      desired Sepia
       Why are pink borders surrounding                                                                                                               color for Slide 1
       the thumbnails in the Color
       Saturation, Color Tone, and
       Recolor areas in the gallery?
       The image on Slide 1 currently
       has normal color saturation and a
       normal color tone.

                                                                                                                                                             Figure 3â•›–â•›3

  2
  • If you are using a mouse, point
       to Sepia (third photo in the first
       Recolor area row) to display a
       live preview of this adjustment
       on the photo.                    Sepia color
                                                                           applied to
                                                                           picture
               Experiment
  •    If you are using a mouse, point to
       various thumbnails in the Recolor
       area and watch the hues change
       on the photo in Slide 1.

  • Tap or click Sepia to apply this
       recoloring to the Highway
       Motorcycle photo (Figure 3â•›–â•›4).

       Could I have applied this
Q&A

       recoloring to the photo if it had
       been a background instead of a
       file inserted into the slide?
       No. Artistic effects and
       recoloring cannot be applied to
       backgrounds.                                                                                                                                          Figure 3â•›–â•›4

       Other Ways
       1. Tap or click Format Picture on shortcut menu, tap or click Picture icon, tap or click PICTURE COLOR, tap or click Recolor button
          (Format Picture pane)

    Copyright 201 Cengage Learning. All Rights Reserved. May not be copied, scanned, or duplicated, in whole or in part. Due to electronic rights, some third party content may be suppressed from the eBook and/or eChapter(s).
Editorial review has deemed that any suppressed content does not materially affect the overall learning experience. Cengage Learning reserves the right to remove additional content at any time if subsequent rights restrictions require it.
PPT 152 PowerPoint Chapter 3 Reusing a Presentation and Adding Media and Animation

                                                                                                                                        1 insert & add effects          |   2 modify placeholders          |   3 modify & copy illustrations

To Add an Artistic Effect to a Photo                                                                                                    4 add media       |   5 animate slide content          |   6 customize slide elements

        Artists use a variety of techniques to create effects in their paintings. They can vary the amount of
paint on their brushstroke, use fine bristles to add details, mix colors to increase or decrease intensity, and
smooth their paints together to blend the colors. You, likewise, can add similar effects to your photos using
PowerPoint’s built-in artistic effects. Why? The completed Slide 3 will have both the photo and a video, so applying an
artistic effect to the photo will provide a contrast between the two images. The following steps add an artistic effect to
the Slide 3 photo.
                                                                                                               Artistic Effects
 1                                                                                                             button

 • Display Slide 3 and select the
      photo.

 • Tap or click the Artistic Effects
      button (PICTURE TOOLS FORMAT
                                                                           no effect currently
      tab | Adjust group) to display                                       applied
      the Artistic Effects gallery
      (Figure 3â•›–â•›5).
                                                                                 Artistic Effects
                                                                                 gallery

                                                                                                                                                                                         Paint Brush artistic
                                                                                                                                                                                         effect will be
                                                                                                                                                                                         applied to Slide 3

                                                                                                                                                        Figure 3â•›–â•›5
 2
 • If you are using a mouse, point
      to Paint Brush (third photo in
      the second row) to display a live
      preview of this adjustment on the
                                                                                                                                                                                                               Paint Brush artistic
      photo.                                                                                                                                                                                                   effect applied

          Experiment
 • If you are using a mouse, point to
      various artistic effects and watch
      the hues change on the photo in
      Slide 3.

 • Tap or click Paint Brush to apply
      this artistic effect to the photo
      (Figure 3â•›–â•›6).

      Can I adjust a photo by recoloring
Q&A

      and applying an artistic effect?
      Yes. You can apply both a color
      and an effect. You may prefer at
      times to mix these adjustments to
      create a unique image.                                                                                                                            Figure 3â•›–â•›6

      Other Ways
      1. Tap or click Format Picture on shortcut menu, tap or click Effects icon, tap or click ARTISTIC EFFECTS

               Copyright 201 Cengage Learning. All Rights Reserved. May not be copied, scanned, or duplicated, in whole or in part. Due to electronic rights, some third party content may be suppressed from the eBook and/or eChapter(s).
           Editorial review has deemed that any suppressed content does not materially affect the overall learning experience. Cengage Learning reserves the right to remove additional content at any time if subsequent rights restrictions require it.
Reusing a Presentation and Adding Media and Animation PowerPoint Chapter 3 PPT 153
PowerPoint Chapter 3
1 insert & add effects | 2 modify placeholders | 3 modify & copy illustrations
To Change the Stacking Order 4 add media | 5 animate slide content | 6 customize slide elements
The objects on a slide stack on top of each other, much like individual cards in a deck. To change the order
of these objects, you use the Bring Forward and Send Backward commands. Bring Forward moves an object
toward the top of the stack, and Send Backward moves an object underneath another object. When you tap
or click the Bring Forward arrow, PowerPoint displays a menu with an additional command, Bring to Front,
which moves a selected object to the top of the stack. Likewise, when you tap or click the Send Backward arrow,
the Send to Back command moves the selected object underneath all objects on the slide. The following steps
arrange the Slide 1 photo. Why? On this slide, the photo is on top of the placeholders, so you no longer can see the text.
If you send the photo to the bottom of the stack on the slide, the letters will become visible.
1
• Display Slide 1 and then select the Send Backward
arrow
Highway Motorcycle photo.
• Tap or click the Send Backward Send Backward
menu
arrow (PICTURE TOOLS FORMAT Send to Back
command
tab | Arrange group) to display the
Send Backward menu (Figure 3â•›–â•›7).
title text does not
How can I see objects that are not display because
Q&A
picture covers the
on the top of the stack? placeholder
Press tab or shift+tab to display
each slide object.
Figure 3â•›–â•›7
2
title text displays
• Tap or click Send to Back to move because photo is
moved underneath
the photo underneath all slide placeholder
objects (Figure 3â•›–â•›8).
Figure 3â•›–â•›8
Other Ways
1. Tap or click Send Backward arrow (PICTURE TOOLS FORMAT tab | 2. Press and hold or right-click photo, tap or click Send to Back on
Arrange group), press k shortcut menu
Modifying Placeholders
You have become familiar with inserting text and graphical content in the three types BTW
of placeholders: title, subtitle, and content. These placeholders can be moved, resized, Q&As
and deleted to meet desired design requirements. In addition, placeholders can be For a complete list of the
added to a slide when needed. After you have modified the placeholder locations, you Q&As found in many of
the step-by-step sequences
can view thumbnails of all your slides simultaneously by changing views. in this book, visit the Q&A
In the following pages, you will perform these tasks: resource on the Student
Companion Site located on
1. Resize the Slide 1 title placeholder. www.cengagebrain.com. For
2. Align the Slide 1 title text. detailed instructions about
accessing available resources,
3. Move the Slide 1 title placeholder. visit www.cengage.com/
4. Delete the Slide 1 subtitle placeholder. ct/studentdownload or see
the inside back cover of this
5. Change views. book.
Copyright 201 Cengage Learning. All Rights Reserved. May not be copied, scanned, or duplicated, in whole or in part. Due to electronic rights, some third party content may be suppressed from the eBook and/or eChapter(s).
Editorial review has deemed that any suppressed content does not materially affect the overall learning experience. Cengage Learning reserves the right to remove additional content at any time if subsequent rights restrictions require it.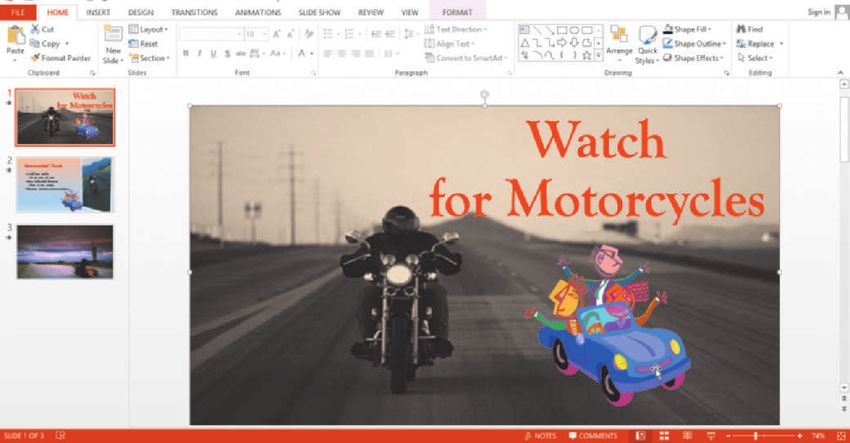
PPT 154 PowerPoint Chapter 3 Reusing a Presentation and Adding Media and Animation

                                                                                                                                1 insert & add effects           |   2 modify placeholders           |   3 modify & copy illustrations

To Resize a Placeholder                                                                                                         4 add media        |   5 animate slide content          |   6 customize slide elements

       The AutoFit button displays on the left side of the Slide 1 title placeholder because the two lines of text
exceed the placeholder’s borders. PowerPoint attempts to reduce the font size when the text does not fit, and
you can tap or click this button to resize the existing text in the placeholder so the spillover text will fit within
the borders. The following step increases the Slide 1 title placeholder size. Why? The two lines of text exceed the
placeholder’s borders, so you can resize the placeholder and fit the letters within the rectangle.
 1
 • With Slide 1 displaying, tap or
      click somewhere in the title                                                                                         top border dragged
                                                                                                                           upward to enlarge
      text paragraph to position the                                                                                       title placeholder
      insertion point in the paragraph.
      Tap or click the border of the title
      placeholder to select it. Point to
      the top-middle sizing handle.                                            sizing                                                                                                  pointer changes to
                                                                               handles                                                                                                 two-headed arrow

 • Drag the top title placeholder                                                                                                                                                                                                                title placeholder
      border upward to enlarge the                                                                                                                                                                                                               border is solid line

      placeholder (Figure 3â•›–â•›9).

      Can I drag other sizing handles to
Q&A

      enlarge or shrink the placeholder?
      Yes, you also can drag the left,
      right, top, and corner sizing handles
      to resize a placeholder. When you
      drag a corner sizing handle, the
      box keeps the same proportion and
      simply enlarges the overall shape.                                                                                                                Figure 3â•›–â•›9

                                                                                                                                       1 insert & add effects           |   2 modify placeholders           |   3 modify & copy illustrations

To Align Paragraph Text                                                                                                                4 add media        |   5 animate slide content          |   6 customize slide elements

       The presentation theme determines the formatting characteristics of fonts and colors. It also establishes
paragraph formatting, including the alignment of text. Some themes center the text paragraphs between the
left and right placeholder borders, while others left-align the paragraph so that the first character of a text
line is near the left border or right-align the paragraph so that the last character of a text line is near the right
border. The paragraph also can be justified so that the text is aligned to both the left and right borders. When
PowerPoint justifies text, it adds extras spaces between the words to fill the entire line.
       The words, Watch for Motorcycles, are left-aligned in the Slide 1 title placeholder. Later, you will add an
illustration below the words, for Motorcycles, so you desire to center the paragraph. Why? Both the text and the
picture will be centered, so the alignments complement each other. The following steps change the alignment of the
Slide 1 title placeholder.
 1                                                                                                                                                       Align Left button is
                                                                                                                                                         selected, indicating
 • With the HOME tab displayed,                                                                                                                          text left aligned in
                                                                                                                                                         placeholder
      tap or click somewhere in the
      title text paragraph of Slide 1 to
      position the insertion point in
      the paragraph to be formatted
      (Figure 3â•›–â•›10).
                                                                                                                                                                                                    left-aligned text
                                                                                                                                                                                                    in placeholder

                                                                                                                                                        Figure 3â•›–â•›10
              Copyright 201 Cengage Learning. All Rights Reserved. May not be copied, scanned, or duplicated, in whole or in part. Due to electronic rights, some third party content may be suppressed from the eBook and/or eChapter(s).
          Editorial review has deemed that any suppressed content does not materially affect the overall learning experience. Cengage Learning reserves the right to remove additional content at any time if subsequent rights restrictions require it.
Reusing a Presentation and Adding Media and Animation PowerPoint Chapter 3 PPT 155
PowerPoint Chapter 3
2
• Tap or click the Center button Center button is selected,
(HOME tab | Paragraph group) indicating text is centered
in placeholder
to center the paragraph
(Figure 3â•›–â•›11).
What if I want to return the
Q&A
paragraph to left-alignment?
Tap or click the Align Left button centered text
in placeholder
(HOME tab | Paragraph group).
insertion point in
title placeholder
Figure 3â•›–â•›11
Other Ways
1. Press and hold or right- 2. Press and hold or right-click paragraph, tap 3. Tap or click Paragraph dialog box launcher 4. Press ctrl+e
click paragraph, tap or or click Paragraph on shortcut menu, tap (HOME tab | Paragraph group), tap or click
click Center button on or click Indents and Spacing tab (Paragraph Indents and Spacing tab (Paragraph dialog
mini toolbar dialog box), tap or click Alignment arrow, box), tap or click Alignment arrow, tap or
tap or click Centered, tap or click OK button click Centered, tap or click OK button
1 insert & add effects | 2 modify placeholders | 3 modify & copy illustrations
To Move a Placeholder 4 add media | 5 animate slide content | 6 customize slide elements
Why? If you desire to have a placeholder appear in a different area of the slide, you can move it to a new location.
The theme layouts determine where the text and content placeholders display on the slide. The Slide 1 title
placeholder currently displays in the upper third of the slide, but the text in this placeholder would be more
aesthetically pleasing if it were moved to the upper-right corner of the slide. The following step moves the
Slide 1 title placeholder.
1
• Tap or click the border of the
Slide 1 title placeholder to select it.
• With the title placeholder border
displaying as a solid line or fine dots,
point to an area of the left border
between the middle and lower
sizing handles so that the pointer
changes to a four-headed arrow.
title placeholder
dragged to
Can I tap or click any part of the
Q&A
desired location
border to select it?
Yes. You can tap or click any of
the four border lines.
How do I know if the placeholder
is selected?
The selection handles are displayed.
subtitle
placeholder
• Drag the placeholder upward
and to the right so that the
text is centered between the
motorcyclist’s helmet and the right
edge of the slide (Figure 3â•›–â•›12). Figure 3â•›–â•›12
Copyright 201 Cengage Learning. All Rights Reserved. May not be copied, scanned, or duplicated, in whole or in part. Due to electronic rights, some third party content may be suppressed from the eBook and/or eChapter(s).
Editorial review has deemed that any suppressed content does not materially affect the overall learning experience. Cengage Learning reserves the right to remove additional content at any time if subsequent rights restrictions require it.PPT 156 PowerPoint Chapter 3 Reusing a Presentation and Adding Media and Animation
1 insert & add effects | 2 modify placeholders | 3 modify & copy illustrations
To Delete a Placeholder 4 add media | 5 animate slide content | 6 customize slide elements
When you run a slide show, empty placeholders do not display. You may desire to delete unused
placeholders from a slide. Why? So they are not a distraction when you are designing slide content. The subtitle
placeholder on Slide 1 is not required for this presentation, so you can remove it. The following steps remove
the Slide 1 subtitle placeholder.
1
• Tap or click a border of the subtitle placeholder so that it displays as a solid line or fine dots (Figure 3â•›–â•›13).
Cut button
subtitle
placeholder
is selected
Figure 3â•›–â•›13
2
• Tap or click the Cut button (HOME tab | Clipboard group) to remove the placeholder.
Other Ways
1. Select placeholder, press delete or backspace 2. Press and hold or right-click placeholder border, tap Cut on
shortcut menu
To Add a Text Box
You occasionally may need to insert a small amount of text in an area of a slide
where no content placeholder is located. A text box allows you to emphasize or set off
text that you consider important for your audience to read. To add a text box to a slide,
you would perform the following steps.
1. Tap or click the Text Box button (INSERT tab | Text group), click or tap the slide,
and then drag the object to the desired location on the slide.
2. Click inside the text box to add or paste text.
3. If necessary, change the look and style of the text box characters by using formatting
features (HOME tab | Font group).
Copyright 201 Cengage Learning. All Rights Reserved. May not be copied, scanned, or duplicated, in whole or in part. Due to electronic rights, some third party content may be suppressed from the eBook and/or eChapter(s).
Editorial review has deemed that any suppressed content does not materially affect the overall learning experience. Cengage Learning reserves the right to remove additional content at any time if subsequent rights restrictions require it.Reusing a Presentation and Adding Media and Animation PowerPoint Chapter 3 PPT 157
PowerPoint Chapter 3
Changing Views
You have been using Normal view to create and edit your slides. Once you
completed your slides, you reviewed the final products by displaying each slide in
Slide Show view, which occupies the full computer screen. You were able to view how
the transitions, graphics, and effects will display in an actual presentation before an
audience.
PowerPoint has other views to help review a presentation for content,
organization, and overall appearance. Slide Sorter view allows you to look at several
slides at one time. Reading view is similar to Slide Show view because each slide
displays individually, but the slides do not fill the entire screen. Using this view, you
easily can progress through the slides forward or backward with simple controls at
the bottom of the window. Switching between Slide Sorter view, Reading view, and
Normal view helps you review your presentation, assess whether the slides have an
attractive design and adequate content, and make sure they are organized for the most
impact. After reviewing the slides, you can change the view to Normal so that you may
continue working on the presentation.
1 insert & add effects | 2 modify placeholders | 3 modify & copy illustrations
To Change Views 4 add media | 5 animate slide content | 6 customize slide elements
Why? You have made several modifications to the slides, so you should check for balance and consistency. The following
steps change the view from Normal view to Slide Sorter view, then Reading view, and back to Normal view.
1
• Tap or click the Slide Sorter view button in the lower right of the PowerPoint window to display the presentation in
Slide Sorter view (Figure 3â•›–â•›14).
Why is Slide 1 selected?
Q&A
It is the current slide in the Thumbnails pane.
colored border
indicates Slide 1
is selected
Slide Sorter
Reading View
view button
button
Figure 3â•›–â•›14
Copyright 201 Cengage Learning. All Rights Reserved. May not be copied, scanned, or duplicated, in whole or in part. Due to electronic rights, some third party content may be suppressed from the eBook and/or eChapter(s).
Editorial review has deemed that any suppressed content does not materially affect the overall learning experience. Cengage Learning reserves the right to remove additional content at any time if subsequent rights restrictions require it.PPT 158 PowerPoint Chapter 3 Reusing a Presentation and Adding Media and Animation
2
• Tap or click the Reading View button in the lower right of the PowerPoint window to display Slide 1 of the
presentation in Reading view (Figure 3â•›–â•›15).
Slide 1 does not
fill entire screen
in Reading view
Figure 3â•›–â•›15
3
• Tap or click the Next button two times to advance through the presentation.
• Tap or click the Previous button two times to display Slide 2 and then Slide 1.
• Tap or click the Menu button to display commonly used commands (Figure 3â•›–â•›16).
menu of commonly
used commands
Menu button
Previous End Show
button command
Figure 3â•›–â•›16 Normal View
Next button button
4
• Tap or click End Show to return to Slide Sorter view, which is the view you were using before Reading view.
• Tap or click the Normal view button to display the presentation in Normal view.
Copyright 201 Cengage Learning. All Rights Reserved. May not be copied, scanned, or duplicated, in whole or in part. Due to electronic rights, some third party content may be suppressed from the eBook and/or eChapter(s).
Editorial review has deemed that any suppressed content does not materially affect the overall learning experience. Cengage Learning reserves the right to remove additional content at any time if subsequent rights restrictions require it.Reusing a Presentation and Adding Media and Animation PowerPoint Chapter 3 PPT 159
PowerPoint Chapter 3
Modifying and Copying an Illustration
Slides 1 and 2 (shown in Figures 3â•›–â•›1a and 3â•›–â•›1b on PPT 147) contain an illustration
of a car that was downloaded from Office.com and then modified. You may want to
modify an illustration for various reasons. Many times, you cannot find an illustration
that precisely represents your topic. For example, you want a picture of a person
wearing a red sweater, but the only available picture has a person with a blue sweater.
Occasionally, you may want to remove or change a portion of an illustration or
you might want to combine two or more illustrations. For example, you can use one
illustration for the background and another photo as the foreground. Other times, you
may want to combine an illustration with another type of object. In this presentation,
the tires on the car are orange, and you want to change the color to black. In addition,
the car illustration has a highway below the tires and a colorful background, which are
not required to display on the slide, so you will ungroup the illustration, change the
color of the tires, and remove the highway and the background.
Modifying the clip on Slide 2 and then copying it to Slide 1 requires several BTW
steps. In the following pages, you will perform these tasks: BTWs
For a complete list of the
1. Zoom Slide 2 to examine the illustration. BTWs found in the margins
of this book, visit the BTW
2. Ungroup the illustration.
resource on the Student
3. Change a color. Companion Site located on
www.cengagebrain.com. For
4. Delete objects. detailed instructions about
5. Regroup the illustration. accessing available resources,
visit www.cengage.com/ct/
6. Copy the illustration from Slide 2 to Slide 1. studentdownload or see the
inside back cover of this book.
To Zoom a Slide
You will be modifying small areas of the illustration, so it will help you select
the relevant pieces if the graphic is enlarged. The following step changes the zoom to
200 percent.
1 Display Slide 2 and then drag the Zoom slider or tap or click the Zoom level button or
the Zoom In button to change the zoom level to 200% (Figure 3â•›–â•›17).
slide shown at
200% zoom
Zoom level
button
Zoom slider
Zoom Out
button
Zoom In button
Figure 3â•›–â•›17
Copyright 201 Cengage Learning. All Rights Reserved. May not be copied, scanned, or duplicated, in whole or in part. Due to electronic rights, some third party content may be suppressed from the eBook and/or eChapter(s).
Editorial review has deemed that any suppressed content does not materially affect the overall learning experience. Cengage Learning reserves the right to remove additional content at any time if subsequent rights restrictions require it.PPT 160 PowerPoint Chapter 3 Reusing a Presentation and Adding Media and Animation
1 insert & add effects | 2 modify placeholders | 3 modify & copy illustrations
To Ungroup an Illustration 4 add media | 5 animate slide content | 6 customize slide elements
The next step is to ungroup the car illustration, also called a clip, on Slide 2. When you ungroup an
illustration, PowerPoint breaks it into its component objects. A clip may be composed of a few individual objects
or several complex groups of objects. These groups can be ungrouped repeatedly until they decompose into
individual objects. Why? Because an illustration is a collection of complex groups of objects, you may need to ungroup a
complex object into less complex objects before being able to modify a specific object. When you ungroup a clip and tap
or click the Yes button in the Microsoft PowerPoint dialog box, PowerPoint converts the clip to a PowerPoint
object. The following steps ungroup an illustration.
1
• Tap or click the car clip to select it PICTURE TOOLS
FORMAT tab
and then tap or click FORMAT on Group
button
the ribbon to display the PICTURE
TOOLS FORMAT tab.
Group menu
• Tap or click the Group button Ungroup
command
(PICTURE TOOLS FORMAT tab |
Arrange group) to display the
Group menu (Figure 3â•›–â•›18).
Why does the Group button look
Q&A
different on my screen?
Your monitor is set to a different
resolution. See Chapter 1 for an car clip
selected
explanation of screen resolution
and the appearance of the ribbon.
Figure 3â•›–â•›18
2
• Tap or click Ungroup on the
Group menu to display the
Microsoft
Microsoft PowerPoint dialog box PowerPoint
(Figure 3â•›–â•›19). dialog box
clicking Yes button
converts picture to
an drawing object
Figure 3â•›–â•›19
Copyright 201 Cengage Learning. All Rights Reserved. May not be copied, scanned, or duplicated, in whole or in part. Due to electronic rights, some third party content may be suppressed from the eBook and/or eChapter(s).
Editorial review has deemed that any suppressed content does not materially affect the overall learning experience. Cengage Learning reserves the right to remove additional content at any time if subsequent rights restrictions require it.Reusing a Presentation and Adding Media and Animation PowerPoint Chapter 3 PPT 161
PowerPoint Chapter 3
3
• Tap or click the Yes button DRAWING TOOLS
FORMAT tab
(Microsoft PowerPoint dialog box) Group
to convert the clip to a Microsoft button
Office drawing.
What happens if I tap or click the
Q&A
No button?
The clip will remain displayed on
the slide as an illustration and will
not ungroup.
• Tap or click FORMAT on the ribbon
to display the DRAWING TOOLS sizing handles
FORMAT tab. Tap or click the indicate objects
that constitute
Group button (DRAWING TOOLS the car clip
FORMAT tab | Arrange group) and
then tap or click Ungroup again to
display the objects that constitute
the car clip (Figure 3â•›–â•›20).
Why does the ribbon change from
Q&A
the PICTURE TOOLS DRAWING tab
to the DRAWING TOOLS FORMAT
tab and show different options
this time?
Figure 3â•›–â•›20
The illustration has become a
drawing object, so tools related to
drawing now display.
Why do all those circles and squares display in the clip?
The circles and squares are sizing handles for each of the clip’s objects, which resemble
pieces of a jigsaw puzzle.
Other Ways
1. Press and hold or right-click clip, point to Group on shortcut menu, tap or click Ungroup 2. Press ctrl+shift+g
1 insert & add effects | 2 modify placeholders | 3 modify & copy illustrations
To Change the Color of a Clip Object 4 add media | 5 animate slide content | 6 customize slide elements
Now that the car illustration is ungrouped, you can change the color of the objects. You must exercise care
when selecting the correct object to modify. Why? The clip is composed of hundreds of objects. The following steps
change the color of the car’s tires from orange to black.
1
• Tap or click an area of the slide
that is not part of the clip to
deselect all the clip pieces.
• Tap or click the car’s left front tire
to display sizing handles around the
orange colored area (Figure 3â•›–â•›21).
What if I selected a different area
Q&A
by mistake?
Tap or click outside the clip and
sizing handles
retry. for front tire
Figure 3â•›–â•›21
Copyright 201 Cengage Learning. All Rights Reserved. May not be copied, scanned, or duplicated, in whole or in part. Due to electronic rights, some third party content may be suppressed from the eBook and/or eChapter(s).
Editorial review has deemed that any suppressed content does not materially affect the overall learning experience. Cengage Learning reserves the right to remove additional content at any time if subsequent rights restrictions require it.PPT 162 PowerPoint Chapter 3 Reusing a Presentation and Adding Media and Animation
2 Shape Fill bar
displays last fill
• Tap or click the Shape Fill arrow color selected Shape Fill arrow
(DRAWING TOOLS FORMAT tab |
Shape Styles group) to display the
desired
Shape Fill gallery. tire color
• If you are using a mouse, point to
Black, Text 1 (second color in the Shape Fill
gallery
first Theme Colors row) to display
a live preview of the tire color
(Figure 3â•›–â•›22).
Experiment
• If you are using a mouse, point to
various colors and watch the car’s
tire color change.
Black tire color
is previewed
Figure 3â•›–â•›22
3
• Tap or click the color Black, Text 1
to change the car’s tire color Shape Fill bar
displays new
(Figure 3â•›–â•›23). Black fill color
selected
Why is the bar under the Shape
Q&A
Fill button now black?
The button displays the last fill
color selected.
BTW
The Ribbon and rear tire will be
recolored
Screen Resolution
PowerPoint may change
how the groups and buttons
within the groups appear on
the ribbon, depending on the Black tire color
computer’s screen resolution. is applied
Thus, your ribbon may look
different from the ones in
this book if you are using a
screen resolution other than
1366 3 768. Figure 3â•›–â•›23
Copyright 201 Cengage Learning. All Rights Reserved. May not be copied, scanned, or duplicated, in whole or in part. Due to electronic rights, some third party content may be suppressed from the eBook and/or eChapter(s).
Editorial review has deemed that any suppressed content does not materially affect the overall learning experience. Cengage Learning reserves the right to remove additional content at any time if subsequent rights restrictions require it.Reusing a Presentation and Adding Media and Animation PowerPoint Chapter 3 PPT 163
PowerPoint Chapter 3
4
• Tap or click the left rear tire to
select it.
Shape Fill
button
• Tap or click the Shape Fill button
to change the tire color to Black,
Text 1 (Figure 3â•›–â•›24).
Why did I not need to tap or click
Q&A
the Shape Fill arrow to select this
color?
PowerPoint uses the last fill color
selected. This color displays in the
bar under the bucket icon on the
button.
Black tire color
is applied
front tire will be recolored
Figure 3â•›–â•›24
5
• Change the right front tire color
to black (Figure 3â•›–â•›25).
Black tire color
is applied
Figure 3â•›–â•›25
Other Ways
1. Press and hold or right-click object, tap or click Fill button below 2. Press and hold or right-click object, tap or click Format Shape on
shortcut menu shortcut menu, tap or click Fill & Line icon
1 insert & add effects | 2 modify placeholders | 3 modify & copy illustrations
To Delete a Clip Object 4 add media | 5 animate slide content | 6 customize slide elements
With the car tires’ color changed, you want to delete the pink and purple background objects and the highway
objects. Why? These objects clutter the slide and are not necessary elements of the clip. The following steps delete these objects.
1 solid border and sizing
handles indicate background
• Tap or click the background in any object is selected
area where the pink color displays
to select this object (Figure 3â•›–â•›26).
Can I select multiple objects so I
Q&A
pink background
can delete them simultaneously? color
Yes. While pressing the shift
key, tap or click the unwanted
elements to select them.
Figure 3â•›–â•›26
Copyright 201 Cengage Learning. All Rights Reserved. May not be copied, scanned, or duplicated, in whole or in part. Due to electronic rights, some third party content may be suppressed from the eBook and/or eChapter(s).
Editorial review has deemed that any suppressed content does not materially affect the overall learning experience. Cengage Learning reserves the right to remove additional content at any time if subsequent rights restrictions require it.PPT 164 PowerPoint Chapter 3 Reusing a Presentation and Adding Media and Animation
2 Cut button
• Display the HOME tab and then
tap or click the Cut button (HOME
tab | Clipboard group) to delete
this object (Figure 3â•›–â•›27).
purple background
will be deleted
Should the purple background
Q&A
object display on the slide?
pink background
Yes. It is part of the car clip. You is removed
will remove it in the next step.
Figure 3â•›–â•›27
3
purple background
• Tap or click the purple is removed
background to select this object.
• Tap or click the Cut button to
delete this object.
4
• Tap or click the mauve highway to mauve highway
select this object (Figure 3â•›–â•›28). will be deleted
• Tap or click the Cut button to
delete this object.
Should the white highway stripes
Q&A
display on the slide?
Yes. They are part of the car clip.
You will remove them in the
next step.
Figure 3â•›–â•›28
5
• If using a mouse, click one white
highway stripe, press the shift key,
and then click the second white
highway stripe to select both
objects (Figure 3â•›–â•›29).
• If using a touch screen, select
one stripe, tap the Cut button to
delete this object, and then select mauve highway
is removed
the other stripe and tap the Cut
button again.
• If using a mouse, click the Cut
button to delete these objects.
white highway
stripes selected
Figure 3â•›–â•›29
Copyright 201 Cengage Learning. All Rights Reserved. May not be copied, scanned, or duplicated, in whole or in part. Due to electronic rights, some third party content may be suppressed from the eBook and/or eChapter(s).
Editorial review has deemed that any suppressed content does not materially affect the overall learning experience. Cengage Learning reserves the right to remove additional content at any time if subsequent rights restrictions require it.Reusing a Presentation and Adding Media and Animation PowerPoint Chapter 3 PPT 165
PowerPoint Chapter 3
1 insert & add effects | 2 modify placeholders | 3 modify & copy illustrations
To Regroup Objects 4 add media | 5 animate slide content | 6 customize slide elements
When you ungrouped the car clip, you eliminated the embedding data or linking information that tied
all the individual pieces together. If you attempt to move or size this clip now, you might encounter difficulties
because it consists of hundreds of objects and is no longer one unified piece. Dragging or sizing affects only a
selected object, not the entire collection of objects, so you must use caution when objects are not completely
regrouped. All of the ungrouped objects in the car clip must be regrouped. Why? So they are not accidentally moved
or manipulated. The following steps regroup these objects into one object.
1
• If necessary, select the clip, tap Group
button
or click the DRAWING TOOLS
FORMAT tab and then tap or click
the Group button (DRAWING Group
menu Regroup
TOOLS FORMAT tab | Arrange command
group) to display the Group menu
(Figure 3â•›–â•›30).
2
• Tap or click Regroup to recombine
all the clip objects.
Figure 3â•›–â•›30
3
• Use the Zoom slider to change the
zoom level to 74%.
• Increase the car’s size by dragging
one of the corner sizing handles
outward until the illustration is
the size shown in Figure 3â•›–â•›31
and then move the illustration to
the location shown in the figure
(Figure 3â•›–â•›31). car clip size
increased and
location moved
Zoom slider
Figure 3â•›–â•›31
Other Ways
1. Press and hold or right-click clip, point to Group on shortcut menu, tap or click Regroup
Copyright 201 Cengage Learning. All Rights Reserved. May not be copied, scanned, or duplicated, in whole or in part. Due to electronic rights, some third party content may be suppressed from the eBook and/or eChapter(s).
Editorial review has deemed that any suppressed content does not materially affect the overall learning experience. Cengage Learning reserves the right to remove additional content at any time if subsequent rights restrictions require it.PPT 166 PowerPoint Chapter 3 Reusing a Presentation and Adding Media and Animation
1 insert & add effects | 2 modify placeholders | 3 modify & copy illustrations
To Copy a Clip from One Slide to Another 4 add media | 5 animate slide content | 6 customize slide elements
The car clip on Slide 2 also can display in its modified form on the title slide. You first must copy it using
the Office Clipboard and then paste it in the desired location. Why? The Office Clipboard is a temporary storage
location that can hold a maximum of 24 text or graphics items copied from any Office program. The same procedure of
copying and pasting objects works for copying and pasting text from one placeholder to another. The following
steps copy this slide element from Slide 2 to Slide 1.
Copy button puts
1 duplicate copy of clip
on Office Clipboard
• With the car
illustration selected,
display the HOME
tab and then tap or
click the Copy button
(HOME tab | Clipboard
group) (Figure 3â•›–â•›32).
2
• Display Slide 1 and then
tap or click the Paste
button (HOME tab |
Clipboard group) to sizing handles
indicate clip is
insert the car illustration selected
into the title slide.
Is the clip deleted from
Q&A
the Office Clipboard
when I paste it into the
slide?
No.
Figure 3â•›–â•›32
3
• Increase the car size by dragging one of the corner sizing handles outward until the car
is the size shown in Figure 3â•›–â•›33. Drag the car to the location shown in this figure.
Clicking Paste button
inserts copy of clip
from Office Clipboard
clip resized and
moved to desired
location
Figure 3â•›–â•›33
Copyright 201 Cengage Learning. All Rights Reserved. May not be copied, scanned, or duplicated, in whole or in part. Due to electronic rights, some third party content may be suppressed from the eBook and/or eChapter(s).
Editorial review has deemed that any suppressed content does not materially affect the overall learning experience. Cengage Learning reserves the right to remove additional content at any time if subsequent rights restrictions require it.Reusing a Presentation and Adding Media and Animation PowerPoint Chapter 3 PPT 167
PowerPoint Chapter 3
Break Point: If you wish to take a break, this is a good place to do so. Be sure to save the Watch for Motorcycles file again
and then you can quit PowerPoint. To resume at a later time, start PowerPoint, open the file called Watch for Motorcycles, and
continue following the steps from this location forward.
Adding Media to Slides
Media files can enrich a presentation if they are used correctly. Movie files can be BTW
produced with a camera and editing software, and sound files can come from the Office. Using Codecs
Video and audio content
com Clip Art collection, files stored on your computer, or an audio track on a CD. To developers use a codec
hear the sounds, you need a sound card and speakers or headphones on your system. (compressor/decompressor)
Once an audio or video clip is inserted into a slide, you can specify options that to reduce the file size of
digital media. The reduced
affect how the file is displayed and played. For example, you can have the video play
file size helps transfer files
automatically when the slide is displayed, or you can tap or click the video frame when across the Internet quickly
you are ready to start the playback. You also can have the video fill the entire slide, which and smoothly and helps save
is referred to as full screen. If you decide to play the slide show automatically and have space on storage media.
Your computer can play any
it display full screen, you can drag the video frame to the gray area off the slide so that it compressed file if the specific
does not display briefly before going to full screen. You can select the Loop until Stopped codec used to compress
option to have the video repeat until you tap or click the next slide, or you can choose to the file is available on your
computer. If the codec is not
not have the video frame display on the slide until you tap or click the slide. installed or is not recognized,
If your video clip has recorded sounds, the volume controls give you the option your computer attempts to
to set how loudly this audio will play. They also allow you to mute the sound so that download this file from the
Internet. Many codex files are
your audience will hear no background noise or music.
available to download from
In the following pages, you will perform these tasks: the Internet at no cost.
1. Insert a video file into Slide 3.
2. Trim the video file to shorten the play time.
3. Add video options that determine the clip’s appearance and playback.
4. Insert an audio file into Slide 1.
5. Add audio options that determine the clip’s appearance and playback.
6. Add a video style to the Slide 3 clip.
7. Resize the video.
1 insert & add effects | 2 modify placeholders | 3 modify & copy illustrations
To Insert a Video File 4 add media | 5 animate slide content | 6 customize slide elements
Slide 3 has another photo of a motorcyclist, and you have a video clip of a person mounting a motorcycle,
putting the bike into gear, and riding out of the scene. You want to use a majority of the clip and eliminate a
few seconds from the end. PowerPoint allows you to insert this clip into your slide and then trim the file. Why?
Just a portion will play when you preview the clip or run the slide show. This clip is available on the Data Files for
Students. See the inside back cover of this book for instructions on downloading the Data Files for Students, or
contact your instructor for more information about accessing the required file. The following steps insert this
video clip into Slide 3.
1
Video button
• Display Slide 3 and then display
the INSERT tab. Tap or click the
Video button (INSERT tab | Media
‘Video on My
group) to display the Video menu PC’ command
(Figure 3â•›–â•›34).
Video menu
Figure 3â•›–â•›34
Copyright 201 Cengage Learning. All Rights Reserved. May not be copied, scanned, or duplicated, in whole or in part. Due to electronic rights, some third party content may be suppressed from the eBook and/or eChapter(s).
Editorial review has deemed that any suppressed content does not materially affect the overall learning experience. Cengage Learning reserves the right to remove additional content at any time if subsequent rights restrictions require it.You can also read