Splashtop Enterprise Administrator Guide - May 4, 2021
←
→
Page content transcription
If your browser does not render page correctly, please read the page content below
Splashtop Enterprise
   Administrator Guide

        May 4, 2021

                      https://www.splashtop.com/enterprise
Table of Contents

Change Log - from last 03/17/2021 version .................................................................................................. 3
1.      Deployment............................................................................................................................................ 4
     How do I update Splashtop Streamer? ...................................................................................................... 7
2.      MacOS Additional Requirements ........................................................................................................... 8
3.      Single Sign-On (SSO) ............................................................................................................................... 9
4.      Inviting Users .......................................................................................................................................10
     Team Roles ...............................................................................................................................................10
5.      Grouping ..............................................................................................................................................11
     Adding Users or Computers to a Group ..................................................................................................11
6.      Access Permissions...............................................................................................................................12
7.      Scheduled Access .................................................................................................................................13
     Scheduled Access Configuration ..............................................................................................................13
     Managing Resources & Schedules ...........................................................................................................17
     If a Group Admin is removed, what happens to their owned Resource/Schedules? .............................18
8.      Team Settings .......................................................................................................................................19
     Overview of Team Settings ......................................................................................................................19
9.      Granular Controls .................................................................................................................................21
10.         Remote Computer Management (Technicans) ................................................................................22
     Windows Event Logs ................................................................................................................................22
     Computer Inventory – System, Hardware, Software ..............................................................................22
     Endpoint Security .....................................................................................................................................23
     Windows Updates ....................................................................................................................................23
     1-to-Many Actions & Schedules ..............................................................................................................24
     Configurable Alerts ..................................................................................................................................25
     Remote Command ...................................................................................................................................25
11.         Attended Access - SOS (Technicians) ...............................................................................................26
     Granular Settings .....................................................................................................................................26
12.         Logs ..................................................................................................................................................27

Page | 2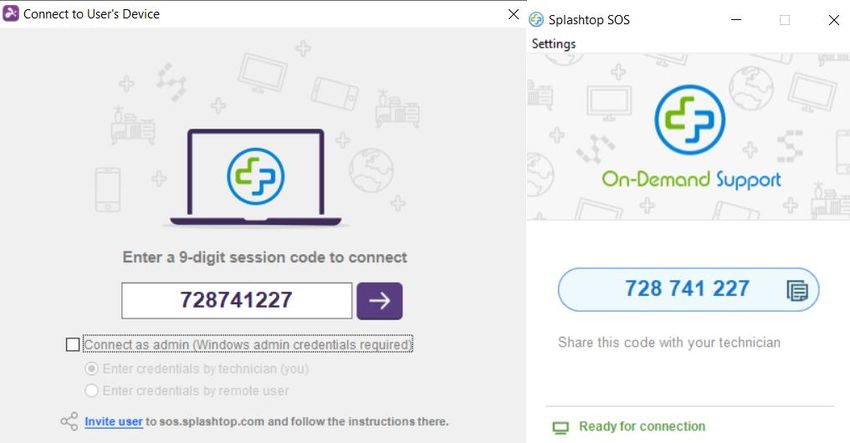
Change Log - from last 03/17/2021 version

   •   Deployment, section 1
          o Added info on how to update the Splashtop Streamer
   •   Scheduled Access, section 7
          o Added info on new Connection Pool feature
   •   Remote Computer Management , section 10
          o Added info on 1-to-Many Scripting and Configurable Alerts

Page | 3
1. Deployment

        Install Splashtop Streamer on computers to make them remotely accessible. You can create a
deployment package to customize the default Streamer settings for deployment. This way, you don’t
have to manually configure the settings after installation.

Overview of the different streamer settings

    1. Log into my.splashtop.com and click Management -> Deployment.

Page | 4
2. Click Create Deployment Package and select your desired Streamer settings. When creating the
      deployment package, you have the option of specifying default settings, including computer
      naming rule, security settings, sound re-direction, etc.

       Note: If using Single Sign-On (SSO), do not select “Lock streamer settings using Splashtop admin
   credentials” - SSO accounts cannot unlock the streamer.

   3. After saving the package, you can see the newly created package and unique 12-digit
      deployment code. Click Deploy to view deployment options.

   4. You will find two options for distributing the deployment package:

       Option 1: Share Link

       Send this link to allow a user to download and install the streamer for you.

Page | 5
Users who follow the link will see instructions to download and install the streamer.

Page | 6
Option 2: Download Installer

        Download the installer to install directly on your computer, share via Dropbox, email, etc., or
    prepare for deployment with a 3rd party tool.

        Multiple installer options are offered for Windows, Mac, Android, and Linux.

            •   View this article for Silent install parameters
            •   Deployment guides are also available for:
                    ▪ Group Policy (GPO)
                    ▪ Jamf Pro
                    ▪ Microsoft Intune
            •   Deployment package settings only apply to the Streamer upon installation. To update a
                Streamer’s settings after deployment, you can re-deploy with a new package or
                manually change the settings directly in the Streamer.
            •   Deleting a deployment package does not affect any already-deployed computers – it
                prevents any new deployments with this package code.

How do I update Splashtop Streamer?

There are multiple ways to update the streamer, including:

    •   Manually Update from the web console
    •   Manually Update from the Streamer -> About -> Check for Updates tab
    •   Manually Update by running the latest streamer installer
    •   Silently update using the .EXE,.MSI or .PKG

For more info, see this article on Splashtop Streamer Updates.

Page | 7
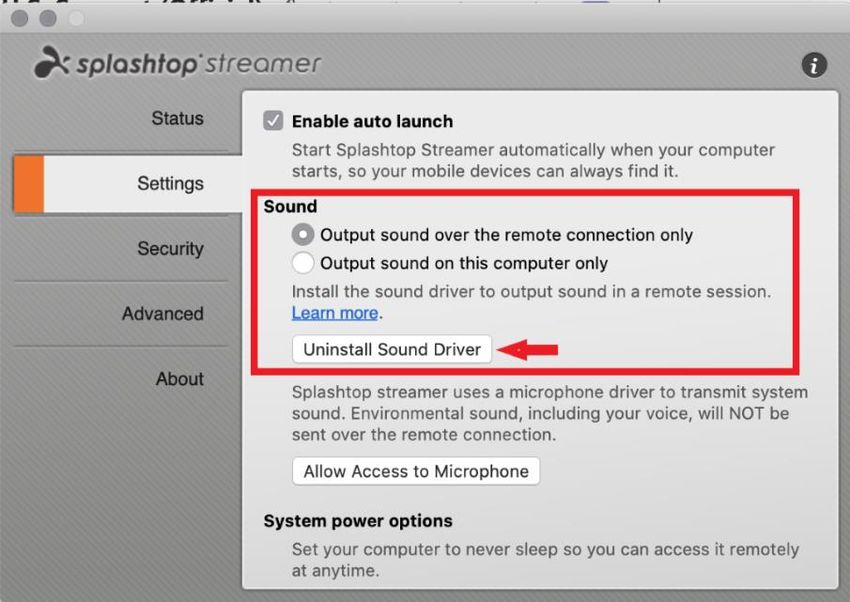
2. MacOS Additional Requirements

       If deploying to Mac computers, note these additional requirements and setup instructions:

   •   Security & Privacy permissions for macOS 10.14 Mojave and 10.15 Catalina/11 Big Sur:

   •   Audio: To enable audio streaming over the remote connection, install the Splashtop Sound
       Driver and allow microphone permission for Mojave/Catalina/Big Sur. If any apps on the Mac
       computers use 3rd party sound drivers, such as Avid Pro Tools or Adobe Premiere, some
       additional configurations may be required.

Page | 8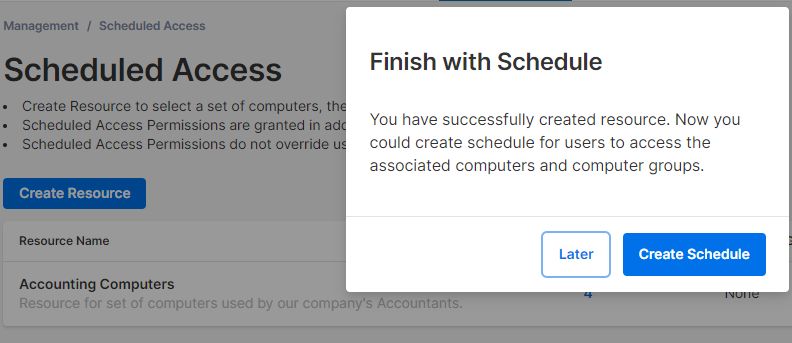
3. Single Sign-On (SSO)

        Splashtop supports logging into https://my.splashtop.com and the Splashtop Business app using
the credentials created from your SAML 2.0 identity providers.

If you would like users to use Single Sign-On (SSO), please complete two steps:

    1. Create an SSO method for your IDP service in the Splashtop web console:
       How to apply for a new SSO method?
           a. Detailed instructions on certain IDP services, such as AzureAD, OKTA, ADFS, JumpCloud,
                OneLogin, can be found here:
                Single Sign-On (SSO)
    2. Our validation team will reach out to you with instructions to verify your domain access and
       activate your SSO method.
    3. (Optional) Set up SCIM provisioning (if you use AzureAD or Okta) to automatically provision and
       sync users and groups. This skips the invitation email process (Section 4, Inviting Users).
    4. (Optional) Import SSO users by CSV fie if you are unable to use SCIM provisioning. This also skips
       the invitation email process.

View this article to read the limitations with SSO.

        Once your SSO method has been activated, note that you can turn off Device Authentication for
users that are associated with this method. This way, users do not need to click additional email links to
authenticate their devices. Simply, uncheck the Device Authentication checkbox for the SSO method
under Management -> Settings (Team owner only).

Page | 9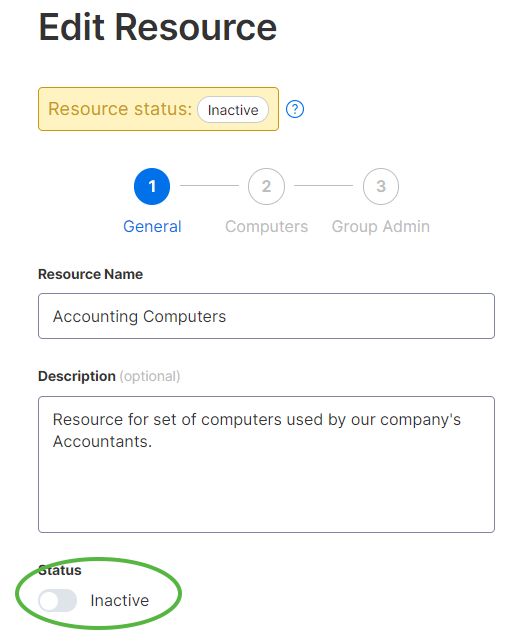
4. Inviting Users

       Invite users by going to Management -> Users -> Invite Users. Assign team roles, user groups,
and SSO authentication methods during the invitation process or later. You can invite up to 500 email
addresses in each invitation window.

Team Roles

    •   Owner: The Owner is the highest level of authority. They have permission to perform any
        functions in Splashtop, including (but not limited to) inviting users, changing roles, viewing
        anyone’s connection history, managing computers, and changing access permissions. The team
        Owner is the only user who has access subscription/payment info, the Team Settings tab, and
        can assign the Admin role to other users.
            o There is only one Owner, and status cannot be transferred between user accounts.

    •   Admin: The Admin role has the same permissions as the Owner above, except they cannot
        access subscription/payment info, the Team Settings tab, and cannot change users’ roles.
            o Group Admin: Group admin is a limited Admin role that gives a user admin privilege
                over specific user and/or computer groups. This allows them to add/remove users &
                computers only for the groups that are authorized.
            o Admins & Group Admins have access to use remote management features (Remote
                command, system inventory, etc) if you have purchased concurrent Technician licenses
                of Splashtop Enterprise. The ability to delegate specific users access to these features
                (regardless of team role) is coming soon.

    •   Member: Members are general users who have been added to the team to allow remote access.
        They only have access to computers that they are granted permission for, and can check their
        own status, account info, team info, and logs. They can remove themselves (“quit”) from a team
        in the Account Summary tab.

Page | 10
5. Grouping
With Splashtop, you can group your users and computers for easier management and access
permission control. Each user or computer can only belong to one group. However, users can have
access to multiple computer groups. Get started by going to Management -> Grouping.
You can create 3 types of groups:
1. User-only group
2. Computer-only group
3. User & Computer group
A user-only group can only consist of users. Grouping users is useful for setting access permissions for
multiple users at a time. It is also useful for automatically applying access permissions to a new user.
A computer-only group can only consist of computers. Grouping computers helps to organize a large
computer list for easier navigation. It can also make assigning access permissions easier – you can grant
a user access to an entire group of computers.
A user & computer group is a shortcut for group-based access control. It can consist of both users and
computers. By default, all users in this group can access all computers in this group.
Adding Users or Computers to a Group
From Management -> Grouping, use the gear icon to the right of the group to assign users or
computers. Multiple users or computers can be added at a time. You can also assign a Group Admin.
From Management -> All Computers, use the gear icon to the right of each computer to assign
that computer to a group.
From Management -> Users, use the gear icon to the right of each user to assign the user to a
group. You can also select a user’s group when sending an invitation.
Page | 116. Access Permissions
Access permissions determine which computers a user will have access to. They can be
configured by the team Owner or Admins under Management -> Users.
Note:
• Access permissions will grant a user persistent access to computers, regardless of time of day.
To only grant access for a particular timeslot, see Section 7, Scheduled Access.
You can set access permissions for a single user or a group of users. Click on the gear icon to the right of
a user or user group and choose Access Permission.
By default, when a user is invited,
• Admins have access to All Computers
• Members have access to No Computers if they are not invited into a group
• Members have access based on the group’s permission when assigned or invited to a group
To give a user or user group access to multiple computers or computer groups, select “Only specific
computers and computer groups”.
Page | 127. Scheduled Access
Scheduled Access allows admins to schedule users, groups, and computers for remote access on
a time-slot basis. The team Owner, Admins, and Group Admins have access to the scheduling module.
Notes:
• Scheduled Access is granted in addition to existing user/group access permissions that are set
under Management -> Users – they do NOT override existing user/group access permissions.
• For users who only need scheduled remote access, set their access permission under
Management -> Users to “No Computers”.
Scheduled Access Configuration
1. Before creating any new schedules, go to Management -> Settings to configure the Scheduled
Access time zone. The time zone cannot be changed when a schedule is in place. Only the team
Owner has access to this setting.
2. Go to Management -> Scheduled Access and click on Create Resource.
Page | 133. Enter the Resource Name and Description (optional). The Resource contains the set of
computers that will be scheduled for access.
4. Click Advanced Settings if you would like to enable Connection Pool or Exclusive Access on this
Resource. This will be the default template for the settings on each schedule that you create.
Connection Pool allows your users to connect to any available computer in the resource.
This is useful for cases where it doesn’t matter which computer the user connects to.
Exclusive access prevents a remote user from accessing a computer if there is already an
OS user logged into the computer. This is useful for scenarios where there may be users
working locally at the computer. You can also enforce additional features such as blank
screen, lock keyboard & mouse, and logout after disconnect for remote sessions that
follow the schedule.
Page | 145. Select the computers and/or groups that you would like to make available in the Resource.
6. (Optional) Assign Group Admin(s) to help with managing schedules on this Resource. Group
Admins can view any Resource that they are assigned to, and can also create new Resources and
Schedules.
7. Continue to Create Schedule, or later click on the Resource name to assign schedules.
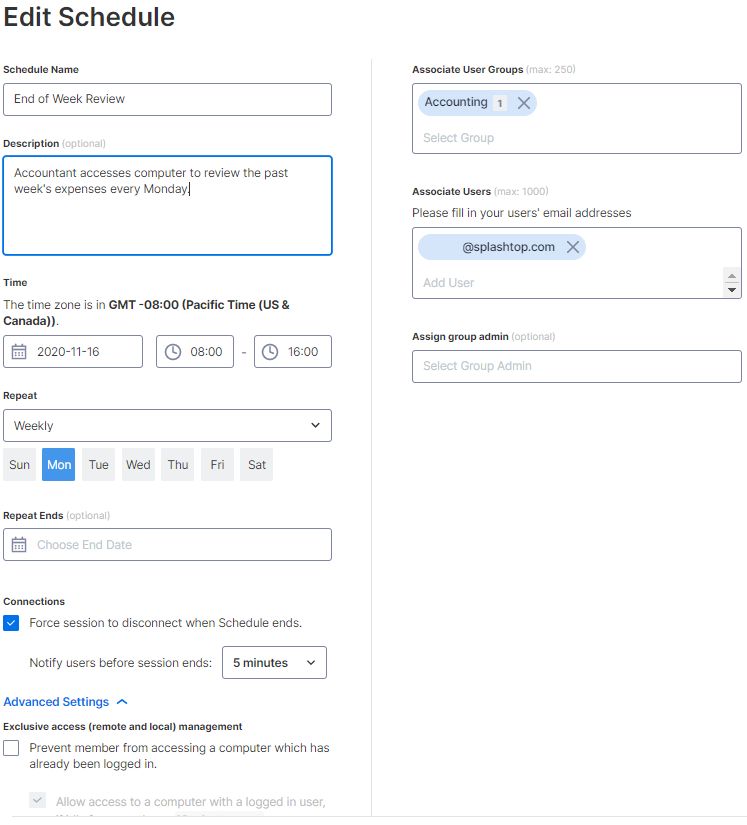
Page | 158. Create a Schedule for the Resource by filling in the Name, Starting Date, and Recurrence.
• Select user groups and/or specific users to access the Schedule.
You may also copy/paste a list of user emails into the Users box.
• The time drop-down selection is in 30-minute intervals, but you can type in any value
granular to a minute.
• You can select multiple days in a weekly recurrence.
• Check “Force session to disconnect when Schedule ends” if you would like sessions to
forcefully disconnect at the end of the timeslot.
Note: This does not automatically log out of the computer’s OS user account.
• Click Advanced Settings to manage the Connection Pool and Exclusive access settings if
they are enabled in the Resource.
Page | 16Managing Resources & Schedules Click on the menu to the right of each Resource to view management options. • Manage Schedule to get to the Resource’s calendar view. • Edit to change configurations of the Resource. • Delete to remove the Resource. Click on a Schedule in the calendar view to manage schedule functions. • Edit to change configurations of the schedule. • Delete to remove all recurrences of a schedule. • Clone to easily create a new schedule with similar configurations. • Pause/Resume the recurrence of a Schedule. (ex: holidays, maintenance) Page | 17
If a Group Admin is removed, what happens to their owned Resource/Schedules?

If a Group Admin is removed from the team or has their admin privileges revoked, their owned
Resources will become “Inactive”.

   1. To re-activate a Resource, click the menu to the right of the Resource -> Edit.

   2. Toggle the Status of the Resource from Inactive -> Active.

       If a Resource is owned by multiple Group Admins, the Resource will not become inactive unless
       all Group Admins are removed.

Page | 18
8. Team Settings
Go to Management -> Settings to review and configure Team Settings. Team Settings control
important policies for your team, such as feature capabilities and authentication. This page is only
accessible by the Team Owner.
Overview of Team Settings
Team Name: This is the name users will see in their team invitation and account info. The team name is
also displayed on the Status tab of deployed Splashtop Streamers.
Computers: The number of Streamers deployed of the max total.
Management: These checkboxes control the team’s feature capabilities, visibility options, and security
protocols. Most settings apply global – they will be enabled/disabled for all users of the team, regardless
of role. Some settings are role-based, including:
• Enable concurrent remote sessions (Two users into one computer)
▪ Allow members to connect to computers in an active connection
• Allow members to access the Management tab
• Allow members to see groups (Only group names of computers they have access to)
• Allow members to establish concurrent sessions (connecting to multiple computers)
• Allow members to disconnect others' sessions
• Enable remote reboot (normal reboot, restart streamer, safe-mode reboot)
▪ Allow members to reboot computers and restart streamers
Page | 19Schedule Access: Set the time zone for the scheduling module. Notification: Set up email notifications for certain actions in the team, such as when a computer is added, when a connection is initiated, when a user accepts the team invitation, etc. Two-Step Verification: Force admins and/or members to use Two-Step Verification (2FA). Device/Browser Authentication: Determine who receives device authentication links for new Business App or Web Console logins. Email authentication is disabled if a user already has 2FA turned on. Third-party integration: If you have technician licenses to use Splashtop SOS, you can set up API keys to integrate Splashtop SOS with your existing ServiceNow, Zendesk, Freshservice, Freshdesk, and/or Jira helpdesk solution. Single Sign-On: Apply and manage SSO methods here. Page | 20
9. Granular Controls

With Granular Controls, you can enable or disable certain features for specific users or groups.

Granular Controls are currently available for:

    •   File Transfer                                     •   Remote Print
    •   Copy & Paste                                      •   Attended Access (Technician license)

From Management -> Settings, you can set the Default Granular Settings of these features per user
role. These default settings will be applied when a new user is invited to the team’s default group or if a
user/group’s granular control setting is set to follow the default. The Admin Configurable setting can be
checked if you would also like to allow Admins to help with managing the granular controls.

Under Management -> Users, you can configure the granular control per user or user group. To
configure the granular control settings for a user group, click the group’s gear icon -> Granular Control.

To configure per individual user, click on each feature icon to enable/disable or click the user’s gear icon
-> Granular Control.

    •   On: Enable this feature for the user.
    •   Off: Disable this feature for the user.
    •   Follow Group: Apply the user group’s setting for the user.
    •   Default: Apply the team’s default setting per the user’s role from the Team's Default Granular
        Settings.

Page | 21
10. Remote Computer Management (Technicans)
Concurrent Technician licenses include features to remotely manage computers with the ability
to view Windows event logs, system/hardware/software inventory, endpoint security, and manage
Windows Updates and configurable alerts. You can also send commands to an unattended remote
computer’s command prompt in the background. All features described are available for the Team
Owner and Admins unless otherwise specified.
Windows Event Logs
View an online computer’s Windows Event Logs from within the Splashtop web console. You can
filter by event level, type, date range, and ID.
View this article for more details and instructions.
Computer Inventory – System, Hardware, Software
View and compare snapshots of a computer’s System, Hardware, or Software inventory. This
view is available per individual computer. You can also export the inventory of all computers by clicking
the Export option at the bottom of the Management -> All Computers page.
View this article for more details and instructions.
Page | 22Endpoint Security
View the endpoint security status for Windows computers at Management -> Endpoint Security
to make sure all machines are protected. You can also purchase additional licensing for Bitdefender to
enable installing and scanning directly from the Splashtop web console. The Endpoint Security
dashboard is available to the Team Owner, Admins, and Group Admins.
View this article for more details and instructions on Bitdefender.
Windows Updates
Check a computer’s Windows Updates status at Management -> Windows Updates. Click
Details to check for, view, and push available updates immediately or at a scheduled time for a specific
computer.
Page | 231-to-Many Actions & Schedules
Create a 1-to-Many Action that allows you to immediately run or schedule a system reboot or
Windows update to multiple computers or computer groups. This can be configured under
Management -> 1-to-Many Actions or 1-to-Many Schedules.
1-to-Many system reboots and Windows Updates are available for the Team Owner, Admins,
and Group Admins.
Actions that are set to run immediately can only be run on Online computers. If a computer is offline
when a Schedule Action is attempted, there is currently no retry mechanism.
By request, your Account Manager can also enable 1-to-Many Scripting, which includes the
ability to run or schedule tasks to silently deploy .EXE,.MSI,.PKG files and more. 1-to-many Scripting can
be available for only the Team Owner, or Team Owner and Admins, depending on the option selected
under Management -> Settings. If interested, let your Account Manager know.
Page | 24Configurable Alerts
Set up configurable alerts under Management -> Alert Profiles to get notified when certain actions
occur. Actions vary from software installed/uninstalled, CPU/disk utilization, computer online/offline,
and more.
Remote Command
From the Business App, click on a computer’s Remote Command icon to send command line or
terminal commands to a remote Windows or Mac computer in the background.
This feature is available for all users of the team if enabled, and requires the user to enter admin
credentials of the remote computer to access.
View this article for more details and instructions.
Page | 2511. Attended Access - SOS (Technicians)
Concurrent Technician licenses enable Attended Access with Splashtop SOS. Use Splashtop SOS
to access Windows, Mac, iOS, Android, and Chromebook devices with a 9-digit session code.
To connect, enter the 9-digit session code generated by the end user who runs the Splashtop SOS app.
See the tutorial here.
Additional Features:
• Connecting with Admin privileges
• Switching OS Users
• Reboot-and-Reconnect
• Custom Brand SOS
• Helpdesk Integrations (ServiceNow, Freshservice, Freshdesk, Zendesk, Jira, and more coming soon)
Granular Settings
Configure who can use Attended Access with Granular Settings. The Team Owner can configure the
default Attended Access permission per user role under Management -> Settings. This determines a
user’s default Attended Access permission when they are invited to the team.
Under Management -> Users, you can also configure the Attended Access permission per individual user
or user group.
Page | 2612. Logs
Splashtop maintains logs for self-auditing. The Team Owner and Admins can view logs of
everyone in the team. Members will only see their own logs.
To view logs, go to my.splashtop.com -> Logs.
Logs include the last 7, 30, or 60 days. If your service includes both unattended and attended access, you
can choose which to view. Scroll down to the bottom of the page to Export to CSV to download up to a
year of past logs.
View this article for an overview of logs.
Page | 27You can also read