The $98 Solar Panel Solar Panel DIY Instructions - Copyright 2009 GreenDIYenergy.com
←
→
Page content transcription
If your browser does not render page correctly, please read the page content below
The $98 Solar Panel

    Solar Panel DIY Instructions

           GreenDIYenergy.com

1   Copyright © 2009   GreenDIYenergy.com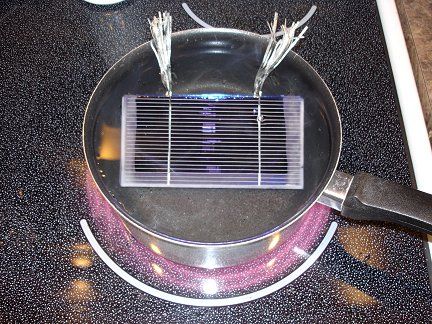
Legal Disclaimer

The author and the publisher disclaim any liability, loss or risk, personal or otherwise, which is
incurred as a direct or indirect consequence of the use and application of any of the contents of
this book.

                                         Copyright

You are not authorized or allowed to transmit copies of this file to anyone without written
permission, in case you received or purchased it. The use of this file is limited to your personal
use. Giving away copies to people who haven’t paid for them is illegal under international
copyright laws and will submit you to possible legal action.

      2              Copyright © 2009                GreenDIYenergy.com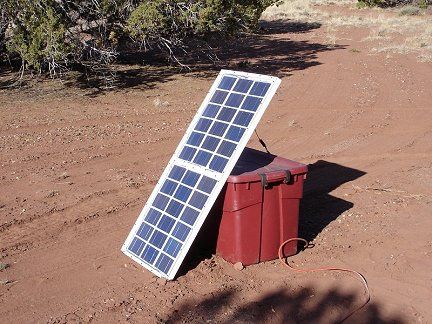
PARTS LIST AND COSTS:

Here is a picture of the final product that I’ll be walking
you through in this DIY guide.

To give you an idea of the costs associated with building
such a solar panel, here is a breakdown of the parts and
costs. These are just approximate costs and parts in your
area may be different.

           Part               Origin            Cost

           Solar Cells        Ebay              $67.50
           Misc. Lumber       Hardware Store    $16.62
           Plexiglass         Scrap Pile        $0.00
           Screws & Misc.
                              Hardware Store    $3.85
           Hardware
           Silicone Caulk     Hardware Store    $3.95
           Wire               Already on hand   $0.00
           Diode              Ebay              $0.20
                              Newark
           Jones Plug                           $6.08
                              Electronics
           Paint              Already on hand   $0.00

           Total                                $98.20

    3        Copyright © 2009     GreenDIYenergy.com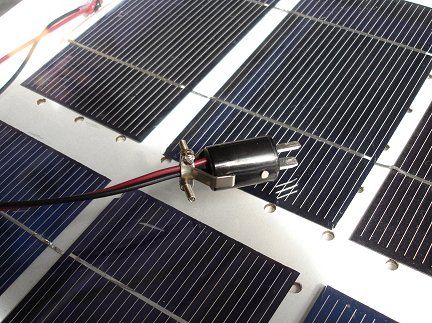
I used common tools and inexpensive and easy to acquire
materials to produce a solar panel that rivals commercial
panels in power production, but completely blows them
away in price.

Read on for step by step instructions on how I did it.

SOLAR ENERGY BASICS:

So what is a solar panel anyway?

It is basically a box that holds an array of solar cells.
Solar cells are the things that do the actual work of
turning sunlight into electricity. However, it takes a lot of
cells to make a meaningful amount of power, and they are
very fragile, so the individual cells are assembled into
panels.

    4        Copyright © 2009    GreenDIYenergy.com
FINDING LOW COST MATERIALS:

The challenges in making low cost solar panels….

The main stumbling block to building solar panels is
purchasing “solar cells” at a reasonable price. Solar cells
are grouped together in solar panels and are what create
the energy from the sun’s rays.

You can buy new solar cells but some can be pretty
expensive so shop around. One great way to save money
on solar cells is by purchasing blemished or slightly
damaged cells. Solar cell manufactures will often sell
these at a big discount.

   5         Copyright © 2009   GreenDIYenergy.com
For our example in this guide, I decided to use new solar
cells when making the solar panel.

You can also purchase damaged and used solar cells for
highly discounted price. This requires more work on your
part but the savings are big.

You will need to clean up the used solar cells and test
them for their output ratings but they generally work just
as good as new solar cells.

You may even be able to find solar cells for free if you do
some extra work. Many solar companies dispose of old
solar panels that they remove from houses where their
customer is buying their new systems. By contacting the
solar companies, you may be able to take the “trash” off
of their hands for free.

 In later chapters we’ll discuss the other parts that you
will need to create solar energy. For now, lets focus on
creating the actual solar panel.

   6         Copyright © 2009   GreenDIYenergy.com
Building the Solar Panel:

==> Solar Cells

Again, in our example for this guide we’ll use new solar
cells that were purchased online.

I bought a couple of bricks of 3 X 6 mono-crystalline
solar cells. It takes a total of 36 of these type solar cells
wired in series to make a panel.

Each cell produces about 1/2 Volt, so 36 in series would
give about 18 volts which would be good for charging 12
volt batteries. Yes, you really need that high a Voltage to
effectively charge 12 Volt batteries.

    7         Copyright © 2009    GreenDIYenergy.com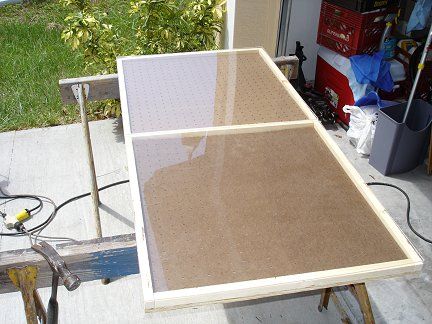
Solar Cells Shipped In Wax:

This type of solar cell is as thin as paper and as brittle and
fragile as glass. They can be damaged in shipping and so
some sellers package them in wax for shipping.

Oftentimes they stack 18 cells together in a wax brick.
The wax can be difficult to remove but I have shown you
how to do it below.

Solar Cells Shipped Without Wax:

If you can find cells that aren't dipped in wax for a good
price, then you can save a little time by purchasing those.
Just watch out for damaged cells during the shipping
process.

Solar cells with chipped edges and corners can still be
used. Minor chips won't reduce the cell's output enough to
worry about.

Solar Cells With Tabs:

Notice that these cells have metal tabs on them. I’d
suggest you purchase cells with tabs already on them.
    8        Copyright © 2009    GreenDIYenergy.com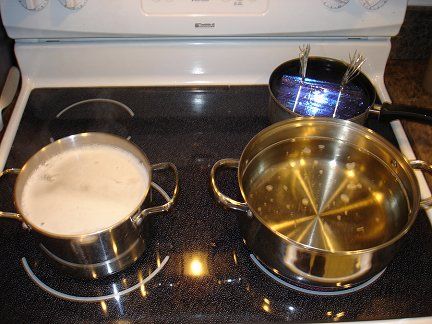
You will have to do a lot of soldering when building a
solar panel, so this will save you time by having them
already on the solar cells. Of course you could save even
more money by soldering on your own tabs.

Have Extra Cells:

When buying solar cells, I’d suggest you buy some extra
cells in case you break or damage them when you are
creating your solar panel. There will be a learning curve
with your soldering, so get a few extra just in case.

   9        Copyright © 2009   GreenDIYenergy.com
There are a lot of different sized solar cells (besides the 3
X 6 inches that I used in this example). You could use
larger or smaller cells for your panel.

When deciding on the size of solar cell to use, keep these
things in mind:
• Cells of the same type all produce the same Voltage
no matter what size they are. So the same number of cells
is always needed.
• Larger cells produce more Current (Amps) and
smaller cells produce less current.
• The total power your panel can produce is
determined by your Amps times your Volts.

             Amps x Volts = Watts of Power

So using larger cells produces more power, but the panel
will be large and heavy. Using smaller cells keeps the
panel small and light, but won't produce as much power.

              NOTE:
              Also, mixing different sized cells is not a good idea. The current your
              panel can produce will be limited by the smallest cell in the group and the
              larger cells won't work to their full potential.

   10        Copyright © 2009               GreenDIYenergy.com
The cells in this solar panel example are 3 X 6 inches in size and are rated at around 3 amps. When 36 of these cells are wired together in a series, we get a little over 18 volts. The result should be a panel capable of delivering almost 60 Watts of power. That power can be used to charging storage batteries and then later be used for powering lights and appliances. Or you could hook up an appliance directly to your solar panel inverter with no battery for direct energy. Building Solar Panel Box: A solar panel is really just a shallow box. So start out by building a shallow box with scrap wood. 11 Copyright © 2009 GreenDIYenergy.com
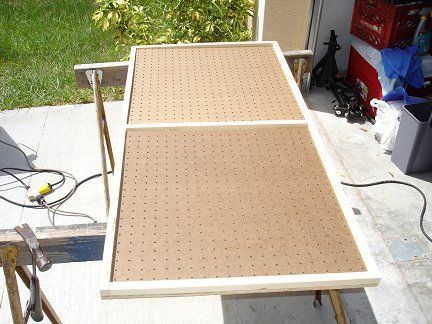
Make the box shallow so the sides don’t shade the solar
cells when the sun comes at an angle from the sides.

This example is made of 3/8 inch thick plywood with 3/4
X 3/4 pieces of wood around the edges. The pieces are
glued and screwed in place. This panel will hold 36 of the
3 X 6 inch solar cells.

It is smart to make 2 sub-panels of 18 cells each just so
it’s easier to assemble later. There is a center divider
across the middle of the box.

  12         Copyright © 2009   GreenDIYenergy.com
Here is my “back of the napkin” sketch showing the
overall dimensions of the solar panel. All dimensions are
in inches. The side pieces are 3/4 by 3/4 and go all the
way around the edges of the plywood substrate. A piece
goes across the center to divide the panel into two sub-
panels.

You can design your solar panel box differently, this is
just one example that has worked well for me. There is
nothing critically important about these dimensions, or
even the overall design.

Here is a close-up showing one half of the main panel.
This section will hold one 18 cell sub-panel.

  13         Copyright © 2009   GreenDIYenergy.com
Ventilation:
Notice the small holes drilled in the edges of the well.
These vent holes serve two purposes:
  • First to keep the air pressure inside the panel
    equalized with the outside
  • And second to let moisture escape.

These holes must be on the bottom of the panel or else
rain and dew will run inside. There must also be vent
holes in the center divider between the two sub panels.

  14         Copyright © 2009   GreenDIYenergy.com
Substrate: You can use any thin, rigid and non-conducting material for the substrate. For our example, I used two pieces of masonite peg-board to fit inside the wells. These pieces of peg-board will be the substrates that each sub-panel will be built on. They were cut to be a loose fit in the wells. Plexiglass Protector: To protect the solar cells from the weather, the panel needs a plexiglass front. 15 Copyright © 2009 GreenDIYenergy.com
I have used two pieces of scrap plexiglass that have been
cut to fit the front of the panel. You can also use one
large piece but I was able to find these two smaller pieces
for free.

Drill and countersink holes around the edges of both
pieces of plexiglass. Then attach with 1 inch drywall
screws into the face of the panel.

Be careful working close to the edge of the plexi. If you
get to aggressive it will break.

Glass could also be used for this, but glass is fragile. Hail
stones and flying debris that would shatter glass will just
bounce off the plexiglass.

Painting the Box:
Next give all the wooden parts of the panel several coats
of paint to protect them from moisture and the weather.

   16        Copyright © 2009    GreenDIYenergy.com
The box needs to be painted on top and bottom and
several coats may be needed.

The peg-board pieces also need to be painted (several
coats). Be sure to paint them on both sides or they will
curl when exposed to moisture. Curling could damage the
solar cells that will be glued to them.

Now that the structure of the solar panel box is finished, it
is time to get the solar cells ready.

  17         Copyright © 2009    GreenDIYenergy.com
Removing Wax From Solar Cells:

If you chose to purchase solar cells that are shipped in
was, then you will need to completely remove the wax
before using the cells.

Here is the best method I have found for removing the
wax quickly.

  18         Copyright © 2009   GreenDIYenergy.com
This photo shows the 3 pots of hot water I used to
separate the cells from the wax. All the pots of water are
at just below boiling temperature.

The process of removing the wax:

1. Put wax brick of solar cells in the initial pot of water
(right-rear).

It is recommended you put the brick of cells in cold water
first. Then slowly heating the water to just below boiling
temperature to avoid harsh thermal shocks to the cells.

   19        Copyright © 2009    GreenDIYenergy.com
Don't let the water boil or the bubbles will jostle the cells
against each other violently. Also, boiling water may be
hot enough to loosen the electrical connections on the
cells.

As you melt the bricks apart in the hot water, carefully
tease the cells apart and remove them one at a time.

Plastic tongs and spatulas come in handy for teasing the
cells apart once the wax melts.

NOTE:
Try not to pull too hard on the metal tabs or they may rip
off.

2. Then use a bath of hot soapy water (left-front) to
remove any wax still attached to the cells.

3. Finally, use a bath of hot clean water (right-front) to
thoroughly rinse the cells.

4. The cells would then be set out to dry on a towel.

   20        Copyright © 2009    GreenDIYenergy.com
Suggestions:
  • You should change the water frequently in the soapy
    and rinse water baths.

  • When finished don't pour the water down the sink.
    The wax will solidify in your drains and clog them.

  • This process removed almost all the wax from the
    cells. There is still a very light film on some cells, but
    it shouldn’t interfere with soldering or the working of
    the cells.

  • Once separated from their wax stabilized brick form,
    the cells are amazingly fragile and difficult to handle
    (and store). It is recommended leaving them as bricks
    until you are ready to install them in your panel. So
    build the panel first.

  21           Copyright © 2009   GreenDIYenergy.com
Here are some separated and cleaned solar cells drying on a towel. Installing Cells on Panel: Now it's time to start installing the cells on the panel. Laying out the cells: 22 Copyright © 2009 GreenDIYenergy.com
Start out by drawing a grid pattern on each of the two
pieces of pegboard. This will show you where each of the
18 cells will be located.

All 18 cells on each half panel need to be soldered
together in series, then both half panels need to be
connected in series to get the desired voltage.

Soldering Cells Together:

Soldering the cells together can be tricky at first, but you
should get the hang of it fairly quickly.

Start out with just two cells and place them upside-down.
Lay the solder tabs of one cell across the solder points on
the back of the other cell.

  23         Copyright © 2009    GreenDIYenergy.com
Make sure the spacing between the cells matched the grid
pattern you made.

Use a low-wattage soldering iron and fine rosen-core
solder. I also used a rosen pen on the solder points on the
back of the cells before soldering. Use a real light touch
with the soldering iron.

NOTE:
The cells are thin and delicate. If you push too hard, you
will break the cells.

  24         Copyright © 2009   GreenDIYenergy.com
Repeat the above steps and solder a string of six cells
together.

Solder tabs from scrapped cells to the solder points on the
back of the last cell in the string of six. Then repeat the
whole process two more times to get three strings of six
cells for a total of 18 for this half of the panel.

The three strings of cells need to be wired in series. So the
middle string needs to be rotated 180 degrees with respect
to the other two. Orient the strings the way you want them
(still upside-down) on top of the pegboard panel before
the next step of gluing the cells in place.

  25         Copyright © 2009   GreenDIYenergy.com
Gluing the cells in place can be a little tricky. Place a
small blob of clear silicone caulk in the center of each cell
in a six cell string.

Then flip the string of six cells over and set in place on
the outlined grid you made earlier. Press lightly in the
center of each cell to get it to stick to the pegboard panel.

NOTE:
Flipping the floppy string of cells is tricky. Another set of
hands may be useful in during this step.

Don't use too much glue, and don't glue the cells
anywhere but at their centers. The cells and the panel they
are mounted on will expand, contract, flex and warp with
changes in temperature and humidity. If you glue the cells
too tightly to the substrate, they will crack in time.

Gluing them at only one point in the center allows the
cells to float freely on top of the substrate. Both can
expand and flex more or less independently, and the
delicate solar cells won't crack.

   26        Copyright © 2009    GreenDIYenergy.com
Another method is to solder tabs onto the backs of all the
solar cells. Then glue all the cells down in their proper
places. And then solder the tabs together.

  27         Copyright © 2009   GreenDIYenergy.com
Here is one half panel, finally finished.

You can see from the picture above that I used copper
braid to interconnect first and second strings of cells. You
could also use solar cell tabbing material or even regular
wire.

There is another similar interconnection between the
second and third strings at the opposite end of the board. I
used blobs of silicone caulk to anchor the braid and
prevent it from moving around.

  28         Copyright © 2009    GreenDIYenergy.com
Here I am testing first half panel outside in the sun. In
weak sun through clouds the half panel is producing 9.31
Volts. Y

Once you have two half panels complete, you can install
them in their places in the main panel frame and wire the
two sections together.

Each of the half panels should drop right into place in the
main panel frame. Use four small screws (like the silver
one in the photo above) to anchor each of the half panels
in place.

  29         Copyright © 2009   GreenDIYenergy.com
Wires to connect the two half panels together were run
through the vent holes in the central divider. Again, blobs
of silicone caulk were used to anchor the wire in place
and prevent it from flopping around.

Remember to leave a few holes open so that the two
halves of the panel can breath.

Diodes:
Each solar panel in a solar power system needs a blocking
diode in series with it to prevent the panel from

  30         Copyright © 2009   GreenDIYenergy.com
discharging your batteries at night or during cloudy
weather.

I used a Schottky diode with a 3.3 Amp current rating.
Schottky diodes have a much lower forward voltage drop
than ordinary rectifier diodes, so less power is wasted.
Every Watt counts. I got a package of 25 diodes (Schottky
31DQ03) on Ebay for only a few bucks.

After looking at the spec-sheet for the diode you might
think to mount the diode inline with the positive wire
outside the panel.

  31        Copyright © 2009   GreenDIYenergy.com
However, it is better to mount it inside the panel since the
forward voltage drop gets lower as the temperature rises.
It will be warmer inside the panel and the diode will work
more efficiently. More silicone caulk was used to anchor
the diode and wires.

Drill a hole in the back of the panel near the top for the
wires to exit. Create a knot in the wires for strain relief,
and anchored them in place with more silicone caulk.

It is important to let all the silicone caulk cure well before
screwing the plexiglass covers in place. I have found
through past experience that the fumes from the caulk
   32        Copyright © 2009    GreenDIYenergy.com
may leave a film on the inside of the plexiglass and the
cells if it isn't allowed to thoroughly cure in the open air
before screwing on the cover.

And still more silicone caulk was used to seal the outside
of the panel where the wires exit.

   33        Copyright © 2009    GreenDIYenergy.com
I added a polarized two-pin jones plug to the end of the
panel wires. A mating female plug will be wired into the
charge controller.

  34        Copyright © 2009   GreenDIYenergy.com
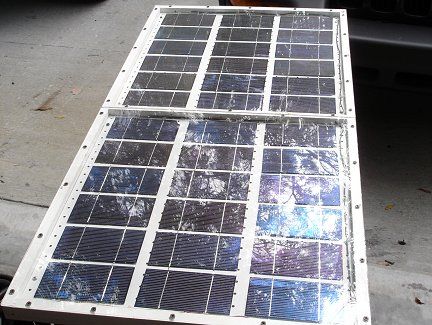
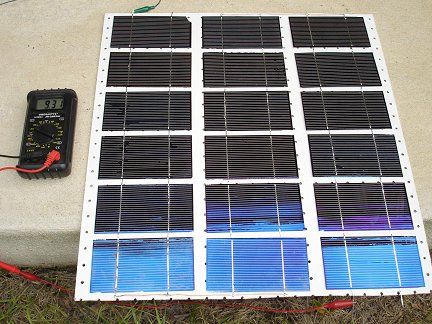
Here is the completed panel with the plexiglass covers
screwed into place.

It is a good idea to test your new solar panel before
sealing it shut. If there is a problem it is a lot easier to get
back into the panel without the sealant already applied.

You can seal the panel with either a bead of silicone caulk
or aluminum AC duct tape wrapped around the edges.

Testing Your New Solar Panel:

When testing the Voltage output of the completed panel,
just place it in the sunlight.

   35         Copyright © 2009    GreenDIYenergy.com
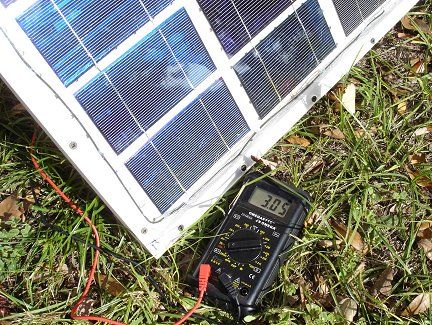
My meter says 18.88 Volts with no load. That's exactly
what I was aiming for.

Here I am testing the current capacity of the panel, again
in bright sunlight. My meter says 3.05 Amps short circuit
current. That is right about what the cells are rated for. So
the panel is working very well.

Finished Product Costs:
So how much did all this cost to build the solar panel in
this example? I saved all the receipts for everything I
bought related to this project and it came in around $100.

  36         Copyright © 2009    GreenDIYenergy.com
There were some supplies that I already had lying around
the shop (wood, plexiglass, etc), but these are common
items you can find for free (or cheap).

Once you have finished your first solar panel, you can
start building more so that your solar panel array grows
and you start creating more energy.

Here is a picture of the solar panel collecting energy. In
the back ground you will also see the homemade wind
turbine.

  37         Copyright © 2009   GreenDIYenergy.com
You can also read