The Chronicles of Narnia: The Lion, The Crowds and Rhythm and Hues
←
→
Page content transcription
If your browser does not render page correctly, please read the page content below
The Chronicles of Narnia:
The Lion, The Crowds and Rhythm and Hues

               Course 11
             Siggraph 2006

                                                Presenters
                                                 Jubin Dave
                                                Brad Hiebert
                                              Tae-Yong Kim
                                             Ivan Neulander
                                             Hans Rijpkema
                                                 Will Telford

                        Rhythm and Hues Studios
                                        5404 Jandy Place
                                   Los Angeles, CA 90066
                                          (310) 448-7500
                  Film Images © Disney/Walden, All Rights Reserved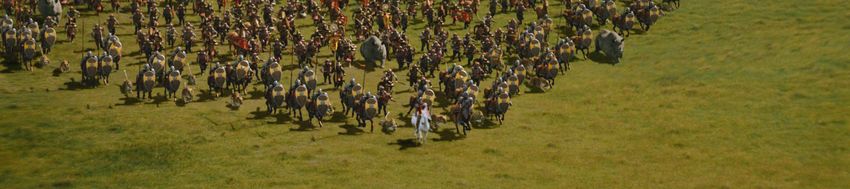
Introduction

For almost 2 decades Rhythm and Hues Studios has been using its
proprietary software pipeline to create photo real characters for films
and commercials. However, the demands of "The Chronicles of
Narnia" forced a fundamental reevaluation of the studio's existing
pipeline and procedures. The requirements of Aslan and the
thousands of mythological creatures presented a variety of technical
issues that necessitated new solutions and changes in the work flow
of almost every department in the studio. This course will explore the
studio's new work flow and latest technical solutions by taking a look
at several case examples from the production.

The evolution of Aslan will be explored in detail from initial models
through rendering. Detail will be paid to the rigging process, muscle
systems, a new approach to facial setup, R&H's proprietary fur
solution as it was used on Aslan, as well as dynamics on both
muscles and fur.

Elements of other creatures offered their own set of technical
challenges. The fully articulate wing solution for gryphons will be
explored, as well as challenges associated with combining live actors
with cg to create centaurs, minotaurs and fauns.

Creating the final battle presented the challenge of creating large
crowds composed of many different, non-human character types with
cloth and fur. This course will explore several aspects and issues
involved in this process including, pipeline considerations, motion
transfer between hero and crowd rig, motion generation, skinning,
level of detail, lighting, rendering and flexible body dynamics

                           Prerequisites

Topics will range from intermediate to advanced. An intermediate
knowledge of 3D workflow, procedures and terminology is helpful but
not required.
Presenter Biographies

Jubin Dave
Lead Lighting TD, Rhythm and Hues Studios

Jubin got his Bachelor's degree in Electrical Engineering from the
University of Bombay and his Master's in Computer Science from the
University of New Hampshire. He has been with Rhythm and Hues
for almost 8 years. He initially worked as a Software Engineer on the
proprietary renderer. He is currently a Lead Lighting TD. His partial
list of credits include Garfield, Elektra, and The Chronicles of Narnia:
The Lion, The Witch and The Wardrobe.

Brad Hiebert
Senior Character Rigger, Rhythm and Hues Studios

Brad Hiebert is currently a senior character rigger at R&H. He was
lead rigger on The Chronicles of Narnia where he rigged Aslan and
supported all rigs through out the production.
  He is self taught and started in the 3D industry as a demo artist for
SoftImage where he tested software and created demo material for
Siggraph and other presentations. After SoftImage, Brad worked for
several of commercial production companies around the country,
including Big Idea Productions, before coming to R&H 3 years ago

Tae-Yong Kim
Software Engineer, Rhythm and Hues Studios

Tae-Yong Kim is currently a software engineer in Rhythm and Hues
Studios. His primary responsibility at R&H includes development of
simulation tools such as cloth, hair, and other types of softbody. For
the Chronicles of Narnia, he developed a new hair simulation
technique
that was used to simulate aslan's fur as well as fur and hair of other
creatures. He holds a Ph.D degree in computer science from the
University of Southern California where he did researches on hair
modeling and rendering techniques. His work was published in
SIGGRAPH 2002 as well as other conferences. He has taught a
SIGGRAPH course on hair simulation in 2003 and 2004.

Ivan Neulander
Principal Software Engineer, Rhythm and Hues Studios

Ivan has been with R&H for over 8 years and presently leads the
Rendering Software team. He is a graduate of the University of
Toronto, from which he holds a Masters degree in Computer Science.
He has made contributions to the photorealistic rendering of CG fur in
a number of recent films, including: The Chronicles of Narnia,
Garfield, Scooby Doo, Cats & Dogs. He has also made a number of
SIGGRAPH presentations on the efficient rendering of realistic fur
and hair.

Hans Rijpkema
Character Technology Lead, Rhythm and Hues Studios

Hans has a masters degree in Computer Science. He worked at
SCAN in Groningen (The Netherlands) for five years as head of R&D
and as a teacher of a computer graphics masters degree program.
 He came to Rhythm and Hues in 1996 to start up the rigging
department and is currently in the software department responsible
for character development, like rigging, skinning, fur grooming and
animation and model creation and deformation. He has worked on
over 30 feature films like Mousehunt, Babe: Pig in the City,
Frequency, Harry Potter I, Cats and Dogs, Elf, Scooby Doo, Riddick,
Garfield and Narnia.

Will Telford
Creature Supervisor, Rhythm and Hues Studios

As Creature Supervisor on "The Lion, the Witch and the Wardrobe,"
Will Telford participated in defining and creating look development for
more than 60 characters. He co-supervised modeling, texture
painting, rigging and lighting.
  In addition Will served as Rigging Supervisor on projects including
"Scooby-Doo 2," "Garfield" and "Cat in the Hat." He served as

Character Rigging Lead on "Harry Potter and the Sorcerer?s Stone"
and "Elf," and as technical director on "Scooby Doo," "Men in Black
2," "The Ring" and "Daredevil," as well as for commercials Coca Cola
Polar Bears, Geicko, Advantix and Cheetohs.
   Will holds a a Bachelor of Environmental Design Degree from
Texas A&M University
Course Outline
1) Introduction
        1. Welcome, introduction of speakers, short overview - 5 min

2) Pipeline overview - 10 minutes
       1. R&Hs proprietary software philosophy
       2. Lite Comps
       3. Construction Kits
       4. Multi-Character pipeline - sharing many characters in one scene
           between many depts.

3) Aslan: From Model to Render - 75 minutes
       1. Modeling - 5 min.
       2. Body Rigging - 10 minutes
              a - construction kits
              b - binding dynamically
              c - muscle systems
              d- secondary motions
       3. Facial rigging - 15 min
              a - goals and production requirements of facial rig
              b - driven Poses - 2 animator inputs, many complex outputs
              c- final technique - minimal shapes with muscles working together
       4. Animation Testing - 5 min
              a- making it move like a lion
              b- finding human personality in photo real lion
       5. Fur - 25 min
              a - overview of proprietary fur system - guides, pelts
              b- evolution of Aslan's fur - examples of process
              c- lighting & rendering - HDRI, dual highlight specular model
       6 Dynamics - 15 min
              a. Simulating jiggles and body masses with harmonics
              b. Animating Aslan's mane with fur dynamics

4) Q&A 10 min.

Break 15 min
5) Mythological Characters - issues and solutions - 20 minutes
      1. Gryphon - 10 min
             a- model, rigging, render - details behind a fully articulated (folded
                 to open) wing
      2. Centaurs - 10 min
             a- overview problems with actor movements and proportions
             b- solutions with before and after examples

6) Battlefield 75 min
       1) Introduction - 5 min
               a - the challenge- large crowds on different character types with
                    cloth and fur
               b - pipeline consideration- crowd preview, independent stages
       2) Rigging considerations - 15 min
               a - hero rigs vs. crowd rigs- differences. similarities and motion
                     transfer
               b - skinning the crowd- stored in cached character rig model format
       3) Motion generation - 10 min
               a - Joint motion- crowd simulation and key frame animation
               b - Crowd motion files: efficiently recover subsets of individuals
       4) Skinning of a crowd - 15 min
               a - View port clipping- only process that which is visible
               b - Automatic Level of Detail selection
               c - Variation control geometry and materials
       5) Lighting and rendering - 15 min
               a - Prelighting: Levels of Detail and flavors
               b -Shadows, Tiling, Ambient occlusion, compositing
       6) Flexible body dynamics - 15 min
               a- Dynamics relative to camera: Simulation level of detail and view
                   port clipping
               b- Feeling the wind -simulating wind effects in cloth and hair
                    simulation for crowds.
               c - Parallel dynamics computation

7) Q&A 10 min
2. 1 Pipeline overview
       The Lion, The Witch, and The Wardrobe is the largest character
show Rhythm & Hues has ever done. With an 18 month production
schedule and over 67 unique characters to build, the entire
production pipeline had to be revisited. Rhythm and Hues primarily
uses proprietary software. This approach leads to a much greater
flexibility when approaching the challenges of a production. It reduces
the need for a dependency on resources external to the studio. The
following is a summary of software primarily used for this production:
           • Modeling: Maya and And
           • Rigging: Voodoo
           • Texture Painting: Photoshop and Deep Paint
           • Animation: Voodoo
           • Renderer: Wren
           • Compositing: Icy
           • Particle Effects: Houdini
           • Crowd Simulation: Massive

      To successfully address the challenges of the production,
Rhythm and Hues needed to create and refine several new pipeline
processes. It was clear very early on that the production would
stretch every resource in the studio very thin. As such we needed to
improve the efficiency of the studio. Many processes in the studio
worked well for single character shows. A whole new set of
challenges arose with so many characters.

LiteCmps
      Rendering resources were a primary concern for the
production. As such we needed to be more efficient during shot
production with our renders. To solve this problem we created
LiteCmps. The philosophy behind a LiteCmp is to move as much
computation from the render and allow it to happen in the composite.
In order to do this it is necessary to generate many additional layers.
This is done to the extent that the only changes that require a re-
render are animation, light position, and the creation of new lights. On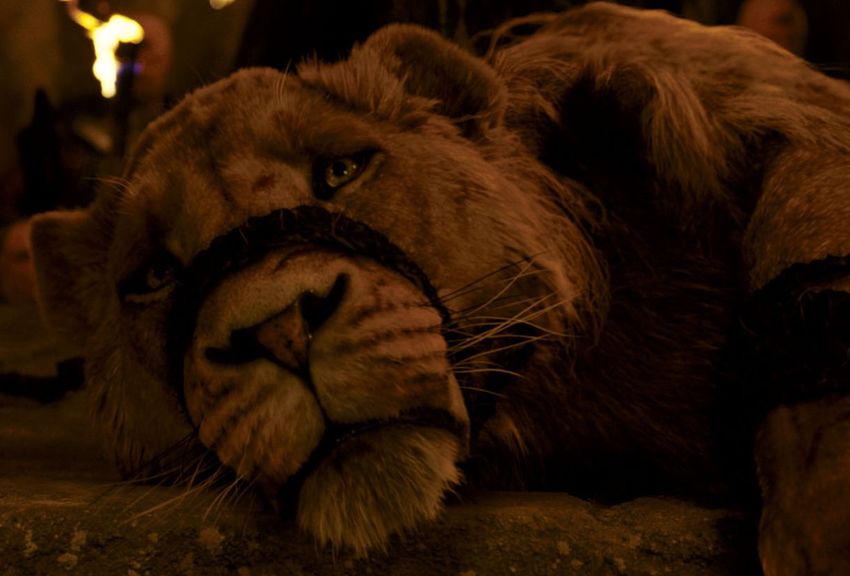
average each new light added roughly six layers. At render times all
lights are pure white. Intensity and color are entirely controlled in the
comp.

Construction Kits
     Another major concern was rigging and animation time of so
many characters. It was necessary to create a system that kept the
character rigs consistent. Our first approach was to group similar
characters. For example, a big cat rig could be re-used for Aslan, the
leopard, the cheetah, and the white tiger.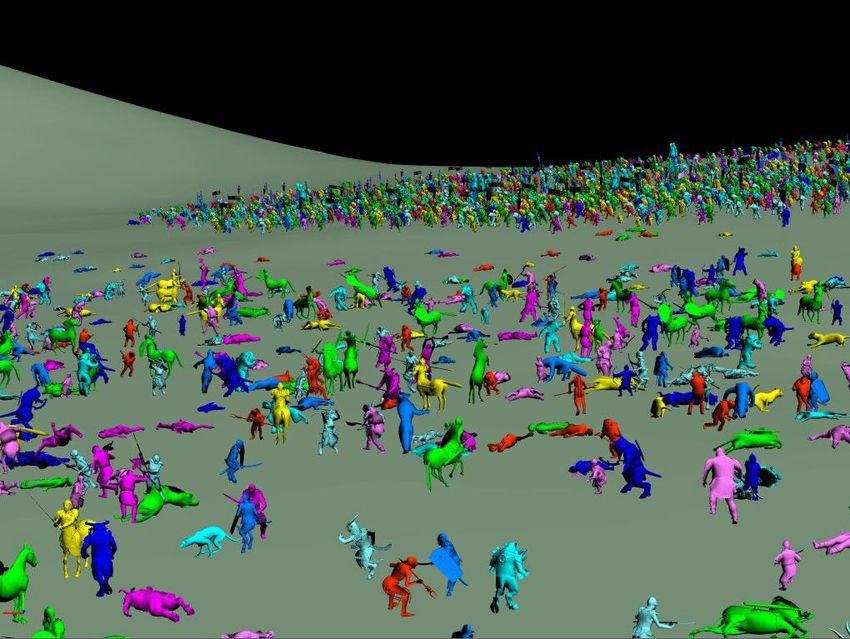
This level of granularity addressed our concerns, but we
determined that it didn’t go far enough. Our next step was to further
break down our characters by the components that they were
constructed of. In doing this, we could create one global spine
structure for quadrupeds. In the end we found 13 basic modules that
we used to construct every character on the show.
   • BipedArm
   • HoofedArm
   • PawedArm
   • BipedLeg
   • HoofedLeg
   • PawedLeg
   • BipedNeck
   • QuadNeck
   • BipedSpine
   • FkBipedSpine
   • QuadSpine
   • MultiResTail
   • Wing

  This approach guaranteed consistency between the characters
and allowed riggers to easily construct and support rigs. As an added
benefit, animation ramp-up time was drastically reduced. For
example, if an animator had already animated a centaur, they only
needed to learn how the neck controls work if they were moved onto
a horse. If an animator already had experience with a faun arm, they
new that the minotaur arm would be identical. Another bi-product of
this system was the ability to more easily retarget and share motions
from one character to the next.

Multi-char pipeline
       Another challenge for this production due to the shear volume
of characters was the management of multiple characters in one
scene. When anticipating the needs of the show it was determined
that we would need the ability to combine upwards of 30 hero
animated characters in a single animation file, with the possibility of
multiple animators working on the same shot.
       This presented two main challenges. One, with that many
characters in a shot we new we would be pushing the software’s
threshold for memory and maintaining file speeds. Two, we needed
animators to be able to collaborate and share animation and
characters between files.
       To solve the memory issue the first step was to create less
computationally expensive characters for the shots. This was done by
allowing animators to publish a character, which would bake out the
animation into two resolutions of cached geometry files. This gave an
animator three choices when working with characters. They could
have the live rig in the file, a lo-res cached geometry, and a hi-res
cached geometry. The system allowed them to swap these in and out
on the fly.
       As the animators published their characters as opposed to
publishing their entire animation file, other animators were given the
ability to check them out. Any newly published character changes
were reflected immediately in the files of animators using a cached
geometry.
3 Aslan Rigging 3.2 Body Rigging There were 3 primary elements in the rigging process that made rigging Aslan and the dozens of other hero characters possible and manageable.
Cks
As mentioned earlier, the standardization of the underlying rigs was
key to allowing the production of rigs quickly and to allow changes to
happen quickly and seamlessly.

Dynamic Binds
Rather than ever having a baked in weighting, All verts in our rigs are
bound dynamically when the scenes are loaded. There are many
advantages to the fact that there is rarely the need to have a fixed
vert to bone relationship. Joint position, control placement and fall off
change can be adjusted at any time in the production process.

Muscle Systems
Another change to our workflow was the creation of an entirely new
muscle system. The system was simple in design, volume-preserving
shapes, controlled by muscles that the skin would bind directly to.
Secondary deform issues like kin slide were not addressed with this
tool, however, harmonics and dynamics could be added to the
muscles.
Part of the R&D process was to determine the best way to handle the
new tools. Initially we tried building a very accurate setup, with as
many as 30 muscles per side of the body with 100% biological
accuracy. However, that proved to be computationally expensive and
many muscles in a small area could cause binding errors. In the end,
we determined that less was more. We combined many muscles into
larger single muscles. In the end we had about 10 major muscles per
side of the body.

Subtle secondary motions
To achieve the subtle effects like loose skin and muscle flexing, we
relied on two main approaches, harmonics and shapes. Harmonics is
a cycle-based system that mimics dynamics but is much faster and
less computationally demanding. The results are not as accurate as a
simulation, but adding a simple "jiggle" cycle on a muscle mass was
very convincing.
Subtle secondary shapes added an important degree of realism in the
torso and legs. These shapes could be animated by hand when
needed, or automated for repetitive cycles or at time when the
character was far enough back in the frame that it wasn’t to
noticeable.
3.3 Aslan Facial Rigging
Initial requirements
In addition to all of the issues related to the body, the facial rig had its
own set of concerns and problems. Bill Westenhoffer, the Visual
Effects Supervisor and Richie Baneham, the Animation Director both
had a number of issues that they wanted addressed as we began any
development on the face

1) 100% biological accuracy
This issue proved to be tricky. Given our history of cartoony
characters, Bill insisted that every movement of the face be muscle
based and that the rig not be able to hit ANY pose that a lion couldn't
hit. However, Aslan needed to speak. In addition, Richie wanted a lot
of random sculpting control that didn't necessarily fit into the rigid
system of control that Bill wanted....... there were a lot of meetings on
this one!

2) Concerns about too many shapes
We had several animators and leads that had worked on other high
profile characters where the face rigs were based upon thousands
and thousands of modeled shapes. They found those rigs overly
complex and difficult to use. Also, the addition of other shapes during
production might conflict with existing animation and require
reworking of finaled shots. They wanted to avoid this situation if
possible.

3) Concerns with muscles
Muscles could provide realistic movement, but not being locked to
modeled shapes gave a high level of sculptabilty that could lead to
different looks between artists. The production wanted consistent,
easily repeatable poses that would guarantee a consistent look
through out the production.

4)Concerns about UI
Animation had concerns that the level of subtle control required would
result in a cumbersome, overly complex UI. They wanted something
that was as simple and as intuitive as possible.
Working with Shapes
Although we didn't rely completely on shapes, they still played a very
important roll in the facial rig. By the time we were done we were
using about 75 shapes in the face. These shapes fell into 2
categories, deforming shapes and corrective shapes used to fix
deformations in certain situations. The deforming shapes were based
(and named) on isolated facial muscle movements rather than poses
like "Brow Up" or "Lip Corner Angry". We then combined these
isolated muscle based shapes into recognizable "poses" that
animators would be more familiar with.

For example, a pose of "Brow Up and In" might be a combination of
the externus, temporo, auricularis and palpeb modeled shapes. This
helped us to create human like expressions that we were confident
were biologically accurate since they were created from accurate
muscle movements that a lion could make.

In the past, R&H favored "traditional deforms" over shape based
controls. In the end Narnia definitely made more use of shapes than
anything we had done in the past. Because of this new emphasis on
shapes we were able to create some new tools for working with
shape based deforms.

Dpose, a radial basis function
Dpose, or drivenPose, is a tool that was created to allow us to mix
multiple shapes and create a wide variety of poses with a minimum
number of controls exposed to the animator. Our tool allows for a few
inputs, usually 2, to generate any number and variety of outputs. To
explain.....
Example 1- basic blend

First consider how a basic blend shape works in its simplest form......
One control drives the addition of one shape to a model. Four
controls drive 4 blend shapes which are mixed together according to
a preset algorithm such as average or additive. You can mix different
shapes together, but if you don't like the results you get, you will need
to create another shape and use another control.

           Example 2 – adding expressions to control more shapes

Using separate controls and some expressions on the blend shape sliders,
you can have two controls (ex. BrowUp/Down and BrowIn/Out) that drive 4
blend shapes. However, you are still limited in how you chose to mix those shapes. If BrowUp (shape1) and BrowIn (shape3) don't combine nicely with any of your mix mode choices you have a problem to sort out. Using Dpose we are able to assign any number of shapes to the result of two slider combinations. If you don't like the results of combining Shape1 (Brow Up +1) and Shape3 (BrowIn -1), we can simply create a new shape that is used instead of shapes 1 & 3 when "BrowUp" =1 and "BrowIn" = -1 The final facial approach After much experimenting, we ended up with a multi-tiered rig that combined shapes, 2 layers of muscles and traditional deforms.
Starting Model
The final model existed in a number of resolutions that were used at
various stages depending upon the need of that stage. Usually a very
low res model was used.

Step 1 - deforming muscles
First we created a few muscles that were needed to handle major
movements and deformations such as rotations and skin stretch from
jaw, ears and tongue. In general these deforms were still fairly rough
and not all vertices were distributed in a pleasing manner.

Step 2 – shapes

On top of these muscle deforms we mixed in the shape based deformations.
These handled many key expressive muscle poses and wrinkles as well as
subtle corrections to the previous muscle based movements.

Step 3 - traditional deforms
The next step involved adding many layers of deforms that built on
top of the accumulated muscle and shape based deforms. Although
many of these controls were for tweaking subtle areas, many had
much broader effects such has sculpting the shape of the lips,
moving the eyeballs and creating complex ear movements and poses

Step 4 – skin slide muscles

Finally, a set of detailed muscles that represented the muscles on a
lion's face that lay just under the surface were added to calculate
subtle skin slide that would result from all of the various deformations
that have accumulated to this point.

These were then mixed in on top of all of the other deforms at various
levels . These provided a subtle movement that really sold the face.
UI - make it simple and clear

Finally, it was very important to the rigging team to have a user
interface that made accessing the controls as easy and as intuitive as
possible. In addition, we wanted to help standardize the look of Aslan
by creating tool sets that lead the animator to use the broader tools
first before resorting to low level sculpting tools that a rig this flexible
needs.

R&H uses a tool called "CharVui" which is a standardized UI for
controlling all characters. It groups all tools into layers that can then
be called up into the control window.

Per a suggestion by Erik De Boer, one of the animation supervisors,
we grouped all of the controls in 3 major layers.

1) faceMajor Controls

This is where every animator should spend the majority of their time.
Controls here were designed to give consistent, repeatable results. It
was our hope that 90% of the animation could be done with the
faceMajor tools.

This layer included things like eye controls, jaw, complex (Dpose)
shape controls and other high level functionality.

2) faceMinor Controls

This was the next tier down of controllability. This layer consisted
primarily of access to the individual modeled shapes, not their
complex combinations in the faceMajor layer.

In the end these were rarely used, if at all. In retrospect, this was
partially due to the fact that we named the shapes after the facial
muscles they were based on. As it turns out, calling a shape
"mentalis" or "orbicLevator" is not terribly intuative to ,well.
anyone!..... who knew?
3) face tweaker

This was the lowest level of control and it contained controls for
sculpting the lip shape spline, ears, loose skin around the face and
more.

Most animators spent some time with these controls. It was probably
inevitable, but grouping these controls on this level helped insure that
an animator didn't do an entire scene's lip sync by brute forcing it with
sculpting control. The rig was certainly capable of performing in that
manor, but it wasn't an efficient use of an animator’s time nor did it
give the consistent results we wanted.
3. 5 Hair Lighting and Rendering

Hair Representation
Each strand of hair is rendered as a closed generalized cylinder: a
tube of varying thickness following a given path through space and
tapered at the tip. Hair strands are passed to the renderer in patches
that have precomputed bounding boxes for fast clipping. Each strand
consists of two or more control points that define (x,y,z) position, as
well as some extra information used for texture lookups and for
approximating self-shadowing. Also, each strand has a hairType that
defines its shading attributes.

Within the renderer, each strand is tessellated into a polygonal ribbon
that follows the Catmull-Rom spline defined by the positional control
points. The ribbon is oriented to face the camera, which entails
rendering fewer polygons than would tessellating a true generalized
cylinder. Even though the ribbon thus constructed is valid only from
the camera’s view, this is not a problem for us because we assume
the hair deforms from one frame to the next and we therefore need to
re-tessellate it on a per-frame basis anyway.

In the few scenes where we used ray tracing (mainly for shadows),
we used an additional hair representation within the ray tracer: Each
hair segment was decomposed into a ball and cone, which are
primitives that our ray tracer can natively ray-intersect.
Hair Shading Overview
The shading parameters of hairs are fully scriptable and exist
independently of the geometric representation discussed above.
Each hair strand is associated with a hairType, which is a label that
associates it with a particular hair shader. Our hair shader contains
the following attributes, of which many are self-explanatory but others
are quite complex.

   Ka             Color Ambient color for local illumination
   Kd             Color Diffuse color for local illumination
   Ks / Ks2       Color Specular color for local illumination
                         (individual control for dual highlights)
   Kr             Color Specular color for reflections
   Kdr            Color Diffuse color for reflections
   Kt             Color Transmissive color
   Kxn            Color Arbitrary color channel, e.g. Kx1, Kx2, etc.
   Ko             Scalar Opacity
   Ns / Ns2       Scalar Specular exponent for local illumination
                         (individual control for dual highlights)
   Bs / Bs2       Scalar Broadness of specular highlights under
                         local illumination (individual control for dual
                         highlights)
   Thickness      Scalar Strand thickness (more than a shading
                         parameter)
   EdgeFade       Scalar Rate of opacity fade from edge to center of
                         strand. This causes a breadthwise blurring
                         of each strand.
   Kambert        Scalar Controls blend between Kajiya and
                         Lambert shading
   TanShift /     Scalar Moves primary (tanShift) or secondary
   TanShift2             (tanShift2) up or down the hair based on
                         given parametric offset value
   ColShift       Scalar Alters color lookups of Ka, Kd, Ks, Kr, Kdr
                         by altering their spline lookup parameters
   Nt             Scalar Exponent for transmissive falloff
   Bt             Scalar Alters broadness of transmissive hotspots

Each of these shading parameters can vary over the length of a hair.
We support this variation by allowing each parameter’s values to be
specified multiple times, with each specification representing a control point of a one-dimensional (for scalars) or three-dimensional (for colors) Catmull-Rom spline. By default, the control points are spaced evenly, but the spacing can be adjusted arbitrarily per-hairType. Even though thickness is more than just a shading parameter (in that it affects the geometry of the hair ribbon) we include it in the above chart because it is controllable within the hair shader and uses the same syntax as the other parameters. Texture-Based Shading Parameters An additional level of flexibility comes from allowing any shading parameter specification to come from a texture. Each hair has a single pair of texture coordinates (u,v), which match the (u,v) of the skin position (follicle) from which it originates. When a texture is used as a shader parameter specification, the texture is sampled at the hair’s (u,v) coordinates and the resulting color or scalar is used as a control point in the shading spline. Jittered Shading Parameters Another useful shading control we implement is the ability to randomly perturb or jitter each shading parameter at each control point of its specification spline in a user-specified way. In addition to purely random additive and multiplicative jitter, we support jitter palettes. These allow the artist to specify, using an image, an allowable palette of colors or scalar values which to apply as jitter. This provides control over not only the range of possible jitter values but also the relative probability of each, which is controlled by varying the number of pixels allocated to each color in the palette. Dual Highlights Although we make no attempt to accurately model the dual highlights observed in real hair as discussed in Marschner et al. [SIGGRAPH ’03], we make it easy to achieve a similar look in a much less expensive and more art-directable fashion: We allow two sets of highlight parameters to exist on each strand (Ks, Ns, Bs and Ks2, Ns2, Bs2). Moreover, we allow the user to effectively move each set of highlights along the hair strand by altering the spline parameter
used to compute the shading tangent for each shading point. The
latter is accomplished using the TanShift[2] parameter. The following
images illustrate this technique, along with the use of additive jitter in
the TanShift.

 Single highlight,   Single highlight,   Dual highlights,   Dual highlights,
 no jitter           with jitter         no jitter          with jitter

Transmissive Lighting
We model transmissive lighting for traditional local illumination by
considering the dot product between the view vector (from camera to
shading point) and the light vector (from shading point to light), raised
to the power nt and scaled by the color paramter kt. Although the
original Kajiya model does a good job of making backlit hair shine,
our transmissive lighting component allows this effect to be
accentuated and the backlight to be colored differently from regular
illumination.

Transmissive lighting proved very valuable in several shots featuring
Aslan standing in front of a low, late-afternoon sun. Lighters were
able to use this feature to highlight backlit hairs without altering the
desired look of the frontlit fur or introducing additional light sources.

We illustrate the effect below:
Local Self-Shadowing Model
In addition to depth-map-based shadows, we use a local self-
shadowing model that darkens hair using information gathered from
the underlying skin. The following renderings illustrate the effect, the
left image rendered without local self-shadowing and the right one
with. Neither image uses any type of global shadowing (e.g. depth
maps)

           Left: No local self-shadowing; Right: with local self-shadowing. Neither image uses any true
           (e.g. depth map or ray-traced) shadowing.
Our self-shadowing model is based on a Graphics Interface ’98 paper by Neulander and Van de Panne (http://www.rhythm.com/~ivan/pdfs/gi98.pdf). In short: As part of each hair’s geometry, we store at each control point a vector (the self- shadowing normal) and a scalar (the self-shadowing depth). The combination of these values place the control point within a virtual sphere, as illustrated below. The sphere is assumed to consist of a homogeneous semitransparent material. Given the position of the point, we can compute for any light direction the relative distance that light must penetrate through the sphere to reach the point. We attenuate the lighting of this point based on this distance, through the following exponential formula:
Self-shadowing height = 1 – s*depth (s varies per hairType)

    Self-shadowing normal vector

    Unit vector from shading point to light

    Hair density constant (varies per hairType)
                                                                  r

We also model a separate opaque skin sphere within the
semitransparent hair sphere. The relative size of the skin sphere is
based on the hairType parameter s. We can determine which light
directions are occluded by the skin sphere by evaluating the
conditional

where r = 1 – s.

Although local self-shadowing does not capture distantly cast
shadows (e.g. from an animal’s paw onto its belly), it is nevertheless
useful in providing subtle shading hints as to a pelt’s shape. We
found it most useful in conjunction with depth-map-based shadowing,
which by itself would often fail to pick up very subtle self-shadowing
without introducing bias artifacts.

Image-Based Lighting
Image-based lighting was essential to our goal of rendering
photorealistic fur that blended seamlessly with live environments. We
applied a two-pronged strategy in rendering image-based lighting of
hair:

  1) We decomposed the environment map into a 16-20 colored
     directional lights, each with a moderately blurred shadow map.
     We used an image processing tool, similar to HDRShop’s
     LightGen plugin, to extract a small set (1-3) of bright pixel
clusters as key lights. After removing the light contribution of
these bright clusters, we then extracted 16 evenly spaced fill
lights from the residual environment map. The fill lights used a
lower resolution depth map, applied with greater blur.
Even though subsequent shading required a large number of
depth map lookups, the result was a smooth and relatively
efficient way to capture IBL and properly take occlusion into
account.
Left: Sample arrangement of colored directional lights derived from HDRI environment map.
Right: Final rendered image using these lights with depth-map shadows.
2) A less expensive alternative used in some shots was to sample
diffuse and specular reflection rays around each strand into
pre-filtered diffuse and specular environment maps, using the
local self-shadowing model to approximate occlusion. This
technique is described in more detail in a 2004 SIGGRAPH
sketch by Neulander
(http://www.rhythm.com/~ivan/pdfs/sketch2004.pdf). Note that
even though this approach sounds like a ray-traced one, it does
not use ray tracing. Map lookups are computed purely based on
ray directions, and the occlusion term for each lookup is
computed using the local self-shadowing formula. As a result,
the shading is relatively inexpensive and can even be
computed in real time as was demonstrated during the 2004
sketch.The following illustrate the second IBL approach without (left half)
and with (right half) the use of local self-shadowing for occlusion
approximation. Clearly, taking occlusion into account, whether by
depth maps or otherwise, is very important with IBL.
The left side of each image uses unoccluded IBR sampling. The right side of each uses the “fake”
self-shadowing model to approximate occlusion.
Kambert Shading Model
The Kajiya shading model nicely captures the look of thin strands of
hair (infinitesimal cylinders). However, for thicker clumps, it is
desirable to see a distinct lambertian falloff across the width of the
clump. To facilitate this, we allow the artist to blend between
lambertian and Kajiya shading using the kambert hairType paramter.In order to apply lambertian shading to hair, we first need to compute
a shading normal based on a given shading position and tangent
vector. We do so by interpolating between a pair of view-dependent
vectors C and E, based on the distance of the shading point from the
edge of the hair ribbon. Vector E is the view vector and vector C is
based on E and the hair tangent T as per the following formula:
O
C
T
O = E x T and C = T x O
E
We blend the diffuse components of Kajiya and Lambert shading as
follows:
Diffuse = (1- ) Dkajiya + π Dlambert
The factor of π accounts for the fact that the Kajiya model, applied to
a thin cylinder, on average yields brighter illumination than the
Lambert model by a factor of π.
To avoid aliasing problems, we always use the Kajiya model for
specular shading.
The following renderings illustrate the results with several values for
:
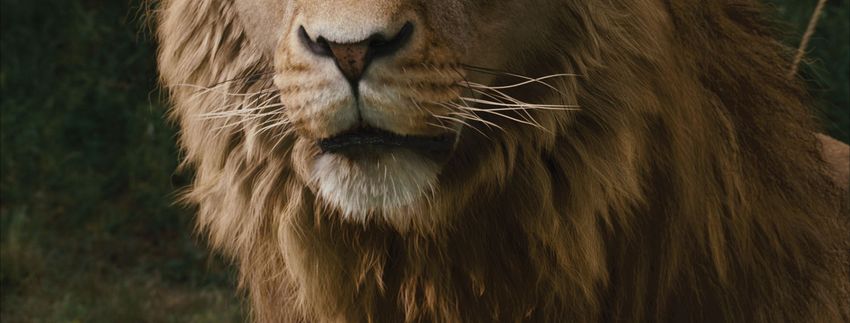
= 0 0.3 0.6 1.03.6 Simulating the world of talking animals Simulating Hair, Fur, and others The movie had many talking animal characters, including the majestic lion - aslan. Dealing with fur of each character presented enormous challenges on every side of pipeline. Animating fur - especially longer hairs like the mane of a lion - presented a challenge that the studio had not dealt with before. A new hair dynamics solution as well as many other tools had to be developed and the tools were extensively used to simulate motion of the hair of many such mythological characters. When the crew had a change to see and interact with wild animals (such as a real lion!), two observations came out.
• Most animal fur is very stiff.
  • Animal fur almost always move in clumps, apparently due to
    hair-hair interaction

This meant that we needed to have a stiff hair dynamics system with
full control over hair-hair interaction. As any experienced simulation
software developer would find, this is not a particularly pleasant
situation to be in – to hear something is stiff in a simulation.

1.1 The hair simulator
   From the literature, one would find a number of choices for dealing
with hair-like objects. Among those are articulated rigid body method,
mass-spring (lumped particle), and continuum approach. Each
method has pros and cons and one could argue one method’s
advantages over others. We decided to start with the mass-spring
system since we had a working code from the in-house cloth
simulator. Thereby we started by adapting the existing particle-based
simulator to hair.

1.2 mass-spring structure for hair
In our simulator, each hair would be represented by a number of
nodes, each node representing the (lumped) mass of certain portion
of hair. In practice, each CV of
guide hairs (created at the
grooming stage) was used as the
mass node. Such nodes are
connected by two types of springs –
linear and angular springs. Linear
springs maintain the length of each
hair segment and angular springs
maintain the relative orientation
between hair segments.

   Linear spring was simply taken from the standard model used for
cloth simulator, but a new spring force had to be developed for the
angular springs. We considered the use of so-called ‘flexion’ springs
that are widely used in cloth simulation. With this scheme, each
spring connects nodes that are two (or more) nodes apart. However, after initial tests, it was apparent that this spring would not serve our purpose since there are a lot of ambiguities in this model and angles are not always preserved. This ambiguity would result in some unwanted ‘wrinkles’ in the results (in the figure below, all three configurations are considered the same from linear spring’s point of view). ventually, the hair angle preservation had to be modeled directly from angles. We derived the angle preservation force by first defining an energy term defined on two relative angles between hair segments, and then by taking variational derivatives to derive forces. A matching damping force was added as well. Derivation on angles are usually far more difficult than working on positions, and it would also require additional data such as anchor points attached to the root such that angles could be computed at the root point as well. To compute a full angle around each node, each node would have an attached axis that was generated at the root and propagated to each node. We simulated the motion of each hair along with external forces such as gravity, wind forces. The time integration was performed with a full implicit integration scheme. As a consequence, the simulator was very stable, elegantly dealing with
the stiff hair problem. Extremely stiff hairs (such as wire) needed
some numerical treatment such as modification of jacobian matrices,
etc., but in general, this new approach could handle very stiff hairs in
a fixed time stepping scheme.
   In the absence of collision and hair- hair interaction, each hair
could be solved independently, and solved very fast if a direct
numerical method was employed (thousands of guide hairs could be
simulated in a second per frame). In practice, the simulation time
was dominated by collision detection and hair-hair interaction.
Overall integrator time was only a small fraction (< 5%).
This CG lion test was performed before the production started, as verification on many aspects such as
simulation of hair-hair interaction, collision handling, grooming of hair, rendering, and compositing.

1.3 Collision Handling
   There are two types of collision in hair simulation – hair would
collide against the character body, but would also collide against
other hairs. These two cases were separately handled, and each
case presented challenges and issues.

1.2.1 Collision handling between hairs and characters.

For collision handling, each character was assigned as a collision
object and collision of each hair against the collision object was
performed using the standard collision detection techniques (such as
AABB, Hashing, OBB, etc.) with some speed optimizations (e.g.
limiting distance query to the length of hair.) added.
If a CV was found to be
                                       penetrating the collision object, it
                                       was pushed out by a projection
                                       scheme that was tied to our
                                       implicit integrator. For most
                                       cases, the simple scheme
                                       worked very well, even in some
                                       situations where collision objects
                                       are pinched between
                                       themselves.
                                          However, in character
                                       animation, some amount of
                                       pinching is unavoidable
(especially when characters are rolling or being dragged on the
ground), and the simulator had to be constantly augmented and
modified to handle such special case of ‘user error’ in collision
handling.
  For example, in some scenes, hair roots often lie deep under the
ground. In such cases, applying standard collision handler would
push things out to the collision surface, but hair had to be pulled back
since the root had to lie under the ground. This would eventually
result in oscillations and jumps in the simulation. Our simulator had
additional routines to detect such cases and provided options to
freeze the simulation for the spot or to blend in simulation results. In
addition, animations were adjusted (mostly for aesthetical reasons)
and other deformation tools were also employed to sculpt out the
problem area in collision.

1.3.2 Hair-hair interaction
   Early on, it was determined that the ability to simulate hair-hair
interaction was a key feature that we wanted to have. Without hair-
hair interaction, hairs would simply penetrate through each other, and
one would lose the sense of ‘volume’ in hair simulation. This was
especially important since our hair simulation was run on guide hairs,
and each guide hair could represent a certain amount of volumes
around it. So, the sense of two volumes interacting with each other
was as important as simulating each guide hair accurately.
Having based our
simulator on a mass-
spring model, we added
the hair interaction
effect as additional
spring force acting on
hair segments.
Whenever a hair is
close to another hair, a
spring force was
temporarily added to
prevent nearby hairs
from further
approaching each other,
and also to repel too
close ones away from
each other. The amount
of spring force was
scaled by such factors
Simulating interactions between a mermaid’s hair as distance, relative
velocity, and user-
specified strength of hair interaction.
1.3 Adding wind effect
In the movie, many scenes were shot in extremely windy environment.
There was almost always some amount of wind in the scene, whether it was
a mild breeze or a gusty wind. Once we had a working simulator, the next
challenge was to add these wind effects with full control.
In general, hair simulation was first run on (only) thousands of guide hairs
and then the guide hairs would drive motion of millions of hairs that were
finally rendered. Correspondingly, there were two controls over the wind
effects.
First, dynamics had a wind force that applied random and directional noise-
driven force that would move around guide hairs. Second, a tool called ‘pelt
wind’ was developed and added on top of the dynamics motion, providing
subtle control over motion in every rendered hair.1.5 Bad inputs / user errors We would battle issues with ‘bad inputs’ to the simulator. In practice, inputs to simulation are never perfect – sometimes there would be two hairs stemming from exactly the same position, sometimes hair shape was too crooked. In some cases, hairs were too ‘tangled’ to begin with, and hair interaction alone couldn’t handle the situation. Additional hair model processing tools were then used to tame the input – such as untangling hair orientation more evenly or straightening out crooked hairs. In the end, the simulator was also used as a ‘draping tool’ that users could use to process and clean up some of the hand modeled hair geometry. 2. Layering and mixing simulations In this scene, three types of simulations were used. Hair simulation for aslan’s mane, cloth simulation for the curtain, and simulation of grass with hair dynamics. Moreover, hair for the mane and cloth simulation had to interact with each other. Often, digital counterpart of real actors were used and mixed into the real scenes. Simulations were also used for clothing of such characters (such as cape, skirt, etc.) and even skins of winged characters. At times, cloth simulation and hair simulation had to work
together. Cloth would collide against hairs, but hair would in turn
collide with cloth. In such cases, ‘proxy’ geometry was built to
represent the outer surface of hair volume. Cloth would then collide
against the proxy geometry and then served as collision object for
hair simulation.

  This concept of ‘simulation layering’ was used all over. For some
hair simulation, cloth was first simulated as the proxy geometry for
hair, and then hair simulation was run, roughly following the overall
motion driven by the proxy geometry, and then individual hair motion
and hair interaction was added.

  Interaction between hair and cloth.
Layering cloth simulation and interaction between hair and clothing simulation for digital doubles.

              Layering hair simulation with cloth simulation.
5 Mythological Characters
Among the many characters that Rhythm & Hues created for the film
were several mythologically creatures. Below we cover some of the more
complex.
5.1 Centaurs
The centaurs for the show were some of the most challenging
characters. We had to create three different techniques to be mixed and
matched throughout the film: fully CG, CG horse body with live action
human, and CG human body with live action horse. The latter two obviously
presented the most challenges.
The first step was coordinating with KNB, responsible for building
prosthetics, to determine the overall proportions. How large were the horse
bodies? How large were the human bodies? At what point should we join the
human and the horse? In the end we determined that the horses would be 15
hand horses based off the stunt horses that were cast for the film. It was also
determined that we didn’t want to deal with any forced perspective shots
necessary to cheat the size of the human torso. In the end, the only decision
to make was how to join the two together. The positioning settled on was
with the human torso slightly cantilevered in front of the horse body. This
design decision helped insure the horses front legs didn’t read as a human
wearing a costume.Given the connection point it was then necessary to determine how
they would move, both for the performance of the centaur and for the
direction of the actors on set. For animation the centaurs had to behave as if
one brain was controlling all limbs, as opposed to the motion you would get
from a rider controlling a horse. To determine how the actors should move
on set our animation director took a walk cycle of a horse, parented a human
to its shoulders, and then animated a walk cycle for the person that followed
the motion of the horse’s structure. To our surprise, we found that a normal
human walk cycle replicated the motion a centaur’s upper body would
inherit.
To integrate CG and practical elements for the centaur it required very
accurate matchmove. The actors on set wore green pants with tracking
markers so that they could be tracked and painted out. They were then
placed on a platform roughly 14 inches tall. Due to different shooting
conditions and the actors’, safety the platform height could vary. A CG
centaur was then imported into the scene with its movement constrained to
the track at the horse shoulder. From there our animators would drive the
motion of the horse. In cases where the platforms on set were not exactly 14
inches, it was necessary to sometimes cheat the size of the horse to allow
him to properly fit the distance from the actor’s hips to the ground.5.2 Gryphon
One of the most technically challenging characters was the
gryphon. Originally the gryphon did not have such a prominent role.
Early versions of the script had a hawk flying in and landing on
Peter’s arm prior to the battle. After our animation team did a test
showing the gryphon coming in for a landing, the director quickly
changed his mind and gave the gryphon the part instead.
The gryphons shoulders are constructed of two real world
systems that could not reasonably exist together in nature, theshoulder of a lion and the wing of a bird. Joining these structures at
the same point on the torso created further complications. The
shoulder of a lion involves a very unique structure. Unlike humans,
there is no bone that physically connects the bones of the arm to the
bones in the torso. Straps of muscle run from the scapula to the chest
allowing the rib cage to hang in them like a basket. This allows the
entire shoulder structure to slide fore and aft, up and down, as well as
rotation about any axis.
The shoulder of a bird is controlled through a very unique
mechanism as well. The chest muscles drive both the downward and
upward flapping motion of the wing, unlike humans which use their
chest muscles to pull their arms forward and their back muscles to
pull their arms back. This is done by using a pulley like system of
tendons. By doing this it keeps the birds mass on the underside of its
body allowing it more stability in flight, as well as plenty of power.
For our CG gryphon we needed to have shoulders with the
range of motion of the lion’s, but with the mass and muscle structure
that he would need to support his wings. This was difficult to achieve
due to the fact that sliding the arm resulted in the shoulder needing to
occupy the same space as the mass of the wing. This was solved by
creating a false lat muscle that ran vertically behind the shoulder. As
the wing flapped, we would flex the false lat to give the feeling of
power.
Another challenge of the gryphon was creating his fur and
feathers. The gryphon required a transition from real fur, to fur-like
downy feathers, to small feathers, and finally to large flight feathers.With the exception of three rows of flight feathers, everything else
was done using our in house fur software. The fur and downy
feathers were both strands of hair with varying densities and
thickness, while the small feathers were simply instanced geometry
controlled by guide hairs. We were then able to apply dynamics to the
guide hairs to create wind effects that rippled through all of the fur
and feathers. Our fur uses slightly different illumination models than
those available to geometry. This required our look development
team to resolve those differences in order to smoothly transition
through the different feather types as we moved from fur-base to
geometry-based solutions.
The gryphon’s performance also required him to fold his wings.
Folding a photo-real bird wing in CG is a problem that has largely
been avoided in film. Research into the problem presented many
different cheats from not showing the entire wing in frame, to
strategically placed cuts, to render tricks that try to account for feather
interpenetration. After early tests we came to realize that the smaller
fur based feathers behaved rather well with our default set of tools.
Most interpenetrations were imperceptible. The challenge became
controlling the major flight feathers.
Our prior flight feather solutions involved using a spline that
trails the wing that each feather points at. This method allows an
animator to use a relatively small number of controls to control a large
number of feathers. This method works very well for flight motion.,
however employing this method for folding the wing causes the
feathers to stack up unrealistically. To fold the wing we combined
this method with the ability to break the primary and secondary
feathers onto separate spline controls to allow the primary feathers to
slide over the secondary feathers when closing. One additional layer
of control was added in to allow each feather to be animated
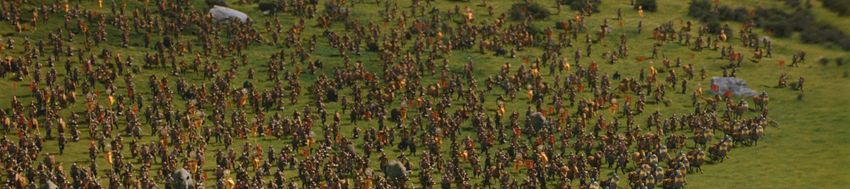
individually to cleanup any unavoidable interpenetration.6. The Battlefield: the Crowd Pipeline 6.1 Introduction The task of being able to model, light, simulate and render armies made out of about four dozen different types of characters for “The Lion, the Witch and the Wardrobe” seemed daunting at first. At Rhythm and Hues we had done some minor crowd like work before, for example the army of mice in “Cats and Dogs”, a space ship full of Gazoos in “Flintstones II: Viva Rock Vegas”, and streets of background characters in “Around the World in 80 days”. However, none of these previous productions came near the scope and complexity of what was required for “The Lion, the Witch and the Wardrobe”. Since the crowd characters could end up very close to camera (sometimes running next to hero characters) it was necessary to produce relatively high quality skinnings of these characters, as well as the ability to put simulated cloth and fur on them. These requirements logically lead to repercussions on the renderability of the crowds since it could mean large amounts of geometry and hair could be generated at any give time. Another main requirement was the capability to vary many aspects of the characters’ geometry, material and motions. The ability to change these attributes had to be relatively easy and manageable.
And last but not least, the pipeline dealing with the hundreds of
models, materials, textures, render scripts and motions would have to
be as flexible and transparent as possible. Although there would be
many inter dependencies between different parts of the pipeline, we
knew that the pipeline should be designed in such a way to allow
each component of it to work as independently as possible.

We investigated a number of different commercial packages in order
to determine how and to what extent they would be able to solve or
help with some of these issues. We finally decided to use Massive as
the tool to generate the basic crowd motions but to rely on our
proprietary tools to deal with most other aspects, like rigging, skin
binding, fur, cloth simulation and variation control of geometry and
materials.

In this way we combine the strong point of Massive, which is the
ability to build agent brains to generate motion, with the strong points
of Voodoo (our proprietary rigging and simulation tool) and Wren (our
proprietary renderer).

6.2 Modeling
The crowds consists of about four dozen distinct character types, like
fauns, centaurs, cheetahs, minotaurs, horses, boars, ankle slicers,
werewolves, etc. Each of these characters can hold or wear a
number of different accessories like helmets, swords, shields,
scabbards, flails, etc. For these there can be different variations in
terms of geometry (for example helmets with different horns). Finally
most of these models exist at three levels of detail (LOD), which we
call “lo”, “xlo” and “xxlo”.
All characters, accessories, variations and resolutions resulted into a
set of approximately 800 individual models.

6.3 Rigging
The rigging for a crowd character is different from rigging for a hero
character. A hero character normally has many more sophisticated
controls and structures than are practically possible for a character
that has to be instantiated hundreds or thousands of times.
A crowd rig or mrig (the name can be interpreted either as mocap rig,
massive rig or medium rig) has just a very simple straightforward
hierarchy. We allow for some basic joint dependencies (f.e. for finger
controls) as well as a number of sizing controls which can be used to
resize specific body parts.

These mrigs are rigged in Voodoo and can to some degree be
derived from the hero rig (hrig), which helps enormously in keeping
them both in sync. The resulting rig is then exported from Voodoo as
an ASF file which then is used in the motion capture sessions and as
a CDL file (an internal Massive character description format), for use
as the foundation for the agent building in Massive.

It is vital to keep the rigs which are used during motion capture,
motion simulation and rendering the same. The mrig from Voodoo
serves as the ground truth and the exported rigs are derived as a
subset from this one.
6.4 Skinning
Voodoo contains a large number of deformation tools, which are used
for skinning our hero characters. Since we want to be able to deform
thousands of characters on the fly at render time, we use a subset of
these deformation tools that are needed for the required skinning
quality, while being practical in terms of efficiency at the same time.
Deformations based on bone weighting and blend shapes are among
these fundamental deformation tools. On top of that we did build
more efficient versions of tools for hair instantiation and flexible body
dynamics to deal specifically with crowd characters (mor eont his
later).

Since the characters are skinned using the same tools (albeit a
simpler subset) which are used for hero characters, they are relatively
easy for the rigging department to generate. However, there is some
added complexity since all different geometry variations and levels of
detail must be rigged as well.

A big difference from hero character skinning is that the resulting skin
binds for the crowd characters can be exported to a completely stand
alone model which not only contains the geometry but also all the
skinning data.
You can also read


