Troubleshooting Guide - SOLUS3 Common Tasks
←
→
Page content transcription
If your browser does not render page correctly, please read the page content below
SOLUS3 Common Tasks &
                               Troubleshooting Guide

           (Applicable to version 3.10 onwards)

School IT Systems Support                                                                                               Doc Ref S1574
Herts for Learning Ltd
                                                                                                                 Published June 2016
SROB202, Robertson House,
Six Hills Way, Stevenage,                                                                   © School IT Systems Support (SITSS)
Herts, SG1 2FQ                                                                                        Herts for Learning Ltd, 2016
        Technical Support Centre Accredited by the Learning and Performance Institute (formerly, the Institute of IT Training)
                                                  RM Approved Support Partner
                                Fully accredited by Capita SIMS for proven quality of SIMS support

CONTENTS
INTRODUCTION .............................................................................................................1

HOW AN UPGRADE/PATCH RUNS UNDER SOLUS3 ...................................................2

SOLUS3 DEPLOYMENT SERVER USER INTERFACE .................................................3

POST INSTALLATION CHECKS AND TASKS ...............................................................4

         Check Agents have installed correctly ..................................................................4

         ‘Endpoint’ Communication Errors .........................................................................5

         Add additional workstations into the environment .................................................6

         Backup of the SOLUS3 Deployment Server Database .........................................6

         Remove SIMS Packages from software distribution solution ................................6

ADDING WORKSTATIONS INTO THE SOLUS3 ENVIRONMENT .................................7

         Pre-requisites for SOLUS3 ....................................................................................7

         Workflow for Adding Workstations into the Environment ......................................8

INSTALLING THE SOLUS3 AGENT ONTO NON-DOMAIN WORKSTATIONS ..............9

DEFINING WORKSTATION TARGETS IN SOLUS3 ..................................................... 11

         Using the Auto-Detect Functionality.................................................................... 12

         Adding a new SIMS/SIMS Discover/FMS workstation ........................................ 15

         Reinstalling a SOLUS3 Agent ............................................................................. 17

REBUILDING A WORKSTATION.................................................................................. 18

PROGRAM SHORTCUTS FOR SIMS .......................................................................... 19

         Mixed 32-bit and 64-bit Environments ................................................................ 19

NOVA-T6 SATELLITE INSTALLATIONS AND UPGRADES......................................... 20

         Installing the latest version of the Nova-T6 Satellite ........................................... 21

FMS – FINANCE DATABASE SELECTOR (DFS) ........................................................ 22

DEPLOYING AN UPGRADE OR A PATCH .................................................................. 23

         Scheduling a Patch or Upgrade .......................................................................... 24

         Checking which Targets have applied an Upgrade ............................................. 26
REDEPLOYING AN UPGRADE/PATCH ...................................................................... 27

CHECK FOR UPDATES ON THE WORKSTATION..................................................... 29

TROUBLESHOOTING .................................................................................................. 30

         Warning: Unknown Agent .................................................................................. 30

         Agent Install Failed ............................................................................................ 31

         Download not progressing ................................................................................. 31

         Upgrade/Patch Package not Visible in the Update Library................................. 31

         Incompatible Database ...................................................................................... 32

         “SIMS Connection failed for Login USERNAME, Reason 0” on Workstations ... 33

         Deployment Failed: “Tolerance not met…” ........................................................ 33

         Workstation Failing to Download/Deploy an Update .......................................... 34

         Redeploying an Upgrade Reporting “Failed” in the Deployment History ............ 34

         Exams Automation Error .................................................................................... 35

         Unable to open Nova-T6 or Options .................................................................. 35
Herts for Learning

Introduction
These notes are intended for use in schools to assist with commonly encountered tasks
once your school has been migrated to use SOLUS3. In doing these tasks, it is helpful to
understand at an overview level how SOLUS3 operates, as this is different from the
SOLUS2 system you may be accustomed to working with. The diagram below illustrates
this:

The model that we use in Hertfordshire operates as follows:

    1.    We authorise the release of software to the school – this could be an entire
          release upgrade or a patch for SIMS, FMS or Discover.

    2.    In school, the Deployment Server communicates directly with the Capita SOLUS
          Manager Server and downloads any authorised files from it into the school’s
          SOLUS3 repository, at specific times configured when SOLUS3 was set up.

    3.    Once the school has downloaded the files, they can be sent to workstations as an
          automated background task, again at specific times configured within SOLUS3.
          Each machine in the environment will have an Agent installed to manage all
          SOLUS3 task.

    4.    The school can then schedule a time for the upgrade or patch to be applied. In
          Primary schools a default auto-deployment time will have been configured when
          SOLUS3 was set up to run upgrades and patches, however patches can be run at
          other times if necessary. Scheduling ensures that stations can be upgraded
          when they are not in use.

The following sections of this document show you how to carry out common tasks when
required to ensure the smooth day-to-day running of your MIS.

Doc Ref S1574                                                                            1 of 35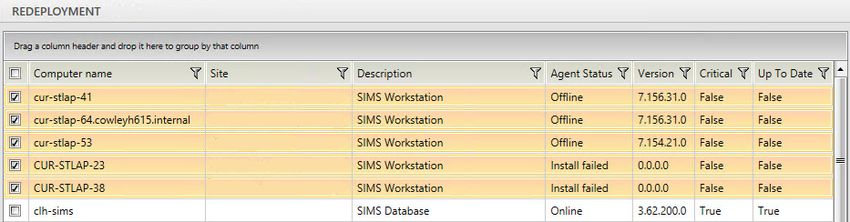
Herts for Learning

How an Upgrade/Patch runs under SOLUS3
It might be useful to understand the process that SOLUS3 follows when installing an
Upgrade/Patch across your environment. Further details are provided throughout this
document with regards to each stage:

     1.    The Upgrade/Patch is scheduled to apply to your system, either having been
           scheduled manually (Secondary/Upper schools only) or for Primary Schools
           (including Middle, Special, ESCs & PRUs) as an automated process. Schedules
           include those that have been set to run immediately (Deploy Now).

     2.    Before the scheduled deployment time, the required files are distributed as an
           automated background task, so that they are available when the Upgrade/Patch
           is triggered to install. If the files are not present on the machine when the
           installation is triggered they will be transferred at that time.

     3.    At the scheduled time the Deployment Server sends an instruction to all
           applicable Agents in the environment to run the upgrade installations, in a set
           order. SOLUS3 supports Wake-on-LAN (WOL) and so can remotely start
           workstations that may be shutdown, assuming they have the applicable hardware
           installed. Once the instruction is sent a Notifier window appears on the
           workstations to advise the user to close any Capita software, with a 2 minutes
           countdown. The user can click to Deploy Now, bypassing the countdown. Users
           only need to close the applicable software type, e.g. SIMS, but it might be safer
           to close all Capita software.

     Note: If the applicable software, e.g. SIMS, is open at the time the
     installation commences it will be forced to close and any unsaved work will
     be lost!

     4.    Some machines may have multiple items to install and so the Notifier may open a
           few times during the deployment. This is particular relevant on the SIMS
           Server/Office Master, or any FMS Workstations. We therefore recommend that
           the Network Manager advises users when they can log back in, once the
           Deployment shows as being Successful/Partially Successful.

     5.    If a workstation is not online and connected to the network at the time of the
           deployment, it will install the update when the workstation is next connected to
           the network:

           •    Once the Agent service starts during the workstation start-up process it will
                check with the SOLUS3 Deployment Server (on a Heartbeat) to see if there
                are any outstanding upgrades to be installed and if so will apply them
                straightaway, downloading files as needed. This will happen even if the user
                hasn’t yet logged into Windows.

           •    If the user tries to open SIMS/SIMS Discover/FMS and the upgrade hasn’t
                applied for some reason, the user will be informed as such and will be given
                the option to install the update at that time.

2 of 35                                                                        Doc Ref S1574
Herts for Learning

SOLUS3 Deployment Server User Interface
To carry out any task in SOLUS3, you must run the Deployment Service User Interface at
your database server (or office master in many primary schools):

    •     Either using the desktop icon (if
          present)

    •     Or via the Start menu

If you are logged into the SIMS Server/Office Master as a Domain Administrator user then
you will have full functionality within the User Interface. However, some tasks, such as
adding new workstations to the environment, require full Domain Administrator permissions.

If you are not logged in as a Domain Administrator you can either log off the machine and
back on again with an appropriate user account, or alternatively you can run a script we
have produced, as follows:

     1.     Navigate to S:\SOLUS3 Files\

     2.     Double click on the file named ‘Solus3UIasDomainAdmin.cmd’

     3.     Assuming SOLUS3 has been installed in an expected location, a window will
            appear prompting you to provide your domain name. Type this in and press
            Enter.

     4.     You will then be prompted to enter the password for the domain\Administrator
            account. Please type this in carefully as nothing will be displayed in the window
            to represent each character entered.

     5.     Press Enter. The SOLUS3 Deployment Server UI will now open with full
            functionality.

If you require the use of the script and it is not available on the S drive, please contact the
SITSS Service Desk who will provide you with a copy.

Doc Ref S1574                                                                             3 of 35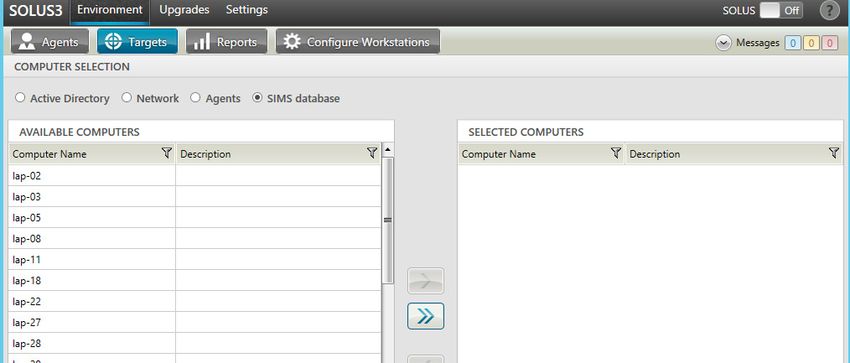
Herts for Learning

Post Installation Checks and Tasks
Following the initial installation of SOLUS3 on the school’s SIMS Server/Office Master by
SITSS, it may be necessary for your Network Manager or Network Support Provider to
carry out the following checks and tasks.

Check Agents have installed correctly
When SITSS initially install SOLUS3 onto the school system we will use an Auto detect
function to add into the environment any machines that have been used to log into SIMS in
the preceding 6 months. It is likely however that not all of these machines will have been
available in school and powered on at the time of the installation and so it will be necessary
to check the status of these machines as follows:

     1.    On the SIMS Server/Office
           Master, open the SOLUS3
           Deployment Server UI and
           click on Environment >
           Agents > Agents.

     2.    You will be presented with the list of all the machines that have been added into
           the SOLUS3 environment. You will need to check the Status column for any
           machines that show as Install failed. You can use the funnel button on the
           column heading to filter the list to just show you those machines with this status.

     3.    It may be that some of the machines in the list are no longer relevant, either
           because they are no longer used for SIMS, FMS or SIMS Discover, the machine
           has been rebuilt with a different name or the machine is no longer in use. We
           would suggest highlighting these machines, using the shift or ctrl keys to multi-
           select if needed and then click on Remove computer, followed by Yes to the
           message that appears.

     4.    If any of the machines in the list are not on the domain you will need to remove
           these from the list, as above, and then following the instructions under Adding
           Workstations into the SOLUS3 Environment on page 7 to manually install the
           Agent onto the machine.

     5.    Once you have identified all the domain machines that have failed to install the
           Agent and are still required, you will need to do one of the following, depending on
           the error message being displayed in the last column.

           Where it requests you reinstall the Agent, refer to Reinstalling a SOLUS3 Agent on
           page 17 (however if this affects more than 10 workstations you may instead want to
           consider removing the workstations, as above, and then adding them again referring
           to Defining Workstation Targets in SOLUS3 on page 11):

           •    ‘Access Denied to the remote machine’ – Either the Domain Administrator
                credentials entered when adding the machines were incorrect or that user
                does not have administrative privileges on the workstation(s), i.e. it is not
                part of the domain. Reinstall the Agent(s).

4 of 35                                                                          Doc Ref S1574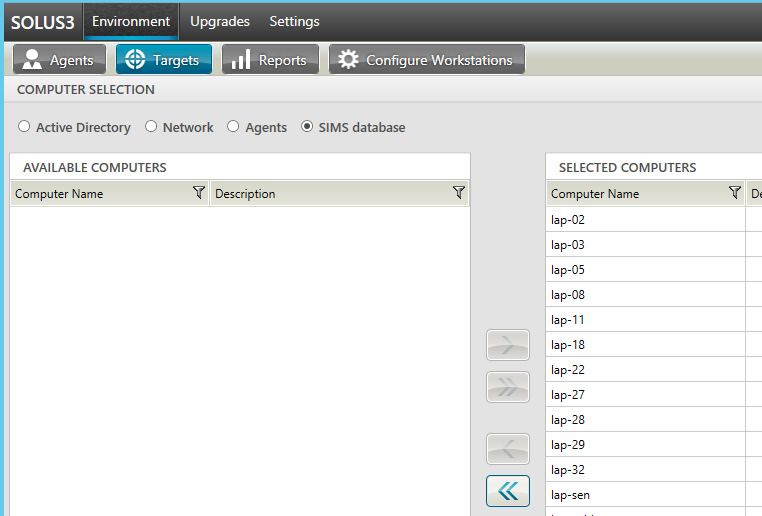
Herts for Learning

          •     ‘The remote machine cannot be contacted’ – This usually means that the
                workstation was not available on the network at the time it was added into
                the environment. Reinstall the Agent(s).

          •     ‘The remote machine actively refused the connection’ – This usually
                indicates that the workstation is not on the domain or doesn’t recognise the
                domain administrator credentials provided. Reinstall the Agent(s).

          •     ‘Agent installer completed but agent not installed’ – This means that the msi
                failed to complete the installation, which could be for a number of reasons.
                Reinstall the Agent(s). Reinstallation normally resolves the issue but the
                error logs should be checked to investigate the cause if this persists.

          •     ‘Unable to obtain an ip address for the remote machine’ – This will either be
                because the machine has not been connected to the network recently and
                the DHCP lease has expired, or there is an issue with the forward and/or
                reverse lookups in DNS. Please ensure the machine is connected to the
                network, check the DHCP and DNS entries are all correct and then reinstall
                the Agent(s).

If you find that the Agent is not installing on domain machines from the Server and you are
unable to ascertain why, try installing the Agent manually as if it were a non-domain
workstation. You will need to remove the machine from the Agent list before doing so.

     If after trying the above you find that the Agent will still not install, please
     contact the SITSS Server Desk. on 01438 844777 (option 1 then option 1),
     via email at sitss.mis@lea.herts.sch.uk, or via Service Desk Online (if
     registered).

‘Endpoint’ Communication Errors
Following successful installation of the Agent on the workstations, you may find that some
of the Agents display an error message in the UI Agents list such as “Cannot run
ExecuteAgentDeploymentPlan: Endpoint net.tcp://111.222.333.444:52966/ not found.”
(where 111.222.333.444 is the IP Address of the workstation). The first part of the error
can be a multitude of things, however the key factor is the “Endpoint net.tcp” string. This
indicates a communication error between the Agent and the SOLUS3 Deployment Server.

This will usually be the result of the firewall exceptions having not been applied to the
workstation, either manually or via Group Policy (please refer to Pre-requisites for
SOLUS3 on page 7). Alternatively, this can indicate an issue in DNS and so you may need
to check the entries for the workstation(s) in question, in the forward and reverse lookups
within DNS, ensuring no duplicate entries with other machine names.

Also check that you can ping the workstation from the server by name, and vice versa, with
the correct IP Addresses being displayed in the ping results. You may need to Flush DNS
before communication can start again. We would also recommend restarting the agent
service on the local computer, via services.msc.

Doc Ref S1574                                                                           5 of 35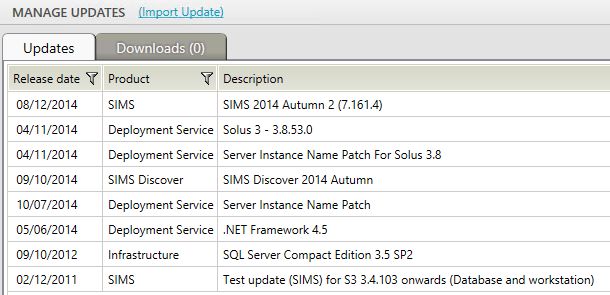
Herts for Learning

Add additional workstations into the environment
Please check the list of workstations in the SOLUS3 UI to ensure that all SIMS machines
have been added. As the initial installation will only add machines that have been used to
log into SIMS in the last 6 months it is possible that not all the SIMS workstations have
been added. If this is the case then please refer to Adding Workstations into the
SOLUS3 Environment on page 7 onwards.

Backup of the SOLUS3 Deployment Server Database
The email the school receives confirming the installation of SOLUS3 has been carried out
will contain information regarding whether the SITSS MIS Consultant was able to add the
SOLUS3 Deployment Server database into the existing backup solution or whether this
needs to be done by the school’s Network Manager or Network Support Provider.

The database name is solus3_deployment_server and should be added in the same way
as the SIMS database into the chosen solution.

     Note: If the school uses the SITSS Azure Backup solution, this database will
     automatically be added into the backup schedules and no action is
     required.

Remove SIMS Packages from software distribution solution
If you school is using a management solution for deploying software packages onto
workstation, e.g. has an RM CC4 network or equivalent, then you may have packages in
place to install SIMS, FMS or SIMS Discover onto workstations.

Such packages are no longer required as when a machine is added into SOLUS3 (see
Adding Workstations into the SOLUS3 Environment on page 7 onwards) the required
software will be installed by the SOLUS3 Agent, at the correct version. Please ensure that
these packages are removed from the system (delete them, do not withdraw them),
however any associated shortcuts will still be required (see Program Shortcuts for SIMS
on page 19).

6 of 35                                                                      Doc Ref S1574
Herts for Learning
Adding Workstations into the SOLUS3 Environment
Pre-requisites for SOLUS3
All machines that will form part of the SOLUS3 environment, being those that are used for
SIMS, SIMS Discover or FMS, will require certain pre-requisites before the installation of
the Agent can take place.
Please ensure that:
• Microsoft .NET Framework 4 (Full version, i.e. Client Profile and Extended) or later
is installed. If SIMS is already running on the workstation then this is already
present;
• Windows Task Scheduler is running;
• you can browse to network shares, e.g. the S:\ drive. This will confirm the
requirement for TCP port 139, UDP port 137 and UDP port 138 to be open in the
workstation’s firewall, supporting NetBIOS network browsing;
• TCP ports 52965, 52966 and 8739 are open in the workstation’s firewall. On
workgroup machines you can run the Solus 3 Firewall Exceptions.bat file, located
in S:\SOLUS3 Files to open these ports, although you may need to right click on
the file and select Run as Administrator if errors are reported when run;
Note: there is a text file of the same name in this folder that can be used to set up
Group Policy, however you will need to ensure that you run the .bat file on
non-domain workstations. If you have an RM CC4 network then the route to follow
in the RMMC to add these ports is | Registry Policies |
Computer Policies | Global | All computers. You can then add the exceptions
into the Windows Firewall option on the right using the details in the text file.
• Some domain controllers also require that port 389 (TCP) be opened for LDAP;
• Windows Management Instrumentation (WMI) service is running and is enabled on
the firewall; and
• there are no obvious issues with the workstation, e.g. suspected virus, unreliable
network connection, etc. There should also be at least 1Gb of free disk space on
the workstation system drive (i.e. C:\).
Note: Please ensure all the above ports are open in ALL firewalls, i.e.
Windows Firewall, AntiVirus Firewall and any hardware firewalls in place.
If you are unable to confirm any of the above prerequisites please take
advice before continuing.
If SIMS, FMS or Discover is installed on a workstation that is no longer required to run the
software, please uninstall the software package (if this is how it was installed initially,
otherwise simply delete the application folder(s)) and do not install an Agent.
Doc Ref S1574 7 of 35Herts for Learning Workflow for Adding Workstations into the Environment This diagram provides a representation of the processes to be carried out when adding a workstation into the SOLUS3 environment, assuming that all pre-requisites have been checked and applied. The following sections describe in detail how to perform these steps. Note: Items shaded in tan are to be performed by the Network Manager or Network Support Provider. Items shaded in blue are carried out by SOLUS3 itself. 8 of 35 Doc Ref S1574
Herts for Learning

Installing the SOLUS3 Agent onto Non-Domain Workstations
Any workstation that forms part of a domain will have the SOLUS3 Agent installed directly
by SOLUS3. Unfortunately, SOLUS3 is unable to install the Agent software onto
non-domain workstations and instead this will need to be installed manually:

    1.    Firstly you need to ensure you have access to the latest version of the SOLUS3
          Agent Installer files. On the SIMS Server/Office Master, check the version of
          SOLUS3 installed at your school by opening the SOLUS3 UI and noting the
          version number displayed across the top window bar.

    2.    In Windows, browse to the folder name S:\SOLUS3 Agent Installer 3.10.88; the
          version number at the end of this folder name should match the version of
          SOLUS3 installed at your school. If the number matches then proceed to step 3.
          If this version number does not match, or the folder is missing:

          •   Delete any existing folder S:\SOLUS3 Agent Installer 3.10.88 (or equivalent)

          •   In the SOLUS3 UI open the Settings area and click on the SOLUS3 tab.

          •   On the SOLUS tab, click on the Export agent installer button.

          •   In the window that opens, navigate to and select the S:\ drive, click on
              Make New Folder and type in the name of the folder as
              “SOLUS3 Agent Installer xx.xx.xx”, where xx.xx.xx is the version installed.

          •   Click on OK. A message will appear towards the top of the UI to confirm the
              export has completed.

    3.    In Windows, navigate to the folder S:\SOLUS3 Agent Installer xx.xx.xx, right
          click on the file named Solus3AgentInstaller.bat and select Edit.

Doc Ref S1574                                                                        9 of 35
Herts for Learning
• The first line of this file should begin “CScript AgentInstaller.js” (without the
speech marks). If the CScript text is missing please add this to the beginning
of the line so it reads as above, ensuring that a space is placed afterwards
and that no other text is altered in this file! Save the file and close it.
4. Once you are satisfied that all the workstation pre-requisites have been met,
ensure that you are logged onto the workstation as an administrator and can see
the usual S:\ drive mapping. On the workstation, navigate to the SOLUS3 Agent
Installer folder as detailed above and double-click the Solus3AgentInstaller.bat
file to display the Welcome to the SOLUS 3 Agent Setup Wizard page.
5. Click the Next button to display the End-User License Agreement page.
6. Select the ‘I accept the terms in the License Agreement’ check box to accept
the end-user licence agreement then click the Next button to display the Service
Endpoints page.
7. The Agent Service Address and Deployment Service Address fields are
populated automatically by the batch file and should not need altering.
8. Click the Next button to display the Deployment Server Public Key page. The
Key file directory will automatically be entered by the batch file, being the folder
detailed in step 2.
9. Click the Next button to display the Set Up Shortcuts page. Untick the Desktop
checkbox.
10. Click the Next button to display the Destination Folder page – retain the default
destination and click the Next button to display the Ready to install SOLUS 3
Agent page.
11. Click the Install button. When the installation process is complete, click the
Finish button.
12. To confirm the installation:
o Look for the Agent Notifier icon in the icon tray, located next to the computer
clock; or
o Look in the Services list on the workstation and ensure that the
Solus3 Agent Service is running.
The Agent service will be installed in C:\Program Files\Solus3\AgentService.
13. If the Capita SIMS software required, i.e. SIMS, FMS and/or Discover, is not
already installed on the workstation, proceed to the next section of this document
so that the software can be installed by the system.
If the Agent does not install onto the workstation, please contact the
SITSS Service Desk on 01438 844777 (option 1 then option 1), via email at
sitss.mis@lea.herts.sch.uk, or via Service Desk Online (if registered).
10 of 35 Doc Ref S1574Herts for Learning
Defining Workstation Targets in SOLUS3
This process assumes that the SOLUS3 Agent has been installed onto non-domain
workstations, as documented under “Installing the SOLUS3 Agent onto Non-Domain
Workstations” on page 9. Once this has been done, SOLUS3 will automatically determine
that the station is a part of its environment, but you must tell SOLUS3 which Capita
applications it is to run, using the following instructions. If however the applications in
question, e.g. SIMS, were already installed on the machine when the Agent was installed,
these details will already have been added into the system by the Agent itself.
SOLUS3 will also need to know which Capita software is to be used on domain
workstations, however the SOLUS3 Deployment Server will install the Agent automatically
on these machines; you do not need to install the agent manually beforehand as with
non-domain machines. You will however need to ensure that you are logged onto the SIMS
Server/Office Master as a Domain Administrator (please see page 2 for full details).
If the workstation already has the relevant Capita software installed, you may need to
redeploy the latest upgrade to that machine (see “Redeploying an Upgrade/Patch” on
page 27), although any missed upgrade should automatically apply to the workstation when
it is first added into the environment as a version check is performed by the system. If
however this workstation does not have the software already installed, then the
workstation/client software will be installed automatically.
Note: This will cause messages to be displayed on the workstation during
the installation so please liaise with the user to ensure that an appropriate
time is chosen to carry out this task; the user may not want this happening
during a teaching session, especially if the workstation is connected to an
interactive whiteboard.
If you use automated processes on the school network to deploy or update software
(including Windows Updates) during the school day, it is recommended that you avoid
times when these processes are underway.
It is possible to define machines for multiple Capita software at once, but you may find it
easier to define machines for one piece of software at a time, i.e. follow the steps below for
SIMS and then repeat them for SIMS Discover or FMS afterwards.
If you are rebuilding a workstation that has a SOLUS3 Agent installed on it, please refer to
Rebuilding a Workstation on page 18, as you will need to follow certain steps to ensure
that the Agent is also reinstalled and can communicate with the SOLUS3 Deployment
Server after rebuild.
Note: If the workstation is going to be used to access Nova-T6 or Options,
you will need to ensure that the Borland Database Engine (BDE) has been
installed. This is not done by SOLUS3. To obtain a copy of the BDE
installer you can run the ‘NovaSatelliteSetup.exe’, which can be extracted
from SOLUS3 following the steps on page 20.
Doc Ref S1574 11 of 35Herts for Learning
Using the Auto-Detect Functionality
(Recommended for Secondary and large Primary schools)
When adding workstations into SOLUS3, as SIMS or FMS workstations, there is an option
for SOLUS3 to interrogate the SIMS Database to obtain details of any workstations used to
access SIMS in the last 6 months. Once the Agent is installed via this option, it will check
the local SIMS.ini file to see if FMS is also present on the machine and if so will
automatically add that target information back into the SOLUS3 Environment.
This option is not available to define SIMS Discover workstations or FMS workstations that
are not also used for accessing SIMS.
1. Run the Deployment
Server UI and click on
Environment > Targets.
2. The Clients tab should automatically be selected. Note: All other targets will have
been set up during the initial installation of SOLUS3 so please DO NOT change
them!
A list of existing workstations in the environment will be listed.
3. Click on the Auto Detect button in the bottom left corner of the screen.
4. At the Auto detect
dialogue, click Yes.
5. SOLUS3 will detect any
workstations that have
logged into SIMS in the
last 6 months and will list
them in the left hand side
panel. You will notice that
the radio button at the top
is in SIMS database,
being the source of the
list.
12 of 35 Doc Ref S1574Herts for Learning
6. Click on the right facing
double headed arrow to
move all the identified
workstations into the
‘selected computers’
panel on the right (or
manually select those
required and use the
single arrow, or double
click on the name).
You can move any you
don’t want included back
using the left facing arrow
or again double clicking
on the name.
7. Click OK at the bottom once satisfied with your selection.
8. A window will display requesting Domain administrator credentials – Enter your
full domain administrator User Name (i.e. School123\Administrator) and the
associated password. Click on Save.
9. The Auto detect
message will indicate how
many workstations have
been selected for a
SOLUS3 Agent to be
installed. Click on Yes.
10. After a few moments you will see a ‘Save successful’ confirmation message. Click
OK.
11. You should now navigate to Environment > Agents > Agents to monitor the Agent
installations:
Doc Ref S1574 13 of 35Herts for Learning
Please refer to Post Installation Checks and Tasks > Check Agents have
installed correctly on page 4 for details of what the different error messages
mean and how to correct them.
14 of 35 Doc Ref S1574Herts for Learning
Adding a new SIMS/SIMS Discover/FMS workstation
1. Run the Deployment
Server UI and click on
Environment > Targets.
2. The Clients tab should automatically be selected. Note: All other targets will have
been set up during the initial installation of SOLUS3 so please DO NOT change
them!
A list of existing workstations in the environment will be listed.
3. Click Add in the bottom
right hand corner to
display a panel for adding
new client machines.
4. Place a tick against the
software that is
installed/requires
installation on the
workstations to be added
and then click on
Choose clients.
5. The Computer Selection screen will be displayed and will provide 3 options for
selecting the required machine:
The default is Active Directory and will allow you to search for workstations by their
Organisational Unit (OU). Once you have selected the correct location in the AD,
click on Select.
Network will only display workstations currently active on the network (both domain
and non-domain).
Agents will display only those workstations that have previously had an Agent
installed on them, such as non-domain machines.
6. If there is a very long list of
computers, you can use the filter
options across the top of the
columns to reduce the number of
computers being displayed at any
one time.
Doc Ref S1574 15 of 35Herts for Learning
7. Select the computer name(s) in the left panel (you can use the Ctrl or Shift keys to
multi-select) and then click on the button in the centre to move them into the right
hand panel. If you wish to move all of the machines listed on the left across to the
right then simply click on the button, without the need to individually highlight the
names. You can also double-click on the machine name to add/remove it to/from the
right hand panel.
When you are sure the correct machines have been selected, based on the software
types selected at step 4, click on OK.
8. A window will display requesting Domain administrator credentials – Enter your
full domain administrator User Name (i.e. School123\Administrator) and the
associated password. Click on Save.
As mentioned before, if any of the workstations defined by this process are domain
machines, SOLUS3 will now install the Agent first and then the assigned Capita software. If
SIMS has not already been installed on the new workstation(s) then, after a short delay,
SOLUS3 will install the software automatically. If the workstations are logged on then the
user will see the Solus3 Agent Notifier screen appear to advise them that Capita Software
is being installed and will appear for each piece of software to be installed. We would
recommend that you inform the user before completing this task.
You can monitor the installation of the Agent via the Environment > Agents > Agents tab.
You can then select the Environment > Agents > Targets tab and you will see in here the
version of the software installed on each workstation. You may need to go out of the UI
and back in again before the version information will appear. Otherwise you can select the
workstation and click on the Get Target Version button.
Currently the SIMS Discover Client will not automatically install onto a workstation and
there are 2 methods that can be used to install the software:
• Redeploy the SIMS Discover upgrade to the required workstation(s) (see page 27);
or
• Check for Update from the Agent Notifier on the workstation(s) (see page 29).
If you school has more than one FMS database please refer to FMS – Finance Database
Selector (DFS) on page 21 (if this is used in your school).
16 of 35 Doc Ref S1574Herts for Learning
Reinstalling a SOLUS3 Agent
If an Agent installation shows a status of Install failed you may need to try reinstallation of
the Agent:
1. Open the SOLUS3
UI and click on
Environment >
Agents > Agents.
2. Highlight the machine(s) that require a reinstallation of the Agent. To select
multiple machines you can use the standard shift or ctrl key options for multi-
selection.
Please note: you can only select a maximum of 10 machines at a time.
3. Click on the Reinstall agent button. A window will display
requesting Domain administrator credentials. Enter your full domain
administrator Username (i.e. School123\Administrator) and the associated
password. Click on Save.
4. If you try to reinstall the Agent where the status is currently showing as Install
active, you will receive an error message and will need to wait upto an hour
before you can try again.
Alternatively you can select to Remove computer and add it again, using either
the Auto-Detect or manual process used previously, as appropriate.
Doc Ref S1574 17 of 35Herts for Learning
Rebuilding a Workstation
Schools using a build image for the workstations may need to check if the SIMS.INI is
inculded in the build (C:\WINDOWS) if so please remove from the image as this has on
occasions stopped the Capita software from installing automatically after installing the
Solus 3 agent.
On occasion it is necessary to rebuild a workstation and reinstall all the software. If you find
you need to do this with a machine that has a SOLUS3 Agent installed on it, please follow
the steps below to add the newly rebuilt machine into the SOLUS3 environment, as the
rebuild process will remove the SOLUS3 Agent from the workstation:
1. Open the SOLUS3
UI and click on
Environment >
Agents > Agents.
2. Highlight the machine that you have rebuilt (the Agent status should show as
Offline). The next step will depend on the workstation type:
• Domain Machine with a Different Name
Click on the Remove computer button and confirm the
deletion when prompted. You will now need to add the newly rebuilt
workstation into the environment, following the instructions under “Defining
Workstation Targets in SOLUS3”, starting on page 11.
• Non-Domain Machine
Click on the Remove computer button and confirm the
deletion when prompted. You will now need to install the Agent manually
onto the newly rebuilt workstation, following the instructions under
“Installing the SOLUS3 Agent onto Non-Domain Workstations” on page
9. Then you will need to add the workstation into the environment, following
the instructions under “Defining Workstation Targets in SOLUS3”, starting
on page 11.
On some occasions you may find that none of the Capita software will automatically install,
it maybe nessecary to initiate the installation process manually Please refer to Page 27 for
details on how to do this.
18 of 35 Doc Ref S1574Herts for Learning
Program Shortcuts for SIMS
All shortcuts for Capita software are placed in Start Menu > All Programs > SIMS
Applications and these contain the correct settings needed to run the software. If it is
possible it is recommended that this location is accessible to the end user, e.g. via changes
to Group Policy where needed. If this is not possible you will need to check the following.
The standard shortcut created when SIMS is installed, which appears in Start Menu >
All Programs > SIMS Applications, contains 2 targets. The first target, namely
‘SIMSLoad.exe’, is required in order to ensure that the version of the application is checked
when launched. This allows for the workstation upgrade to be applied if the workstation has
fallen out-of-step with the SIMS Server/Office Master.
Typically shortcuts created on desktops are missing this first target and therefore the
version check is not performed, which will result in the user receiving an error message on
launch (see Incompatible Database on page 32). The same applies if the application icon
is pinned to the Taskbar whilst the application is running.
It is therefore recommended that you create these desktop shortcuts for the users centrally,
if appropriate, and also ensure that any other shortcuts you have in the Start Menu folders
are also correct, e.g. the Program Sets on RM CC4 networks.
The target line in the shortcuts should be as follows:
“C:\Program Files (x86)\SIMS\Sims .net\SIMSLoad.exe” “Pulsar.exe”
Although the standard shortcut target line looks slightly different, whereby the full path is
written twice, the above wording is preferable on many networks with mixed architecture
(see below).
Mixed 32-bit and 64-bit Environments
On many networks, such as RM CC4, the Program Files folder will be checked on each
machine when the shortcut is added to ensure that it is the correct directory for the
application, given that 32-bit machines will require the above path without the ‘ (x86)’
section.
Depending on the software being used to manage your network, you may find that 32-bit
machines do not receive the modified shortcuts and instead they are added as written
above. Therefore it may be necessary to create separate 32-bit versions for those specific
machines.
We highly recommend that all users have access to the main program
shortcuts in the Start Menu under All Programs > SIMS Applications, as this
removes the need for any additional work on setting shortcuts up.
Doc Ref S1574 19 of 35Herts for Learning
Nova-T6 Satellite Installations and Upgrades
SOLUS3 does not currently manage the upgrades to Nova-T6 Satellite installations and so
the school will need to arrange for these installations to be manually upgraded after each
SIMS Release has been applied.
When initially setting up SOLUS3 at the school, an Auto-Extraction process may have
been set up to extract the necessary files from the latest SIMS package. To check that this
has been configured correctly, or to set it up in the first instance:
1. Open the SOLUS3 UI and navigate to Settings > SOLUS3 > Updates
2. Under AUTO EXTRACT ensure that there is a tick alongside SIMS and under the
heading after deployment. If the tick is showing under After download please
tick the other box instead. DO NOT untick the incorrect box first as this may
remove the location path setting.
3. In the Extract to folder box should be detailed the UNC path for the folder to
extract the files into. This should be in a shared area on your network so that it
can be accessed from the satellite workstations. Initially this may have been set
to the S drive, e.g. \\SIMSSERVER\Sims\SOLUS3 NovaT Installer. If this
location is incorrect or requires changing, please ensure that the UNC path is
entered and not the mapped drive or local drive location.
The screen should look as follows:
This setup will ensure that the latest installation files are extracted ready for the manual
upgrade to the satellite installations, following the successfully completion of the SIMS
upgrade. If you use the After download option in step 2 above then the extracted files will
be newer than the version of SIMS on the workstation and Nova-T6 may not be compatible.
If the date against the files in the extraction location fall within an earlier term than the
version of SIMS installed in the school then it is likely that the Auto-Extraction process has
failed. The files can be manually extracted:
1. In the SOLUS3 UI, navigate to Upgrades > Update Library
2. Highlight to latest SIMS Release package, click on Extract and select the
destination folder, as above.
Please refer to the next section for instructions on installing the Nova-T6 Satellite.
20 of 35 Doc Ref S1574Herts for Learning
Installing the latest version of the Nova-T6 Satellite
The Nova Licence file MLICENCE.DAT will be required on the first installation of the
Satellite, but not when upgrading. This file is located in the folder S:\SIMS\SNOVA\NOVAT
on the school network.
You will need Administrator rights to install the satellite. The Timetabler will also need Full
Control to the file C:\Windows\Sims.ini in order to use Nova-T6.
Please ensure that you have matching versions of Nova-T6 on your satellite and SIMS
system. If you save a file in a newer version you will not be able to open it with a previous
version of the software.
If you are doing a new install then you will have to load the data from your main system.
Extract the Nova-T6 installation files
1. Navigate to the shared location into which you are extracting the Nova Satellite
installer, e.g. S:\SIMS\SOLUS3 NovaT Installer.
2. Double-click on NovaSatelliteSetup.exe to run the Nova Satellite Wizard.
3. Click Next at each screen of the wizard until the installation is complete and then
click Finish. This wizard will extract files into one of the following paths:
C:\Program Files\SIMS\SATS (32bit)
C:\Program Files (x86)\SIMS\SATS (64bit)
Run the Nova-T6 installation
1. Navigate to the appropriate file below and double click on it to run:
C:\Program Files\SIMS\SATS\NOVA\NovaT6Setup.exe (32bit)
C:\Program Files (x86)\SIMS\SATS\NOVA\NovaT6Setup.exe (64bit)
2. Click Next at each screen of the wizard until the installation is complete and then
click Finish.
3. If you are installing Nova-T6 for the first time, copy the file MLICENCE.DAT from
S:\SIMS\SNOVA\NOVAT and paste it into the folder C:\SNOVA\NOVAT on the
satellite machine.
4. To run Nova-T6, go to:
Start | All Programs | SIMS Applications | NOVA-T6
Doc Ref S1574 21 of 35Herts for Learning
FMS – Finance Database Selector (DFS)
Currently SOLUS3 does not configure the Finance Database Selector (FDS) on FMS
Workstations and so this will need to be set up manually (as has always been the case
when schools used the previous upgrade software, SOLUS 2).
On the FMS Workstation:
1. Navigate to Start > Programs > SIMS Applications > FMSSQL > Finance
Database Selector.
2. If this hasn’t been configured previously you will be asked to complete the Default
Settings page:
3. Please enter the information requested, as per the example above.
• The location of the SS_FMS_Companies file in normally S:\Finance,
however this can be located anywhere on a mapped drive, depending on your
school’s initial setup of FMS.
• The FMS Applications folder, named FMSSQL, if installed by default into
C:\Program Files (x86)\SIMS\FMSSQL\, however it is possible that this
default had been changed when the program was initially installed onto the
workstation. If you check the properties of the FMS shortcut in the Start
menu, that will provide the correct location on the machine.
22 of 35 Doc Ref S1574Herts for Learning Deploying an Upgrade or a Patch This diagram provides a representation of the processes to be carried out when an upgrade or patch is made available to the school. The following sections describe in detail how to perform these steps, where needed. Note: Items shaded in tan are to be performed by the Network Manager or Network Support Provider. Items shaded in blue are carried out by HfL or SOLUS3 itself. Please note that when an upgrade is due, workstations must to connected to the network using a single connection and remain on the same connection type until the upgrade has completed. For example, if the laptop is started up using a wireless connection then a network cable must not be connected until the upgrade has completed, and vice versa. If this advice is not followed then you may get ‘Endpoint’ errors the morning following a deployment; please refer to point bullet 5 under Incompatible Database on page 32 for details of this error and how to rectify it. You may then need to redeploy the upgrade to the affected workstation(s); see Redeploying an Upgrade/Patch on page 27. Doc Ref S1574 23 of 35
Herts for Learning

Scheduling a Patch or Upgrade
When an Upgrade or Patch is released to your school, it may be necessary to schedule the
package to be installed:

   •        Secondary Schools (including All Through and Upper Schools)
            ALL Upgrades and Patches will need to be scheduled manually, following the steps
            below, unless you have previously agreed with SITSS to set up Auto-Deployment.

   •        Primary Schools (including all Nursery, Middle, Special Schools, ESCs and
            PRUs)
            A schedule will have been set up within SOLUS3, at the time of installation, to
            automatically deploy upgrades and patches on a particular day each week, in the
            early hours of the morning. However, you may require a patch more urgently, or if a
            patch is marked with     it is not auto-deployable, and therefore the steps below will
            need to be followed.

If you are following these steps because of an email you have received from SITSS, please
ensure that the entire email has been read as it may contain additional information that
alters the below steps, or specifies the order in which upgrades and patches need to be
applied. If your school is deemed secondary (see above) the email will contain details of
the exact files you need to select and deploy.

       1.      Open the SOLUS3
               Deployment Server UI
               and select Upgrades >
               Update Library.

       2.      A list of Upgrades and
               Patches that have been
               authorised to your school
               will be displayed.

       3.      You can use the filters on each column heading to help search for a particular item
               by clicking on the funnel symbol.

       4.      SOLUS3 is configured to automatically download any new items during a set time
               each morning.

       5.      If the Status shows as Available, highlight the item and click on the Download
               button at the bottom right of the screen.

24 of 35                                                                            Doc Ref S1574
Herts for Learning
You can monitor the progress of the download by clicking on the Downloads tab. If
you find however that the download isn’t progressing or remains at 0%, please refer
to Download not progressing on page 31.
6. If the upgrade/patch you are looking for is not listed in the Updates Library (unless
you click on the Show all updates box), please refer to Upgrade/Patch Package
not Visible on page 31 to resolve.
7. Once the item has downloaded, highlight it and click on the Deploy button. If you
have just downloaded the item you will have to select a different item and then click
back onto it (or change tabs in the UI) in order for this button to become available.
8. The next screen
comprises of 3 sections:
Updates lists the
various components of
the Upgrade or Patch;
Targets lists the various
targets (server and
workstations) that will
receive the new
software; and
The scheduler.
It is highly recommended that you schedule Upgrades and Patches to run overnight
when no users are likely to be logged into the system, either when onsite or via
remote access technologies, such as a VPN connection.
If you schedule the deployment during the school day the users need to be aware
that they will receive messages on their workstations advising that the deployment is
about to happen, during the installation process and then a confirmation when
finished. This would not be convenient if, for example, the workstation is connected
to an Interactive Whiteboard.
9. To schedule a deployment, enter the date and time (in 24 hour format) in the fields at
the bottom of the screen and click the Schedule button.
10. If however you are sure that all users are out of all applicable Capita SIMS software
on the affected server/workstations, you can click the Deploy now button.
If anyone is still logged into SIMS/FMS/Discover when the upgrade starts they
will be logged out automatically and any unsaved data will be lost!
Doc Ref S1574 25 of 35Herts for Learning
11. If you select the Deployment History tab at the top of the screen, you can see the
current status of the deployment as it runs.
12. If you need to cancel a scheduled deployment, select it from within the
Deployment History screen and click on the Cancel button at the bottom of the
screen.
Checking which Targets have applied an Upgrade
When an Upgrade to SIMS, SIMS Discover or FMS is deployed, it is likely that some
workstations will not be online at the time, or maybe the installation fails. It is possible to
get a list of targets (server and/or workstations) that were included in the deployment plan,
along with the current status for that device:
1. Open the SOLUS3
Deployment Server UI
and select Upgrades >
Deployment History.
2. Highlight the deployment you want to check and click on the View detail
button.
3. The next screen will
display all the machines
included in the
deployment plan, showing
the current status and any
relevant comments.
Where the status is
Offline, this means that
the device had not been
powered up, either at all
or long enough following
the deployment time, for
the upgrade to be
installed.
If any of the workstations are showing a status of Failed and you are confident in
reading developer style log files, you can highlight the target and click on the
Agent deployment log button to display a verbose log of the deployment on that
device which should enable you to identify the reason for the failure.
However, you can always contact the SITSS Service Desk for assistance in these
circumstances as we are familiar with these log files.
26 of 35 Doc Ref S1574Herts for Learning
Redeploying an Upgrade/Patch
It may be necessary at times to redeploy an upgrade or patch, for example:
• Installing the Discover Client software on a new workstation; or
• An upgrade failed on certain machines and, following investigation, you wish to try
again.
The latter assumes that you have read the deployment log files, determined the cause of
the error and rectified it. Should you require any assistance in reading the log files or
carrying out rectification work, please contact the SITSS Service Desk.
1. Open the SOLUS3 Deployment Server UI
and select Upgrades > Deployment
History.
2. Highlight the upgrade or patch that you wish to redeploy. This will change the
section at the bottom of the screen to show the results at the point in time the
deployment completed (not the current status of the machines). The number of
lines in this section will depend on what the deployment (upgrade/patch) needs to
update.
3. Click on the Redeploy button.
This will display a list of all the machines that have been defined as a target
relevant to the upgrade/patch. The last column will indicate whether the version of
software currently installed on the workstation is correct.
Doc Ref S1574 27 of 35Herts for Learning
4. Place a tick against the machines to which you wish to redeploy. Any workstations
that are showing as False in the Up To Date column should already be ticked for
redeployment by default. If you are redeploying an upgrade to SOLUS3 itself then
all workstations will be listed and you will not be able to remove the ticks, however
any machine on the correct version will be skipped during the redeployment.
5. To schedule a deployment, enter the date and time (in 24 hour format) in the fields
at the bottom of the screen and click the Schedule button.
6. If however you are sure that all users are out of the relevant Capita software on the
affected server/workstations, you can click the Deploy now button.
7. You will be returned to the Deployment History screen. A new entry will appear at
the top of the list, with a Status of “Scheduled”. This will update, along with
messages in the Stage column, as the redeployment runs.
8. If you need to cancel a scheduled deployment, select it from within the
Deployment History screen and click on the Cancel button at the bottom.
It is highly recommended that you schedule Database Patch redeployments to run
overnight when no users are likely to be logged into the system, either when onsite
or via remote access technologies, such as a VPN connection.
If you schedule the redeployment during the school day the users on the selected
machines need to be aware that they will receive messages on their workstations
advising that the deployment is about to happen, during the installation process and
then a confirmation when finished. This would not be convenient if, for example,
the workstation is connected to an Interactive Whiteboard.
28 of 35 Doc Ref S1574Herts for Learning
Check for Updates on the Workstation
Some workstations may fail to apply an upgrade to SIMS/FMS/SIMS Discover, or the user
may receive an application fault when trying to launch the software. It is possible to check
for missed updates and reinstall the current version via the Solus3 Agent Notifier. If
installing SIMS Discover on a new workstation you can also use these steps to install the
Client software for the first time, assuming it has been defined in the UI as a Discover Client
target.
1. Open the SOLUS 3 Agent
Notifier via the Start
Menu, or by double
clicking on the icon in
the icon tray next to the
computer clock.
2. Select the Applications
tab in the Notifier window.
3. If the version of the
software is out of date, or
is showing as 0.0.0.0
(meaning not installed),
then click on Check for
update to install/update
the software.
4. If you require to reinstall
the software, possible
due to an application
fault, then click on Check
for update. You will be
asked to confirm if you
wish to re-install.
5. If software has been selected for installation then the Notifier window will advise
when this is being carried out and when it has completed.
6. Close the Notifier window on completion.
Doc Ref S1574 29 of 35Herts for Learning
Troubleshooting
This section contains some common issues that may arise and details of how to resolve
them.
Warning: Unknown Agent
When in the Deployment Server UI, in the Agents screen, you may find workstations listed
with “Warning: Unknown Agent…” against them. This normally occurs when either:
• The Agent hasn’t installed correctly on the workstation; or
• The workstation has been rebuilt with the same name and a manual Agent
install is carried out but the original Agent wasn’t removed from the SOLUS3
environment during the rebuild process, as per the instructions on page 17.
1. Highlight the workstation in the Agent list and click on the Remove computer
button on the bottom right, confirming the removal when prompted.
2. Open the Services list on the Workstation (Start > Run > services.msc) and
restart the Solus3 Agent Service.
3. After a few seconds the workstation should reappear in the Agent list. If after a
short time the warning message appears again you will need to do the following:
• On non-domain machines
i. Uninstall the Agent from the workstation (via the Programs and
Features control panel on the local machine).
ii. Remove the computer from SOLUS3 as per step 1 above.
iii. Reinstall the Agent, following the instructions under “Installing the
SOLUS3 Agent onto Non-Domain Workstations” on page 9; it
should then appear again in the SOLUS3 UI.
iv. Once this warning message has been resolved you will need to follow
the instructions under “Defining Workstation Targets in SOLUS3”,
starting on page 11, to define the workstation as a target for SIMS,
FMS and/or SIMS Discover.
• On domain machines, highlight the workstation name in the SOLUS3 Agent
list and click on the Reinstall agent button.
30 of 35 Doc Ref S1574You can also read