TSS User Guides ENS Step-by-step guide: Consignment First - Date: June 2021 - Northern Ireland Customs & Trade Academy
←
→
Page content transcription
If your browser does not render page correctly, please read the page content below
TSS User Guides
ENS Step-by-step guide:
Consignment First
Date: June 2021

                     OFFICIAL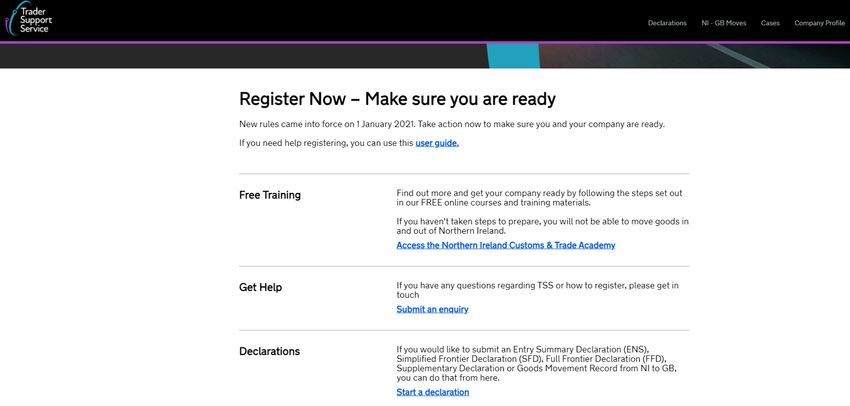
Contents

1. How do I choose between the Standard process and Consignment First process ..................................... 5

2. Consignment First process .................................................................................................................... 6
     (a)     Create a new consignment, to be linked to movement information by the carrier/haulier ................. 6
     (b)     Add items to a consignment ....................................................................................................... 17

3. Consignment First Process - Create movement information, and align a consignment to movement
   information ....................................................................................................................................... 32

4. How do I check the status of an ENS and SFD? ..................................................................................... 41

5. I need to know more .......................................................................................................................... 43

www.tradersupportservice.co.uk
Copyright © 2021 Trader Support Service. All rights Reserved.

                                                                                                                                                       1
                                                                      OFFICIAL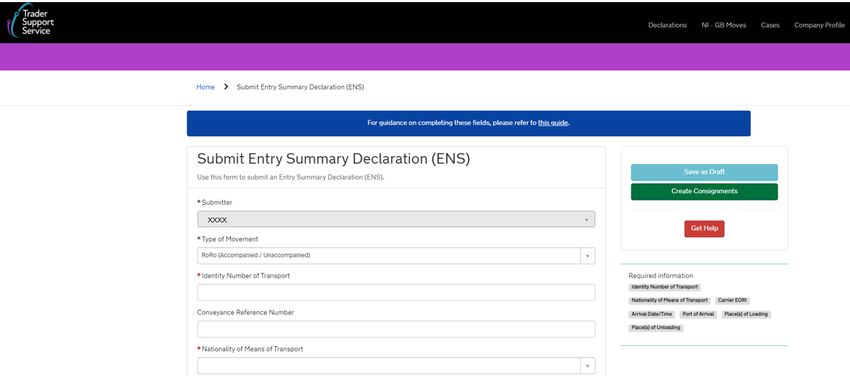
ENS Step-by-step guide: Consignment First
1. What are Entry Summary, Safety & Security (ENS)
   declarations and who completes them?
As of 1 January 2021, Entry Summary, Safety & Security declarations (also called ENS declarations) are
required for all goods moved from Great Britain to Northern Ireland.

Carriers have the legal responsibility to ensure that the UK customs authority is provided with safety
and security pre-arrival information for goods being moved to Northern Ireland, by way of an ENS
declaration. For these declarations, the carrier is defined as the operator of the active means of
transport.

For roll-on/roll-off movements, this would mean the haulier if goods are accompanied, or the ferry
operator if goods are unaccompanied. The carrier can agree to pass the requirement onto the trader;
however, the carrier retains legal responsibility.

For controlled goods, the importer usually supplies the extra data required for these goods through
the ENS – this information goes on to form the simplified frontier declaration (Simplified Frontier
Declaration (SFD) – more details below). They can supply this information directly to TSS and assign
the consignments to carriers using the ‘consignment first’ process. Alternatively, they can provide the
necessary information to the carrier who can then complete the full ENS declaration themselves
through the Standard Process. Item price data will only be visible to the importer and the party
entering the data for this field (who may still be the importer). Note that it is also possible for a haulier
to submit an ENS declaration for controlled goods without submitting this extra data, but that TSS will
not process the SFD on their behalf. More explanation of these processes follows in the upcoming
sections.

The legal requirement is that the ENS declaration is complete and accurate to the best of the
declarant’s knowledge at the time.

2. How ENS declarations work in the TSS process
The Trader Support Service (TSS) will provide a portal and bulk upload function for registered carriers
and hauliers to provide Safety & Security data, which TSS will use to generate and submit ENS
declarations to HMRC.

TSS will then provide hauliers with the reference numbers which must be inputted in GVMS (Goods
Vehicle Movement Service) to receive authorisation to move goods. These references will be provided
almost immediately after an ENS is successfully submitted.

Before you submit your ENS data, you will be asked whether you want TSS to only generate the ENS
without any subsequent customs declarations. There are certain situations in which you may wish to
only complete the ENS in TSS. You will be asked to provide the reason for this from the below options:

www.tradersupportservice.co.uk
Copyright © 2021 Trader Support Service. All rights Reserved.

                                                                                                           2
                                                         OFFICIAL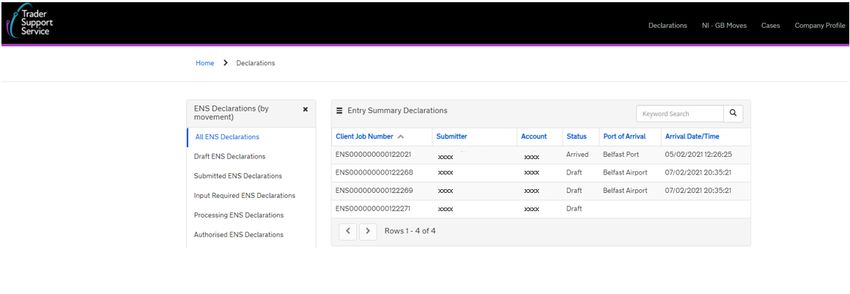
•    Your ENS relates to Full Frontier Declaration (FFD) completed within TSS

                        Note: The functionality for FFDs to be submitted through TSS is expected to go live
                        in early July
                            o The trader is completing a full frontier declaration within TSS. The FFD
                                 MRN (Movement Reference Number) should be given to the carrier for
                                 the GMR before the goods arrive.
                            o The trader is completing a full frontier declaration within TSS and will need
                                 the ENS Movement Reference Number (MRN) to complete. The FFD MRN
                                 should be given to the carrier for the GMR before the goods arrive.

                   •    My trader is due to submit the Simplified Frontier Declaration (SFD) using a
                        system outside of TSS
                            ▪ The declarant will be creating an SFD outside of TSS on a different CFSP
                                authorisation – a customs declaration is required for the import into
                                Northern Ireland
                   o    Goods where a customs declaration is being made using EIDR using a system
                        outside of TSS
                            ▪ The declarant will be making a declaration using EIDR (entry in declarants
                                records) outside of TSS on a different CFSP authorisation – a customs
                                declaration is required for the import into Northern Ireland

                   •    You are transporting an empty container/trailer/van/lorry under a contract of
                        carriage, which requires a safety and security declaration for GVMS
                            o The trailer does not contain goods but is under a contract of carriage,
                                which requires a safety and security declaration for GVMS

                   •    Goods which are the subject of a Transit declaration or are using the
                        transhipment arrangements that do not require an import declaration through
                        TSS into NI
                            o Goods that are travelling through NI to another common transit country
                                that do not require an import declaration through TSS into NI

                   •    Your goods are entering Temporary storage and the customs declaration (if
                        required) will not be made within TSS
                           o The goods are going to a temporary storage facility outside of the scope
                               of TSS and require a declaration outside of TSS to be completed

www.tradersupportservice.co.uk
Copyright © 2021 Trader Support Service. All rights Reserved.

                                                                                                         3
                                                         OFFICIAL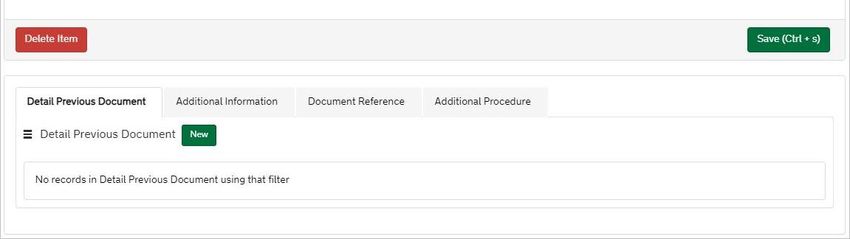
3. How TSS supports import declarations
Import declarations are required for goods moved from GB to NI.

For registered and eligible traders, TSS will use the Safety & Security data provided by the carrier to
generate import declarations (if required). This process maximises the chances that traders’ import
declarations are completed on time for the goods to move. It is also possible to create an ENS
without the associated SFD (for controlled goods) or SDI if you intend to complete this outside of
TSS, or in circumstances where an import declaration is not required. You also have the option of
using TSS to only create the ENS Declaration while creating the FFD Declaration outside TSS
Q:   As a haulier, what if my customer is not registered with TSS?

     TSS can only generate import declarations for registered users. You should ensure your customers
     are registered for TSS, or that they will submit their own import declarations and provide you with
     an import declaration Movement Reference Number (MRN) for entry into Goods Vehicle
     Movement Service (GVMS).
     For controlled goods, if the customer is not registered with TSS the full set of additional data is not required but again,
     you should ensure the importer has provided the import declaration MRN (Simplified Frontier Declaration - SFD/ Full
     Frontier Declaration - FFD) to you directly.

Q:   As an importer, what if the carrier does not use TSS to submit the ENS, but I want to use the TSS import declaration
     process?

     To use the TSS import declaration process, the ENS must be submitted through TSS.

     If the haulier has already submitted an ENS for the consignment separately, we recommend that
     the haulier cancel that ENS and re-submit through TSS.

     In exceptional cases where this is not possible, you (the importer) may submit the consignment’s
     ENS through TSS -- but must ensure the data is fully accurate (including transport details) and the
     previous ENS for the consignment has been cancelled. You must then pass the TSS-provided
     reference numbers to the haulier for input into GVMS.
Q: As an importer, what do I need my carrier to do if I have completed or intend to complete
a full frontier declaration (FFD)?

FFD functionality is expected in early July 2021. Once available, the haulier must ensure they
specify the appropriate reason within the “ENS Only Reason” related to FFD. This will ensure
an SFD/SDI is not generated for your goods.

In turn, you should provide your haulier with the MRN from your full frontier declaration for
them to complete their GMR through GVMS.

www.tradersupportservice.co.uk
Copyright © 2021 Trader Support Service. All rights Reserved.

                                                                                                                              4
                                                          OFFICIAL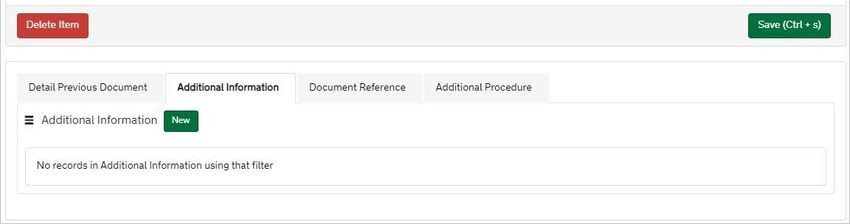
1. How do I choose between the Standard process and Consignment First
   process?
There are two methods of submitting an ENS declaration, the Standard process and the Consignment
First process. In both cases, declaration data must be provided at 3 levels:
●   Movement: provided once for all consignments on a vehicle (e.g., truck).
●   Consignment: provided once for each consignment. A consignment is a set of goods being moved
    from one consignor (sender) to one consignee (receiver). TSS will generate one ENS declaration for
    each consignment.
●   Item: provided once for each item on the ENS. An item is a set of goods with the same description
    (i.e., with the same commodity code). For example, 5 pallets of a single type of apples would be
    one item. On the TSS portal, this is called ‘Declaration Goods.’

The Standard and Consignment First process differ in the order in which this data is uploaded, and
have different benefits:

1. Standard process: Information on the movement is submitted first. Next, consignments are
   created linked to the movement. This process is recommended if all movement and consignment
   data is available, upfront, and held by a single party (e.g. the carrier/haulier).

2. Consignment First process: Consignment data is submitted first. This allows consignments to be
   created independently and later linked to the movement information. Consignments can be
   created by any user and are linked to another TSS user account (e.g. the carrier/haulier) using the
   latter’s EORI number. This allows creation of an ENS/SFD declaration where consignments have
   been created (and data supplied) by other users.

This process is recommended if:
●   you require flexibility in adding and removing consignments related to movement information e.g.,
    where a haulier is managing groupage movements
●   consignment and movement information are held by different parties e.g., where an importer
    holds consignment level data for controlled goods

This guide explains the individual steps for the Consignment First process (for details on the Standard
process, please refer here). This will be comprised of 3 steps. Whilst we have outlined an order here
for explanatory purposes, note that they can be conducted in any order, except that goods can only
be added once a consignment is created:

1. Create consignments

2. Add goods to the consignment

3. Link consignments to movement information

www.tradersupportservice.co.uk
Copyright © 2021 Trader Support Service. All rights Reserved.

                                                                                                     5
                                                         OFFICIAL
2. Consignment First process
(a) Create a new consignment, to be linked to movement information by the
carrier/haulier
You will need to create consignments. A consignment is a set of goods being moved from one
consignor (sender) to one consignee (receiver). TSS will generate one ENS declaration for each
consignment.
You can create consignments by navigating to the Trader Support Service Portal via this link
https://www.tradersupportservice.co.uk/ and logging in.
● Free Training - Links to the NI Customs & Trade Academy
● Get Help - Raise a trader enquiry, which is initially triaged by the HGS Agents
● Declaration - Raise a declaration
Note: If you do not have an account, you will have to register on the portal to complete a declaration,
as this option is only accessible to registered traders and carriers.
1. Select ‘Start a declaration’ (see link in above screenshot) and select Entry Summary Declaration –
Consignment which opens a new consignment form.
www.tradersupportservice.co.uk
Copyright © 2021 Trader Support Service. All rights Reserved.
6
OFFICIAL2. When the consignment is opened, the Client Job Number field (this is your ENS reference) is empty
as this consignment has not yet been linked to an ENS record (since you are creating consignments
first before linking to movement information). The form includes a new DEC____________ number
(e.g. DEC000000000022225), which is the unique reference number that will be used to link your
consignment to movement information before submission
3. The top section provides key information, depending on the status of the Declaration. The fields
with highlighted in grey are read-only fields, including the Status.
4. Within this, note the presence of the Carrier EORI field, used to add the carrier details either on
initial completion of consignment form or at when the form is submitted. The purpose of this field
is to enable the carrier to have visibility of the consignment from their movement information, to
link the consignment, prior to submission. When empty, only the trader who created and saved
the consignment can view the consignment detail. You may find this useful if you wish to prevent
others from editing the consignment, only adding the Carrier EORI when the declaration is ready
for final submission.
5. If you select Yes to the field Does this consignment contain controlled goods question, additional
fields are added to the consignment (see first screenshot) and the item level (covered in next
www.tradersupportservice.co.uk
Copyright © 2021 Trader Support Service. All rights Reserved.
7
OFFICIALsection) to support additional data required for Controlled goods. These will be covered in step 8
– if you answer No to this question, skip step 8.
Goods are controlled if they are subject to special health, licensing, or environmental controls and
as such must be placed under customs control at the border. Goods must be presented at the
border for specific pre-clearance or Border Inspection Post Controls. note that goods shown as
restricted in the NI Trade Tariff must be entered as controlled goods.
As well as those goods shown as restricted in the NI Trade Tariff, the following are also classed as
controlled goods:
a) Common Agricultural Policy (CAP) goods
b) Excise goods including unmanufactured tobacco and tobacco refuse
For more information on how to find out if your goods are controlled goods, please refer to
the data guide.
6. ENS Only Reason is to be completed if you wish only to generate an ENS without an
SFD. If you intend to create an ENS only including while following the FFD route, you
must select a reason from the drop-down menu. See the ENS data guide for more
information.
Note: If you intend to generate an ENS only in relation to an FFD, this functionality is
to be delivered in early July and will only be available at that time.
7. Populate the Transport Document Type from one of the following depending on the Type of
Movement
— CMR/Delivery Note – used for Roll-on Roll-off journeys (Ro-Ro)
— Airway Bill - used for air journeys
www.tradersupportservice.co.uk
Copyright © 2021 Trader Support Service. All rights Reserved.
8
OFFICIALAdd the Transport Document Number, which is the identification number of any international or
national documents, certificates and authorisations produced in support of the declaration and
additional references (please note that this field is limited to 35 characters). The relevant transport
document number will be dictated by the type of journey:
— For RoRo (Accompanied / Unaccompanied), this is the reference number of the CMR document
(also known as a Road Consignment Note, or Convention relative au contrat de transport
international de Marchandises par Route) filled out by the sender, the carrier or their agent. If
unavailable, you can provide the delivery note reference number instead
— For Air, Airway bill documents issued by the carrier or their agent
8. Add the Goods Description for the associated goods in this consignment. This should be a plain
language description of the goods that is precise enough for customs to be able to identify what
the goods are. The description should cover:
— What are the goods?
— What are they made of?
— What are they used for?
If the package contains any branded items, it is advisable to include the brand and model number
along with the description. It is also recommended that the description is ‘packaged’ re. sets and
sizes, e.g., Women’s Cotton T-shirts, size 14, packs of 3.
Further details of the goods are also completed in the next step on the Goods linked to this
consignment. Examples of acceptable and unacceptable descriptions (e.g., “Refrigerator” vs
“Appliances”) are available from European Commission guidance.
9. Answer additional questions if you answered Yes to the field Does this consignment contain
controlled goods. Otherwise, skip to step 9. The additional fields on the consignment form are:
— Goods Domestic Status – This defaults to NIDOM, but ensure you select the correct option. For
more details on doing this, please see the ENS Data Guide
www.tradersupportservice.co.uk
Copyright © 2021 Trader Support Service. All rights Reserved.
9
OFFICIAL— Customs Warehouse Identifier - This data element is used to declare premises ID for goods
being:
› entered to or removed from a customs warehouse
› entered to an excise warehouse
› removed from a free zone
For more details on this field, refer to the data guide.
— Supervising Customs Office – Here, enter the code to identify the office specified as the
supervising office in the authorisation for a procedure if it is in use Therefore, note that this
field only applies for some procedures (see the data guide for more details). Use the selection
list to select the required office, where the format includes the country prefix, followed by a
6-digit location code.
— Declaration Unique Consignment Reference (DUCR) – The DUCR will be used to link your
ENS/SFD declaration, to your Supplementary Declaration. In most cases where the DUCR is left
blank, TSS will auto-generate it, but there may be cases where you must manually input. This
must be provided by the importer. Note the field length is 35 characters. For more details on
the DUCR, refer to the data guide.
10. Add the EORI numbers for the Consignor, Consignee, Importer and Exporter. If the EORI number
is unknown, please select the check box and complete the additional fields presented.
www.tradersupportservice.co.uk
Copyright © 2021 Trader Support Service. All rights Reserved.
10
OFFICIALNote: If the EORI number is invalid it will be cleared from the field. Note the EORI needs to have
an XI format for Consignor and Consignee, and a GB format for Importer and Exporter.
The roles of the Consignor/Consignee/Importer/Exporter are now explained below:
— Consignor: Party delivering the good as stipulated in the transport contract
— Consignee: Party that receives the goods post customs-clearance
— Importer: (EORI of the party legally responsible for the import declaration) Party responsible
for completing the customs procedures for the arrival of the goods. This could be the sender,
receiver or their intermediary and should be pre-agreed in the delivery terms
— Exporter: Party responsible for completing customs procedures for the departure of goods
either directly or through an intermediary
If the EORI number is unknown, select the check box and enter the address and name of the
consignor, which appear when the check box is selected. However, please note that this is not
applicable for the Importer EORI which is a mandatory field going forward.
Note: if the Importer EORI is not provided, TSS will not be able to generate an import declaration
on behalf of the importer (this is also true if the importer is not registered for TSS). The implication
is that the importer will need to independently submit their import declaration, which is required
before goods travel.
11. Once the details are added, select the Save (Ctrl + s) button and the unique DEC_____________
reference number for the consignment will be presented at the top of the page.
www.tradersupportservice.co.uk
Copyright © 2021 Trader Support Service. All rights Reserved.
11
OFFICIALNote that you will also have visibility of the consignment by clicking the Declarations link in the top
of the page and navigating into the ENS Declarations (by Consignment) > Draft ENS Consignments
or All ENS Consignments.
There are three supplementary tabs at the bottom of the screen.
The first, ‘Declaration Goods’, is used to submit item-level data (set of goods with the same
description), explained in the next section of this guide (5 (b)), here
To complete the Declaration Goods form, you must add item (an item is a set of goods with the
same description) to the consignment before submitting.
Selecting the Submit button on the consignment form, without Goods record(s) linked to the
consignment, will return the following error message. Selecting X on the error message will remove
it from view.
www.tradersupportservice.co.uk
Copyright © 2021 Trader Support Service. All rights Reserved.
12
OFFICIALFor certain procedures/additional procedures, you may have to populate the header previous
document tabs and holder of authorisation tabs (see the data guide for more details on what
procedures this entails). If your goods are not using such procedures, please now skip to step 12
here.
12. Once the consignment data has been input and saved, supplementary tabs (related records) are
added to the consignment form, so that additional information relating to the consignment can be
included for the controlled goods process.
You can see the three tabs in the image below.
Declaration Goods: Used to provide item-level data for goods within the consignment, explained
in the next section of this guide, here.
If you transport the same type of goods on a regular basis, you can copy item-level goods
information from a previously submitted or closed ENS by clicking on the Copy Previous Good(s)
button.
Header Previous Document: Used to collate previous documents, as some procedures will require
previous documents to be declared on the SFD for movement to be approved.
Add a document by selecting the New button on the tab and entering the following details.
www.tradersupportservice.co.uk
Copyright © 2021 Trader Support Service. All rights Reserved.
13
OFFICIALFor Previous Document Class, enter one of the following;
— X – use when inputting a declaration for temporary storage. This will not apply to UK domestic
/ NIDOM movements being released into free circulation but could be required where NIIMP
in use and goods moving from temporary storage in GB to NI
— Z – use when inputting any other previous document
Note: Document class ‘Y’ cannot be input here. It will only be available in the supplementary
declaration, as it is a reference for the simplified frontier declaration/EIDR record (and will be auto
populated by TSS).
The Previous Document Type is a selection list; to see what types of document the different codes
refer to, please refer to this link
The Previous Document Reference enables you to add up to 35 characters in length for the
reference for that document (example below). You should add the reference identifier that
corresponds to the document type identified in the previous field. To see what references
correspond to codes, please refer here
Once all the details are added, select the Save (Ctrl + s) button.
Holder of Authorisation: Use to submit data that demonstrates authorisations held, this is
mandatory when using certain customs procedures. To check whether this applies to your
movement, please refer to the data guide.
www.tradersupportservice.co.uk
Copyright © 2021 Trader Support Service. All rights Reserved.
14
OFFICIALAdd authorisation records by selecting the New button on the tab and entering the required
details.
— Authorisation Role ID - this is a 17-digit field. Please refer to the data guide for more details on
completing this
— Authorisation Code – Authorisation code and corresponding identifier need to be entered
where a customs procedure in use requires the importer to hold an authorisation to move
those goods. Use the selection drop down to select the required code. Please refer to the data
guide for more details on completing this.
Once all the details are added, select the Save (Ctrl + s) button. The field Authorisation Role Type
is auto populated by TSS, you do not need to populate.
Note: For controlled goods, upon submission of ENS data, additional records in the ‘Previous
Header Documents’ section may be added to the record. These records will be visible via the
associated tab on the consignment level record.
13. It is possible for you to cancel an ENS in the TSS system and consequently, a Simplified Frontier
Declaration (SFD), with any associated goods it has, using the buttons on the form, in the following
circumstances:
www.tradersupportservice.co.uk
Copyright © 2021 Trader Support Service. All rights Reserved.
15
OFFICIAL— If you are still in process of creation on the TSS portal and have not yet submitted– (i.e. in draft
state)
— If you have submitted a declaration but have been subsequently rejected
— If you have submitted a declaration but the declaration is not ‘arrived’ – this will occur at the
date/time indicated in the ‘Arrival date/time’ field indicated at the movement information
level (see here)
If a vessel is re-routed changing the departure or arrival port, declarations do not need to be
amended (as long as vessel is leaving a GB port and arriving in an NI port) as customs systems will
be able to identify this.
14. Before completing data entry for a consignment, it is recommended you attach any relevant
documents relating to your movement. If you do not do so, and your movement needs additional
controls/inspections, you may be asked to upload these documents or physically present them
during movement. This could cause unnecessary delays to your journey.
To find a list of the documents commonly required, refer below, but please refer to the tariff tool
for a definitive list of the documents required for a specific commodity.
— Commercial invoice
— Packing list of items included
— Any non-electronic, paper licences
— Any certificates of origin
— Additional certificates, licences and permits e.g., CITES permits
— Export health certificates
— Any further documents you may have referenced in the supplementary tabs at the bottom of
the consignment/item page
To attach documents, click on the ‘paperclip’ icon at the top of the consignment page (see image
below).
If the document applies to every item in the consignment, attach on the consignment page.
If the document applies to an individual item, attach on the item page.
Note: Any organisation that the consignment is shared with (e.g. carrier/haulier) will be able to
access uploaded documents.
www.tradersupportservice.co.uk
Copyright © 2021 Trader Support Service. All rights Reserved.
16
OFFICIAL(b) Add items to a consignment
Once the consignment level data has been entered, add items (Declaration Goods) to the
consignment. Each item is a set of goods with the same description (i.e., with the same commodity
code).
1. Once the consignment has been saved, select the New button in the Declaration Goods section at
the bottom of the consignment form denoted with a DEC reference in the breadcrumb at the top
of the page.
If you transport the same type of goods on a regular basis, you can copy item-level goods
information from a previously submitted or closed ENS by clicking on the Copy Previous Good(s)
button.
Search for the ENS from which you want to copy goods in the ENS to add from field. Once you
have selected the ENS, you will be able to choose the good(s) you want to copy into your current
declaration.
This feature auto-populates all editable fields from the old goods item and imports any associated
documents.
Press submit and navigate back to the Consignment Information page on the ENS declaration to
view the copied goods in the Declaration Goods section.
www.tradersupportservice.co.uk
Copyright © 2021 Trader Support Service. All rights Reserved.
17
OFFICIAL2. The Declaration Goods form will open. Note: The maximum number of item(s) (sets of goods with
the same description) that can be linked to a consignment is 99.
3. Add the Package Marks. Where containerised, the equipment number can be used as a shipping
mark.
4. Add the Type of package from the options list presented.
5. Add the Equipment Number for the container, where goods are being shipped in a container. If
not packaged in a container, leave the field blank.
6. Add the Number of Packages and then confirm the Number of Individual Pieces within each
package (only relevant if not in bulk, as explained below).
The number of packages is the number of individual items that are packaged in such a way that
they cannot be divided without undoing the packing, if not in bulk, and the number of individual
pieces if in bulk. For example, for palletised goods, the number of pallets should be provided if the
goods are covered/wrapped in pallets.
www.tradersupportservice.co.uk
Copyright © 2021 Trader Support Service. All rights Reserved.
18
OFFICIAL7. Declare the UN Dangerous Goods Code, if applicable to your goods. This is a unique serial number
assigned by the UN to dangerous substances and articles (e.g., chemicals, weapons). The codes are
available on the United Nations Economic Commission for Europe (UNECE) Website, please refer
to the UN Recommendations on the Transport of Dangerous Goods - Model Regulations for details.
8. Add the associated Invoice Number, where known. This field is optional and should only be
entered if available.
9. Confirm the Item Gross Mass (weight) in Kilograms for all packages. The weight (Item Gross Mass)
needs to include all packaging (but not the carriers’ equipment) Add the Net Mass in Kilograms,
which excludes packaging. Item net mass is mandatory for items where licences require net mass
on the declaration to match that on the licence, and for goods being released from bulk
consignment. Note that packaging is defined as materials and components used in any packaging
operation to wrap, contain, or protect the goods during transport. See the data guide for more
details.
10. Add the Goods Description for these packages. This should be a plain language description of the
goods that is precise enough for customs to be able to identify what the goods are. The description
should cover:
— What are the goods?
— What are they made of?
— What are they used for?
If the package contains any branded items, it is advisable to include the brand and model number
along with the description. It is also recommended that the description is ‘packaged’ re. sets and
sizes, e.g. Women’s Cotton T-shirts, size 14, packs of 3.
Further details of the goods are also completed in the next step on the Goods linked to this
consignment. Examples of acceptable and unacceptable descriptions (e.g., “Refrigerator” vs
“Appliances”) are available from European Commission guidance.
11. Add the Procedure Code. Where items are released into free circulation / home use, with no
previous procedure in GB, this will be 4000, but please refer to the data guide for more details.
Additional procedures can be claimed for a range of reasons where traders have requirements
over and above those indicated by standard procedure code (e.g., 4000).
A full list of additional procedure codes which could apply can be found in the CDS guidance
Only in cases where no other additional procedures apply, 000 may be used (indicating no
additional procedure to declare).Please see data guide for more details.
www.tradersupportservice.co.uk
Copyright © 2021 Trader Support Service. All rights Reserved.
19
OFFICIAL12. Respond to the question ‘Are These Items Deemed Controlled goods?’ Using the selection
presented.
Goods are controlled if they are subject to special health, licensing, or environmental controls and
as such must be placed under customs control at the border. Goods must be presented at the
border for specific pre-clearance or Border Inspection Post Controls. Note that goods shown as
restricted in the NI Trade Tariff must be entered as controlled goods.
As well as those goods shown as restricted in the NI Trade Tariff, the following are also classed as
controlled goods:
a) Common Agricultural Policy (CAP) goods
b) Excise goods including unmanufactured tobacco and tobacco refuse
For more information on how to find out if your goods are controlled goods, please refer to the
data guide.
Note: If you select Yes to this question then the following fields will also be required to be
completed. If you select No, you will not be prompted with further questions in this area, and
should skip to step 30 here
www.tradersupportservice.co.uk
Copyright © 2021 Trader Support Service. All rights Reserved.
20
OFFICIAL13. What Type of Controlled Goods Are You Carrying, you should select from the options in the
dropdown list
— Goods of animal origin
— Plant-based products
— Fruits & vegatables
— Fish products
— Endangered species (CITIES-listed endanged animals and plants or their products)
— Weapons
— Goods requiring certifications (e.g., controlled drugs, rough diamonds)
— Excise Goods
14. For the Country of Origin either start to type the country or use the lookup to select the country.
This classifies where goods were produced and is used to determine duty rates. It is not necessarily
where the goods were sent from. The importer should establish the country of origin and provide
you with this information. For guidance on establishing country of origin, the importer can consult
the Rules of Origin guidance on GOV.UK. For more details, please refer to the data guide.
15. For the Commodity Code enter a commodity code, or search for goods to identify the appropriate
commodity code. The Commodity Code is a 10-digit code which links goods to duties, VAT rates,
control measures, measurement units etc. For more details, please refer to the data guide.
16. The Item Invoice Currency is the currency used to invoice the goods. A list of currencies and their
corresponding codes can be found here
www.tradersupportservice.co.uk
Copyright © 2021 Trader Support Service. All rights Reserved.
21
OFFICIAL17. Populate the supplementary units field if the commodity code must be described not only by mass,
but by a second measure such as volume in litres. If applicable, this will be listed in the Northern
Ireland (EU) Tariff under the ‘Value’ column (column 3) of ‘Import measures and restrictions’ for
the appropriate commodity code. When required, you should enter the supplementary units as a
number.
18. For the Item Invoice Value, add the total value of the goods. Where goods have a payable price
(i.e., valuation method 1), this is the amount charged for the item and the currency used, listed on
the invoice. For more details on invoices, consult the NICTA Introduction to Customs course.
Where other valuation methods are used (for example, if there is no sale), enter the customs value
of the goods before any additions or deductions. The importer must determine the customs value
according to Notice 252 on GOV.UK, and should provide the haulier with this information.
19. When moving certain chemicals, the eight-digit CUS Code is added to identify the chemical. For
more details on the circumstances to populate this field and how to do so, refer to the data guide.
20. A Tax Base Unit will need to be declared on an SFD where the commodity code requires the
declaration of a 3rd quantity for goods clearance and controls (e.g., need to enter pure alcohol
content for certain alcoholic beverages). The field is structured as follows: The measurement unit
code is a three-letter code and a qualifier (if present) is a single letter to indicate which type of
third quantity is being entered. More details on this, including what the different units are and
where they are applicable, can be found in the data guide. TSS can now support goods that require
multiple tax base units for declaration.
21. Enter TARIC additional code(s) if relevant for the commodity code. You can find out if this is
applicable to your goods by referencing the EU TARIC tool. These codes indicate that there may be
additional duty payable, for example duty applicable to some dairy or sugar products (identified
by a Meursing code), or anti-dumping duty. In some cases, more than 1 TARIC additional code
could be supplied per item. If this applies all codes must be entered in single string (no spaces
between them) in portal field
22. The Tax Base Quantity is the quantity of the goods and is based on the tax base units. For example,
if the tax base unit is LTR (litres), write the quantity in litres
23. Select the associated 4-digit national additional code(s) for the National Additional Code(s). For
certain items, there may be more than one code –if this applies, all code must be entered in single
string (with no spaces between them) in portal field. For more details, consult the data guide.
Once these steps are completed, select the Save (Ctrl + s) button.
www.tradersupportservice.co.uk
Copyright © 2021 Trader Support Service. All rights Reserved.
22
OFFICIALSupplementary tabs (related records) will be added to the form, so that additional information
relating to the good at the item level can be included given your goods are controlled.
24. Detail Previous Document tab: used to collate previous documents, as some procedures will
require previous documents to be declared on the SFD for the movement to be approved.
Add a record by selecting the New button on the tab, and entering the data outlined below.
— The Previous Document Reference enables you to add up to 35 characters in length for the
reference for that document (example below). Add the reference identifier here, taking the
description that matches the document code.
— The Previous Document Type is a selection list; input the code that matches the reference
identifier written in the previous field. Use the same link as in the Previous Document
Reference field to find the corresponding code.
— For Previous Document Class, enter one of the following.
www.tradersupportservice.co.uk
Copyright © 2021 Trader Support Service. All rights Reserved.
23
OFFICIAL— X – use when inputting a declaration for temporary storage. This will not apply to UK domestic
/ NIDOM movements being released into free circulation but could be required where NIIMP
in use and goods moving from temporary storage in GB to NI
— Z – use when inputting any other previous document
Note: Document class ‘Y’ cannot be input here. It will only be available in the supplementary
declaration, as it is a reference for the simplified frontier declaration/EIDR record (and will be auto
populated by TSS).
25. Additional Information tab: used to collate additional information codes, which are required for
certain movements/commodity codes. For more details, refer to the data guide. Note that this tab
will not be visible if you have not declared controlled goods.
Add a record by selecting the New button on the tab, and entering the data outlined below.
— Additional Information Code - use the selection drop down to select the required code. For
further information on the full list of these codes use this link, but refer to the data guide for
more guidance.
www.tradersupportservice.co.uk
Copyright © 2021 Trader Support Service. All rights Reserved.
24
OFFICIAL— Additional Information Description – Note that in certain cases, these additional information
codes will require accompanying descriptions. To see where this is the case consult the GOV.uk
guidance on additional information codes
Once all the details are added, select the Save (Ctrl + s) button.
26. Document Reference tab: used to collate documents/certificates/authorisations/references (that
are not documents used on previous movements) that are required to enable this movement to
occur. Please see the data guide for more details.
Note: This tab is only visible if you are declaring controlled goods.
Add a record by selecting the New button on the tab and entering the details below.
www.tradersupportservice.co.uk
Copyright © 2021 Trader Support Service. All rights Reserved.
25
OFFICIAL— Document Code - use the selection drop down to select the required code. For further
information on the descriptions for these codes, consult the data guide
— Document Reference – up to 30 characters can be added to the reference field. Consult the
data guide for more details.
— Document Status - use the selection drop down to select the required code. Consult the data
guide for more details.
www.tradersupportservice.co.uk
Copyright © 2021 Trader Support Service. All rights Reserved.
26
OFFICIAL— Document Part Reference – up to 5 characters can be added to the Document Part Reference
field, which identifies the line item (part) number. Consult the data guide for more details
— Document Reason - Where a document code permits the use of status codes ‘XX’ or ‘XW’, a
statement supporting the use of those status codes must be provided in the section ‘document
status reason’ (see data guide for more details).
27. Populate the Writing Off section if you are declaring controlled goods. Please refer to the data
guide to identify the circumstances when this section must be populated.
— Add Date of validity using the calendar icon or use a date format of dd/mm/yyyy for more
details on when this is required, consult the data guide.
— For Currency – use the selection drop down to select the required currency
— Add details regarding the Issuing Authority. This will be the governing body that issued
documents/certificates/authorisations that you have provided. It will be a free-text field. For
more details, consult the data guide.
— Where a currency has been declared in ‘Writing off – currency’ field, enter the monetary
amount associated with the document / writing off details in the Amount field.
— For Measurement Unit - use the selection drop down to select the required measurement unit.
Further information on Measurements can be found in the data guide.
www.tradersupportservice.co.uk
Copyright © 2021 Trader Support Service. All rights Reserved.
27
OFFICIAL— For Quantity, enter the quantity being attributed to the specific document code being
referenced. For example, a measurement unit (above) could be litres, and the quantity could
be number of litres.
Once all the details are added, select the Save (Ctrl + s) button.
The Additional Procedure tab is used when traders want to enter more than one additional
procedure code for their item. The first additional procedure code can be entered into the
“Additional procedure code” field in the goods information section of the declaration. Any further
codes should then be added sequentially to this table. Note, 000 cannot be entered wherever more
than one additional procedure code is in use. Please refer to “Additional procedure code” section
of this guide here for more information.
Add a record by selecting the New button on the tab and entering the required details.
28. Select the Additional Procedure Code using the drop-down list. For further information on the
descriptions for these codes and when they should be chosen, refer to the data guide.
www.tradersupportservice.co.uk
Copyright © 2021 Trader Support Service. All rights Reserved.
28
OFFICIAL29. When all the data is added to the Item level, and the consignment is submitted, additional Detail
Previous Documents may be added to the record and will be visible to you via the associated tab
on the consignment/Item level record.
The Holder of Authorisation may also be populated after submission with information returned
from the HMRC system. Note: that the field Authorisation Role Type is auto populated by TSS but
requires no action from the trader.
30. Once all the details are added, select the Save (Ctrl + s) button (you will have already done this if
you have had to declare controlled goods).
Note: If you are not moving controlled goods, you do not need to populate the supplementary tabs
(which will not appear if you have not declared controlled goods).
Once saved, the name of the good is presented at the top of the page, and you can navigate back
to the consignment by clicking on the DEC________ link.
www.tradersupportservice.co.uk
Copyright © 2021 Trader Support Service. All rights Reserved.
29
OFFICIALIt is possible to remove items from the consignment but selecting Delete Item.
31. Repeat the above steps for each item within the consignment. Navigate to the consignment
reference number by selecting the DEC_________ reference number in the breadcrumb in the top
of the page. Before the consignment is linked to movement information, the breadcrumb should
look as follows:
Where multiple items are linked to a consignment, you will be presented at the bottom of the
consignment form, with a unique number on the tab for the different items.
www.tradersupportservice.co.uk
Copyright © 2021 Trader Support Service. All rights Reserved.
30
OFFICIALNote: As the items are added to the consignment records the Total Packages and the Total Gross
Mass (KG) fields on the consignment form, will be automatically updated and will total all the
Packages and Goods Mass linked to this consignment.
32. Before completing data entry for a consignment, it is recommended you attach any relevant
documents relating to your movement. If you do not do so, and your movement needs additional
controls/inspections, you may be asked to upload these documents or physically present them
during movement. This could cause unnecessary delays to your journey.
To find a list of the documents commonly required, refer below, but please refer to the tariff tool
for a definitive list of the documents required for a specific commodity.
— Commercial invoice
— Packing list of items included
www.tradersupportservice.co.uk
Copyright © 2021 Trader Support Service. All rights Reserved.
31
OFFICIAL— Any non-electronic, paper licences
— Any certificates of origin
— Additional certificates, licences and permits e.g., CITES permits
— Export health certificates
— Any further documents you may have referenced in the supplementary tabs at the bottom of
the consignment/item page
In order to attach documents, please use the ‘paperclip’ icon at the top of the item level page (see
example below) – you should attach on the consignment page if the document applies to every
item in the consignment, and at the item level, if it just applies to that item. Please note that
hauliers will be able to see documents you upload.
33.
Once all items have been added to the consignment, it is ready to submit, once it is linked to
movement information (instructions on this in the next section); the consignment state will update
to Submitted accordingly.
3. Consignment First Process - Create movement information, and align a
consignment to movement information
Once consignments are created and saved, they can be linked to movement information, which
represents the vehicle moving items (which could therefore transport multiple items, and have
multiple consignments aligned with it).
Once saved, a notification will be sent to the carrier indicating that there is an ‘orphaned’ consignment
(a consignment not linked to movement information) ready to be linked to the movement information,
from the ENS record. The user that created the consignment will also receive a notification.
The following steps will outline the process to create movement information. If you have already
created movement information, skip to step 19 here to view the steps for linking consignments.
1. To create a Declaration, select Start a declaration – this opens the declaration options page - and
then select Start an Entry Summary Declaration (ENS).
This will create movement information. Do this once per movement, i.e., once for all consignments
on a vehicle (e.g., truck)
www.tradersupportservice.co.uk
Copyright © 2021 Trader Support Service. All rights Reserved.
32
OFFICIAL2. This opens the ENS declaration form for you to complete, automatically adding your business
details to the Submitter field. Note: the required information to complete the form is shown on
the right of the page and the ENS declaration can be saved at any time for you to complete and
submit prior to movement of goods.
3. Select the Type of Movement from RoRo (Accompanied / Unaccompanied) or Air.
When Air is selected the Conveyance Reference Number becomes mandatory, and the Identity
Number of Transport is no longer required.
4. The Identity number of the Transport for accompanied ‘RoRo’ is the haulier’s Vehicle Registration
and Trailer number, separated by a space. For unaccompanied RoRo, only the trailer number is
required.
Note: This field is 27 characters in length and is not required for Air.
5. When Air is selected, the Conveyance Reference Number is mandatory, and you will need to add
the IATA flight number. This can contain up to 8 alphanumeric characters, and must include the
carrier code (3), the flight number (4) and an optional suffix (1) without any separator between
www.tradersupportservice.co.uk
Copyright © 2021 Trader Support Service. All rights Reserved.
33
OFFICIALthe two or three elements
Otherwise, the field is optional.
6. The Nationality of Means of Transport will be the country where the vehicle is registered and is
selectable from a drop-down list. You can start to type in the field or scroll through the list
presented. This is the vehicle’s country of registration.
7. Add the Carrier EORI number to the form. This must be either an XI or EU EORI number. The carrier
is the operator of the active means of transport at the border.
For accompanied Ro-Ro movements, haulage company’s EORI should be entered. For
unaccompanied Ro-Ro shipments, the ferry company’s EORI should be entered.
Note: There is validation on the EORI number to check it is a valid number and that the prefix is
either XI or an EU EORI. Where a European EORI is added then you will be prompted to add the
Carrier Name, Address details and Carrier Country.
www.tradersupportservice.co.uk
Copyright © 2021 Trader Support Service. All rights Reserved.
34
OFFICIALThere is also the option to input a Haulier EORI, so that a haulier can manage movement
information and have visibility of movement information and its consignments, even if they are
not the carrier. Use for unaccompanied movements, where the carrier, such as Irish Ferries, Stena
Line or P&O Ferries, is not accessing TSS as often and it is the haulier who is handling the
declaration submission.
8. Use the Calendar icon to select the Arrival Date/Time at the NI seaport or airport, based on GMT
time zone, or type the date and time into the field in the following format DD/MM/YYYY HH:MM:SS
using the 24 hr clock times, e.g. 11/01/2021 22:30:00. Selecting the Clock icon on the calendar
view will open the time selector and selecting the calendar from the time view, will show the date
selector.
Note: The date and time must be within the following 14 days. If the arrival date will be greater
than 14 days, leave this field empty, save an initial draft, and complete the details later.
9. Add the Port of Arrival from the drop-down list by either typing in the field or using the selection.
This is the first seaport or airport goods enter NI through.
www.tradersupportservice.co.uk
Copyright © 2021 Trader Support Service. All rights Reserved.
35
OFFICIAL10. Where Seals are affixed to the transport equipment, the identification number on the Seal will
need to be added to the Seal Number field. Otherwise, leave this field empty.
11. The Route will default to GB-NI and will default to GB-IE-NI if the transport is via an IE port, such
as Dublin, Dun Laoghaire, or Rosslare. Additional processes and data are required for Transit
movements (including GB to NI via IE). Details of this process, and availability of TSS support will
be available on the NICTA site in the future.
12. Add the place(s) of loading of the goods to the Place of Loading free text field. This is name(s) of
the seaport, airport, freight terminal or other place where goods are loaded onto the means of
transport.
For accompanied Ro-Ro movements the place of loading would be a description of where goods
are loaded onto the truck (e.g. Liverpool).
If there are multiple places of loading for a Ro-Ro movement (e.g., groupage), provide the best
indication of primary locations, up to 35 characters (e.g., “Edinburgh, Glasgow”).
13. Then, add the Place(s) of Unloading. This is the name(s) of the seaport, airport, freight terminal
or other place where goods are unloaded from the means of transport.
For accompanied Ro-Ro movements the place of unloading would be a description of where goods
are unloaded off the truck (e.g., city).
If there are multiple places of unloading for a Ro-Ro movement (e.g., groupage), provide the best
indication of primary locations, up to 35 characters (e.g., “Belfast, Larne”).
14. Select from the below options to confirm how the Transport Charges will be paid. This is the
method of payment (from the trader to the carrier) for transporting the goods. The field defaults
to Account Holder with Carrier.
www.tradersupportservice.co.uk
Copyright © 2021 Trader Support Service. All rights Reserved.
36
OFFICIAL15. You can Save as Draft at any point. If you need assistance completing this part of the form, before
adding the consignment details, you can select the Get Help button.
www.tradersupportservice.co.uk
Copyright © 2021 Trader Support Service. All rights Reserved.
37
OFFICIAL16. Once saved, you will be presented with the following details including the unique ENS reference
number at the top of the page.
17. Find your current ENS Declaration movement information by selecting Declarations in the banner
of the portal and viewing All ENS Declarations or Draft ENS Declarations.
www.tradersupportservice.co.uk
Copyright © 2021 Trader Support Service. All rights Reserved.
38
OFFICIAL18. If you need to cancel a declaration, you can do this (providing it has not yet been submitted) by
selecting the Cancel Declaration button at the bottom of the ENS page.
19. Once the ENS movement information is saved, navigate to the Consignment Information section
on the form, and select the Associate Consignment(s) button.
20. Selecting ‘Associate Consignment(s)’ opens the mechanism to link consignments that are
associated to the carrier/haulier’s organisation, based on the EORI number added to the Carrier
EORI field on the consignment form. Click on the field, which will present a drop-down of these
consignments, highlighting the DEC________ reference number, and the description of the goods
and the document reference number. Selecting one will link it as a consignment to the movement
information.
This mechanism enables multiple consignments to be linked to the movement information, before
selecting the Submit button
www.tradersupportservice.co.uk
Copyright © 2021 Trader Support Service. All rights Reserved.
39
OFFICIALOnce associated, the user that created the consignment will have visibility of the ENS reference
number via their account on the TSS portal, as it is populated onto the consignment form in the
Client Job Number field. They will not be able to access the movement information.
21. Once saved, you can decouple the consignment from the movement information. To do so,
navigate to the Consignment DEC__________ record at the bottom of the form and select the
Decouple from Header button.
22. Once all consignments are added to movement information. Verify that the consignment and good
details are accurate. The consignments are now ready for submission. Click the Submit button on
the Consignment DEC__________ record.
23. If you want to create an ENS without an SFD, select the reason for this from the ‘ENS only
reason’ drop down menu.
www.tradersupportservice.co.uk
Copyright © 2021 Trader Support Service. All rights Reserved.
40
OFFICIALYou can also read