Universidad de Alcalá Escuela Politécnica Superior
←
→
Page content transcription
If your browser does not render page correctly, please read the page content below
Universidad de Alcalá
         Escuela Politécnica Superior

               Grado en Ingeniería Telemática

                   Trabajo Fin de Grado

Android-based application for monitoring the rehabilitation of
                patients with breast cancer

            Autora: Ainhoa Caballero Cardenete

           Tutor/: Juan Jesús García Domínguez

                            2021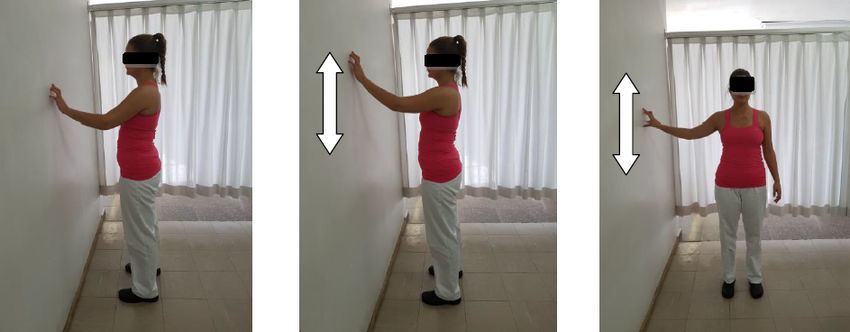
Universidad de Alcalá
          Escuela Politécnica Superior

    Grado en Ingeniería Telemática

              Trabajo Fin de Grado
  Android-based application for monitoring the
  rehabilitation of patients with breast cancer

    Autora: D.ª Ainhoa Caballero Cardenete

   Tutor: Dr. Juan Jesús García Domínguez

Tribunal:

Presidente: Dr. Luciano Boquete Vazquez

Vocal 1º: Dra. Ana Jiménez Martín

Vocal 2º: Dr. Juan Jesús García Domínguez

Fecha: Enero 2021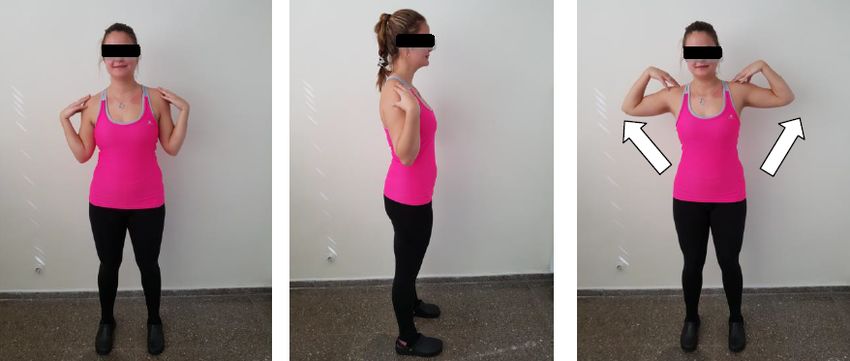
ii
Android-based application for monitoring the
rehabilitation of patients with breast cancer

            Ainhoa Caballero Cardenete

                 January 20, 2021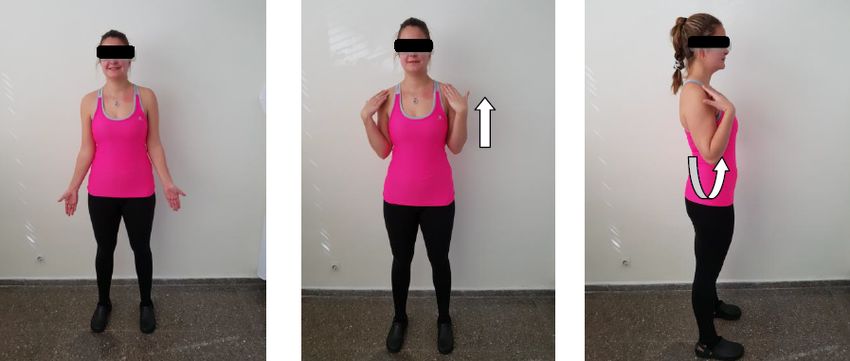
ii
Acknowledgements

Gracias a mi familia por permitirme tener la oportunidad de formarme, no solo en
España sino además haberlo hecho en el extranjero en múltiples ocasiones. Gracias a
ellos por darme todo el apoyo y el ánimo necesario durante los peores baches y las
mejores alegrías, sé que sin ellos esto no hubiese sido posible.

Además, doy gracias a la carrera por haber cruzado en mi camino a personas tan ma-
ravillosas, mis amigos. Somos una gran familia, son los que más me entienden con el
sufrimiento y presión que tiene la Ingeniería, pero además los que más disfrutan conmigo
las alegrías. Gracias a ellos por hacer toda la etapa universitaria más amena y divertida.
Pero sé que esto no acaba aquí, nos quedan muchas más aventuras por vivir juntos.

Por último, no podía olvidarme de uno de mis pilares fundamentales durante toda esta
etapa, mi pareja. Gracias por apoyarme en todo, por celebrar todas las noticias buenas,
pero también, por aguantarme en mis caídas y levantarme de ellas con más fuerza.

                                            iii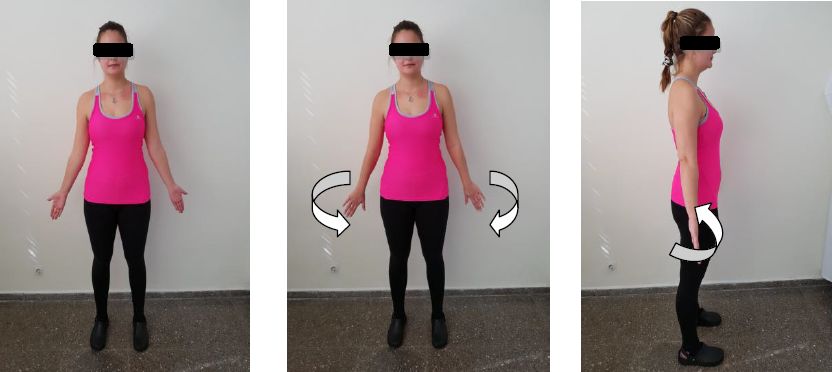
iv 0. Acknowledgements
Índice general

Acknowledgements                                                                                                                             iii

Resumen                                                                                                                                      xi

Summary                                                                                                                                     xiii

Key words                                                                                                                                   xv

1 Introduction                                                                                                                                1
  1.1 Motivation . . . . . . . . . . . . . . . . . . . .                        .   .   .   .   .   .   .   .   .   .   .   .   .   .   .     1
  1.2 Global Overview and Objectives . . . . . . . .                            .   .   .   .   .   .   .   .   .   .   .   .   .   .   .     2
  1.3 State of Art . . . . . . . . . . . . . . . . . . .                        .   .   .   .   .   .   .   .   .   .   .   .   .   .   .     3
       1.3.1 Health Applications . . . . . . . . . . .                          .   .   .   .   .   .   .   .   .   .   .   .   .   .   .     3
       1.3.2 Cancer and Rehabilitation Applications                             .   .   .   .   .   .   .   .   .   .   .   .   .   .   .     4
       1.3.3 Technology . . . . . . . . . . . . . . .                           .   .   .   .   .   .   .   .   .   .   .   .   .   .   .     5

2 Methods                                                                                                                                     7
  2.1 Breast cancer rehabilitation exercises                .   .   .   .   .   .   .   .   .   .   .   .   .   .   .   .   .   .   .   .     7
      2.1.1 Stage 1 . . . . . . . . . . . . .               .   .   .   .   .   .   .   .   .   .   .   .   .   .   .   .   .   .   .   .     7
      2.1.2 Stage 2 . . . . . . . . . . . . .               .   .   .   .   .   .   .   .   .   .   .   .   .   .   .   .   .   .   .   .    11
      2.1.3 Stage 3 . . . . . . . . . . . . .               .   .   .   .   .   .   .   .   .   .   .   .   .   .   .   .   .   .   .   .    13
      2.1.4 Tips and Clarifications . . . .                 .   .   .   .   .   .   .   .   .   .   .   .   .   .   .   .   .   .   .   .    15
  2.2 Study Population . . . . . . . . . . .                .   .   .   .   .   .   .   .   .   .   .   .   .   .   .   .   .   .   .   .    15

3 Materials                                                                                                                                  17
  3.1 Computer . . . . . . . . . .      .   .   .   .   .   .   .   .   .   .   .   .   .   .   .   .   .   .   .   .   .   .   .   .   .    17
  3.2 Mobile Phone . . . . . . . .      .   .   .   .   .   .   .   .   .   .   .   .   .   .   .   .   .   .   .   .   .   .   .   .   .    17
  3.3 Sensors . . . . . . . . . . . .   .   .   .   .   .   .   .   .   .   .   .   .   .   .   .   .   .   .   .   .   .   .   .   .   .    17
      3.3.1 Theoretical Concept         .   .   .   .   .   .   .   .   .   .   .   .   .   .   .   .   .   .   .   .   .   .   .   .   .    17
      3.3.2 IMU BWT61 . . . .           .   .   .   .   .   .   .   .   .   .   .   .   .   .   .   .   .   .   .   .   .   .   .   .   .    18

4 Programming                                                                       21
  4.1 Android Based Application . . . . . . . . . . . . . . . . . . . . . . . . . . 21
      4.1.1 Structure . . . . . . . . . . . . . . . . . . . . . . . . . . . . . . . 21

                                                    v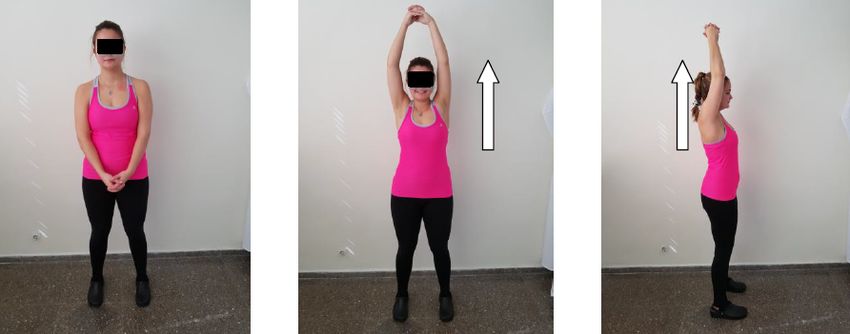
vi                                                                                                                                        ÍNDICE GENERAL

     4.2   Bluetooth and Sensor communications                                .   .   .   .   .   .   .   .   .   .   .   .   .   .   .    .   .   .   .   22
           4.2.1 Looking for Bluetooth . . . . .                              .   .   .   .   .   .   .   .   .   .   .   .   .   .   .    .   .   .   .   22
           4.2.2 Sensor Settings . . . . . . . . .                            .   .   .   .   .   .   .   .   .   .   .   .   .   .   .    .   .   .   .   23
     4.3   Exercises Example . . . . . . . . . . .                            .   .   .   .   .   .   .   .   .   .   .   .   .   .   .    .   .   .   .   25
           4.3.1 Exercise 1 . . . . . . . . . . . .                           .   .   .   .   .   .   .   .   .   .   .   .   .   .   .    .   .   .   .   25
           4.3.2 Exercise 2 . . . . . . . . . . . .                           .   .   .   .   .   .   .   .   .   .   .   .   .   .   .    .   .   .   .   30
           4.3.3 Exercise 3 . . . . . . . . . . . .                           .   .   .   .   .   .   .   .   .   .   .   .   .   .   .    .   .   .   .   31
     4.4   Database Management (Firebase) . . .                               .   .   .   .   .   .   .   .   .   .   .   .   .   .   .    .   .   .   .   32
           4.4.1 Structure . . . . . . . . . . . .                            .   .   .   .   .   .   .   .   .   .   .   .   .   .   .    .   .   .   .   32

5 Results                                                                                                                                                  37
  5.1 Log in . . . . . .      .   .   .   .   .   .   .   .   .   .   .   .   .   .   .   .   .   .   .   .   .   .   .   .   .   .   .    .   .   .   .   37
  5.2 Change Password         .   .   .   .   .   .   .   .   .   .   .   .   .   .   .   .   .   .   .   .   .   .   .   .   .   .   .    .   .   .   .   38
  5.3 Stages . . . . . .      .   .   .   .   .   .   .   .   .   .   .   .   .   .   .   .   .   .   .   .   .   .   .   .   .   .   .    .   .   .   .   39
  5.4 Exercises . . . . .     .   .   .   .   .   .   .   .   .   .   .   .   .   .   .   .   .   .   .   .   .   .   .   .   .   .   .    .   .   .   .   40

6 Conclusions and Future work                                                         43
  6.1 Conclusions . . . . . . . . . . . . . . . . . . . . . . . . . . . . . . . . . . 43
  6.2 Future work . . . . . . . . . . . . . . . . . . . . . . . . . . . . . . . . . . 44

Bibliography                                                                                                                                               44

Appendixes                                                                                                                                                 45

A Specifications                                                                                                                                           45

B User Manual                                                                                                                                              47
  B.1 Run the application .           .   .   .   .   .   .   .   .   .   .   .   .   .   .   .   .   .   .   .   .   .   .   .   .   .    .   .   .   .   47
  B.2 Log in . . . . . . . .          .   .   .   .   .   .   .   .   .   .   .   .   .   .   .   .   .   .   .   .   .   .   .   .   .    .   .   .   .   47
  B.3 Change the password             .   .   .   .   .   .   .   .   .   .   .   .   .   .   .   .   .   .   .   .   .   .   .   .   .    .   .   .   .   48
  B.4 Stages . . . . . . . .          .   .   .   .   .   .   .   .   .   .   .   .   .   .   .   .   .   .   .   .   .   .   .   .   .    .   .   .   .   48
  B.5 Exercises . . . . . . .         .   .   .   .   .   .   .   .   .   .   .   .   .   .   .   .   .   .   .   .   .   .   .   .   .    .   .   .   .   48

C Budget                                                                                                                                                   51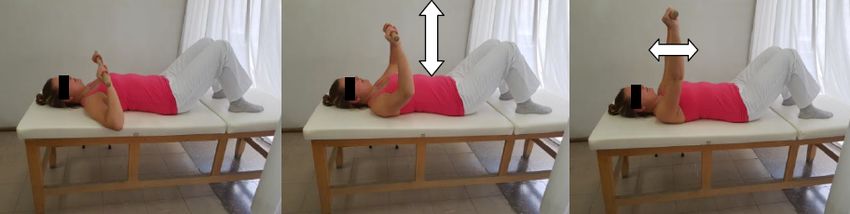
Lista de figuras
1.1 Overview . . . . . . . . . . . . . . . . . . . . . . . . . . . . . . . . . . . . 3
2.1 Stage1: Exercise 1 . . . . . . . . . . . . . . . . . . . . . . . . . . . . . . 8
2.2 Stage1: Exercise 2 . . . . . . . . . . . . . . . . . . . . . . . . . . . . . . 8
2.3 Stage1: Exercise 3 . . . . . . . . . . . . . . . . . . . . . . . . . . . . . . 9
2.4 Stage1: Exercise 4 . . . . . . . . . . . . . . . . . . . . . . . . . . . . . . 9
2.5 Stage1: Exercise 5 . . . . . . . . . . . . . . . . . . . . . . . . . . . . . . 10
2.6 Stage1: Exercise 6 . . . . . . . . . . . . . . . . . . . . . . . . . . . . . . 10
2.7 Stage2: Exercise 1 . . . . . . . . . . . . . . . . . . . . . . . . . . . . . . 11
2.8 Stage2: Exercise 2 . . . . . . . . . . . . . . . . . . . . . . . . . . . . . . 12
2.9 Stage2: Exercise 3 . . . . . . . . . . . . . . . . . . . . . . . . . . . . . . 12
2.10 Stage3: Exercise 1 . . . . . . . . . . . . . . . . . . . . . . . . . . . . . . 13
2.11 Stage3: Exercise 2 . . . . . . . . . . . . . . . . . . . . . . . . . . . . . . 13
2.12 Stage3: Exercise 3 . . . . . . . . . . . . . . . . . . . . . . . . . . . . . . 14
2.13 Stage3: Exercise 4 . . . . . . . . . . . . . . . . . . . . . . . . . . . . . . 14
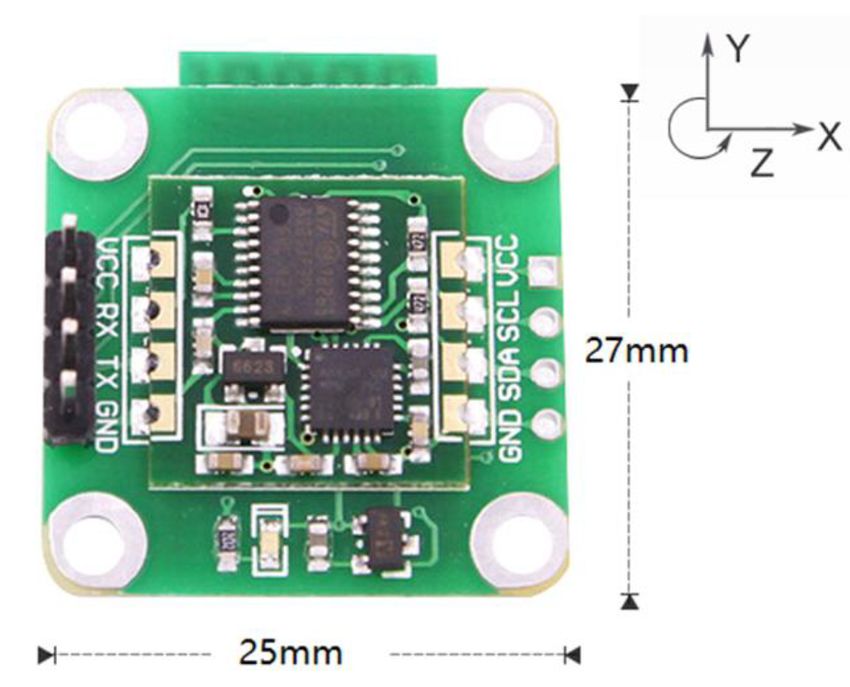
3.1 IMU BWT61 sensor, dimensions and axis [20]. . . . . . . . . . . . . . . . 18
4.1 Exercise’s flowchart. . . . . . . . . . . . . . . . . . . . . . . . . . . . . . 28
4.2 Structure of the database. . . . . . . . . . . . . . . . . . . . . . . . . . . 32
4.3 Database . . . . . . . . . . . . . . . . . . . . . . . . . . . . . . . . . . . . 36
5.1 Logging in . . . . . . . . . . . . . . . . . . . . . . . . . . . . . . . . . . . 37
5.2 Changing the Password . . . . . . . . . . . . . . . . . . . . . . . . . . . . 38
5.3 Appearance of the database . . . . . . . . . . . . . . . . . . . . . . . . . 39
5.4 Progress in stages . . . . . . . . . . . . . . . . . . . . . . . . . . . . . . . 40
5.5 Exercise . . . . . . . . . . . . . . . . . . . . . . . . . . . . . . . . . . . . 41
5.6 Exercise correctly performed. . . . . . . . . . . . . . . . . . . . . . . . . 42
5.7 Retake the exercise . . . . . . . . . . . . . . . . . . . . . . . . . . . . . . 42
B.1 Logo . . . . . . . . . . . . . . . . . . . . . . . . . . . . . . . . . . . . . . 47
B.2 Log in . . . . . . . . . . . . . . . . . . . . . . . . . . . . . . . . . . . . . 47
B.3 Change the password . . . . . . . . . . . . . . . . . . . . . . . . . . . . . 48
B.4 Menu . . . . . . . . . . . . . . . . . . . . . . . . . . . . . . . . . . . . . . 49
viiviii LISTA DE FIGURAS
Lista de tablas

 3.1   Instructions from PC to module [21].       .   .   .   .   .   .   .   .   .   .   .   .   .   .   .   .   .   .   .   .   19
 3.2   Acceleration output [21]. . . . . . . .    .   .   .   .   .   .   .   .   .   .   .   .   .   .   .   .   .   .   .   .   20
 3.3   Angular velocity output [21]. . . . . .    .   .   .   .   .   .   .   .   .   .   .   .   .   .   .   .   .   .   .   .   20
 3.4   Angle output [21]. . . . . . . . . . . .   .   .   .   .   .   .   .   .   .   .   .   .   .   .   .   .   .   .   .   .   20
 C.1   Material Budget . . . . . . . . . . . .    .   .   .   .   .   .   .   .   .   .   .   .   .   .   .   .   .   .   .   .   51
 C.2   Personnel Budget . . . . . . . . . . .     .   .   .   .   .   .   .   .   .   .   .   .   .   .   .   .   .   .   .   .   51

                                           ix
x LISTA DE TABLAS
Resumen

Hoy en día, el cáncer es una enfermedad muy común. Los pacientes necesitan mucho
apoyo psicológico, una rutina terapéutica y un gran seguimiento por parte del personal
sanitario. Acerca del cáncer de mama, éste tiene una alta probabilidad de ser superado
en comparación con otros tipos de cáncer. Esta enfermedad conlleva, en muchos casos,
la extirpación de la mama afectadaa lo que requiere rehabilitación para recuperar la
movilidad en la zona.
    En este proyecto, vamos a desarrollar una aplicación basada en Android para el te-
léfono móvil con el fin de ayudar a los médicos y pacientes en la rehabilitación desde
casa. Con la ayuda de esta aplicación y algunos sensores que los pacientes tienen que
colocar en sus brazos, será posible monitorizar los ejercicios y proporcionar una retro-
alimentación sobre el desempeño. Esto les ayuda a recuperarse evaluando el ejercicio
inmediatamente. De esta manera, se pueden mostrar los errores en la ejecución de estos.

                                           xi
xii 0. Resumen
Summary

Nowadays, cancer is a very common disease. Patients need a lot of psychological support,
a routine and a lot of follow-up by healthcare personnel. Focusing more on breast cancer,
it has a high probability of being overcome compared to other types of cancer. This
disease leads, in some cases, in a breast removal, which leads to rehabilitation to recover
mobility in the area.
    In this project, we are going to develop an Android-based application for the mobile
phone to help doctors and patients in rehabilitation from home. With the help of
this application and some sensors that patients have to place on their arms, it will be
possible to monitor the exercises and to provide a feedback about the performance. This
helps them to recover by evaluating the exercise immediately. In this way, errors in the
execution of the exercises can be shown.

                                           xiii
xiv 0. Summary
Key words

 • Breast cancer

 • Android application

 • Sensors

 • Bluetooth

 • Firebase

                         xv
xvi 0. Key words
Chapter 1

Introduction

1.1     Motivation
The rehabilitation is the care that patients receive in order to maintain or to improve
their capacities. These capacities are needed for their daily life, and can be physical,
mental or cognitive. They can be lose by an illness, or by a secondary effect of a medical
treatment.
    The rehabilitation general objective is to help patients to recover their capacities or
their independence. But depending on the patient, the objectives will be different as
they have different problems, and causes.
    There are different types of rehabilitation treatments, some of them use machines,
devices or sensors, but other ones not. So depending on what kind of rehabilitation the
patient is going to need, the rehabilitation is developed in different places, such as an
hospital, an rehabilitation center or at home [1].
    At the first stages of the rehabilitation process, the patients go to the centers, so
they are under the supervision of an expert. Patients are supervised by the experts.
Depending on how the patients improve, the experts will take in consideration if the
patients can go home or if they has to come back. In case the patients are sending home,
they will have to continue doing exercises in order to get the full recovery.
    Usually, doctors give patients instructions (printed on a paper) of the exercises that
they have to performed at home. But when patients are at home, most of them do
not remember the correct way of doing the exercise, or with how much speed should be
done. Indeed, they do not know if they are doing right or not because there is no one
checking on them.
    The project is focused on patients who suffer breast cancer removal, where the re-
habilitation is really important for the patient. It helps to restore arm and shoulder
movements, as these parts are tauter after the surgery. In addition, after the breast
removal, the affected area of the chest or arm may become inflamed, this is because
some lymph nodes have been removed, so, in consequence, there would be fewer lymph
nodes to filter out the lymphatic fluid, which causes the inflammation of the area. So, if
patients want a full recovery, all the exercises have to be done perfectly and periodically.

                                             1
2 1. Introduction
1.2 Global Overview and Objectives
This project is developed in the University of Alcalá in the framework of the FrailCheck
project, advised by physiotherapist from both University of Alcalá and Ramon y Cajal
Hospital.
The main objective is to provide a mobile application to the patients to assist them
in performing the rehabilitation exercises. The patients have the exercises with all the
instructions in an app. By means of this app, they can watch a video showing how to
do the exercise, so they are guided during all the workout, but they also have a timer
to control the time.
The project is focused on patients who have suffered breast cancer removal, so does
the application. Doctors have to register their patients with their username, which is the
ID, and a default password. Patients which are previously registered by their doctors
are the only ones who can enter into the application. Figure 1.1 shows a diagram of the
project.
The application is divided into different parts, one where the patients choose the
stage, and other one with the exercises to be done. There are a few recommendations
showing the correct order to perform the exercises (first of all stage one, then stage two,
and finally stage three), but this is not mandatory, the patient can change it depending
on his/her necessities. Usually, at the next stage, the exercises will start to become
harder until they get to the final stage. When this last step is completed, it will be
stated that the patients have reached their final target. For example, if the final goal
is to reach an arm amplitude movement of 90 degrees, the patients will start with a
reduced amplitude degree, increasing it stage by stage.
In order to have the records of their exercises, some sensors are going to be used,
they are called IMUs (Inertial Measurement Units). As this sensors have to be placed
by the patients, an image is going to be provided within the app with the concrete spots
where the sensors should be located. Once they are placed in the patient’s body, they
have to be connected via Bluetooth with the application, so the data that is picked
up by them is stored in a database (using Firebase). In addition, the application will
show an immediate feedback to inform the patients if the exercise was developed right
or not. In case that it is not, the patients will have to repeat the exercise, until they get
a positive feedback.
Doctors can see their patients improvement by accessing the database through Fire-
base. So they can give their patients a feedback about the improvements and failures
at the next appointment.1.3. State of Art 3
Figure 1.1: Overview
1.3 State of Art
1.3.1 Health Applications
The advance of medicine has always gone hand in hand with technology. In this context,
the challenge of engineers has always been to provide the necessary technology to support
health experts in improving diagnoses or the precision of operations. For example, with
the help of cameras, machines, etc. In the same way, the emergence of smartphones has
led the growth of application for both patients and doctors.
For example, IDoctus [2], which is developed for doctors, is an application that
provides access to a big database full of information about diseases. Doctors can check
symptoms and treatements of diseases looking into this database. IDoctus helps to get
a more precise diagnosis. On the other hand, there are applications focused only on
patients. For example, another tool called Universal Doctor Speaker [3], helps patients
to understand better what their doctor just told them. It works like a translator, but
in addition, it also helps patients to know which health problem they could have with
their current symptoms.
Moreover, there are also a lot of applications aimed at doctors and patients. For
example, ConsultorioMovil [4], it is developed as a chat between patients and doctors.
Patients can receive automated telemedicine, care and monitoring services during their
medical treatments. They can ask for an appointment through the app, or they can
even consult their personal medical file. On the other hand, doctors can register new
patients through the app or through the web, so they can check their medical files.
In times of pandemic, this last example of application is really useful. Patients
having online appointments, it reduces infection risk.
Furthermore, there are a lot of applications which are developed to treat one specif-
ically disease, instead of making a general health application.4 1. Introduction
1.3.2 Cancer and Rehabilitation Applications
Nowadays, there are a lot of studies and applications about cancer. Among all types of
cancers, this project focuses on breast cancer, a disease that happens more frequently
to women than to men. However, there are studies which show that during the first five
years after the diagnosis, the mortality is higher in men than in women [5].
As this is a very common disease, there are a lot of applications and articles which
try to help the patients along their paths. That help focuses on their physical recovery,
on their mental health, or even on the previous detection of the disease (which helps to
decrease the mortality).
For example, one of those articles [6] explains an application where the patients
are connected with their doctors. Patients upload any relevant information or anomaly
that they have noticed. With that information, the application automatically scores
the risk of breast cancer. Doctors can read that information about their patients, so
they can assess them. This will potentially encourage people to do more frequently
self-examinations.
Another example on how to help patients is: assist them following a diet and doing
sport, i.e. to have a correct lifestyle according to their necessities [7]. This study
explains the fact that exists a variation in breast cancer incidence and in the mortality
rates depending on geographic factors (involving regional and cultural differences in
diet and lifestyle). Although, there are already many applications that do this function
(establishing diets, workout plans, etc), these are not suitable for people with special
medical conditions. This article focuses on specific dietaries, workouts and mental plans
for breast cancer patients. These plans depend on the stage of their treatment.
Moreover, the importance of the mind in the whole disease process should not be
overlooked. These kind of patients need a lot of emotional support, their mental attitude
is crucial to overcome the illness. To help them during all the path, the application
Contigo has been created [8]. This application focuses on emotions and it cares a lot
about explaining how the process is going to be, so the new patients can understand
everything and stay calm. It is a guide where sixteen women talk about their personal
experiences encouraging others that are going through the same.
Once a disease has been diagnosed, there exists a rehabilitation process, which starts
at the hospital, but later on it takes place at home. When patients leave the hospital
they are no more under the supervision of any expert, which can conduct to a state of
relaxation. This leads to a bad execution of the exercises, and in consequence to an
extension of their rehabilitation process. For example, among other applications, there
is one focused on a knee joint rehabilitation. It shows the patients a table with all the
exercises, indicating the speed, repetitions, level and intensity of the exercises [9]. This
application is really helpful for the patients because there is not any chance for them to
forget how to perform the exercises or do them in a wrong way.1.3. State of Art 5
1.3.3 Technology
Sensors
A sensor is a device which catch physical magnitudes from the environment such as
temperature, sound, light, speed etc. The sensors are used for a lot of equipments:
microphones, speedometer, thermometer, accelerometers, cameras, GPS, etc.
At the health field, a lot of sensors are used to monitor the patients. All the infor-
mation that the sensors pick up, are send to other devices to process the data and make
it readable for doctors [10]. Some example of sensors that are used in the health field
are the following:
• Medical electrodes: These types of sensors conduct electricity from a device to
the patient (which is in a surgery or is receiving a medical treatment). But the
electrodes can also catch the electrical signals from the muscles, organs, or other
parts of the body, and display that signals in a screen. Electrodes help to the
diagnosis [11].
• Optical fibres: These kind of sensors are really flexible and thin. They are intro-
duced through little human cavities, or through little incisions in order to get to
the sick area [12].
• IMUS: These sensors are used to measure the patients movements, such as in
rehabilitation.
As it is explained, there are a lot of different types of sensors that are used in
health field. For this project IMUs (Inertial Measurement Unit) sensors are going to
be used. These are special types of sensors which measure angular rate, force and
sometimes magnetic field, they have 3-axis accelerometer and 3-axis gyroscope and 3-
axis magnetometer [13].
The sensors need to be connected to the mobile phone (where the application is
running) in order to send the data. To do so, there are two ways: USB and Bluetooth.
The latter (Bluetooth) is more expensive than the first one, but it is worth it because it
is a wireless connection, so the wires do not disturb the patient while doing the exercise
[14].
The latest version of Bluetooth is 5.0, and it is only compatible with devices that have
the same version. It has a lot of improvements in comparison with the previous version,
one of them reduces energy consumption of the wireless devices that are connected. The
other one, for example, consists in two headphones that can be connected to the same
device while listening to different songs.6 1. Introduction
Electronic Devices: mobile phones
Nowadays, there are different types of mobile phones with different types of operative
systems. The two most well known are: Android and IOS (Apple operative system).
They have some differences such as: Android users have permissions to customize
their phones, while IOS not. Android can have more problems because it is an operative
system which is used for more manufacturers than just Apple in the case of IOS. So,
as they have advantages and disadvantages, it is up to the users to choose which one is
better for them.
In this project, the application is going to be developed with Android Studio plat-
form. The latest version of android studio is the 4.1, released on October of 2020.
However, they are working on the version 4.2. This platform is used in order to develop
applications in Android [15].
Data Storage
When the connection via Bluetooth between the application and the sensors is estab-
lished, the application starts receiving information from the sensors. All that informa-
tion can be stored at a database. There are a lot of different programs that manage
databases, some examples are: MySQL Database, SQL Server, Firebase...
In this project is going to be used Firebase. It is a Backend-as-a-Service — BaaS —
which grew up into Google Cloud Platform.
The main positive differences, between Firebase and other programs, are that Fire-
base sends new data as soon as it is updated, while others wait until the user asks for the
information. Other advantage is that the application is connected to Firebase through
a WebSocket which is much faster than HTTP (what others programs do). Another ad-
vantage is its authentication, directly included in Firebase database (so it can be used
to control the access to the data). One disadvantage is that there are limited queries
because of its data stream model [16].Chapter 2
Methods
2.1 Breast cancer rehabilitation exercises
The following stages and exercises are part of the rehabilitation program carry out by
the Ramon y Cajal Hospital (the authors have given us permission to use the photos
and videos of the exercises). These exercises has to be followed by the patients [17].
These exercises should be started on the day after surgery, with some limitations
in the immediate postoperative period (7-10 days) so as not to increase the amount of
surgical drainage and seroma formation. The exercises will therefore be carried out in
three phases.
2.1.1 Stage 1
This stage should be perform during the first seven or ten days after the surgery.
Instructions: The movements of the shoulder should be restricted by avoiding raising
the arm above 90°. Feeling any "discomfort" while performing them is considered to be
natural. Exercise slowly, minimizing discomfort. If any of the exercises cause extreme
pain, stop and start again in a couple of days. If the issue continues, check with the
clinicians who are treating you. If you think it is important, you can also do the exercises
sitting down. IMPORTANT: during the execution of all exercises.
• Hold your back straight all the way.
• The head is expected to be in line with the body, looking straight ahead.
• Do not move your neck or turn your head when exercising
• Keep the muscles of your abdominal and pelvic floor clenched during exercises.
78 2. Methods
Exercise 1: Shoulder lift
Starting position: standing, facing forward, the legs detach from each other and the
arms along the body. The palms face each other. Hold your back straight all the way.
Exercise: lift the shoulders upwards, hold on for 5 seconds and return to the starting
point. Start with 3 repetitions and progress to 5 repetitions in the next few days.
Exercise four times a day.
Figure 2.1: Stage1: Exercise 1
Exercise 2: Elbow bending
Starting position: palms facing forwards.
Exercise: Bend the elbows. Bring the hands to the shoulders on the same side. Don’t
move your neck around. Keep the spot for 5 seconds and go back to the starting point.
Start with 3 repetitions and progress to 5 repetitions in the next few days.
Figure 2.2: Stage1: Exercise 22.1. Breast cancer rehabilitation exercises 9
Exercise 3: Arm twist with elbows outstretched
Starting position: arms a little apart. Palms looking ahead.
Exercise: slowly turn your arms around so that the palms of your hands face backwards,
without turning your body. Keep for 5 seconds and go back to the starting point. Start
with 3 repetitions and progress to 5 repetitions in the next few days.
Figure 2.3: Stage1: Exercise 3
Exercise 4: Arms elevation to the horizontal with elbows bent
Starting position: elbows bent and attached to the body. The tips of the fingers touch
the shoulders on the same side, the arms pointing backwards. Back straight.
Exercise: Slowly direct the elbows forward and upwards while touching the shoulders
with the fingers. DO NOT raise your elbows above shoulder level. Do not lean your
body to the side. Hold for 5 seconds and return to the starting position. Start with 3
repetitions and progress to 5 repetitions on the following days.
Figure 2.4: Stage1: Exercise 410 2. Methods
Exercise 5: Separation of arms up to the horizontal with the elbows bent.
(This can only be done if the surgeon authorises it.)
Starting position: standing facing forward, elbow bent and fingertips touching the shoul-
ders. Go back straight.
Exercise: slowly lift your elbows upwards, separating them from your sides as your
fingertips touch your shoulders. You must not raise your elbows above shoulder level,
nor must you tilt your body to the side. Keep this position for 5 seconds and go back
to your starting position. Start with 3 repetitions and progress to 5 repetitions in the
next few days.
Figure 2.5: Stage1: Exercise 5
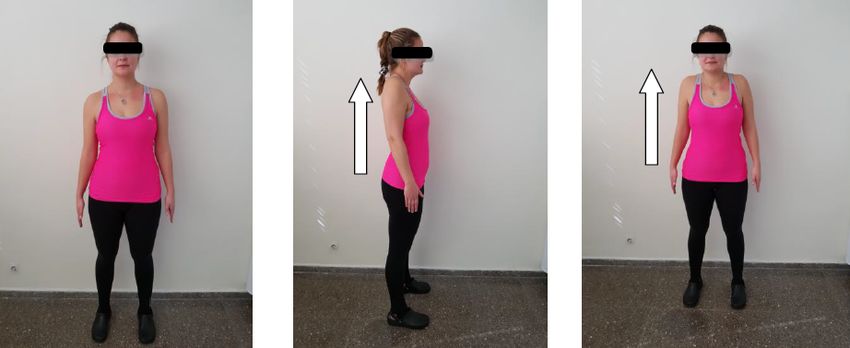
Exercise 6: Shoulder extension
Starting position: standing, facing forward, the legs detach from each other and the
arms along the body. The palms face each other. Hold the back straight all the way.
Don’t lift the shoulders.
Exercise: Gently move the arms backwards. Keep this position for five seconds and
return to the starting position. Start with 3 repetitions and progress to 5 repetitions in
the next few days.
Figure 2.6: Stage1: Exercise 62.1. Breast cancer rehabilitation exercises 11
2.1.2 Stage 2
After the first seven or ten days, this is the next stage. In this step, the patient will
move forward, moving beyond the initial 90 degrees, using aids such as a table, a stick
or a wall to make it easier to complete the movement. This process is going to last 10-15
days.
Exercise 1: Arm separation
Starting position: sitting on a chair with the back straight, lean the hand on a folded
towel, on top of a table next to you.
a. Slide the towel forward on the table, separating your arm from your body. Hold
for 5 seconds and return. Slide the towel to one side. Hold for 5 seconds and
return. Slide the towel backwards. Hold for 5 seconds and return. Repeat each
movement 5 times.
b. Make a combined movement by sliding the towel in a sweep: front-to-side-back
and back-to-side-forward. Repeat 5 times.
Figure 2.7: Stage2: Exercise 112 2. Methods
Exercise 2: Self-passive
Starting position: Lying face up with knees bent. Feet slightly apart. Holding a stick
with both hands. Elbows bent with the stick close to the chest.
a. Stretch the arms and raise the stick up to the ceiling. Hold for 5 seconds and
return. Repeat 5 times.
b. Arms stretched with the stick up. Bring the stick back, (towards the head) and
then down (towards the knees). Hold for 5 seconds. Increase the direction of
movement according to tolerance. Always keep your shoulders in contact with the
table during the exercise. Repeat 5 times.
Figure 2.8: Stage2: Exercise 2
Exercise 3: Walk on the wall
Starting position: standing in front of a wall. Keep your back straight and your core
active.
a. Walk with your fingers along the wall. Walk upwards until it is tolerable. Keep
on for 5 seconds and walk down slowly. Repeat 5 times.
b. Carry out the exercise above but stand sideways on the wall to move your fingers
up and down. Repeat 5 times.
Figure 2.9: Stage2: Exercise 32.1. Breast cancer rehabilitation exercises 13
2.1.3 Stage 3
Once the second stage has been completed, stage 3 is the next step. In this phase, the
goal is to reach the complete movement of the shoulders.
Exercise 1: Complete arm lift
Starting position: standing facing forward. Arms forward and fingers interlaced.
Exercise: Raise your arms above your head. Keep the elbows straight. Do not arch the
back. Keep on for 5 seconds and return to the starting spot. Start with 3 repetitions
and progress to 5 repetitions in the next few days.
Figure 2.10: Stage3: Exercise 1
Exercise 2: Complete lateral arm lift
Starting position: standing facing forward. Arms apart and hands forward.
Exercise: Separate your hands and arms from your trunk. Bring your arms up to touch
the edges of your hands. Do not bend the trunk or the elbows. Hold the position for 5
seconds and return to the starting position. Start with 3 repetitions and progress to 5
repetitions on the following days.
Figure 2.11: Stage3: Exercise 214 2. Methods
Exercise 3: Elbows separation with the hands on the head
Starting position: elbows bent and facing forward. Hands behind the neck.
Exercise: Bring the elbows out and back without raising the shoulders. Keep the palms
of your hands behind your ears. Hold the position for 5 seconds and return to the
starting position. Start with 3 repetitions and progress to 5 repetitions on the following
days.
Figure 2.12: Stage3: Exercise 3
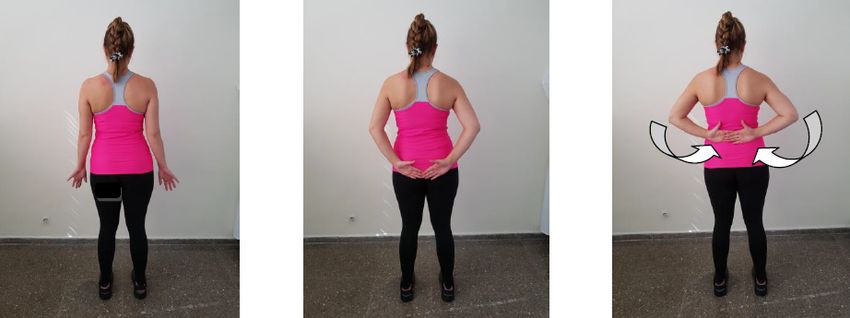
Exercise 4: Hands behind the back
Starting position: standing, with arms apart and palms facing backwards.
Exercise: Bring your hands behind your back until they touch. Bend your elbows as far
as you can, trying to keep your hands together. Hold for 5 seconds and return to the
starting position. Start with 3 repetitions and progress to 5 repetitions on the following
days.
Figure 2.13: Stage3: Exercise 42.2. Study Population 15
2.1.4 Tips and Clarifications
According to the Ramon y Cajal Hospital, these are the general tips after a breast
removal [17]:
• Feelings like tingling, puncture or even an increase of the sensibility of the skin,
are normal. These sensations tend to disappear over time.
• It is convenient to put some cushions or pillows under the armpit in order to keep
the arm separated from the body, avoiding the shoulder stiffness. Moreover, this
helps to the transport of the lymphatic liquid.
• Bands of tissue can appear in the armpit (they will disappear). They produce an
irritating sensation of tautness when the rehabilitation exercises are done. These
exercises can help to overcome the pain, and to recover the mobility of the arms.
• If three weeks after the surgery, there exists an intense pain or a limitation of the
arms mobility, the doctor will refer to the rehabilitation’s room.
• The exercises should be done everyday until the arm’s mobility is similar than
before.
• Do not drive during the first two weeks after the surgery.
• If six weeks after the surgery the scar is well healed, the patient can swim unless
he/she is receiving chemo or radiotherapy treatment. Other kind of sport can be
practised two months after the surgery.
2.2 Study Population
Due to the current situation, it has been impossible to perform any test in a hospital
with real patients with breast cancer. However, the tests have been carried out by
healthy people. These people are from my family, from the university, or simply me.
In the future, the participants to validate the application will be patients from the
Ramon y Cajal Hospital (Madrid, Spain). These patients have been operated due to
breast cancer, and their doctors have allowed them to do these rehabilitation exercises.
To validate this application, there is no specific age or gender, because the only require-
ment is to have been operated recently.
For this study, the research team has applied for the Ethical Approval to both
Guadalajara University Hospital and University of Alcalá Ethics Commitees.16 2. Methods
Chapter 3

Materials

In this project, some materials are going to be used for developing the application and
the rehabilitation correctly. Those materials are: sensors and a mobile phone.

3.1     Computer
In order to create the application, a personal computer is needed. The PC needs to have
Windows or Mac as the operative system, and the Android Studio application installed
(version 4.0.1).

3.2     Mobile Phone
As the application is developed in Android, the telephone must have Android as the op-
erative system (version 5.0). The telephone must have Bluetooth connection, otherwise
the patient will not be able to perform the exercises at home. This is necessary because
if not the results of his/her exercises are not going to be saved, so the doctor would not
know if the patient is doing right or not.
    In addition the telephone should have WiFi (and it has to be activated), otherwise
the data cannot be stored in the database.

3.3     Sensors
3.3.1    Theoretical Concept
The sensors that are going to be used are called IMUs (Inertial Measurement Unit). They
are the measurement unit of the inertial systems. An inertial system is a coordinate
system in which bodies move uniformly in a straight line, but there is no force acts
on them. This is what is called inertia, when a body keeps moving, but there is no
force acting on it. These inertial systems should be taken into considerations within a

                                           17
18 3. Materials
reference system. So depending on the reference system that is chosen, the bodies will
be considered: in movement or motionless.
IMUs are used mostly in navigation systems, so the data that is picked up by the
IMUs sensors, let the computer knows where is located the body. These types of sensors
are very useful for knowing the exact bodies location every moment [18].
But, in the last few years, IMUs are more used in the health field. They are being
used to monitor the different movements of the patients with different diseases, or for
athletes in order to quantify their training results and their improvements.
Inertial sensors respond to motion of the sensor itself. As it is said in subsection
1.3.3, these sensors measure angular rate, force and sometimes magnetic field. They
have 3-axis accelerometer and 3-axis gyroscope and 3-axis magnetometer.
The gyroscope sensor measures angular rate, which is expressed in degrees per sec-
ond. This sensor helps to track changes in orientation. It is also known as angular
velocity sensor.
The accelerometer sensor measures acceleration. There are two types of accelera-
tion that are measured, one caused by device motion and other one due gravity. It is
expressed in g’s (G). They measure the static orientation of the device, which is done
computing the angle of the device compared to gravitational force.
An accelerometer can measure gravity when the device is motionless, or with a
gyroscope during motion cycles. For example, there are phone with gyroscope sensor
which have more precise gravity measurement when the phones are in use, and a quicker
response time to rapid orientation changes.
In addition, IMUs experiment changes in their measurement output. So, for that
reason, a calibration is needed at the very beginning and periodically during the use of
the sensor [19].
3.3.2 IMU BWT61
IMU BWT61 is the sensor that is going to be used in the project. It has an accelerometer
and a gyroscope sensor, but no magnetic one. The Figure 3.1 shows the IMU BWT61.
The axis of the module are shown in the figure
above. In order to know in which axis is the sensor ro-
tating, the Law of the right hand is implemented. So,
the direction of rotation around the axis is the four-
finger bending direction. And the thumb points at the
axis.
Moreover, the Law of the left hand it is also used
in order to know where are the axis located. Being he
thumb the Z-axis, the index finger is the Y-axis, and
Figure 3.1: IMU BWT61 sensor,
finally the middle finger is the X-axis. dimensions and axis [20].
The manufacturer provides an application which
can be installed on the PC and on the phone, so the3.3. Sensors 19
sensor can be tested. First of all,the sensor has to be connected via Bluetooth with the
PC or with the phone. A password (1234) is asked for matching with the sensor (which
name is "HC-06"). The user knows that the sensor is connected to the phone or to the
PC when its red light is not flashing.
Once this is done, the screen shows data that the sensor is sending to the application.
That data are: acceleration, angular velocity, or the angle (all of them given in the three
axis (X, Y and Z)).
In order to establish the coordinate system centering at (0,0,0), the X, Y and Z axis
have to be calibrated. For doing this, the module needs to be static, and the calibration
process has to follow an order, being X and Y axis the first ones, and Z axis the last
one. The application also has a button to calibrate X, Y and Z axis.
When all these steps have been completed, a communication between the PC and
the sensor starts. The first instruction that is needed to be sent from the PC to the
module, is the calibration in every axis. After that, some additional settings such as
horizontal or vertical installation of the module (the default position is horizontal) have
to be done. In addition, the PC can send to the module an instruction to enter the
standby state from the working state (Dormancy), or the other way around, from the
standby state to the working state (Break dormancy), this is done when the user want
to stop sending data to the PC or when the user want to restart receiving data. In Table
3.1 the sensor settings can be observed.
Instruction content Function Remark
0xFF 0XAA 0X52 Angle initialization Z axis to 0
0XFF 0XAA 0X67 Accelerometer calibration X, Y axis to 0
0XFF 0XAA 0X60 Dormancy/Break dormancy Standby state/working state
0XFF 0XAA 0X65 Horizontal instalation Horizontal placed
0XFF 0XAA 0X66 Vertical instalation Vertical placed
Table 3.1: Instructions from PC to module [21].
The sensor sends 33 characters all the time to the PC. It starts when the device
is connected via Bluetooth. The data have to be processed by the PC in order to
understand the information.
Those 33 characters represent: Acceleration output, Angular velocity output, and
Angle output (11 characters for each of them, creating three arrays). The array’s posi-
tions are from 0 to 10, being 0 the head of the frame, which value is 0x55 in hexadecimal,
and 85 in decimal value (is the same value for the three arrays). This is done for de-
tecting the correct three frames which are been looking for. After that, in order to
distinguish between the three of them, the character at the position 1 tells what frame
it is. Being 0x51 (81 in decimal) for the acceleration output, 0x52 (82 in decimal) for the
angular velocity output, and 0x53 (83 in decimal) for the angle output. The following
values (show in Tables 3.2, 3.3 and 3.4), are the valid data that has to be processed.20 3. Materials
Data number Data content Implication
0 0x55 Header of packet
1 0x51 Acceleration packet
2 AxL X axis acceleration low byte
3 AxH X axis acceleration high byte
4 AyL Y axis acceleration low byte
5 AyH Y axis acceleration high byte
6 AzL Z axis acceleration low byte
7 AzH Z axis acceleration high byte
8 TL Temperature low byte
9 TH Temperature high byte
10 Sum Checksum
Table 3.2: Acceleration output [21].
Data number Data content Implication
0 0x55 Header of packet
1 0x52 Angular velocity packet
2 wxL X axis angular velocity low byte
3 wxH X axis angular velocity high byte
4 wyL Y axis angular velocity low byte
5 wyH Y axis angular velocity high byte
6 wzL Z axis angular velocity low byte
7 wzH Z axis angular velocity high byte
8 TL Temperature low byte
9 TH Temperature high byte
10 Sum Checksum
Table 3.3: Angular velocity output [21].
Data number Data content Implication
0 0x55 Header of packet
1 0x53 Angle packet
2 RollL X axis angle low byte
3 RollH X axis angle high byte
4 PitchL Y axis angle low byte
5 PitchH Y axis angle high byte
6 YawL Z axis angle low byte
7 YawH Z axis angle high byte
8 TL Temperature low byte
9 TH Temperature high byte
10 Sum Checksum
Table 3.4: Angle output [21].Chapter 4
Programming
4.1 Android Based Application
4.1.1 Structure
The application is divided into different parts:
• Log in: is where the user enters the ID and the password. The password has been
given by the doctor. So only the patients that have been registered previously by
their doctors can use the application.
• Change the password (optional): Once the user has logged in, the password can
be change. This option is in the upper right part of the screen (three dots). To
change the password the user has to enter its ID and the new password twice. If
the user is in the database, the password will be change.
• Select the stage: In this part, the patient chooses which stage does he/she wants
to do. There are three stages, which should be done in order, starting at Stage 1.
Each stage has a different color depending if the whole stage has been completed
or not.
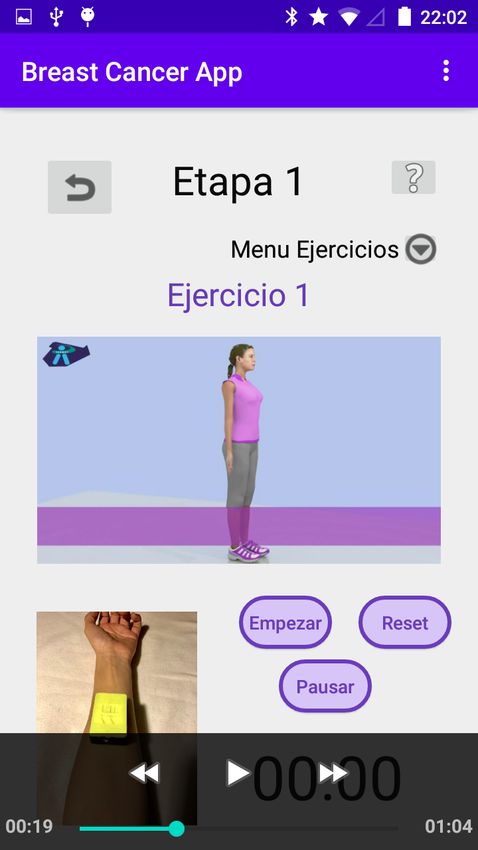
• Exercises: Inside each stage there are few exercises. In each exercise the patient
has access to a timer, to an image explaining where the sensor should be place,
and to a demo video (where it is explained how the exercises is done). Moreover,
the user can navigate through the exercise menu to move from one exercise to
another. In each exercise a Bluetooth connection should be establish between the
sensor an the mobile phone.
• Feedback: when the exercise has been completed, a feedback is displayed. It could
be positive or negative, depending on how the patient has done the exercise.
All these parts are developed in Android Studio. They have two files: one in java, where
all the code is written, and other one in xml where it is designed the application.
2122 4. Programming
4.2 Bluetooth and Sensor communications
As it is said in section 4.1, when a patient enters into an exercise, a Bluetooth connection
has to be established between the sensor and the mobile phone.
4.2.1 Looking for Bluetooth
The first thing to do is to check whether the mobile phone has Bluetooth or not. If it
does, then the application will have to check whether it is activated or not. If it is not
activated, the patient will be asked if he/she wants to activate it, and once activated,
the sensor (which had to be linked previously with the mobile phone, HC-06) will be
searched in the list of linked devices of the mobile phone. Once it has been found,
it will establish the Bluetooth connection, showing a message to the user whether the
connection has been made or not. However, in the case that the Bluetooth had been
activated, it would be necessary to deactivate it and then establish the connection as
explained. The following code shows how to check the Bluetooth.
btAdapter = B lu e to o th A da p te r . g e t D e f a u l t A d a p t e r ( ) ;
i f ( btAdapter == null ) {
Toast . makeText ( g e t A c t i v i t y ( ) , " El ␣ b l u e t o o t h ␣no␣ s e ␣ e n c u e n t r a ␣ en
␣ e s t e ␣ d i s p o s i t i v o " , Toast .LENGTH_SHORT) . show ( ) ;
}
e l s e i f ( ! btAdapter . i s E n a b l e d ( ) ) { // B l u e t o o t h i s not a c t i v a t e d
r e q u e s t B l u e t o o t h ( ) ; // a s k s t o a c t i v a t e t h e B l u e t o o t h
setupConnectionBT ( ) ; // e s t a b l i s h i n g c o n n e c t i o n
}
e l s e { // i t has B l u e t o o t h and i t i s a c t i v a t e d
btAdapter . d i s a b l e ( ) ; // d e a c t i v a t i n g B l u e t o o t h
requestBluetooth () ;
setupConnectionBT ( ) ;
}
private void r e q u e s t B l u e t o o t h ( ) {
I n t e n t e n a b l e B t I n t e n t = new I n t e n t ( Bl u et o ot h Ad a pt e r .
ACTION_REQUEST_ENABLE) ;
s t a r t A c t i v i t y F o r R e s u l t ( e n a b l e B t I n t e n t , REQUEST_ENABLE_BT) ;
}
private void setupConnectionBT ( ) {
ConstantsBWT61 . btManagerBWT61 = new BluetoothManagerBWT61 (
getActivity () , bluetoothIn ) ;
}4.2. Bluetooth and Sensor communications 23
Every time the requestBluetooth() function is running, another function called On-
ActivityResult() runs. Within this function, a pop-up message shows up, this message
asks to the user to activate the Bluetooth, if the answer is OK then the searching through
the linked devices will start.
Once the connection is made, the mobile’s Bluetooth will be kept waiting to receive
information sent by the sensor. This is done with a handler and with a switch case
structure. The cases are the states of the Bluetooth: connected (which value is 3),
connecting (which value is 2), or listen (which value is 1). When the state is listen, is
because the connection could not be make.
4.2.2 Sensor Settings
In the connected state, the application will proceed to set the settings into the sensors.
These settings are the calibration of the three axis (X, Y and Z) and, if necessary, set
the sensor in vertical or in horizontal. For these, three methods have been developed:
setXYAxis(), setZAxis(), and setVertical(). In order to have a really good performance of
the exercise, the sensor has to be configured perfectly. So for that reason, these settings
are going to be perform not only in the connected state, but also at the beginning of the
exercise (when the user clicks start button). The following part of code is an example
of how to do one of these settings.
public void setXYAxis ( ) {
new Thread (new Runnable ( ) {
@Override
public void run ( ) {
ConstantsBWT61 . btManagerBWT61 . w r i t e (new byte [ ] { − 1 , −86,
ConstantsBWT61 .SET_XY_ANGLE_TO_0} ) ;
}
}) . s t a r t ( ) ;
}
Inside write() function of the code above, there are three numbers, -1, -86 and the
last one which is defined by ConstantsBWT61.SET XY ANGLE TO 0. The first two
numbers are always the same, but the last one is different depending on what is the
setting that want to be performed. These numbers are defined in Table 3.1. Although
the numbers are written in hexadecimal in Tables 3.2, 3.3, and 3.4, in the code they
should be written in decimal.
As it can be seen, the function run() makes reference to ConstantsBWT61. Con-
stantsBWT61 is a java file where some static variables are defined, these variables are
used along all the project. However, this is not the only file that is used, Bluetooth-
ManagerBWT61 is a library created for the Bluetooth connection between the mobile
phone and the sensor.
At the end of the BluetoothManagerBWT61 file there is a a function called Cope-24 4. Programming
SerialData(). This function, which is divided into different cases, stores the data sent
by the sensor into a float array (fData array) of thirty three positions (eleven for accel-
eration, eleven for angular velocity, and eleven for angle; as explained in 3.3.2). After
storing the data in the array, the array is sent by a bundle to the handler defined in the
java file where the Bluetooth settings are done. Once the array has been received, the
data can be manipulated to obtain the desired final result. In the following codes, an
example of the storage in the array and the bundle can be seen.
case 8 1 : // e s t e e s e l 51 , a c e l e r a c i o n
t h i s . fData [ 0 ] = ( ( ( f l o a t ) ( ( ( ( short ) t h i s . f r a m e B u f f e r [ 1 ] )4.3. Exercises Example 25
In the previous fragment of code, the speed in which the sensor sends data is deter-
mined by the second line of the code, that is, lT imeN ow − this.lLastT ime > SP EED,
where SPEED is initialized to value 1, which means that the sensor sends data each
millisecond. This frequency can be reduced or increased by replacing the number 1 by
other number (bigger or smaller), in case there is an interest to send data slowly or fast.
Once the fData array is sent by the bundle, the manipulation of the data starts. This
manipulation is done with the handler (it is defined in the java file where the Bluetooth
connection has been established, it is called bluetoothIn). As it is explained before in
this section, there are different cases inside the bluetoothIn handler. One of them is
when the Bluetooth connection is done, so the application’s Bluetooth is waiting to
receive information sent by the sensor. That information that is being waited is what
the fData array has sent.
An important fact to consider is that the data that want to be collected from the
fData array it has to be specified in the code (within the bluetoothIn handler). So, for
example F loat.valueOf (f Data[6]) specifies position 6 of fData in case the X angle is
needed.
Depending on the type of exercise that is going to be performed, the treatment of
the data sent by fData will be different.
4.3 Exercises Example
4.3.1 Exercise 1
In this exercise, the patient has to bend her/his elbows bringing her/his hands to her/his
shoulders on the same side, holding position five seconds, and then come back to the
starting point. That is, exercise 2.1.1. The programming of this exercise follows the
flowchart 4.1.
The only angle that should be taken in consideration in this exercise, is the X angle
(after setting the vertical direction). It is only this angle because there is no other
movement in other direction. So, for that reason, it is only needed the data that is
stored in position six (this is extracted from the BluetoothManagerBWT61 library).
In every exercise there is a chronometer to time the exercise. So every time the user
presses the start button, the manipulation with the data will start. And when the user
presses the stop or pause button, the sensor stops sending data (this is done with the
Dormancy, explained in Table 3.1).
The following code is where the Bluetooth’s application starts receiving information
from the sensor. That information is stored in fData. The fData array is used in order to
pick up specific information within the array (in this case angleX). At the following lines
the angleX is checked so it is positive always. And also the Boolean variable "pressed"
is checked, which is true when the start button has been pressed, and false when the
stop or pause button are pushed.26 4. Programming
case ConstantsBWT61 .MESSAGE_READ:
// Waiting t o r e c e i v e or t o send messages
f l o a t [ ] fData = msg . getData ( ) . g e t F l o a t A r r a y ( "Data" ) ;
// t a k e s X a n g l e
angleX =F l o a t . v a l u e O f ( fData [ 6 ] ) ;
i f ( angleX < 0 ) {
angleX = angleX ∗ −1;
}
i f ( p r e s s e d ) { // i f s t a r t b u t t o n has been pushed
Data ( ) ;
}
Before the patient starts performing the exercise, he/she has to select how many
repetitions (three or five) are going to be done. After the selection, and during the
performing of the exercise, some conditions have to be accomplished in order to conclude
that the exercise was done perfectly.
In this exercise, the angle X should be between 0 and 180 degrees. Being 0 degrees
the starting position, and 180 degrees with the hands at the shoulders. If the patient
exceeds 180 degrees, or if the user does not reach these degrees, the exercise will not be
perfectly completed (a Boolean variable is set to true).
The patient has to go from 0 to 180 degrees as many times as he/she has previously
selected. As the repetitions have to be counted in order to stop the sending of infor-
mation from the sensor (done with Dormancy explained in Table 3.1), every time the
patient goes to the starting position, between 0 and 15 degrees, the counter will add one
(starting from zero).
In order to check that the patient goes to the shoulders, between 100 and 180 degrees,
the counter is also checked. Therefore, depending on the value of the counter, a different
Boolean variable ( "up1", "up2", "up3", "up4" and "up5") is set to true. This is a good
way to know if the patient has bent the elbow well, and if not, to know in which of all
the repetitions he/she has not done it well.
The following code is how all the previous explanation is implemented with three
repetitions:
i f ( angleX >= 0 && angleX = 0 && angleX4.3. Exercises Example 27
i f ( c a s o ==2) {
i f ( angleX >= 100 && angleX28 4. Programming
Figure 4.1: Exercise’s flowchart.4.3. Exercises Example 29
Where the red circle is located in figure 4.1, the flowchart is uncompleted, this is
because for five repetitions it is the same flowchart but adding two more variables, "up4"
and "up5".
In the flowchart there is a new variable that has not been explained before: "caso"
(with a blue circle in the flowchart). This variable is initialized to one. It is used for
establishing the position where the patient should go next (starting position, or hands
in the shoulders). If the patient is in the starting position, the variable changes its value
to two (so next step are the shoulders). Once the patient has reached this second step,
the variable changes its value to one again. This helps to count the repetitions, and to
know if the patient has reached both positions correctly.
For instance, if the patient does not reach the shoulders position, the variable "caso"
will not change its value to one, so even if the patient reaches the starting point correctly,
it will not be valid because the exercise has not done well.
The last observation to be made in relation to the flowchart is the green circle. This
condition is to check if the patient has reached the three repetitions. The patient starts
the exercise at 0 degrees so, at that point, the counter has added one to its current
value (which was zero), so the repetitions are counted from 1. If it was selected three
repetitions, the counter reaches number four instead of three. However, if the number
of repetitions was five, the counter reaches number six.30 4. Programming
4.3.2 Exercise 2
In this exercise, the patient has to touch the shoulders with the fingers, and slowly raise
the elbows upwards until the shoulders level. And then go down again. That is, exercise
2.1.1.
As it is done in the previous exercise, the only angle that should be taken in consid-
eration is angle X, as there is no other movement in other direction.
The value from this angle is sent within position 6 from the fData array (take it from
BluetoothManagerBWT61 library).
Until now, it is the same as the previous exercise. The difference it is that here, the
X angle must be between 0 and 90 degrees, instead of between 0 and 180 degrees. So,
related with the code it is exactly the same but changing the X angle range.
i f ( angleX >= 0 && angleX = 0 && angleX = 70 && angleX4.3. Exercises Example 31
4.3.3 Exercise 3
In this exercise, the patient has to touch the shoulders with the fingers. After that,
he/she has to slowly lift the elbows upwards separating them from the body. It is
important to not raising the elbows above the shoulders level. This is exercise 2.1.1.
This exercise has some things in common with the previous two exercises. It takes
into account the X-angle, as it measures the angle of the arm’s rises and falls. As in the
previous exercise, this angle must not exceed 90 degrees, so it must be between 0 and
90 degrees.
In addition, it is also necessary the information obtained by the Z angle, since this
measures the angle in which the arm moves forwards and backwards (taking as a refer-
ence that the elbows have to be aligned with the shoulders and back).
In the fData array, the X angle is in the sixth position, and the Z angle is in the
eighth position, both of them are extracted in the same way.
a n g l e Z = F l o a t . v a l u e O f ( fData [ 8 ] ) ;
Regarding the manipulation of the data, the X angle is treated in the same way as in
the previous exercise, and Z angle has to go between 0 and 40 degrees. If this condition
is not accomplished, a Boolean variable called "bad_angle2" will take true value, this
means that the patient has not aligned correctly the elbows with the shoulders (then
the exercise was not done correctly).
i f ( a n g l e Z >= 0 && a n g l e Z = 0 && angleX = 0 && angleX = 70 && angleX32 4. Programming
4.4 Database Management (Firebase)
4.4.1 Structure
The following image shows the structure of the database. It will be seen with more
details in the following parts:
Figure 4.2: Structure of the database.
As it can be seen, the database is structured according to the number of users
(previously registered by their doctors). Within each user, there are different fields: ID,
password, and the three different stages.
This database is needed in order to store the data of the patients such as their
personal data and their results of performing different exercises. So, there are going to
be multiple queries to Firebase.You can also read