User and Reference Manual
←
→
Page content transcription
If your browser does not render page correctly, please read the page content below
User and Reference Manual
Altova Work in Process XBRL add-in for
Excel, version 2018r2 User & Reference
Manual

All rights reserved. No parts of this work may be reproduced in any form or by any
means - graphic, electronic, or mechanical, including photocopying, recording, taping, or
information storage and retrieval systems - without the written permission of the
publisher.

Products that are referred to in this document may be either trademarks and/or
registered trademarks of the respective owners. The publisher and the author make no
claim to these trademarks.

While every precaution has been taken in the preparation of this document, the
publisher and the author assume no responsibility for errors or omissions, or for
damages resulting from the use of information contained in this document or from the
use of programs and source code that may accompany it. In no event shall the publisher
and the author be liable for any loss of profit or any other commercial damage caused or
alleged to have been caused directly or indirectly by this document.

Published: 2018

© 2018 Altova GmbH
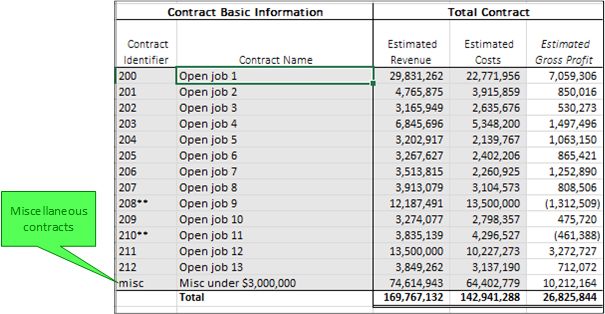
Table of Contents

      1       Altova Work in Process (WIP) XBRL add-in
              for Excel, version 2018r2                                                                                               5

      2       Installation and Licensing                                                                                              7

      3       Creating a new WIP Report                                                                                               9

      4       Entering Data                                                                                                         11
      4.1    Reporting
                     .................................................................................................................
                        Miscellaneous Contracts                                                                                        14
      4.2    Controlling
                      .................................................................................................................
                           Numeric Accuracy                                                                                             15
      4.3    Resetting.................................................................................................................
                         Data and Restoring Formulas                                                                                    17
      4.4    Adding XBRL
                    .................................................................................................................
                              Footnotes                                                                                               18

      5       Importing Data                                                                                                        19
      5.1    Importing.................................................................................................................
                         Data Using Data Mappings                                                                                       21
      5.2    Importing.................................................................................................................
                         Data Using Templates                                                                                           24
      5.3    Importing.................................................................................................................
                         Data From NASBP Excel Sheets                                                                                   32
      5.4    Importing.................................................................................................................
                         Data From Existing XBRL WIP Reports                                                                            37

      6       Validating Data                                                                                                       38

      7       Exporting Data to XBRL                                                                                                40

      8       Command Reference                                                                                                     42

      9       License Information                                                                                                   44
      9.1    Electronic
                     .................................................................................................................
                         Software Distribution                                                                                         45

Altova Work in Process XBRL add-in for Excel, version 2018r2                                                                                 3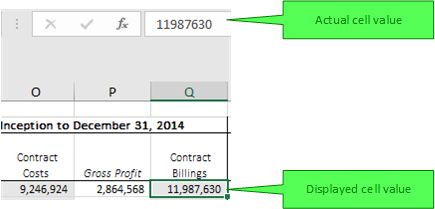
9.2   Software.................................................................................................................
                    Activation and License Metering                                                                                 46
    9.3   Intellectual
                   .................................................................................................................
                        Property Rights                                                                                              47
    9.4   Altova XBRL
                  .................................................................................................................
                           Add-in Software License Agreement                                                                        48

    Index                                                                                                                        59

4                                                                   Altova Work in Process XBRL add-in for Excel, version 2018r2
Altova Work in Process (WIP) XBRL add-in for Excel, version 2018r2 5
1 Altova Work in Process (WIP) XBRL add-in
for Excel, version 2018r2
The Altova Work in Process (WIP) XBRL add-in for Excel is targeted towards businesses and
organizations that submit Work in Process (WIP) financial data in XBRL format, as part of the
XBRL US Work in Process (WIP) reporting.
The Altova Work in Process (WIP) XBRL add-in for Excel enables stakeholders in the WIP
process to do the following:
Enter XBRL US WIP data in Microsoft Excel, using a predefined template spreadsheet
which maps to the XBRL US WIP taxonomy.
Validate the report data directly from Excel, to ensure it conforms to the XBRL US WIP
taxonomy.
Export the WIP report from Excel to XBRL format.
Import data from existing XBRL format WIP reports into Excel.
The currently supported taxonomy is the 2016 Surety Work in Process Taxonomy (see https://
xbrl.us/xbrl-taxonomy/2016-surety-wip/).
This documentation makes references to, and should be read in conjunction with, the "XBRL US
Work In Process Taxonomy 2016 Preparers Guide" (see http://taxonomies.xbrl.us/wip/2016/docs/
WipPreparersGuide.pdf).
© 2018 Altova Gmb H Altova Work in Process XBRL add-in for Excel, version 2018r26 Altova Work in Process (WIP) XBRL add-in for Excel, version 2018r2
System requirements
Windows 7 SP1 with Platform Update, Windows 8, Windows 10
Windows Server 2008 R2 SP1 with Platform Update or newer
Microsoft Excel 2016, 2013, 2010
.NET Framework 4.0 or later
The add-in is available for both Microsoft Excel 32-bit and 64-bit.
Last updated: 11 April 2018
Altova Work in Process XBRL add-in for Excel, version 2018r2 © 2018 Altova Gmb HInstallation and Licensing 7
2 Installation and Licensing
To install the Altova Work in Process (WIP) XBRL add-in for Excel, download the executable from
the Altova website (https://www.altova.com) and run it. Follow the wizard steps to complete the
installation. You will need to accept the license agreement and privacy policy in order to proceed
with the installation.
Make sure to download the executable corresponding to your operating system's platform
(32-bit or 64-bit). The 32-bit executable can be installed on both 32-bit and 64-bit Windows;
however, it supports only Excel 32-bit.
After installation, a new tab called WIP becomes available in the Excel ribbon.
Licensing
To use Altova Work in Process (WIP) XBRL add-in for Excel, a valid license key code is required.
To enter the license key code, or to purchase a new one, or to request a free evaluation from the
Altova website, take the following steps:
1. In the Excel ribbon, click the WIP tab.
2. Click Add-In Activation.
How to view the current version of the add-in
1. In the Excel ribbon, click the WIP tab.
2. Click About WIP Add-In.
© 2018 Altova Gmb H Altova Work in Process XBRL add-in for Excel, version 2018r28 Installation and Licensing Altova Work in Process XBRL add-in for Excel, version 2018r2 © 2018 Altova Gmb H
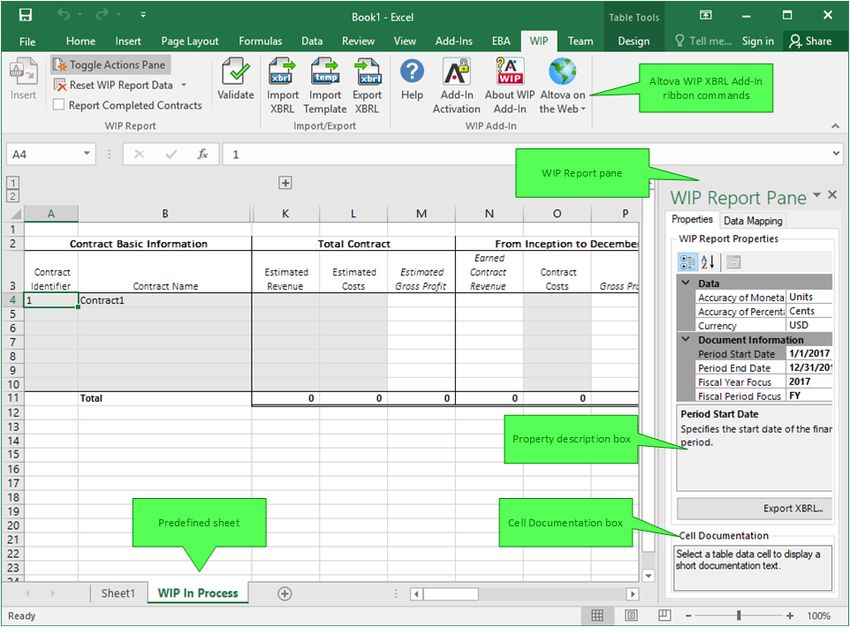
Creating a new WIP Report                                                                                        9

3        Creating a new WIP Report
         This topic shows you how to create a new (blank) WIP Report and also gets you familiar with the
         graphical user interface of the WIP Add-In. Be aware that, as an alternative to creating a blank
         WIP Report that is filled out manually, it is also possible to import data automatically from various
         existing spreadsheets, see Importing Data.

         To create a new WIP report:

             1.   In the Excel ribbon, click the WIP tab.
             2.   Click Insert.

             3.   Select the Blank WIP Report check box (this is the default option), and click OK.

         Whenever you create a blank report, a new Excel sheet becomes available, called "WIP In
         Process".

© 2018 Altova Gmb H                                   Altova Work in Process XBRL add-in for Excel, version 2018r2
10 Creating a new WIP Report
The "WIP In Process" sheet is bound to the XBRL taxonomy file, and enables you to enter data
directly in the supplied cells.
If you need to produce the "WIP Complete" report in addition to the "WIP In Process" report, click
the WIP tab in the Excel ribbon, and select the Report Completed Contracts check box. This
adds a new sheet to the Excel workbook, called "WIP Complete".
When clicked, each XBRL-bound cell inside the "WIP In Progress" or "WIP Complete" sheets
displays a description in the Cell Documentation box of the WIP Report pane. This description
originates in the underlying XBRL taxonomy.
Several XBRL report properties are available in the WIP Report pane to the right. These properties
directly affect the content of the XBRL instance file that will be created when you export the XBRL
instance. To view what each property does, click it and observe the description displayed in the
lower area of the WIP Report pane. For more information, refer to the "XBRL US Work In Process
Taxonomy 2016 Preparers Guide", primarily to Section 4, "DEI Taxonomy Logical Structure".
Because the "WIP In Process" and the "WIP Complete" sheets are bound to the XBRL taxonomy,
they must not be deleted. It is also not recommended to rename these sheets. If necessary, you
can add new sheets to the workbook; however, such sheets would not be bound to the XBRL
taxonomy, and consequently be ignored when you generate the XBRL instance file.
Altova Work in Process XBRL add-in for Excel, version 2018r2 © 2018 Altova Gmb HEntering Data 11
4 Entering Data
You can use the standard Excel commands to paste cell values or entire rows into the "WIP In
Process" and "WIP Complete" sheets. You can also add new rows to the body of the report table,
or delete existing rows, in the standard Excel way.
Note that some cells include calculations and SUM formulas and they are filled automatically
when you fill in the corresponding source cells. These include sum cells, as well as columns such
as "Estimated Gross Profit" or "Estimated Contract Revenue". Columns that contain formulas
have the text header in italics and should not be edited, whereas editable cells have a gray
background.
When you paste cells or rows into the predefined sheets, be aware of the following:
The number of pasted columns should correspond to the number of columns in the
predefined sheet. If you accidentally paste a larger number of columns, or if you type text
outside the default table, unwanted columns may appear (named "Column 1", "Column2",
and so on).
To delete the unwanted columns, right-click the cell and select Delete > Table
Columns. To prevent Excel 2013 from adding new columns and rows automatically, go
to File > Options > Proofing > AutoCorrect Options > AutoFormat As You Type >
Apply as you work, and click to clear the Include new rows and columns in table
check box.
When pasting data, it is recommended to keep only the values (and not the formatting).
Namely, select the Paste Values option when pasting cells or rows:
© 2018 Altova Gmb H Altova Work in Process XBRL add-in for Excel, version 2018r212 Entering Data
While generating the XBRL instance file, the add-in ignores any cell formatting information
and exports the actual value of the Excel cell. However, bear in mind that, as part of
Excel functionality, the actual value may be different from the value displayed in the cell,
because of the cell formatting information. You can view at any time the actual value (the
one that will be written to the XBRL instance) in the formula bar of Excel. Consider this
example:
In the example above, the value that will be written to the XBRL instance is 11987630.
Note that the number accuracy reported in the XBRL instance file will depend on the value
you selected for the "Accuracy" property (see Controlling Numeric Accuracy).
As you enter data in Excel, the add-in may round automatically values in those cells which
are calculated automatically (the so-called "calculated" cells, they always have a white
background). The add-in never rounds values in cells where you enter data (such cells appear
with a gray background).
However, when you export data to XBRL, both the manually entered cells and the calculated
Altova Work in Process XBRL add-in for Excel, version 2018r2 © 2018 Altova Gmb HEntering Data 13
cells will be rounded automatically, if necessary, in the XBRL instance file. This behavior is
intentional; otherwise, it would lead to inconsistency warnings due to rounding. Note that
values in the original Excel spreadsheet remain unaffected after you export data to an XBRL
instance file.
© 2018 Altova Gmb H Altova Work in Process XBRL add-in for Excel, version 2018r214 Entering Data Reporting Miscellaneous Contracts
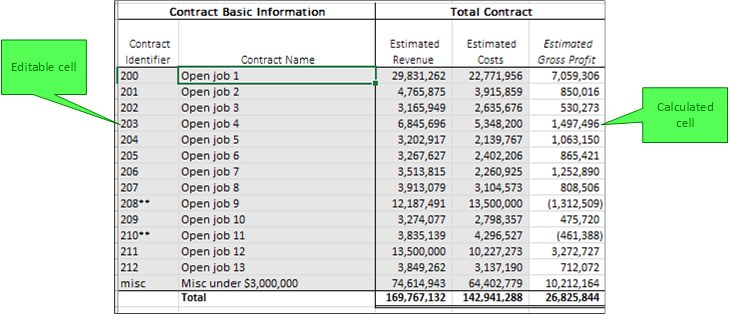
4.1 Reporting Miscellaneous Contracts
In a Work In Process report, contracts can have an identifier (see the "Contract Identifier"
column), or be reported as miscellaneous contracts. To report contracts as miscellaneous, do
one of the following:
Do not enter a value in the "Contract Identifier" column (leave the cell empty)
Enter either "n/a" or "misc" in the "Contract Identifier" column.
Any contracts where the conditions above are true will be reported as miscellaneous in the
generated XBRL instance.
Note: Miscellaneous contracts should not contain any values in the "Contract Basic
Information" section of the Work In Process report (Excel columns "C" to "J"), except
"Contract Identifier" and "Contract Name". Any values present in these columns will raise
validation warnings and will not be exported when you click the Export button.
Altova Work in Process XBRL add-in for Excel, version 2018r2 © 2018 Altova Gmb HEntering Data Controlling Numeric Accuracy 15
4.2 Controlling Numeric Accuracy
The accuracy of monetary and other numeric values in the XBRL WIP report can be controlled by
setting the following report properties:
1. Accuracy of Monetary Items
2. Accuracy of Percentage Items
These properties are available in the WIP Report pane.
Most of report items are numeric monetary items, so the property Accuracy of monetary items
applies to nearly all numeric cells in the report. The property Accuracy of Percentage items
applies to values that represent a percentage (such as values in the "Percent Complete" column).
In the XBRL instance file, the "Accuracy" properties are bound to the decimals attribute. By
default, they are set as follows:
The Accuracy of Monetary Items is set to Units, which sets the value of the decimals
attribute in the XBRL instance to "0".
The Accuracy of Percentage Items is set to Cents, which sets the value of the
decimals attribute in the XBRL instance to "2".
To find out how each "Accuracy" property value affects the decimals attribute in the XBRL
instance file, see the third column of the table below. You can either set the accuracy to one of
the predefined values or specify a custom accuracy value. The predefined values are listed in the
table below.
Accuracy Meaning Sets the value of the
value "decimals" attribute
in the XBRL instance
to...
Exact This is the default value. When this value is selected, INF
the accuracy will be maintained exactly as you
entered it.
© 2018 Altova Gmb H Altova Work in Process XBRL add-in for Excel, version 2018r216 Entering Data Controlling Numeric Accuracy
Accuracy Meaning Sets the value of the
value "decimals" attribute
in the XBRL instance
to...
Billions Maintains accuracy up to 9 digits to the left of the -9
decimal point (billions).
Millions Maintains accuracy up to 6 digits to the left of the -6
decimal point (millions).
Thousands Maintains accuracy up to 3 digits to the left of the -3
decimal point (thousands).
Units Maintains accuracy up to integers. 0
Cents Maintains accuracy up to 2 digits to the right of the 2
decimal point.
Mills Maintains accuracy up to 3 digits to the right of the 3
decimal point.
Note: Do not set the Accuracy of Percentage Items property to "Units", "Billions", "Millions",
or "Thousands". Instead, use the "Exact", "Cents" or "Mills" accuracy values, or a
custom value that would not result in an incorrectly rounded value in the XBRL instance.
For example, a percent value of "23%" in the Excel report, using an accuracy of Cents,
would be reported as "0.23" in the XBRL instance and rounded to 2 decimals to the right
of the decimal point (which is acceptable). Using an accuracy of Units is not acceptable,
since it would round 0.23 to 0.
As shown in the table, the accuracy value can be either positive or negative.
A positive value N specifies the accuracy of up to N digits to the right of the decimal place. For
example, the value 2 specifies the accuracy to be in cents, while the value 3 specifies the
accuracy to be up to mills.
A negative value N specifies the accuracy of up to N digits to the left of the decimal place. For
example, the value -3 specifies the accuracy to be up to thousands, while the value -6 specifies
the accuracy to be up to millions.
As you enter data in Excel, the add-in may round automatically values in those cells which
are calculated automatically (the so-called "calculated" cells, they always have a white
background). The add-in never rounds values in cells where you enter data (such cells appear
with a gray background).
However, when you export data to XBRL, both the manually entered cells and the calculated
cells will be rounded automatically, if necessary, in the XBRL instance file. This behavior is
intentional; otherwise, it would lead to inconsistency warnings due to rounding. Note that
values in the original Excel spreadsheet remain unaffected after you export data to an XBRL
instance file.
Altova Work in Process XBRL add-in for Excel, version 2018r2 © 2018 Altova Gmb HEntering Data Resetting Data and Restoring Formulas 17
4.3 Resetting Data and Restoring Formulas
In some cases, you might want to clear all entered data from the WIP report sheet in one
operation. For example, you might want to do that when you discover that validation fails after you
have pasted some data from an external source.
The Reset WIP Report Data command is available in the WIP tab and it performs the following
actions:
Clears all data from the sheet
Restores the Excel formulas to their default state
Restores the WIP report properties to their default state.
Note: The Reset WIP Report Data command does not affect the cell formatting.
To reset the WIP report data, click Reset WIP Report Data > Reset WIP Report data in the
Excel ribbon. A confirmation dialog box prompts you for confirmation before data is actually
cleared.
Restoring only formulas
You can also restore the Excel formulas to their default state, without clearing the existing data.
This is necessary, for example, after you imported data from an XBRL report instance. To restore
only formulas, click Reset WIP Report Data > Restore only formulas in the Excel ribbon.
© 2018 Altova Gmb H Altova Work in Process XBRL add-in for Excel, version 2018r218 Entering Data Adding XBRL Footnotes
4.4 Adding XBRL Footnotes
If you add comments to any of the XBRL-bound cells, the comments are automatically translated
into XBRL footnotes in the exported XBRL instance.
For example, the comment above would look as follows in the exported XBRL instance:
Altova Work in Process XBRL add-in for Excel, version 2018r2 © 2018 Altova Gmb HImporting Data 19
5 Importing Data
As an alternative to entering data manually into the "WIP In Process" or "WIP Completed" sheets,
you can also import it from custom Excel sheets or workbooks, including NASBP (National
Association of Surety Bond Producers) Excel sheets. You can also import data from existing
XBRL WIP reports saved with the Altova Work in Process (WIP) XBRL add-in for Excel.
The various import options listed below are all available in the Altova Work in Process (WIP) XBRL
add-in for Excel. These options enable you to keep the source data for the WIP reports in a layout
that is perhaps more convenient to your organization, and quickly import it into the "WIP In
Process" or "WIP Completed" sheets as and when necessary.
Importing Data Using Data Mappings Use this option to import data from custom Excel
workbooks. This option requires that a data mapping be
created first. A "data mapping" means that specific
fields in the WIP report will map to specific cell ranges
in your custom sheet. It is you who decides what
should map to what. The source data can be either in a
different sheet in the same workbook, or in an external
workbook.
Once the data mapping is ready, you can automatically
populate the WIP data sheets from your custom sheet.
This is done with a click of a button (either the Copy
Values or Reference Values button).
Data mappings are saved together with the WIP
workbook. This makes them suitable for on demand or
recurring imports into the same workbook. To become
reusable across multiple workbooks, data mappings
must be saved as templates (see next option).
Importing Data Using Templates Use this option to import data from custom Excel
workbooks for which you already have prepared a
template. A template is just a permanently saved data
mapping between specific fields in the WIP report and
specific cell ranges in any custom sheet.
This requires that all your source workbooks have the
same layout that is recognized by the template. Unlike
data mappings, templates are saved to a special
template folder that you designate, and thus are
reusable across multiple workbooks. You can define as
many templates as required, one for each custom
Excel sheet from where you need to import data.
Importing Data From NASBP Excel Use this option to import data from sheets produced by
Sheets the NASBP (National Association of Surety Bond
Producers). As long as the source sheet is a valid
NASBP sheet, the add-in will automatically import data
© 2018 Altova Gmb H Altova Work in Process XBRL add-in for Excel, version 2018r220 Importing Data
from it; no other setup is required.
Importing Data From Existing XBRL Use this option to import existing WIP Report data that
WIP Reports was saved in XBRL format with the Altova Work in
Process (WIP) XBRL add-in for Excel.
Altova Work in Process XBRL add-in for Excel, version 2018r2 © 2018 Altova Gmb HImporting Data Importing Data Using Data Mappings 21
5.1 Importing Data Using Data Mappings
Data mappings are a flexible way to import data from an external workbook, or from a different
sheet of the same workbook, into a WIP Report. Data mappings are saved references between
the WIP report fields and any cell ranges in a custom sheet. The data mappings are saved
together with the WIP workbook they are part of and they are typically most appropriate for on
demand or recurring imports of data into the same workbook.
Data mappings can become reusable across multiple workbooks if you save them as templates,
see Importing Data Using Templates.
To set up a data mapping:
1. Open the workbook which contains an existing WIP Report, or create a new WIP Report
(see Creating a new WIP Report).
2. Click the Data Mapping tab in the WIP Report Pane.
3. If you want to import values in the "WIP In Process" sheet, click the In Process tab. To
import values in the "WIP Completed" sheet, click the Completed tab.
4. Enter a source cell range next to the field where data must be imported. You can either
type the cell range manually, or click the button and select the required cell range
from a source sheet. In the example below, the field Contract Name is mapped to the
source cell range $B$4:$B$8 originating from a sheet named "Sheet1".
You can also map cell ranges from Excel files other than the current workbook. The same
instructions as above apply, the only requirement is that both the source and target Excel
books are currently open. In the example below, the field Contract Name is mapped to
the source cell range $B$4:$B$8 originating from a sheet named "Sheet1" of a separate
Excel book called "Book1".
© 2018 Altova Gmb H Altova Work in Process XBRL add-in for Excel, version 2018r222 Importing Data Importing Data Using Data Mappings
Note: The source cell range must consist of either a single row or a single column. Values can
be copied or referenced from other workbooks or sheets as long as they represent valid
Excel cell ranges. It does not matter if the range is vertical or horizontal in the source
sheet; in the "WIP In Process" and "WIP Completed" sheets, the imported cell ranges
will automatically conform to the required layout. For examples of creating references to
cell ranges, see https://support.office.com/en-US/article/Create-or-change-a-cell-
reference-C7B8B95D-C594-4488-947E-C835903CEBAA.
5. Repeat the previous step for each WIP report field that must be mapped to a source cell
range.
Once you set up the data mapping, you can copy or reference the actual values.
There are two ways to import values from a source sheet: copying or referencing them. Copying
means that the value is literally taken from the source range and placed into the target; also, if the
source value changes, then it is not automatically updated in the target WIP sheets (you can
however update the WIP report from the source at any time by clicking a Copy Values button).
Referencing means that, instead of storing an actual value, the WIP sheet will contain a formula
which refers to the source cell range; updating the value in the source will also automatically
update it in the target sheet next time when you open the target sheet.
To copy or reference the mapped cell ranges:
1. Click the Data Mapping tab in the WIP Report Pane.
2. Click either Copy Values or Reference Values (see the explanation above for the
difference between these two options).
3. When prompted that you are about to overwrite data in the WIP report, click OK to
confirm.
Note the following:
When you click the Copy Values or Reference Values button, values are copied (or
referenced) from all data mapping tabs (In Progress and Completed), not just the
Altova Work in Process XBRL add-in for Excel, version 2018r2 © 2018 Altova Gmb HImporting Data Importing Data Using Data Mappings 23
current visible tab.
If you copy or reference values from another Excel book, both books must be open for
values to be copied or referenced correctly.
© 2018 Altova Gmb H Altova Work in Process XBRL add-in for Excel, version 2018r224 Importing Data Importing Data Using Templates
5.2 Importing Data Using Templates
Templates represent reusable data mappings between fields in the WIP report and cell ranges in a
custom sheet. The source cell ranges may be horizontal (for example, A1:Z1) or vertical (for
example, A1:A30). Templates are very similar to the data mappings described in Importing Data
Using Data Mappings. However, unlike data mappings, templates are reusable across multiple
workbooks, because they are saved as independent files (not inside the workbook, like data
mappings). With templates, it is therefore possible to import data from virtually any source
workbook that contains the cell ranges predefined by the template.
A significant difference between data mappings and templates is that the cell ranges referenced
by a data mapping are fixed (predetermined) while cell ranges referenced by templates can grow if
more rows or columns of data are available in the source (likewise, they can shrink if less rows or
columns are available in the source). Also, unlike data mappings, all mapped cell ranges in a
template must originate from the same workbook, and from the same worksheet, as further
explained below.
Creating a template
You can create a new template as follows:
1. Open any existing Excel workbook which contains WIP data in custom (not XBRL-bound)
format.
2. On the WIP tab, click Insert, and add a blank WIP report into the workbook (see also
Creating a new WIP Report).
Altova Work in Process XBRL add-in for Excel, version 2018r2 © 2018 Altova Gmb HImporting Data Importing Data Using Templates 25
3. In the WIP Report Pane, click the Data Mapping tab. Notice this tab has three other
tabs: In Process, Completed, and DEI (Document Entity Information). The first two tabs
let you map fields belonging to the "In Process" and "Completed" sheets, respectively.
The DEI tab lets you map data for those fields which appear in the Document properties
(such as the start and end date of the reporting period, Registrant Name, and others).
© 2018 Altova Gmb H Altova Work in Process XBRL add-in for Excel, version 2018r226 Importing Data Importing Data Using Templates
4. Enter a cell range next to each field in the WIP report that you want to be part of the
template. You can either type the cell range, or click the Ellipsis button and then
select the range from the source sheet (in the latter case, the range will be populated
automatically). For example, the image below illustrates the field "Contract Identifier"
mapped to the cell range B3:B7 of Sheet1. The cell range selection mechanism is the
same that you use for Excel formulas, see https://support.office.com/en-US/article/
Create-or-change-a-cell-reference-C7B8B95D-C594-4488-947E-C835903CEBAA.
Altova Work in Process XBRL add-in for Excel, version 2018r2 © 2018 Altova Gmb HImporting Data Importing Data Using Templates 27
Rules for referencing cell ranges
All cell ranges must consist of either single rows (for example A1:K1) or
single columns (for example, A1:A20). In other words, all of them must be
either vertical or horizontal.
All cell ranges must originate from the same worksheet of the same
workbook.
All cell ranges must begin and end on the same row (or column in case of
vertical ranges). For example, an error would be raised if the field "Contract
Identifier" used the range B1:B10 and the field Contract Name used the
range C2:C9. However, no error would be raised if these fields used the
range B1:B20 and C1:C20, respectively.
When you apply the template to a workbook, it may be the case that more or less
rows or columns are available in the source workbook than specified by the template
cell range—in this case, the cell range will grow or shrink to match the exact number
of rows or columns.
5. Once you've mapped all required fields to cell ranges, click Save Template. At this
stage, some validation takes place, and error messages may appear with indicative text
(to fix the errors, see the rules above). Otherwise, the dialog box below is displayed.
© 2018 Altova Gmb H Altova Work in Process XBRL add-in for Excel, version 2018r228 Importing Data Importing Data Using Templates
6. Optionally, select a destination template folder. By default, the template folder is C:
\Users\...\Documents\Altova\WIPAddInForExcel. You can optionally change this folder
to another one, by clicking the Ellipsis button.
7. Enter a file name in the File name box. The template will be saved to the selected
template folder as a file with .wdmt (WIP Data Mapping Template) extension.
8. Optionally, enter in the Template name box some descriptive text to help you identify
this template later (for example, "Template 1").
9. Click Save.
If your WIP worksheet already contains previously defined data mappings (as explained in
Importing Data Using Data Mappings), it is possible to save them as a template (meaning that
you can skip directly to step 5 above). Note the following:
All data mappings must adhere to the "Rules for referencing cell ranges" listed above;
otherwise, relevant errors will be shown, and the template will not be saved.
Templates are meant to be reusable and not bound to specific workbooks, like data
mappings. Therefore, when you save data mappings as a template, any references to
specific workbooks (if such exist) are removed. Only references to worksheets and cell
ranges will be preserved by the template. For example, a cell range such as
[CustomBook.xlsx]CustomSheet!$C$4:$C$8 would be saved only as
CustomSheet!$C$4:$C$8.
Editing existing templates
Templates saved previously can be modified if necessary, as follows:
1. Open any workbook that contains an XBRL-bound WIP Report sheet.
2. Click the Data Mapping tab in the WIP Report pane.
Altova Work in Process XBRL add-in for Excel, version 2018r2 © 2018 Altova Gmb HImporting Data Importing Data Using Templates 29
3. Click Load Template.
4. Select the required template from the list of available templates, and then click Load. If
the templates were saved to a custom template folder, click the Ellipsis button to
switch the template folder.
5. Edit the cell ranges In the Data Mapping tab as necessary. The same rules apply as
when adding new templates, see Rules for referencing cell ranges.
6. Click Save template.
How to apply a template to a custom Work-In-Process workbook
Once you have created a template, it can be applied to virtually any source workbook that
contains the cell ranges defined by the template.
1. Open any custom Excel workbook that contains the cell ranges defined by the template.
2. In the WIP tab of the Excel ribbon, click Insert. Notice that the right-hand area of the
dialog box below displays any open Excel workbooks and their worksheets (in this
example, the workbook CustomBook.xlsx and the sheet "CustomSheet").
© 2018 Altova Gmb H Altova Work in Process XBRL add-in for Excel, version 2018r230 Importing Data Importing Data Using Templates
3. Under Custom, select the template name (in this example, "Template1"). Any template
files available in the Template Folder appear on this dialog box automatically. If no
template files appear on the dialog box, make sure that the template folder contains
.wdmt template files that you've created previously (see "How to create a template"
above). To switch the template folder, click the Ellipsis button.
4. Click either the In Process or Completed tab, depending on the kind of WIP report you
wish to import data into.
5. Click Open Workbook and browse for the Excel book from where you would like to
import data (you can ignore this step if the source Excel workbook is already open). In
this example, the source workbook was already opened in step 1 so this step can be
ignored.
6. Select the worksheet from which you would like to import data (in this example, data is
being imported from worksheet "CustomSheet" of workbook CustomBook.xlsx).
Altova Work in Process XBRL add-in for Excel, version 2018r2 © 2018 Altova Gmb HImporting Data Importing Data Using Templates 31
7. Under Mapping Method, select either Copy or Reference (see explanation below), and
click OK.
There are two ways to import values from a source sheet: copying or referencing them. Copying
means that the value is literally taken from the source range and placed into the target; also, if the
source value changes, then it is not automatically updated in the target WIP sheets (you can
however update the WIP report from the source at any time by clicking a Copy Values button).
Referencing means that, instead of storing an actual value, the WIP sheet will contain a formula
which refers to the source cell range; updating the value in the source will also automatically
update it in the target sheet next time when you open the target sheet.
© 2018 Altova Gmb H Altova Work in Process XBRL add-in for Excel, version 2018r232 Importing Data Importing Data From NASBP Excel Sheets
5.3 Importing Data From NASBP Excel Sheets
If your organization works with Work In Process Excel sheets created by the NASBP (National
Association of Surety Bond Producers), it is possible to import data from such sheets
automatically into the XBRL-bound reports (either the WIP In Process or the WIP Completed
report). There are two ways to do this:
1. Import existing NASBP Excel data into a new XBRL-bound Excel sheet.
2. Create new XBRL-bound sheets directly in the existing NASBP Excel workbook.
There are two ways to import values from a source sheet: copying or referencing them. Copying
means that the value is literally taken from the source range and placed into the target; also, if the
source value changes, then it is not automatically updated in the target WIP sheets (you can
however update the WIP report from the source at any time by clicking a Copy Values button).
Referencing means that, instead of storing an actual value, the WIP sheet will contain a formula
which refers to the source cell range; updating the value in the source will also automatically
update it in the target sheet next time when you open the target sheet.
To import NASBP data into a new XBRL-bound sheet:
1. Create a new blank Excel workbook.
2. In the Excel ribbon, click the WIP tab, and then click Insert.
3. Select the NASBP WIP Report check box.
4. Click Open Workbook and browse for the NASBP Excel book from which you want to
Altova Work in Process XBRL add-in for Excel, version 2018r2 © 2018 Altova Gmb HImporting Data Importing Data From NASBP Excel Sheets 33
import data. The dialog box below opens. Notice that the right-hand side of the dialog box
displays all sheets from all currently open Excel workbooks (except for hidden sheets,
and the XBRL-bound WIP In Process or WIP Completed sheets). Any sheets that are
detected to be valid NASBP sheets are enabled and can be selected as source; the
others are grayed out. In the image below, the current book is "Book1". Since "Sheet1"
does not contain NASBP data, it is grayed out.
5. Select the check box next to the sheet from where you want to import data. In the image
below, the name of the source workbook is NASBP.xlsx, and it contains a sheet "WIP"
which qualifies for automatic import.
© 2018 Altova Gmb H Altova Work in Process XBRL add-in for Excel, version 2018r234 Importing Data Importing Data From NASBP Excel Sheets
6. To import data into the "WIP In process" sheet, click the In Process tab. Likewise, to
import NASBP data into the "WIP Completed" sheet, click the Completed tab.
7. Under Mapping Method, choose an import option (Copy or Reference, as explained at
the top of this page), and click OK.
To create an XBRL-bound Work in Process sheet directly in the NASBP Excel workbook:
1. Open the existing NASBP Excel workbook.
2. In the Excel ribbon, click WIP, and then click Insert.
3. Select the NASBP WIP Report check box. The dialog box below displays sheets from
all currently open workbooks (in this case, NASBP.xlsx). Sheets which are detected to
be valid for NASBP import are enabled; other sheets, if available, are grayed out.
Altova Work in Process XBRL add-in for Excel, version 2018r2 © 2018 Altova Gmb HImporting Data Importing Data From NASBP Excel Sheets 35
4. To import data into the "WIP In process" sheet, click the In Process tab. Likewise, to
import NASBP data into the "WIP Completed" sheet, click the Completed tab.
5. Select the check box next to the sheet from where you want to import data (in the image
above, "WIP").
© 2018 Altova Gmb H Altova Work in Process XBRL add-in for Excel, version 2018r236 Importing Data Importing Data From NASBP Excel Sheets
6. Under Mapping Method, choose an import option (Copy or Reference, as explained at
the top of this page), and click OK.
Altova Work in Process XBRL add-in for Excel, version 2018r2 © 2018 Altova Gmb HImporting Data Importing Data From Existing XBRL WIP Reports 37
5.4 Importing Data From Existing XBRL WIP Reports
You can import data from existing instances of XBRL WIP reports into Excel (typically, files with
either .xbrl or .xml extension). For the import to be successful, the imported instances must be
valid XBRL WIP reports. They may be either reports you have previously generated using the
Altova Work in Process (WIP) XBRL add-in for Excel, or reports that you received from other
parties.
When you import data from an XBRL instance file, the Excel sum formulas are overridden by
the imported values. After the import, you will need to restore the Excel formulas to the
default state. To do this, click Reset WIP Report Data > Restore only formulas in the
Excel ribbon (see Resetting Data and Restoring Formulas).
To import an XBRL US WIP report instance file into Excel:
1. In the Excel ribbon, click the WIP tab.
2. Click Insert.
3. Click Import XBRL, and browse for the XBRL instance file.
Before the report data is loaded into Excel, it is automatically validated. A dialog box notifies you
about potential warnings, inconsistencies, or errors (see also Validating Data).
Note: During import, the add-in validates XBRL formula assertions. A report will be imported
even if it contains unsatisfied assertions.
© 2018 Altova Gmb H Altova Work in Process XBRL add-in for Excel, version 2018r238 Validating Data
6 Validating Data
Validation ensures that the XBRL data you are filing conforms to the XBRL specification. The WIP
report data should be validated before you export it to XBRL. You might also want to validate data
progressively, after each action that could potentially render it invalid (for example, after pasting
new rows into the spreadsheet).
To validate data, click the Validate button in the WIP tab of the Excel ribbon.
Be patient while Altova Work in Process (WIP) XBRL add-in for Excel performs the validation
process (typically, a few seconds). When validation completes, a dialog box appears, containing
a validation report.
The validation result can be any of the following:
Message Meaning
type
The instance data is valid.
The instance data is valid, but has inconsistencies or warnings.
The instance data is not valid.
The Validation Report dialog box may additionally display any of the following message types:
information messages, warnings, and errors.
Altova Work in Process XBRL add-in for Excel, version 2018r2 © 2018 Altova Gmb HValidating Data 39
Message Meaning
type
Denotes an information message. Information messages do not make the XBRL
instance invalid.
Denotes a warning message, or an inconsistency. Warnings and
inconsistencies do not make the XBRL instance invalid.
In some cases, you may choose to ignore inconsistency messages, depending
on the situation. As stated in the XBRL US Work In Process Taxonomy 2016
Preparers Guide, some validation messages may be ignored under certain
circumstances (see the section "Calculation").
Denotes an error. If there are validation errors, the XBRL instance is not valid,
and you will need to edit the report data so as to resolve each error before
proceeding with the export to XBRL.
Note: During validation, the add-in checks XBRL formula assertions and reports
them as errors. If you are using the Altova RaptorXML+XBRL Server for validation
(https://www.altova.com/raptorxml), XBRL formula assertions may be optionally
configured not to be reported as errors.
To copy the contents of the validation report to clipboard, click Copy, and then paste into a target
file (for example, an email).
© 2018 Altova Gmb H Altova Work in Process XBRL add-in for Excel, version 2018r240 Exporting Data to XBRL
7 Exporting Data to XBRL
Once your WIP report is ready and valid (see Validating Data), you can generate the XBRL
instance file. To do this, click the Export XBRL button in the WIP Report pane. Alternatively,
click the WIP tab, and then click Export XBRL.
Note: If you need to export both the "WIP In Process" and the "WIP Completed" reports, select
the Report Completed Contracts check box in the Excel ribbon.
By default, instance files are saved as files with .xbrl extension. If you need the exported file to
have another extension (for example, .xml), type the file extension in the Export dialog box:
Before export, data is automatically validated. Any errors, inconsistencies and warnings are
reported on the screen.
The XBRL instance file is created even if data is not valid; however, such report instances are not
valid for XBRL submission (see also Validating Data).
Altova Work in Process XBRL add-in for Excel, version 2018r2 © 2018 Altova Gmb HExporting Data to XBRL 41
In case of invalid reports, the cell values that are XBRL incompatible are ignored and not written to
the XBRL instance file. For tips on how to avoid data formatting errors, see Entering Data. Note,
however, that not all XBRL validation errors might be related to incorrect formatting. Some errors
might occur because your data does not meet the XBRL validation rules set out in the "XBRL US
Work In Process Taxonomy 2016 Preparers Guide".
To copy the contents of the validation report to clipboard, click Copy, and then paste into a target
file (for example, an email).
© 2018 Altova Gmb H Altova Work in Process XBRL add-in for Excel, version 2018r242 Command Reference
8 Command Reference
The add-in commands available the WIP tab of the Excel ribbon are listed below.
Insert Creates a new WIP report. This command is disabled if the WIP report
sheet has already been inserted into the workbook.
Toggle Actions Shows or hides the "WIP Report" pane. By default, the "WIP Report"
Pane pane is visible.
Reset WIP Report This is a split button which contains the following commands:
Data
Reset WIP Report Data
Discards (deletes) any data entered in the "WIP In Process" or
"WIP Completed" sheets, and returns the Excel formulas to their
default state. A confirmation dialog box prompts you for
confirmation before data is actually discarded.
Restore only formulas
Restores the Excel formulas to their default state, without
deleting any data.
See also Resetting Data and Restoring Formulas.
Report When selected, this option adds the "WIP Completed" sheet to the
Completed current workbook. This may be necessary if you want to report the
Contracts completed WIP, in addition to the "WIP In Progress" data.
Validate Performs a validation of the WIP data against the underlying XBRL US
WIP taxonomy and displays the validation results in a dialog box (see
Validating Data).
Import XBRL Imports an XBRL WIP instance file to the current Excel spreadsheet (see
Importing WIP Data from XBRL).
Import Template Imports data from custom WIP workbooks by means of predefined
templates (see Importing Data Using Templates).
Export XBRL Exports the WIP data from the "WIP In Process" sheet (and, if applicable,
from the "WIP Complete" sheet to an XBRL instance file (see Exporting
WIP Data to XBRL).
Altova Work in Process XBRL add-in for Excel, version 2018r2 © 2018 Altova Gmb HCommand Reference 43
Help Opens this help file, in CHM (Microsoft Compiled HTML Help) format.
Add-In Activation Displays the activation status of the add-in, or provides options to enter or
purchase a license key code.
About Displays version information about the add-in.
Altova on the Provides links to the Altova website (including Online Support Center,
Web components download page, training and tutorials).
© 2018 Altova Gmb H Altova Work in Process XBRL add-in for Excel, version 2018r244 License Information
9 License Information
This section contains:
Information about the distribution of this software product
Information about software activation and license metering
Information about the intellectual property rights related to this software product
The Software License Agreement governing the use of this software product
Please read this information carefully. It is binding upon you since you agreed to these terms
when you installed this software product.
Altova Work in Process XBRL add-in for Excel, version 2018r2 © 2018 Altova Gmb HLicense Information Electronic Software Distribution 45
9.1 Electronic Software Distribution
This product is available through electronic software distribution, a distribution method that
provides the following unique benefits:
You can evaluate the software free-of-charge before making a purchasing decision.
Once you decide to buy the software, you can place your order online at the Altova
website and immediately get a fully licensed product within minutes.
When you place an online order, you always get the latest version of our software.
The product package includes a comprehensive integrated onscreen help system. The
latest version of the user manual is available at www.altova.com (i) in HTML format for
online browsing, and (ii) in PDF format for download (and to print if you prefer to have the
documentation on paper).
30-day evaluation period
After downloading this product, you can evaluate it for a period of up to 30 days free of charge.
About 20 days into this evaluation period, the software will start to remind you that it has not yet
been licensed. The reminder message will be displayed once each time you start the application.
If you would like to continue using the program after the 30-day evaluation period, you have to
purchase anAltova XBRL Add-in Software License Agreement, which is delivered in the form of a
key-code that you enter into the Software Activation dialog to unlock the product. You can
purchase your license at the online shop at the Altova website.
Helping Others within Your Organization to Evaluate the Software
If you wish to distribute the evaluation version within your company network, or if you plan to use it
on a PC that is not connected to the Internet, you may only distribute the Setup programs,
provided that they are not modified in any way. Any person that accesses the software installer
that you have provided, must request their own 30-day evaluation license key code and after
expiration of their evaluation period, must also purchase a license in order to be able to continue
using the product.
For further details, please refer to the Altova XBRL Add-in Software License Agreement at the end
of this section.
© 2018 Altova Gmb H Altova Work in Process XBRL add-in for Excel, version 2018r246 License Information Software Activation and License Metering
9.2 Software Activation and License Metering
As part of Altova’s Software Activation, the software may use your internal network and Internet
connection for the purpose of transmitting license-related data at the time of installation,
registration, use, or update to an Altova-operated license server and validating the authenticity of
the license-related data in order to protect Altova against unlicensed or illegal use of the software
and to improve customer service. Activation is based on the exchange of license related data
such as operating system, IP address, date/time, software version, and computer name, along
with other information between your computer and an Altova license server.
Your Altova product has a built-in license metering module that further helps you avoid any
unintentional violation of the End User License Agreement. Your product is licensed either as a
single-user or multi-user installation, and the license-metering module makes sure that no more
than the licensed number of users use the application concurrently.
This license-metering technology uses your local area network (LAN) to communicate between
instances of the application running on different computers.
Single license
When the application starts up, as part of the license metering process, the software sends a
short broadcast datagram to find any other instance of the product running on another computer in
the same network segment. If it doesn't get any response, it will open a port for listening to other
instances of the application.
Multi license
If more than one instance of the application is used within the same LAN, these instances will
briefly communicate with each other on startup. These instances exchange key-codes in order to
help you to better determine that the number of concurrent licenses purchased is not accidentally
violated. This is the same kind of license metering technology that is common in the Unix world
and with a number of database development tools. It allows Altova customers to purchase
reasonably-priced concurrent-use multi-user licenses.
We have also designed the applications so that they send few and small network packets so as
to not put a burden on your network. The TCP/IP ports (2799) used by your Altova product are
officially registered with the IANA (see the IANA website (http://www.iana.org/) for details) and our
license-metering module is tested and proven technology.
If you are using a firewall, you may notice communications on port 2799 between the computers
that are running Altova products. You are, of course, free to block such traffic between different
groups in your organization, as long as you can ensure by other means, that your license
agreement is not violated.
You will also notice that, if you are online, your Altova product contains many useful functions;
these are unrelated to the license-metering technology.
Altova Work in Process XBRL add-in for Excel, version 2018r2 © 2018 Altova Gmb HLicense Information Intellectual Property Rights 47
9.3 Intellectual Property Rights
The Altova Software and any copies that you are authorized by Altova to make are the intellectual
property of and are owned by Altova and its suppliers. The structure, organization and code of the
Software are the valuable trade secrets and confidential information of Altova and its suppliers.
The Software is protected by copyright, including without limitation by United States Copyright
Law, international treaty provisions and applicable laws in the country in which it is being used.
Altova retains the ownership of all patents, copyrights, trade secrets, trademarks and other
intellectual property rights pertaining to the Software, and that Altova’s ownership rights extend to
any images, photographs, animations, videos, audio, music, text and "applets" incorporated into
the Software and all accompanying printed materials. Notifications of claimed copyright
infringement should be sent to Altova’s copyright agent as further provided on the Altova Web
Site.
Altova software contains certain Third Party Software that is also protected by intellectual property
laws, including without limitation applicable copyright laws as described in detail at http://
www.altova.com/legal_3rdparty.html.
All other names or trademarks are the property of their respective owners.
© 2018 Altova Gmb H Altova Work in Process XBRL add-in for Excel, version 2018r248 License Information Altova XBRL Add-in Software License Agreement
9.4 Altova XBRL Add-in Software License Agreement
The license agreement below applies to the following Altova XBRL Add-in software products:
Altova WIP XBRL Add-in Software
Altova EBA XBRL Add-in Software
THIS IS A LEGAL DOCUMENT -- RETAIN FOR YOUR RECORDS
ALTOVA® XBRL ADD-IN SOFTWARE LICENSE AGREEMENT
Licensor:
Altova GmbH
Rudolfsplatz 13a/9
A-1010 Wien
Austria
Important - Read Carefully. Notice to User:
This Software License Agreement (“Agreement”) is a legal document between you and
Altova GmbH (“Altova”). It is important that you read this document before using the
Altova-provided software (“Software”) and any accompanying documentation, including,
without limitation printed materials, ‘online’ files, or electronic documentation
(“Documentation”). By clicking the “I accept” and “Next” buttons below, or by
downloading, installing, or otherwise using the Software, you agree to be bound by the
terms of this Agreement as well as the Altova Privacy Policy (“Privacy Policy”) including,
without limitation, the warranty disclaimers, limitation of liability, data use and
termination provisions below, whether or not you decide to purchase the Software. You
agree that this Agreement is enforceable like any written agreement negotiated and
signed by you. If you do not agree, you are not licensed to use the Software, and you must
destroy any downloaded copies of the Software in your possession or control. You may print a
copy of this Agreement as part of the installation process at the time of acceptance. Alternatively,
a copy of this Agreement may be found at http://www.altova.com/legal.html and a copy of the
Privacy Policy may be found at http://www.altova.com/privacy.
1. SOFTWARE LICENSE
A. License Grant. Upon your acceptance of this Agreement Altova grants you a non-
exclusive, non-transferable (except as provided below), limited license, without the right to grant
sublicenses, to install and use a copy of the Software on one compatible personal computer or
workstation. The term of the license is delineated in your purchasing documents. The license may
not be installed on more than one personal computer or workstation at any given time and may
not be installed on more than two personal computers or workstations over a thirty-day period.
B. Backup and Archival Copies. You may make one (1) backup and one (1) archival copy
of the Software, provided your backup and archival copies are not installed or used on any
computer and further provided that all such copies shall bear the original and unmodified
copyright, patent and other intellectual property markings that appear on or in the Software. You
may not transfer the rights to a backup or archival copy unless you transfer all rights in the
Altova Work in Process XBRL add-in for Excel, version 2018r2 © 2018 Altova Gmb HYou can also read