USER GUIDE ELYSIUM (FRANCISCAN CLINICAL MESSAGING)
←
→
Page content transcription
If your browser does not render page correctly, please read the page content below
ELYSIUM
(FRANCISCAN CLINICAL MESSAGING)

USER GUIDE
Elysium Module Breakdown
   Level                  Module                            Title                   Page
   Basic    1. Introduction to Elysium   1.0 - Logging In                              1
                                         1.1 - Understanding Views                     3
                                         1.2 - Icons and Symbols                       4
                                         1.3 - Customize                               7
                                         1.4 - Printing                               10
                                         1.5 - Patient Index / Patient Summary        11
            2. Working with Clinical     2.0 - Managing Transcriptions                13
               Documents                    2.0.1 - Uploading                         13
                                            2.0.2 - Opening / Signing / Sending       17
                                         2.1 - Inbox Management                       18
                                            2.1.1 - Reviewing                         18
                                            2.1.2 - Forward / Assign                  18
                                            2.1.3 - Signing                           20
                                         2.2 - Using the Memo Function                21
                                            2.2.1 - Create a New Memo                 21
                                            2.2.2 - Create a Prewritten Memo          22
                                         2.3 - Virtual Health Record                  23
                                            2.3.1 - Using VHR                         23
                                            2.3.2 - Cumulative Lab                    25
                                         2.4 - Using Reply / Reply with History       27
                                         2.5 - Deleting / Retrieving documents        28
Intermediate 3. Workflow Management      3.0 - Identify and Merge                     30
                                         3.1 - Action                                 34
                                         3.2 - Creating A Tickler File                35
                                         3.3 - Message Encounter Form                 37
                                            3.3.0 - Creat a New MEF                   37
                                            3.3.1 - Edit a MEF                        40
                                         3.4 - Auto Processing                        42
            4. Using Elysium Forms       4.0 - Using Elysium Office Memos / Forms     44
                                         4.1 - Business Letters                       60
            5. Referrals                 5.0 - Direct Referral                        79
                                         5.1 - Diagnostic Imaging Order               82
                                         5.2 - Patient Navigator                      83
 Advanced   6. Rx Writer                 6.0 - Creating a new Rx                      86
                                         6.1 - Processing a Manual Refill             90
                                         6.2 - Processing an Electronic Refill        91
                                         6.3 - Intra-Office communication with Rx     92
                                         6.4 - Viewing Prescriptions                  93
                                         6.5 - FAQ's                                  94
            7. Other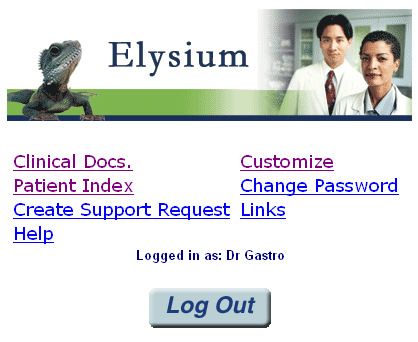
1.0 LOGGING IN

Elysium is a web-based application. It can be viewed from both FHS and non-
FHS PCs.

FHS Secure Connection (FHS PC)

   1. Open Internet Explorer.

   2. From http://fhsconnect scroll down to Franciscan Clinical Messaging on
      the right side of the screen.
   3. Click on the underlined Franciscan Clinical Messaging (FCM) .

   4. Also, you can select Elysium from Quicklinks.

Non Secure Connection (Home or Other PC)

   1. Open your internet browser.

   2. Go to fhs.axolotl.com.

                                     -1-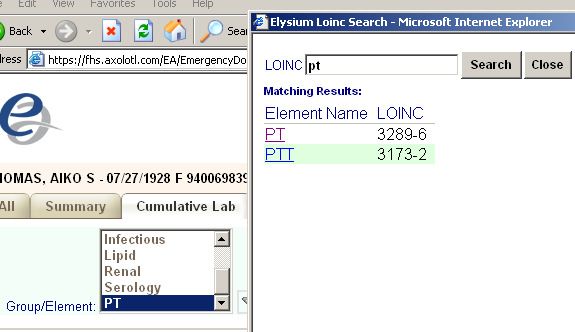
1.0 LOGGING IN
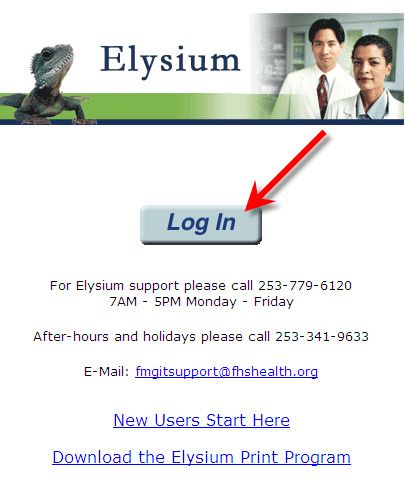
1. Click on Log In
2. Enter User Name and Password.
3. Click OK.
This is your Home Screen for Elysium
-2-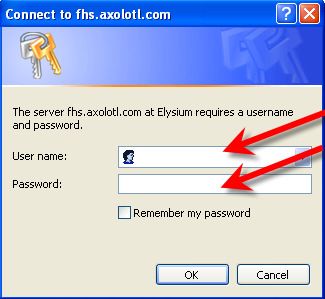
1.1   UNDERSTANDING VIEWS

   1. From Home Screen select Clinical Docs.

          The Left side column of your screen is used to navigate through the
                                      program.

1. Under Clinical Docs there are a variety of “Views.”

     a.     >> Awaiting                       d. >> Prescriptions
             i. AKA “Inbox”                        i. Shows all Rx written for patient
            ii. All new documentation             ii. Shows Rx date and delivery info
           iii. Shows users in group          e. >> Print Queue
                with items in A.A.                 i. Shows last and next print time
     b.     >> Final                          f. >> Set Up Printing
             i. AKA “Electronic Chart”             i. Used to set up printers (IT)
            ii. Shows all Final reports       g. >> Auto Processing
           iii. Will not show any                  i. Sets up Automatic Processes
                preliminaries                         for documentation, Rx, etc
     c.     >> Encounter                      h. >> Deleted View
             i. Shows only transcriptions          i. Stores deleted documents
            ii. Organized by date and             ii. Documents can be retrieved and
                time                                   added to patient record

                                        -3-
1.2 ICONS AND SYMBOLS
Symbol / Icon Action
New Results that have not yet been
actioned
Marked as not printed
Marked as printed
Electronically sent to another user
Message from another user
Ordered STAT
Amended or appended since it was first
delivered
Forwarded by another user
Unsigned prescription
Abnormality present
Critical abnormality present
High
Critically High
Out of Range High
Low
Critically Low
Out of Range Low
Values are not reported numerically and
can only be described as abnormal
-4-1.2 ICONS AND SYMBOLS
Symbol / Icon Action
Draft of office form
Sent to print queue, awaiting print and
clear from Awaiting Action.
Do not print selected document and
clear from Awaiting Action. Mark as not
printed.
Hide details
Show details
Advances one window
Goes back one window
Opens a search window. (Searches
either Final, Preliminary, or
Prescriptions)
Maximizes all items in view
Minimizes all items in view
Create a Memo about this patient
Opens Office Memo Forms
(Office Visit, RTW, Business Letters)
Forward this document to another
Elysium user via Address Book
Reply to sender
Reply to sender and include a copy of
the document
Opens the Patient Summary form
-5-1.2 ICONS AND SYMBOLS
Symbol / Icon Action
Opens the Prescription window (Rx
writer)
Not in use at this time
Opens the Direct Referral form
Not in use at this time
Not in use at this time
Open next result
Open previous result
Assigns document to be handled by
another workgroup member. Routed to
user’s Awaiting Action/Unassigned
queue.
Assigns document to be handled by
another workgroup user with Instructions
attached. Instructions can be
standardized.
Opens up a summary view of the
patient’s clinical results in a tabular
format
Retrieves lab results in group over a
period of time
Deletes clinical document and removed
to Deleted View
-6-1.3 CUSTOMIZE
Customizing Your Environment
Users may create personal lists of annotations to apply to clinical documents and
instructions to send to staff and personnel, as well as personal list of contacts.
Workstation users can also create “Short Cut” combinations of staff persons,
annotations, and instructions which can be applied to a clinical message.
** In addition to the instructions below, customization can be done while
working with clinical results **
1. Click Customize on the left side of the screen.
a. Action Shortcuts
i. Combinations of an instruction, annotation, and a staff
person.
ii. Each user may create 3 shortcuts.
iii. Create or Edit Shortcuts by clicking the Edit Action
Shortcuts button.
iv. Once established, Shortcuts will appear at the top of any
unactioned document.
-7-1.3 CUSTOMIZE
b. Annotations
i. Singular note that is applied to clinical message (i.e. Reviewed
by Dr Jones or Results within normal limits).
ii. Each Annotation is displayed at the top of the note with a
date and time stamp.
iii. To add or change Annotations click on the Edit Annotations
button.
c. Instructions
i. Gives specific Instructions to take some action (i.e. Call
patient with results or File and mail copy to patient).
ii. Lists as a personal Heading in the recipient’s Awaiting view.
iii. To add or change Instructions click on the Edit Instructions
button.
-8-1.3 CUSTOMIZE
d. Edit Staff
i. Allows you to add staff members to personal list from the
database address book.
ii. To add or change staff, click on the Edit Staff button.
iii. Click on the blue book icon to see global list.
iv. Type the desired name in the search box. Click Search once.
1. A list of names will display in the large white box
below the search tab.
2. Click once on the actual name (this will highlight the
name).
3. Click on the Add button once.
4. Click on the OK button. (Window closes.)
5. Click on the Add New button.
6. Repeat for addition names you would like added.
7. Note: Names can be added only one at a time.
8. When list is complete, click on the Done button at the
top of the screen.
e. Edit Memo
i. The Memo function attaches a “Memo” (more than one line
of text) to a document.
ii. Allows you to create standard Memos.
-9-1.4 PRINTING
Documents are sent to a “universal” printer in your office. The printer is set up
to print in regular intervals. Often the printer is set up to print every hour.
Icons and directions
Sends document to print queue and clears from Awaiting Action
Document is marked as Printed.
Does not print selected document and clears from Awaiting Action
Document is marked as Not Printed.
This clears ALL of the items from your
inbox and sends them to the print
queue. They will be available in Final
View.
This clears ALL of the items from your
inbox. Items are NOT printed, but will
be available in the Final View.
** Note: Once an item is in the Final View it cannot be altered. **
Signs (finalizes) the document and sends it to
the print queue. Document will be available in
Final View.
Signs (finalizes) document and does NOT send
to print queue. Document will be available in
Final View.
Auto Processing
Auto Processing allows you to set printer values (among other things) to
individual documents. For example, you can set all Labs to print “STAT.”
This will send those documents to the printer every 5 minutes without
manual direction.
Auto Processing will be reviewed in Module 3.4
- 10 -1.5 PATIENT INDEX / PATIENT SUMMARY
The Patient Index allows for the identification of a patient in the Community
Patient Index. Once found, the patient’s demographic information is displayed
in the Patient Summary form.
1. From the Menu on the left side of the screen choose Patient Index,
2. Search can be preformed through a variety of fields. At least one field
must be complete to search.
a. Last Name / First Name
b. Medical Record Number
c. Date of Birth
d. Encounter Number
3. Complete at least one of the mandatory search fields and press the Search
button.
a. From the list of options click once on the name of the correct
patient. (Note: If only one patient exists based on search criteria,
the Patient Summary will automatically open.)
- 11 -1.5 PATIENT INDEX / PATIENT SUMMARY
4. The Patient Summary screen will display all of the patient’s demographic
information available.
a. Address and phone numbers
b. Insurance information past and present
c. Medication allergies
d. Medications (either manually added or auto populated when Rx
writer is used)
e. Problems
f. Vaccinations
5. You can add content to any field by clicking on the button next to the
field.
6. To change Basic demographic content click on the button at the top of
the screen.
- 12 -2.0 MANAGING TRANSCRIPTIONS
Transcriptions are created on the voice recorder and uploaded to the computer for
Axolotl dictation service. Dictations are guaranteed to be returned to your inbox
within 48 hours of uploading.
2.0.1 Uploading Transcriptions
1. Connect the voice recorder to PC
a. Plug the USB cable into the PC.
b. Turn the recorder “ON”.
c. Make sure the recorder is in the “STOP” position.
d. Attach the other end of the USB cable into the recorder.
e. The message below may appear. Click OK to move on.
2. Backup the Files to Your PC
a. Go to the desktop on the PC and double click on the DSS-FLDA
shortcut icon.
i. If no shortcut is available, this folder will appear on your desktop
when the recorder is turned on.
b. This shortcut points to Folder A on your recorder. IF you recorded files
under a different folder, go to the Address bar and delete everything
after E:\ (this letter may differ depending on your computer setup).
You can then select the different folders until you find your dictations.
c. Hold the Ctrl key down while left-clicking on each file to copy to backup
(those with the extension .DSS).
d. Press the Ctrl key and the letter “C” at the same time to copy the files to
the clipboard (not shown). Alternatively, you can right click and select
‘Copy’ from the list.
e. Go to the desktop on the PC and double click on the Dictation Backup
shortcut icon.
f. Press the Ctrl key and the letter “V” at the same time to paste the files
into the folder. Alternatively, you can right click and select ‘Paste’ from
the list.
g. Close the backup folder and the voice recorder folder (E:\DSS_FLDA).
- 13 -2.0 MANAGING TRANSCRIPTIONS
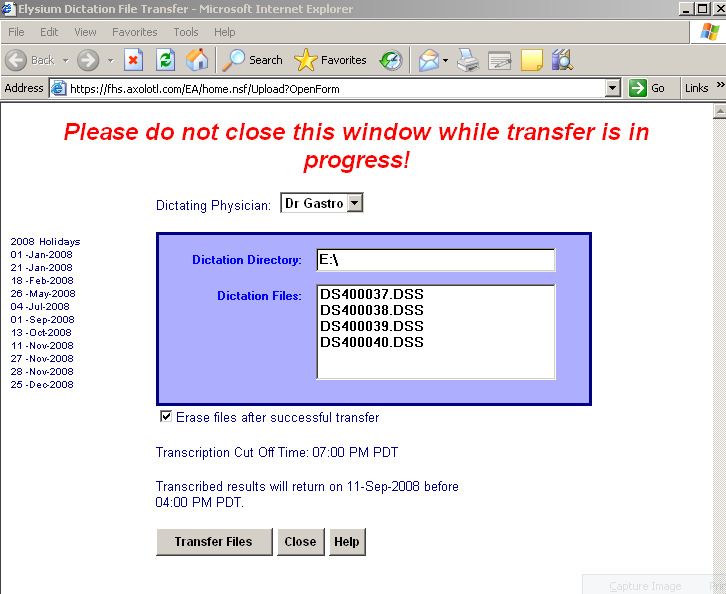
3. Upload files to Elysium
a. When logged into Elysium < Clinical Docs, click on Transfer
Dictation from the menu bar on the left. The Transfer Progress
window opens.
b. Confirm your name in the Dictating Physician box.
c. The first time you upload dictations, you will have to type the file
path of the voice recorder and press enter (Usually E:\) . From then
on, it will automatically retrieve the file path and files.
d. Click in the box (check) “Erase files after successful transfer” to clear
your dictation device. Do this ONLY if you have backed up the files
to your PC.
e. Click on Transfer Files. A box will appear showing the percentage of
files in progress.
f. When the transfer process is complete, a summary page will appear.
- 14 -2.0 MANAGING TRANSCRIPTIONS
4. Confirm Upload and Print Summary Sheets.
a. Successful Transfer
i. Confirm the number of files sent.
ii. Click the Print Summary button. Save this summary until the
transcriptions are returned.
iii. Unplug the USB from the voice recorder. Place the recorder in the
charging cradle with the power on.
b. Unsuccessful Transfer
i. Click the Retry button (sends only the missing files).
ii. If the second attempt (after Retry) fails, click the Cancel button. A
summary page appears.
iii. Click the Print Summary button.
iv. Click the Close button.
v. Repeat the upload process from step 3.
- 15 -2.0 MANAGING TRANSCRIPTIONS
Once Transcriptions have been dictated, they will appear in your “Awaiting
Action” view. They will be titled either Progress Note or Chart Note based on
preference.
2.0.2 Opening and Editing Dictations
1. To open a dictation click once on the blue title of the document.
2. To change demographic information (name, DOB, etc) click once on the
Correct button at the top of the page.
a. Once correction is made, click once on the Correct button.
3. To change the body of text, click once on the Edit button at the top of the
page.
a. Once correction is made, click once on the Save button.
- 16 -2.0 MANAGING TRANSCRIPTIONS
Once you have determined the dictation is correct, it needs to be “Signed.” Once “Signed”
the dictation can no longer be edited. The electronic signature is legal and will be noted on
the dictation with the time and date signed.
2.0.3 Signing and Printing Dictations
1. To sign, click once on Sign and Print. This will sign the dictation and send
the dictation to Medical Records to be placed in the patient’s chart.
2. The other sign options will sign the document, but it will not be sent to a
printer.
2.0.4 Sending Dictations
1. To send a dictation click once on the Forward button at the top of the
screen.
2. Using the phone directory to the right of the “To:” field, choose the
recipient.
3. Add annotation if desired, and click Send at the top of the page.
- 17 -2.1 INBOX MANAGEMENT
Your Awaiting Action view is most commonly referred to as your “Inbox.” Your name will
appear at the top of the screen only if you have items awaiting your attention. If your name
does not appear at the top of the screen, your “Inbox” is empty.
2.1.1 Reviewing a Document
1. The headings in purple can be expanded by clicking on the blue triangle to the left of
the heading.
2. To review an item, click on the blue description. If you have already opened an item,
the description changes from blue to purple.
2.1.2 Forward / Assign a Document
1. If it is determined that the document needs to be addressed by another Elysium user it
can be either Forwarded or Assigned to that user.
a. Forward – Used most commonly when one provider is forwarding results to
another provider. Once forwarded, the document stays in the “Inbox”
(Awaiting Action view) and advances a copy to the specified user.
i. From within the document, click once on the Forward button at the top
of the screen.
ii. From within your “Inbox” check the small white box to the left of the
patient’s name, then click once on the Forward button at the top of the
screen.
- 18 -2.1 INBOX MANAGEMENT
Forward – continued…
iii. Choose the designated recipient by clicking on the blue address book to
the right of the To: field.
iv. You can then choose to add a prewritten memo, create a new message,
or leave blank to send no message. Once complete, click once on the
Send button.
b. Assign – Removes a document from “Inbox” (Awaiting Action view) and
assigns it to another Elysium user.
i. From within the document, click once on the Assign button at the top of
the screen.
ii. From within your “Inbox” check the small white box to the left of the
patient’s name and click once on the Assign button at the top of the
screen.
- 19 -2.1 INBOX MANAGEMENT
Assign – continued…
iii. Choose the designated recipient by clicking on the blue address book to
the right of the New: field.
1. Alternatively, you can select once of the names from your staff list
if applicable. (See 1.3 Customize to add names to staff list.)
iv. Once the name is in the New: field or highlighted from the staff list, click
on OK.
2.1.3 Signing a Document
1. At the top of certain documents you have the option to Sign. Signing a document
finalizes that document and leaves an electronic signature at the top with the date and
time. Once a document has been signed, it can no longer be edited or annotated.
a. Signs the document, and the document stays in the “Inbox” (Awaiting
Action view).
b. Signs the document and sends it to the medical records
printer. The document is also routed out of the Awaiting Action view into the
Final view.
c. Signs the document and does not send it to the medical
records printer. The document is also routed out of the Awaiting Action view
into the Final view. ** Use with caution; remember the paper chart is the legal chart
at FMG**
- 20 -2.2 MEMO FUNCTION
Memos can be sent from one user to another in regards to a patient. Each memo can be
saved and available from a drop down menu to be used again and again. Once sent,
Memo’s will be available in the patients “Final View” for review only.
2.2.1 Creating a Memo
1. From the Patient Summary screen or from within a patient’s document, click once
on the Memo button.
2. Click once on the small blue address book to select the recipient.
3. Enter the description of the memo in the Subject field.
4. Type the body of the memo in the large white box.
5. Save the memo as a template to be used again by clicking once in the Add field.
6. Clicking on the Route to Elysium Repository will save the document in the VHR
database, allowing outside providers and staff to view the document.
- 21 -2.2 MEMO FUNCTION
7. To attach a file from outside Elysium, click once on the Browse button in the File
Attachments field.
8. Once reviewed, click once on the Send button at the top of the screen.
2.2.2 Selecting a Prewritten Memo
1. Complete steps 1 & 2 above.
2. In the Use Text field, click once on the down arrow to see the prewritten
Memo’s available.
3. Click once on the title of the memo.
4. The Memo will be populated and can be edited if desired.
a. If the memo is edited and you would like to save the edited
version, click once on the Modify field. This will replace the
previous version.
b. If you would like to save the memo as a secondary memo while
saving the original, change the Subject line and click once on the
Add field.
5. Once reviewed, click the Send button.
** To create a list of memo templates without sending them, use your Customize
function**
- 22 -2.3 VIRTUAL HEALTH RECORD (VHR)
The Virtual Health Record will be referred to as the VHR or the Repository. The VHR is a
centralized database that stores final records for clinical patients. Within the VHR, data
can be grouped by category, simplifying the search process.
2.3.1 Using the VHR
1. Access the VHR
a. From the Clinical Docs screen, click once on VHR located on the left side of
the screen.
b. From within a patient’s document, click once on the button.
c. If accessing the VHR from the patient record, skip step 2. The patient’s
information will be automatically loaded.
2. From the home screen, click once on the search icon located towards the top
of the screen.
a. The Patient Search screen allows you to search by patient name, date of
birth, encounter number, etc.
b. If the patient data only relates to one patient, the information is
automatically routed to the VHR screen.
c. If there is more that one option, click once on the correct name to route the
patient’s information to the VHR.
- 23 -2.3 VIRTUAL HEALTH RECORD (VHR)
3. The VHR is listed in a tabular view for ease of use. You can review each tab by
clicking on it once.
a. All
i. The All tab lists all documents for the patient in reverse
chronological order, similar to the Final View.
b. Summary
i. The Summary tab separates the most recent documents into four
(Lab, Radiology, Reports, and Forms) easy to see boxes.
c. Cumulative Lab
i. The Cumulative Lab tab, allows you to see multiple dates of the same
test in a horizontal or vertical view. In addition the information can
be viewed as a graft. Please see section 2.3.2 for more information.
d. Lab
i. The Lab tab lists only laboratory results in reverse chronological
order.
e. Radiology
i. The Radiology tab lists only radiology reports in reverse
chronological order.
f. Reports
i. The Reports tab lists any report that has been dictated or manually
entered for the patient.
g. Forms
i. The Forms tab lists out any forms that have been created for the
patient. (i.e. memos, message encounter forms, letters, etc.)
h. Patient Info
i. The Patient Info tab lists the Patient Summary. This information
includes demographics and medical history if populated.
4. Additional Search Criteria
a. You can narrow or expand the search criteria by changing the “From:” and
the “To:” dates.
b. A specific date can be entered into the “Visit:” field.
c. A specific facility can be entered into the “Facility:” field.
5. Icons
a. Forwards the c. Refreshes the screen.
document.
d. Associates a report with
b. Deletes the document. another patient’s record.
- 24 -2.3 VIRTUAL HEALTH RECORD (VHR)
2.3.2 Cumulative Lab
1. The Cumulative Lab view allows you to view all associated lab values over a
period of time on one screen.
2. To graft one specific lab value, click once on the graft icon to the left of the test
name.
- 25 -2.3 VIRTUAL HEALTH RECORD (VHR)
3. Labs can be viewed by group. Labs can also be viewed individually.
a. To change the group, click on the desired group in the Group/Element field.
b. To choose a specific test, click once on the search icon next to the
Group/Element field.
i. Type the desired test in the LOINC field and click once on the Search
button.
ii. Click once on the name of the correct test. That test will appear in
the Group/Element field in the Cumulative Lab screen.
iii. In the Cumulative Lab screen, click once on the get results
button to the right of the Time Change field.
4. To search within a specific time range, click on the down arrow next to the Time
Change field and click once on the desired time frame for viewing.
a. Click once on the get results button to the right of the Time Change field.
5. To change the view from Horizontal (tests on the right, dates on the top) to
Vertical (tests on top, dates on the left) click once on the arrow in the Time Axis
field. Click once on Vertical.
a. Click once on the get results button to the right of the Time Change field.
- 26 -2.4 USING REPLY / REPLY WITH HISTORY
When a document is sent to you, you have the option of replying to that
document either with or without an Elysium document attached.
Reply
1. From within the open document you are replying to, click once on the
Reply button at the top of the page.
2. This will open a Memo with the To: field and the Subject field auto
populated. Type the body of the memo and click once on Send at the top
of the page.
Reply with History
1. From within the open document you are replying to, click once on the
Reply + History button at the top of the page.
3. This will open a Memo with the To: field and the Subject field auto
populated. The document you are replying to will also be auto populated
at the bottom of the Memo.
a. Type the body of the memo and click once on Send at the top of the
page.
- 27 -2.5 DELETING CLINICAL DOCUMENTS
In the event that a document needs to be deleted, such as a duplicate document, it can be
removed from the patient’s Final view. Once deleted, the document is stored in a “Deleted
View”.
2.5.1 Delete
1. From Clinical Docs
a. Click once in the white box to the left of the patient’s name. This will
put a check mark in the box.
b. Click once on the Trash Can icon in the upper right corner of the screen.
2. From within the document you wish to delete
a. Click once on the Trash Can icon in the upper right corner.
- 28 -2.5 DELETING CLINICAL DOCUMENTS
2.5.2 Retrieving Deleted Documents
1. Click once on Deleted under Clinical Docs, on the left hand side of the
screen.
2. In the Search for: field, type the last name of the patient and click once on Go To.
3. Click on the name of the document to open it.
4. Click once on the “undelete” icon in the top left corner of the page.
- 29 -3.0 IDENTIFY AND MERGE
Identify allows you to reassign documents to the correct patient record. Documents that need to
be identified are often marked with an asterisk after the patient name.
Merge takes two (or more) separate records and makes them into one. The need to merge patient
records often occur when a patient changes their demographic information and a new account is
created inadvertently.
3.0.1 Identifying Records
1. Once you have verified that a document(s) need to be moved out of the current record and
into the correct record, click once on the white box to the left of the document name
(putting a check mark in the box).
** Note: By choosing once document, Identify recognizes all documents in that record. **
2. Click once on the Identify button.
3. Select the correct name from the Patient Index Candidate(s) and select the correct name in the
Final view group of reports to identify by clicking in the white box to the left of the patient
name.
a. If the correct patient name does not appear in the Patient Index Candidate(s), you
can click once on the Next button to scroll through the next page.
b. You can also do your own search by using the search field at the top of the screen.
- 30 -3.0 IDENTIFY AND MERGE
4. With a check mark next to both names, as shown above, click once the Identify button.
5. A warning box will appear. Click once on the OK button.
6. Once complete, notice the patient name only appears once in the final view.
3.0.2 Merging Records
** Once you Merge a record, there is no Un-Merge **
1. Identify all documents first by completing steps 1-6 above.
2. In the Patient Index, pull up the record that needs to be merged.
3. At the top of the Patient Summary screen, click once on the Merge button.
- 31 -3.0 IDENTIFY AND MERGE
4. Select the both records to be merged by checking the white box to the left of the patient name.
5. To select the correct patient demographic information, click once on the white circle to the left of the
check box. This will populate the information in the Demographic data for merged Patient Index
record at the bottom of the screen.
a. Click once on the white box to the left of the patient name at the bottom of the screen to
transfer data.
b. Click once on the Merge Candidates button.
- 32 -3.0 IDENTIFY AND MERGE
6. Verify the information in the next screen and click once on the Finish Merge button.
7. A message window will appear, click once on the OK button to close the Patient Merge window.
8. The merge is complete; the Patient Summary will reflect the retained patient record.
- 33 -3.1 WORKFLOW MANAGEMENT - ACTION
Within a document you have the option to “Action” that document to another Elysium
user in your workgroup. Actioning a document allows you to specify the recipient, the
heading it will appear under within their “Inbox”, and give one line of directions.
3.1 Using Action
1. From within the document, click once on the Action button at the top of the page.
2. Assign to: This is the recipient of the document.
a. Click once on the box to the left of Add to Personal Database? to add name
to list above.
3. To: This is the purple heading in the recipient’s “Inbox”.
4. Annotate with: This is the instructions to the recipient.
5. Click once on OK to send.
6. This is how the document will display within the recipient’s “Inbox”:
7. When the recipient opens the document, it will note the sender, date, time, and
annotation at the top.
- 34 -3.2 CREATING A TICKLER FILE
Tickler Files can be used to prompt follow up care. With Elysium we use the “Action”
feature to put documents or results in a date/month file. These files are stored in the
Awaiting Action view.
3.2 Create a Tickler File
1. From within the patient’s document or result, click once on the Action
button.
2. In the Assign to: field, choose your own name either from the list, or by
using the address book.
a. If using the address book to choose your name, be sure to check the
Add to Personal Database box. This will add your name to the list
for the next time.
3. In the To: field, enter the letter z followed by the month and year to follow
up. (Putting the letter z in front of the date will place this heading at the
bottom of your “Awaiting Action” view.)
- 35 -3.2 CREATING A TICKLER FILE
4. The Annotate with: field can be used to give yourself a line of instructions
as a reminder.
5. This is how the file will appear in your inbox.
6. To view the items, click once on the blue arrow to the left of the date.
7. To clear the item out of your inbox, use the thumbs down button. Once
all items are cleared out of that date heading, the heading will
automatically be removed from the “Awaiting Action” view.
- 36 -3.3 MESSAGE ENCOUNTER FORM
The Message Encounter Form (MEF) is used to document patient phone calls. The MEF
can be created and forwarded to another workgroup user, that user can then update the
MEF. Once complete, the MEF can be electronically signed and printed to be placed in
the chart.
3.3.0 Create a new Message Encounter Form
1. From within the Patient Summary Form, or within any of the patient’s
documentation or results, click once on the Create an Office Memo
button. (Resembles a note pad with a yellow star.)
2. Click once on Message Encounter Form.
3. Select the provider name either from the drop down list, or by using the
address book.
- 37 -3.3 MESSAGE ENCOUNTER FORM
4. The date and time populates automatically.
5. Select the caller from the drop down list.
6. The message can be sent either Routine or Urgent. If you select Urgent
from the drop down, there will be a small icon indicating “Urgent” in the
receiver’s “Awaiting Action” view.
7. Type the message in the Message: field.
a. Note: You do not need to note the day, time, or initials. This is
populated automatically.
8. Select an Action from the drop down menu in the Action Required: field.
- 38 -3.3 MESSAGE ENCOUNTER FORM
9. Once all fields have been completed, there are 2 options:
a. If the form is complete and does not need to be sent to anyone for
review or action, click once on Sign and Print. This will sign the
document, close it (no one can edit it) and send it to the Medical
Records printer. ** The MEF must be printed and put into the
patient’s chart. **
b. If the form needs to be sent to another user, click once on Save.
i. The form will open in a new window.
ii. Click once on Action.
iii. Select the recipient in the Assign to: field.
iv. Select the heading in the To: field.
1. The heading appears in bold in the Awaiting Action
field of the recipient.
v. Select an Annotation if desired. Most Message Encounter
Forms do not need an Annotation.
vi. Click OK to send.
- 39 -3.3 MESSAGE ENCOUNTER FORM
3.3.1 Editing a Message Encounter Form
1. Open the Message Encounter Form.
a. From Awaiting Action
i. Click once on the words Message Encounter Form next to
the correct patient’s name.
b. From Patient Index
i. Search the patient name and open the Patient Summary
Form.
ii. Click once on Patient’s Results in the left corner of the page.
iii. Click once on the Message Encounter Form.
c. From the “Final” view
i. Search the patient name, and click once on the Message
Encounter Form.
2. Click once on the Edit button.
3. In the Message: field, create a barrier line (either ******** or --------), then
enter the date and time.
4. Add your information to the message, followed by your initials.
- 40 -3.3 MESSAGE ENCOUNTER FORM
5. Change the Action Required: field.
a. If Medical Advice:
i. Choose the reference used (appears below the Message:
field).
1. If using Provider Specific or Protocol Title, please
enter the provider name or protocol title where
prompted.
6. Once all fields have been completed, there are 2 options:
a. If the form is complete and does not need to be sent to anyone for
review or action, click once on Sign and Print. This will sign the
document, close it (no one can edit it) and send it to the Medical
Records printer. ** The MEF must be printed and put into the
patient’s chart. **
b. If the form needs to be sent to another user, click once on Save.
i. The form will open in a new window.
ii. Action to recipient.
- 41 -3.4 AUTO PROCESSING
Auto Processing allows you to set up automatic print requests or forward / copy
requests. With an Auto Process you can specify which documents print, where
they print, and how often.
3.4 New Auto Processing
1. From you Clinical Docs screen, click once on Auto Processing.
2. Click once on the New Request button.
3. In the Short Description: field, enter a “Title” for the Auto Process. For
example: Final Lab Auto Print on Printer 1.
4. Select the type of documents to be printed.
- 42 -3.4 AUTO PROCESSING
5. The following fields are pre-established: Priority, Forwarded by other
Users, and Patient Related Restrictions. They can be changed if needed.
6. User Related Restrictions: If no user is entered, the Auto Process will
apply to all users. If only one user wants the auto process, use the address
book to populate the name(s).
7. Select the Action required.
a. Mark as No Print
b. Print On: (Choose Printer)
c. Assign to User: (Select user name from address book)
d. Send Copy to: (Select user name from address book)
e. Evaluate Formula: (For Elysium Administrator only)
8. Click once on the Save button.
9. Once created, the auto process can be turned off using the “Enabled” field.
- 43 -4.0 USING ELYSIUM FORMS
Elysium Forms are templates used to easily create letters, office visits, and
patient notifications.
To access any of the forms, open any document for the patient, or from the
Patient Summary Form, click once on the Office Memo button at the top of
the page.
Certification of Disability Page 45
Clearance to Participate in Sports Page 47
Office Visit Page 48
Return to Work Page 50
Diagnostic Notification Page 51
Podiatry Office Visit Page 53
Diabetic Visit & Care Management Page 55
Patient History Page 57
Office Transcription Page 59
Message Encounter Form - Module 3.3 Page 37
Business Letters - Module 4.1 Page 60
- 44 -4.0 USING ELYSIUM FORMS
Certification of Disability
1. Click on Certification of Disability.
2. Select the provider from the drop down list, the date is automatically
populated.
3. Create the body of the letter by populating the following fields:
a. Partial / Fully Disabled
b. Explanation of Disability (if applicable)
c. From (1st day of Disability)
d. To (Last day of Disability release)
e. Comments (As applicable)
4. Click on Save to see the completed letter.
- 45 -4.0 USING ELYSIUM FORMS
5. To print the letter on a local printer, click on File, then Print. (You may
want to load letter head in the printer first).
6. This is how your letter will print….
7. Once printed locally, click Sign and Print to send the letter to Medical
Records.
- 46 -4.0 USING ELYSIUM FORMS
Clearance to Participate in Sports
1. Click on Clearance to Participate in Sports.
2. Select the provider from the drop down list, the date is automatically
populated.
3. Specify any limitations in the box provided. If there are no limitations,
click the box next to None.
4. Click on Save to see the completed letter.
5. To print the letter on a local printer, click on File, then Print. (You may
want to load letter head in the printer first).
6. This is how your letter will print….
- 47 -4.0 USING ELYSIUM FORMS
Office Visit
1. Click once on Office Visit.
a. The Office Visit form can be used in place of, or in correlation with
dictation.
2. Confirm the Provider name and Date / Time of service.
3. Subject Line defaults to Office Visit, but can be changed if needed. (For
example: Annual Physical Exam)
4. Enter Vitals.
5. Enter Chief Complaint.
6. Enter History of Present Illness.
7. Once reviewed, enter the status of the History Form, Problem List, and Rx
List.
a. If all forms have the same status, you can click once on the All No
Change or All Updated.
b. Any comments can be added in the box below.
*** Note: Steps 1-7 can be entered by the nurse / medical assistant. ***
1. Once fields are complete, the MA / nurse can click once on the Save button at the
top of the screen.
2. The Office Visit form can be located in the providers “Awaiting Action” view.
3. Open the Office Visit and click once on the Edit button to resume.
- 48 -4.0 USING ELYSIUM FORMS
8. Review of Systems:
a. Mark all negatives by clicking the box closest to the description.
b. Mark all positives by clicking the left most box from the
description. (Abnormalities will be listed below)
c. If no boxes are checked, that indicates the system was not
reviewed.
d. If all were items in a field were checked and all negative, click once
in the box to the left of the field number and name. (Gray Strip)
9. Counseling Time can be indicated by clicking the circle to the left of the
time.
10. Describe any Abnormalities.
11. Enter the Assessment.
a. If any tests were ordered, indicate them by clicking on the box to
the left of the description.
12. Enter the Plan.
13. Indicate when you would like the patient to return in the Followup: field.
14. If a note was dictated, click on the box to the left of Note Dictated.
15. Once complete, click once on Sign and Print.
- 49 -4.0 USING ELYSIUM FORMS
Return to Work
1. Click once on Return to Work.
2. Confirm the Provider and the Date fields are correct.
a. The Date field should indicate the date the patient will be returning
to work.
3. Indicate no limitations by clicking the box to the left of None.
4. If the patient has limitations, enter them in the box below.
5. Click on Save to see the completed letter.
6. To print the letter on a local printer, click on File, then Print. (You may
want to load letter head in the printer first).
7. This is how the letter will look when printed:
- 50 -4.0 USING ELYSIUM FORMS
Diagnostic Notification
1. Click once on Diagnostic Notification.
2. Verify the Date and the Provider.
3. Choose a category for the results. Click once on the down arrow to see
options.
a. Within normal range
b. Abnormal
c. Received
d. Normal – see comments
4. Select the test by clicking in the box to the left of the name.
a. If the test is not listed click the “Other” box and specify the test
name in the comments field.
5. Enter the Comments or Instructions by selecting an item from the drop
down list.
a. To enter something that is not on the list, select Other: and a text
box will open.
i. Type your instructions / comments in the text box.
6. Click Save to see the completed letter.
- 51 -4.0 USING ELYSIUM FORMS
7. To print the letter on a local printer, click on File, then Print. (You may
want to load letter head in the printer first).
8. This is how the letter will look when printed:
- 52 -4.0 USING ELYSIUM FORMS
Podiatry Office Visit
1. Click once on Podiatry Office Visit.
a. The Podiatry Office Visit form can be used in place of, or in
correlation with dictation.
2. Confirm the Provider name and Date / Time of service.
3. Reason Line defaults to New Patient Visit, but can be changed if needed
by using the drop down list.
4. Enter Vitals.
5. Enter Chief Complaint.
6. Enter History of Present Illness.
7. Once reviewed, enter the status of the History Form, Problem List, Rx List,
PMH, Meds, Allergies, and Social History.
a. Any comments can be added in the box below.
*** Note: Steps 1-7 can be entered by the nurse / medical assistant. ***
1. Once fields are complete, the MA / nurse can click once on the Save button at the
top of the screen.
2. The Podiatry Office Visit form can be located in the providers “Awaiting Action”
view.
3. Open the Podiatry Office Visit and click once on the Edit button to resume.
- 53 -4.0 USING ELYSIUM FORMS
8. The Physical Exam is noted by marking either absent or present within
each category. If a field is not marked either (left blank), it is indicated as
not examined. The categories are:
a. Vascular
b. Neurological
c. Dermatological
d. Musculoskeletal
e. Biomechanical
9. Describe any Abnormalities.
10. Enter the Assessment.
a. If any tests were ordered, indicate them by clicking on the box to
the left of the description.
11. Enter the Plan.
12. Enter any Follow up plan.
13. If a note was dictated, click on the box to the left of Note Dictated.
14. Once complete, click once on Sign and Print.
- 54 -4.0 USING ELYSIUM FORMS
Diabetic Visit & Care Management
1. Click once on Care Management.
2. Verify Provider, Date/Time of service, and Subject.
3. To Update the Diabetic Registry click on the blue arrow to the left of
Update Registry to expand those fields.
a. Enter Education Date and By:
b. Enter Eye Exam Date and By:
c. Enter information of Self Management, Tobacco, and Medication
Intolerance.
4. Enter Vital Signs.
5. Enter any Nursing Notes.
*** Note: Steps 4-5 can be entered by the nurse / medical assistant. ***
1. Once fields are complete, the MA / nurse can click once on the Save button at the top of the
screen.
2. The Care Management form can be located in the providers “Awaiting Action” view.
3. Open the Care Management Form and click once on the Edit button to resume.
- 55 -4.0 USING ELYSIUM FORMS
6. The Glucose Log, Diet, and Activity fields can be populated by using the
drop down lists.
7. Enter all symptoms by clicking on the box to the left of the symptom. Use
None if applicable, leave blank if not addressed.
8. Enter in Examination details by clicking on the box to the left of the result.
Click None or Normal if applicable, leave blank if not examined.
9. Enter in any additional notes in the Provider Notes: field.
a. If notes were dictated, click on the box to the left of Notes Dictated.
10. Enter the Assessment and Plan.
11. Once complete, click once on Sign and Print.
- 56 -4.0 USING ELYSIUM FORMS
Patient History
1. Click on Patient History.
2. Choose the condition from the drop down list.
a. If the condition is not on the list, click once on Add New from the
list.
b. A blank box will appear to the right. Enter the condition in that
box.
3. Enter the Date the condition occurred and click once on the Add button.
4. The condition will then be added to the list directly under Past Medical
History.
5. Enter the Habits by using the drop down menus.
- 57 -4.0 USING ELYSIUM FORMS
6. Enter the Social History using the drop down lists.
a. Enter the patient’s resuscitation order if applicable.
b. If patient has a Power of Attorney, select Yes and enter the Name of
the POA in the Name: field.
7. Enter the Family History using the drop down list.
a. Choose the Condition, Relationship, and Age at Death.
b. Click once on the Add button.
8. Enter any preventative procedures under Prevention using drop down
list.
a. Enter the Date.
b. Click once on the Add button.
9. Enter any notes in the Notes: field.
10. Once complete, click once on Sign and Print.
- 58 -4.0 USING ELYSIUM FORMS
Office Transcription
1. Click once on Office Transcription.
2. Verify the Physician (provider name) and the Clinical date.
3. Enter the Work Type as applicable.
4. Use the large white box to free text the chart note.
a. This box can be used in conjunction with Dragon Speak.
5. Once complete, click once on Sign and Print.
- 59 -4.1 BUSINESS LETTERS
Business letters are template based. Fields that need to be completed are noted
in the body of the letter and marked with dollar signs ($) on either side of the
field name.
Each business letter has been duplicated from the FMG Business Office letters
available on the intranet.
Letters will need to be signed by the Clinic Manager and/or the Provider before
mailing to patients.
TO ACCESS BUSINESS LETTERS
1. From within the Patient Summary screen or within a patient’s document,
click once on the Create a New Office Memo button at the top of the
screen.
2. Click once on Business Letters.
ABUSIVE BEHAVIOR DISCHARGE PAGE 61
ALTERING A PRESCRIPTION DISCHARGE PAGE 63
DISCHARGE TO HMO PAGE 65
DRUG SEEKING BEHAVIOR DISCHARGE PAGE 67
MISSED REFERRAL APPOINTMENT PAGE 69
NON-COMPLIANCE TO TREATMENT DISCHARGE PAGE 71
NO SHOW LETTER – DISCHARGE PAGE 73
NO SHOW LETTER – FIRST MISSED APPOINTMENT PAGE 75
NO SHOW LETTER – REPEAT PAGE 77
- 60 -4.1 BUSINESS LETTERS
ABUSIVE BEHAVIOR DISCHARGE
1. Choose Abusive Behavior Discharge from the drop down list in the
Letter: field.
2. Click once on the Preview button.
a. The patient’s demographic information will populate automatically
within the body of the letter.
b. Any field within the letter that begins with $ and ends with $ needs
to be completed above in the fields above.
3. Complete the following fields:
a. Incident date:
b. Clinic Name:
c. Provider Name:
d. Clinic Manager:
4. Click once on the Preview button.
a. Review letter, complete any missed fields.
5. Click once on the Save button at the top of the page to see the letter
completed.
a. Once a letter is saved, it is routed to the provider’s Awaiting Action
for review.
- 61 -4.1 BUSINESS LETTERS
6. To print the letter:
a. Load letterhead into your local printer.
b. Click once on File, then Print.
7. This is how your letter will look:
- 62 -4.1 BUSINESS LETTERS
ALTERING A PRESCRIPTION DISCHARGE
1. Choose Altering a Prescription Discharge from the drop down list in the
Letter: field.
2. Click once on the Preview button.
a. The patient’s demographic information will populate automatically
within the body of the letter.
b. Any field within the letter that begins with $ and ends with $ needs
to be completed above in the fields above.
3. Complete the following fields:
a. Clinic Name:
b. Provider Name:
c. Clinic Manager:
4. Click once on the Preview button.
a. Review letter, complete any missed fields.
5. Click once on the Save button at the top of the page to see the letter
completed.
a. Once a letter is saved, it is routed to the provider’s Awaiting Action
for review.
- 63 -4.1 BUSINESS LETTERS
6. To print the letter:
a. Load letterhead into your local printer.
b. Click once on File, then Print.
7. This is how your letter will look:
- 64 -4.1 BUSINESS LETTERS
DISCHARGE TO HMO
1. Choose Discharge to HMO from the drop down list in the Letter: field.
2. Click once on the Preview button.
a. The patient’s demographic information will populate automatically
within the body of the letter.
b. Any field within the letter that begins with $ and ends with $ needs
to be completed above in the fields above.
3. Complete the following fields:
a. Insurance Name:
b. Insurance Address:
c. Insurance City:
d. Insurance State:
e. Insurance Zip:
f. Member ID name:
g. Provider Name:
h. Reason Statement:
i. Incident date:
j. Clinic Manager:
k. Provider name:
4. Click once on the Preview button.
a. Review letter, complete any missed fields.
- 65 -4.1 BUSINESS LETTERS
5. Click once on the Save button at the top of the page to see the letter
completed.
a. Once a letter is saved, it is routed to the provider’s Awaiting Action
for review.
6. To print the letter:
a. Load letterhead into your local printer.
b. Click once on File, then Print.
7. This is how your letter will look:
- 66 -4.1 BUSINESS LETTERS
DRUG SEEKING BEHAVIOR DISCHARGE
1. Choose Drug Seeking Behavior Discharge from the drop down list in the
Letter: field.
2. Click once on the Preview button.
a. The patient’s demographic information will populate automatically
within the body of the letter.
b. Any field within the letter that begins with $ and ends with $ needs
to be completed above in the fields above.
3. Complete the following fields:
a. Provider name:
b. Clinical manager:
4. Click once on the Preview button.
a. Review letter, complete any missed fields.
5. Click once on the Save button at the top of the page to see the letter
completed.
a. Once a letter is saved, it is routed to the provider’s Awaiting Action
for review.
- 67 -4.1 BUSINESS LETTERS
6. To print the letter:
a. Load letterhead into your local printer.
b. Click once on File, then Print.
7. This is how your letter will look:
- 68 -4.1 BUSINESS LETTERS
MISSED REFERRAL APPOINTMENT
1. Choose Missed Referral Appointment from the drop down list in the
Letter: field.
2. Click once on the Preview button.
a. The patient’s demographic information will populate automatically
within the body of the letter.
b. Any field within the letter that begins with $ and ends with $ needs
to be completed above in the fields above.
3. Complete the following fields:
a. Insurance name:
i. This will be the provider the patient was referred to.
b. Reason statement:
i. The reason the patient was seeing the provider
(consultation)
c. Insurance address:
i. List appointment date(s) (9/18/08 and 9/20/08)
d. Clinic phone number:
e. Clinical manager:
f. Provider name:
- 69 -4.1 BUSINESS LETTERS
4. Click once on the Preview button.
a. Review letter, complete any missed fields.
5. Click once on the Save button at the top of the page to see the letter
completed.
a. Once a letter is saved, it is routed to the provider’s Awaiting Action
for review.
6. To print the letter:
a. Load letterhead into your local printer.
b. Click once on File, then Print.
7. This is how your letter will look:
- 70 -4.1 BUSINESS LETTERS
NON-COMPLIANCE TO TREATMENT DISCHARGE
1. Choose Non-Compliance to Treatment Discharge from the drop down list
in the Letter: field.
2. Click once on the Preview button.
a. The patient’s demographic information will populate automatically
within the body of the letter.
b. Any field within the letter that begins with $ and ends with $ needs
to be completed above in the fields above.
3. Complete the following fields:
a. Provider name:
b. Clinical manager:
c. Incident date:
d. Clinic name:
4. Click once on the Preview button.
a. Review letter, complete any missed fields.
5. Click once on the Save button at the top of the page to see the letter
completed.
a. Once a letter is saved, it is routed to the provider’s Awaiting Action
for review.
- 71 -4.1 BUSINESS LETTERS
6. To print the letter:
a. Load letterhead into your local printer.
b. Click once on File, then Print.
7. This is how your letter will look:
- 72 -4.1 BUSINESS LETTERS
NO SHOW LETTER – DISCHARGE
1. Choose NS Letter – Discharge from the drop down list in the Letter: field.
2. Click once on the Preview button.
a. The patient’s demographic information will populate automatically
within the body of the letter.
b. Any field within the letter that begins with $ and ends with $ needs
to be completed above in the fields above.
3. Complete the following fields:
a. Provider name:
b. Clinical manager:
c. Reason statement:
a. The patient’s condition (i.e. None, Diabetes)
d. Clinic name:
4. Click once on the Preview button.
a. Review letter, complete any missed fields.
5. Click once on the Save button at the top of the page to see the letter
completed.
a. Once a letter is saved, it is routed to the provider’s Awaiting Action
for review.
- 73 -4.1 BUSINESS LETTERS
6. To print the letter:
a. Load letterhead into your local printer.
b. Click once on File, then Print.
7. This is how your letter will look:
- 74 -4.1 BUSINESS LETTERS
NO SHOW LETTER – FIRST MISSED APPOINTMENT
1. Choose NS Letter – First Missed Appt from the drop down list in the
Letter: field.
2. Click once on the Preview button.
a. The patient’s demographic information will populate automatically
within the body of the letter.
b. Any field within the letter that begins with $ and ends with $ needs
to be completed above in the fields above.
3. Complete the following fields:
a. Provider name:
b. Clinical manager:
c. Clinic name:
d. Clinic phone number:
e. Incident date:
4. Click once on the Preview button.
a. Review letter, complete any missed fields.
- 75 -4.1 BUSINESS LETTERS
5. Click once on the Save button at the top of the page to see the letter
completed.
a. Once a letter is saved, it is routed to the provider’s Awaiting Action
for review.
6. To print the letter:
a. Load letterhead into your local printer.
b. Click once on File, then Print.
7. This is how your letter will look:
- 76 -4.1 BUSINESS LETTERS
NO SHOW LETTER – REPEAT
1. Choose NS Letter - Repeat from the drop down list in the Letter: field.
1. Click once on the Preview button.
a. The patient’s demographic information will populate automatically
within the body of the letter.
b. Any field within the letter that begins with $ and ends with $ needs
to be completed above in the fields above.
3. Complete the following fields:
a. Clinic Name:
b. Provider Name:
c. Clinic phone number:
d. Incident date:
e. Number of Occurrences:
4. Click once on the Preview button.
a. Review letter, complete any missed fields.
- 77 -4.1 BUSINESS LETTERS
5. Click once on the Save button at the top of the page to see the letter
completed.
a. Once a letter is saved, it is routed to the provider’s Awaiting Action
for review.
6. To print the letter:
a. Load letterhead into your local printer.
b. Click once on File, then Print.
7. This is how your letter will look:
- 78 -5.0 DIRECT REFERRAL
Referrals can be sent from one Elysium provider to another. Within the Direct
Referral (aka Specialty Care Request) you can specify patient insurance, the
number of visits authorized, ICD-9 codes, and attach relative labs or dictation if
necessary.
The Direct Referral shows up as a Specialty Care Request within the referred
provider’s Awaiting Action view.
DIRECT REFERRAL (SPECIALTY CARE REQUEST)
1. From within the Patient Summary form (or any of the patient’s
documentation) click once on the Direct Referral button.
2. If the patient’s insurance information is in the system, it will pull into the
Direct Referral. If no insurance is in the system, you will be prompted to
enter the insurance information.
3. Enter the Provider Details.
a. Requesting Provider
b. PCP
i. If the PCP is the same as the Requesting Provider, click on
the Same as Above button.
c. Specialist
d. Note: If the provider name is not available from the drop down list,
use the address book to populate the field.
4. Enter the Number of Visits being authorized.
- 79 -5.0 DIRECT REFERRAL
5. Enter the Appointment Details.
a. Status (STAT, Urgent, Routine, or Retro)
b. Date of Service
i. Appt date if known
c. Click once on the box next to PRS Make Appointment if needed.
6. Choose the Procedure Requested by using the drop down list.
7. Enter in the diagnosis and click once on the Search button to see a list of
ICD-9 codes that match the diagnosis.
a. Select the correct code by clicking once on the code.
b. Once selected the code will appear under ICD-9 Code.
8. Additional notes or specific patient history can be entered in the Notes and
History: field.
9. Results and reports can be sent with the Direct Referral. Choose the Type
of result (or ALL) from the drop down list and click once on the Search
button.
- 80 -5.0 DIRECT REFERRAL
10. Select the document by clicking once on the description.
a. The document appears in list format
11. Enter any of the Office Use Only fields that are pertinent.
a. Tax ID#
i. Generally NPI number
b. L&I number
c. DSHS #
d. Authorization #
e. Start Date / End Date
f. If Authorization is needed, click once in the whit box next to
Authorization Needed.
12. Once complete, click once on Save and Send to send it to the specialist’s
office.
13. If you are partially done, you can click once on the Save as Draft button,
and the document will be routed to the provider’s Awaiting Action until
complete.
- 81 -5.1 DIAGNOSTIC IMAGING ORDER
Orders for Diagnostic Imaging can be entered into Elysium for tracking
purposes.
DI ORDER
1. From within the Patient Summary form, or one of the patient’s documents,
click once on the Order button.
2. Enter in the ordering provider in the Physician: field.
3. Choose the Performing Site.
4. Enter the Scheduled Appointment Date if known.
5. Use the address book next to the CC list: field to populate any carbon copies.
6. Verify the insurance information.
a. Enter any additional insurance information if necessary.
7. Enter the test by clicking in the white box to the left of the name of the test.
8. If a test is not listed, you can click once on the Order from Catalog button to
search for the test.
9. When complete, click once on the Place Order button at the top of the page.
- 82 -You can also read