User Manual AlterG Anti-Gravity Treadmill Product Via 400 and 400X
←
→
Page content transcription
If your browser does not render page correctly, please read the page content below
User Manual
AlterG Anti-Gravity Treadmill® Product
          Via 400 and 400X
This manual covers operation procedures for the following AlterG products:
    AlterG Anti-Gravity Treadmill, Via 400 and 400X

Copyright © 2018 by AlterG, Inc. All rights reserved.

Note: The following symbol is used throughout this manual to call attention to Warnings, Cautions or
operational procedures that may directly affect the safe operation of the Via 400 Anti-Gravity Treadmill.
Read and understand these instructions and statements before operating the Via 400 Anti-Gravity
Treadmill.

              Warning. Cautionary statement or operational procedure that may directly affect the safe
              operation of the treadmill.

Note: The Via 400 Anti-Gravity Treadmill has been tested to IEC medical standards for electrical safety.

IEC 60601-1:2005 + A1 2012
IP20

AlterG and Anti-Gravity Treadmill are registered trademarks in the US by AlterG, Inc.

D000348-00 Rev. C                                  9-July-2021                                              2
Table of Contents
Owner Responsibility .................................................................................................................................... 5
AlterG Contact Information............................................................................................................................ 6
Indications and Contraindications for Use .................................................................................................... 7
   Statement of Intended Use ....................................................................................................................... 7
   Indications for Use .................................................................................................................................... 7
   Precautions for Use .................................................................................................................................. 7
   Contraindications for Use ......................................................................................................................... 7
Safety: Warnings and Cautions..................................................................................................................... 8
Introduction.................................................................................................................................................. 10
   Things to Consider Before Beginning an Exercise Program .................................................................. 10
Setup and Installation.................................................................................................................................. 11
  Electrical Requirements .......................................................................................................................... 11
  Ground Requirements ............................................................................................................................ 12
  Danger .................................................................................................................................................... 12
  Location Requirements ........................................................................................................................... 12
  Transporting Your Anti-Gravity Treadmill ............................................................................................... 12
Principle of Operations ................................................................................................................................ 13
   Physics and Technology Behind the Anti-GravityTreadmill .................................................................... 13
   Differential Air-Pressure Technology ...................................................................................................... 13
   Pressure Regulation System .................................................................................................................. 13
   Air Seal Shorts ........................................................................................................................................ 14
Operating the Anti-Gravity Treadmill ........................................................................................................... 15
  Powering Up ........................................................................................................................................... 15
  Putting on the Shorts .............................................................................................................................. 15
  Stepping into the Treadmill ..................................................................................................................... 16
  Adjusting the Height of the Cockpit ........................................................................................................ 17
  Zipping into the Fabric Enclosure ........................................................................................................... 18
  Using the Safety Lanyard ....................................................................................................................... 19
  Operating the Treadmill and the Unweighting System ........................................................................... 19
  Stepping Out of the Treadmill ................................................................................................................. 23
Session Metrics ........................................................................................................................................... 24
  Session Metrics....................................................................................................................................... 24
  Calories ................................................................................................................................................... 24
  Heart Rate Monitoring ............................................................................................................................. 24
Operating HD Video Monitoring System ..................................................................................................... 26
  Getting Started ........................................................................................................................................ 26
  Focusing and Positioning Cameras ........................................................................................................ 26
  Camera Views......................................................................................................................................... 26
Operating Gait ............................................................................................................................................. 27
  Gait Measurements ................................................................................................................................ 27
  Gait Recording ........................................................................................................................................ 27
  Gait Features .......................................................................................................................................... 28
  Gait Reports ............................................................................................................................................ 28
Operating Pain ............................................................................................................................................ 29
  Pain Recording ....................................................................................................................................... 29
  Pain Results ............................................................................................................................................ 29
End-of-Session Reporting ........................................................................................................................... 30
  Creating End-of-Session Reports ........................................................................................................... 30
  Emailing Reports .................................................................................................................................... 31
  Saving to USB......................................................................................................................................... 31

D000348-00 Rev. C                                                          9-July-2021                                                                         3
Emergency Extraction Procedures ............................................................................................................. 32
  Emergency Scenarios ............................................................................................................................. 32
Facility Settings ........................................................................................................................................... 33
  Settings Menu Navigation ....................................................................................................................... 33
  Adjusting Display Layout – GUI Tab ....................................................................................................... 33
  Manage Emails – GUI Tab ..................................................................................................................... 34
  Tech Support – Support Tab .................................................................................................................. 35
  Restart App ............................................................................................................................................. 36
  Shutdown PC .......................................................................................................................................... 37
  Calibrate Deck Weight – Service Tab ..................................................................................................... 37
Calibration ................................................................................................................................................... 38
Wi-Fi Connectivity ....................................................................................................................................... 39
Labels, Locations, Interpretation ................................................................................................................. 40
Anti-Gravity Treadmill Maintenance ............................................................................................................ 43
  General Cleaning and Inspection ........................................................................................................... 43
  Cleaning the Windows ............................................................................................................................ 44
  Shorts ...................................................................................................................................................... 44
  Fabric Enclosure Maintenance ............................................................................................................... 44
Appendix A: Anti-Gravity Treadmill Specifications ...................................................................................... 46
Appendix B: Accessories and Options ........................................................................................................ 47
Appendix C: Troubleshooting ...................................................................................................................... 48
  Repairs .................................................................................................................................................... 48
  Diagnostic Codes .................................................................................................................................... 48
Appendix D: EMC Statement ...................................................................................................................... 49
Appendix E: Wi-Fi Specifications ................................................................................................................ 53
Appendix F: Warranty ................................................................................................................................. 54

D000348-00 Rev. C                                                           9-July-2021                                                                         4
Owner Responsibility
The AlterG® Via 400 Anti-Gravity Treadmill® product will perform as described in this manual and by
accompanying labels and/or inserts when it is assembled, operated, maintained and repaired in
accordance with the instructions provided. The Anti-Gravity Treadmill must be checked periodically as
described in this manual. A defective Anti-Gravity Treadmill should not be used. Parts that are broken,
missing, plainly worn, distorted or contaminated should be replaced immediately. Should such repair or
replacement become necessary, it is recommended that a request for service be made to AlterG, Inc. The
Anti-Gravity Treadmill, or any of its parts, should only be repaired in accordance with instructions provided
by AlterG, Inc., authorized representative of AlterG, Inc., or by AlterG, Inc. trained personnel. The Anti-
Gravity Treadmill must not be altered without the prior written approval of the AlterG, Inc. Quality
Assurance Department.
The owner of this product shall bear the sole responsibility for any malfunction, which results from
improper use, faulty maintenance, improper repair, damage, or alteration by anyone other than AlterG,
Inc. authorized representatives.
Any unauthorized maintenance, repairs or equipment modification activities may void the Anti-Gravity
Treadmill Product Warranty.

D000348-00 Rev. C                                  9-July-2021                                             5

AlterG Contact Information
AlterG welcomes your inquiries and comments. If you have any questions or comments, please contact
our service and support team.

AlterG Headquarters, Service and Support
48368 Milmont Drive
Fremont, CA 94538 U.S.
510 270-5900
www.alterg.com

D000348-00 Rev. C                              9-July-2021                                           6
Indications and Contraindications for Use
Statement of Intended Use
The AlterG Via 400 Anti-Gravity Treadmill provides unweighting of the user’s body weight in addition to
normal treadmill functions. The unweighting allows patients and individuals to do standing exercises,
walk, or run with reduced impact on their musculoskeletal system.

Indications for Use
•   Aerobic conditioning Sport specific conditioning programs
•   Weight control and reduction
•   Gait training and neuromuscular re-education in neurologic patients
•   Strengthening and conditioning in geriatric patients
•   Rehabilitation following injury or surgery of the lower extremity
•   Rehabilitation after total joint replacement

Precautions for Use
•   Cardiovascular disease or respiratory compromise
•   Exercise induced asthma or angina
•   Acute and chronic back problems
•   Ruptured or herniated disc
•   Safety and effectiveness in pregnant women has not been established
•   Safety and effectiveness for individuals with Functional Independence Measure score of 1 or 2
    (dependent of max assist) has not been established
•   Treadmill belt does not lock in place. Be sure patient is stable before turning off the treadmill and
    exiting
•   Heart rate monitor is not accurate
•   Any condition where increased intra-abdominal pressure may be a concern (for example urinary
    incontinence, pelvic floor dysfunction, pelvic floor reconstruction, or other conditions)

Contraindications for Use
•   Unstable fracture
•   Cardiovascular hypotension
•   Deep vein thrombosis

 “This appliance is not intended for use by persons with reduced physical, sensory or mental capabilities,
or lack of experience and knowledge, unless they have been given supervision or instruction concerning
use of the appliance by a person responsible for their safety. Keep children under the age of 13 away
from this machine.”

D000348-00 Rev. C                                   9-July-2021                                              7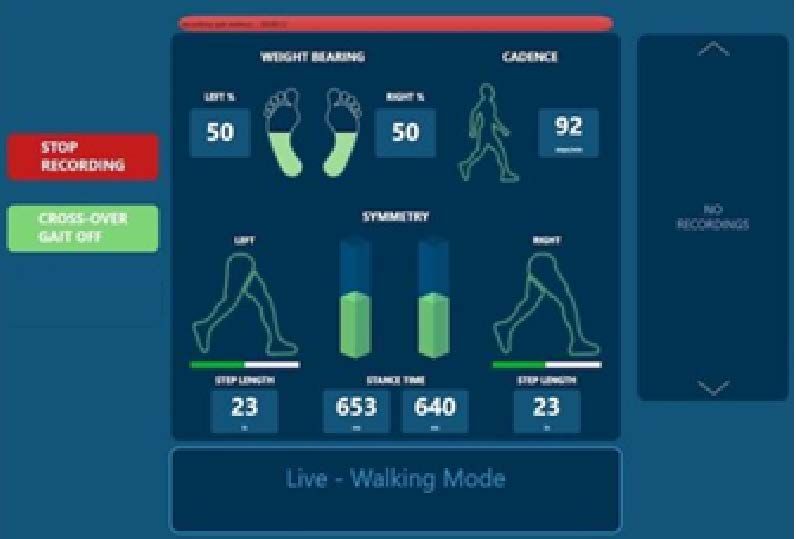
Safety: Warnings and Cautions
Before using the Anti-Gravity Treadmill, please read this manual. As a physical therapist, trainer, or
clinician (the operator of the product), you must understand the safety features and user interface. We
want you and your clients or patients (the users of the product) to have a safe and enjoyable exercise
experience.

              DANGER: Imminently hazardous situation to be avoided that will result in serious
              injury or death.

•   DO NOT modify the plug provided with the treadmill. The Anti-Gravity Treadmill requires a 20A 220
    VAC outlet protected by a 20-amp circuit breaker. The Anti-Gravity Treadmill comes equipped with a
    6-20P NEMA plug. If the provided plug will not fit in the outlet, have a proper outlet installed by a
    qualified electrician.
•   Do not use any electrical adapters. To do so could result in an electrical shock hazard.
•   Do not operate the Anti-Gravity Treadmill in wet or damp environments.
•   Do not operate the heart rate monitor transmitter in conjunction with an electrical heart Pacemaker or
    similar device. The transmitter may cause electrical disturbances, which can interfere with pacemaker
    function.
•   Note: the disconnect plug is accessible after installation. Always unplug all power to the Anti-Gravity
    Treadmill before cleaning or servicing.
•   Do not soak any part of the Anti-Gravity Treadmill with liquid during cleaning; use a sprayer or damp
    cloth. Keep all liquids away from electric components. Always unplug the machine before cleaning
    and maintenance.
•   Only an authorized technician should service the system.
•   Do not place any liquids on any part of the Anti-Gravity Treadmill.
•   Do not unplug or alter any of the internal wiring on the machine after installation.
•   Do not operate where aerosol (spray) products are being used or where oxygen is being
    administered.

              WARNING: Potentially hazardous situation to be avoided that could result in serious
              injury or death.

•   Consult with your physician before beginning any exercise program. This is particularly true if you
    have any of the following: history of heart disease, high blood pressure, diabetes, chronic respiratory
    disease, elevated cholesterol, if you smoke cigarettes, or have any other chronic disease or physical
    impairment.
•   If you experience dizziness, chest pains, nausea or any other abnormal symptoms while using the
    treadmill stop immediately. Consult a physician before continuing.
•   Close supervision is necessary when this appliance is used by, or near children, invalids, or disabled
    persons.
•   Use this appliance only for its intended use as described in this manual. Do not use attachments not
    recommended by the manufacturer.
•   Never operate this appliance if it has a damaged cord or plug, if it is not working properly, if it has
    been dropped or damaged, or dropped into water. Return or call a service center for examination and
    repair.
•   Do not carry this appliance by supply cord or use cord as a handle.
•   Keep the cord away from heated surfaces.
•   Never operate the appliance with the air openings blocked. Keep the air openings free of lint, hair,
    and the like.

D000348-00 Rev. C                                   9-July-2021                                               8
•   Never drop or insert any object into any opening.
    •   Do not use outdoors.
    •   Do not operate where aerosol (spray) products are being used or where oxygen is being
        administered.
    •   To disconnect, turn all controls to the off position, then remove all power to the unit.

                                       SAVE THESE INSTRUCTIONS

                  CAUTION: Potentially hazardous situation to be avoided that may result in minor or
                  moderate injury.

•   Consult a qualified electrician before using any extension cords. Long extension cords cause a voltage
    drop to the machine, which may cause it to operate improperly
•   ALWAYS USE THE EMERGENCY SAFETY LANYARD SUPPLIED WITH THE ANTI-GRAVITY
    TREADMILL! It should be attached to the user. This is very important for your safety in case you fall
    during your workout.
•   Read and understand all instructions before using the Anti-Gravity Treadmill.
•   Read and understand and test the emergency stop feature.
•   Inspect the Anti-Gravity Treadmill for worn or loose components prior to use. Tighten/replace any worn or
    loose components or bolts prior to use.
•   Pregnant women or women who may be pregnant should consult their physician before using the Anti-
    Gravity Treadmill.
•   The Anti-Gravity Treadmill must be used under the supervision of a properly trained operator. At no time
    should a user of the machine exercise without appropriate supervision; even if having been previously
    trained in the proper operation of the device.
•   Set up and operate the Anti-Gravity Treadmill on a solid, level surface.
•   Keep all loose clothing and towels away from the treadmill running surface. DO NOT store anything (like
    shorts) inside the bag.
•   Prior to beginning a workout, check to make sure there is no debris inside the Anti-Gravity Treadmill.
•   Always keep the running surface clean.
•   Keep the area around the treadmill clear. Make sure you leave at least 2 feet on either side of the Anti-
    Gravity Treadmill to accommodate bag expansion during inflation.
•   Keep hands away from the bag and frame structure during inflation to avoid pinching.
•   Keep hands away from all moving parts.
•   Do not remove the cover or bag unless instructed to do so by an AlterG Technician.
•   Wear proper athletic shoes, such as those with rubber or high-traction soles. Do not use shoes with heels
    or leather soles. Make sure no stones or sharp objects are embedded in the soles.
•   As with any treadmill workout, include a cool-down phase at the end of your exercise session. Return to
    full body weight and exercise moderately before stopping. Avoid abruptly ending or pausing your workout
    while at reduced body weight or high speed.
•   The safety and integrity of the machine can only be maintained when the Anti-Gravity Treadmill is
    regularly examined for damage and wear and is properly repaired. It is the sole responsibility of the
    user/owner or facility operator to ensure that regular maintenance is performed. Worn or damaged
    components must be replaced immediately, and the Anti-Gravity Treadmill removed from service until the
    repair is made. Only manufacturer supplied or approved parts should be used to maintain and repair the
    Anti-Gravity Treadmill.

                                           SAVE THESE INSTRUCTIONS

    D000348-00 Rev. C                                   9-July-2021                                             9
Introduction
Things to Consider Before Beginning an Exercise Program
Consult a Physician
Anyone considering an exercise program or an increase in activity should consult a physician. It is highly
recommended that users follow the guidance of their physician before and during an exercise program or
any other increase in physical activity if they:
•     Have heart disease, high blood pressure, diabetes, chronic respiratory disease or elevated
      cholesterol
•     Smoke cigarettes
•     Are currently inactive, are obese, or have any other chronic disease or physical impairment, of if there
      is a history of such disease in their family

Consult a Professional Fitness Trainer
In addition to following the recommendations of a physician, it is advisable to consult a professional
fitness instructor or personal trainer to develop an overall fitness evaluation/wellness program that is
tailored to your particular needs.

Understanding the Importance of Warming Up and Cooling Down
It is important that users gradually warm up, cool down, and incorporate a series of stretches prior to and
at the end of each workout. Stretching encourages the necessary flexibility to help prevent sore muscles
and injury during daily activities.
Do not abruptly end your exercise session on the Anti-Gravity Treadmill. The user’s full body weight
should be restored slowly and should include a few minutes of walking at full body weight and low
intensity before stopping the workout session.

How Often and for How Long Should You Exercise?
The American College of Sports Medicine recommends a frequency of 3 to 5 days per week for duration
of 20 to 60 minutes, dependent on the intensity of the exercise session. 1 The United States Department
of Agriculture suggests that physical activity should be moderate or vigorous and add up to at least 30
minutes a day. The USDA defines moderate as walking briskly at about 3.5 miles per hour while vigorous
activity is running or jogging at 5 miles per hour. 2 These are general guidelines; you should determine
what is appropriate for you with the help of your physician.

1   Medicine & Science in Sports & Exercise. Volume 30 (6) pages 975-991, 1998
2   http://www.mypyramid.gov/pyramid/ physical_activity.html

D000348-00 Rev. C                                     9-July-2021                                          10
Setup and Installation
An AlterG qualified technician will install the AlterG Anti-Gravity Treadmill after delivery. Please make
sure that you inspect the Anti-Gravity Treadmill upon delivery for any damage that may have occurred
during transportation. Take pictures and immediately report any damage to the shipping company and
AlterG. When you sign for the shipment of your Anti-Gravity Treadmill, you are taking responsibility for
any damage that may occur before installation.
Electrical Requirements
The recommended electrical outlet/power source for the AlterG Anti-Gravity Treadmill is a 20 ampere,
220VAC @ 50/60 Hz dedicated circuit with ground. The plug supplied with the AlterG Anti-Gravity
Treadmill is designated by the NEMA configuration system as 6-20P. The corresponding receptacle for
the plug is a NEMA 6-20R.
International systems are shipped with the NEMA 6-20P. An appropriate plug for the country and facility
in question should be wired as follows:
Black Conductor: Line
Black Conductor: Line
Green/Yellow Conductor: Ground
Customer Via 400 2 Connector
Cable (mm ) Region
Circuit Rating Type
4
US,
20A 16A LAPP USA # 321203
Canada
ANIXTER # 4A-1203EC-UL
≥ 1.5 2.5
16A 12.8A LAPP USA # 321203 EU (DEU)
ANIXTER # 4A-1203EC-UL
≥ 1.5 2.5
13A 10.4A LAPP USA # 321203 UK
ANIXTER # 4A-1203EC-UL
No Plug Required on 20A Switch Spur
2.5
32A 16A LAPP USA # 321203 UK (ring)
ANIXTER # 4A-1203EC-UL
IEC 60309 male plug
32A 16A ≥ 4.0 UK (ring)
D000348-00 Rev. C 9-July-2021 11Ground Requirements The Anti-Gravity Treadmill must be grounded electrically. If there is an electrical malfunction, grounding provides a path of least resistance for electric current to reduce the risk of electric shock. The Anti-Gravity Treadmill is equipped with a power cord with a grounded plug (domestic systems). This plug must be plugged into an appropriate receptacle (NEMA 6-20R) that is properly installed and grounded in accordance with the current National Electrical Code as well as all local codes and ordinances. If you are at all unsure of these requirements, contact AlterG for clarification. Danger Improper connection of the equipment-grounding conductor can result in a risk of electric shock. Check with a qualified electrician or serviceman if you are in doubt as to whether the product is properly grounded. Do not modify the plug provided with the product; if the plug will not fit the outlet, have a proper outlet installed by qualified electrician. Location Requirements The Anti-Gravity Treadmill is 38” (96.5cm) wide and 84” (213cm) long. It weighs approximately 750lbs (340kg). It needs to be placed on a structurally sound surface. If it is used above ground level it is advisable to place it near the corner of the room or where the floor will be strongest to ensure maximum support during high-speed, high-impact use. The surface should be level to ensure minimal flexing of the Anti-Gravity Treadmill frame. It is recommended that the Anti-Gravity Treadmill be placed on a rubber mat or padded indoor/outdoor style carpet. The front of the Anti-Gravity Treadmill needs to be within 10ft (3.05m) of the proper electrical outlet. Check with a qualified electrician or AlterG if you plan on extending the cord in any way. Make sure you leave at least 24” (61cm) on either side of the Anti-Gravity Treadmill to allow the bag to expand during inflation. Allow 40” (101.5cm) behind the Anti-Gravity Treadmill to accommodate a user getting in and out of the Anti-Gravity Treadmill system safely. We recommend an area at least 12ft (3.66m) long by 8ft (2.44m) wide to provide adequate space for operation and user access. Also check ceiling height to ensure users will not hit their heads. The treadmill surface is approximately 8” (20cm) off the floor when level and can be higher when the user is running on a grade. An 8ft (2.44m) ceiling may be too low for taller users. Transporting Your Anti-Gravity Treadmill Contact AlterG if you plan on moving your Anti-Gravity Treadmill. Damage sustained by improperly moving the Anti-Gravity Treadmill will not be covered by your warranty. D000348-00 Rev. C 9-July-2021 12
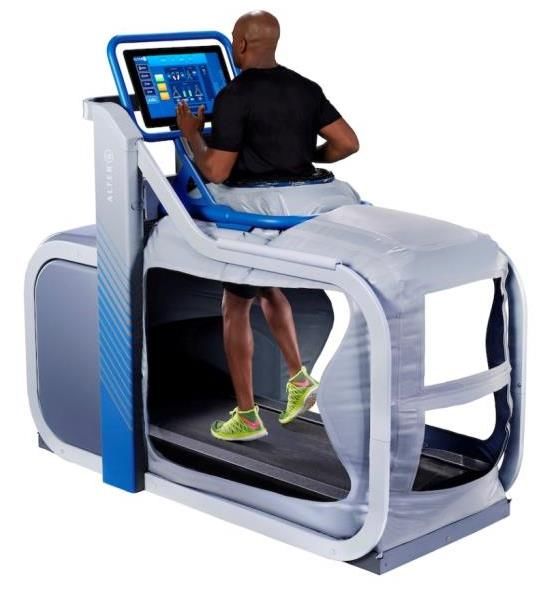
Principle of Operations
AlterG’s technology was originally conceived as part of an effort to help NASA’s astronauts maintain
fitness during prolonged space flight. AlterG pioneered the concept of combining this technology with an
advanced pressure regulation system and treadmill into a machine that provides the most effective and
comfortable body weight support system available today.

Physics and Technology Behind the Anti-GravityTreadmill

Differential Air-Pressure Technology
The physical lifting force generated by the Anti-Gravity Treadmill comes from a difference in air pressure
around the user’s upper and lower body. The Anti-Gravity Treadmill uses this methodology, known as
Differential Air Pressure (DAP) technology to unweight the user.
An inflatable fabric enclosure covers the treadmill. In the middle of the enclosure is a hole through which
the user steps onto the surface of the treadmill. The user wears a special pair of shorts, and these shorts
are zipped into the hole in the enclosure. A blower is used to inflate the enclosure. The pressure
generated in the inflated enclosure provides a lifting force against the body. Because the pressure is only
slightly above atmospheric and evenly distributed, the force on the lower body is almost imperceptible.
The Anti-Gravity Treadmill provides a level of comfort while exercising unmatched by other unweighting
systems.

Pressure Regulation System
AlterG has developed an advanced and very sophisticated pressure regulation system that ensures the
Anti-Gravity Treadmill has extremely accurate weight control with good reproducibility between sessions.
When you run in the Anti-Gravity Treadmill, the natural bouncing motion of your body changes the shape
and volume of the bag. This effect would change the interior pressure of the bag and your effective
exercise weight if it were not for the pressure regulation system in the Anti-Gravity Treadmill that monitors
and reacts to these changes. This technology makes rapid adjustments to the bag pressure, maintaining
the pressure in the bag and your exercise body weight at near constant levels.

D000348-00 Rev. C                                  9-July-2021                                             13
Air Seal Shorts
To seal users into the Anti-Gravity Treadmill in a comfortable and convenient manner, AlterG has
designed a special pair of shorts. These create an airtight environment around the lower body, and the
zipper provides a mechanism to quickly attach and detach from the enclosure. The shorts are easy to
take on and off and sealing with the machine is as simple as zipping up a jacket. The shorts are similar to
those worn by many professional athletes for compression and support during training activities.
Shorts are manufactured using the following materials: 90% Neoprene, 10% Urethane coated Nylon.

D000348-00 Rev. C                                 9-July-2021                                            14
Operating the Anti-Gravity Treadmill
Powering Up
The main power switch is located at the front over of the Anti-Gravity Treadmill. Switch it on to start the
system.

Before you turn on the Anti-Gravity Treadmill, you must do the following:
1. Make sure there is no one standing on the treadmill when you power up the system.
2. Make sure the cockpit is locked in its topmost position, so the inflatable enclosure is not sitting on the
   treadmill surface.
The computer that controls the Anti-Gravity Treadmill weighs the treadmill when the system is first turned
on. The computer will receive an erroneous reading if either the fabric enclosure or an individual is on the
surface of the treadmill. The proper location of the cockpit on power-up is shown in the photo.

Note: After the power switch is turned on, wait 30 seconds before the user attempts to enter the treadmill.
The system requires 30 seconds to run a series of diagnostic tests.

Putting on the Shorts
Your Anti-Gravity Treadmill comes with dedicated shorts that ensure an airtight seal in the fabric
enclosure. Slip the shorts on in the same manner as a conventional pair. The life of the shorts will be
extended, and they will be easier to get on if you first remove your shoes.

D000348-00 Rev. C                                   9-July-2021                                               15
Note: End of Life Product Disposal: AlterG products contain no waste or residual materials. The products
have significant recoverable and recyclable elements. Consult your distributor for the safe and
appropriate disposal of product no longer in service.
Select a short size that is snug but not uncomfortable and make certain the tag is at your back and on the
inside of the shorts. The long tail of the zipper should be in front. It is advisable that you wear a pair of
running shorts or tights under the AlterG shorts.
Stepping into the Treadmill
Lower the cockpit so it compresses the bag against the treadmill surface. Push it all the way down for
ease of entry. Enter from the back and step into the opening in the fabric enclosure. It is fine to step on
the fabric as you enter, but make sure that you have no rocks or sharp objects embedded in the soles of
your shoes that could mar or damage the bag.
Step over the cockpit
and into the hole in
the enclosure.
Step on this surface
to enter.
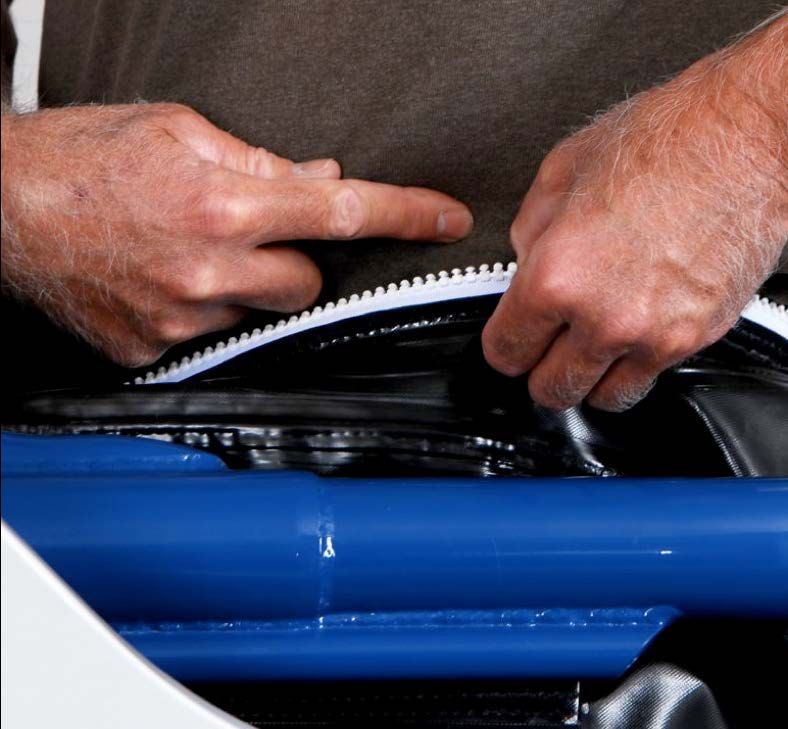
D000348-00 Rev. C 9-July-2021 16Adjusting the Height of the Cockpit
The cockpit slides up and down on a bearing system and is counter-weighted to make it easy to lift.
CAUTION: Before lifting the cockpit, ensure that the cockpit lock is in the open
position, all the way to the left side of its travel. If it is not fully locked, it may
engage in the lowest position as you lift.
Cockpit lock in
open position
Stand centered in the hole in the fabric enclosure facing forward with both feet on the treadmill belt.
Lower yourself by bending at the knees and grasp the cockpit on either side. With a straight back and
good lifting technique, lift the cockpit to the appropriate height and engage the lock by pulling the lock
lever to the right. Do not force the lever. You may have to “jiggle” the cockpit up and down slightly to get
the lock pins to engage. When fully enaged, the lock lever will be positioned all the way to the right in the
slot.
Cockpit lock in closed
or locked position
D000348-00 Rev. C 9-July-2021 17There is a range of heights at which the cockpit can be placed. For greatest freedom of movement, place
the top of the cockpit frame slightly below the greater trochanter of the femur as shown in the photo.
Top surface of cockpit
slightly below greater
trochanter
For more support and stability place the cockpit in a higher position. Some users use the iliac crest as a
reference point. Pull up on the zipper sewn to the enclosure and align the zipper with the iliac crest as
shown in the photo.
Zipper at level
of iliac crest
You should never attempt to move the cockpit while the fabric enclosure is inflating or when fully inflated.
If you discover while you are exercising that you need to reposition the cockpit, you will have to pause or
stop the workout, re-adjust the height of the cockpit and start again.
Zipping into the Fabric Enclosure
When the cockpit is in place, zip yourself into the Anti-Gravity Treadmill. The zipper should be started at
the front and center of your body and zipped counterclockwise all the way around until it returns to
overlap in the front. Make sure that the zipper is completely closed.
D000348-00 Rev. C 9-July-2021 18Using the Safety Lanyard
ALWAYS use the magnetic safety lanyard supplied with the machine. Attach the spring clip to the front of
clothing and place the red magnet on the circular locator labeled “Emergency Stop”.
The lanyard and magnet serve as a safety switch mechanism. If you become uncomfortable during
exercise you can pull on the lanyard to displace the magnet and stop the system. Should you fall while
exercising, the magnet will be pulled from the console and the system will stop.
Lanyard to be
clipped to clothing
WARNING: NEVER attempt to defeat this critical safety feature by attaching the
lanyard to the structure of the machine or anywhere else besides your clothing.
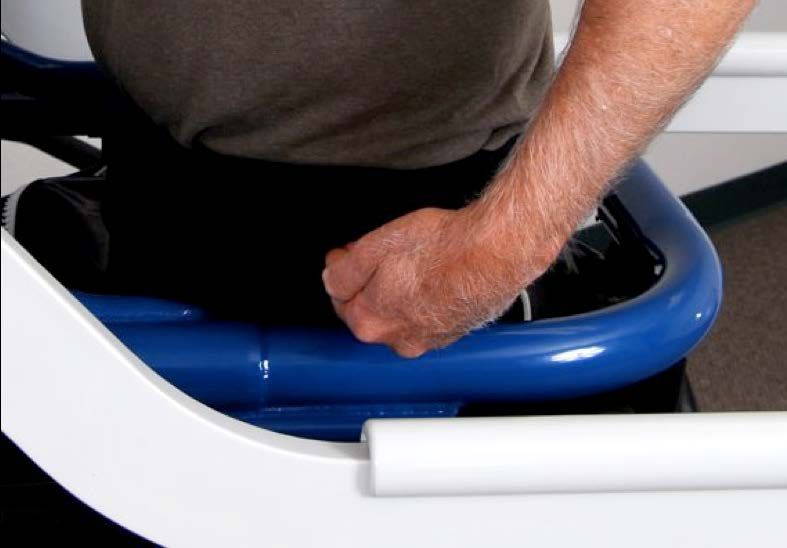
Operating the Treadmill and the Unweighting System
Tap START SESSION Tap SELECT WORKOUT
to begin to use a preprogrammed
workout
All treadmill and pressure functions are controlled from the touch monitor. Prior to accessing treadmill and
gait controls, weight calibration must be done.
D000348-00 Rev. C 9-July-2021 19Operator or User Action Screen
1. PREPARATION FOR EXERCISE.
Before you begin, stand still on the surface of the
treadmill belt. Do not hold onto or support yourself
on any part of the system structure. The system
weighs you prior to exercise and the treadmill must
support your full body weight.
2. BEGINNING THE EXERCISE SESSION.
Tap START CALIBRATION to begin the exercise
session. The Anti-Gravity Treadmill will proceed
with a calibration routine that allows the system to
determine the relationship between enclosure
pressure and your body weight. You will feel the
pressure in the bag change as the system
calibrates. It is best to cross your arms while the
routine runs to avoid touching any part of the
structure and ruining the calibration.
You will be promptly notified when the calibration
sequence is complete, tap START SESSION to
start your workout session. Inactivity will cancel
your completed calibration.
This screen also displays your lower body weight
limit.
D000348-00 Rev. C 9-July-2021 20Operator or User Action Screen
The controls on the Main Screen are shown below.
Session Metrics
Treadmill and Body
Weight Controls
Main Display
Navigation Bar
3. ADJUST YOUR BODY WEIGHT.
Adjust your body weight with the up arrow and
down arrow button controls. Tapping up arrow
increases your body weight and tapping down
arrow decreases your body weight. Your body
weight is displayed as a percentage of your full
body weight. You can adjust your body weight at Tap up arrow to
any time during your exercise session. increase body
weight, tap down
arrow to decrease
CAUTION: At 40% body weight and body weight
lower, you can become unstable if
you jump or perform any other % of your full
activity besides walking or running. body weight
Reduce your body weight percentage
slowly so you can become
accustomed to the new sensation
and adjust your gait mechanics
accordingly.
4. SELECT TREADMILL DIRECTION.
When the treadmill turns on, it is programmed for
forward ambulation. To walk backwards, tap down
arrow until it displays negative numbers.
D000348-00 Rev. C 9-July-2021 21Operator or User Action Screen
5. ADJUST TREADMILL SPEED.
Adjust treadmill speed using the up arrow and
down arrow button controls. In the forward
direction, speed will increase in 0.1mph (0.16km/hr)
increments for each button tap. When the treadmill
is programmed in reverse, speed will increase in
0.1mph (0.16km/hr) increments up to a maximum
of 3mph (4.8km/hr). Holding either button down for
more than 2 seconds causes the speed to
increment or decrement at a faster rate.
Note: For speeds above a value of 10 (for both Tap up arrow to
mph and kph), the speed display alternates increase speed, tap
between the integer and fractional speed setting. down arrow to
decrease speed
6. ADJUST TREADMILL INCLINE.
Tap up arrow to increase incline and tap down Tap up arrow to
arrow to decrease incline. Holding the button down increase incline, tap
for more than 2 seconds will cause incline to down arrow to
change at a more rapid rate. decrease incline
Note: Treadmill incline cannot be adjusted greater
than 5% if speed is set for less than 0.5mph
(0.8km/hr).
7. ENDING OR PAUSING THE EXERCISE
SESSION.
Before stopping your session, return the treadmill
to 0% incline. Tap STOP to end the exercise
session.
To place the treadmill in pause mode, tap PAUSE.
The tread belt will stop, but all statistical information
will be preserved. Body weight support is
maintained while the treadmill is paused. To
resume the exercise session, tap PAUSE.
Tap STOP to end
exercise session
Tap PAUSE to
pause treadmill
D000348-00 Rev. C 9-July-2021 22Stepping Out of the Treadmill 1. Wait for the tread belt to stop and the enclosure to fully deflate before exiting the system. 2. Unzip your shorts and pull the top “skirt” of the shorts from under the enclosure lip. 3. Open the cockpit lock to disengage it from its locked position. 4. Lower the cockpit onto the surface of the tread belt, turn around and exit to the rear of the system. 5. After exiting the system, return the cockpit to an upright, locked position. D000348-00 Rev. C 9-July-2021 23
Session Metrics
The session screen gives you a graphical overview of body weight, speed, and inclines. It also includes
information on your average speed, calories burned, and total distance.

Session Metrics
The session metrics, by default, is displayed on the top portion of the screen. The session time, calories
burned, pace, distance traveled, and heart rate are displayed. Alternative layouts can be set in the facility
setting. For more information, see “Adjusting Display Layout – GUI Tab”.

Calories
The calorie count displayed takes into account your body weight percentage and treadmill speed, incline,
and distance. As a result, the calories burned reading is more accurate when compared to exercise
equipment that does not include these parameters.
Reference http://42.195km.net/e/treadsim/ for more information on how the Via 400 calculates calories
burned.

Heart Rate Monitoring
Heart Rate Monitor
The Anti-Gravity Treadmill display is designed to receive a user’s heart rate in conjunction with the use of
a Polar® (Chest Strap) Heart Rate Monitor. 3 Polar chest straps can be purchased at most popular
sporting goods stores or online. For the screen to correctly display a user’s heart rate, the receiver within
the display must obtain a stable heart rate signal from the Polar transmitter. The Polar Heart Rate System
consists of two elements, 1) the sensor/transmitter and 2) the receiver within the Anti-Gravity Treadmill
display.

3   Polar® is a registered trademark of Polar Electro, Inc. Lake Success, NY

D000348-00 Rev. C                                        9-July-2021                                       24
How to Wear the Chest Strap Transmitter
The Sensor/Transmitter is worn just below the chest and at the top of the abdomen, directly on bare skin
(not over clothing). The transmitter should be centered below the pectoral muscles. After you secure the
strap around your chest pull it away from your chest by stretching the band, and moisten the conductive
electrode strips with plain water. The transmitter operates automatically while you are wearing it; it does
not operate while it is disconnected from your body. However, as moisture may activate the transmitter
and salt buildup from sweat can be a problem, rinse the transmitter with water and wipe it dry after use.
The chest band is washable. After you have detached the transmitter, wash the band in warm water using
mild soap and rinse thoroughly in clean water.

The Receiver
You must be within two and a half feet of the receiver for the signal to be received. Please take note that
your transmitter may fluctuate erratically if you are too close to other Polar equipment. Maintain at least a
three-foot distance between other Polar units.
Note: Erratic heart rate reception may occur if the Polar Monitor is too close in proximity to strong
sources of electromagnetic radiation, such as television sets, Personal Computers, electric motors and
some other types of fitness equipment. Only one transmitter should be used inside the range of any one
receiver as the receiver may pick up several signals simultaneously, causing an inaccurate readout.

              CAUTION: The heart rate obtained while on the AlterG Treadmill is for reference
              only. No medical treatment or diagnosis should be based on the Polar Monitor.

D000348-00 Rev. C                                  9-July-2021                                             25
Operating HD Video Monitoring System
Getting Started
Operator or User Action Screen
To view the camera, tap VIDEO on the navigation bar.
Focusing and Positioning Cameras
There is a single camera on the Via 400 Anti-Gravity
Treadmill. The front camera is mounted on the inside of
the bag and focused at the factory before shipment.
Camera Views
The front camera is permanently affixed
inside the treadmill bag. The video feed
will be displayed on the touch monitor
on the main display window.
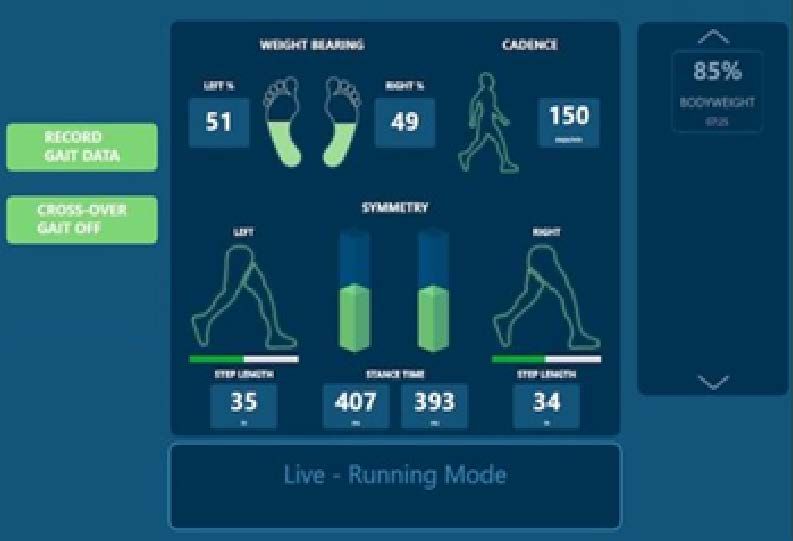
D000348-00 Rev. C 9-July-2021 26Operating Gait Gait Measurements The Anti-Gravity Treadmill measures the following: • Weight bearing symmetry • Cadence • Stance time symmetry • Step length symmetry To view Gait, tap GAIT on the navigation bar. Gait measurements are a display of the last 3 steps on each foot. NOTE: Gait features are intended for use at moderate walking speeds only. Gait Recording Users can record as many gait reports as they want. There is no time limit to the length of the recording. To record a gait report, navigate to the gait page and tap RECORD GAIT DATA. A red bar will appear at the top of the screen signaling that gait is currently being recorded. Tap STOP RECORDING when you want to stop recording. You can adjust any of the treadmill controls while recording (body weight %, incline, and speed). We recommend recording different reports so that you can see the effect of body weight, incline, or speed on gait symmetry. When you have completed your recording, reports are automatically listed to the right of the data screen. D000348-00 Rev. C 9-July-2021 27
Gait Features
There is one additional feature for different use cases on the Gait Screen.

 Cross-over gait. If you have a patient
 with scissoring gait (foot crosses the
 midline when planted), tap CROSS-OVER
 GAIT. The button is highlighted in orange
 when in effect. This allows the software to
 identify the right foot when the left load
 cells detect weight, and the left foot when
 the right load cells detect weight.

Gait Reports
 To view previous Gait Reports, navigate to
 the Gait screen. All reports are listed to the
 right of the Gait Data.
 Select which gait report(s) you want to
 review from the thumbnails.
 A summary of that data session will display
 on the screen. This is an average of each
 of the gait measurements over the duration
 of your recording. (i.e., If you recorded for
 30 seconds, this is a summary of your gait
 symmetry over those 30 seconds).
 The thumbnails are labeled with the
 starting body weight % and session time of
 your recording to allow you to easily locate
 the report you want to view.
 Note: You will be able to email or save gait
 reports at the end of your session (for
 more information, see “Creating End-of-
 Session Reports”).

D000348-00 Rev. C                                 9-July-2021                 28
Operating Pain
Pain Recording
 To record pain levels during the exercise session, tap
 PAIN on the navigation bar.
 Pain can be recorded on a scale of 0-10 (0 = no pain,
 10 = maximum pain). To record pain, select a number
 from 0-10 and tap SET PAIN LEVEL.
 There are no prompts during the session to remind you
 to input pain. It is up to the therapist to ask the patient to
 set their pain levels throughout the session.
 After you have set the pain level, the View Results page
 is displayed.

Pain Results
 To review previous pain recordings, tap VIEW RESULTS.
 A graph displays all recorded pain results. The graph displays pain
 in relation to approximate body weight %. (for example, If you
 recorded a pain level of 8 at 93% body weight, the number 8 is listed
 between 90% and 100%).
 Tolerance is also displayed. This is a measurement of the body
 weight % where the patient felt the least amount of pain.
 Note: Pain results are automatically included when you email or
 save your end-of-session reports (for more information, see
 “Creating End-of-Session Reports”).

D000348-00 Rev. C                                     9-July-2021        29
End-of-Session Reporting
The end-of-session report is a summary of your session details. At the end of your exercise session, you
have the opportunity to email or save a copy of your session report, gait data, and pain measurements
captured during your session. It will be sent to you by email or saved to USB in PDF format. There will be
no patient or athlete name on the report.
Any session reports not emailed or saved at the end of the session will be deleted.
Estimated wait time to email reports is approximately 20 seconds, depending on your Wi-Fi connection.
Please be patient and confirm all data has been sent before exiting the treadmill.

Creating End-of-Session Reports
                Operator or User Action                                         Screen

 1. To create a report, tap CREATE REPORT.

 2. Select the reports you want to email or save by
    tapping the thumbnails you want. Selected
    thumbnails are highlighted. You can send as many
    reports as you want.
 3. After you have selected all of your items, tap SEND
    BY EMAIL, or tap EXPORT TO USB to save to
    USB.

D000348-00 Rev. C                                 9-July-2021                                           30
Emailing Reports
Operator or User Action Screen
1. If you select Send by Email, enter a report name in the
Create Report screen. We recommend a non-identifiable
patient ID (for example, 12345), or the session time and
date (for example, 181205 02:00). This will help you
identify the patient. We recommend emailing the
information to yourself and later attaching it to the patient’s
EMR.
2. Enter your email address, and tap SEND REPORT.
Saving to USB
Operator or User Action Screen
1. If you select Export to USB, enter a report name in
the Create Report screen. We recommend a non-
identifiable patient ID (for example, 12345), or the
session time and date (for example, 181205 02:00).
This will help you identify the patient.
2. Tap SAVE REPORT.
Note: You can save as many reports as you want, as
long as there is enough space on your thumb drive.
D000348-00 Rev. C 9-July-2021 31Emergency Extraction Procedures
In the unlikely event that a patient becomes immobilized in the Anti-Gravity Treadmill, please refer to the
urgent steps below to secure the situation before calling +1510.270.5900 or referring to alterg.com.
IMPORTANT NOTES:
1. Do not unlock the cockpit until you read further.
2. The treadmill belt on the Via series does not lock in place, so secure it by holding your foot
against it at the rear of the treadmill.
Emergency Scenarios
There are two likely scenarios in which a patient may require urgent help with getting out of the Anti-
Gravity Treadmill:
Scenario 1
The patient falls or becomes fatigued to the point of inability to exit the treadmill before the air chamber is
inflated with air.
Option 1: If the patient can stand, stop the treadmill and secure the belt with your foot. Help the patient
exit the treadmill.
Option 2: Prevent the belt from moving by securing it with your foot. Remove the bag rods at the
treadmill base.
Option 3: Prevent the belt from moving by securing it with your foot. Cut the air chamber and help the
patient exit the treadmill.
Scenario 2
The patient becomes fatigued to the point of inability to exit the treadmill after the air chamber is inflated.
Reduce the body weight percentage to less than 40% and have the patient sit down in place until they re-
gain their strength and can exit on their own.
D000348-00 Rev. C 9-July-2021 32Facility Settings
Operator or User Action Screen
1. To access all setting screens, return to
the home screen and double-tap on the
upper-left corner of the screen.
2. A keypad will pop up. Enter code 5900.
Upon entering the Settings menu, you will be
greeted with a number of configurations and
options.
Settings Menu Navigation
Your facility will have limited access to the Settings navigation bar to aid in troubleshooting and
diagnostics. You will be granted access to the GUI, Support and Service and other highlighted tabs.
Inaccessible Tabs and Buttons will be grayed out.
Adjusting Display Layout – GUI Tab
AlterG has set the default layout in the factory to the first setting listed. Alternative layouts can be made to
the navigation bar, Session Metrics and the Treadmill controls. Below is an example of a selected session
layout.
D000348-00 Rev. C 9-July-2021 33To select an alternative layout, tap Change Layout adjacent to the layout you want.
You can also change from Metric or Standard units by toggling the Use Metric Units button.
Manage Emails – GUI Tab
Operator or User Action Screen
Shorten the End-of-Session process by pre-
programming your staff’s email addresses.
This allows you to select email addresses
from a pre-programmed list and reduce the
amount of time spent entering data.
1. Select the GUI Tab.
2. Tap Manage Emails.
3. Enter the clinician’s name and email address and tap ADD.
D000348-00 Rev. C 9-July-2021 34Operator or User Action Screen
4. You have the option of displaying the pre-programmed list
by name or by email.
Tech Support – Support Tab
If you are experiencing issues with your Stride Smart system and are connected to Wi-Fi, our Service
Team may be able to get remote access and help you troubleshoot your unit.
Please call our Service Team at (510) 270-5369 if you would like to grant them remote access. They can
walk you through the procedure below.
D000348-00 Rev. C 9-July-2021 35Operator or User Action Screen
1. In Facility Settings under the Support Tab, tap Tech Support.
Within 5 seconds you should see a TeamViewer window pop up. After
another 5-10 seconds, the ID and password fields will auto-populate.
2. Read the ID and password back to your technician. This will allow them
to connect to your unit and control the screen.
Restart App
Operator or User Action Screen
If you are experiencing issues with Stride Smart, we may ask you to restart
your device. To do this, tap Restart App.
D000348-00 Rev. C 9-July-2021 36Shutdown PC
We have designed the Anti-Gravity Treadmill to remain on at all times. The computer and the displays
draw exactly 45W, which is less than a 60W light bulb.
Operator or User Action Screen
Shutdown PC should only be used if Stride Smart and the Anti-Gravity
Treadmill must be powered down. Please shut down the unit before
unplugging anything from the wall.
The system will start automatically after it is plugged back into the wall.
Calibrate Deck Weight – Service Tab
If you are experiencing issues with calibration, you may need to recalibrate the deck weight. Please
contact AlterG Service prior to resetting the deck weight.
Operator or User Action Screen
1. Select the Service Tab.
2. To recalibrate deck weight, make sure there is no
weight on the treadmill deck. There cannot be
anyone standing inside or on the sides of the
treadmill.
3. Tap Set Deck Weight. This number should be
approximately 200lbs (+/- 50).
If calibration issues persist, please contact our AlterG
Service Team.
D000348-00 Rev. C 9-July-2021 37Calibration You may notice differences in the calibration from older model Anti-Gravity Treadmills. We have implemented a smarter calibration process, which can cause: • Faster calibration process • Stronger pressure in the calibration process • More accurate unweighting • An inability to unweigh every patient to 20% The inability to reduce a user’s body weight to 20% is the result of increased accuracy during the initial calibration process. If the Anti-Gravity Treadmill is unable to reduce the user’s body weight to 20% during calibration, it will only allow them to unweight themselves to the lowest accurate body weight point. (that is, if a patient is limited at 37% body weight, this means that during calibration the Anti-Gravity Treadmill could not go below 37%.) A few factors that can cause this, and it should not be of concern unless persistent with all users. The following may cause an inability to reduce body weight to 20%: • User moving during the calibration process • Body composition • Wearing old shorts (with leaks, tears, or holes) • Old bag (with leaks, tears or holes) • Wearing shorts that are not properly fitted to the individual • Incomplete zipping of shorts to the bag • Poor seating of the shorts on the user D000348-00 Rev. C 9-July-2021 38
You can also read