Warrior & Brave Owner's Manual
←
→
Page content transcription
If your browser does not render page correctly, please read the page content below
Warrior & Brave
Owner’s Manual
Members of the ATA
817 Maxwell Avenue Evansville, IN 47711
800-694-9494 fax 812-467-1245
www.BearArcheryProducts.com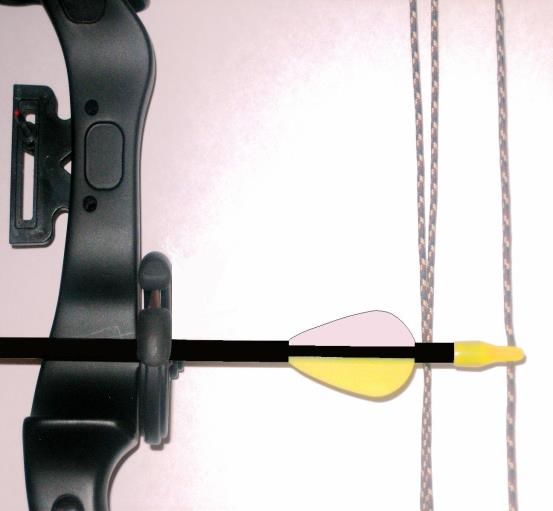
Contents
Archery Safety & Warnings         3-4

Bow Diagram                         5

Care & Maintenance                6-7

Bow Adjustments                     8

Cam Adjustments                     9

Initial Bow Setup                10-11

Shooting the Bow                12-13

Warranty   Statement               14

Record important bow information here
and keep for future reference.

Model:__________________________

Weight Range:___________________

Draw Length:____________________

Purchased From:_________________

Date Purchased:__________________

                    2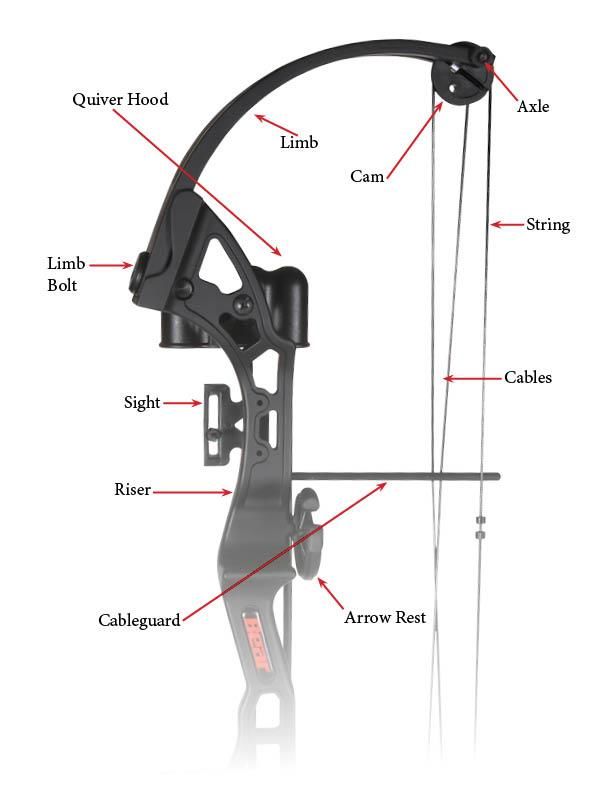
Congratulations! Your new Bear Archery youth
bow is the finest available. It has been engineered
for accuracy and long life. It was built with
quality and pride. No other bow delivers a higher
performance to value ratio than a Bear. We know
how much you are going to enjoy your new bow.
For this reason, we ask you read the Care and
Maintenance section carefully to learn how easy it
is to maintain the quality, performance and level
of satisfaction you expect from a Bear Archery
product.

ENJOY YOUR NEW BOW!

        ! SAFETY FIRST !
If this was purchased for a young archer, please
be sure he or she uses it under adult supervision.
Before using, everyone should carefully read and
understand the instructions and the proper safe
use of this product. If you have any questions,
contact Bear Archery or a qualified Bear Archery
dealer.

             This bow is not a toy. Adult
supervision is required. Misuse or careless use
may cause serious injury or death.

             Dry-firing a bow severely reduces
the life expectancy of the bow and may cause
immediate damage to the bow resulting in injury
to yourself or others. Never dry-fire your bow!
Never pull back and release the bowstring
without an arrow attached to the string. Your
bow is designed to transfer energy to a properly
weighted arrow.

             Shooting underweight arrows has
the same effect as dry-firing a bow and may
cause serious injury. Use the proper arrow for
you and your bow. If you are unsure about your
arrow choice, contact your local Bear Archery
dealer or an arrow manufacturer.

                         3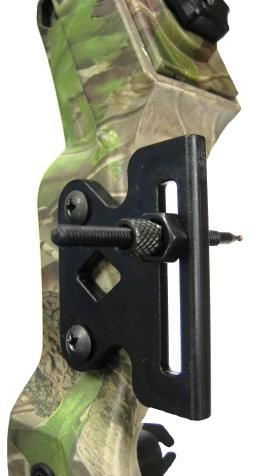
Inspect your arrows and nocks
regularly. Damaged arrows or nocks may cause
serious injury. Immediately discard any dented,
split, splintered or otherwise damaged arrows and
replace cracked or broken nocks.
Do not draw your bow beyond its
maximum draw length as damage to the limbs,
cables and strings could occur.
The use of safety glasses is recommended with
any archery product.
! SAFETY FIRST !
Targets and Hunting Safety
Be sure of your target. Bowhunters often
wear camouflage and are difficult to
identify.
Never aim at anything you don’t intend to
shoot.
Never point or aim a drawn bow at
another person.
Never draw or shoot when anyone is
between you and your target.
Never shoot at a target or object unless
you are sure that it can stop your arrows.
Make sure the area behind and around
your target is clear.
Before shooting, be sure that no part of
the bow will strike any tree branches or
other obstacles.
Never shoot arrows straight up in the air
or in any direction where you might
destroy property or endanger life.
Pre-shooting checklist
Are these items in good condition?
Properly installed? In working order?
___ Cables ___ Sight
___ String ___ Arrow Rest
___ Screws ___ Arrow Nocks
___ Arrow Shafts ___ Cableguard
4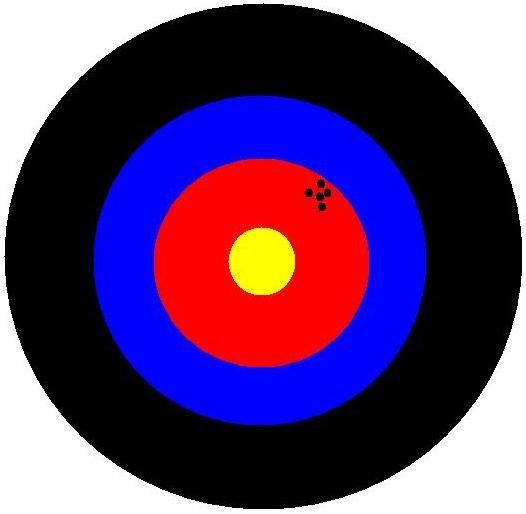
BOW DIAGRAM
Understanding your bow and its component
parts will add to your archery enjoyment.
Although bows differ in performance and
features, this photo represents the components
available in various combinations on most
models. Being familiar with this information will
help you with the instructions throughout this
manual.

                        5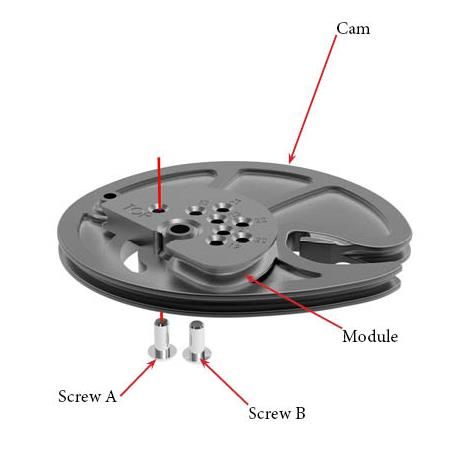
CARE AND
        MAINTENANCE
With proper care and a minimum amount of
routine maintenance, your bow will be kept in
top condition. However, it is still important to
carefully inspect your bow on a regular basis.

Cleaning
Your bow should be kept clean of dust, mud and
grime. Use a damp soft cotton cloth to remove
dirt and moisture. Do not use solvents such as
acetone or mineral spirits as they may ruin the
finish.

Storage and Transportation
Avoid exposing your bow to temperatures over
150 degrees. Excessive heat may damage your
bow. Do not leave your bow unprotected in your
vehicle on a hot sunny day or store in a hot attic
or other hot enclosed area. Clean your bow
thoroughly after each use. Never put your bow
away wet or store it in a damp place. Lightly oil
all steel parts (axles, mounting screws) to prevent
rust. You can relax the limbs if storing for more
than a year. Follow the instructions under Peak
Draw Weight Adjustment in the bow adjustment
section.

Bow Presses
Use only “double-pull” type APPROVED bow
presses. A “double-pull” bow press draws your
bow down at two points on the riser. Older style
“single-pull” bow presses that contact the bow
only in the grip area can result in bent or broken
risers.
To reduce unnecessary stress on the riser, back
off the limb bolts 2-3 turns before placing in a
press. See page 4 and/or
www.BearArcheryProducts.com for additional
bow press information.

                         6
CARE AND
MAINTENANCE
Lubrication
Your Bear Archery compound bow requires very
little lubrication. Wipe the cable guard
periodically with a dry cloth to keep the cables
running smoothly and free of dust. Cams do not
require lubrication. If other lubrication is
necessary, use white lithium grease or Teflon
lubricants. Avoid excessive lubrication of any
item, as this can attract dirt.
String and Synthetic Cable Maintenance
Regularly apply a high quality bowstring wax to
your string and synthetic cable system. Regular
waxing protects your cables and string from
abrasion, wear and separation. Smear the wax
into position. Then, rub it gently with your
fingers or a soft piece of leather to work the wax
into the strands. Replace frayed or worn
bowstrings and cables immediately.
7BOW ADJUSTMENTS
Peak Draw Weight Adjustment
Bear Archery bows have roughly 4-pound peak
weight adjustment range.
Using a 5/32” hex wrench, turn the limb bolts
clockwise to increase peak weight and counter-
clockwise to reduce peak weight. Bow weight will
increase or decrease approximately one to two
pounds per turn. IMPORTANT both limb
bolts must be adjusted equally. Each limb bolt
must never be adjusted more than 1 full turn
counter-clockwise which will bring the bow to its
lowest draw weight.
Counter-
Clockwise
Decreases
Peak Weight
8CAM ADJUSTMENTS
Warrior - Adjusting the Draw Length
The rotating cam equipped on the Warrior can
be configured to provide a draw length from 19”
to 25” in 1” intervals. To adjust the draw length,
using a 3/32” hex wrench, loosen Screw A
approximately one revolution and remove Screw
B. For access to Screw A, it may be necessary to
pull the cable towards the riser to rotate the cam.
Next, rotate the module about the axle to the
desired draw length and align the holes in the
module and cam. Insert Screw B into the hole
labeled with the desired draw length and tighten
Screws A and B. Make sure that the module is
flush against the face of the cam while tightening
the screws. Do not over tighten the screws. Next
perform the same operation on the opposite
cam. Be sure that both the top and bottom cams
are using the same draw length modules.
Brave 3 - Adjusting the Draw Length
While the Brave 3 does not have an adjustable
draw length, the young archer will achieve full
let-off for 2-3” at full draw.
9INITIAL BOW SETUP
Before you can safely and effectively shoot your
bow, a number of specific initial bow setup steps
must be taken. These steps can be performed on
your own, if your level of expertise is adequate or
your local Bear Archery dealer can help you.
Arrow Rest Installation
Arrow rests should be installed according to the
manufacturer’s specifications. Both Warrior and
Brave come with the arrow rest installed and
ready to use. If the arrow rest ever needs
replaced, simply visit an authorized Bear or
Trophy Ridge dealer. If you need help finding a
dealer, logon to www.trophyridge.com or
www.beararcheryproducts.com and click on the
dealer locator link or contact us by calling 1-800-
694-9494.
Sight Installation
Install the pin into the sight-mounting bracket as
shown below. Next install the sight-mounting
bracket to the bow using the two screws
provided.
Elevation Sight
Locking Nut Mounting
Bracket
Windage
Locking Nut Sight Pin
10INITIAL BOW SETUP
Quiver Installation
Install the quiver as shown below using the two
screws provided.
Sight Adjustment
When first sighting in your
new bow or bow sight, the
key thing to remember is
“Chase the arrows”. In
other words if your arrows
are hitting the target to the
right of the bull’s-eye, move
your sight to the right. If
the arrows hit high on the
target, raise your sight.
Arrow
Group
In the picture, the arrows are hitting the target
high and to the right of the bull’s-eye. To correct
this, adjust your sight up and to the right.
Remember, “Chase the arrows.”
11SHOOTING THE BOW
Preparing to Shoot
Put the arm guard on the arm with which you
hold the bow. It should cover the inside of the
lower arm to protect it from being slapped by the
string when the string is released.
The finger tab protects your
fingers from rubbing by the
bow string when string is
released. Slip the finger tab
over your second and third
finger so that the tab is on the
palm side of your hand with the
small lobe up. Bend the tab so
that the small lobe covers your
index finger and the large lobe
covers your middle two fingers.
Shooting Stance
Stand with your body at a
right angle to the target.
Right-handed archers will
have their left shoulder
toward the target. (These
instructions are written for
right-handed archers. Left
handed archers simply reverse
the instructions.) Hold the
bow with your left hand.
Extend left arm toward the
target with your head in a
natural “looking at the target”
position.
12SHOOTING THE BOW
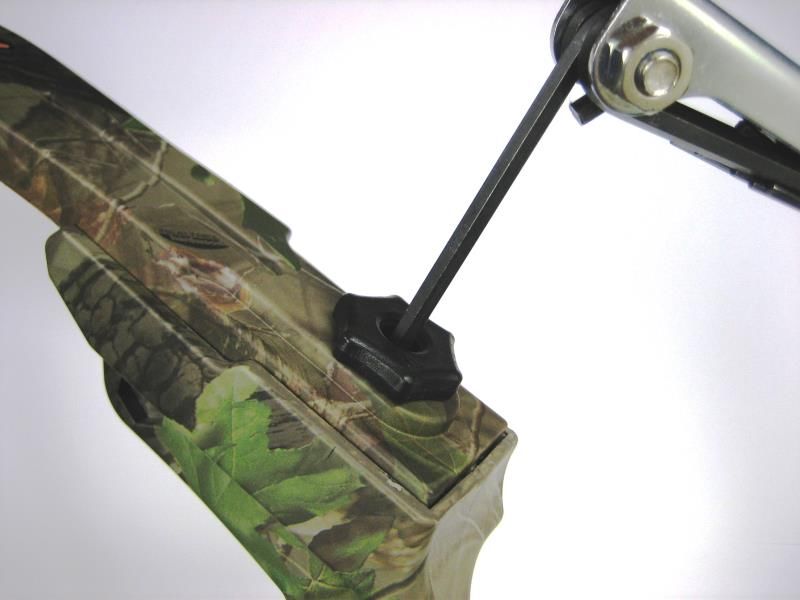
Nocking an Arrow
Before each shot, make sure the arrow does not
have a cracked or loose nock. Immediately
replace any damaged nocks. Also be sure the
shaft of the arrow is not dented or cracked.
Immediately discard any cracked or broken arrow
shafts. With
the bow in
the relaxed
position,
snap the
nock end of
the arrow
(closest to
fletching)
onto the
string with
the arrow
perpendicular
to the string
as shown
above. The
odd colored
vane should be pointing up. Place the arrow in
the arrow rest.
Drawing the Bow
Place your first finger
around the string above
the nock point and
arrow. Place the middle
finger and third finger
around the string under
the arrow. Draw the
bowstring back to your
jaw, placing your first
finger at the corner or
your mouth. This is called an anchor point.
Keep your left arm slightly bent. Keep the bow
straight up and down. Point the arrow at your
target, aim and let go of the string.
***Remember, never draw back and release your
bow without an arrow in place.***
13WARRANTY
STATEMENT
All Bear Archery youth bows are backed with a
90 Day Limited Warranty.
Original Owner:
Warranty applies only to the original owner and
is not transferable. Proof of purchase may be
required.
Items Not Covered:
Cables, strings, bearings, paint and/or film
dipped finishes resulting from normal wear and
tear is not included in this warranty.
Damage Not Covered:
Damage caused by abuse, mishandling, dry firing,
alteration or modifications made to original
products are not covered under this warranty.
The use of any bow press other than those
approved by Bear Archery will void this
warranty. Additionally, shooting of arrows less
than 5 grains per pound of peak draw weight will
void this warranty. Bear Archery reserves the
right to make parts substitutions on warranty
coverage at Bear Archery’s sole discretion, for
any reason.
In the event a bow requires warranty service,
please contact the Bear Archery Customer
Department at 800-694-9494 for a return
authorization (RA) number and return shipping
instructions. For full warranty details, please log
on to BearArcheryProducts.com for further
information.
Key Contact data:
Dealer 800 Number: 800-694-9494
Dealer Fax Number: 812-467-1245
Web: www.BearArcheryProducts.com
©2008 Bear Archery
14You can also read