Windows 10 v1809 Made Easy Bill James, VP, Computer Club of Oklahoma City APCUG Advisor, Region 8 - APCUG VTC
←
→
Page content transcription
If your browser does not render page correctly, please read the page content below
Windows 10 v1809 Made Easy
Bill James, VP, Computer Club of Oklahoma City
APCUG Advisor, Region 8
APCUG VTC
November 3, 2018

Windows Timeline
Timeline helps you pick up where you left off. Clicking the Task View button in the
taskbar or pressing the Windows Key + Tab summons the feature, which displays the
timeline of your activity in supported apps, stretching back over the past. Even more
handily, Microsoft lets you group related apps together into “Activities” in Timeline, so
that when you open that week-old budget document, for example, the presentations and
websites you referenced at the time can be easily summoned as well. This even syncs
across devices, so it could be especially useful if you use multiple PCs. At the time of
release, only a limited number of apps will work with Timeline.
To use Timeline:
   1. Press the Timeline button, which appears to the right of the search box. Or hit
      Windows + Tab. A list of all currently-open tasks appear at the top of the screen.
      Below that is your timeline of activity.
   2. Scroll down to see files / sites you opened.
   3. Use the search box to find a particular file.
   4. Click on a file or web page to open it.

Cloud Clipboard
Windows 10’s copy and paste functionality has been hit and miss for years, but now you
can deploy that bugginess across multiple PCs with cloud clipboard – a genuinely useful
feature introduced in the October 2018 Update. You will need to go to
Start>Settings>System>clipboard and enable “Sync across devices” to start copying
data on one PC and pasting in on another PC. While you're in this menu, enabling
“Clipboard history’ let's you save multiple items to the clipboard, so you can use them
again later. How to enable clipboard on Windows 10
On Windows 10 version 1809, you can enable the new clipboard experience using the
Settings app and the new keyboard shortcut.
Enabling clipboard using Settings
To enable clipboard in the Settings app, use these steps:
   1.   Open Settings.
   2.   Click on System.
   3.   Click on Clipboard.
   4.   Turn on the Clipboard history toggle switch.

                                            1
Your Phone
Want to tie your phone and PC closer together? Download Microsoft’s Your Phone
Companion App for Android and link it to your PC using the new Your Phone app from
the Microsoft Store. Your Phone lets you open, view, copy, and share photos that you
took on your phone, as well as send and reply to texts right on your PC. There is an iOS
version with limited capabilities.

Snip & Sketch
The firmly entrenched Snipping Tool with in Windows in finally getting replaced and
upgraded. The October 2018 Update added Snip & Sketch, a new tool that let's you
select a portion of the screen to copy when you press Windows + Shift + S. After doing
so, the selected screenshot will be copied to your clipboard, so you can paste it into any
image editing software – including the standalone Snip & Sketch app, which lets you
annotate and share your marked-up images.
How to take screenshots with Snip & Sketch
Using Snip & Sketch, there are at least three ways to access and take screenshots on
Windows 10:
Using Snip & Sketch app
The easiest way to get to the snipping tools is to use the Snip & Sketch app with these
steps:
   1. Open Start.
   2. Search for Snip & Sketch click the top result to open the experience.
   3. Click the New button in the top-left corner.
   4. Select the type of snip you want to use, including:
          • Rectangular Clip.
          • Freeform Clip.
          • Fullscreen Clip.
     5. Take the screenshot

Using Action Center quick button
If you want to take a screenshot to paste on a document, you can use the new Screen
snip button using these steps:
Open Action Center.
Quick tip: Use the Windows key + A keyboard shortcut or click the Action Center
button in the notification area to open the experience.

   1. Click the Expand button.
   2. Click the Screen snip button.

                                            2
3. Select the type of snip you want to use, including:
• Rectangular Clip.
• Freeform Clip.
• Fullscreen Clip.
4. Take the screenshot
Using the Print Screen button
If you enabled the option, you can take screenshots on Windows 10 using the Print
Screen key.
1. Hit the Print Screen button.
Quick Tip: Alternatively, you can use the Windows key + Shift + S shortcut to open
the snipping toolbar.
2. Select the type of snip you want to use, including:
• Rectangular Clip.
• Freeform Clip.
• Fullscreen Clip.
3. Take the screenshot
Unlike using Snip & Sketch app when using the Screen snip button or the Print Screen
key, the screenshot will copy to the clipboard. If you want to annotate the snip or save it
into a file, you need to click the Snip & Sketch notifications in Action Center.
How to enable Print Screen button to use Snip & Sketch
You can also bring up the screen snipping tool using the Print Screen button on the
keyboard, but it's an option that you need to enable manually using these steps:
1. Open Settings.
2. Click on Ease of Access.
3. Click on Keyboard.
4. Under "Print Screen shortcut," turn on the Use the PrtScn button to open
the screen snipping option
Near Share
Near Share makes it easy to share files and URLs with local PC over the air, negating
the need for flash drives or chat apps to pass something along. If you open the Share
interface in Microsoft Edge or File Explorer, you’ll see PCs with Nearby Sharing enabled
appear as an option if you have the April 2018 Update installed. Recipients receive a
pop-up notification when something is sent. Think of it as an alternative to Apple’s
Airdrop, albeit one without any mobile support. To use Near Share, your computer
needs both Bluetooth and Wi-Fi working, and you’ll have to enable the Nearby Sharing
option in Settings before you can start using it. Microsoft says the feature automatically
chooses to use Wi-Fi or Bluetooth depending on what’s available, and what’s faster.
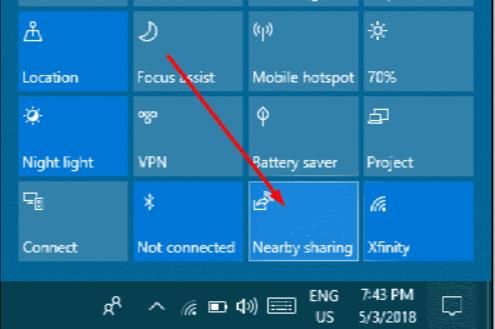
3How to enable Nearby Sharing
Step-1: Move the mouse pointer across Desktop area to the bottom right side and
perform a click on Action Center from the Notification area. Upon viewing the quick
actions, choose the Expand option from the left side to access more buttons.
Step-2: Make a click on the Nearby Sharing tile to enable the option in your Windows.
The feature will be active once the tile turns blue. Now, if you like to Disable Nearby
Sharing in Windows 10, follow the same method and make a click on the tile once more.
When it turns into Gray-blue, you can be sure that the feature is disabled.
Ransomware Protection
Controlled Folder Access “protects your files and folders from unauthorized changes by
unfriendly applications.” Your Documents, Pictures, Movies, and the Desktop folders are
protected by default, though you can block other folders manually or whitelist trusted
software to access your locked-though you can block other folders manually or
whitelisted trusted software to access your locked-down info. You can tweak Controlled
Folder Access by opening the Windows Security app (formerly Windows Defender),
heading to the Virus & threat protection tab, and clicking the “Manage ransomware
protection” link at the bottom.
45
Windows Security
   •   Windows Defender will be known as Windows Security in 1809. When you get
       a new device and start up Windows 10 for the first time, the antivirus protection
       that comes installed with the device is your default security app. However,
       Windows Security is pre-installed and ready for you to use at any time.
   •   If you want to use Windows Security, uninstall all your other antivirus programs
       and Windows Security will automatically turn on. You may be asked to restart
       your device. (Note that in previous versions of Windows 10, Windows Security is
       called Windows Defender Security Center.)

Windows Defender Gets Sandbox Mode (To be re-named in 1809 as Windows
Security)
Microsoft Windows built-in anti-malware tool, Windows Defender, has become the very
first antivirus software to have the ability to run inside a sandbox environment.
Sandboxing is a process that runs an application in a safe environment isolated from
the rest of the operating system and applications on a computer. So that if a sandboxed
application gets compromised, the technique prevents its damage from spreading
outside the closed area.
Since antivirus and anti-malware tools run with the highest level of privileges to scan all
parts of a computer for malicious code, it has become a desired target for attackers.
The need for sandboxing an antivirus tool has become necessary after multiple critical
vulnerabilities were discovered in such powerful applications, including Windows
Defender, in past years that could have allowed attackers to gain full control of a
targeted system.
That's why Microsoft announced to add a sandbox mode to its Windows Defender. So,
even if an attacker or a malicious app exploiting a flaw in Defender compromises the
antivirus engine, the damage can't reach out to other parts of the system.
How to Turn on Sandbox Feature in Windows Defender Antivirus
For now, Windows Defender running on Windows 10, version 1703 (also known as
the Creators Update) or later, support the sandbox feature, which is not enabled by
default, but you can turn the feature on by running following command on your system:
   •   Open Start and Search for "CMD" or "Command Prompt"
   •   Right Click on it and select "Run as administrator."
   •   Type: "setx /M MP_FORCE_USE_SANDBOX 1" and then press ENTER
   •   Then restart your computer, that’s it

                                             6
Dark theme
If you love dark themes, your love dark themes. Light themes sear your eyeballs.
Fortunately, Windows 10 now supports a dark them. Head to
Start>Settings>Personalization>Color and select the “dark” option under “Choose your
default app mode. “The Windows 10 October 2018 Update extended the dark theme to
include File Explorer.
Storage Sense (Say Goodbye to Disk Cleanup)
Over time, your PC can quietly fill with needless junk without your even realizing it, as
the Recycle Bin and temporary files suck up your storage. We relied of Disk Cleanup or
maybe cCLeaner to do that job. In Windows 10 we now have Storage Sense to help
combat the creep. While Disk Cleanup is saying its goodbyes, it still lives on in spirit.
The new “Free Up Space” tool in Windows 10 is basically a modern, faster Disk
Cleanup. It does everything Disk Cleanup does—and more. Head to
Settings>System>Storage and enable the Storage Sense option to have Windows start
automatically clearing out unneeded temporary files and deleting any files in your
Recycle Bin over 20 days old. You can tweak those options using the Chang how we
free up pace link underneath the option.
Start Menu Folders
What’s old is new again: You can create basic Start menu folders in Windows 10,
organizing Live Tiles into clusters. Simply drag your Start menu apps on top of each
other to create folders that expand when clicked on. As on the October 2018 Update,
you can now name the folders you create, by expanding the folder to see the option.
Cortana
By default, Cortana does not listen for your commands. If you’d like to be able to say
commands at your PC, open Cortana by clicking the search field in the taskbar and
select the Notebook icon in the left=side options pane. Select settings from the list, then
simply enable the Let Cortana respond when you say “Hey Cortana” option. You’ll need
an active microphone for this to work. Enabling Cortana on the Windows lock screen
lets you use voice commands to view and edit your schedule at a glance. To turn on the
feature, open Cortana and use the “Cog” icon >Settings> Use Cortana even when my
device is locked.
7Windows October 2018 Update (Version 1809) Timeline:
October 2, 2018: Windows 10 Version 1809 released to the general masses.
October 6, 2018: Microsoft paused the rollout of 10 October 2018 Update for all users
as they investigate isolated reports of users missing some files after updating.
Update October 8, 2018: This guide has been received to include new changes, and to
remove those features and improvements that won’t make it to the final version, such as
Sets, rename group of tabs you set aside in Microsoft Edge, Block suspicious behavior
in Windows Security, and others.
Update October 9, 2018: Microsoft confirms that the missing files after the upgrade
problem has been fixed, but it’ll be testing the patch with participants of Windows Insider
Program before re-releasing the October 2018 Update to the public. If you already
updated to version 1809, the latest cumulative update also contains the fixes.
Update October 16, 2018: Microsoft is now making available update KB4464455 with
various fixes bumping the version number to build 17763.104. Although the company is
fixing a number of issues, including problems with Task Manager, driver compatibility,
and conflicts with third-party antivirus solution, it’s unclear when the October 2018
Update will re-release again.
Update October 30, 2018: Windows 10 build 17763.107 releases to fix known problem
with File Explorer extracting content from a .zip folder, but it seems that feature update
is still not ready for the masses.
8You can also read