WOOD FIRED PIZZA RECIPES - OPERATING MANUAL - Green Mountain Grills
←
→
Page content transcription
If your browser does not render page correctly, please read the page content below
WOOD FIRED
PIZZA RECIPES
greenmountaingrills.com/recipes/pizza

                                         PELLET GRILL ATTACHMENT

                                        OPERATING MANUAL
                                         DANIEL BOONE & JIM BOWIE MODELS
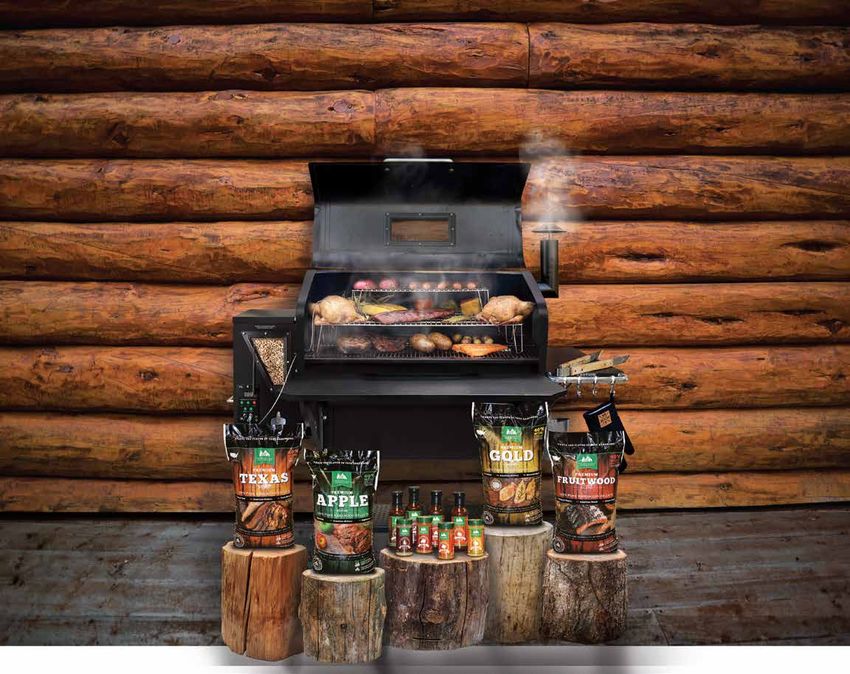
Convert your GMG Pellet Grill into
                                                                                                                   a wood-fired gourmet pizza oven

                                                                                                                   Cook ristorante quality pizzas in
                                                                                                                   2-4 minutes

Welcome to the                       Pizza Oven                 This table shows approximate stone temperatures for a
                                                                number of grill settings. It is by no means guaranteed that
                                                                your stone’s temperature will be precisely the same; these
Thank you and congratulations on the purchase of GMG’s          numbers are guidelines only. They were experimentally
pizza oven attachment.                                          determined in ambient conditions that may differ greatly
                                                                from yours and may differ from use to use. See the
Please read and understand the important safety                 Operation section for more details on safe and proper use.
information before using this product.
                                                                    Your Grill’s Set Temperature          Approximate Stone Temperature
In addition to amazing wood-fired pizza, you can also use
this attachment to achieve a high-temp sear on your steaks,               °F               °C                  °F                 °C
grill burgers and chops, bake bread or breadsticks, and broil            175               79                550-600            288-316
                                                                         225              107                600-650            316-343
seafood!                                                                 275              135                650-700            343-371
                                                                         350              177                700-750            371-399
Yes, it’s versatile!                                                     430*             211*               750-850            399-454
                                                                   *Maximum safe temperature with pizza attachment installed.
CONTENTS
Warranty                        6
                                        PELLET GRILL ATTACHMENT

Important Safety Information
                                    Cook ristorante quality pizzas at home.
READ THIS FIRST                 7

Pizza Stone Size                9

How it Works                   10

Installation                   11

Operation
- Stone Temperature            12
- Preparing the pizza          14
- Inserting the pizza          15
- Rotating the pizza           17
- Removing the pizza           18
- Care and maintenance         19

Recipes
- Pizza Dough                  20
- Pizza Sauce                  23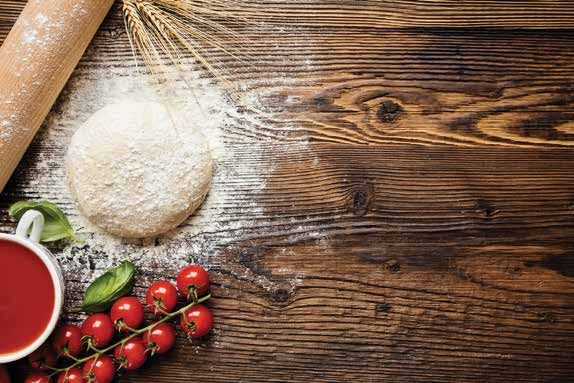
This LIMITED WARRANTY covers defects in workmanship and
                                                    materials for a period of one (1) year from the date of first
                                                    retail purchase. During the warranty period, GMG Products,
                                                    LLC (dba Green Mountain Grills) will replace or repair, at its
                                                    sole option, any defective Green Mountain grill returned to us,
                                                    or to one of our dealers, by its original purchaser. Any claims
                                                    under this warranty must be received by the expiration of the
                                                    warranty period.

                                                    This warranty does not cover problems that result from abuse,
                                                    accident, misuse, or problems with electrical power. It does
                                                    not over cosmetic elements and components, such as paint
                                                    and other finishes. It does not cover uses not in accordance
                                                    with the instruction manual. It does not cover commercial use
                                                    of the product. It specifically excludes products for which
                                                    Green Mountain Grills has not received payment.

                                                    THIS WARRANTY GIVES YOU SPECIFIC LEGAL RIGHTS
                                                    WHICH MAY VARY FROM STATE TO STATE (PROVINCE TO
                                                    PROVINCE IN CANADA). GREEN MOUNTAIN GRILL’S
                                                    RESPONSIBILITY FOR DEFECTS IN MATERIAL AND
                                                    WORKMANSHIP SHALL BE LIMITED TO REPAIR AND/OR
                                                    REPLACEMENT AS SET FORTH IN THIS WARRANTY. ALL
                                                    EXPRESS AND IMPLIED WARRANTIES, INCLUDING, BUT NOT
                                                    LIMITED TO, ANY IMPLIED WARRANTIES AND WARRANTIES
                                                    OF MERCHANTABILITY OR FITNESS FOR A PARTICULAR
                                                    PURPOSE ARE DISCLAIMED. NO OTHER WARRANTIES ARE
                                                    PROVIDED.

                                                    IN NO EVENT WILL GMG PRODUCTS, LLC (dba GREEN
                                                    MOUNTAIN GRILLS) HAVE ANY LIABILITY FOR SPECIAL,
                                                    INCIDENTAL OR CONSEQUENTIAL DAMAGES, WHETHER TO
                                                    THE ORIGINAL PURCHASER, OR WITH RESPECT TO ANY
                                                    THIRD-PARTY CLAIMS FOR DAMAGES AGAINST THE RETAIL
    REGISTER YOUR WARRANTY HERE:                    PURCHASER OF THIS PRODUCT. SOME STATES
                                                    (PROVINCES IN CANADA) DO NOT ALLOW THE EXCLUSION
    greenmountaingrills.com/warranty-registration   OR LIMITATION OF INCIDENTAL OR CONSEQUENTIAL
                                                    DAMAGES, SO THIS MAY NOT APPLY TO YOU.

                                                    To exercise your rights under this warranty, contact the dealer
                                                    from whom you purchased it, or call us at 530-347-9167.

                                                    © 2019 GMG Products LLC - All Rights Reserved

5                                                                                                                     6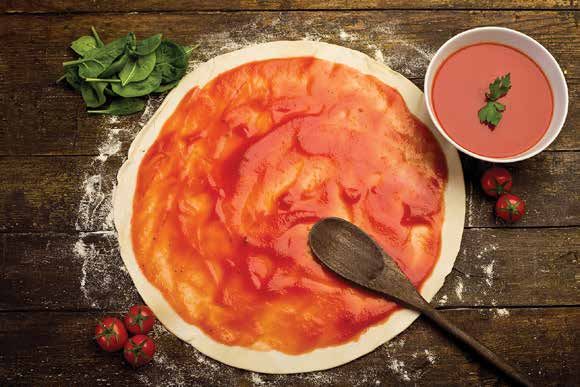
IMPORTANT SAFETY INFO                                         WARNING PLEASE READ CAREFULLY

DO NOT PROCEED UNTIL YOU                                      DO NOT operate this equipment in areas without
                                                              adequate ventilation to exhaust heat and smoke.
HAVE READ THIS THOROUGHLY

This device is intended to sit atop the firebox on a Green    DO NOT operate this equipment unattended.
Mountain Pellet Grill. It is not designed for any other use   A responsible, competent adult MUST be located in close
or purpose.                                                   proximity to the grill at all times.

Fire is inherently dangerous and may cause severe injury      DO NOT operate this equipment except with the stone
or even death if not used with great care. Fire may also      furnished with it or a replacement stone, should you
cause damage to combustible structures. This device           break yours, with the exact same construction. The feet
must not be used on or near any combustible decks or          on the bottom of the stone are an integral part of the
buildings.                                                    design. They allow air flow between the steel surface and
                                                              the stone which maintains a lower temperature on the
The flame of a fire may exceed 1,600° F (871° C). Since       stone and allows it to be used for cooking.
this apparatus comes in close contact with flames, its
surface temperature may exceed 1,100° F (593° C). The         DO NOT MODIFY THIS EQUIPMENT to fit any other grill.
pizza stone’s temperature may exceed 900° F (482° C).
                                                              DO NOT operate this equipment on a fire pit.
DO NOT touch the stone or any part of this device
without a suitable thermal barrier such as a welder’s         DO NOT operate the grill at a higher set temperature
glove. Silicon gloves and normal kitchen hot pads WILL        than 350° F (176° C) with the pizza attachment installed.
NOT PROTECT YOU from burns at those temperatures.
                                                              ALSO, you MUST observe all warnings and safety
WAIT AT LEAST ONE HOUR after turning off the grill            information applicable to the Green Mountain Pellet Grills
before handling the stone or the pizza attachment.            as found in those products’ operating manuals.

DO NOT operate this equipment in windy conditions.

DO NOT operate this equipment indoors.

7    Important Safety Info                                                                                                8
PIZZA STONE SIZE                                    HOW THE

                  DANIEL BOONE
                                            WOOD-FIRED
                                                    MAGIC WORKS
                   & JIM BOWIE
                                 The pizza oven attachment captures and funnels the heat
                                 from the firebox directly up and into the steel baking
                        14.5”D   chamber encasing the pizza stone. This process raises
                                 the internal temperature of the chamber to that of a
                                 ristorante quality wood-fired pizza oven. It creates
                                 temperatures upwards of 800°F, allowing you to cook
          16”W                   ristorante quality pizza in 2-4 mins. The steel dome baking
                                 chamber captures and enhances 3 different types of heat
                                 from your pellet grill.

                                 Wood-Fired Heat Distribution
                                 Conductive    Convective           Radiant

9    Pizza Stone Size                                                                     10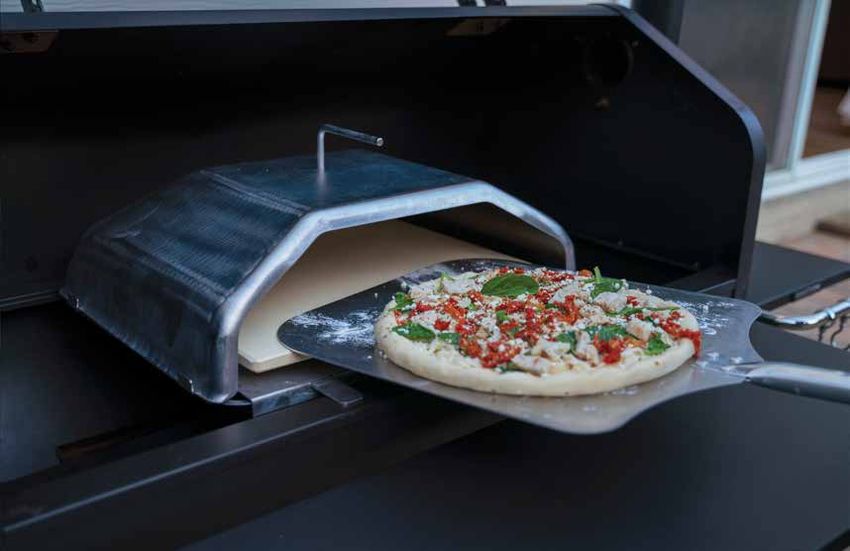
INSTALLATION                                                 OPERATION
  Remove the grates, grease tray, and heat shield from       Getting the stone up to temperature
  your grill. Insert the pyramid-shaped ventilation base
  by aligning the circular extension with the opening of     You MUST bring the stone up to a high temperature in
  the firebox as pictured. The horizontal tabs should sit    order to cook the pizza. If you build a pizza on a cold
  on the grill rails to hold it in place.                    stone and then insert it into the pizza oven, you will
                                                             achieve undesirable results. The stone will remain cold
                                                             for some time, but the hot air will cook the toppings,
                                                             leaving your crust gooey and sticky. You don’t want this!

                                                                         An infrared temperature measuring device (IR
                                                                         temp gun) is a necessary accompaniment for
                                                                         successful pizza grilling when using GMG’s
                                                                         wood-fired pizza oven attachment. The
                                                                         stone’s surface temperature should be
                                                                         between 650° F and 800° F (343° C and 427°
                                                                         C) when you insert the pizza.
 Place the included pizza stone, FEET DOWN and
 centered on the surface of the ventilation base as shown.
 Install the steel hood with the opening toward the front.
 The outside edges of the dome should fit INSIDE the
 vertical tabs of the base.

11    Installation                                                                                        Operation      12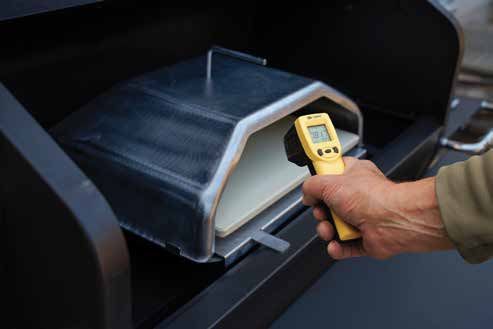
Close the lid on the grill when heating up. Testing has         PREPARING THE PIZZA
shown that the stone will heat marginally faster with the
grill’s lid closed. If you have installed a thermal blanket,    The stone is 16”W X 14.5”D, so
you MUST remove it when using the pizza attachment.             you could theoretically use a
                                                                round pizza of nearly up to 14”
Turn the grill on. After the grill cycles through its 0-1-2-3   (35.6 cm.) in diameter or a
phases, the digital readout will display a temperature. At      rectangular pizza slightly
this time, use the UP ARROW to raise the temperature to         smaller than the stone.
300° F (148° C). We always recommend starting at lower
temperatures to get comfortable working with the oven
and properly cooking your pizza.                                Whether you use a store-bought or a
                                                                “take-and-bake” pizza, be sure to discard
Stone temperatures will vary based on ambient                   any packaging, cooking inserts, or other
temperatures, wind, and opening/closing the lid. Also, the      flammable material. The instructions on these types of
time it takes for the stone to reach operating temperature      pizzas frequently tell the user to cook the pizza on the
will vary with these conditions. In extreme cold, it may        insert. THIS WILL NOT WORK with GMG’s pizza
take nearly an hour to get the stone to 800° F (425° C). In     attachment – the temps are too high. Also, DO NOT cook
hot weather, it may take only 20 minutes.                       pizza on parchment paper. That product has a normal
                                                                safe operating temperature of only about 450° F (232° C).
                                                                NEVER place a frozen pizza on a hot stone!

                                                                You will need a pizza peel for successful operation of this
                                                                device.

                                                                If you manufacture your own pizza, you should prepare it
                                                                on a peel. If you are cooking a store-bought or
                                                                “take-and-bake,” you should put it onto a peel.

           3 0 0 °F

          TEMPERATURE
            CONTROL

13                                                                                                  Preparing the Pizza   14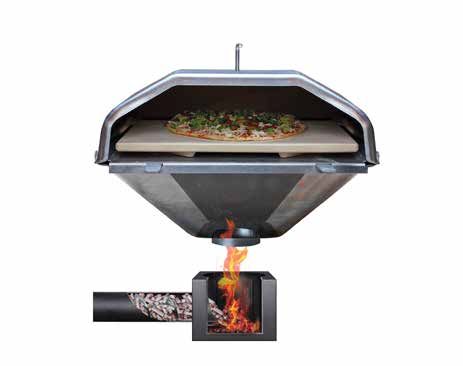
First, you could remove the dome. But this causes
                            WOOD                              consternation: where do you set this hot piece of
                              VS                              equipment? If you have a nearby non-combustible
                                                              surface (concrete springs readily to mind), you can set it
                           ALUMINUM
                                                              on that. Use the handle on top of the dome to do this, but
                             PEEL                             use a suitable thermal barrier. A common hot pad or
                                                              silicon glove WILL NOT PROTECT YOU from burns here.
                                                              A welder’s glove or multiple layers of thick cloth must be
Cavemen likely pondered this life question, too. Both
                                                              used. DO NOT ALLOW pets or kids anywhere near this
have pros and cons. First, regardless of which one you
                                                              hot device if you set it on the ground!
use, you will need to dust it liberally in order to get the
pizza to slide off easily onto the stone. We recommend
                                                              The advantage of removing the dome is that you can
an even matting of corn meal topped with a dusting of
                                                              incline the peel at a greater angle. This will allow the
semolina flour. This acts like tiny ball bearings which let
                                                              pizza to slide off more easily. Yes, you will lose some air
the pizza slide off gently onto the stone. The pizza will
                                                              heat for a few seconds, but it will rebuild quickly once you
usually slide a little better on a wood peel than on an
                                                              reinstall the dome.
aluminum one. But a wood peel is more difficult to clean
and can harbor bacteria if not scoured thoroughly. A
                                                              Or, second, if you’re deft (and debonair!), you can leave
metal peel is thinner and easier to get under the pizzas
                                                              the dome on, insert the peel at a more modest angle, and
when turning or removing. On cold, dour days in winter or
                                                              shake it from side to side slightly in order to encourage
when it’s too windy to haul rocks in other seasons, you
                                                              your creation to assume the position on the stone.
can contemplate this metaphysical dilemma and form
                                                              Unless you have prior experience (such as an internship
your own conclusion.
                                                              at the Authentic Wood-Fired Pizza Ristorante), this may
                                                              take a little bit of practice. In the long run, you will
INSERTING THE PIZZA                                           probably find this method preferable.

Once the stone reaches                                        Your goal is to place the pizza on the approximate center
your desired temperature                                      of the stone.
as evidenced by the temp
gun, you are ready to put                                     The pizza will cook fairly quickly (not NASCAR fast, but
the pizza in.                                                 pretty fast nonetheless).

There are two ways to insert the pizza.

15   Inserting the Pizza                                                                                                 16
The design of this (yes, and other wood-fired When is the pizza done and how long will it take?
pizza ovens as well) means that it will be
hotter in the back than at the front. We Okay, here’s the moment of truth. How done you like it is
experimented with one with no back and a matter of personal choice. Pizza perfection is in the
no front, but it did not cook as evenly, eyes of the beholder (mouth of the be-eater?). Generally
since the surface air heat escaped Accepted Pizza Principles (GAPP, not to be confused
rapidly. This resulted in burnt crusts with Generally Accepted Accounting Principle, GAAP)
and undone toppings. assume this to be a golden brown crust and boiling
cheese and toppings. You can check the crust by lifting
What this means to you, dear patron, is that you must the edge with the peel, and of course, you can see the
rotate the pizza a couple of times while it cooks. You can toppings.
accomplish this with the peel. Or you could invest in a
round peel which makes it a little easier but costs a The cooking time will vary with the thickness of the crust
hundred bucks or more. Or you could just learn to do it and the temperature of the stone. Normally, this will be
with your normal peel. from 2-5 minutes.
ROTATING THE PIZZA REMOVING THE PIZZA
Insert the peel under the When it is finished to your
pizza with the handle offset standards, remove it from
to either the left or right. the oven and place on a
Rotate the peel sharply to countertop or table. Let it
the opposite direction. This will provide rest for a few minutes. Then slice it.
momentum to the pizza, and it should
continue to rotate more than the peel. You can also
purchase a pizza turner, which is just a long spatula
and costs a fraction of a round peel. Here’s our favorite slicer,
although it is somewhat
This will be more difficult (impossible!) with a rectangular intimidating.
pizza. Here, you will need to remove the pizza completely
with the peel, slide it off on a counter or other sanitary
surface, and the reinsert the peel on the opposite side Return the grill temperature to 150 with the down arrow,
before putting it back into the oven. (Sounds like a Laurel release the button, and then press once again to put the
and Hardy routine, doesn’t it? “When I nod my head, Oly, grill into fan mode. Let the grill cool for at least an hour
you hit it!) before removing the pizza attachment and stone.
17 Rotating the Pizza Removing the Pizza 18What else can I cook in the pizza oven attachement?
Achieve a steakhouse quality sear on
PIZZA
your steaks and roasts meat and fish
Bake bread, cookies, and desserts
Perfect for pan-roasting vegetables DOUGH
RECIPE
CARE & MAINTENANCE
We left the stainless parts out in the rain for the
six-month rainy season (coastal Oregon – 60” of rain).
We experienced zero rust. Not even surface rust. So we
feel it is safe to leave outdoors. It will tarnish somewhat
from the heat. You may try to clean this with stainless
steel cleaner. (But why?) While we recommend “00” (“double-ought”) pizza flour
for light, crispy crusts, it is not readily available in
Clean the stone in warm, soapy water. Do not plunge a grocery stores. You can buy it online from several
hot stone into cold water! You will not like the results, sources. You can also yield great results using bread
although they will create a nice fish habitat in a nearby flour, which will still produce a crisp crust. If you want
pond. Dry your stone thoroughly before using. Moisture chewier crusts, use “AP”(all-purpose) flour. This recipe
may cause it to crack. Never oil your stone. Cover with makes two 13” pizza crusts.
foil if you’re cooking greasy foods.
If you do happen to break your stone, it is absolutely INGREDIENTS
necessary to replace it with one similar in design. The
feet on the bottom of the stone are required. If you use a • About 3 ½ cups flour plus • tsps. salt
more for dusting and • 1 ½ cups hot water - as hot
flat stone, the surface will get too hot to use as a cooking prepping the dough ball as your tap will get. 120° F
medium. Our tests showed a flat stone attained temps of • 1-2 ¼ tsps. active dry yeast (49° C) is ideal.
1,100° F (593° C) or higher. (use 1 for thin crusts and up • 2 tbsps. olive oil
to 2 ¼ for thick crusts.)
• 1 tsp. white sugar
19 Care & Maintenance GMG Pizza Dough 20If you have a stand mixer, use the wire whisk attachment This process is called “proofing” the dough. If you prefer
to thoroughly mix the dry ingredients (flour, yeast, salt, a more sourdough flavor for your pizza crust, proof at a
sugar). Otherwise, use a hand whisk to mix them higher temperature (90° F/32° C). Do not proof at any
thoroughly. higher temperatures than this, as the yeast basically dies
at 95° F/35° C.
Change to the bread hook attachment on the stand
mixer, and turn it on low speed. If you’re going to knead Then, spread a light coating of flour on a work surface
by hand, flex your muscles a few times and get ready for and place the dough ball on it. Cut the ball in half and
some work. punch down lightly. Reform each piece of dough into a
round ball and roll in the flour until dry and dusty.
Very gradually add the olive oil and then the hot water.
By hand, pour slowly with one hand and begin mixing Place the dough balls on a cookie sheet and cover them
gently with the other. loosely with a clean towel. Put them back into a warm
place (80-90° F/27-32° C) for half an hour.
As soon as the ingredients are thoroughly mixed, turn the
mixer speed on medium for about 5-7 minutes. By hand, You can freeze the dough for several weeks.
fold and vigorously massage the dough for 5-7 minutes.
To prepare the crust, place on a lightly floured surface.
Gently stretch the dough in all directions, forming a flat
If the dough is sticky, as evidenced by dough still sticking circle. If the dough springs back, just wait a few minutes.
to the sides of the bowl, then add flour, a little at a time, If you’ve master dough twirling, congratulations – you
until the sides come clean. If the dough is too dry, the know what to do. If not, you can use a rolling pin to flatten
mixer will work hard, jump around on the counter, and try the dough and form it into a circle. Light flour both sides
to throw the dough out the top. If you’re mixing by hand, of the crust and brush excess from the top.
the dough will feel a little coarse and not very pliable.
Add hot water, a little at a time, until the dough relaxes. Lightly brush the top of the crust with about one
tablespoon of olive oil before building your pizza.
Next, form the dough into a round ball. Put about 2
teaspoons of olive oil into the bottom of a non-conductive
bowl (glass or stainless steel) and roll the dough ball to
cover with the oil. Cover the bowl tightly with plastic wrap
and put in a warm place (80° F/27° C) for about an hour
until it doubles in size.
21 22FOR MORE GMG PRODUCTS & RECIPES CHECK OUT
PIZZA
WWW.GREENMOUNTAINGRILLS.COM
SAUCE
RECIPE
You can buy GMG Pizza Sauce from
your local dealer. Or you can prepare it
at home. It will taste great either way!
INGREDIENTS
• 1 cup Marzano peeled whole • 1 tsp. fennel seed
tomatoes • ¼ tsp. red pepper
• ¾ cup tomato paste flakes
• 1 tsp. fresh basil • ½ cup diced yellow
• 1 tsp. dried oregano onion
• ½ tsp. Kosher salt • ¼ cup diced celery
• ½ tsp. brown sugar • 2 cloves garlic,
• ½ tsp. black pepper mashed
Sauté in 1 tbsp. butter and 1 tbsp. olive oil until soft; set
aside.
Mix ingredients and puree in immersion blender. Add
onion/garlic/celery mixture. Blend until thoroughly mixed.
Simmer 15 minutes. Enjoy!
23 GMG Pizza SauceYou can also read