WVSOM IT Department Information Technology Department Booklet
←
→
Page content transcription
If your browser does not render page correctly, please read the page content below

WVSOM IT Department
Information Technology Department Booklet
Class of 2024 Device Information
Please verify that you received the following items:
Hardware/Bag
1 Microsoft Surface Book 2 Laptop
1 Black Surface Book 2 Carrying Case
1 AC Power Adapter
1 Docking Station
1 Ethernet Cable
1 Microsoft Arc Touch Mouse
1 USB Drive
1 Microsoft Surface Pen
1 Headphones
WVSOM Document Folder
Acknowledgement of the Acceptable Use Policy of WVSOM IT Resources/Laptop Ownership Notification and
Agreement
WVSOM Information Technology Department brochure
Class of 2024 Booklet which includes:
Getting Started with your Microsoft Surface Book
Cleaning and Caring for your Surface Guide
Copy of GA-31: Acceptable Use Policy of WVSOM
Copy of E-40: Copyright Policy
Tutorial for setting up OneNote 2016 and OneDrive for Business
Tutorial for Activating Office Pro Plus/Outlook 2016 Setup
Track-It User Guide
Getting Started with Your Microsoft Surface Book 2
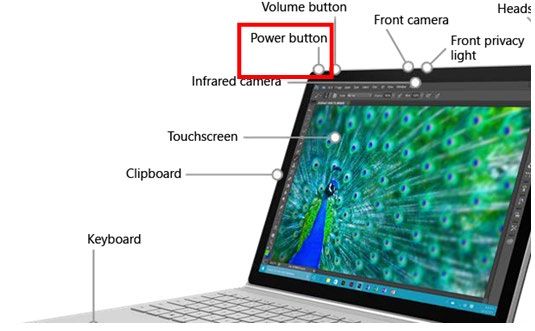
1. Power on the device. The button is located on the outside edge of the screen, on the
upper left.
Last Modified 2/17/2021 Page 1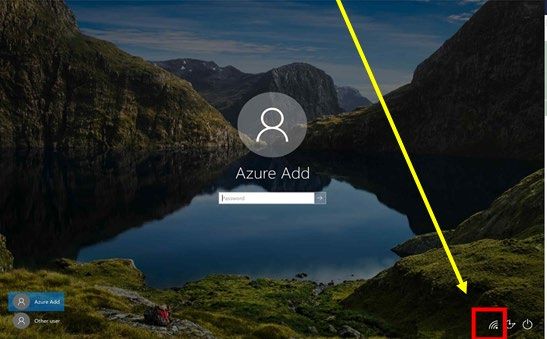
2.   From the log on screen you will need to connect to Wi-Fi before logging on.

                  3.    After connecting to the internet, simply enter your full WVSOM email address and
                       password in the log in boxes. This will be how your will log into your device every time.
                       Once on campus you will need to connect it to the WVSOM network, which will be
                       discussed during orientation.

Last Modified 2/17/2021                                                                                  Page 2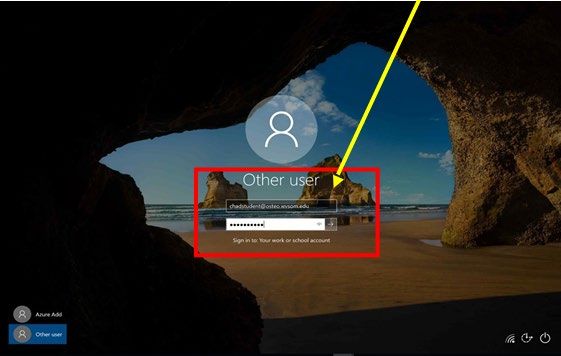
Clean and Care for your Microsoft Surface Book 2

To keep your Surface looking and working great, clean the touchscreen and keyboard frequently, and keep
your Surface covered when you're not using it.

General cleaning recommendations

To keep your Surface looking and working great, use a soft lint-free cloth (microfiber cloths work great)
dampened with a little bit of mild soap and water, or screen wipes. Clean every 3-6 months or whenever
needed. Important: Don’t apply liquids directly to your Surface.

Using disinfecting products on your Surface

You can use many common disinfectant products to safely clean most Microsoft Surface devices. Use pre-
moistened disinfectant wipes or apply an isopropyl alcohol (IPA) solution that's 70% or less to a soft, lint-free
cloth to clean the device.

We've tested the safety of using the following isopropyl alcohol (IPA) solution and disinfectant wipes on
different Surface devices. Be sure to follow the recommendations in the next section as there are specific
cleaners that are best for certain devices and finishes.

   1.    Isopropyl alcohol (IPA) solution
   2.   70% or less PDI Sani-Cloth® Plus
   3.   Covidien™ Alcohol Prep
   4.   pads CaviWipes™
   5.   Clorox Healthcare® Bleach
   6.   Germicidal Wipes Total
   7.   Solutions® Disinfectant Wipes

Important: Microsoft cannot decide of the effectiveness of a given disinfectant product in fighting pathogens,
such as COVID-19. Please refer to your local public health authority’s guidance on how to stay safe from
potential infection.

Last Modified 2/17/2021                                                                                     Page 3
Battery Health

All rechargeable batteries wear out eventually. Here's how to get the longest life from your battery:

   1.   Once a month, let your battery drain below half way before charging it.
   2.   Avoid having your Surface plugged in 24/7.
   3.   Store your Surface in a cool, dry room when you're not using it.

If you plan to store your Surface for an extended period, charge it to 50% every six months to help make sure it
stays chargeable.

For more battery saving tips, see How to charge Surface.

Touchscreen Care

Scratches, finger grease, dust, chemicals, and ultraviolet light can affect the performance of your touchscreen.
Here are a few things you can do to help protect the screen:

   1.  Clean frequently. The Surface touchscreen is coated to make it easier to clean. You don't need to rub
      hard to remove fingerprints or oily spots. Use a soft, lint-free cloth (either dry or dampened with water or
      eyeglass cleaner—never glass or other chemical cleaners) or a screen cleaning wipe to gently wipe the
      screen.
   2. Keep it out of the sun. Don't leave your Surface in direct sunlight for a long time. Ultraviolet light and
      excessive heat can damage the display.
   3. Keep it covered. Close the cover when you're taking your Surface with you, or if you're not using it.

Power Core Care

 Power cords, like any other metal wire or cable, can be weakened or
 damaged if repeatedly twisted or bent in the same spot. Here are a few
 things you can do to keep your power cord from being damaged:
                 Avoid twisting or pinching your power cord .
                 Don't wrap your power cord too tightly, especially around the
                 power brick. Instead, wrap it using loose coils rather than
                 tight angles.

Last Modified 2/17/2021                                                                                   Page 4
Inspect your power cord regularly, especially where
                   it joins the power brick.
                   Avoid pulling on the power cord when unplugging your
                   Surface. Gently removing the connector from the
                   charging connector can help prevent damage to your
                   power cord.

Activation of Office

               1. Microsoft office is already installed on your machine, open any office program,
                  e.g. Word, Excel, PowerPoint.

               2. The below dialog box should open, click “sign in”

Last Modified 2/17/2021                                                                             Page 5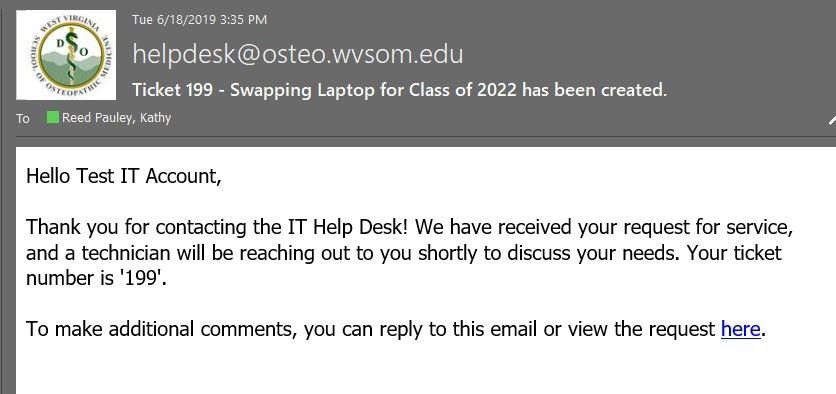
3. Type in your osteo.wvsom.edu email account in its entirety and click “next”

               4. This should take you to a sign in box with the WVSOM logo, make sure your full email is
                  still typed in the top box and enter your current email password into the password field and
                  click “sign in”

Last Modified 2/17/2021                                                                                Page 6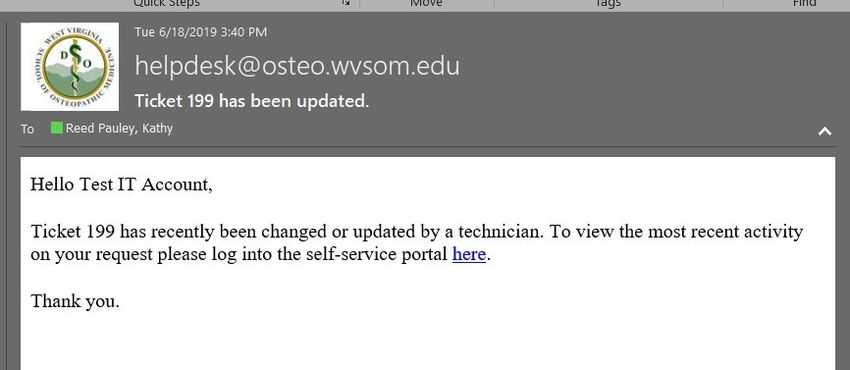
5. You should see the message “you’re all set!” This will activate all your office products.

Outlook Setup

   1.    Open outlook by clicking the icon on the desktop, task bar, or navigating to outlook via the start menu.
        It should open to a welcome screen like the one below. Enter your WVSOM email address and click
        “connect”

   2.    A second Window Security dialog box will pop up and should have your email pre populated, if it does
        not please retype in your email in the appropriate box and enter your password. It is up to you if you
        want to click “remember my credentials” usually we recommend it as you can lock the computer itself. If
        you do not choose this option you will frequently be prompted to re-enter your password.

Last Modified 2/17/2021                                                                                   Page 7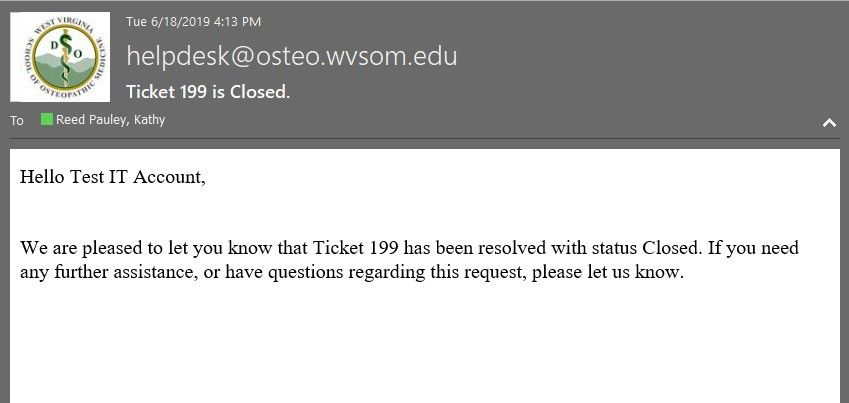
3.    If the password is accepted you will receive a completed message and you can click “OK” to enter
        outlook and it will begin to pull your emails down locally to the machine. If you leave the bottom box
        checked a webpage will open with instructions to set up outlook on your phone.

One Drive Setup

   1.    Click the ^ at the bottom of the task bar to show the One Drive Icon. One Drive icon is the icon with a
        line through it. Left click to open.

   2.   Click “Sign In”

Last Modified 2/17/2021                                                                                    Page 8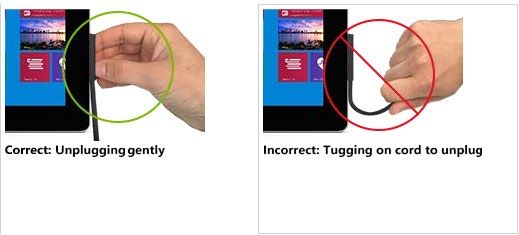
3.   Enter in your WVSOM e-mail and click “Sign In”

   4.    This will pop up another grey windows security box, type in your user name as the first part of your
        WVSOM email (i.e. for drubin@osteo.wvsom.edu only use drubin) and your email password. For this
        you will need to click the box for Remember my Credentials because OneDrive works in the
        background to keep all your files backed up. Check the box and click “ok”

Last Modified 2/17/2021                                                                                 Page 9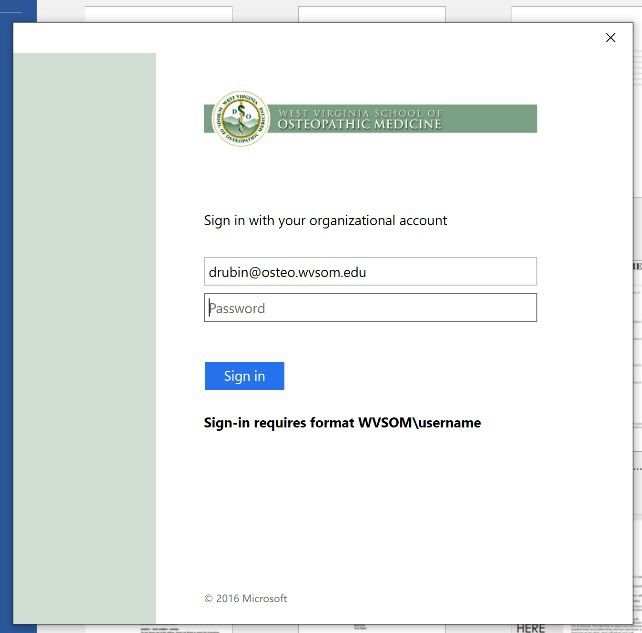
5. This will prompt a short OneDrive tutorial and options dialog box click next through each prompt until
      you reach the “you’re good to go!” Screen.

   6.   Now your One Drive icon should be colored in, left click and open One Drive.

   7.   Click More and then Settings

Last Modified 2/17/2021                                                                               Page 10
8. Click the “Backup” tab at the top and click “Manage Backup”
9. Then click each library location so they have a blue check box and click Start backup. This will keep all
your files backed up that are dropped onto your desktop, pictures, and documents folder as well as
anything in your OneDrive.
Installing and setting up the One Note app
1. (You may also want to install OneNote Web Clipper and Send to OneNote) The OneNote Web Clipper
allows you to save something from the web to OneNote. The Send to OneNote allows you to do things like
print a PowerPoint to OneNote.
2. One you click on the app in the search click the “Get” button. It will come up with a window to sign in
with Microsoft just click the “No, thanks” button and the install will begin.
Last Modified 2/17/2021 Page 113. Now from the start menu you can find the OneNote app version. To make this easier to access for later you can right click on the app from the start menu and choose pin to taskbar, which will snap it to the bottom of the screen. 4. When you open OneNote it will give you two sign in options of which you need to choose the Work or school account option. Then you will be redirected to sign in with your osteo email and account password. Congratulations your OneNote account is already linked to your OneDrive and the notebooks you create will sync with the account that you used to sign in. OneNote 1. The OneNote app is a Microsoft application designed for note taking. 2. PowerPoint presentations can be pulled into OneNote to allow for note taking directly on the slides. 3. Students can organize the slides/notes by creating separate Notebooks for each, or by sections and pages within a single class Notebook. 4. Notes can be typed or handwritten with the active stylus pen that is included with the device. OneDrive 1. Cloud based file storage tied to your Office 365 account. 2. Allows you to sync files between the cloud and multiple devices. 3. File storage location for backing up files from your WVSOM issued laptop. 4. Gives you access to your files from anywhere that you have an internet connection, regardless of whether you are using your WVSOM laptop or a different device. Creating a Notebook in OneNote that Syncs to OneDrive 1. To sync OneNote to your WVSOM OneDrive for Business account: a. Open OneNote b. Click the arrow in the top left of the screen to expand the notebooks. Last Modified 2/17/2021 Page 12
c.     Click the + Notebook at the bottom of the Notebook section that you expanded.

d.     Then give your notebook a name and click Create Notebook.

A new OneNote notebook is created on your local machine as well as in your OneDrive account in the cloud.
You can now add sections and pages to your notebook in the same way for better organization.

Exporting PowerPoint Presentations into OneNote

1.     Open the PowerPoint presentation and navigate to File > Print.
2.     Under the Printer dropdown, select Send To OneNote.
3.     Hit Print when ready to export to OneNote (Don’t select Send to OneNote 2016 if using the app).

Last Modified 2/17/2021                                                                             Page 13
4. Choose the Notebook where you want the slides imported and hit OK. Please note that you cannot
      create a Notebook from here, it must already exist. Refer to the section above regarding the creation of
      a Notebook.

The PowerPoint slides will now appear in the OneNote Tutorial notebook, under the PowerPoint section. Notes
can be added as needed, with the stylus or by typing.

Last Modified 2/17/2021                                                                               Page 14
Track-It Self Service Submitting a Ticket Last Modified 2/17/2021 Page 15
Category Selection

Selecting the correct category is essential to ensuring that tickets route to the proper department and team.
Category descriptions are available to assist in the selection.

Common Requests

To ensure proper category selection and routing to the correct department or team, users can select from a
listing of pre-populated ticket requests that reflect the most common requests.

Viewing Submitted Tickets

Last Modified 2/17/2021                                                                                 Page 16
Users can search through all tickets that they have submitted, and they can filter their ticket view by Open,
Closed or All.

From within the submitted ticket users can view the following information:

-      Assigned Technician
-      Expected Completion Date
-      Date Completed (If closed)
-      All system activities (business and routing rules)
-      Technician notes

Additionally, the following actions can be taken by the user:

-      Cancel the ticket
-      Add additional notes
-      Add attachments

Last Modified 2/17/2021                                                                                  Page 17
Email Notifications

All Track-It users will receive email notifications at various times during the service request cycle. These
include:

   1.   New Ticket Creation

   2.   Ticket Status Update

Last Modified 2/17/2021                                                                                   Page 18
3.   Ticket Closed

Last Modified 2/17/2021   Page 19
You can also read