You Deserve One Now! - 2020 Owner's Manual - Barefoot Spas
←
→
Page content transcription
If your browser does not render page correctly, please read the page content below
You Deserve One Now!

2020 Owner's Manual
!              IMPORTANT SAFETY INSTRUCTIONS
                       READ AND FOLLOW THESE INSTRUCTIONS CAREFULLY. KEEP FOR FUTURE USE.

When installing the spa, basic safety precautions should always be followed, including the following:

WARNING: To reduce the risk of injury, do not permit children to use this product unless they are closely
supervised at all times by adults.

WARNING: A grounding wire connector is provided on this unit to connect a minimum No. 8 AWG (8.4 mm2)
solid copper conductor between this unit and any metal equipment, metal enclosures of electrical equipment,
metal water pipe or conduit within 5 feet (1.5 m) of the unit.

DANGER: RISK OF ACCIDENTAL DROWNING: Extreme caution must be exercised to prevent unauthorized
access by children. To avoid accidents, ensure that children cannot use this spa unless they are closely
supervised at all times by adults.

DANGER: RISK OF INJURY. The suction fittings in this spa are sized to match the specific water flow created
by the pump. Should the need arise to replace the suction fittings or the pump, be sure to replace with same
model suction fittings for safety and compatible flow rates. Never operate the spa if the suction fittings are
broken or missing. Never replace a suction fitting with one rated less than the flow rate marked on the original
suction fittings.

DANGER: RISK OF INJURY. Do not remove suction grate. Suction through drains and skimmers are powerful
when the jets in the spa are in use. Damaged suction grate can be hazardous to children and adults with long
hair. Should any part of the body or hair be drawn into these fittings or stuck onto the fittings turn off the spa
immediately. As a precaution, long hair should NOT be allowed to float freely in the spa.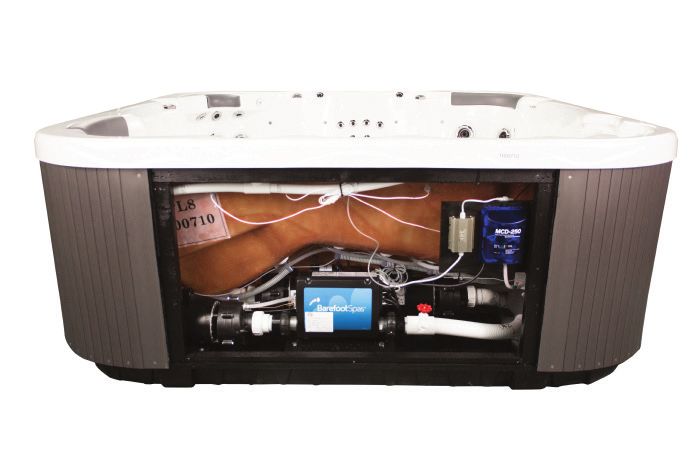
Table of Contents

Letter from our CEO                        4

Environmental Statement                    5

Health Benefits                            6

First Things First                         7

Topside Control Guide                      9

Maintenance                               11

Parts of the Spa                          14

Troubleshoting                            16

Electrical Wiring                         20

Thank you for choosing BarefootSpas!

You have made a wonderful investment in your health and well-being. For over a quarter century,
BarefootSpas has dedicated it’s time, talent and resources to the manufacturing of world-class spas. Our
mission, to deliver awe inspiring relaxation begins in the design studio. Working with leading engineers
and the top minds in ergonomics and therapeutic massage, we design luxurious spas designed to deliver
relaxation and absolute enjoyment. We are commmitted to building the highest quality spas, using the most
advanced technologies available.

We are always looking for new ways to improve. We are very selective in choosing technology partners
to ensure the very best parts and accessories are included in every spa. You can rest assured, you have
selected the very best-of-the-best.

I want to personally thank you for the confidence you have shown in me and my team here at BarefootSpas.

Now it’s time to kick back, relax and enjoy your new spa, because "You Deserve One NOW!"

Sincerely,

Richard T. French, CEO
BarefootSpas

4
BarefootSpas is committed to managing its environmental affairs as an integral part of its business.

It is our policy to assure environmental integrity in our business processes and facilities.

BarefootSpas will provide personnel and other resources to ensure successful compliance with all applicable
environmental requirements. Our policy of innovation, shared leadership, informed decision making,open
communication, professional growth, and personal responsibility directly support our commitment to the
environment.

                          To facilitate our commitment to Environmental Stewardship:

                                  Environmental Statement
                                                  BarefootSpas

We comply with applicable federal, state, and local laws and regulations and will implement programs and
procedures to assure compliance. Compliance with environmental program requirements will be a key
ingredient in our management programs.

We undertake management systems procedures and training that are designed to continually improve our
environmental management system, improve our operations, and prevent activities or conditions that may
pose a threat to human health or the environment.

We minimize risk to our employees and to the community in which we operate through the use of safe
technologies and operating procedures.

We will continue to minimize the potential for releases to the atmosphere, land or water and be prepared to
respond to emergencies.

We use natural resources, including raw materials, water, and energy as efficiently as possible and will strive
to create opportunities to recycle, reuse, and renew.

We continue to engage in pollution prevention practices and maximize the beneficial use of by-products
(waste streams) from our operations, and minimize the generation of solid waste from our facilities.

We communicate this policy and our commitment to environmental quality to our employees, our customers,
vendors and our community.

                                                                                                                  5
~ Health Benefits ~
The health benefits attributable to the spa are both mental and physical. The heat, buoyancy, and massaging
characteristics of the spa work together to produce a euphoric sense of comfort and relaxation.

Stress and Stress-Related Conditions

Sitting in hot water causes endorphins to be released, which melts away the aches and pains. The massaging
characteristics of the strategically placed jets together with the heat of the water alleviates the tension and
allows the body to more effectively cleanse the carbon dioxide in its muscles (CO2 is what gives muscles the
fatigued sensation).

Better Sleep

Soaking in a spa before bedtime not only has the ability to help induce sleep...it can also provide for a deeper,
more relaxed sleep.

Healing

The hydrotherapy associated with spas has the tremendous ability to alleviate the fatigue and soreness that
muscles build up from exercise or just from one’s daily routine. When used properly, the spa has the ability to
lower blood pressure, increase circulation, and speed up the body’s ability to cleanse out toxins.

Arthritis and Chronic Pain

Spending time in a spa is a great way to apply heat to arthritic joints. In fact, getting in the spa for 10-15
minutes in the morning is a great way to ease up the joints when they are generally at their worst.

Diabetes

Please understand that a spa is not a ‘cure-all’ for people with diabetes. Studies have indicated, however, that
sitting in a spa can help improve blood sugar levels, help promote weight loss, and improve sleep patterns in
people suffering from Type 2 diabetes.

Time for Family and Friends

A spa provides access to all the therapeutic benefits listed above and more…why not share them with loved
ones?The spa is a perfect place to relax with family members and catch up on what’s on everyone’s mind.
The spa also serves as a nice environment when entertaining friends.

6
~ First Things First ~
               Choosing where to place the spa requires careful consideration.

The spa must be installed on a sturdy, flat surface that is built to code. Consult a building inspector or a
licensed contractor

When properly installed, the spa base will rest flat on the supporting surface. Do not attempt to shim the spa
or place in an otherwise unleveled surface. Failure to place the spa on a level plane will cause the unit to
distort, collapse, or crack. It is your resonsibility to ensure the chosen location is pefectly flat and level. Any
such damage caused by improper installation will not be covered under the warranty.

The surface design and material used to support the spa should meet local building regulations and should be
verified before installing the spa.

Additionally, make sure the spa is accessible to service technicians. Leave at least a three feet of open space
for any side of the spa housing a pump.

                                           The spa must be installed on a sturdy, flat surface that is built to code.

                                                                                                                      7
~ First Things First ~ Filling the Spa Please take the following precautionary measures before filling the spa: 1. Make sure the electrical service is shut off at the breaker. Failure to do so may cause damage to the pump(s) and/or heater, which is not covered under your limited warranty. 2. Remove the cabinet panel directly below the topside controls to access the equipment compartment. Make sure the pipe unions on either side of the pump(s) are tight. You are now ready to fill your spa. Please follow the instruction’s below: 1. Place the garden hose down inside the filter housing. On a dual-filter system, use the filter closest to the topside control panel. Remove the skimmer (and filter basket on certain systems) to access the filter and filter housing. 2. Feed the garden hose down into the filter housing and turn on the water. **If using well water, use the hose filter attachment to reduce contaminants and help water’s alkalinity** 3. Fill the spa until the water level is approximately one inch above the highest jet (excluding any small jets the spa may have that are designed for the neck and/or shoulders). 4. When the spa is filled to the appropriate water level, you may turn power “ON”. Following these instructions carefully allows the spa to prime the pump(s) properly, preventing possible air pockets that may result in an air lock. In which case, no water can be pulled through the pump until the pocket of air is released. IF you experience an air lock, turn ‘pump 2’ on high. If the spa does not work out the air pockets and prime properly within 12-24 hours, contact Barefoot Spas customer service. 8
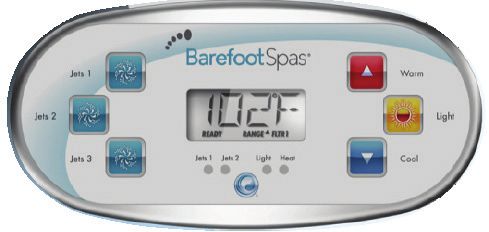
~Topside Control Guide~

Start-up

When your spa is powered up, it will go into priming mode. The display will read RUN PMPS PURG AIR ----.
Priming mode can last up to 10 minutes, press WARM or COOL to manually exit the priming mode.

Temperature settings (80°F - 104°F)

The last measured temperature is constantly displayed on the topside’s LCD. Press “Warm” or “Cool” once
to display the set temperature. Each time either button is pressed again, the set temperature will increase or
decrease. After three seconds, the current temperature will resume on the topside’s LCD.

Jets

Press “Jets 1” once to turn on the primary pump, press again to shift between high and low speed. If your
model has any additional pumps, they will be displayed as “Jets 2” and “Jets 3”, press the button once to
turn on the pump desired. Secondary pumps are only 1-speed pumps. All pumps will timeout if left in
highspeed as a safety precaution.

Heating the Spa

The heater and “Jet 1” will run on the low setting until 1 degree below the temperature selected. Then, “Jet
1” will run in the low setting WITHOUT the heater until 1 degree above the temperature selected. Once the
set temperature is exceeded by 1 degree, both the heater and “Jets 1” will remain off until the water drops to
the temperature selected.

                                                                                                                 9
Ozonator
The Ozonator will run when the “Jets 1” is running in the lower setting.
Lights
Press the “Light” button once to start the lights. Continue to press the light button to go through the wheel,
stop at the desired selection. Press the light again to turn the lights off.
Please see the following guide for messages that may display on your spa’s topside.
WATR / HTR TOO HOT
One of the sensors has detected a temperature that exceeds 107°F.
Remove the cover and allow the water to cool, check for water flow
obstructions. Call customer service if the code does not reset.
SNSR BAL-ANCE or SNSR SYNC SNSR A / B
The temperature sensors are out of balance. If the display is toggling
with the temperature, it may be a temporary condition. Check for
water flow obstructions. If only this message is displayed, the spa
has shut down. Call customer service.
HTR FLOW LOSS / FAIL
Low flow. Heater may shut down. Check for water flow
obstructions. Call customer service if the code does not reset.
HTR DRY / HTR MAY BE DRY
Low/no flow. Check for water flow obstructions. Call customer
service if the code does not reset.
-- -- -- F
Temperature unknown. Allow the pump to run for at least 1 minute to
register the current temperature.
TOO COLD
If the temperature sensors within the heater detect a low enough
temperature, then the jets automatically activate to provide freeze
protection. The jets will run either continuously or periodically
depending on conditions. If “TOO COLD” displays on your topside
and the spa does not resume and heat to the set temperature,
contact customer service.
10~ Maintenance ~
Proper Water Level
It is normal for the spa to lose approximately one inch of water per week. The water loss is due to evaporation
and run off from people exiting the spa. Please be mindful of this and add water as necessary. If the water
level drops below the filter level then the pumps will draw in air. This will cause the pumps to ‘air-lock’ and can
cause error codes that will prevent the heater from turning on.
Filter Maintenance and Replacement
Proper maintenance of the spa’s filter is very important. The filter helps to clean the spa from algae, bacteria,
hair, debris, and other solids that enter the spa. Failing to clean the filter will place an unnecessary strain on
its respective pump. Additionally, a dirty filter will result in dirty water. Clean the filter at least once a month. Do
not use a pressure washer.
To clean the filter:
1. Shut off power to the spa.
2. Remove the filter from the spa. Hold the filter at a 45º angle and spray it off with a garden hose.
3. Re-insert the filter in the spa.
It is of equal importance that the spa filter be replaced periodically. The fibers in the filter
loosen over time, allowing more particles to pass through them. A standard cartridge filter needs to be
replaced every six months at a minimum.
Draining the Spa
The water needs to be replaced at least once a year. Always remember to shut off power at the breaker before
draining the spa.
The most common way to drain the spa is with the drain valve. The drain valve is a red handled spigot located
in the main access panel. Attach a garden hose to the valve and turn the spigot into the open position to
release the water. Be sure to close the spigot before refilling the spa.
Another way to drain the spa is by means of reverse siphon. The steps for this method are as
follows:
1. Place one end of the garden hose in the spa and connect the other end to a faucet.
2. Turn the faucet on to fill the garden hose with water.
3. Once the garden hose is full, turn off the water and disconnect it from the faucet. Be sure this end of the
garden hose is at a lower elevation than the end in the spa.
4. The water will now drain out of the spa.
Cover
While the spa cover is very sturdy, it is not meant to withstand excessive weight. Never stand on the cover.
Remove snow or other items that accumulate on the cover promptly to avoid causing it to misshape or
otherwise become damaged.
11Panel Maintenance
The standard synthetic panels installed on most spas are weather resistant and non-porous. They are virtually
maintenance free, only requiring the occasional rub-down with a wet cloth.
Preparing for Cold Weather
There are two options when preparing for a winter with freezing conditions: maintain it or drain it.
Maintain It
Maintaining the spa in the winter months is much the same as maintaining the spa the rest of the year. The
only major addition is that the spa and GFCI needs to be checked on a daily basis to make sure it is receiving
power. The spa is constantly monitoring the temperature of the water and will automatically activate the
pump(s) and heating element if it registers freezing or near-freezing conditions. Drain the spa immediately
if it loses power for an extended period of time. Otherwise, the pipe fittings in the spa will freeze and break.
Consult the next paragraph for instructions on draining the spa.
Drain It
The spas internal components are designed to be wet at all times, prolonged periods without power or water
run a risk of damage to the internal components (including premature shalt seal failure) that will void the
manufacturer’s warranty. If circumstances do not allow power or water in colder months, Follow the drain
instructions found in General Maintenance, and flush the jet lines to remove any remaining water to lower the
risk of freeze damage.
To do this, remove the jet from the jet body. Place the shop vacuum up to the opening and suck out the
remaining water. Follow this procedure with every jet line in the spa. It is important to remember that snow
gets quite heavy as it accumulates. Brush snow off of the spa cover as necessary.
or
Drain It Maintain It
12~10 Easy Steps to a Perfect Hot Tub!~
Spa First Aid Kit
1. Fill your spa with water that has NOT gone through a water softener. If you have very hard water, lots of
rust, or are using well water use a pre-filter on the end of your hose (Not included). Remove the Hot
tub filter, and place the end of the hose in the filter compartment. While filling add Spa Bright per the
directions on bottle. When full: replace the filter, and turn on the jets, close the cover, and let it heat.
2. After at least an hour, add a cap full of Spa Shock directly into the center of the spa. Turn the jets
back on, close the cover, and let it heat again.
3. When the spa reaches at least 90 degrees, turn the jets on again, close the cover, and let it heat.
4. When the spa reaches the right temperature it is ready to use. Use a Test Strip from the bottle. Use
according to the directions on the bottle. The Chlorine may read low, this is normal.
5. Both the Alkalinity and the PH are adjusted together. Always adjust the Alkalinity first, then the PH.
Read the Alkalinity on the test strip. If it is too high add PH Down (a cap full) every 4 to 6 hours until it
reads in the “Okay” range. If the Alkalinity is too low add Alkalinity Up (a cap full) every 4 to 6 hours
until it reads in the “Okay” range.
6. Once the Alkalinity has been in the “Okay” range for 48 Hours, then read the PH. If the PH is too high
add PH Down at the rate of 1 teaspoon every 4 to 6 hours until it is in the “Okay” range. If the PH is too
low add PH Up at the rate of 1 teaspoon every 4 to 6 hours until it is in the “Okay” range.
7. Once a week re-test the PH and Alkalinity and adjust if necessary.
8. Every other week add Spa Bright per directions on the bottle, and add water to the proper level. On
opposing weeks, add a cap full of Spa Shock and 2 ounces of Clear Spa. Wait at least 6 hours, but
not more that 24 hours, and then remove and rinse your filter. You must turn off the hot tub at the
breaker before removing the filter.
9. If your water gets cloudy, or has a smell add a cap full of Spa Shock. Then wait at least 6 hours, but
not more than 24 hours, and then remove and rinse your filter. You must turn off the hot tub at the
breaker before removing the filter.
10. Last and very important! Be patient and go slow. Your Ozone system will do most of the work if you
give it time. You should only drain and re- fill your spa once a year!
Note: The initail time period immediately after a fresh water fill is the most important and unpredictable
time of this process. Don’t be discouraged if your water gets worse before it gets better. The worst thing
you can do is add to much of anything. The second worst thing is get frustrated, or impatiant and start
over.
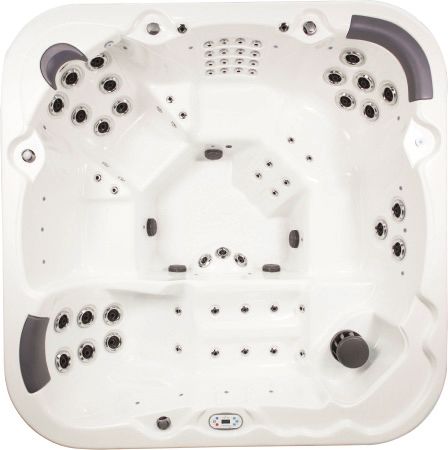
13~ The Parts of Your Spa ~
6
7
4
5
3
1
8 2
Filter Assembly LED Light Lenses
1 Varies, in most models it consists 5 Houses individual LED accent
of the filter housing, filter, basket, lights
and telescoping skimmer.
Topside Control Unit Headrest (Pillow)
2 Controls the temperature, light(s), 6 Provides a cushioned surface
mode, and filter settings
Footwell Light Lens Floor Suction
3 Houses a large incandescent or 7 Water intake source for the
LED light pump(s)
Jets Air Control Valve
4 8 Used to control the amount of
Water release point for the
pump(s) air injected into the jet lines.
** Many of these features are optional and will not necessarily be present on your spa **
14~ The Parts of Your Spa ~
1
3
5
4 8 7 6
2
Waterfall Pump
1 5 Propels water throughout the spa. The
Enhances visual and audible
ambiance pump(s) can have either one or two
speeds.
Ozone Generator
Kickplate 6 Produces ozone, which helps to break
2 Base of spa down organic contaminants and maintain a
sanitary spa.
Cabinet LED Controller
3 7 Processes the various color effects for the
Made of synthetic wood, the
cabinet helps to insulate and LED
protect the spa
Spa Pack
4 8 Drain Valve (model specific)
Monitors all the spa’s functions, including
the heater, pump(s), and filtration settings.
Unscrew the lid to gain access to the
electrical wiring connections, circuit board,
fuses, and heater.
** Many of these features are optional and will not necessarily be present on your spa **
15~ Troubleshooting ~
Airlock
Air in the pump – pump is working but nothing is coming out of the jets
Locate the pump by turning
! If the pump is airlocked 1 it on and listening for its
position.
Remove the panel(s) around
2 the pump to gain access.
Make sure the air locked
3 pump is off.
Locate and loosen one of the
drain plugs until water begins
4 to seep out. The pocket of air
will be released momentarily.
Drain Plug
They are plastic, hexshaped,
and 11/16 of an inch in
diameter.
After air is released, tighten
5 the drain plug and re-attach
the panels.
16~ Troubleshooting ~
Pump/motor is not working correctly
Check the GFCI and topside
1 If that does not solve the problem,
control to make sure the spa ! follow the actions below.
is receiving power.
1 Remove the spa panels
around the pump and try
to turn it on by pressing its
coresponding ‘Jets’ button.
Pump and motor appear to be No activity from the motor or
functioning correctly, the shaft ! pump, no clicking noise from
can be seen rotating – The pump the spa pack – Likely a problem
is ‘airlocked.’ Bleed the pump with the wiring or the topside
(using one of the bleeder valves) control.
with the pump on.
Contact Customer Support.
See Troubleshooting – Air in the
Pump.
Motor is making a buzzing
sound and the shaft is not ! Motor is likely damaged.
rotating Motor is likely Contact service.
damaged. Contact service.
No activity from the motor or Replace the fuse for the
pump, a clicking noise can be corresponding pump in the
heard from the spa pack – spa pack.
17~ Troubleshooting ~
Flow issues in one or more jets.
Rotate the jet counterclockwise to
1 open it.
2 If the jet is already open…
Remove the jet from the jet body.
3 Check the back of the jet and the jet
line for any obstructions.
! If there are no obstructions…
Remove a properly functioning jet of The jet needs replacing if a
4
the same size and insert it in the jet ! proper stream is achieved with
body with the weak stream. the swapped jet.
If there is no stream or a weak
! stream with the swapped jet then
there is likely a problem with the jet
line.
Contact Customer Support.
18~ Troubleshooting ~
Tripping Breaker
Circuit Breaker Tripping
If your GFCI breaker trips and will not let you use the spa’s functions, and the spa has been wired
correctly, you can determine the root of the problem through process of elimination.
1) With the breaker turned off, remove the panel below the topside control to access the equipment
compartment.
2) Trace the wire from the heater to the control pack. Unplug this wire and reset the breaker. If the
breaker remains on, your heater is malfunctioning. If it trips, continue on to the next step.
3) On the left side on the control pack, you will see a series of multicolored plugs aligned vertically.
4) Remove the first plug to disconnect that component.
5) Reset the breaker and see if the spa will power up without tripping the breaker. If it will not, repeat
steps 3 and 4, disconnecting each component individually until the breaker does not trip.
6) Once the breaker remains on, trace the plug of the last component disconnected back to its source.
This is the part that will need to be looked at for service.
7) If the breaker continues to trip, contact your dealer for service.
19~ Electrical Wiring ~
Remember Safety First
NOTE: ALL ELECTRICAL WORK MUST BE DONE BY A QUALIFIED ELECTRICIAN AND MEET THE NATIONAL
ELECTRICAL CODE REQUIREMENTS. ALL WIRE GAUGE AND TYPE SHOULD BE SIZED IN ACCORDANCE WITH
THE NEC AND INSTALLED BY A LICENSED ELECTRICIAN. PLEASE HAVE THE ELECTRICIAN REFER TO THIS
SECTION OF THE MANUAL BEFORE INSTALLING THE ELECTRICAL SERVICE. THE FOLLOWING GUIDELINES
ARE NECESSARY FOR PROPER FUNCTIONALITY OF THE SPA.
The spa must be set up with a dedicated service. Use of extension cords is a safety hazard and can result in electrical
damage that is not covered under the warranty.
The circuit breaker panel should be a minimum distance from where the hot tub is to be located. Check with the local
building official for additional code requirements.
Only copper wire may be used. Use of aluminum or other wire will void the warranty and may cause extensive
damage to the equipment.
All lugs must be torqued to proper specifications. Over or under torqued lugs may cause excessive heat and void your
warranty. Please read all instructions enclosed in the GFCI package.
240V GFCI SPA WIRING DIAGRAM FOR CERTIFIED ELECTRICIANS REFERENCE ONLY
O
N
IMPORTANT: The white wire that
comes with the GFCI breaker MUST be
wired to the box neutral bar. The
neutral wires and the ground wires
o MUST be isolated and NOT connected
F
F to the same box neutral bar. The hot
TEST
tub (load) neutral MUST be connected
to the correct lug ON THE GCFI
breaker; NOT the box neutral bar.
LOAD
LOAD NEUTRAL
POWER
LOAD
POWER NEUTRAL - INPUT
White Wire
LINE 2 - INPUT
Red Wire From Electric
Service Panel or
LINE 1 - INPUT Other Source
Black Wire
LOAD 2 OUTPUT To Spa Equipment
Red Wire (Control Pack)
LOAD NEUTRAL
OUTPUT
White Wire
LOAD 1 OUTPUT
Black Wire
Improper wiring can cause damages to the spas electronics, which is not covered in the warranty
20To Learn More visit www.barefootspas.com
Barefoot Spas
8401 Fort Darling Road
North Chesterfield, VA 23237
(804) 298-3950
You can also read


