AirLink USER MANUAL - Air Quality Sensor - Davis Instruments
←
→
Page content transcription
If your browser does not render page correctly, please read the page content below
USER
MANUAL

                                                                                                      R

AirLink
                                             TM
                                                                                          R

Air Quality Sensor

Product number 7210

                                     R

Davis Instruments, 3465 Diablo Avenue, Hayward, CA 94545-2778 U.S.A. • 510-732-9229 • www.davisinstruments.com
FCC Part 15 Class B Registration Warning
This equipment has been tested and found to comply with the limits for a Class B digital
device, pursuant to Part 15 of the FCC Rules. These limits are designed to provide
reasonable protection against harmful interference in a residential installation. This
equipment generates, uses, and can radiate radio frequency energy and, if not installed and used in
accordance with the instructions, may cause harmful interference to radio communications.
However, there is no guarantee that interference will not occur in a particular installation.
This device complies with part 15 of the FCC Rules. Operation is subject to the following two
conditions: (1) this device may not cause harmful interference, and (2) this device must accept any
interference, including interference received, including inference that may cause undesired operation.
If this equipment does cause harmful interference to radio or television reception, which can be
determined by turning the equipment on and off, the user is encouraged to try to correct the
interference by one or more of the following measures:
• Reorient or relocate the receiving antenna.
• Increase the separation between the equipment and receiver.
• Connect the equipment into an outlet on a circuit different from that to which the receiver is
connected.
• Consult the dealer or an experienced radio/TV technician for help.
This device complies with Industry Canada license-exempt RSS standard(s). Operation is subject to
the following two conditions: (1) this device may not cause interference, and (2) this device must
accept any interference, including interference that may cause undesired operation of the device.
Le présent appareil est conforme aux CNR d'Industrie Canada applicables aux appareils radio
exempts de licence. L'exploitation est autorisée aux deux conditions suivantes: (1) l'appareil ne doit
pas produire de brouillage, et (2) l'appareil doit accepter tout brouillage radioelectrique subi, même si
le brouillage est susceptible d'en compromettre le fonctionnement.
Innovation, Science and Economic Development Canada ICES-003 Compliance Label: CAN ICES-3
(B)/NMB-3(B)
Changes or modification not expressly approved in writing by Davis Instruments may void the warranty
and void the user's authority to operate this equipment.
Contains: FCCID: 2AC7Z-ESP32WROVERE IC: 21908-ESP32WROVERE
Information Regarding Exposure to Radio Frequency Energy: The antenna used for this
transmitter must be installed to provide a separation distance of at least 20 cm from all persons and
must not be co-located or operating in conjunction with any other antenna or transmitter.
Davis Instruments, 3465 Diablo Ave., Hayward, CA 94545
Power Supply Model identifier: DSA-5PF07-05 FUK 050100 or DSA-5PF07-05 FEU 05010
Input voltage: 100-240 VAC Input AC frequency: 50/60 Hz
Output voltage: 5.0 VDC Output current: 1.0 A
Output power: 5.0 W Average active efficiency: 73.77%
Efficiency at low load (10 %): N/A % No-load power consumption 0.075 W
EC-Declaration of Conformity
Directive 2014/53/EU (RED)
Manufacturer/responsible person: Davis Instruments
Compliance Engineer
3465 Diablo Ave., Hayward, CA 94545 USA
Declares that the products:
7210EU, 7210UK, 7210USB
Comply with the essential requirements of
2014/53/EU, if used for its intended use. The complete Declaration of Conformity is on our website at
https://www.davisinstruments.com/legal.
The technical documentation relevant to the above equipment will be held at:
Davis Instruments at 3465 Diablo Ave, Hayward CA 94545.
RoHS Compliant.
0Welcome to AirLink
AirLink air quality sensor uploads your air quality data directly to the
WeatherLink Cloud via Wi-Fi. You’ll see your air quality on your phone or tablet
with the WeatherLink app, or on your computer on WeatherLink.com.
It can be used as a stand-alone sensor, or added to your current weather station
system that is being uploaded to WeatheLink.com via WeatherLink Live or
WeatherLink data logger. You may add up to three sensors to your system. It can
be mounted indoors on a flat surface such as a counter or table top, or on a wall
using the included mounting bracket. It can also be used in a protected outdoor
location, mounted vertically and with the included outdoor sensor cover.
AirLink measures airborne particulate matter (PM) by shining a laser through the
air. Particles in the air reflect the laser and the sensor uses the reflection to
determine the number and size of particles.
You’ll get easy access to:
• Real-time current readings of particular matter (PM1, PM2.5, and PM10),
updated every minute.
• Color-coded Air Quality Index (AQI) reading, based on current PM2.5 data.
You may choose your preferred Air Quality Index (AQI) from a growing list:
• United States Air Quality Index
• Air Quality Health Index (Canada)
• Metropolitan Index of Air Quality Index (Mexico)
• Common Air Quality Index (EU)
• UK Daily Air Quality Index
• India Air Quality Index
• China Individual Air Quality Index
• AIRKOREA (South Korea)
• Australian Air Quality Index
• 6-hour Air Quality Chart
• High AQI
• NowCast reading. NowCast shows the current air quality using the AQI colors
and scales. It is calculated using the data for the current hour as well as multiple
hours of past data. It uses a heavier averaging weight for recent hours of data
and data that is changing rapidly. The NowCast reading is used in lieu of a 24-
hour average, to give you a more useful indication of the danger of the air
quality over that period.
You can access your data on WeatherLink.com or the WeatherLink mobile app.
Archive data (used in trends and NowCast) updates at user-selectable intervals
every 15, 30 or 60 minutes. More frequent archive update intervals are available
with Pro (5, 15, 30, 60), and Pro+ (1,5,15,30,60) tier subscriptions.
Note: If you are adding your AirLink with a currently upgraded system, the AirLink will be
automatically upgraded as well.
Use AirLink with Amazon Alexa or Google Assistant. Just ask for your current air
quality.
1Components
Power Cable
Sensor (plug-in adapter not
included in USB
Cover version)
R
Mounting
Bracket
(attached to
back of Foot
sensor housing)
Pads
R
Sensor
Mounting
Housing
Screws
AirLink Installation Requirements & Tools
• Wi-Fi internet connection
• Wi-Fi password
• Phone with Bluetooth enabled
• AC power
• Drill or screwdriver if mounting on a vertical surface
2Install or open the WeatherLink App
1. If you have already installed the WeatherLink App and created your account,
sign in to the app.
Note: Make sure you have the latest version of the app.
2. If you have not already installed the app and created your
account, install WeatherLink mobile app on your phone.
Find the app by searching for the Davis WeatherLink app in
the iOS App Store or Google Play Store.
3. In the app, create your account on WeatherLink.com.
4. Make sure your phone’s “Bluetooth” function is on. With
your phone near your AirLink sensor, tap the Account icon: in the upper
right corner of the app’s home screen.
5. Tap the Add button next to Devices, then choose AirLink.
Note: You will use the user name and password you have set up to access your page on
WeatherLink.com from your computer as well. You will only have to enter your name
and password the first time you open the app unless you log out.
The WeatherLink app will walk you through powering up and connecting your
device as shown in the steps below.
Set Up Your AirLink
Power and Connect
1. Plug the AC adapter into the socket on the side of the AirLink, and plug the
adapter into the wall.
Power Cable
Socket
R
Cable
Channel
Tip: There is a cable channel in which to run the cable.
32. The blue LED will begin flashing
indicating that the device is ready to R
connect to the phone app.
3. With AirLink “awake,” and your phone
next to it, follow the prompts to connect
AirLink to the internet.
Blue BLE
Light
Tip: If the device doesn’t find your Wi-Fi network, make sure you have entered the
correct password and that you are connecting AirLink to a 2.4 GHz network. It will
not connect to a 5 GHz network. Then try repeating these steps.
4. The LED will go solid when the phone is connected to the AirLink.
Configure
1. When you are prompted to do so, enter a name for your AirLink, such as
“Downtown Hayward Air Quality.” Remember that this name will be visible
to all WeatherLink users if you make your station “public.” (The Device ID
and activation date will be entered automatically.)
2. In the next screen, a map opens with the location of your station. You can
change this by moving the pin. Tap Save.
3. In the next screens, select your Wi-Fi network and enter the network
password. Tap Connect.
4. Your air quality data will now appear in the opening “snapshot” screen of the
WeatherLink app, and on your bulletin page on WeatherLink.com. Your
AirLink’s name will appear in the list of your devices under your account.
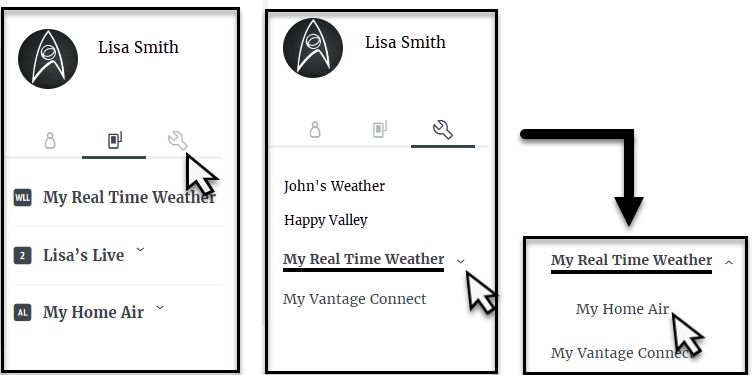
5. To edit your AirLink’s device information (name, indoor or outdoor use, or
location), open your WeatherLink.com page and click the wrench icon under
your name on the right hand side of the bulletin. (If your AirLink is part of an
existing system, click the next to the system’s name to open it.) Click the
name of your AirLink to open the Device Info page, where you can edit the
name, location, and elevation. Click Device Settings to edit environment.
After editing, click Save.
4Mount Your AirLink
AirLink can be mounted inside or in a protected area outside where AC power is
available. Good airflow through the sensor is important.
Using on flat surface such as a counter or tabletop:
1. Adhere the foot pads to the feet.
2. Slide the mounting bracket down and off the sensor housing.
3. Place the sensor on the surface, with the Davis logo facing upward. The raised
feet on the underside of the sensor housing will ensure air flow through the
sensor.
If installing on a vertical surface, inside or outside:
Installing the sensor outside: Choose a shaded and protected spot. In the
Northern Hemisphere, a north-facing (south-facing in the Southern Hemisphere)
wall or under an eave is a good choice. Don’t install the sensor near outdoor
exhaust vents for air conditioning, hot water heaters, dryers, or kitchen/bathroom
vents.
Note: If using outdoors, mount only on a vertical surface and with the outdoor sensor cover.
Do not use on a flat surface or without the cover.
1. Slide the mounting bracket down and off the back of the sensor housing.
2. Use the bracket as a template to mark screw holes, then use a drill create pilot
holes in the mounting surface. Use the included screws to mount the bracket to
the wall.
UP
Screw
Holes
3. Slide the sensor housing down onto the bracket. It will click into place.
54. If installing outside: slide the sensor cover over the sensor housing.
R
R
6Maintenance
Accurate air quality readings require free air flow over the sensor. If your readings
stop or seem wrong, check the sensor housing for leaves, insect webs or nests, and
any other debris. You can use a vacuum hose or compressed air to clean the debris
from the sensor housing.
If large insects are a problem in a sensor mounted outside, you may install a screen
over the sensor. The sensor’s accuracy is rated without the screen, so be aware that
using the screen may reduce accuracy.
The screen is located in a storage area inside the sensor housing.
Note: It is important to avoid damaging the device with a discharge of static electricity when
you touch the board. You should ground yourself before opening the case by
touching any conductive material, such as metal, that is either touching the floor or
touching a series of items leading to the floor.
1. Unplug the AC-power cable.
Note: Unplugging the AC adapter will cause any stored archive data to be lost. Since data
is uploaded as soon as it is generated when connected to Wi-Fi, this will only be a
problem if the device has not been connected to Wi-Fi for some time.
2. Remove the two screws on the back of the sensor housing.
3. The screen is stored above the green PCBA board. Remove the factory-
installed frame (no screen) that surrounds the air intake openings, and replace
it with the screened frame.
Stored
screened
frame
Sensor
Factory - installed
frame
Air intake (no screen)
openings
4. Put the unscreened frame into the empty storage slot and close the sensor
housing.
7Troubleshooting
When setting up my AirLink, I don't see AirLink in the list of devices to set up in the
WeatherLink app.
You may have an older version of the app. Please download the latest version from
iOS App Store or Google Play Store
Can I use AirLink with my Davis weather station?
You can use AirLink with an existing Davis system that is uploading to the
WeatherLink Cloud. Your air quality will appear on your WeatherLink.com
bulletin page as well as on your WeatherLink app. (It will not appear on your
Vantage Pro2 or Vantage Vue console.)
The blue LED on my AirLink does not come on.
The BLE may have “gone to sleep.” To
reset, insert a paper clip into the reset
button access on the front of the sensor
housing. If the LED still does not come R
on, make sure your AirLink is
connected to AC power. (Unplugging
the device from AC power will also
reset it. See note on page 7 about
possible archive data loss from power
loss.)
Reset Button
Access Opening
My AirLink will not connect to the internet.
Check to make sure you entered the correct Wi-Fi password. You may have
entered the wrong password: repower the AirLink and try reconfiguring Wi-Fi in
the app.
There is no air quality data on my WeatherLink.com page and app.
Make sure the sensor is powered up and connected to the internet.
Can I change my archive rate?
The archive rate is the rate at which archive data is permanently stored on the
WeatherLink Cloud. (It does not affect the update rate for current conditions.) The
default setting for AirLink’s archive rate is 15 minutes. You can change this to 1 or
5 minutes by purchasing an annual device upgrade subscription for your AirLink.
You can select 30- or 60-minute archive rates without upgrading.
You can change your archive rate on the WeatherLink app or on WeatherLink.com.
Note: If you are using AirLink with a WeatherLink Live or EnviroMonitor system that has
already been upgraded, it will also be upgraded. No need to purchase another.
8Contacting Davis Technical Support
For questions about installing or operating your AirLink please contact Davis
Technical Support. We’ll be glad to help.
Online www.davisinstruments.com
See the Weather Support section for copies of user
manuals, product specifications, application notes,
software updates, and more.
E-mail support@davisinstruments.com
Telephone (510) 732-7814
Monday - Friday, 7:00 a.m. - 5:30 p.m. Pacific Time.
9Specifications (See www.davisinstruments.com for more information)
Operating Temperature ............................................... 14° to +140°F; -10° to +60°C
Storage Temperature .................................................. -40 - +176°F; -40 - +80°C
Current Draw............................................................... Average: 100 mA; Peak 500mA
Housing Material ......................................................... Rugged ABS Plastic
AC Adapter (not included with 7210USB) ................... 5 VDC, 1000 mA
Wi-Fi Frequency Range
US Model ............................................................... 2412-2462 MHz, 802.11b/g/n
EU/UK/USB Models............................................... 2412-2472 MHz, 802.11b/g/n
BLE Frequency Range................................................ 2402-2480 MHz
Particulate Matter Sensor
Particle Range of Measurement .............................. 0.3 ˜͂ 1.0 μm; 1.0 ˜͂ 2.5 μm;. 2.5 ˜͂ 10 μm
Particle Resolution .................................................. 1 μg/m3
Accuracy .................................................................. ±10 μg/m3
Update Interval ....................................................... 1 minute
Inside/Outside Relative Humidity
Resolution and Units............................................... 0.1%
Range ..................................................................... 0.1% to 100% RH
Accuracy ................................................................. ±2%
Update Interval........................................................ 1 minute
Inside/Outside Temperature
Resolution and Units............................................... Current Data: 0.1°
Range ..................................................................... -40° to +140°F (-40° to +60°C)
Sensor Accuracy. .................................................... ±0.5°F (±0.3°C) (typical)
Update Interval ...................................................... 1 minute
AirLink™
Product Number 7210, 7210EU, 7210UK,7210USB Document Number: 07395.384 Rev. B 9/10/20
AirLink™, Vantage Pro®, Vantage Pro2™, EnviroMonitor®, Vantage Vue® , and WeatherLink® are
trademarks of Davis Instruments Corp., Hayward, CA.
© Davis Instruments Corp. 2020. All rights reserved.
Information in this document subject to change without notice. Davis Instruments Quality Management
System is ISO 9001 certified.
®
3465 Diablo Avenue, Hayward, CA 94545-2778 U.S.A.
510-732-9229 • Fax: 510-732-9188
info@davisinstruments.com • www.davisinstruments.comYou can also read