Alexander Calder-Inspired Wire Sculpture
←
→
Page content transcription
If your browser does not render page correctly, please read the page content below

Alexander Calder-Inspired Wire Sculpture
                  Written by Amy Briere, Museum Educator

                  Calder at his workbench.
                  © Gordon Parks

Introduction
Alexander Calder was a 20th century American sculptor and artist most
famous for inventing the mobile, a type of sculpture that moves. In addition
to creating mobiles, he coined the term stabiles to refer to his immobile
sculptures. Calder also made paintings, lithographs, toys, tapestries, and
jewelry. In his first critically important work, Le Cirque de Calder (Calder’s
Circus), the artist magically brought inanimate objects and a band of circus
characters to life using wire and recycled materials. Calder’s Circus was a
miniature reproduction of an actual circus, and is considered to be the start
of his lifelong interest in both wire sculpture and kinetic art. These art forms
would typify much of his later sculptural work, including the over 1,800
examples of jewelry made throughout his lifetime, approximately ninety of
which are currently on view at the San Diego Museum of Art in the exhibition
Calder Jewelry thru January 3rd, 2010.

Two mini lessons are offered as a jumping off point for discussing with
K-12th grade students the sculptural art found within the Calder Jewelry
exhibition. The techniques of manipulating wire and found materials are
explored through two sculpture projects, wire circus figures and wire
jewelry, both inspired by Calder’s imaginative and whimsical investigations
with forms in space.

                                                                               1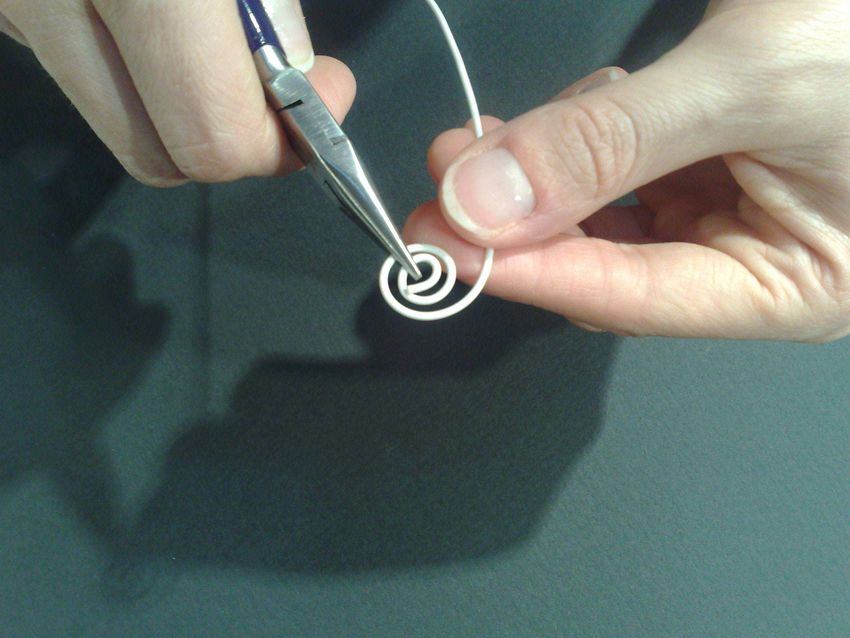
Pre-Lesson Information

Objectives

Students will . . .
   • learn about the life and work of the artist Alexander Calder
   • create sculpture works inspired by the work of Alexander Calder as well as
      the work on display in Calder Jewelry
   • create a wire figure following a circus theme as a warm up activity and
      introduction to the work of Alexander Calder
   • explore various techniques for bending and manipulating wire
   • reflect on the art they have created
   • present their works in a collaborative presentation

Art Terms

Abstract – A style of art that is not realistic. Abstract art usually contains bold
colors and lines with geometric and organic shapes

Form - An element of art, such as you would see in a sculpture that has three
dimensions

Geometric Shapes – Any regular shape or form consisting of measurable lines and
angles or shapes from geometry; shapes with names

Organic Shapes – Any shapes or forms that are irregular; suggestive of shapes or
forms found in nature

Space – The area around, between or within objects in an artwork; three-
dimensional space can be created with color, overlapping of objects and the amount
of detail in the artwork

Preparation

   1. If possible, plan a trip to the San Diego Museum of Art to view the exhibition
      Calder Jewelry.
   2. If teaching this lesson to more than one group of students, think about
      displaying unique student examples from the first group for students from
      later groups.
   3. Display photographs of Calder’s works for students to look at and be inspired
      by.
   4. Gather all materials from the materials list, including your own assortment of
      found materials.
   5. Distribute materials onto the tables or desks.

                                                                                      2
Tips for Working with Wire

Explore wire bending techniques prior to introducing the lesson, using online
sources, books, or through play. Several of the following tips come from wire
artist, Elizabeth Berrien’s online resource Teaching Innovative Wire Sculpture:
http://www.wirelady.com/berrienwirehowtopage.html.

      Safety first. Loose wire can be a hazard for eyes. It is recommended that
       students first work with foot-long, pipe-cleaner lengths of wire. Especially at
       the beginning, students working with wire should be supervised closely to
       ensure that they handle it safely and with respect. Any student that waves a
       wire about should be gently shown the correct way to control it.

      Start with simple materials. Twisteez or plastic coated telephone wire is
       helpful for beginners. The different color strands helps the student see what
       is going on as they blend wires together.

      Include props. Hands are often the best tools for working with wire, but
       students may also enjoy alternatives such as pencils, markers, and other
       forms around which they might wrap the wire to create new shapes.

      Explore materials. If you have an assortment of different kinds of wire,
       encourage your students to try working with all of them.
       Note: Copper, including plastic coated telephone wire, is soft and pliable.
       This may make it easier to shape. It may also make it a little harder to hold
       together as a structure.

      Play. Direct students to explore with the wire rather than suggesting that
       there is only one way to do it. Left to their own innate inventiveness, a class
       of 25 students given total creative rein may invent 25 new and different
       methods of assembling wire sculpture.

      Begin with a drawing. Some students may want to begin with a drawing,
       then lay their wire on it and push it around and shape it to conform to the
       image. Although Calder did sometimes sketch prior to creating his wire art
       works, be sure to monitor this process, as some students may have a difficult
       time translating a three-dimensional, balanced form from a 2-D sketch.

      Apply discoveries. More advanced students can ponder the structural
       aspects of wire sculpture - how many different ways can they attach the wire
       to itself, and how strong or weak are the results? What happens when they
       combine two or more different thickness or types of wire? Can a kinked wire
       be straightened again?

      Begin again. Remember: any time you're just not satisfied with what you
       make, it's okay to take it apart and start over.

                                                                                         3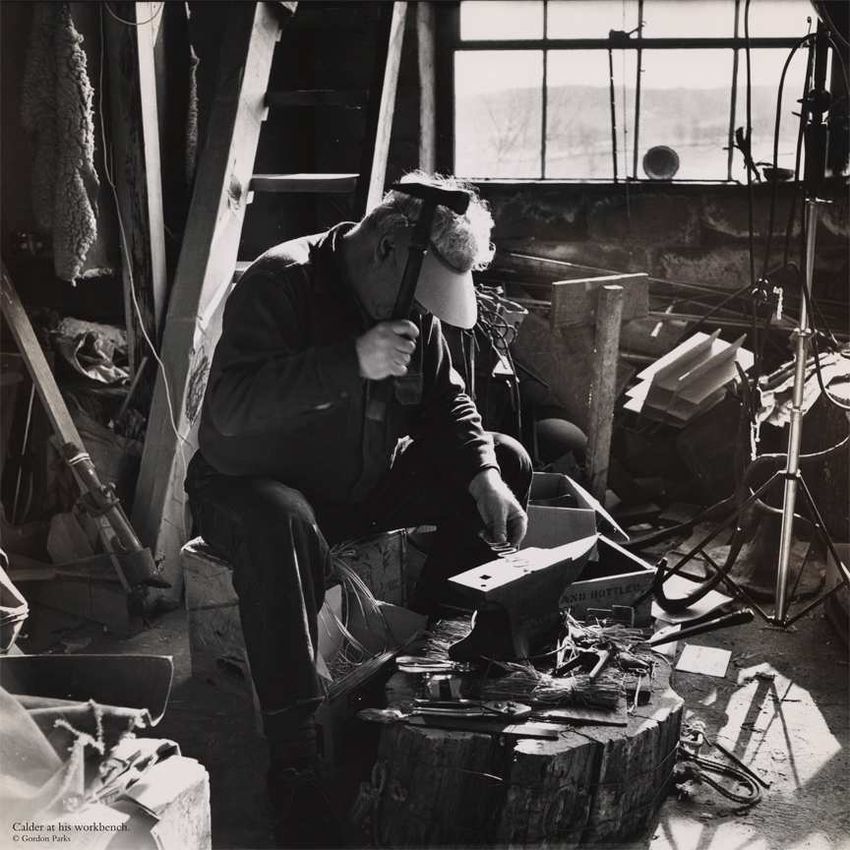
Wire Circus Figures
Inspired by Le Cirque de Calder (Calder’s Circus), Whitney Museum of Art, New York

Subject: Visual Art
Grades: Upper Elementary (adaptable to all grade levels)
Medium: wire, felt, and string
Project Time: approximately one hour from start to completion

General Description
In this project, students will make their own circus characters inspired by the wire
figures and animals created by Alexander Calder in Le Cirque de Calder. Like
Calder, students will bend, twist, and shape wire into forms and combine various
other found materials without the use of glue or tape. Students will be encouraged
to work collaboratively to act out their pieces following the art making activity.

Materials
   o Wire (select one)
      aluminum/copper/brass wire (gage 18 – found in hardware stores)
      plastic coated wire (Twisteez Wire brand can be purchased through Nasco
       Art Supplies - http://www.enasco.com/ or coated telephone wire)
      pipe cleaners [safer option for younger students (K-2)]
      floral wire
  o Scissors (wire cutters should be used for 18 gage wire)
  o Felt and Fabric scraps
  o Yarn, string
  o Pencils and paper for sketching (optional)
  o Other found materials
Reminder: No glue, staples, or welding materials are needed for this activity!

                                                                                       4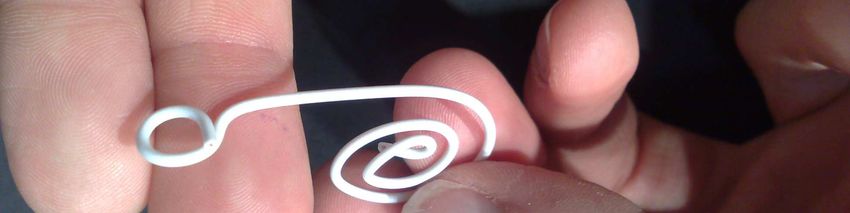
Directions

     Motivation (10 minutes)

     o   Show PowerPoint (or slides) of Alexander Calder’s wire sculptures from
         Le Cirque de Calder or show a clip from the video from the Whitney
         Museum’s exhibition "Alexander Calder: The Paris Years, 1926-1933" -
         available on You Tube http://www.youtube.com/watch?v=t6jwnu8Izy0

     o Read a biography for Alexander Calder and review as a class (an upper
         elementary-level biography is available on page 12 of this lesson plan).

     o Lead a gesture drawing activity to study various ways in which circus
         performers’ bodies might move (optional)

     Discussion (10 minutes)

     As a class, discuss why the circus may have inspired Calder in his own art
     making:

     After seeing the Ringling Brothers, Barnum & Bailey Circus in Paris in 1926,
     Calder made his circus of working miniature wire figures. It was not the
     tricks of the circus that interested Calder, but the dynamic movement of
     bodies in space. The circus atmosphere may have also have appealed to
     Calder’s own free-spirited nature. As a trained engineer, Calder was familiar
     with the mechanics required to achieve balance when working with three-
     dimensional forms and he used this knowledge to create his moving
     sculptures.

     Have students consider:
     o What are some of the different acts one might see at a circus?

     o   What types of characters (lion tamer, clowns, elephants, etc) are they
         interested in making?

     o   How can one suggest these characters with wire and other materials?

     Art Making (40 minutes)

     o   Introduce the project. Having an example(s) on hand will help students
         better understand the project idea. These figures do not need to be
         realistic – no face details. They will be fairly abstract forms, suggestive
         and whimsical, like Calder’s own creations.

                                                                                       5
Art Making continued. . .
    o Introduce the supplies to be used in this project – these should include
       only supplies which can be wired or attached to the figure without the use
       of glue.

    o   Demonstrate ways to bend, cut, and coil wire and allow students to
        experiment with these and other techniques on their own.

        Note: Many students will enjoy the freedom of this activity, but may also
        get caught up in exploring the materials outside the circus theme.
        Encourage some initial “playtime,” so that students will have the
        opportunity to familiarize themselves with the materials and what they do
        prior to starting a more directed activity. Having visuals on the table may
        also help to inspire circus-themed projects.

    o   Allow students to explore materials and create their characters.

    o   For Calder, the act of performing the work was as vital as the figures
        themselves, so you may consider having students work collaboratively to
        act out their pieces following the art making activity. Have the students
        help with the arrangement of the circus characters for installation. Give
        them criteria for the grouping, dividing the characters into acts or stages.

Adaptation Suggestions

    For Younger students (grades K-2)
    This lesson can be adjusted for younger elementary grades by using larger,
    more easily manipulated coated, wire material, such as pipe cleaners, and by
    allowing works to be larger in size, accommodating young students’
    developing motor skills.

    For Older students (grades 7-12)
    This lesson can be adjusted to fit the needs of middle school and high school
    students by including more in depth exploration with raw wire materials and
    various means of combining materials without glue (twisting, linking, sewing,
    etc.). If students are already familiar with wire bending and are looking to
    be challenged, encourage them to explore making their works kinetic through
    mechanized means similar to those utilized by Calder in his work.

    Special Needs Adaptations
    This lesson can be easily adapted to suit the needs of most learners with
    disabilities. For students with visual impairments, tactile activities are
    essential to learning and present throughout this lesson. For students with
    tactile sensitivity, limit their exposure to more irritating items (such as some
    fabrics and pipe cleaners). For students with limited motor skills, try using
    larger materials. Also consider group work, where students share the
    responsibility of designing the works and putting them together.

                                                                                   6
Wire Jewelry
Inspired by Calder Jewelry on view at The San Diego Museum of Art thru January 3, 2010

Subject: Visual Art
Grades: Upper Elementary (adaptable to all grade levels)
Medium: wire, beads, found materials
Project Time: approximately one and a half hours from start to completion.

General Description
In this project, students will make wire jewelry forms inspired by the sculptural
jewelry created by Alexander Calder. Like Calder, students will combine wire and
various found materials, incorporating methods and motifs associated with Calder’s
work, without the use of welding, soldering, or settings, to form three-dimensional
wearable or non-wearable works of art. Students will be encouraged to present
their work to the class following the art making activity.

Materials
   o   Wire (select one)
        Aluminum/copper/brass wire (gage 18 – found in hardware stores)
        plastic coated wire (Twisteez Wire brand can be purchased through Nasco
          Art Supplies - http://www.enasco.com/ or coated telephone wire)
        pipe cleaners (safer for younger students)
        floral wire
   o   Scissors (for use with Twisteez or telephone wire)
   o   Wire cutters (for use with aluminum, copper, and brass wire)
   o   Needle nose pliers (for use with aluminum, copper, and brass wire)
   o   Tissue paper or cloth scraps (for smoothing out wire safely)
   o   Ring measure (can be found in most jewelry supply stores or online at Fire

                                                                                         7
Mountain Gems and Beads http://www.firemountaingems.com) – a Crayola
      marker is an inexpensive alternative
  o   Chasing hammer and anvil (can be found in most jewelry supply stores or
      online at Fire Mountain Gems and Beads http://www.firemountaingems.com)
  o   Pencils and paper for sketching (optional)
  o   Other found materials (yarn, string, beads, sea glass, etc.)
  o   Goggles (optional)
  o   Mirrors (optional)

Directions

      Motivation (10 – 20 minutes)

      o   If possible, plan a trip to the San Diego Museum of Art to view the
          exhibition Calder Jewelry.

      o Read a biography for Alexander Calder and review as a class (an upper
          elementary-level biography is available on page 12 of this lesson plan).

      o View the other work of Alexander Calder, including his circus characters,
          to explore connections between his jewelry designs and other work.

      Discussion (10 minutes)

      Briefly discuss the jewelry work of Alexander Calder.

      Alexander Calder created necklaces, bracelets, brooches, earrings and tiaras
      from brass, gold, and silver combined with non-precious material and found
      objects. Each of his works began as a piece of wire that he then hammered
      into shape, often a spiral. Each of his jewelry works stands alone as a one-
      of-a-kind piece (Calder never duplicated his designs). He saw his jewelry
      objects as wearable sculpture, possessing the same three-dimensionality,
      line, and materials found in much of his other sculptural work.

      Discuss the jewelry designed and created by Alexander Calder:

             o   What are some of the motifs that we see often (e.g. spiral – see
                 page 14 of this lesson plan for other design ideas)?

             o   Because Calder used cold processes when making and attaching his
                 works, the pieces reveal his process (the artist’s hand). Looking
                 carefully at examples of his jewelry art, how does it appear that he
                 created each piece?

             o What can we learn about jewelry making and sculpture by looking
                 at Calder’s works?

                                                                                     8
Art Making (40 – 60 minutes)

o   Introduce the project. Having an example(s) on hand will help students
    better understand the project idea.

o   Introduce the supplies to be used in this project – these should include
    only supplies which can be wired or attached to the work without the use
    of glue.

o   Demonstrate ways to bend, cut, and coil wire as well as the jewelry
    making techniques recommended below and allow students to experiment
    with these and other techniques on their own.

    Techniques to try:

    Create a loop. Cut the length of wire that you’ll be working with. On
    one end, with round-nose pliers, make a simple loop by grasping the end
    of the wire (Fig. 1) in the pliers and wrapping the wire once around the
    outside of the pliers (Fig. 2).

                      Fig. 1                      Fig. 2
    Create a spiral.
    This was a key motif in Calder’s work. To create a spiral, begin with a
    loop. Hold the loop firmly in the middle of your pliers or fingers (if
    working with softer wire) (Fig. 3) and, with your finger, push the wire
    upward to wrap it around the first loop. Do this until you have the desired
    size, as many revolutions as desired (Fig. 4). When you have all the loops
    you need, if desired, bend the tail wire 90 degrees at the top of the spiral.
    Form a simple loop to attach to other items (Fig. 5).

                    Fig. 3                   Fig. 4                    Fig. 5

                                                                                9
Create a Loop & Loop or Loop & Hook (for attaching two ends of wire)

To attach two ends of wire together, one can either create a permanent
bond, by creating one loop within another or a temporary attachment that
can be made using a loop and hook. To create a hook, grasp the straight
piece of wire with pliers (or fingers if working with softer wire), and form
a hill shape (Fig. 6). Bend the hill shape over to form a hook (Fig. 7) and
attach the hook to a pre-made loop shape (Fig. 8).

                Fig. 6                  Fig. 7                   Fig. 8

Lash a stone or glass piece to an object.
To attach large pieces of glass and rough cut stones Calder would often
use wire to lash these objects to his pieces. To lash a piece of stone or
glass, lay the wire over the object with equal amounts of wire hanging
over each side (Fig. 9), and wrap the wire in varying directions around the
object (Fig. 10), twisting the two wire ends together when done and
cutting off any excess wire.

                 Fig. 9                     Fig. 10

Wrap a ring.

Start with approximately three feet of wire for this project and place your
wire around the ring measure or Crayola marker. To make the band of
your ring, you will leave about 6" of wire on one side, wrap the longer
side around the ring measure about 3-4 times (Fig. 11). Twist the two
wires around each other. Place the first stone on the longest wire and
bring it down close to the band of the ring (Fig. 12). Wrap the wire
around the stone and under the band, bring it back up. If you want to go
around the stone again you can. At this point you need to be creative and
make your own design. There really is not a wrong or right way.

                                                                          10
Wrap a ring continued. . .
Continue to add additional stones at this point if you choose. Wrap around
the stones and occasionally go under the band to add more strength.
Once you are finished adding your stones, wrap the longer wire around
the band 3-4 times, close to the setting. Cut the wire once you are happy
with how it looks (Fig. 13).
Fig. 11 Fig. 12 Fig. 13
o Finish demonstrating the above techniques and then allow students to
explore materials and create their pieces.
o For Calder, the act of wearing the work was as vital as the works
themselves, so you may consider having students display their art on
themselves or other students following the art making activity, perhaps in
the format of a fashion show or formal exhibition.
Adaptation Suggestions
For Younger students (grades K-2)
This lesson can be adjusted for younger elementary grades by using larger, more
easily manipulated coated, wire material, such as pipe cleaners, and by allowing
works to be larger in size, accommodating young students’ developing motor skills.
For Older students (grades 7-12)
This lesson can be adjusted to fit the needs of middle school and high school
students by including more in depth exploration with raw wire materials and various
means of combining materials without glue (twisting, linking, sewing, etc.). If
students are already familiar with wire bending and are looking to be challenged,
encourage them to explore making their works kinetic through mechanized means
similar to those utilized by Calder in his work.
Special Needs Adaptations
This lesson can be easily adapted to suit the needs of most learners with
disabilities. For students with visual impairments, tactile activities are essential to
learning and present throughout this lesson. For students with tactile sensitivity,
limit their exposure to more irritating items (such as some fabrics and pipe
cleaners). For students with limited motor skills, try using larger materials. Also
consider group work, where students share the responsibility of designing the
works and putting them together.
11Biography
Alexander Calder
(1898-1976)
Written by Branan Freeman, Museum Educator
Alexander Calder was born on July 22, 1898. Both of his parents were artists.
His father was a sculptor and his mother was a painter. They moved often because
his father made art for people all over America, but in every house where they
lived, little Alexander had his own workshop where he was encouraged to create. At
age 11, he made his first two sculptures, a tiny dog and a duck, for his parents for
Christmas gifts. By this age, he was already skilled at handling tools and metal
sculpting materials.
Even though he was a talented artist, he decided to study to be an engineer
while at university. He liked inventing and operating machines and figuring out how
to make things work. However, while at work aboard a ship one day, he saw an
amazing sunrise on one side of the boat and a brilliant moon on the opposite side.
He was so inspired by the beauty of nature that he decided to become an artist.
One of his first jobs as an artist was working for a magazine sketching
animals in the circus. This experience influenced much of his artwork for many
years. He even sculpted a tiny circus of performers made from wire, leather and
cloth and performed his Cirque Calder for friends and family. Soon he began to
sculpt other things from this material, such as portraits of his friends and public
figures of the day. Word traveled about the inventive artist, and in 1928 Calder was
given his first solo gallery show in New York.
In 1931, Calder created his first kinetic sculpture and gave form to an
entirely new type of art. Kinetic sculpture is sculpture that moves. The first of these
objects moved by systems of cranks and motors, and were called "mobiles.” Calder
later created sculptures that moved with wind currents. In addition, he created
sculptures that stood still. They were called “stabiles.”
“I think best in wire” - Alexander Calder
12California Visual Arts Standards Addressed in this Lesson
Grade Three
1.1 Perceive and describe rhythm and movement in works of art and in the
environment.
1.5 Identify and describe elements of art in works of art, emphasizing line, color,
shape/form, texture, space, and value.
3.3 Distinguish and describe representational, abstract, and nonrepresentational
works of art.
3.4 Identify and describe objects of art from different parts of the world observed in
visits to a museum or gallery
4.3 Select an artist's work and, using appropriate vocabulary of art, explain its
successful compositional and communicative qualities.
Grade Four
2.3 Use additive and subtractive methods processes in making simple sculptural
forms
3.1 Describe how art plays a role in reflecting life (e.g., in photography, quilts,
architecture).
4.1 Describe how using the language of the visual arts helps to clarify personal
responses to works of art.
4.2 Identify and describe how a person's own cultural context influences individual
responses to works of art.
4.3 Discuss how the subject and selection of media relate to the meaning or
purpose of a work of art.
4.5 Describe how the individual experiences of an artist may influence the
development of specific works of art.
5.4 Read biographies and stories about artists and summarize the readings in short
reports, telling how the artists mirrored or affected their time period or culture.
Grade Five
1.1 Identify and describe the principles of design in visual compositions,
emphasizing unity and harmony.
1.2 Identify and describe characteristics of representational, abstract, and
nonrepresentational works of art.
1.3 Use their knowledge of all of the elements of art to describe similarities and
differences in works of art and in the environment.
2.4 Create an expressive abstract composition based on real objects.
2.5 Assemble a found object sculpture that reflects unity and harmony and
communicates a theme.
3.2 Identify and compare works of art from various regions of the United States.
13Alexander Calder Jewelry – Simple and More Complex Forms
Created by Deidra O’Flaherty, Docent, The San Diego Museum of Art
14You can also read