Alpha Performance Mercedes-Benz
  CLA45 AMG Heat Exchanger
            Upgrade
←
→
Page content transcription
If your browser does not render page correctly, please read the page content below

Alpha Performance Mercedes-Benz
CLA45 AMG Heat Exchanger
Upgrade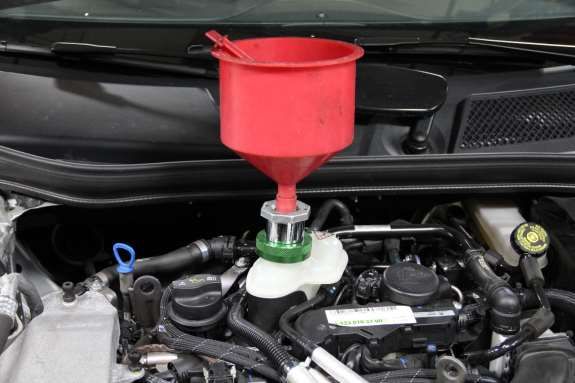
The goal of Alpha Performance is to provide the highest quality, best
performing products available. By utilizing research and development, and
rigorous testing programs Alpha Performance will never compromise the
quality or performance of our products. In addition, Alpha Performance will
only provide the finest customer service offering only parts and advice that
are in the best interests of the customer. Alpha Performance was built on a
foundation of integrity. This is who we are; this is what you can count on.

A vehicle modified by the use of performance parts may not meet the legal
requirements for use on public roads. Federal and state laws prohibit the
removal, modification, or rendering inoperative of any part or element of
design affecting emissions or safety on motor vehicles used for transporting
persons or property on public streets or highways. Use or installation of
performance parts may adversely affect the drivability and reliability of your
vehicle, and may also affect or eliminate your insurance coverage, factory
warranty, and/or new OEM part warranty. Performance parts are sold as-is
without any warranty of any type. There is no warranty stated or implied due
to the stresses placed on your vehicle by performance parts and our inability
to monitor their use, tuning, or modification.

These instructions are provided as a guide only as there are many variables
that cannot be accounted for concerning your particular vehicle, including but
not limited to model year differences, model differences, the presence of non-
OEM parts, and modifications that may already be or were previously
installed. A basic knowledge of automotive parts and systems is helpful but a
better understanding of the parts and systems on your particular vehicle may
be required.

If you have any questions or issues at any time during the installation of your
Alpha Performance product(s) please call us for technical assistance. The
Alpha Performance tech line can be reached during business hours at 847-
709-0530 for Alpha Performance products only.
Installation

   1) Remove the engine cover to expose the intercooler system coolant reservoir. Lift
      the cover up while wiggling it to release the rubber grommets that hold the cover
      in place.

                                         1                                            1

   2) Raise the vehicle up safely and remove the right front wheel. Remove the right front
      fender liner to expose the side cooler.

                                         2                                            2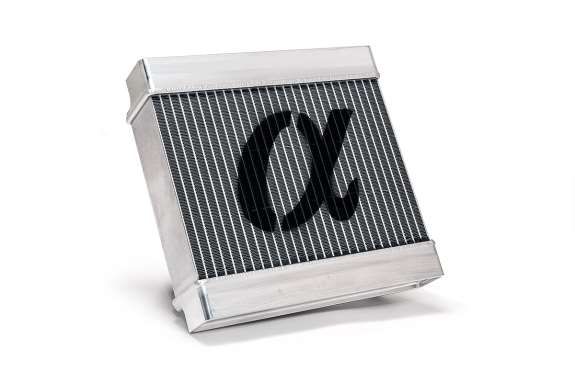
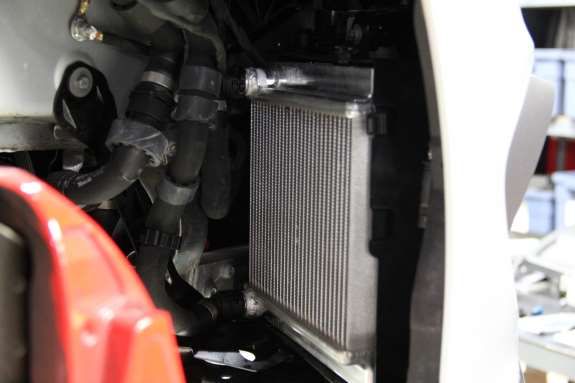
3) Disconnect the wire harness on the cooler shroud by cutting the zip ties. Unbolt the
   cooler shroud by removing the two M6 nuts, one on the top and one on the bottom.

4) The cooler slides out of the rear bracket at the top and the bottom. Slide the cooler
   outwards and disconnect the lower connection to drain the cooler. Once drained,
   disconnect the top connection and completely remove the cooler.

                                      3                                             4

5) To remove the cooler from the shroud, release the tabs on the bottom and top of the
   shroud shown in the picture.

                                      5                                             5

6) Install the new Alpha heat exchanger into the shroud in the reverse order.

                                      6                                             6
7) Install the new heat exchanger into the car. Install it half way in then make the hose
connections. After the connection are made, fully install the heat exchanger. Due
to the increased size of the heat exchanger, adjustment will need to me made before
bolting the shroud in place with the two M6 nuts. The 45 degree hose connection
at the bottom will just rest inside the mounting bracket and the upper 90 degree
fitting will clear the frame bracket once properly adjusted. Trimming the bracket is
not necessary but is an option.
7
8) Use the two supplied zip ties to reattach the harness removed in step 3).
9) Take a look at the front grill inlet of the front bumper, the heat exchanger shroud
should line up with the opening. If the rubber sealing strips of the shroud stick out
slightly, you can reach around the heat exchanger from the wheel well side and pull
them back so to not interfere with air flow to the heat exchanger.
10) Reinstall the wheel well liner and right front wheel.Intercooler System Bleeding with Air Lift
1) The proper way the bleed the system is to use an air lift coolant fill system. These
are available from any major tool manufacture.
1
2) Use the air lift system to fill the system with coolant according to the tool’s
instructions. Once filled, remove the air lift tool.
3) Run or drive the car until the IC pump turns on. This could take 10 minutes or
more of idle time.
4) Once the pump cycles on and off, check the fluid level.
5) If when the IC pump turns off and the reservoir pushes a bunch off coolant out,
this means there is still a large amount of air in the system that needs to be bled.
6) You may have to repeat this process multiple times along with test drives.
Continue until the coolant level is stable with the pump on or off.
7) Reinstall the engine cover.
8) Enjoy!Intercooler System Bleeding with Standard Filling
1) Fill the system through the factory reservoir.
1
2) It may only take a little bit of coolant. Run the car until the IC pump turns on.
This can take 10 minutes or more of idle time.
3) Once the pump turns on, it will start to cycle coolant into the system. Continue to
fill with coolant to maintain a proper level. Make sure the fluid level is
maintained when the IC pump turns off.
4) If when the IC pump turns off and the reservoir pushes a bunch off coolant out,
this means there is still a large amount of air in the system that needs to be bled.
5) You may have to repeat this process multiple times along with test drives.
Continue until the coolant level is stable with the pump on or off.
6) Reinstall the engine cover.
7) Enjoy!You can also read