ASSEMBLY MANUAL - Go Easy Online
←
→
Page content transcription
If your browser does not render page correctly, please read the page content below
ATV OFF ROAD - GMX SHIFT 150cc QUAD BIKE

ASSEMBLY MANUAL         Read and understand this entire manual before riding!
                                      DO NOT RETURN TO STORE!
NOTE: Manual illustrations are for demonstration purposes only. Illustrations man not reflect exact appearance of actual procduct.

                                       WWW.GMXMOTORBIKES.COM.AU
This assembly guide covers basic step by step instructions to assist you with assembly process. Products are always subject to further improvement,
which will cause some difference between vechicle and this manual without further notice. W wish you happy riding!

UNPACKING
Please CAREFULLY remove all external packaging and metal frame packaging.
TIP: Metal packaging can be sharp so when unpacking please handle with caution.

CHECK FOR LOOSE PARTS
On most occasions your bike will come 90% assembled (depending on the model). Please go through all lose parts and check packaging that has been
taken out, to ensure no parts get thrown out so you can assemble your GMX Product.

- Be careful to follow fuel/oil ratio requirements and not put to much oil in the fuel.
- Always use clean fuel - Never use old Fuel.
- After your Bike has sat for a period of time the oil in the fuel can settle in the bottom of the carbie bowl so be sure to drain the fuel and
follow points in the trouble shooting to remedy.
- Do not overload the bike with more that the recommended weight capacity as this can cause undue wear/damage to the clutch.
WEAR SAFE
- Always wear a helmet.
- Wear protective clothing and gear such as goggles, long sleeves, long pants, boots and gloves/hand protection.
RIDE SAFE
- Never let children ride quad bikes that are meant for adults – even as passengers.
- Do not carry any passengers on quad bikes that are meant for one person.
- Quad bikes are not all-terrain vehicles so they cannot go safely on all types of terrain. Avoid riding on rough terrain or steep slopes.
- Ride on familiar tracks and beware of obstacles.
- Never ride under the influence of alcohol/drugs.
- Ensure children are supervised at all times near any quad bike activity.
- Always carry a mobile phone or radio device so you can contact help in case of an emergency.
READ MANUAL
Ensure that you read and go over the manual and UNDERSTAND before assembling this Bike.
PLEASE NOTE: Minor assembly is required, but in the interest of your safety it is recommended that you have this bike assembled by a skilled
bike mechanic.
PLEASE READ AND UNDERSTAND ALL INSTRUCTIONS AND WARNINGS PRIOR TO ASSEMBLY AND OPERATING OF YOUR VEHICLE.
WARNING: This product is powered by a 4 stroke engine and comes with transport oil in the engine.

- THE OIL NEEDS TO BE DRAINED AND REPLACED WITH MOTORCYCLE OIL 10W/40 or 10W/50 IS REQUIRED
- IF THE OIL CHANGE IS NOT PERFORMED YOU MAY INTERNALLY DAMAGE THE ENGINE AND CLUTCH AND VOID YOUR WARRANTY
- DO NOT USE MOTOR CAR OIL
- DO NOT USE OIL WITH FRICTION MODIFIERS                    WARNING
                                                       UNLEADED FUEL ONLY
                                                       Please use unleaded fuel
                                                          90 Octane or above

OIL WILL NEED TO BE CHANGED EVERY 3 MONTHS IN A HOTTER CLIMATE OR THE NOTHERN HEMISPHERE
- There is an oil drain plug located underneath you quad/dirt bike and is highlighted with an oil drain plug sticker. This is a 14mm bolt.
- DO NOT remove the other bolt located under the engine.
- Place an oil receptacle under the drain hole, undo bolt and let oil drain from the vehicle. Please note: Dispose of oil correctly
- Tighten bolt back up, remove dipstick (oil fill point) and fill the vehicle with suggested correct amount of oil required. Tighten

SWING TAG’S & WARNINGS
Swing tags have been placed on your vehicle for you to identify checks that are located within this manual. Once you have performed the
check required remove these swing tags and nylon loops attaching them to the vehicle.

MAKE SURE TO REMOVE THE SWING TAGS AND TAKE SPECIAL NOTICE TO REMOVE THE NYLON LOOP. The tags and loops that need to be removed
from this model
                                YOU MUST CHECK                  YOU MUST CHECK
                                                                THAT THE CHAIN               CHECK BRAKES                   ALWAYS LEAVE IN
                                THAT THE FRONT                                               ARE ADJUSTED
                                                                IS ADJUSTED                                                 THE OFF POSITION
                                STEERING IS ADJUSTED                                         CORRECTLY PRIOR                WHEN NOT IN USE
                                                                CORRECTLY PRIOR
                                CORRECTLY PRIOR                                              TO RIDING.                     OR REMOVE KEYS
                                                                TO RIDING.
                                TO RIDING.

                       STEERING ADJUSTMENT x2            CHAIN ADJUSTMENT             BRAKE ADJUSTMENT x3            KEY REMOVAL

ONCE SWING TAGS AND NYLON LOOPS ARE REMOVED YOU ARE ACKNOWLEDGING THAT THESE CHECKS HAVE BEEN
PERFORMED
There may be a “Spare Parts Package” within the carton so please check all of the packaging and DO NOT THROW OUT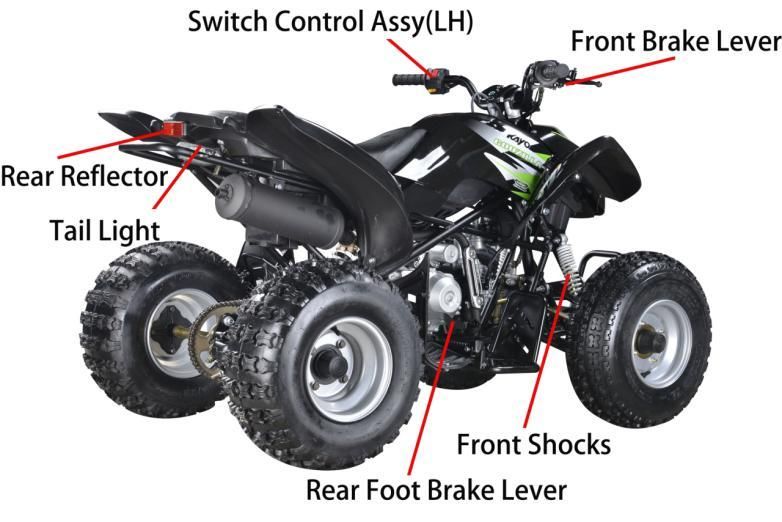
GMX Motorbikes WARRANTY

GMX MOTORBIKES WARRANTY
Our goods come with guarantees that cannot be excluded under the Australian Consumer Law. You are entitled to a replacement or refund for a major
failure and compensation for any other reasonably foreseeable loss or damage. You are also entitled to have the goods repaired or replaced if the goods
fail to be of acceptable quality and the failure does not amount to a major failure.
The manufacturer warrants this product to be free of manufacturing defects for a period of 12 months from date of purchase. This Limited Warranty does
not cover normal wear and tear( exclusions apply) or any damage, failure or loss caused by improper assembly, maintenance, or storage or use of the GMX
product. Some parts will have a limited warranty period, please see below. This warranty is a part replacement warranty.

3 Month Parts Replacement Parts
Electrical components, suspension, drive train and brakes/fittings.

30 Days Parts Replacement Parts
Bearings, tires, tubes, cables, clutches, brake pads, seats

Minor assembly is required and in the interest of safety and warranty it is recommended that you have this product assembled by a qualified, skilled small
engine mechanic.
You may need to provide proof of being assembled by a skilled mechanic if not a report from a small engine mechanic advising of the issues to process
your warranty claims.
The warranty is a parts replacement warranty and labor is not included, defective parts may need to be sent back for inspection.

This Limited Warranty will be void if the product is ever;
- Used in a manner other than for recreation or transportation
- Modified in anyway
- Rented or commercial use.
The manufacturer is not liable for incidental or consequential loss or damage due directly or indirectly to the use of this product.
Always adhere to the maximum load of the product, over loading the product will void the warranty.

How a claim is made
When making a claim, you will need to provide proof of purchase, condition photos of the item. This information is required to be submitted via the
support center and communication is made through the support center. When the claim is created, the customer will receive the claim number and the
customer support team should reply within 48 hours.
SAFETY PRECAUTIONS                                                                                                                                             1.

Please read these warnings carefully.
                                                                                 rider to be able to handle the hazards. Persons that are supervising need
PARENTS/SUPERVISING ADULTS MUST TEACH CHILDREN HOW TO RIDE                       to select themselves the appropriate product for the age of the user that
                                                                                 is riding and need to take care to prevent any user who may be too
THIS PRODUCT.
                                                                                 immature or not experienced for a products. characteristics to endanger
                                                                                 themselves around it.
If the rider does not use common sense and heed these warnings, there
is an increased risk of damage, serious injury or possibly death.                Any rider unable to fit comfortable on the product should not attempt to
                                                                                 ride it. It’s a parent’s decision to allow the user to ride this off road vehicle
Riding this product presents potential risks.                                    product, which should be based on the user’s maturity, skill and ability to
                                                                                 follow rules.
Like any OFF ROAD riding product, riding this product can be hazardous
(e.g., falling off or riding into a hazardous situation).                        Keep this product away from small children and remember that it is
                                                                                 intended for use only by person who are, at the age requirement,
These items are meant to move and it is therefore possible for a rider to        completely comfortable and competent while riding.
lose control or otherwise get into dangerous situations.
                                                                                 Persons with any mental or physical conditions that may make them
                                                                                 susceptible to injury impair their physical dexterity or mental capabilities
Persons responsible for supervising the rider must recognize that if such
                                                                                 to recognise, understand, and follow safety instructions inherent to use of
things occur, a rider can be seriously injured or possibly die, even when
                                                                                 this product, should not use or are permitted to use products inappropriate
using safetyequipment and taking other safety precautions.                       for their ability.

USE PRODUCTS AT YOUR OWN RISK AND USE COMMON SENSE
                                                                                 Persons with heart conditions, head, back or neck ailments (or prior
                                                                                 surgeries to these areas of the body), or pregnant women, should be
Parents and adult responsibility and supervision are necessary for any off
                                                                                 cautioned not to operate such products.
road vehicle.

This product can be hazardous and not always appropriate for every age
or size user - age recommendations are found on these items that should
reflect the nature of the hazards and the expected mental or physical ability,
or both, of a
RIDING PRACTICES                                                                                                                                           2.

This product is designed for off road use. Follow all rules applicable in the   Do not ride at night or when visibility is low.
area of intended use.
                                                                                Do not attempt to do stunts or tricks on your item.
Ride defensively to avoid dangers that may enter your path.
                                                                                It is not strong enough to withstand use such as jumping or any other
Always check and obey local laws or regulations which may affect where          types of stunts.
the item can be used. Keep safely away from motor vehicles and traffic at
all times and only used where allowed and with caution. Watch out for           Never carry a passenger on an ATV.
potential obstacles
                                                                                Do not allow hands, feet, hair, body parts, clothing or similar articles
The product is intended for use on flat, dry surfaces such as concrete or       come in contact with moving parts, wheels or drive train.
level ground, without loose debris such as sand, leaves, rocks or gravel.
                                                                                Never use headphones or a mobile phone/s whilst riding.
Riding on wet, slick, bumpy uneven or rough surfaces may give less
traction and in turn increase the risk of accidents.                            Do not use under the influence of drugs and alcohol.

Watch out for obstacles that could stop or catch your wheel or make you         Always wear protective gear, such as an approved safety helmet, gloves,
swerve suddenly or lose control.                                                goggles, boots and protective clothing.

Do not ride indoors                                                             A long sleeve shirt, long pants and gloves are recommended.

Never use near steps or swimming pools.                                         Never ride barefoot or in thongs.

Do not use the brake and accelerator at the same time as the brake may          Never modify an ATV through improper installation or use of accessories.
make the brakes hot and to fail.
                                                                                Never exceed the stated load capacity for an ATV.
Always have your hands on the handlebars and hold them at all times
when riding.                                                                    Do not tow a trailer, the vehicle is not designed for such use.

Do not touch the motor or brakes whilst riding or directly after riding as      Turn off vehicle after each ride and make sure keys are placed out of reach
they can become hot.                                                            of children.

Avoid high speeds on downhill slopes where you might lose control.              Always ware an Australian standard Motorcross helmet when riding an
                                                                                off road vehicle.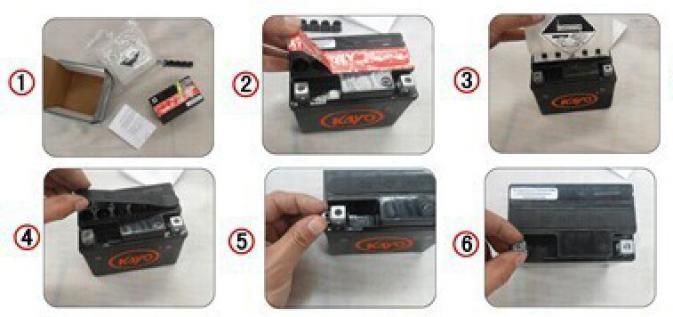
CONTENTS
VEHICLE CONSTRUCTURE LOCATIONS    …………… 2

VEHICLE PARAMETER           ……………………… 3

VEHICLE MARK DESCRIPTION    ……………………… 4

CONTROL FUNCTIONS       …………………………… 7

ATV DRIVING KNOWLEDGE      …………………………… 9

INSPECTION AND MAINTENANCE …………………… 16

TROUBLESHOOTING              …………………… 23

UNPACKING ASSEMBLY         ………………………… 27

YDF SERIES ELECTRICAL CIRCUIT DIAGRAM ……… 29

                                    1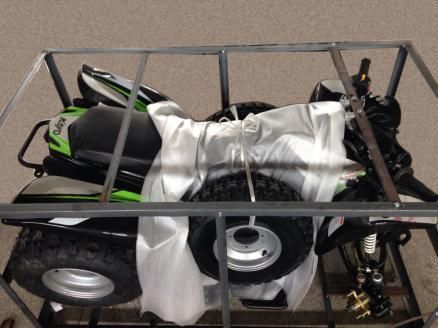
VEHICLE CONSTRUCTURE LOCATIONS

              2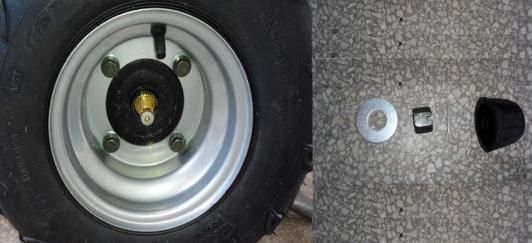
VEHICLE PARAMETER

                    Vehicle size and weigh
Vehicle length        1535mm(60.43 in)
Vehicle width         920mm (36.22 in)
Vehicle height        950mm (37.4   in)
Seat height           705mm (27.76 in)
Wheelbase             1040mm (40.94 in)
Ground clearance      130mm (5.12 in)
Front wheel track     725mm (28.54 in)
Rear wheel track      705mm (27.76 in)
Vehicle weight        119kg

                              3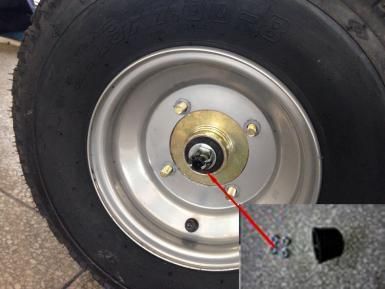
Engine parameters
Engine              Singe cylinder,four stroke,air cooled
Displacement        124ml
                    54×54mm
Bore ×Stroke
Compression ratio   8.7 : 1
Max Power           5.8kw/7500rpm
Max Torque          9.2N.m/5000rpm
Minimum Rev         C.D.I
Lgnition            electric

                               4
VEHICLE MARK DESCRIPTION
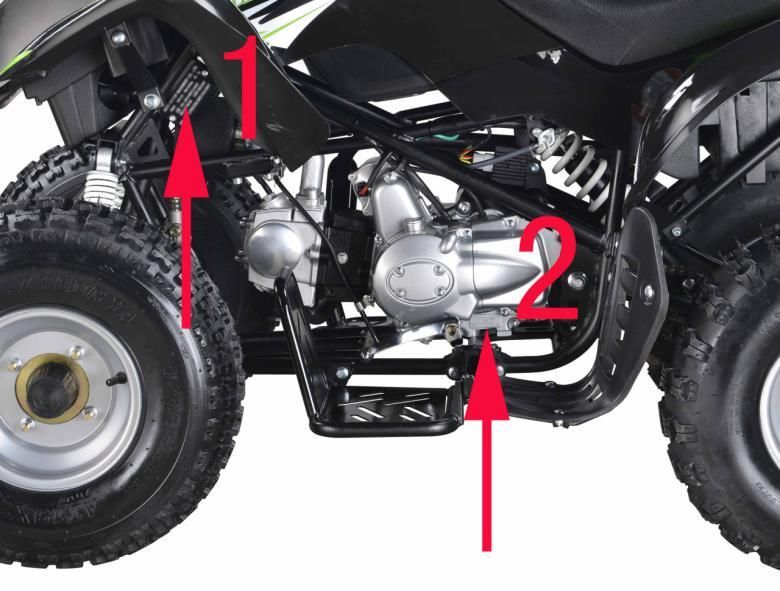
VEHICLE INFORMATION CODE LOCATIONS
5VIN NO .:
Engraved on the frame plate which was mounted on the frame left front tube, please see it as no. "1" position
above.
ENGINE NO .:
Engine name and no. was engraved on the crankcase, please see it as no. "2" position above.
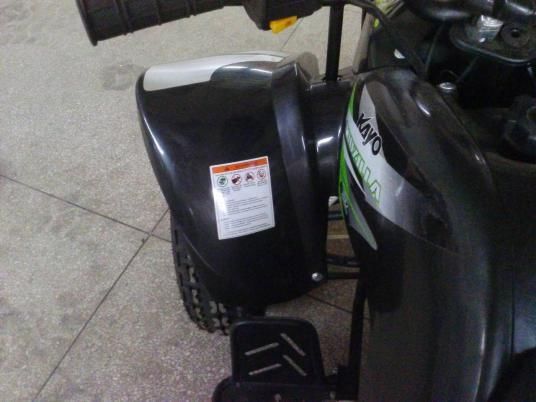
WARNING STICKERS
GENERAL WARNING STICKER
This warning sticker is put on the left
front plastic, same as below picture.
AGE WARNING STICKER
6This warning sticker is put on the left
right plastic, same as below picture.
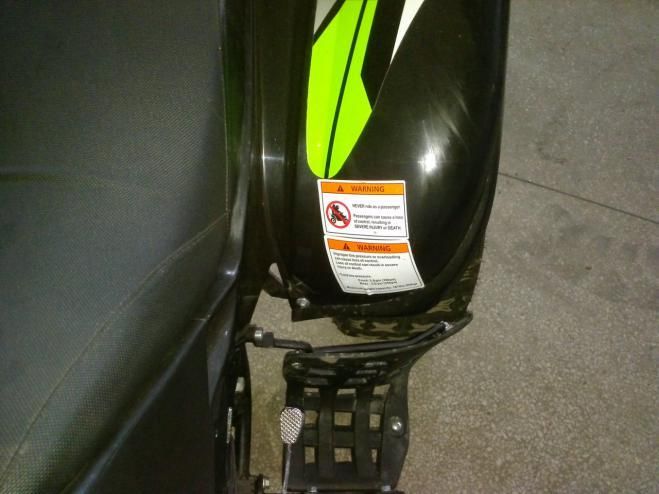
TYRE PRESSURE AND OVERLOAD PASSENGERS WARNING STICKER
COMBINED WARNING STICKER
78
CONTROL FUNCTIONS
HANDLEBAR&SWITCHES

LEFT HANDLEBAR

With the Engine stop switch in the “Stop”position the engine cannot be started. With the Engine stop with in the 'Run"
position .The engine can be started.
Electric starting button
With the key switch in the 'ON' position, pressing this button will automatically start the engine.

RIGHT HANDLEBAR

Throttle Lever

                                                            9
Control the engine and ATV speed with the throttle lever. Operate this Iever with your thumb. Push it forward to
increase engine and ATV speed. Release it to decrease engine and ATV speed.
To set parking brake, squeeze front brake lever then depress parking brake pin, set the parking brake lever.
Throttle Adjusting Screw
To limit the throttle, screw in throttle limiter screw.
Use the throttle adjusting screw to restrict maximum speed of the ATV. Adjust this limiter according to the rider’s
skill and experience.
Adjusting procedures:
1. Loosen the Lock nut.
2. Turn the throttle adjusting screw clockwise to restrict maximum speed of the ATV.
3. Turn the throttle adjusting screw counterclockwise to increase the maximum speed of the ATV.
4. After finished, tighten the lock nut
FULE VALVE
There are three positions: “ON","OFF", and "RES".
“ON” position - In this position, fuel will flow to the carburetor when the engine is running or being started.
“OFF” position-No fuel will flow into the carburetor
“RES” position(arrow on valve pointing up)-If fuel level in the fuel tank becomes too low for engine to stay running
while fuel valve is at “ON” position,turn fuel valve to “RESERVE”.Turning fuel valve to “RESERVE” will allow engine
10to begin using reserve fuel supply.You will need to re-fuel as soon as possible.When fuel valve is placed at
“RESERVE”,spare fuel tank can only be maintained for a limited time.
FUEL TANK CAP
To open the fuel tank cap,take the end of the vent tube out from the vehicle body;turn the fuel tank cap
counterclockwise.To close the fuel tank cap,turn in it clockwise and tighten it securely. Be sure that the vent tube
securely connects to the cap as shown.
ATV DRIVING KNOWLEDGE
WHAT YOU SHOULD KNOW BEFORE RIDING
1. Before riding, you should read all the following information carefully. Operating this ATV without proper
instruction could be hazardous.
112. Beginners and inexperienced operators should complete a certified training course .You should regularly
practice the skills learned in the course and the operating techniques described In this user's manual.
3. Before riding, you should find a good place to practice the skills. Find a flat, open area with enough space to
practice the new skills. Make sure that it is legal to ride in the area you selected. Review the local laws and make
sure you are not trespassing. Protect your riding areas. When you are riding, remember to keep the terrain in
good condition. Don’t destroy plants, trees or other vegetation. Don't litter and don't bother wildlife .With our help,
your riding area can remain open for use in the future.
4. After you have found a good place to practice, review the control system on your ATV before riding. Learn to find
these controls without looking for them, because you will not have time to look for them when you are riding. The
risk of riding could Increase greatly If you do not know how to operate the ATV properly under different situations
and in different types of terrain.
If you are properly prepared, you will have a more enjoyable ride.
12INSPECT THE ATV BEFORE RIDE:
Falling to inspect the ATV before operating could be hazardous. Failing to perform proper maintenance could also be
hazardous. Failing to inspect and maintain your ATV could increase the chances of an accident or equipment
damage. Always inspect your ATV each time before riding,and make sure it is in a safe operating condition.
ITEM TO CHECK CONTENT
Steering Smoothness; No restriction of movement; No play or looseness
Proper brake lever free play; enough brake force; Parking brake
Brakes
effectiveness
Proper air pressure; Enough tread depth; No cracks, rips, or other
Tires
damages
Enough fuel for the intended trip; Fuel hose connected securely; No
Fuel
damage to fuel tank or cap; Fuel tank cap closed securely
Engine stop switch Proper operation
Proper level - Check the oil by inspecting the Engine Oil indicator
Engine oil located at the bottom of the engine. The engine oil should completely fill
the view window . Add oil if the window is not completely filled.
Throttle Proper free play of throttle lever; Smooth response; Quick return to idle
13position
Drive chain Proper tension; adequate lubrication; No excessive wear or damage
Bolts and nuts are tight; No rattle from any parts of the engine when
General condition
running; No visible evidence of Damage
WARNNING!
1. Overloading could be hazardous. Overloading could cause changes in
vehicle handling and could lead to an accident.
2. Operating this ATV with improper modifications could be hazardous.
Improper installation of accessories or modifications to this
vehicle may cause changes in handling. In some situations, this could
lead to an accident. Never modify this ATV through improper installation
or use of accessories.
3. Operating this ATV with improper tires,or improper tire air pressure.
could be hazardous. If you use improper tires or improper air pressure,
you may lose control of the ATV. This will cause an accident.
Check the condition of the ATV to make sure that the ATV does not have mechanical problems or you could get
stranded when you ride. Before riding the ATV, be sure to check the above items. Be sure your ATV is in good
14condition to ensure the safety of the rider.
SAFETY GEAR
A DOT approved motorcycle helmet is the most important part of you safety gear. A DOT approved motorcycle
helmet can help prevent a serious head Injury. Choose a helmet that fits snugly. Motorcycle dealers can help in
selecting a good quality helmet which fits properly.
You should wear eye protection when you ride. If a rock or a branch hits your eyes, you could be severely injured.
Wear goggles or a face shield.
Wear proper clothing when you ride. The proper clothes can protect you from Injury. Wear a good pair of gloves,
strong boots that are over the ankle, long pants, and a long sleeve shirt
WARNING!
1. Checking maintenance items when the engine is running could be hazardous. You could be severely injured if
your hands or clothing get caught in moving ATV parts. Shut the engine off when performing maintenance checks,
except checking the engine stop switch and throttle.
2. Operating this ATV without wearing an approved DOT motorcycle helmet, eye protection, and protective clothing
could be hazardous. Operating without an approved DOT motorcycle helmet or eye protection. Increases your
chances of a severe head injury or death in an accident. Operating without protective clothing also increases your
chances of severe Injury in an accident. Always wear an approved DOT motorcycle helmet which fits properly.
15Always wear eye protection (goggles or face shield). You should also wear I gloves, boots, long sleeve shirt or jacket,
and long pants.
BREAK-IN
The first month is the most important in the life of your vehicle. Proper operation during this break-in period will be
helpful for assuring maximum life and performance of your new vehicle. The following guidelines explain proper
break-in procedures.
Maximum Throttle Opening Recommendation
During the first 10 hours of operation, you should always use less than 1/2 throttle opening.
Vary the Engine Rotating Speed
Vary the engine rotating speed during the break-in period. This allows the parts to "load" and then “unload” (allowing
the parts to cool). Although it is to place some stress on the engine components during break-in, you munt be careful
not to load the engine too much.
Avoid Constant Low Rotating Speed
Operating the engine at constant low rotating speed (light load) can cause parts to glaze and not seal properly. Allow
the engine to accelerate freely without exceeding the maximum throttle limit.
Allow the Engine Oil to Circulate Before Riding
Allow enough idling time after warm or cold engine starting. This allows the lubricating oil to reach all critical engine
16components.
Observe Your Initial and Most Critical Service
The initial service (break-in maintenance) is the most important service that your vehicle will receive. Observing a
proper break-in operation, will help engine components seal properly. Maintenance required as part of the initial
service includes proper adjustments, tightening of all bolts & nuts, and replacement of dirty oil. Timely performance of
this service will help you get the best service life and performance of the engine.
BRAKE SYSTEM
To stop the ATV, first release the throttle lever, then apply the rear
and front brakes smoothly.
WARNING!
1. Braking while turning the ATV could be hazardous. Use of the brake when turning could cause the ATV to slide or
roll over. Use the brake to slow down before you begin to turn.
2. Braking hard on slippery surfaces could be hazardous. The ATV could skid and go out of control if you brake too
hard. Apply the brakes lightly and carefully on slippery surfaces.
3. Operating the parking brake when the ATV is moving could be hazardous.
The front wheels could lock, and it will cause a skid and an accident.
Use the parking brake only after you stop the ATV.
STEERING SYSTEM
17Turning the ATV improperly could be hazardous. If you turn the ATV improperly, it may cause a collision or overturn.
Always follow proper procedures for turning as described in this section. Practice turning at low speeds before
attempting to turn at faster speeds. Never turn at excessive speeds.
To turn the ATV, the rider must use the proper technique. Because this vehicle has a solid rear axle, both rear wheels
always turn at the same speed. This means that if the rear wheels are getting equal traction, the vehicle will tend to
move straight ahead. This is because the rear wheels will travel the same distance. For the vehicle to turn, the
outside rear wheel must travel a longer distance that the inside rear wheel. To make this happen, the rider must
create less traction for the inside wheel, allowing it to skid. This allows it to travel a shorter distance than the outside
wheel. This happens even though both wheels are still turning at the same speed.
To turn ATV use the following technique:
Move your body weight forward and to the inside of the turn.
Turn the handlebar while looking in the direction of the turn.
Use the same technique that you use when you move your body weight farther toward the inside of the turn to
maintain your balance. Natural turning forces (which can push the vehicle to the outside of the turn) increase as the
speed or the turn sharpness increases. This means you must lean your body farther into the turn as you go faster or
turn more sharply. This prevents the Vehicle from tipping over to the outside of the turn. If your ATV starts to tip while
18turning, lean your body farther into the turn while gradually reducing tho throttle and making the turn wider, if
possible.
SKIDDING OR SLIDING
CAUTION:Skidding or sliding improperly could be hazardous. You may lose control of your ATV when you regain
traction unexpectedly. This may cause the ATV to overturn. Learn to safely control skidding or sliding by practicing at
low speeds and on level, smooth terrain. On extremely slippery surfaces, such as ice, go slow and be very cautious,
in order to reduce the chance of skidding or sliding.
You may experience skidding or sliding when you are not braking. You may be able to overcome it by using the
techniques listed below.
If your front wheel skids:
Gain front wheel traction by reducing the throttle opening and leaning your body slightly forward.
If your rear wheel skids:
If space permits, steer in the direction of the skid. Shift your body away from the skid slightly. Avoid using the throttle
or brakes until you regain directional control of the vehicle.
OPERATION ON HILLS
To climb a hill with the ATV, follow the directions below.
1. Speed up and maintain a steady speed before reaching the top of the hill. Remember that you must ride at a
steady speed all the way to the top of the hill.
192. Shift your body forward by sliding forward on the seat. Lean slightly forward. For steep hills, stand on the
footrests and lean forward.
3. Maintain a steady speed while climbing the hill.
4. Slow down gradually when you reach the top of the hill.
If you climb a hill and are unable to make it to the top, use one of
the correct procedures described below to get back down the hill. Never
attempt to turn an ATV around on a steep hill, doing so could cause the
ATV to overturn.
If you lose forward momentum, or begin to roll backwards, follow these
Instructions.
1. Lean uphill.
2. Never apply rear brake but use front brake.
3. Gradually back down the hill with body weight leaning forward while
applying front brake. Use extreme caution when backing down a hill.
If you still have forward movement and the hill is not steep and there
is enough space to turn around safely, follow these instructions.
1. Turn around on hill before you lose forward momentum. As you turn
on side of hill, lean your body weight uphill.
202. Once you have turned around, ride down hill as described in the
DESCENDING A HILL section.
CAUTION:
Going down a hill improperly could be hazardous.
Going down a hill improperly could cause loss of control or cause the
ATV to overturn.
To ride down a hill with the ATV, follow the instructions below.
1. Check the terrain carefully for any obstacles before you go down the hill.
2. Point the ATV straight down the hill.
3. Transfer body to the rear by sliding back on the seat.
4. Ride down the hill slowly with the throttle released.
5. Apply the rear brake to control the speed.
6. Avoid going down a hill at an angle that would cause the vehicle to lean
sharply to one side. Go straight down the hill if possible.
21INSPECTION AND MAINTENANCE
MAINTENANCE SCHEDULE
It is very important to inspect and maintain your ATV regularly. Follow the guidelines in the chart. The intervals
between periodic services in months are shown. At the end of each interval be sure to perform the maintenance
listed.
Initial 1 month Every 3 months Every 6 months
Item
Interval
Air Cleaner — C —
^Exhaust pipe bolt
T T T
and muffler bolt
*Cylinder head,cyl
— C C
inder and muffler
Spark plug — C R
Idle Speed I 1 1
22Throttle cable 1 1 1
*Fuel line 1 1 1
^Brakes 1 1 1
Tires Inspect every month
Drive Chain Clean, lubricate and inspect each time the ATV is
ridden
*Suspension — — 1
*Steering 1 1 1
^Chassis bolts
T T T
and nuts
Flexible tube 1 1 1
Brake fluid Replace every 2 years
I=Inspect and clean, adjust, lubricate or replace, if necessary. C=CIean R=Replace T=Tighten L=Lubricate
^Replace very 2 years
*Replace every 4 years
23If you ride your ATV usually, you need to have it serviced more frequently.
◆ Maintenance for hydraulic brake system:
1) Inspect the brake fluid regularly, if necessary, please replace the brake fluid that is specified.
2) Replace the brake fluid per two years.
3) Replace brake soft pipe per four years.
WARNING: Don’t take any chances not to maintain those parts which must be replaced, otherwise, it may
result in injury or death.
◆ Inspecting spark plug
Spark plug is the key electrical parts, and it’s easy to inspect it.
The heat and debris can rust the spark plug slowly, not making it discharge normally and having strong enough spark,
so that it can’t ignite the gas mixture. In order to make the engine work normally, you must maintain it regularly and
replace the spark plug if necessary.
● Removing spark plug
1. Pull up the wire connecting cap of the spark plug;
2. Use the special tool for spark plug in the tool bag, screwing out the
24spark plug anticlockwise.
●Inspecting spark plug:
1. Inspecting whether the spark plug terminal which is wrapped with pottery (connecting with the wire cap) is oxidated
or not.
CAUTION: It would affect conductivity if the terminal is oxidated or rusted, what’s worse, it would make the engine
power lower, fuel consumption rise up, leading to misfiring and cutout, this will result in the engine operation not
stable, affect the normal work seriously. If you’re not able to judge whether the terminal meets the requirement,
please contact Kayo after-service agent for help.
2. Inspect whether the electrode of the spark plug has rust, carbon deposit or other sediment, if necessary, you must
replace it.
Spark plug model:
A7RTC
3. Measure the clearance of the spark plug electrode, if necessary, adjust the clearance.
Spark plug electrode clearance:
● Assemble the spark plug:
0.6-0.7mm(0.024-0.028in)
251. Wash the spark plug gasket and its matching surface, and wipe up the dirt in the thread of the spark plug.
2. Screw the spark plug in the mounting hole with the special tool, tightening it according to the specified torque.
Spark plug tightening torque:
CAUTION: When assembling the spark plug, if there’s no appropriate wrench, you can estimate whether it is
18Nm(1.8m*kgf,13ft*lbf)
tightened, after tightening spark plug, using spark plug wrench screw 1/4-1/2 will be fine. Of course, in this way,
someone may not meet the requirement when assembling, you should check it with torque wrench.
3. Tighten wire cap on the terminal spark plug.
◆ ENGINE OIL
Running the engine without an adequate amount of engine oil could cause severe engine damage. Running the
engine without any engine oil could cause engine overheating. Always check the amount of engine oil before
starting the engine.
Changing engine oil
The engine oil should be changed every 20 to 40 hours of operation. It should be changed more often in dirty and
dusty areas.
To change oil:
261. Park the vehicle on level ground.
2. Remove the oil cap.
3. Remove the drain bolt and drain oil into proper container.
4. Reinstall the drain bolt
5. Pour fresh oil of the specified type through the oil fill hole.
NOTE: Approximately 900ml (1 Qt) of oil is required.
6. Tighten the oil cap, and check oil level.
7. Dispose of used oil as per governmental regulations.
◆DRIVE CHAIN/SPROCKETS
The condition and adjustment of the drive chain should be checked before riding. Always follow the guidelines below
for inspecting and servicing the chain.
When Inspecting the chain, look for the following:
. Loose pins
. Damaged rollers
. Dry or rusted links
. Kinked or binding links
. Excessive wear
27If you find anything wrong with the drive chain, solve the problem by repairing or replacing the chain. If necessary,
consult your authorized service center.
If It is determined the drive chain is damaged, check the sprocket also for damage. A worn chain can have an
adverse affect on the front and rear sprockets.
DRIVE CHAIN CLEANING, OILING AND ADJUSTING
Clean and oil the chain as the following:
1. Wash the chain with water.
2. Dry the chain, and then oil the links with Chain lube or equivalent.
Failing to inspect the drive chain slack before each use of the ATV could
be hazardous. Too much chain slack could cause the chain to come off the sprockets, resulting in an accident or
serious damage to the ATV. Inspect the drive chain slack before each use. The drive chain should be adjusted and
make sure there is 20-30 mm(0.8-1.2 inches) of slack
◆ Checking the wheel hub bearings
The front and rear wheel hub bearings must be checked at the intervals specified in the periodic maintenance and
lubrication chart. If there is play in a wheel hub or if a wheel does not turn smoothly, please contact the local dealer to
check the wheel hub bearings.
Recommended lubricant:
28
Lithium-soap-based grease◆ Checking swingarm pivots
The swingarm pivots must checked at the intervals specified in the periodic maintenance and lubrication chart, if
there is play in swingarm, or if need lubricated. Please contact the local dealer to check if you found any abnormal
noise or swingarm can not turn smoothly.
Recommended lubricant:
Lithium-soap-based grease
◆ Checking the upper and lower arm pivots
The upper and lower arm pivots must be checked at the intervals specified in the periodic maintenance and
lubrication chart. To check if the clearance is within specification, if there is play in arm pivots. It is very important to
lubricate the arm pivots.
Please lubricate the grease nipple with special lubricated tools.
Recommended lubricant:
Lithium-soap-based grease
◆ Checking and lubricating the steering
The steering must be checked at the intervals specified in the periodic maintenance and lubrication chart.
29Recommended lubricant:
Lithium-soap-based grease
◆ BATTERY
WARNING: Do not leave the head light on for more than 3 minutes while engine is off, because the battery may
discharge,causing starting problems.
If this happens,remove the battery and recharge it,Or use PUSH&BUMP to start the bike. After adding liquid, it
should be used after being placed for one hour at least, or after being charged.
30WARNNING:Battery electrolyte is poisonous and dangerous, as it contains sulfuric acid, which can cause severe
burns. Avoid contact skin, eyes or clothing. Always shield your eyes when working near batteries.
Antidote:
EXTERNAL: Flush with water.
INTERNAL: Drink large quantities of water or milk of magnesia, beaten egg or vegetable oil. Call a physician
immediately.
EYE: Flush with water for 15 minutes and get prompt medical attention.
Battery produce explosive gases. Keep sparks, flame, cigarettes or other sources if ignition away, Ventilate
when charging or using in an enclosed space.
KEEP OUT OF RACH OF CHILDREN.
TROUBLESHOOTING
31Although Kayo ATV received a thorough inspection before shipment from the factory, trouble may occur during
operation. Any problem in the fuel, compression, or ignition systems, for example, can cause poor starting and loss
power.
The following troubleshooting chart represents a quick and easy procedure for checking these vital systems yourself.
However, should your ATV require any repair, take it to a Kayo dealer, whose skilled technicians have the necessary
tools, experience, and know -how to service the ATV properly. Use only genuine Kayo replacement parts, Imitation
part may look like Kayo parts, but they are often inferior, have a shorter service life and can lead to expensive repair
bills.
WARNING :Do not smoke when checking the fuel system.
321. Fuel Check the fuel level in the fuel
tank
Enough fuel No fuel
Check the Supply fuel
compression
The engine does not start Check the
compression.
33Operate the electric starter
2. Compression
There is compression There is no
compression
Check the ignition Please contact dealer
34Remove the spark plug and check the electrodes.
3. Ignition
Wet Dry
Wipe off with a dry close and
Please contact dealer.
correct the spark plug gap, or
replace the spark plug.
The engine does not start.
Check the battery.
35
The engine does not start.4. Battery Operate the electric starter.
The engine turns over quickly The engine turns over slowly
The battery is good Check the battery lead connections,
and charge the battery if necessary.
The engine does not start, please
contact dealer.
36UNPACKING ASSEMBLY
1.Put the vehicle packing on the flat ground or workbench;
2.Cut out the tighten belt with scissor. Take out of the carton and you will see the packing steel support.
3.Remove all the bolts and nuts from steel support from top to bottom.
Carefully clear out of all the steel support to avoid hurt anyone.
4.Remove all the bolts and nuts, and separate the Vehicle from the
packing support.
5.Before assembly, turn around the ball joint. Tighten slotted nut and cotter pin.
376.Assembly front wheel: put the 8pcs locking nut M10 and the plugs on wheels.
7.Assembly rear wheel: First inflate the rear wheel, put washers, slotted
nut, cotter pins one wheel, each of them 8pcs. Also put on the 2pcs plugs.
8. Assembly the handlebar in the right position and make sure the hydraulic brake in a level position.
389. Take out of the bolt on handlebar and assembly the cover of indicating light. Put back the bolt on handlebar.
10. Fully fill the battery with liquid and then put the battery into battery box. Cover the battery and then connect the
cables.
Please carefully check and commission the vehicle after the complete assembly. Only after the full commissioning
test, you can drive away the vehicle.
YDF SERIES ELECTRICAL CIRCUIT DIAGRAM
3940
VEHICLE MAINTENANCE
VEHICLE MAINTENANCE - BEFORE YOU RIDE CHECKLIST

  SAMPLE PRE-OPERATION CHECKLIST
  Add to or adapt this checklist to suit your quad bike and place photocopies in a sturdy folder where vehicle keys and operator
  PPE are stored.
  • Maintain completed forms to provide a record of completedinspection and/or training.
  • The operator’s manual provides information about minimum maintenance activity.
  • Additional copies of checklists are available at worksafe.vic.gov.au

  Pre-operation checklist:

    Check the fuel, oil and coolant every time before use with the engine off.
  Visually inspect
     Check for damaged or loose parts.                    Check for fuel or oil leaks.

  Wheels and Tyres
    Check tyres for damage.              Ensure tyre pressure is correct and even in each tyre.     Check wheel nuts.

  Throttle
    Check the throttle operates smoothly across its range. Accumulated mud and dirt can restrict cable movement and
    prevent the throttle from closing.
  Brakes
     Check brakes operate properly before reaching full speed.

    Check it is not choked with dirt. Clean and replace regularly.
  Lights and switches
     Check lights and switches work.
VEHICLE MAINTENANCE - BEFORE YOU RIDE CHECKLIST Drive chain and chassis Inspect chain for proper adjustment, wear and lubrication. Check drive shaft for oil leakage. Look and feel for loose parts with the engine off. Rough terrain will loosen chassis parts. Steering Check the steering moves freely, but without undue looseness. Other checks required Maintenance actions required Done into operation. Checked by: Date
VEHICLE MAINTENANCE - MONTHLY CHECKLIST
 ROUTINE MAINTENANCE CHECKLIST
   Brakes                                                          Wheels
                                                                     Axle bearings and wheel nuts are tight
      Auxiliary brake                                                Rims not dented or buckled
      Foot and hand levers adjusted – as per the                     Tyres are roadworthy, with adequate tread depth
      operator’s manual                                              Tyre type and pressure as per the operator’s manual
      Check disc wear                                                Use low-pressure tyre gauge. High-pressure gauges
                                                                     are not accurate for quad bike tyres
 Chassis and suspension                                          Steering
   Shock absorbers – for leaks and wear                            Smooth movement from lock to lock
   Suspension operation                                            Linkages – for wear
   Safety guards – for looseness
                                                                 Gear selectors
   Handlebars, foot decks and major fasteners
   – use tension wrench                                            Gear levers – for damage and excessive slack
                                                                   Splines on gear shaft
 Throttle operation
   Test while moving handlebars fully to the left and fully to   Cooling systems
   the right                                                       Fluid levels (if liquid cooled)
 Fluid levels                                                      Thermostatic fan
                                                                   Leaks and damage
   Fluid levels as recommended in the operator’s manual
                                                                 Additional routine maintenance checks required:
   Engine oil
VEHICLE MAINTENANCE - MONTHLY CHECKLIST
ROUTINE MAINTENANCE CHECKLIST (CONT.)
4WD system
Check, clean and regularly replace
Constant velocity joints
Exhaust
Drive line and shafts Holes and corrosion
Check for split boots on drive shafts Excessive noise
Looseness
Signals
Lights
Horn Battery
Battery terminals – for corrosion and tightness
Indicators
Electrolyte levels
For quad bikes with chain drive Damaged casing
Chain adjustment as per the operator’s manual Other
Sprockets not worn
Check for attachment and condition of:
Lever controls Load carriers
Check smoothness of operation Foot decks
Check for broken, sharp or bent levers Seat
Additional routine maintenance checks required:
On the back of this sheet list:
1. Maintenance actions required
2. Items that require attention from an authorised repair person
Maintenance check performed by: Date: Next service at:VEHICLE MAINTENANCE
VEHICLE MAINTENANCE - BEFORE YOU RIDE CHECKLIST
  SAMPLE PRE-OPERATION CHECKLIST
  Add to or adapt this checklist to suit your quad bike and place photocopies in a sturdy folder where vehicle keys and operator
  PPE are stored.
  • Maintain completed forms to provide a record of completedinspection and/or training.
  • The operator’s manual provides information about minimum maintenance activity.
  • Additional copies of checklists are available at worksafe.vic.gov.au

  Pre-operation checklist:

    Check the fuel, oil and coolant every time before use with the engine off.
  Visually inspect
     Check for damaged or loose parts.                    Check for fuel or oil leaks.

  Wheels and Tyres
    Check tyres for damage.              Ensure tyre pressure is correct and even in each tyre.     Check wheel nuts.

  Throttle
    Check the throttle operates smoothly across its range. Accumulated mud and dirt can restrict cable movement and
    prevent the throttle from closing.
  Brakes
     Check brakes operate properly before reaching full speed.

    Check it is not choked with dirt. Clean and replace regularly.
  Lights and switches
     Check lights and switches work.
VEHICLE MAINTENANCE - BEFORE YOU RIDE CHECKLIST Drive chain and chassis Inspect chain for proper adjustment, wear and lubrication. Check drive shaft for oil leakage. Look and feel for loose parts with the engine off. Rough terrain will loosen chassis parts. Steering Check the steering moves freely, but without undue looseness. Other checks required Maintenance actions required Done into operation. Checked by: Date
VEHICLE MAINTENANCE - MONTHLY CHECKLIST
 ROUTINE MAINTENANCE CHECKLIST
   Brakes                                                          Wheels
                                                                     Axle bearings and wheel nuts are tight
      Auxiliary brake                                                Rims not dented or buckled
      Foot and hand levers adjusted – as per the                     Tyres are roadworthy, with adequate tread depth
      operator’s manual                                              Tyre type and pressure as per the operator’s manual
      Check disc wear                                                Use low-pressure tyre gauge. High-pressure gauges
                                                                     are not accurate for quad bike tyres
 Chassis and suspension                                          Steering
   Shock absorbers – for leaks and wear                            Smooth movement from lock to lock
   Suspension operation                                            Linkages – for wear
   Safety guards – for looseness
                                                                 Gear selectors
   Handlebars, foot decks and major fasteners
   – use tension wrench                                            Gear levers – for damage and excessive slack
                                                                   Splines on gear shaft
 Throttle operation
   Test while moving handlebars fully to the left and fully to   Cooling systems
   the right                                                       Fluid levels (if liquid cooled)
 Fluid levels                                                      Thermostatic fan
                                                                   Leaks and damage
   Fluid levels as recommended in the operator’s manual
                                                                 Additional routine maintenance checks required:
   Engine oil
VECHICLE MAINTENANCE - MONTHLY CHECKLIST
ROUTINE MAINTENANCE CHECKLIST (CONT.)
4WD system
Check, clean and regularly replace
Constant velocity joints
Exhaust
Drive line and shafts Holes and corrosion
Check for split boots on drive shafts Excessive noise
Looseness
Signals
Lights
Horn Battery
Battery terminals – for corrosion and tightness
Indicators
Electrolyte levels
For quad bikes with chain drive Damaged casing
Chain adjustment as per the operator’s manual Other
Sprockets not worn
Check for attachment and condition of:
Lever controls Load carriers
Check smoothness of operation Foot decks
Check for broken, sharp or bent levers Seat
Additional routine maintenance checks required:
On the back of this sheet list:
1. Maintenance actions required
2. Items that require attention from an authorised repair person
Maintenance check performed by: Date: Next service at:You can also read