Australian Free-range Snail Production - Snail Farming Information Service
←
→
Page content transcription
If your browser does not render page correctly, please read the page content below
Australian
                                      Free-range
                                    Snail Production

Snail Farming Information Service         © Sonya Begg 2010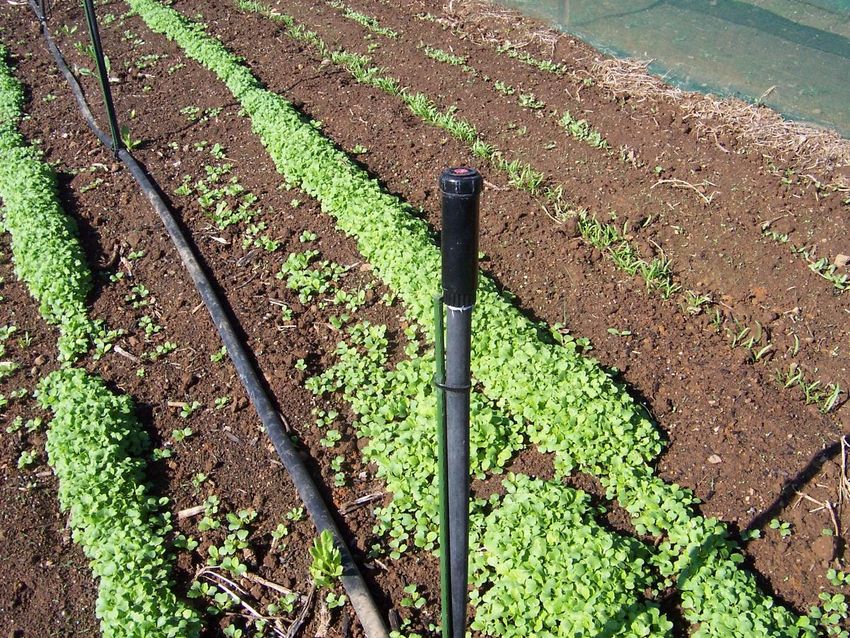
This visual presentation demonstrates the technique of
establishing a free-range snail farm in Australia.

It explains the value of the biological cycle of breeding
snails as the most ethical and sustainable method of raising
snails and how to purge and process snails to ensure a
high-quality end product.

It provides insight on how to produce better tasting snails
than those raised in overcrowded enclosures by optimising
the welfare and health of snails.

It complements the CODE OF PRACTICE Australian Free-
range Snail Farming and Australian Free-range Snail
MARKETING STRATEGIES

Read these documents at www.snailfarming.net Scroll down
to ‘Information’.

                                                               2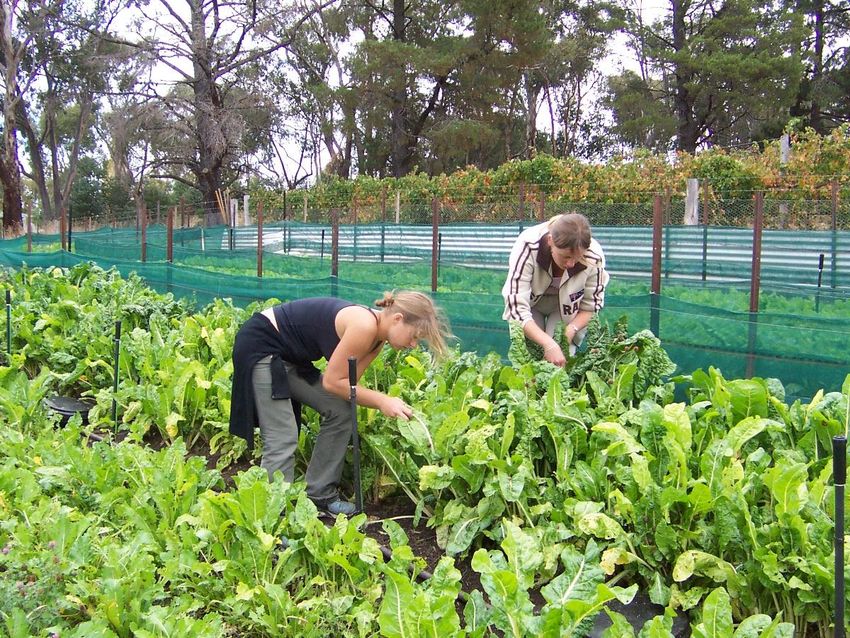
Aim of the Code of Practice

To emphasise that free-range snail
 production is a sustainable farming
 practice.
                                            Please read
To highlight free-range snail farming as
 the most acceptable and moral method
 of snail production and has a positive
 influence on the quality of snails.

To encourage the application of organic
 and biodynamic principles to further
 enhance the biological cycle of raising
 snails.

To discourage intensive snail growing and
 fattening in overcrowded conditions in
 small enclosures or greenhouses
 (backyard operations).

                                                  3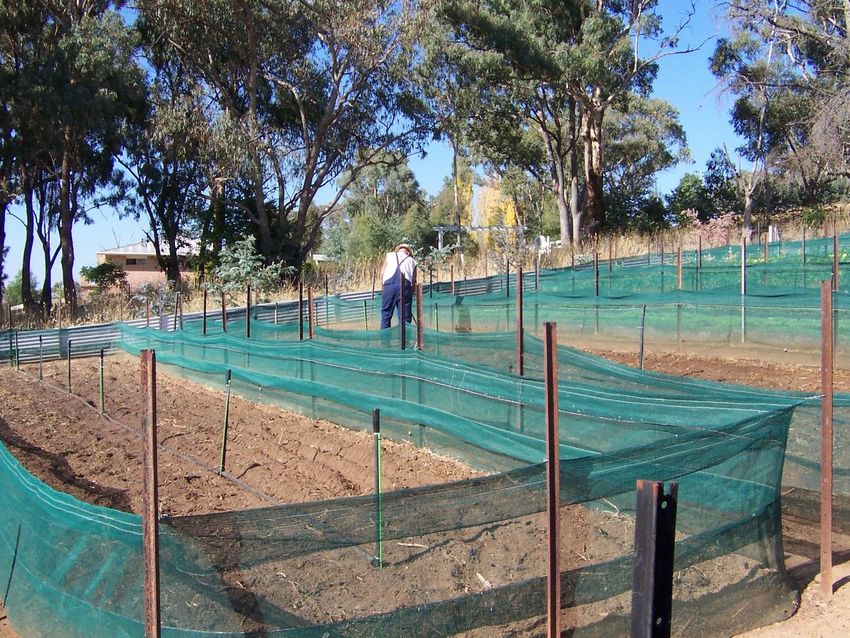
Reason for free-range snail production

The natural physiological
characteristics of snails are
enriched by a free-range
environment.

It it promotes
excellent metabolic and
respiratory functions for the
snails ― plenty of space and
natural air circulation.

To understand the needs of the
physiology, growth, reproduction,
nutrition and snail behavior.

                                         4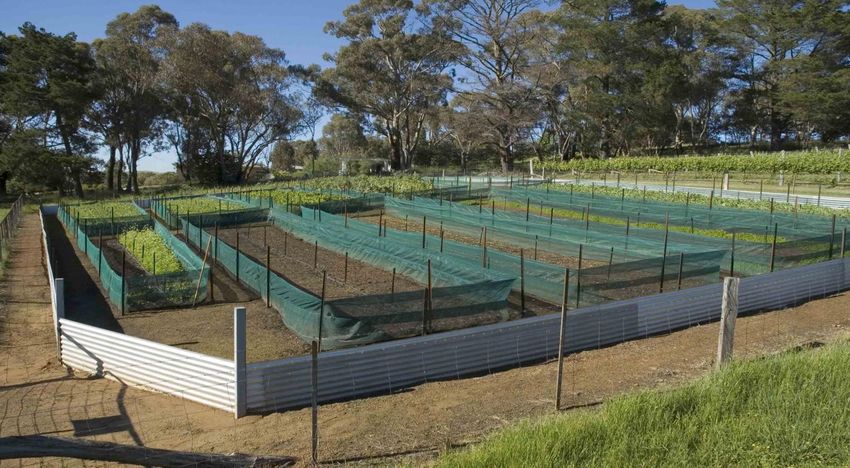
Free-range versus intensive snail production

Improved breeding environment.
No overcrowding problems
Higher reproduction rates.
Lower mortality.
Clean environment, so no excess
slime, faeces or odour.
Optimises the health and welfare
of the snails.
Produces wholesome, consistent
sized, top-quality snails.
Results in a better product.
                                                 Fine example of snails
                                                 bred in free-range snail
                                                     production unit

                                                                    5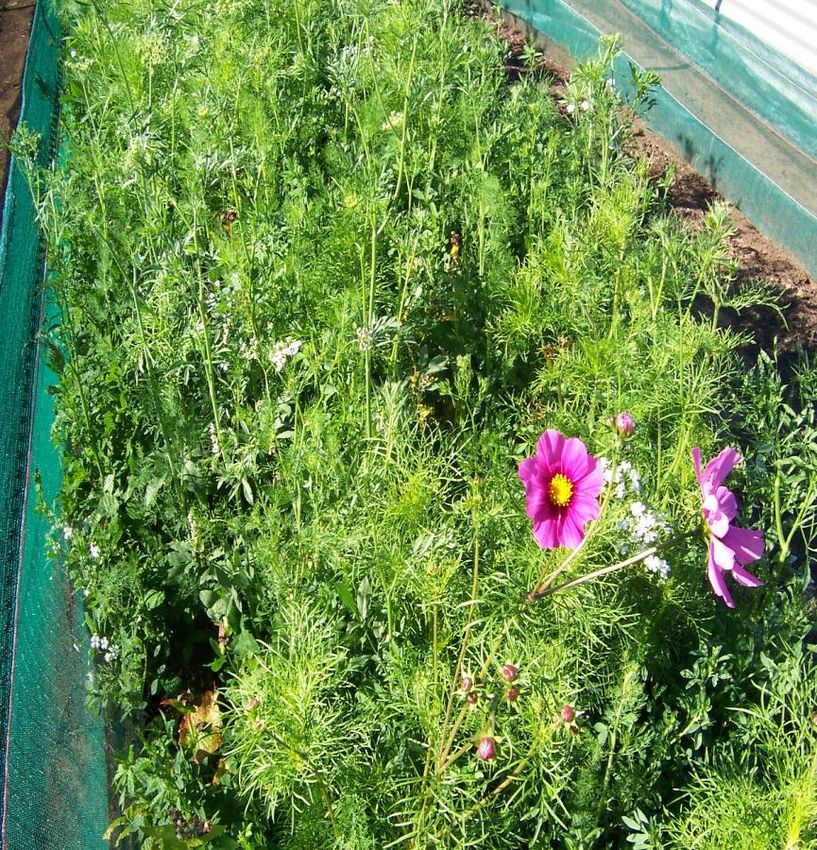
Optimising welfare and health of snails

Space to roam free prevents
over-crowding.
Benefit of natural ventilation, sun
and moon light, rain and the
evening dew.
Allowed to live according to nature,
creating ecological balance
between soil, plants and snails.
Moral and ethical method of
farming snails.
Stress-free environment due to
the natural biological cycle of
breeding snails.
Less human handling.
Produces large numbers of consistent
high-quality snail livestock.
                                       Foraging makes snails more tender

                                                                           6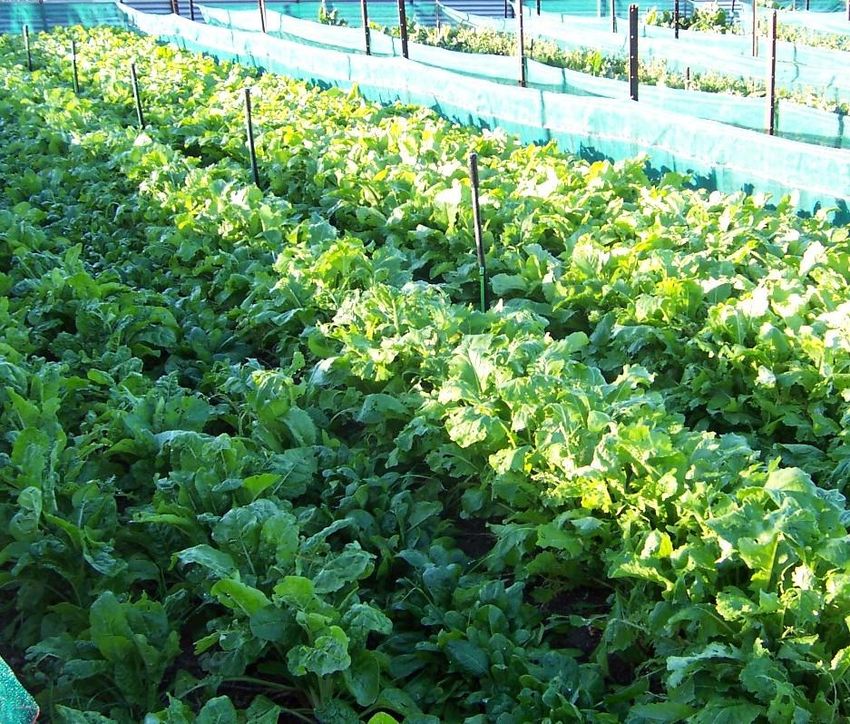
Compare the difference

Snails raised in overcrowded     Snails raised in free-range or open pastures
conditions in small enclosures

                                                                                7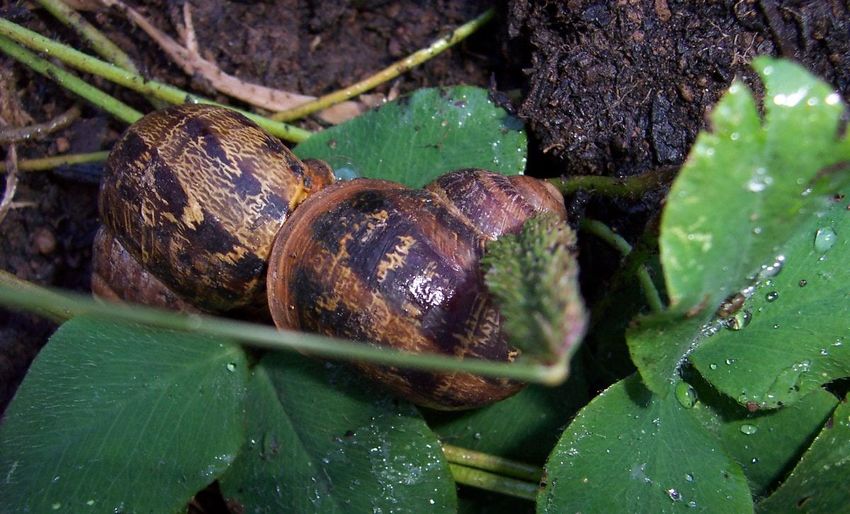
Snails suitable for free-range snail production in Australia

In Australia the domestic production of edible snails for the commercial
market is Cantareus aspersus ─ formerly Helix aspersa — first described
in Italy by Müller in 1774.
It is a terrestrial snail and is herbivorous. It is known in Australia as the
common brown garden snail (or ‘petit-gris’, meaning ‘little grey’).
It is one of the most popular snails eaten snail in France, Italy and other
European countries.

                                                                                8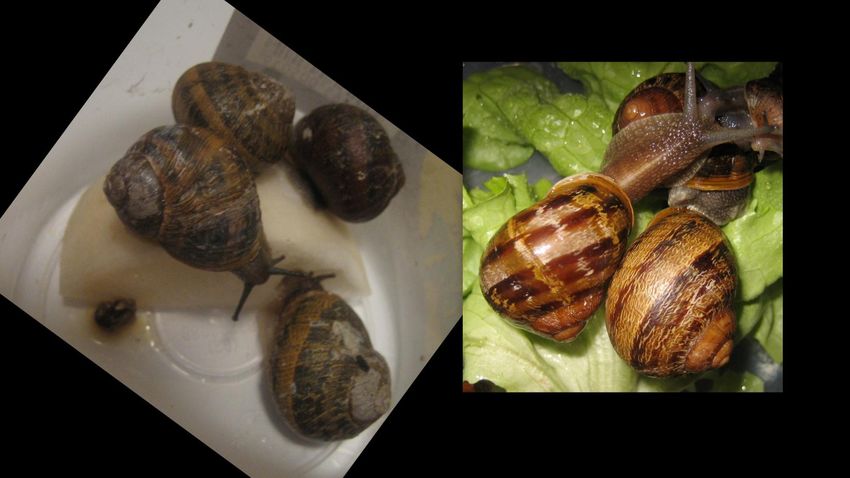
Basic biology of the snail

                             9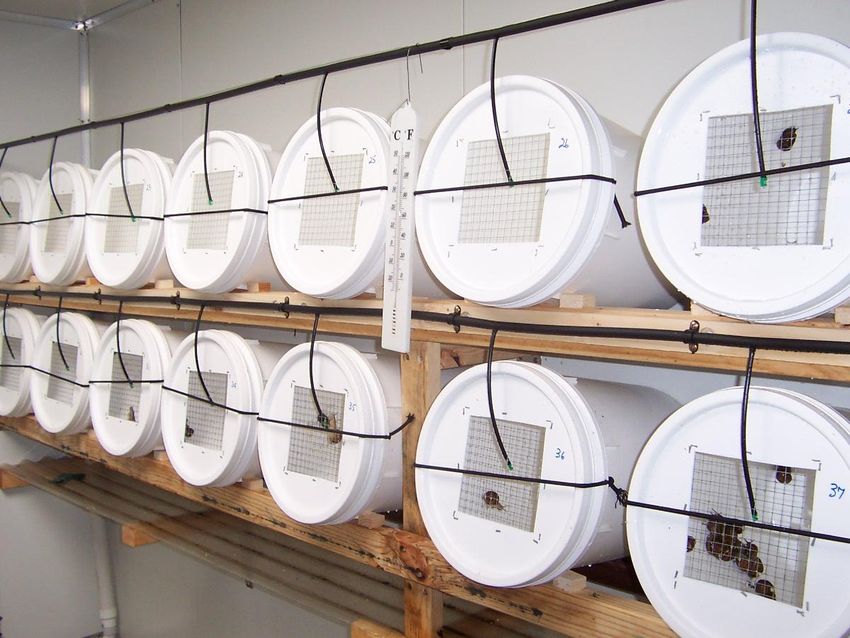
Climatic conditions

  C. aspersus adapt well to cooler
  regions up to 750m above sea level
  and endure frost and snow if given
  adequate crop shelter.

  Temperate regions of Australia and
  New Zealand with yearly temperature
  within the range minimum -4ºC to
  maximum 30ºC.

  C. aspersus are induced to aestivate
  when drought, heat and extreme cold
  slows their metabolic activity.

  They are not suitable for breeding in
  tropical or desert areas of Australia.

                                           10
Benefits of applying organic principles
Applying organic principles is an integral part of a free-range snail farm.
An organic production system sustains the health of soils, ecosystems and
snails.
◘ Crops are planted without the use ◘ Finished crops are ploughed back into
of synthetic fertilisers. the ground as ‘green manure’ crops.
◘ No chemicals are used in the snail ◘ Physical controls are maintained for
fields. unwanted weeds and pests.
◘ Crops are rotated to disrupt any ◘ Biological control using insectary
soil-born diseases. plants attract ‘beneficial bugs’.
◘ Companion planting is encouraged.
◘ Working with the appropriate rhythmic
influences of the moon for planting,
◘ Crops are planted densely to help
cultivation, and harvesting snails.
prevent weed growth and bird
predation.
◘ Ecological benefits of natural sun and
moon light, organic soil, rain and the
evening dew.
11Planting crops by the moon
To follow biodynamic principles, plan the
sowing of seeds to coincide with the fertile
phases of the moon.
Plans for seeding can be formulated by using
lunar phases for sowing seeds so the
connection between the solar system and
natural biological cycles is maximized.
Plant leafy vegetables when the
moon is waxing and root vegetables when
the moon is waning.
Because the lunar phase is said to control
the moisture in the soil, you will find that the
seeds germinate quickly and the plants grow Use an astrological calendar as an
strong and healthy in a relatively short time. easy guide to planting crops.
12Good bug bed – Biological control of unwanted plant pests
Improves natural balance and
reduce harmful insect pest
outbreaks. A ‘good bug bed’ is an
excellent biological method of
controlling aphids, scale, red spider
mite, caterpillar and other pests
without the use of chemicals.
It also provides a natural nectar
source that attracts the beneficial
insects to help control unwanted
pests.
Some of the plants in the mix
The best time to plant a ‘good bug bed’ is in late
include annual and perennial winter so its biological control will be successful in
flowers such as marigolds, controlling any pests that may appear in the crops
alyssum, cosmos, Queen Anne’s grown for snails in mid-spring and summer.
lace, red clover, dill and caraway.
Plant the ‘good bug bed’ either inside the
perimeter fence or outside it, as long as it’s close
to the snail production area.
13Minimum space requirements
To ensure viable, commercial snail production, a minimum of 850 square
metres to one hectare is needed to breed around 50,000 snails each season.
This area allows room for crop and snail rotation and fallow areas.
14Position of site
North facing, level to slightly undulating land.
Good drainage and protection from prevailing winds.
15Preparing the site
◘ Mark out the designated area
and clear land of weeds and
other vegetation.
◘ Determine soil acidity by
conducting a soil test.
◘ Add organic soil conditioner
and composted material if
necessary.
◘ Include fine grade garden
limestone (calcium carbonate)
if necessary. Soil should be
slightly alkaline at pH level of
around 7.5-8.
Good preparation of the soil during initial establishment will prevent the germination of weed
seeds and give a good base for planting of feed and shelter crops for the snails.
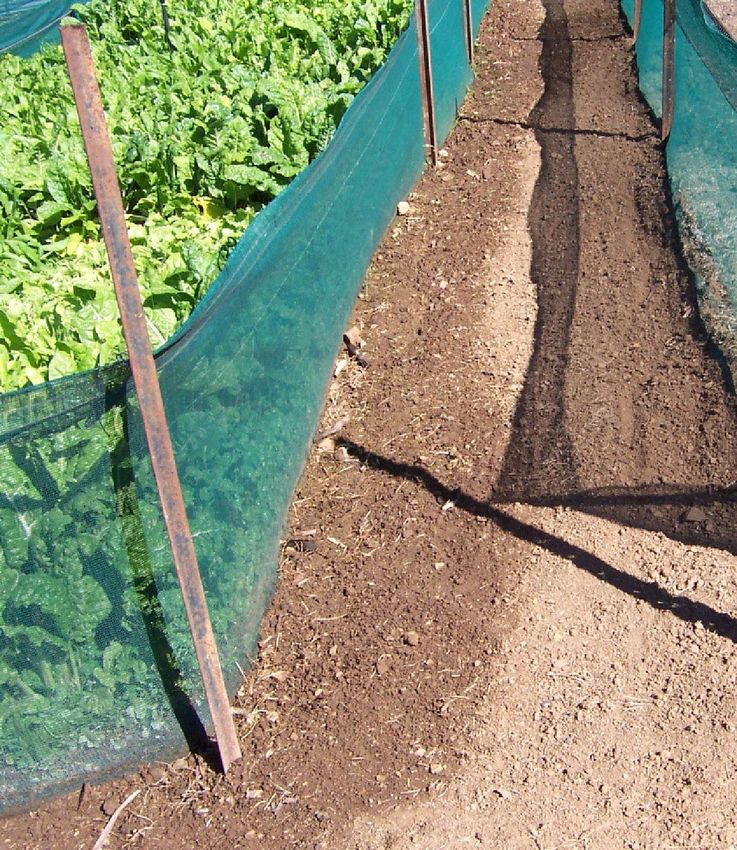
16The perimeter fence
After clearing the land, build the perimeter fence.
The perimeter fence is the most important part of construction. It keeps
burrowing animals, rodents and snakes and other unwanted pests out of the
snail production area.
Producers who have not erected an external fence have reported problems with
rabbits and rodents.
The outside of the galvanized fence must always be completely free of anything
that climbing animals may use as a form of entry.
All posts and other fencing materials should be attached to the inside surface
of the galvanised iron sheets. There must be no holes or gaps so predators
(large and very small) are able to get through.
Once the area is clear of all weeds, the perimeter fence is placed around the
entire area selected for snail production.
Allow enough room for at least one metre of clear pathways on each side of
the perimeter fence.
17Constructing the perimeter fence
This fence is
important
◘ Construct an external fence of corrugated galvanised iron sheeting around the entire
perimeter of the area designated for the snail production unit. Allow for future
internal expansion.
◘ The galvanised sheeting should be at least 85cm in height and buried to a depth
of 30cm.
18Setting the perimeter fence into the ground
Use a trenching Place the galvanized Attach the galvanized sheets
machine to dig a trench iron sheets in the trench butt-joined in the corner with
30cm deep around the and drive in iron star pop-rivets over the right-angled
perimeter. posts where the sheets sections of aluminium so there
meet. are no gaps in the corners.
◘ Use pop-rivets to join the galvanized sheets and then bolt to the star posts.
◘ Use square section 100mm x100mm steel post in the corners.
◘ Pop-rivet right-angled sections of aluminum to the 100mm x 100mm posts.
◘ Allow enough room for at least one metre of clear pathways on each side of the perimeter fence.
19Corners of the perimeter fence
◘ Butt the gal-iron panels closely to steel posts in each corner and seal
behind with silicone (see arrow) so there are absolutely no gaps (even small
ones) to be seen.
20Adding a predator-free gate to perimeter fence
◘ Make two vertical cuts with tin snips
into the middle of one of the
galvanised iron panels of the
perimeter fence – wide enough to 1 2
allow a rotary hoe to enter.
◘ The cuts are made from the top edge
to just above ground level, so that
this panel can be folded down to
make a ramp. (see next page).
◘ Place two flat aluminium strips 75mm
wide and 2mm thick each side of the
cut panel – on the inside of the fence
– so that half the strip is pop-riveted
to the fixed panel and the other half
bolted to the opening panel.
◘ The strips are necessary to
cover the cuts so mice and other
small predators cannot get through.
21Gate access details
◘ To access the free-range area, the bolts on the opening panel only are undone,
leaving the aluminium strip attached to the fixed panel.
◘ The panel is folded downwards to the ground that forms a temporary ramp for the
rotary hoe to be wheeled into the free-range area.
◘ The ramp should never be left down for any length of time, even when operating
machinery in the free-range area, to prevent predators or other animals entering.
Perimeter fence — outside surface Perimeter fence— inside surface
Aluminium strips bolted to fixed
Panel folds outwards to make a and cut sides of panel on inside
ramp on outside of fence of fence, so there are no gaps
22Perimeter fence option
◘ Kangaroos are rarely a problem but if they are, a cyclone wire
extension can be added above the galvanized iron fence.
◘ As an extra precaution, the addition of an electric out-rigger wire is
recommended.
◘ Crops may offer a tempting meal for kangaroos and rabbits.
Out-rigger hot wire attached to cyclone
netting
Cyclone netting above galvanised fence
The outside of the galvanized area of
the perimeter fence should be
completely clear of any materials to
prevent climbing predators
23Internal fencing (snail fields) Once the perimeter fence is in place start constructing the internal fields. Internal fields or paddocks for housing are fenced with open weave shade cloth or wind break material to provide adequate air circulation and ventilation for essential respiration of the snails. The number of internal fields in this project is 10 to maximise the space and take advantage of north/south layout. Any number of fences can be constructed according to the Plan to join the mesh at the end of field so it can be allocated area. opened easily to allow rotary hoeing. NB: All internal fences can be erected at once or if time is an issue, construct only the first field for the breeders (reproduction field) and finish the rest later in the season (optional). 24
Setting out the internal fences

◘ As a guide, you need three
   growing fields for each
   reproduction field.

◘ Leave one metre of space
   between the perimeter
   fence and one metre of
   space between all the
   netting fields.

◘ Place iron posts a
   minimum of 2 metres apart.

      Reproduction
      field                     Growing field   ‘Good bug bed’

                                                                 25
Constructing the internal fences
◘ Have a top pocket and two downward facing
flaps sewn into the mesh by the shade cloth supplier
while it is still in the roll. (The flaps help prevent
snails going over the side). top pocket
and top flap
◘ Incorporate the pocket and flap at the top and thread
pocket with fencing wire so it can be attached to iron
posts.
◘ Flaps should measure 20cm and are sewn in as
pleats ― 40cm of material is allowed for each pleat.
Second flap
◘ Dig a trench around the perimeter of each field.
◘ Place iron posts a minimum of 2 metres apart to
support the mesh. Attach mesh to posts with
remainder
twitching wire. buried
◘ Roll up and bury the remainder of mesh material into
the trench so the completed fence stands at least
70cm high. (You need to be able to climb over the
netting). 26Details of internal fencing mesh
◘ Buy good quality open-weave
windbreak or shade cloth mesh
with ultra violet block out.
◘ It can be purchased in rolls
Flap 1 measuring 1.8m x 50m.
Flap 2 ◘ Cheaper quality mesh is
subject to stretching and
damage from the elements.
◘ Use green or cream coloured
mesh (black attracts heat).
Remainder of material
buried into the trench ◘ If using shade cloth buy
minimum density usually
around 30-50%. It’s not
shade that is required but
good air circulation.
◘ Ask the manufacturer of shade
Pocket for wire
cloth products to sew the flaps in
as pleats.
27Pathways ◘ Keep the pathways around the outside and inside of the perimeter fence and in between internal fields clear of any weeds or vegetation. ◘ Remove the weeds by hand or if necessary, spray the weeds with an organic herbicide. ◘ Some snails manage to climb out of the netting enclosures but they will usually return by daylight because of their territorial nature. ◘ However, if there is a clump of vegetation they are inclined to go only as far as the weeds rather than back to their field. 28
Water requirements for snail production

Snails love rain and need
water for hydration.
                                          Yes, we
The soil needs to be kept                 like lots of
moist for egg laying and                  water
hatching.

Sufficient water is needed to
grow crops successfully.

Water keeps the snails active
(eating, breeding, growing).

                                                         29
Irrigation
An irrigation system is recommended for
watering plants and to encourage night-time
activity of the snails.
Overhead sprinklers, providing light misting,
are more suitable than heavy watering to
prevent the soil from becoming saturated.
Incorporate the irrigation system in the early
stage of establishment, either before or after
erecting the internal fences.
A filter should be attached to the irrigation
system if water is sourced from a dam.
30Food for free-range snails
Snails require protein, fibre, vitamins and minerals including extra
calcium for shell development.
All snails need ad lib access to naturally-grown food, moisture and
the advantage of the evening dew.
Plants such as forage brassicas (cabbage family), hybrid turnip, plantain,
dandelion, wild turnip, clover and silver beet contain necessary nutriments
and are ideal for planting inside fields as a food source and habitat.
Along with growing suitable plants for food, dry organic animal foods such
crushed corn, bran, oats, full-fat soy mixture is an added supplement if
necessary, and can be given to snails bred for human consumption as
long as the formula does not contain antibiotics or any added chemicals.
31Suitable food and shelter crops for free-range snails
FOOD
SHELTER
◘ White clover (Trifolium repens) (only newly hatched snails)
◘ White clover (Trifolium repens)
◘ Strawberry clover (Trifolium fragiferum)
(only newly hatched snails)
◘ Strawberry clover (Trifolium
fragiferum)
◘ Forage rape (Brassica napus)
◘ Chickory (Cichorium intybus)
◘ Forage brassica hybrids (Brassica campestris spp)
◘ Silverbeet (Beta vulgaris)
◘ Plantain (Plantago lanceolata)
◘ Sunflower (Helianthus annuus)
◘ Sunflower (Helianthus annuus)
◘ Lettuce (Lactuca sativa)
◘ White Radish (Raphanus sativus longipinnatus) (root only)
◘ Wild Turnip (Brassica rapa spp. Silvestris)
◘ Purple-top Turnip (Brassica rapa)
32The most accepted plants by free-range snails
◘ Forage brassica
◘ Leafy turnip
◘ Cabbage and other plants from
the Brassica family
◘ Plantain
◘ Silverbeet
◘ Lettuce
◘ Red or white clover
◘ Dandelion
◘ Chickory
33Supplementary food with fresh vegetables
During times of low feed or high
density of juvenile snails,
supplementary crops can be
grown outside the snail production
area,
or
Green waste leaves such as
lettuce and cabbage can be
sourced from local (preferably
organic) fruit and vegetable
suppliers.
Purchase second-grade carrots
(horse carrots) in 20kg bags as an
additional supplement. Carrots are
especially useful after snails come
out of hibernation and at the start
of the breeding season.
34Supplementary feeding with grain
◘ A mix of grains such as maize, soybean,
crushed corn and oats with the addition of
calcium carbonate (fine grade garden lime)
can be sprinkled onto concrete pavers
measuring around 40cm x 40cm.
◘ . Place the pavers flush in the ground
randomly in the enclosures for
supplementary feeding of cereal grains.
◘ The pavers need to be flush to the level
surface of the ground to prevent snails Pavers
snails gathering on the sides or
underneath the pavers.
The pavers can be easily removed later.
Never use wooden boards, polystyrene boxes or rocks in free-range
snail fields as it encourages snails to congregate. This results in
overcrowding and shell rasping and other problems.
35Preparing the seed bed for snail food crops
◘ Open one end of the field and lay
netting flat on the ground to allow
a rotary hoe or other equipment
to enter.
◘ Prepare the soil by rotary hoeing
and rake over to prepare a seed
bed.
◘ Plant seed in rills at 30cm row
spacing. (Rill seeding takes a little
more time than broadcasting but
germination is better).
◘ Use the end of a broom handle to
make rills and sprinkle the seeds
quite heavily into the furrows.
◘ Cover with a thin layer of soil and
then water gently.
36Planting the seeds
◘ Planting seeds rather
than seedlings is more
economical for large
areas that need to be
planted densely.
◘ Rotate crops for each
planting so the same
plants are not planted in
the same area of soil.
◘
◘ Each field can have two
different crops planted
that can be rotated the
following year ―
e.g. brassica on one side,
Plant seeds densely
spinach on the other side
– then rotated at the next
planting.
37Selective and controlled breeding of free-range snails
Selective breeding Controlled breeding
Like any animal raising activity, The traits you desire in your
genetics in snail reproduction plays a snails must be conserved and
major role in homogeneous the undesirable ones
appearance and consistency in size. suppressed.
Selective breeding is based on the This is done by repeatedly
choice of parents with desirable traits selecting the best snails from
to produce improved progeny ― size each generation to be the
first, then colour of shell or flesh. parents of the next. Any mature
snails that are undersize must be
Selective breeding may not be a long- discarded.
term panacea due to possible genetic
throwbacks, so it’s important to focus Close monitoring for undesirable
on the traits that you are looking for in traits (usually after about three –
a snail and this is where ‘controlled four years) may require an
breeding’ comes in. injection of a different strain to
reduce any recessive genes that
Fact: The colour of the flesh of snails is may occur.
most influenced by genetics, not by the
food it is given.
38Selecting initial breeding stock
Sourcing breeding stock The Biological cycle of
breeding snails
Initial breeding stock can be sourced from
suburban gardens to create a genetic base. ◘ The biological cycle starts with
the snails first selected for the
Select only healthy-looking snails measuring
initial breeding program.
30-32mm that display even growth patterns.
Big snails breed bigger snails so it’s ◘ These are the snails that will
important that only large snails are kept for form the foundation for a solid
initial breeding. Discard undersize snails. genetic base.
The progeny of this initial breeding stock ◘ It begins at conception and
judged to have the best growth rates and finishes when adulthood is
size are chosen for the next batch of reached and the snails starts
breeders. to produce their own progeny.
◘ When the progeny reach
Make sure the snails adulthood, the cycle begins again.
selected for breeding
have a hard edge on ◘ Snails must complete their
the lips of their shells
– to indicate maturity.
biological cycle including winter
hibernation, to ensure high
fecundity and fertility.
39Reproduction
Mating begins in spring but
can continue through to
autumn if environmental
conditions are met.
Snails usually mate during the night
and can take four to fourteen hours
to complete.
Around six to ten days after mating,
the snail makes a hole in the soil
where it lays its eggs in batches of
any number from around 30-100
eggs at a time. C.aspersus is an hermaphrodite and each
individual snail possesses both male and
It then covers the hole with a female reproductive organs.
mixture of soil and mucus before
leaving to rest. During mating, mutual fertilisation takes
place and one or both snails will usually lay
eggs.
40Oviposition – egg laying
Soil needs to be friable for efficient oviposition
The eggs are round and measure approximately 3mm in diameter. They are pearly
white in colour and have a rubbery texture.
The eggs usually hatch within three weeks of being laid and the newly hatched baby
snails are exact replicas of the adult snails.
The frequency of egg laying is subject to temperature, humidity and soil conditions.
It’s estimated snails can lay several times during the breeding season under favorable
environmental conditions ― let your snails breed at their own pace.
41Stocking density Maximum ‘on ground’ stocking density Breeding snails 20 per sq m (Reproduction field) Juvenile snails 140 per sq m (Growing fields) Adult snails 80 per sq m (Holding fields) Free-range is about the maximum population size of the species that the environment (soil space) can sustain indefinitely. The freedom of enough ground area allows the snails to avoid each other’s slime trails and enjoy uncongested living space. Over-slimed ground and excess faeces can modify snail behaviour by putting out chemical signals like pheromones — detrimental to reproduction and growth rates in terrestrial snails. Snails raised in overcrowded enclosures produce fewer clutches of eggs or yield fewer eggs per clutch resulting in inferior adult snails. If you follow the ‘on ground’ stocking density recommendations, there will be no over-crowding problems as often is the case in intensive or greenhouse snail farming units. To avoid any unwanted traits that may result in decreased size and fertility from continuous line- breeding, a number of snails from another free-range breeder source can be introduced around every three to five years. 42
Factors that influence the growth of snails

Many factors greatly influence reproduction and the growth of snails

◘ Population density

◘ Food

◘ Temperature and moisture

◘ Breeding technology.

◘ Stress

Snails suffer stress as they are sensitive to noise and vibration, unhygienic and
overcrowded conditions, irregular feeding and human handling.

                                                                                    43
Schedule for managing free-range snail production
This schedule is a guide only. Planting of crops, reproduction and growing differ
according to the climate and can be delayed if unsuitable climatic conditions prevail.
It usually takes around six to eight weeks for crops to grow to suitable size for
introducing or transferring snails
FIRST SEASON
April to July August/September
◘ Clear land and prepare soil. ◘ Construct internal fences.
◘ Erect perimeter fence. ◘ Work up soil with addition of
garden lime (calcium carbonate) to
prepare seed bed in preparation
for planting.
◘ Plant out field 1 for reproduction.
◘ Plant ‘good bug bed’.
Contd….
44Schedule for managing free-range snail production ...contd
October (mid)
◘ When crops are around 25-30cm
high introduce breeding stock.
◘ Don’t introduce new snails if it is
raining and put off irrigating or
watering on the first day/evening
―watering encourages them to
escape.
◘ Monitor enclosures for any escapees
and return them to the field.
Brassica crop about 35-30cm and introducing
◘ The newly introduced snails should breeding snails.
only take a few days to settle in and
then the fields will become their
territory.
Only 20 breeding
◘ Place snails into the plants growing snails to the
square metre
in the middle of the fields. please!
Contd….
45Schedule for managing free-range snail production ...contd
February
November
◘ Allow baby snails to grow
◘ Plant out fields 2, 3 and 4 for through March and April.
growing out baby snails when they
hatch.
◘ Towards the end of February and
when all the juvenile snails have
◘ Breeding snails should be mating been transferred, harvest any
and starting to lay eggs. mature snails for purging and
cooking. Allow juvenile snails to
December continue growing.
◘ Hatchlings and baby snails should
be visible. Leave to grow until big March
enough to transfer (about the size ◘ Supply supplementary food for
of a five-cent piece). juvenile snails if necessary.
January
◘. Clear all snails and old crops
◘ At the end of January/early from out field 1 and cover with
February, transfer and distribute weed matting.
baby snails that have hatched in
field 1 to fields 2, 3 and 4 for
◘ Early in the month plant out fields
growing.
5, 6 and 7 for snails that will be
over-wintering.
46
Contd….Schedule for managing free-range snail production ...contd
April June
◘ Harvest any juvenile snails that ◘ At beginning of June, clear out all
have reached maturity for purging empty fields and cover with weed
and cooking. matting and leave fallow until
ready to plant again.
◘ Keep the largest snails for next
year’s breeders. ◘ Cover the fallow fields with weed
matting to help deter weeds from
May growing.
◘ Transfer snails kept for breeding
next year to field 5 for over July/August
wintering. ◘ Snails are in winter hibernation.
◘ Transfer other remaining snails to ◘ Cover the hibernating snails with
fields 6 and 7. This is where the enviro-cloth.
snails will remain for winter
hibernation until transfer in spring ◘ Carry out field maintenance.
for final growing out.
The second season of production follows the pattern of the first year and for the
following years to come. Remember to rotate crops and snails.
47Winter hibernation
When the temperature drops below ◘ Cover the snail fields with enviro-cloth
around 5-6°C, snails start to close off (frost guard). It keeps the temperature
the opening of their shells. of the soil up to approximately 7°C
The cover is called an epiphragm warmer.
and becomes hard and calcareous.
◘ Cover the fallow fields with weed
matting
Snails stay in hibernation until spring and is an important part of the biological cycle.
Snail in hibernation Enviro-cloth cover Weed cloth cover
48Maintenance management during snail season
◘ Trim crops that start to ◘ Monitor perimeter ◘ Remove any dead or
go to seed to encourage fence for holes that decaying leaves from
new growth. may indicate intrusion crops
of frogs or mice.
◘ Keep pathways clear of weeds.
◘ Check internal fences for holes or weeds growing at the base.
◘ Return any snails that have climbed to top of internal fences.
◘ Check irrigation and spray nozzles. Flush filters.
49Snail predators
◘ Lizards, especially blue-tongue lizards. Warning
.
◘ Rodents (rats and mice).
◘ Frogs (some varieties).
◘ Toads.
◘ Ducks.
◘ Currawongs, butcherbirds, chicken
hawks, owls and other birds.
Predatory snail, Strangesta
◘ Beetles and centipedes.
capillacea. The whorl and
shell of this cannibalistic snail
◘ Carnivorous snails (shown here). is flatter than C. aspersus.
It has a definite hole for its
umbilicus – found on the
underside of the shell.
50Dealing with snail predators
Birds ― threat from birds is unusual if crops are planted densely. Snails are nocturnal and
retreat into the crops during the day, so are not visible to birds.
Carnivorous snails ― make sure there are no carnivorous snails among the collected
snails you introduce as initial breeding stock.
Frogs ― remove by hand and relocate.
Mice ― trap and remove. Using baits is not recommended.
Lizards ― are never a problem if the perimeter fence has been constructed as described.
Beetles
Carabids ― members of this beetle Staphylinid beetles ― known for
family are fast-moving predators and feeding on larvae and slug and
are usually recognized by their prominent snail eggs. They are sometimes
mandibles, large round eyes, slender, confused with earwigs but do not
simple antennae and pungent odor. If have pincers. Remove by hand
seen remove by hand and destroy. and destroy.
51Harvesting snails
◘ Pick up snails by hand and place in ◘ The best time for harvesting is at dawn
collection bucket, ready for transfer to and dusk, especially after rain or water
purging shed or growing fields. misting.
Make sure the shell edge is hard on the snails you pick up.
52Tips for harvesting snails
◘ Use a measuring guide for snails Measuring guide
ready for the market because it’s
easy to become “snail blind” and
sizing can become quite confusing. Cut notch 30mm wide from piece of wood.
Snail should fit snugly in cut out area. If
any space between ends of notch and
◘ Throw out some fresh or grain snail, then it’s not big enough. If it’s too big
supplementary feed. The snails will to fit — it’s a bonus.
gather together and can be easily
picked up and transferred to other
fields or to the purging bins.
◘ Pick snails off the sides of the netting
fences after rain or watering.
Fill a bucket with snails and count
them as you go. Next time just fill
the bucket to the same level and
you will know approximately how
many snails you are harvesting or
transferring.
53Big is better
Soft lip
Hard lip
Mature snails are ready to harvest for the This snail has not reached maturity
market. because the lip of its shell is still soft.
It should be left to mature before
They should measure 30mm absolute
harvesting.
mimimum measured across the base of
the shell.
Snails ready for harvesting should have a
hard lip (or edge) of shell.
54Purging snails – what it’s all about
Purging is the removal of
any soil and grit from the
digestive system of the snails.
It is the first step in preparing
snails for sale.
Snails are purged to make sure
they are perfectly clean and
safe for human consumption.
The snails should remain
Don’t trim whole. It is not necessary to
trim any part of the snail
whorl.
This photo shows how snails should look after Process your own snails
purging and processing. Perfectly clean and plump. to ensure quality control
They are ready to use in recipe of choice.
Visceral mass
55Where to build the purging pod
The purging area can be built utilizing the whole area of a shed or built as separate
pod within an existing shed.
56Please note – irrigation cost saving
Where to build the purging pod
The irrigation shown in the purging buckets was
found to be superfluous.
Only a hose with adjustable spray is necessary
to wash the buckets and rinse the snails at the
same time.
57Inside the purging pod
Snails are purged in clean containers without soil.
Temperature sensor from
Here the evaporative cooler is placed on a stand in front of temperature controller
small window at opposite end to stable door that also
provides air circulation.
Refrigerated air
The cooler is modified with a float valve and attached to conditioning is not
mains water flow and the temperature controller is placed suitable as it dries out
above. the atmosphere.
Install a tap and hose inside the purging pod for washing out bins and floors.
58Purging bins
To accommodate the snails during the
purging process use 25 litre white
plastic bins.
These bins are easy to clean and
efficient management of snails is
maximised.
◘ Drill several holes in the bottom edge
of the bins for water and waste
drainage.
◘ Cut a hole in the lid of the bins to
leave a square hole. Cover with wire
mesh (about 10mm) and secure with
heavy duty staples on the inside of the
lids.
◘ Attach a flexible security cord to the
side of the rim of the bins to keep the lid
in place. (When large numbers of snails
congregate together on the lid, it can
59
easily come off).Constructing the framework for bins
Images next page
◘ Mount the purging bins on timber frames.
◘ Use household guttering along the rear and attached to the wall, to support the
bottom edge of the bucket and for drainage from the buckets.
◘ The timber frame is used to support the bucket while it rests on the guttering.
◘ The guttering is sloped to the water outlet.
◘ Allow at least a 15° slope between the front timber edge and the guttering at the
back to allow for drainage in the bucket.
◘ The framework holding the purging bins should hold them in a secure position to
prevent the containers from rolling around. Otherwise add chocks on either side
of the buckets to keep them secure.
60Framework for bins
Slope the frames and guttering towards the
drainage outlet
Drainage to outside or collection bin
Slope the bin 15º towards the guttering for drainage.
There should be no pooling of water in the bin.
Guttering on back wall.
Chock for bin support
61The purging process ◘ Collect snails from fields and transfer to ◘ The snails are fed a purging mix of clean containers in a cool shed with organic unprocessed bran and/or wheat plenty of air circulation. germ for two days. ◘ Water must be available for misting, ◘ They must continue to be ‘purged’ for cleaning and evaporative cooling (if seven days to rid their digestive systems necessary) to maintain temperature of dirt and grit. around 16-18ºC. 62
Hygiene in the purging pod

   Hygiene in the purging pod is vitally important to maintain a clean environment for
   providing food for human consumption.

◘ Hose out bins to              ◘ To make sure mice and         ◘ Remove any dead and
  remove faeces, uneaten           other unwanted pests           dying snails.
  food and any dead snails.        are not attracted to the
                                   purging pod, keep the          Snails found on their
                                   floor clean and contain        back are dead or dying.
◘ Thoroughly wash and              all cereal food in a
  scrub bins before new            covered bin.                   If there is a bad smell in the
  batches of snails are                                           purging pod it usually
  introduced.                                                     indicates dead snails.
                                                                                             63
How to safely purge snails – day-by-day
Harvested snails need to be purged for a total of seven days before processing. The
best time to for purging process is late in the afternoon, just before dusk if possible.
DAY 1
Place harvested snails in bins and
spray with water only (anytime of the day)
DAY 2 and 3
Remove snails carefully from each bin to the
lid on shelf below. The snails will leave a lot of
greasy, dark faeces so wash the bins well.
Sprinkle purging bran on floor of bins replace
snails, mist lightly with water, replace lid
firmly.
Day 4
Remove snails from each bin to the lid on
shelf below. Wash out bins thoroughly. Return
snails and mist with water. No purging bran.
Day 5 and 6
Leave snails alone without food or water.
Contd…. 64How to safely purge snails – day-by-day …contd
Day 7
Pack snails in lots of 50 into mesh bags and
hang in a cool area with plenty of air
circulation.
Day 8
Cook the the snails in the bags of the
morning of the eighth day.
At the end of processing, pack into
sterilised jars and they are ready to sell.
Keep ‘in’ and ‘out’ date chart for
purging snails.
Shelf life from day of processing is nine days for fresh snails packed in
spring water and refrigerated at 4 degrees.
65The reason for processing snails for the market
Because of diverse multicultural influences on
Australian cuisine today, many chefs request
‘live’ snails.
Sometimes those who request ‘live’ snails may
feed them on unknown herbs or other food, to
keep them longer.
Therefore the guarantee of the healthy,
properly purged and contaminant-free snails
is compromised and the grower no longer
has control of the health of the snails.
You could be putting your business at risk.
To ensure optimum quality and a safe, clean
product…process your snails!
Uncooked snails MUST NEVER
be eaten….EVER
Raw, uncooked snails can cause serious
health risks.
66About the preparation of processing snails for sale
The purged snails are
cooked and shelled.
They are soaked in a
mix of half salt and half
vinegar to remove
slime.
Then they are rinsed,
scraped and packed
with spring water into
sterilised jars.
Processing snails is a specialised part of producing a top-
quality fresh snail product. Cutting corners in this process
will result in inferior snails.
The finished product should look like the snails in the images shown here.
67Food processing equipment
For processing 80 dozen snails – a day’s work for one person
◘ Clean kitchen with smooth work benches
◘ Floors that can be effectively cleaned
◘ Processing area (kitchen) must be free of pests and vermin
◘ Stove
◘ Exhaust fan
◘ Stainless steel sink
◘ Separate sink nearby for hand washing
◘ Dishwasher
◘ Refrigerator
◘ Fire extinguisher
◘ Stainless steel saucepans
◘ Stainless steel or glass bowls
◘ Small-pronged fork for snail extraction
◘ Sieve for draining snails Refer to food handling practices
according to Australian and
◘ Paring knife for slime extraction New Zealand Food Standards.
◘ Latex gloves used for food handling
Standard 3.2.3 – Food Premises
◘ Glass jars for packing and Equipment (Australia only)
68How to process snails
◘ Add 1/4 cup white vinegar and 2 ◘ Make slurry of half salt and half vinegar
tablespoons salt to 4.5 litres of water in to cover the snails and soak for around
a 5 litre saucepan. Boil. two hours.
◘ Then thoroughly rinse at least three times in
◘ Drop a bag of 50 snails into the rapidly cold water.
boiling water.
◘ Carefully scrape off any remaining
◘ To cook the snails, boil rapidly for five slime around the lip of the snail with
minutes, making sure the water does small paring knife.
not go off the boil.
◘ Transfer snails to clean bowl with half
The same water can be used for two or three water, half white wine and leave
batches (depending on slime). Always have overnight in the refrigerator. (The wine
another one or two saucepans ready for the helps to neutralise the salt).
next batches.
◘ The following morning, rinse the snails
◘ Drain snails and place in a bowl of cold and pack into glass jars containing
water. spring water.
◘ Use a small, two-pronged fork such as Snails that appear thin or flattened in the
a cocktail or fondue fork for shelling the centre are inferior and should not be sold.
snails. See images on next page.
Trim only the snout if it has not retracted
◘ Insert the fork and twist and pull the after cooking. No other trimming is
snail out of the shell in one movement. necessary.
The whole snail is removed in one 69
piece — not stretched or broken.Extracting the snail from the shell
These directions are for a right-handed person.
◘ Hold the snail in your left hand
(as shown here) and the fork in
your right hand.
◘ Insert the fork in the retracted
foot of the snail, twist fork
carefully in an anti-clockwise
direction while rotating your
hand the opposite way, pulling
the snail out of the shell in one
movement.
◘ Don’t push the fork all the way
through to the shell.
◘ The whole snail is removed in
one piece — not stretched or
broken.
This takes practice - do dummy runs before tackling your snails for market. 70Quality control
◘ Check processed snails
for quality. They must be clean,
plump and no sign of slime.
Full body, plump, clean
Wizened body, slime
The snail on the left is seriously inferior and should never be sold.
The other snail is a perfect example of a snails produced in free-range snail production.
71The jobs in a free-range snail farm
◘ Preparing the soil ◘ Clearing out used fields
◘ Building the fences ◘ Transferring snails
◘ Planting crops ◘ Harvesting snails
◘ Selecting snails for reproduction ◘ Purging snails
◘ Maintenance of fields
◘ Processing snails
◘ Watering/weeding
◘ Packing and labelling
◘ Supplementary feeding
◘ Invoicing and accounting
◘ Maintenance of paths
◘ Marketing snails
◘ Trimming crops
◘ Packing and delivery of snails
◘ Rotating crops
72Costs
Figures estimated over two-year establishment period using new materials.
Establishment costs can be reduced by utilising second-hand materials and
using resources that may already be available.
Production fields
$17,974 (based on production 50,000 snails)
Purging shed (and associated costs) $9,780.
Snails are seasonal and there is no income for the first year while establishing the
breeding program.
Achievable return for establishment investment
Sell 60 dozen snails a week at $12.50 per dozen for 20 weeks = $15,000
Sell 100 dozen snails a week at $12.50 per dozen for 20 weeks = $25,000
.
Two years after initial establishment, overheads are minimal and you will have a good
understanding of snail behaviour and production management. Snails and markets
can be increased and profits are boosted.
73Marketing snails
Sonya Begg
Orange NSW
Australia
March 2010
©
This document outlines the importance of marketing and strategic planning to provide
a focused approach for snail products and services to reach the appropriate target market.
Complimentary download from website
http://www.snailfarming.net
74Regulations
Development consent from your local Council may be
necessary. Check with the Health and Building Department.
Preparation of snails must be conducted under the
regulatory system of the Food Standards Australia and
New Zealand (FSANZ).
Laws and rules relating to food processing differ in each local
government council and from state to state so it’s necessary to
check the FSANZ website for the most current information.
A commercial business requires an Australian Business
Number (ABN) and business name registered with the
Department of Fair Trading.
75Hints for saving money when setting up
◘ Construct the external fence first as it’s the most expensive
component. Build the area as large as practicable for future
expansion.
◘ Start with four internal fields. It doesn’t matter if the
whole area is not under snails for the first couple of years.
◘ Before the snail season starts you need only to construct
one reproduction field and three growing fields.
◘ Use second-hand materials to reduce set-up costs.
76Health safety
Advice is extended to people with a weakened immune system or who have a
history of respiratory or lung disease who are considering working with a
combination of soil and snails.
The use of potting mix and organic soil has been associated with legionnaire’s
disease, a respiratory infection which, in susceptible individuals such as the elderly
and those with particular respiratory conditions, can prove dangerous to humans.
Most infections are acquired by inhalation or from open wounds on the skin and
people on chronic steroid therapy, those with cancer, organ or bone marrow
transplants, or HIV/AIDS are at risk of contracting these infections.
Refer to Department of Employment and Workplace Relations for information
regarding Occupational Health and Safety in the workplace.
Use mask and gloves when working in organic soil.
77If you are serious about farming snails commercially in
Australia, free-range or open pasture snail farming offers many
benefits compared to intensive snail farming methods because
it’s sustainable.
After more than 26 years of research , development and
practical snail farming using many different snail farming
systems, I can without hesitation, recommend free-range snail
farming as the most viable and moral method of snail
production.
Today, people care about how the snails they eat are raised, as
much as how they taste.
The best texture and flavour comes only from snails that have
raised in open pastures of living vegetables and forage crops.
Free-range snail farming is raising snails as nature intended ―
and it’s sustainable and an accepted, agricultural farming
Sonya Begg practice. Add some passion and you have a recipe for success.
Orange NSW
Australia
Footnote: Sonya Begg passed away peacefully at Orange, NSW 31 May 2012.
78References
Snail Farming Information Service
Code of Practice
Marketing Strategies
Free-range Snail Farming in Australia
Food Standards Australia and New Zealand
Good Bug Bed
Supported by:
79©
All rights reserved. No part of this presentation may be reproduced or
transmitted in any form ― electronic, mechanical, photocopying, recording,
circulated or otherwise, without the prior written permission of the copyright
owner.
All intellectual property is owned by Sonya Begg, Orange NSW Australia.
Modification or use of any of the content for any purpose is illegal. Requests to
use photos, quotations or extracts from this presentation should be addressed
to the author.
The information contained in this document is based on knowledge and
understanding at the time of writing. It does not warrant or assume any legal
liability or responsibility for the accuracy, completeness, or usefulness of any
information, apparatus, product, or process disclosed.
80You can also read