HOJO DIY SOLAR PANELS - HOW TO CONSTRUCT A SOLAR PANEL FOR YOUR HOME
←
→
Page content transcription
If your browser does not render page correctly, please read the page content below
HoJo DIY Solar Panels
 How to Construct a Solar Panel for Your Home

              http://HoJoMotor.com

                       1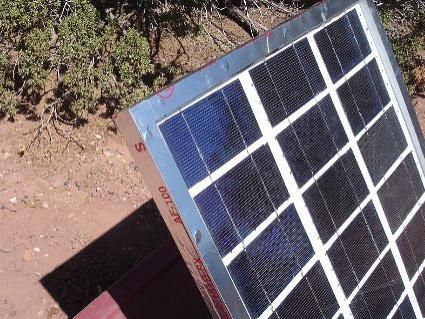
Warning and Disclaimer

Please use caution when working on any of the projects outlined within this manual. By reading
this manual you agree that you are responsible for your own actions. HoJoMotor.com, the
publisher, and the author will not be held accountable for any loss or injuries.

Moreover, every effort has been made to make this digital book as complete and as accurate as
possible, but no warranty or fitness is implied. The information provided is on an “as is” basis.

The author and the publisher shall have neither liability nor responsibility to any person or
entity with respect to any loss or damages arising from the information contained in this digital
book.

Furthermore, by reading this digital book, you CONFIRM that you have READ, UNDERSTOOD,
and ACCEPTED fully (without any exceptions) our “Terms & Disclaimer” found at:

http://HoJoMotor.com

Copyright © 2011 by HoJoMotor.com

All Rights Reserved. No part of this digital book shall be reproduced, stored in a retrieval
system, or transmitted by any means, electronic, mechanical, photocopying, recording, or
otherwise, without the written permission from the publisher.

No patent liability is assumed with respect to the use of the information contained herein.
Although every precaution has been taken in the preparation of this digital book, the publisher
assumes no responsibility for error or omissions. Nor is any liability assumed for damages
resulting from the use of the information contained herein.

Trademarks

All terms mentioned in this digital book that are known to be trademarks or service marks have
been appropriately capitalized. The Publisher cannot attest to the accuracy of this information.
Use of a term in this digital book should not be regarded as affecting the validity of any
trademark or service mark.

                                                2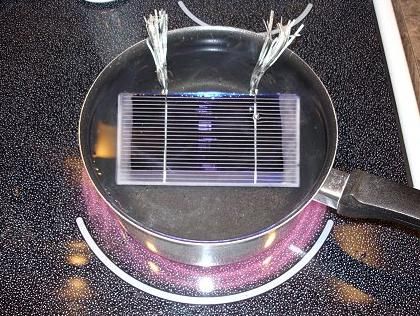
Table of Contents
Introduction .................................................................................................................................................. 5
So How Does Solar Power Work? ................................................................................................................. 6
Building Your Own Solar Generator .............................................................................................................. 8
Different Solar Panel Applications .............................................................................................................. 10
   Application 1: Portable Solar Power System ......................................................................................... 10
   Application 2: Grid-Intertied Solar Power System ................................................................................ 12
   Application 3: Grid-intertied Solar Power System with Battery Backup.............................................. 12
   Application 4: Off-grid Solar Power Setup ............................................................................................ 13
The Parts in a Solar Panel............................................................................................................................ 14
   (1) Solar panels ....................................................................................................................................... 14
   (2) Array DC disconnect .......................................................................................................................... 14
   (3) Charge controller .............................................................................................................................. 15
   (4) Deep cycle battery ............................................................................................................................ 15
   (5) System meter .................................................................................................................................... 15
   (6) Main DC disconnect .......................................................................................................................... 15
   (7) Inverter .............................................................................................................................................. 16
   (8) Generator .......................................................................................................................................... 16
   (9) AC breaker panel............................................................................................................................... 17
   (10) Kilowatt per hour meter ................................................................................................................. 17
   (11) Grid (utility grid) ............................................................................................................................. 18
   (12) Household loads ............................................................................................................................. 18
How to Get Free Solar Panels ..................................................................................................................... 19
How to Build Your Own Solar Panels .......................................................................................................... 22
Getting Solar Cells For Cheap...................................................................................................................... 23
Making the Solar Panel Box ........................................................................................................................ 28
Applying a Plexiglass Cover ......................................................................................................................... 32
Mistakes Happen! ....................................................................................................................................... 33
Applying Protection to the Panel ................................................................................................................ 34
Preparing the Solar Cells ............................................................................................................................. 36
Installing the Cells on the Panel .................................................................................................................. 40
Testing Your Solar Panel before Finishing................................................................................................... 47

                                                                               3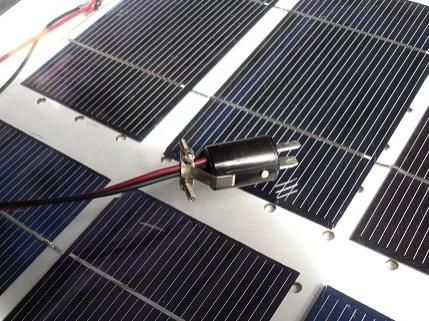
Installing the Panels and Connecting the Wires ......................................................................................... 48
Sealing our Solar Panel................................................................................................................................ 56
Total cost of our Solar Panel ....................................................................................................................... 58
Final Thoughts ............................................................................................................................................. 60
Optional Section – How to Build Your Own Solar Cells............................................................................... 61

                                                                              4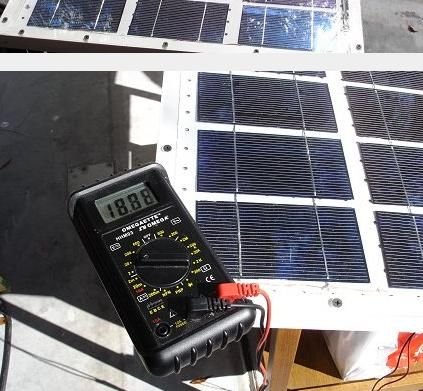
Introduction

As time goes on, more and more people are beginning to
realize something...

We soon won’t be able to rely on fossil fuel as our main energy
source.

With oil price hikes becoming more and more common, wars
being fought over oil reserves, and the excessive use of the
Earth’s natural resources; the need to find alternative energy
sources is becoming more and more apparent.

People have caused irreversible damage to our planet and
we’re beginning to see the severe effects of this now. But if we
don’t start looking for a solution to our energy crisis now, the
reality is that our kids may have to deal with some serious
challenges in the future if they don't have an alternative to
fossil fuels.

But what can we really do about this? Even if there are suitable
alternatives, the cost of mass production will not be cheap. So
the real question is…

Can you as an individual make a difference and can you use
alternative energy sources to supply your own personal power
needs today (even if they aren’t being mass produced yet)?

                                5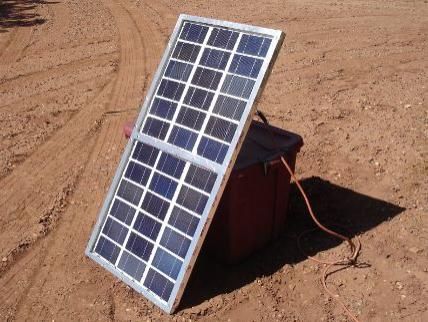
Well, this book has the answers to those questions and also
exactly how we built our own alternative energy source…

A Homemade Solar Panel!

By following along in this book, you can use it as a guide to see
exactly how we built our own solar panel and how you can too!
Just follow along with us as we build our own solar panel and
do exactly like we do and in no time at all (and for really cheap)
you can build one just like us!

So How Does Solar Power Work?

The miracle of solar power is truly amazing! The heat energy
being radiated by our Sun on the Earth’s surface in one day
packs more energy than all the world’s oil reserves combined.

However, the cost to build and operate a solar power plant is
not realistically achievable yet. But once costs come down in
the future and technology makes this more practical, solar
power can potentially be used as our primary source of energy.

In fact, heat is one of the most common forms of energy in the
Universe and solar panels basically work by collecting heat from
the Sun and converting it into electrical energy that, in turn, has
many practical uses.

Solar panels have the ability to convert solar energy into
electrical energy because of their photovoltaic properties.
                                 6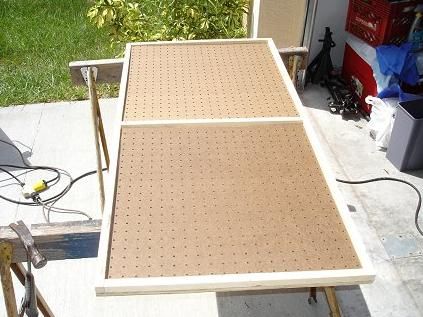
Photovoltaic actually means “light” (photo) and “electricity”
(voltaic).

The cells in solar panels are made up of semi-conductors, with
silicon currently the most widely used. When the sun’s rays hit
the surface of a semi-conductor, a reaction takes place. The
chemical makeup of the solar panel absorbs the energy, and
the energy causes electrons to break free of their atoms and in
the process they create electricity.

With today’s technological advancements, the latest solar panel
designs have improved their absorbing and retaining properties
relative to the Sun’s energy output.

                                7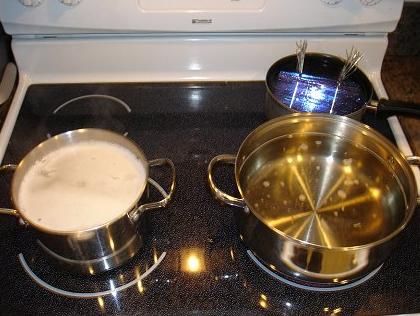
Building Your Own Solar Generator

But what most people don’t even consider when thinking about
getting a solar panel…is building their own!

It’s not hard to do, it’s cheap, and it will provide amazing
results!

And while most people probably think it’s too hard or technical
to build their own solar panel…the truth is, anyone can build
their own!

Most people don’t realize they can build a panel that can easily
rival commercially built ones but for $1,000s less...

But before we start going over how to build a homemade solar
panel, you first need to get acquainted with the different ways
you can use solar panels.

So to start with, we are going to go through a number of
practical applications that solar powered systems have…

Some of these setups are more complicated and expensive than
others; however, we want to make you aware of all the ways
you can use your solar panel before you actually build your
own.

*If you don’t understand how everything works together in the
different setups we talk about below, don’t worry because
                                 8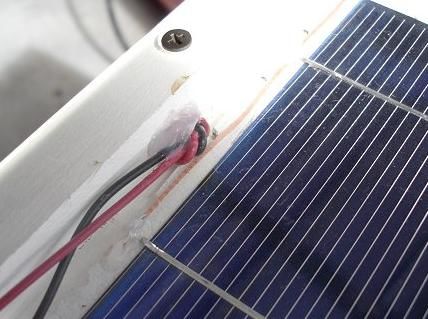
you’re not suppose to yet! This will all be explained in detail
later. Just read about the different setups below and try to
absorb as much as you can. By the end of this guide everything
will make sense and you’ll see us actually complete and hookup
a finished solar panel…

                               9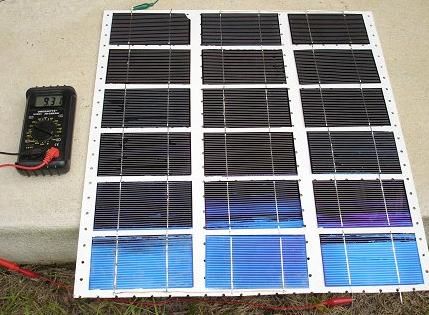
Different Solar Panel Applications
*note: in case you’re not familiar with the individual parts listed
in this section, please refer to the next section for complete
descriptions.
Application 1: Portable Solar Power System
This system is excellent for outdoor use. The best place to store
your battery bank and electrical equipment would be the
garage or you can build a custom made shed instead. By
installing a DC-AC inverter you can run your appliances from a
second loop fed by the solar generator.
The portable solar power system can even handle an 800 watt
refrigerator, so just imagine how much you will save if you run
your fridge off of this system. In fact, this type of solar system
guarantees you your money back after just a few weeks of
service.
Listed below is the basic setup for this system …but there are
other add-ons you can consider if you happen to have extra
money to spend (which we’ll talk about later). You can also use
multiple solar panels and batteries with this if you want.
Here is how this system connects…
Connect the (1) energy source (in our case a Solar panel …12V is
fine) to a (2) Charge controller to a (3) Battery to a (4)
10Inverter to the (5) Household loads (Laptop, TV, DVD player
etc.)
This is a cheap and simple way to set up a solar power system
that costs less than $200. You have the option to either buy an
expensive solar panel from a store and use it in this manner or
(what we recommend) follow our do-it-yourself guide in this
book and build your own. Then you can connect your solar
panel to your household loads (we’ll show how to do this later)!
Options:
In this set-up you may need to construct a battery box because
batteries are optimized for warmer temperatures. This will also
help protect your kids or pets from electrocution and also keep
your entire system organized and “tucked it”.
Adding a system meter is also a good idea. This will measure
the power distribution between the inverter and battery. The
system meter will be able to detect the status of your battery
as well as power usage (more about this later though).
11Application 2: Grid-Intertied Solar Power System
You should use this solar power system if you still want to be
connected to the main power grid. *this system is also known
as on grid, grid-tied or a utility interactive solar electric system.
If the solar power system can generate more power than what
the household appliances can consume then this will cause
your electric meter to turn backwards. This in turn will credit
your account and you can use those credits for future power
consumption when less electricity is produced because of
uncertain weather conditions. This arrangement is called net
metering or net billing.
*Please consult your local electricity provider or stats regulatory
agency for further information.
This is how the system comes together:
(1) Energy source – Solar panels (2) Array DC disconnect
(3) Inverter (4) AC Breaker panel (5) Household loads (6)
Kilowatt per hour meter (7) Grid
Application 3: Grid-intertied Solar Power System with Battery
Backup
Below is a flow chart of a grid-intertied solar power system
including the battery backup.
12The backup battery serves as a temporary power supply when
maintenance is done on the system or if cloudy weather yields
low electrical output.
(1) Energy source – Solar panels (2) Array DC disconnect
(3) Charge Controller (4) Deep cycle battery (5) System
meter (6) Main DC disconnect (7) Inverter (8) AC Breaker
panel (9) Kilowatt per hour meter (10) Grid (11)
Household loads
Application 4: Off-grid Solar Power Setup
The flow chart below is for the off-grid solar power system
setup. A backup generator is required in this setup because
there will be times when the Sun won’t shine its brightest.
(1) Energy source – Solar panels (2) Array DC disconnect
(3) Charge Controller (4) Deep cycle battery (5) System
meter (6) Main DC disconnect (7) Inverter (8)
Generator (9) AC Breaker panel (10) Household loads
13The Parts in a Solar Panel
In this section we will be discussing the basic parts and
terminologies associated with solar panels. We will give you a
quick overview about the items and their uses. This should help
you familiarize yourself with these terms so when we reference
them later you’ll know what we’re talking about.
(1) Solar panels
Photovoltaic panels or PV panels, as they are commonly called,
are the core component of a solar power system. PV panels
capture and converts sunlight into direct current (DC)
electricity.
PV panels, just like all other electric-generating machines, are
measured in watts. Furthermore, the maximum power output
of the panels will depend on the weather conditions (since they
rely on sunlight to produce energy).
You must determine the total amount of household loads that
you use and match it to the rated output of your PV panels in
order to get the panels you need. There is a method that’s
called “array” where you can neatly combine the PV panels to
save space. *We will talk about different wiring configurations
later in this book.
(2) Array DC disconnect
14It is also important to integrate a DC disconnect into the system
whenever you’ll need to do maintenance. Turning the power
off is much easier when you use a DC disconnect mechanism.
(3) Charge controller
Using a charge controller will prolong your battery life. This
device automatically protects battery overcharging. It can
detect when the battery bank is fully charged and then it opens
the circuit to stop the current from flowing endlessly. There are
also “smart” charge controllers that restrict night time
discharging of the battery.
(4) Deep cycle battery
This is the ideal battery to use in your solar power system
because this type of battery has the ability to store all of the
energy your PV panels produce. You can also purchase deep
cycle batteries in junk shops (*they’re also commonly found in
golf carts and forklifts).
(5) System meter
A System Meter measures how full your battery bank is. This
unit also allows you to see how much power is currently being
distributed. This device basically lets you know that your solar
electric system works.
(6) Main DC disconnect
15This device serves as a bridge or switch between the inverter
and the battery bank. The main DC disconnect is for
maintenance purposes.
(7) Inverter
Your PV panels collect the Sun’s energy and store it in the
battery bank as direct current (DC) electricity. The inverter’s job
is to turn the DC signal into an AC signal so that you’ll be able to
run your household appliances (because devices such as
Refrigerators, TVs, VCRs, Computers, etc. run on AC electricity).
However, should you decide to not use any appliances that run
on AC electricity, you could substitute it for a DC input. *Most
car parts stores sell DC input devices at an average price of $10.
There are also inverters which you can buy at most electronic
shops which can be plugged into power sockets. These
inverters actually feed electricity back into your home through
a normal power socket.
(8) Generator
You may have to use a generator if your solar electric system is
not tied to the main power grid. A slight disadvantage with
solely relying on sunlight for your electricity is that it changes all
the time and if you decide to completely remove yourself from
the power grid, the generator can be your alternative energy
16source when it’s cloudy or night time. You can also use it when
you’re doing maintenance work.
(9) AC breaker panel
The AC breaker panel is where all the electrical wirings of your
house converge and are fed by the main electrical source. The
electrical source can be from the grid, solar power system, a
windmill electric generator, or our energy producing motor.
You can usually find this device outside of a building, in the
garage, or in the utility room encased in a metal box. There are
different standards by each country or state that specify how a
solar power system can be connected on the AC breaker panel
so check with an electrician or your power company before you
do this.
*note: in most countries the law requires you to be a
professional electrician to assemble your own grid inter-tied
solar electric system and connect it to the AC breaker panel,
otherwise it’s illegal.
If you don’t want to connect your system to your breaker panel,
you can just have your appliances run from the AC inverter. It is
actually cheaper and easier to run your appliances through the
AC inverter anyway.
(10) Kilowatt per hour meter
17If you have a grid-tied connection you most likely will have a
kilowatt per hour meter installed on your home. It monitors
both the incoming electricity from the grid and the outgoing
electricity to the grid from your solar power system.
Your solar electric system may sometimes produce more
electricity than what you’re using and in turn it reverses this
meter!
(11) Grid (utility grid)
The utility grid is a distribution system that provides the main
power supply from power plants into your house and your local
area (unless of course you’re an off-grid user).
(12) Household loads
All household loads are AC powered and these include
everyday household appliances (*note: these devices are
plugged in an AC socket).
…Well that pretty much wraps up some of the basic
terminology we will use in this book so it’s about time to start
building our solar panels!
However, we have a special little trick we want to teach you
first!
18How to Get Free Solar Panels
Now that we’ve talked covered:
How solar panels work
Common applications for solar panel systems
And common parts in a solar panel
We’re about ready to show you how we build our own
homemade solar panel (and how you can too)!
But before we get into how to build a solar panel…let me first
tell you about a cool trick to possibly get some free solar
panels…
If you happen to pass by construction sites, you may have
noticed that all their signs are typically solar powered. But as
time goes by these signs get damaged from weathering, bad
drivers, or natural causes.
Now, if you take a closer look at these signs (you will have to
pull your car over and get out) you will find a tiny sticker which
has the phone number of the traffic sign rental contractor in it.
Call this number and ask for the shop maintenance manager or
head mechanic. Then ask if they have any damaged panels for
free. It’s almost certain that all traffic rental sign contractors
have slightly damaged or cracked PV panels.
19Since they don’t have the budget to fix these most of the time,
they often replace them and just throw the old damaged ones
away! And even though these panels don’t work 100%
efficiently they’re free (or greatly discounted)!
If you’re lucky enough to score a few of these free panels you
can:
Reseal the cracks with silicon glue
Soldered electrical wirings back into place.
Try to be friendly and make sure that you give them your
contact number and ask them to give you a callback in case
they’ll have more panels to give away for free in the future.
The second best place to get free (or discounted) PV panels is at
solar panel distribution centers themselves. The on-going
technological advances in solar panels give you an opportunity
to get your hands on the distributor’s outdated panels because,
believe it or not, most of these outdated panels will be marked
for the trash if they can’t give them away! We know this may
be hard to believe but only brand new panels are allowed on
the store room floors and these distributors only have so much
storage room.
…So as you can see, there are a few ways to get amazing deals
on solar panels. All you have to do is make a few calls and ask a
few people if they’re willing to give you their damaged or
outdated panels and before you know it you may have a few
$1,000 solar panels for free (or for a huge discount)!
20So before you build your own solar panels with our instructions
below, we recommend that you try your luck with the
techniques we mentioned in the above section first (because
you can’t beat free solar panels!)
…however, if you aren’t able to find any free/discounted solar
panels then it’s time to build your own!
So let’s get started…
21How to Build Your Own Solar Panels
The rest of this book will focus on how we constructed a
customized solar panel. Our main goal when we built our solar
panel was to construct a quality system that could rival a
commercial unit (but for a fraction of the price).
…We definitely accomplished this and you’ll see exactly how we
did it so you can follow along and build your own too!
So if you’re ready, we want to take you all the way from the
start of our project until we finished it so by the end of this
book, you have your own solar panel built and powering your
home and appliances as well!
Let’s begin…
We were able to acquire many of the materials we used in our
solar panel for free or for volume discounts and because of this
we were able to build our solar panel for a very low cost. We’ll
show you where we bought most of our supplies later but try to
be resourceful and search around for the lowest prices you can
find.
22Basically our solar panel is set up as a box that houses multiple
solar cells in an array formation (*note: the devices responsible
for doing the actual energy conversion from thermal to
electrical energy are the solar cells). And we arrange those solar
cells into panels because the panels are designed to protect the
solar cells from outside elements.
Getting Solar Cells For Cheap
One of the main stumbling blocks people have when building
their solar panel are getting solar cells for a good price.
However, one thing a lot of people fail to realize is that these
solar cells can be found for very low prices on Ebay. Why Ebay?
Well, because people use Ebay to sells their old cracked or
slightly damaged solar cells at a fraction of the price of
unblemished solar cells (*note: other sites also sells cheap used
solar cells so check around. We recommend Ebay because that’s
where we bought ours). But as long as the solar cells you find
don’t have too bad of defects, they should work perfectly fine.
*note: we’ve also provided instructions at the end of this book
that show you how you can build homemade solar cells in case
you don’t want to purchase them. However, for an easier,
cheaper, and faster way to get your own solar cells we’d
recommend you buy them from Ebay. But if you’re more of a
“Do It Yourself” kind of person than you will find instructions at
the end of this book to build your own. Building your own can
get bit technical though so we recommend you just buy them
from Ebay instead…
23…In any case let us proceed!
We purchased several bricks of 3 x 6 mono-crystalline solar
cells. It took 36 solar cells wired in a series to make one panel.
And each cell produced about a 1/2 Volt.
An array of 36 mono-crystalline solar cells in series connection
will produce about 18 volts of DC current which is more than
enough to charge a 12 volt battery. (Yes, you really need that
high a Voltage to effectively charge a 12 Volt battery).
*note: these mono-crystalline solar cells were as thick as paper
and were as brittle as glass. They were very easy to damage so
be careful when you get yours.
Furthermore, once you find some solar cells you want to buy
you should note that they are typically dipped in wax before
they are shipped to help stabilize them during shipment to
24prevent any damages. Removing the wax to extract the panels
can be quite challenging. So if you get solar cells that do not use
wax to ship them you will find that it’s much easier to assemble
them; however, they’ll also have a much greater risk of being
damaged while their shipped (*so keep that in mind when
you’re buying your solar cells).
You’ll also notice that most PV cells you find have metal tabs on
them. This is good and we encourage you to look for cells with
metal tabs because these serve as electrical conductors. Keep
in mind that you will be soldering a lot of wires onto the metal
tabs so if you purchase solar cells that don’t have this feature
you will have a lot more soldering to do. So we’d recommend
you spend a little extra for the metal tabs as it is for your
benefit.
25We ended up buying enough solar cells to make two panels. We
also bought extra cells because we figured some would be
damaged during shipping (and in case we accidentally damaged
any of them during building).
Even though we got the 3 x 6-inch sized solar cells, you can get
bigger or smaller cells if you want. However, when you buy
your solar cells take these things into consideration:
PV cells under the same category gives off the same
amount of voltage regardless of their size. So, the number
of cells required will not change as well.
The electrical pressure (current) which is measured in
Amperes varies with cell sizes.
Total power output is equated as Power (Watts) = Current
(Amperes) x Load (Volts).
So the more space the cells occupy the more power they
supply, unfortunately, they’re going be considerably heavier.
On the other hand opting for smaller cells will save you space
but at the same time will be lousy at producing the power
required. If you attempt to mix different sized cells it will only
hurt you because the current capacity will be limited by the
smallest cell and this will limit the entire panel.
The 3 x 6 inch PV cells topped our choice because they make
about 3 amps of electricity each. We should be able to get at
least 18 volts if we connect 36 of them in series. In the brightest
day the whole solar panel should be able to deliver around 60
Watts of power. And this power will be fed into our battery
26banks which can then run our household appliances. *keep in
mind that 60 Watts is achieved at optimal weather conditions.
Once you’ve received the delivery package for the solar cells,
make sure that you store them in a safe place so that they
won’t get damaged before you install them in the panel. You
must understand that these solar cells must be handled with
care at all times. Mishandling and carelessness will turn your
money-saving investment into a useless pile of tiny crumbled
blue glass.
27Making the Solar Panel Box
Basically a solar panel is just a shallow box. So we built the box
as shallow as possible so that the edges would not block the
Sun’s light throughout the day. We got a 3/8 inch-thick
rectangular plywood board and surrounded the edges with a ¾
x ¾ inch-thick wood (we used wood glue and some screws to
hold them into place). It has just enough space to lock-in 36
pieces of 3 x 6 inch solar cells.
Also, right down the middle we made a separator to turn the
whole platform into a 2 sub-panel contraption that fits 18 cells
in each sub-panel. We did this to assemble the cells more
conveniently. Each sub-panel is the same size as the other.
28Above is the original sketch we did for the complete dimensions
of the solar panel. We’ve also decided to have the dimensions
in inches (sorry to all metric system users). The side pieces are
3/4 by 3/4 and go all the way around the edges of the plywood
substrate.
And across the center we placed another piece to separate the
panel into two sub-panels. The overall design and the
dimensions of this will not affect the power production of your
solar panel in anyway. So you can design your solar panel
differently than this if you want. We actually encourage you to
explore and use your own creativity to see if you can come up
with your own (possibly better) design!
29This is what half of the main panel looks like in this photograph.
This has enough space to hold 18 pieces of solar cells. If you’ll
notice we’ve also drilled holes along the edges of the wooden
borders. This is going to be the bottom of the panel (*note: we
took the shot while the panel is inverted). These holes are
actually for ventilation purposes. They will help the moisture
escape and balance the air pressure with the surrounding area.
The reason why these holes are placed at the bottom of the
panel is to prevent rain and dew from getting inside. The center
divider that separates the two sub-panels should have holes as
well.
Update: Since we built this solar panel, we now recommend
that you increase the diameter of the vent holes to at least ¼
inch. And to keep any insects, pests and dust from getting in
the panel, insulate the holes with fiberglass material at the
30bottom rail of the panel. However, the center divider holes do
not need to be insulated.
After that we cut two masonite peg-boards and matched their
dimensions with the sub-panels. They will become the
substrates where the sub-panel will be built on. We precisely
cut the peg-boards to loosely fit in the wells. But you can use
any other material for this and not just peg-boards. It just so
happened that we had a spare peg-board at our disposal.
Although, any thin, rigid and non-conducting material can be a
perfect alternative.
31Applying a Plexiglass Cover
The next thing we need to do is cover the panels with plexiglass
to prevent the solar cells from weather corrosion. We had to
cut two pieces of plexiglass because we didn’t have one that
could cover the whole panel.
Also, it’s important to note that ordinary glass is too brittle to
use for this. It doesn’t have the durable properties of plexiglass
which can withstand the force of falling objects that would
normally shatter ordinary glass.
*The picture above is what the finished panel should look like.
32Mistakes Happen!
Oops! This photo is a close up of where the two halves of the
plexiglass cover meet. In this photo we were drilling
countersunk holes around the edges of both plexiglass pieces
to screw them onto the panel using 1-inch drywall screws. But
be cautious when you’re drilling round the edges of the
plexiglass. Unlike falling debris, remember that you’re
continuously applying force on it when you drill and too much
force can break it (just like we did in this picture).
Anyways we decided to keep this cover and just glue the shard
back into place and drill a new hole close by.
33Applying Protection to the Panel
Applying several coats of paint comes next. Make sure you
don’t miss a spot because you want your solar panel to remain
protected from moisture and the weather. In the photo above
you can see that the entire shallow box we built has been
completely covered in paint!
34We also painted the peg-board. We made sure to put several
coats of paint on each side because the peg-board will curl with
prolonged exposure to moisture. And because the solar cells
will be glued to the peg-board, any curling could damage the
solar cells. So we took extra caution to make sure we really
covered it well!
35Preparing the Solar Cells
The solar panel platform should now be constructed so it’s time
to get the solar cells ready…
As we’ve mentioned before, separating the wax from the cells
is a troublesome job to do. However, we came up with an
unorthodox but extremely effective way to take care of this!
1. First, get a large pot and fill it with hot water
2. “Bathe” the cells in the hot water
3. Wait for the wax to melt and for the solar cells to separate
*important: don’t boil the water because boiling water creates
bubbles and these bubbles will cause the cells to jostle against
each other and possibly cause damage. Also, boiling water may
be hot enough to loosen the electrical connections on the cells.
36We also recommend you put the cells in the water when the
water is only mildly warm and gradually heat it up on a stove to
prevent thermal shock to the cells. Use plastic tongs and
spatulas also when attempting to separate the cells from one
another. But be careful in separating the cells because pulling
them apart too hard may cause the metal tabs to come off.
Hungry Anyone? ;)
Here’s a photograph of our full wax removal station!
In the upper right corner is the first wax melting stage of
the process
In the lower left corner of the photo is the next stage
which is hot soapy water for bathing the cells.
37 And the final wax removal stage is the pot of hot clean
water on the lower right section of the photo.
*note: we maintained all the water temperatures to just below
the boiling point.
Using the plastic tongs and spatulas we slowly teased the cells
apart after bathing them in the hot water. Next we’d transfer
them to the hot soapy water to remove the remaining wax.
Finally we’d give the cells a final rinse in a pot of hot clean
water on the lower right corner of the picture.
After you do this, set the cells to dry on towels and be sure to
not throw the used water down your sink because the wax
might cause it to get clogged when it re-hardens.
The above process should remove most of the wax on the cells.
However, there still may be a thin film left on them. Don’t
worry about this though because this will not be a problem
when you solder the cells (and it won’t hurt the cells
functionality).
*note: giving the cells a solvent bath might do the job;
however, we wouldn’t advise this because the kind of solvents
that can remove wax effectively are either toxic, flammable,
really smelly …or possibly all three of these!
38Here’s a photograph of the cells left to dry on a towel after
going through the hot water baths. At this point we would
advise extra caution in handling them because they’re
extremely fragile without the wax. If you’re not going to install
them any time soon, it may be best to leave them in their brick
form for the time being. This should prevent any accidental
damages.
39Installing the Cells on the Panel
Before installing the cells we carefully drew a pattern on the
peg-boards. We used a pencil to mark the spots so that the 18
cells would be spaced evenly on the sub-panel. Then we laid
the cells in an inverted position on the grid pattern and
soldered them together. It’s important to remember that all of
the 18 cells in each sub-panel must be soldered and connected
in a series. Then both sub-panels have to be tied in a series
connection as well to max out the voltage required.
You may find this stage in the building process a little difficult
but don’t get frustrated…
40Try soldering two cells upside-down. Lay the solder tabs of one
cell across the solder points on the back of the other cell. Also,
space the cells carefully to match the grid pattern.
For this step we used a low wattage soldering iron and fine
rosen-core solder. We also marked the solder points on the
back of the cells with a rosen pen before proceeding.
*note: we soldered the cells as gently as possible because they
easily break when you push too hard.
41**important: if you are not sure how to solder the cells
together don’t misinterpret the photographs and think we
soldered the cells in a parallel connection because they’re
actually in series. The sketch above shows the negative and
positive nodes of the cells and this is how a series connection
actually looks.
As you can see, the negative nodes on top have been soldered
to the positive nodes on the bottom of the cells. This is a series
configuration and it increments their voltage output. We kept
soldering this way until we had a string of 6 cells. And 3 strings
of 6 make a half panel.
42By repeating the process above we were able to solder a string
of six solar cells together. We soldered tabs from scrapped cells
to the solder points on the back of the last cell in the string of
six. Then we repeated the whole process two more times to get
three strings of six cells for a total of 18 for this half of the
panel.
Since all of the three cells needed to be configured in a series
connection, the middle string had to be rotated to 180 degrees
with respect to the other two. Furthermore, we got the strings
oriented the way we wanted them (still upside-down) on top of
the pegboard panel before the next step of gluing the cells in
place.
43To glue the cells in place we first had to put some clear silicone
caulk on the center of each solar cell in the string. Then we
placed a small blob of clear silicone caulk in the center of each
cell in a six cell string. Then we flipped the string over and set it
in place on the pencil line grid we laid out earlier. Then we
pressed lightly in the center of each cell to get it to stick to the
pegboard panel.
*Flipping the floppy string of cells is tricky so be careful.
*Always keep in mind that the cells are very fragile so gently
apply pressure when you’re putting them on the peg-board.
Apply the glue only at the center of the cells and don’t use too
much of it. Both the cells and the panel will undergo physical
changes because of varying temperatures and humidity which
44will lead to flexing, contracting, expanding, and warping. Gluing
the cells too closely to the substrate will cause them to crack
after a while. But gluing them at only one point in the center
allows the cells to float freely on top of the substrate. This
allows them to expand and flex more independently and the
delicate solar cells won't crack.
*note: you may find it easier to instead solder tabs onto the
backs of all the solar cells. Then glue all the cells down in their
proper places. And lastly, solder the tabs together.
Here’s what it looks like so far.
45In this picture we used copper braid to connect the first and
second string of cells together. *You could use solar cell tabbing
material or even regular wire. We used copper braid because
we had spares. The second and third strings also have the same
interconnection but are located at the other end of the peg-
board. We used blobs of silicone caulk to anchor the braid and
prevent it from flopping around.
46Testing Your Solar Panel before Finishing
At this point you can test this half panel and measure the
voltage capacity.
…we got 9.31 Volts under a cloudy sky which means our panel
is working great! Next thing to do is get the other half panel
done.
47Installing the Panels and Connecting the Wires
After completing the two sub-panels, we went on to install
them each in their respective slots on our frame …then we
connected the wires.
*Both sub-panels should have the exact dimensions that fit on
the main panel frame.
Then we locked the panels into place by using four small screws
just like the ones in the photograph.
48The central divider vent holes provided the space needed for
the two sub-panels to be wired together. As before, to maintain
the wirings in a neat and clean look, we used small amounts of
silicone caulk to stick them into place.
49Each solar panel in a solar power system needs a blocking diode
in series with it to prevent the panel from discharging your
batteries at night or during cloudy weather.
We used a Schottky diode with a 3.3 Amp current rating.
Schottky diodes have a much lower forward voltage drop than
ordinary rectifier diodes, so less power is wasted. In our
example, we got a package of 25 31DQ03 Schottky diodes on
Ebay for only a few bucks.
Also, you will want to mount the diode inside the panel since
the forward voltage drop gets lower as the temperature rises. It
will be warmer inside the panel and the diode will work more
efficiently.
*note: more silicone caulk was used to anchor the diode and
wires.
50We also drilled an extra hole in the back of the panel just a
notch closer to the top to help get the wires out. We put a knot
in the wires for strain relief, and anchored them in place with
yet more of the silicone caulk.
Keep in mind that you have to allow all the silicone caulk to dry
before placing the plexiglass cover on and screwing it down.
*note: wet caulk gives off fumes that will leave a thin film inside
the plexiglass (as well as on the cells) unless they’re thoroughly
dried in open air before putting on the plexiglass cover.
51A silicone caulk was used to seal this exiting wire off of the
other side of the panel.
52We also added a polarized male plug to the end panel wires.
*note: since we also have a home-made wind turbine
generator, we will wire a mating female plug into the charge
controller to serve as an alternate power source to charge the
batteries (aside from the solar panel itself).
*another note: It may have caught your attention that we used
a male plug for our solar panel. We understand that a lot of
people advise against this because of the risk of short circuits (a
lot of people would recommend a female plug instead).
However, the reason we used the male plug on the solar panel
is because there is a much greater danger of a short circuit on
the cable going to the charge controller and battery bank. The
solar panel can only supply 3 Amps to a short circuit at most.
However, the battery bank could pump hundreds (or possibly
thousands) of Amps through a short circuit. That is enough
energy to do serious damage. So we put the female end on the
cable to the charge controller.
53Although we do not dispute the dangers of putting a male plug
on the solar panel, we found this strange looking plug at Radio
Shack for a couple bucks and this helps solve the short circuit
problem. So now this device doesn’t short out even unplugged.
54And this is the final output of the solar panel covered with
plexiglass (see the picture below). We haven’t sealed it shut yet
even though the screws are set in place because we wanted to
make sure that it worked before we did this.
55Sealing our Solar Panel
If everything is working then you can seal it off with more
silicone caulk or use an aluminum AC duct tape as an
alternative.
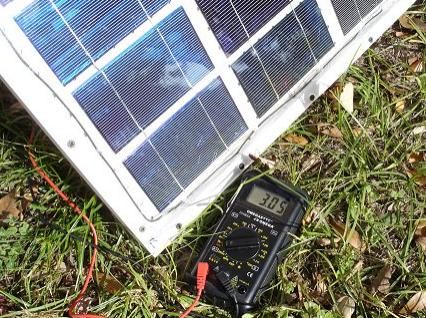
Next we tested the panel’s current output (*note: we did this
on a bright winter day).
The meter read 3.05 Amps…not bad!
56This is a photo taken when we finished sealing the edges of the
panel with aluminum tape. We wrapped around the edges of
the panel enveloping the center seam as well. We also punched
holes where the vent holes were.
The photo below shows the finished product!
57Total cost of our Solar Panel
So how much did this solar panel cost? Well, we kept all of our
receipts and our final cost figures are below. You’re costs could
be more or less depending on what you already have on hand
(also you may choose to not get some of the optional parts we
talked about).
The amount we’ve spent on this solar panel is many times
cheaper than its commercial counterpart with a similar power
production. And because it’s so cheap to build your own
homemade solar panel, you can also build more panels to get
more power!
* note: solar cell prices on Ebay constantly change because of
factors like oil price hikes (and supply and demand). So if you
58are having a hard time finding solar cells for the same price we
got, be patient and keep searching.
59Final Thoughts
We've covered a lot of ground in this book and it’s great to see
that people (like you) are ready to make the transition away
from fossil fuels. One of the absolute best ways to do this is to
build your own solar panel.
And guess what…
You now have all the information you need to build your own!
But don’t wait too long to start your project because if you put
it off for too long or for “down the road” …you’ll never do it! So
just start today (or as soon as possible) and within days you can
dramatically lower your electric bills, cut your carbon footprint,
and do your part to clean up this planet!
We hope you have truly enjoyed this book because we loved
putting it together for you.
Good luck to you and take care.
60Optional Section – How to Build Your Own Solar Cells
As we stated at the beginning of this book, we want to show
you how to build your own solar cells in case you don’t want to
buy them off Ebay (or in case you’re just more of a “Do It
Yourself” kind of person).
It’s important to note that we recommend you just buy your
solar cells blemished off of Ebay if cost is a concern because
building homemade solar cells can be quite technical at times
and you will need some additional equipment as well.
But with that being said, we want to make sure we give you
every bit of information we can to build your own solar panels
(all the way down to making your own solar cells)!
We tried to make this section as easy as we could but we will
warn you that it does get a little technical at times!
So let’s get started!
Equipment and Materials List
o Safety Glasses
o Nitrile Gloves (Supreno)
61o 1” glass squares with conductive coatings (indium tin oxide,
ITO) on one side
o Degussa P25 titanium dioxide (TiO2) (at least 12 g)
o Clear, colorless dishwashing liquid
o Distilled white household vinegar (5% acetic acid, ~1 M)
o Tweezers
o Small metal spatulas
o Scotch “Magic” tape
o Glass stirring rod
o Boxes of small Kim-Wipes
o Paper towels (lots)
o Cotton swabs
o Eyedroppers
o 10 mL graduated cylinder
o 20 mL graduated cylinder
62o Ethanol wash bottles
o Blender
o Deionized water wash bottles
o Oven capable of 450 °C
o Tongs for oven
o alumina sample boats for oven
o Fire brick where all three sample boats can cool
o Small glass petri dishes
o Graphite pencils
o Blackberries
o Thin coffee filters
o Two filter setups (each consisting of a large glass funnel, a small
glass funnel, a rubber stopper for the latter, and a lab stand)
o 20 mL glass vials
o Smaller glass vials (if available)
63o Binder clips
o Iodide electrolyte solution in squeeze bottles
o Digital multimeters with clean, new alligator clips for leads
o Large porcelain mortar and pestle
o Scale and weighing paper or weighing cup
**WEAR GLOVES AND SAFETY GLASSES AT ALL TIMES UNLESS
INSTRUCTED ON THESE PAGES
Preparing the TiO2 Suspension
Materials Used:
Degussa P25 titanium dioxide (TiO2)
Scale
Weigh paper or weighing dish
Metal spatula
Large porcelain mortar and pestle
10 mL graduated cylinder
20 mL graduated cylinder
Small glass vial (20 mL, smaller if available)
Vinegar
64 Deionized water wash bottle
Paper towels (not specifically mentioned, but chances are
you’ll need them)
Steps:
1. Measure out 12 g of Degussa P25 titanium dioxide on the
scale using weigh paper or a weighing dish, and put into a
mortar and pestle.
2. Measure out 18 mL of vinegar in the 20 mL graduated
cylinder.
3. Measure out 2 mL of deionized water in the 10 mL
graduated cylinder.
4. Transfer the water to a small glass vial, and add two drops
of clear, colorless dishwashing detergent to the vial.
Gently stir them so that no foam or bubbles may come up.
5. Add about 30 drops of vinegar to the titanium dioxide in
the mortar and pestle.
6. Mix thoroughly until the mixture is uniform and free of
lumps.
7. Repeat steps 5 and 6 until all 18 mL of the vinegar is used.
658. Add small amounts of detergent and water to the paste,
and very gently stir it, being careful not to produce
bubbles or foam.
9. Let the suspension sit for 15 minutes.
Preparing the Blackberry Juice
Materials Used:
One container of fresh blackberries (containing at least 10-12
berries)
Blender
10 mL graduated cylinder
20 mL graduated cylinder
Two filter setups (each consisting of a large glass funnel, a
small glass funnel, a rubber stopper for the latter, and a “lab”
stand)
Two coffee filters
Two small glass vials (20 mL)
Deionized water wash bottle
Paper towels (not specifically mentioned, but chances are
you’ll need them)
Steps:
661. Put one container of fresh blackberries into a blender,
counting the number of blackberries.
2. For every 5 blackberries used, add 2 mL of deionized water
to the blender, using the 10 mL or 20 mL graduated
cylinder (make sure it is clean first).
3. Cover the blender and run it on the lowest setting (1) until
the mixture is mostly liquid; then increase the speed to a
setting of 3-4, and run for another minute.
4. Ensure that both filter setups are ready and that a fresh
coffee filter (in the large funnel) and a clean 20 mL vial
(below the small funnel) are in place in each.
5. Pour the liquid from the blender into the large funnel at
the top of each filter setup, make sure that you evenly
distribute the liquid mix between them; each filter setup
will not be filled instantly so wait until the level in the filter
drops before you add the remaining liquid mix.
6. Occasionally agitate the filters by bunching up the edges to
form what looks like a little back and gently shaking them
up and down against the large funnel, in order to speed
filtration. The filtration process will take a while so in the
meantime this would be a good time to prepare the
titanium dioxide coated slides; the filtered blackberry juice
will be used later.
67Preparing the TiO2 Films
Materials Used:
Two 1” square glass slides with special conductive coatings
on one side
Kim-Wipes
Ethanol wash bottle
One multimeter set up to measure electrical resistance
Scotch tape
One glass stirring rod
Paper towels
Metal spatula
Eyedropper
Titanium dioxide suspension (made earlier)
Glass stir rod
Petri dish
Oven
Tongs for oven
Fire brick for oven
Steps:
1. Clean both 1” square glass slides gently with ethanol and
Kim Wipes.
682. Using a multi-tester check which side is conductive;
normal resistance reading of the conductive side is around
10-30 Ohms, the non-conductive side, however, has a
higher resistance that will not register in the multi-tester.
3. Clean the area where you’ll be placing the square glass
slides on, its conductive side needs to face in an upward
position, while the other square glass slide’s conductive
side faces downwards. To prevent the slides from coming
into contact with one another, tape them to the lab bench
with a Scotch tape like in the figure below, leaving most of
the surface of the slides exposed and only covering a thin
strip (as shown here, about 2 mm wide) on either side:
69Place a third piece of tape over the top of the conductive
slide, as shown, covering a larger area (about 5-6 mm wide):
70IMPORTANT – THIS IS THE HARDEST STEP, SO PLEASE READ
EVERYTHING HERE BEFORE STARTING.
Remember that what we’re aiming for here is to get a nice,
smooth titanium dioxide film on the conducting slide; the non-
conducting slide is a non-factor. Using a metal spatula or an
eyedropper (depending on how liquid the suspension is), take a
small amount of the titanium dioxide suspension you made
earlier and spread it in a thin line just below the last piece of
tape, on the conductive slide.
71Immediately take a glass stir rod, held horizontal as shown, and
in contact with the tape, and slide it (don’t roll it) in order to
spread the suspension smoothly, first moving downwards, then
reversing direction. Do this 2-3 times or until the film on the
conducting slide is smooth. Add more of the suspension if
necessary, but do it quickly, as it will dry rapidly. If something
goes wrong, you can carefully wipe the slides off and try again.
When you are successful, you should have something like what
is shown below.
72Carefully remove the top piece of tape first, and then place
your finger (you should be wearing gloves, make sure they’re
clean ones) on the uncoated area where the tape just was (see
below), being sure not to touch the film.
You may need assistance in doing this procedure so while you
hold the slide down, get somebody else to peel off the two
pieces of tape and have them do it gently by pulling it from top
to bottom. The non-conducting slide will come loose at some
point. Take the slide whose conductive side has been coated
with the titanium dioxide film and cover it with a glass petri
dish. You may leave it on the bench for this.
73Remove the tape from the other slide then gently wash away
the titanium dioxide suspension from it on the sink. Use
ethanol and Kim-Wipes to finish cleaning it. Clean the glass rod
in the same way.
Once you are done cleaning things, the coated glass slide
(above, at right) you placed under the petri dish on the bench
should be dry (make sure it has had at least one minute to dry;
longer is fine). Take the dried glass slide and put it into an oven
at 450 °C. The slides need to be taken out of the oven after 30
minutes of heating, and allowed to cool.
74Staining the TiO2 Films with Dye, Carbon Coating the Counter-
Electrode, and Constructing the Cell
Materials Used:
Small petri dish
Eyedropper
Filtered blackberry juice
Titanium dioxide coated 1” square glass slide
Uncoated 1” square glass slide with special conductive
coating on one side
Multimeter
Special graphite pencil
Deionized water wash bottle
Ethanol wash bottle
Kim-Wipes
Paper towels
Two binder clips
Squeeze bottle of iodide electrolyte solution
Cotton swabs
Steps:
1. Put a couple of drops of blackberry juice on a small petri
dish using an eyedropper– Just enough to cover the entire
bottom of the dish and form a pool a millimeter or two
thick.
75You can also read