NEST-ED Technical Modules - February 2021 - NEST360
←
→
Page content transcription
If your browser does not render page correctly, please read the page content below
NEST-ED
Technical Modules
February 2021
Newborn Essential Solutions and Technologies-Education (NEST-ED) Technical Modules provide
educational support for each of the technologies included in the NEST360° bundle for newborn
care. These materials are intended to strengthen locally developed neonatal and technical trainings
in pre-and in-service settings and are not intended to be comprehensive technical guidelines or
device-specific manuals.

FACILITATING THE CLINICAL USE AND TECHNICAL
REPAIR OF TECHNOLOGIES FOR NEWBORN CARE
IN LOW-RESOURCE SETTINGS
DISCLAIMER

Newborn Essential Solutions and Technologies-Education
Technical Modules: Oxygen Concentrator

This series reflects the work of the NEST360° team through a joint effort with partner organisations. Some
rights reserved. This work is available under the Creative Commons Attribution-ShareAlike 4.0
International license (CC BY-SA 4.0; https://creativecommons.org/licenses/by-sa/4.0/).

Under the terms of this license, you may copy, redistribute and adapt the work in any medium or format
for any purpose, even for commercial purposes, provided you indicate whether any changes were
made and that the work is appropriately cited, as indicated below. In any use of this work, there should
be no suggestion that NEST360° endorses any specific organisation, products, or services. The
unauthorised use of the NEST360° names or logos is not permitted. If you adapt the work, then you must
license your work under the same or equivalent Creative Commons license. If you create a translation of
this work, you should add the following disclaimer along with the suggested citation: “This translation was
not created by Newborn Essential Solutions and Technologies (NEST360°). NEST360° is not responsible for
the content or accuracy of this translation. The original English edition shall be the binding and authentic
edition”.

Suggested citation. NEST360°. Newborn Essential Solutions and Technologies-Education – Technical
Modules: Respiratory Support: Oxygen Therapy – Oxygen Concentrator. (February 2021). License: CC BY-SA
4.0.

Rights and licensing. For queries on rights and licensing, see the full legal code for the Creative
Commons Attribution-ShareAlike 4.0 International license (CC BY-SA
4.0; https://creativecommons.org/licenses/by-sa/4.0/).

Please contact nest360@rice.edu to obtain a version of the series that may be more easily adapted
and integrated into other materials.

Third-party materials. If you wish to reuse material from this work that is attributed to a third party,
such as tables, figures or images, it is your responsibility to determine whether permission is needed for
reuse and to obtain permission from the copyright holder. The risk of claims resulting from infringement
of any third-party-owned component in the work rests solely with the user.

General disclaimers. All reasonable precautions have been taken by NEST360° to verify the information
contained in this publication. The mention of specific companies or of certain manufacturers’ products
does not imply that they are endorsed or recommended by NEST360° in preference to others of a
similar nature that are not mentioned. The published material is being distributed without warranty of
any kind, either expressed or implied. The responsibility for the interpretation and use of the material lies
with the reader. In no event shall NEST360° or affiliated partner institutions be liable for damages arising
from its use.

The authors have made every effort to check the accuracy of all information and instructions for use of
any devices or equipment. As knowledge base continues to expand, readers are advised to check
current product information provided by the manufacturer of each device, instrument, or piece of
equipment to verify recommendations for use and/or operating instructions.

In addition, all forms, instructions, checklists, guidelines, and examples are intended as resources to be
used and adapted to meet national and local health care settings’ needs and requirements.

page 2   Technical Education Modules
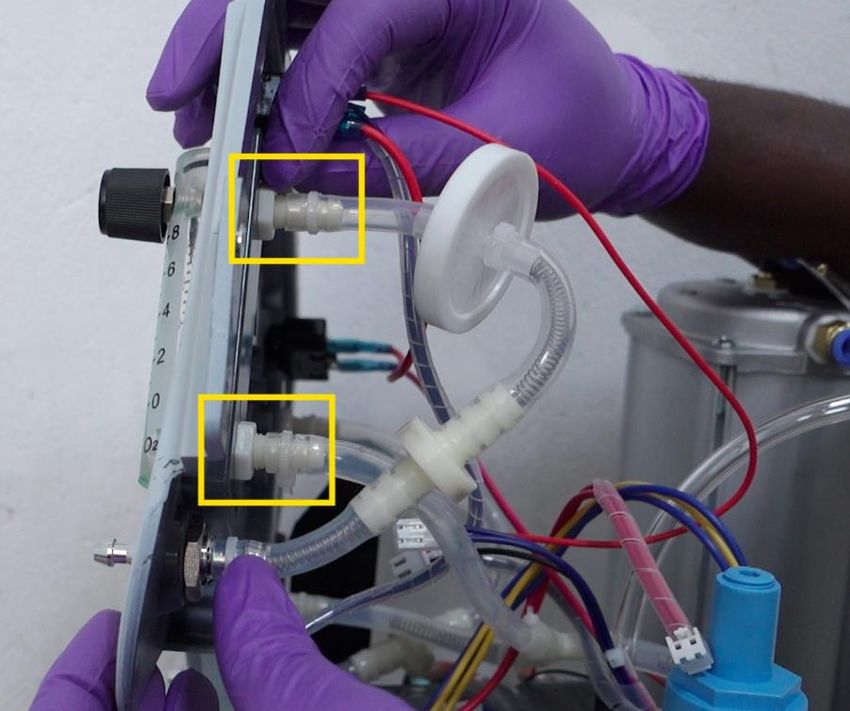
TABLE OF CONTENTS

NEST-ED ......................................................................................................... 1

TECHNICAL MODULES ...................................................................................... 1

DISCLAIMER .................................................................................................................................. 2
TABLE OF CONTENTS.................................................................................................................. 3
PREFACE ........................................................................................................................................ 4
ABBREVIATIONS ........................................................................................................................... 5
NOMENCLATURE .......................................................................................................................... 5
INTRODUCTION ........................................................................................................................... 6

RESPIRATORY SUPPORT ................................................................................. 9

OXYGEN THERAPY .......................................................................................... 9
OXYGEN CONCENTRATOR .............................................................................. 9
1    CLINICAL PROBLEM .............................................................................................................. 10
2    ASSESSMENT .......................................................................................................................... 10
3    MANAGEMENT ........................................................................................................................ 18
4    INFECTION PREVENTION ..................................................................................................... 20
5    COMPLICATIONS.................................................................................................................. 22
6    CARE & MAINTENANCE ....................................................................................................... 22
7    TROUBLESHOOTING & REPAIR........................................................................................... 25
8    REFERENCES .......................................................................................................................... 38

page 3    Technical Education Modules        Respiratory Support – Oxygen Therapy | Oxygen Concentrator
PREFACE

This series has been designed with the intent of supporting the clinical use and
technical repair of technologies in newborn care units.
Newborn Essential Solutions and Technologies-Education (NEST-ED) Technical Modules provide
educational support for each of the technologies included in the NEST360° bundle for newborn
care. These materials are intended to strengthen locally developed neonatal and technical
trainings in pre- and in-service settings. Of note, these materials are not intended to be
comprehensive technical guidelines or to replace the use of device-specific user and service
manuals or textbooks. They are to be used to facilitate the implementation of comprehensive
newborn care, including bubble CPAP, in a resource limited setting.

The NEST-ED Technical Modules were developed through a combination of international standard
review, international expert feedback, and multinational NEST360° expert consensus opinion. NEST-ED
Modules form the backbone of all lectures, power points, job aids, and other supportive education
materials supplied by NEST360°.

                   THIS IS ONE MODULE IN A SERIES OF NEST-ED
                   CLINICAL & TECHNICAL MODULES AVAILABLE.
page 4   Technical Education Modules   Respiratory Support – Oxygen Therapy | Oxygen Concentrator (Canta V8-WN-NS)
                            To view the full series, visit the NEST360° Resources website.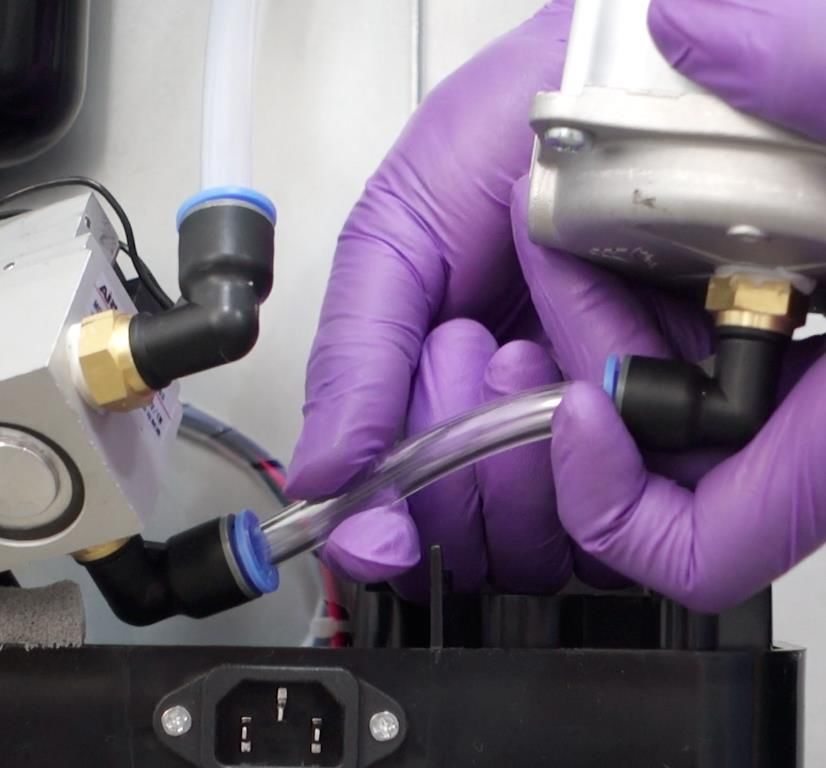
ABBREVIATIONS

                            bCPAP          Bubble continuous positive airway pressure
                              BMET         Biomedical Equipment Technician
                                  dL       Decilitre
                                ESD        Electrostatic Discharge
                                FiO2       Increased Fractional Concentration of Oxygen
                                  Fr       French size
                                HAI        Hospital acquired infections
                             HCWs          Healthcare workers
                              KMC          Kangaroo mother care
                               LBW         Low birth weight
                               LCD         Liquid Crystal Display
                                LED        Light-Emitting Diode
                            mm Hg          Millimeters of mercury
                           NEST-ED         Newborn Essential Solutions & Technologies-Education
                          NEST360°         Newborn Essential Solutions & Technologies
                                nm         Nanometer
                                  O2       Oxygen
                               OGT         Orogastric tube
                               PCB         Printed Circuit Board
                              ppm          Parts per million
                               ROP         Retinopathy of Prematurity
                               PSA         Pressure Swing Adsorption
                                PSU        Power Supply Unit
                               ROP         Retinopathy of Prematurity
                              SpO2         Peripheral blood oxygen saturation
                                UPS        Uninterruptible power supply
                             WASH          Water, sanitation and hygiene

NOMENCLATURE

                      Allen keys           Hex keys
                 bCPAP prongs              bCPAP patient interface
       Christmas tree adapter              Barbed oxygen fitting, nipple and nut adapter
                    Control PCB            Main PCB
                             Cot           Bassinet, infant crib
         Flat head screwdriver             Slot head screwdriver
                    Flow splitter          Oxygen splitter, flow meter stand
                    Glucometer             Glucose meter
    Hospital Acquired Infection            Iatrogenic infection, nosocomial infection
                     Multimeter            Digital multimeter, Avometer
                  Nasal prongs             Oxygen catheter, oxygen cannula, oxygen prongs
              Positive Pressure            Positive end expiratory pressure, positive airway pressure
               Radiant warmer              Resuscitaire, resuscitation table
               Star screwdriver            Torx screwdriver
                 Suction pump              Suction machine

page 5   Technical Education Modules   Respiratory Support – Oxygen Therapy | Oxygen Concentrator (Canta V8-WN-NS)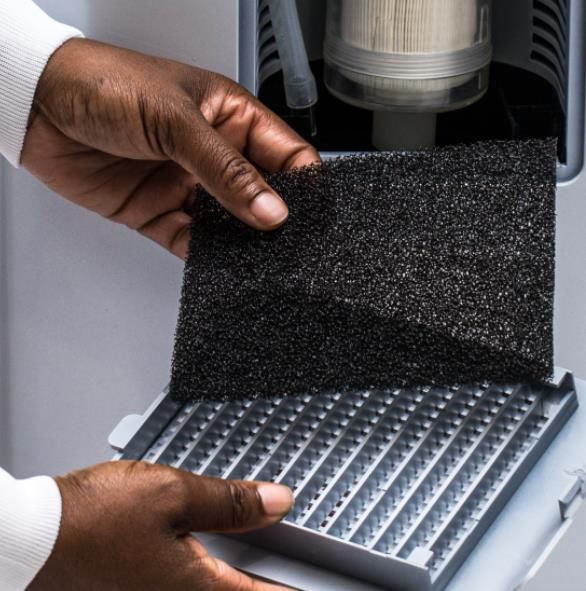
Introduction
The NEST-ED Technical Modules have been prepared to help technical staff and
students understand the basics of when and how to use equipment essential to
newborn care. More importantly, the Technical Modules support staff in
troubleshooting common issues, as well as prepare staff to repair equipment when it
breaks down or malfunctions. Modules may be used by teaching institutions, to
supplement current newborn care curricula, or by hospitals, clinical departments and
individuals to update their knowledge and to better facilitate the effective and safe use
of newborn care equipment. Modules should be used alongside device user and
service manuals to provide additional context as needed.

Whilst reading this series, navigate to the Table of Contents by clicking the NEST360° logo that
appears at the bottom right corner of each page:

Every module has a similar structure with sections and subsections. The sections have similar
headings and subheadings to make it easy for the user to navigate them. However, words may
have different meanings for the various cadres of staff reading them and so to reduce
misinterpretation, the heading titles are explained below.

The NEST-ED Technical Modules are intended as a flexible resource that hospitals and partners can
adapt to their specific needs. The Technical Modules consist of generic content that can be applied
to any model within a device category, coupled with model specific device images that can be
exchanged for alternative images depending on the devices available at your facility. Individuals
who are interested in gaining access to the editable NEST-ED Technical Modules should contact the
NEST Training Materials Coordinator (Anniina Lockwood, al90@rice.edu) or the NEST Biomedical
Tech Training Director (Sara Liaghati-Mobarhan, slmobarhan@rice.edu).

CLINICAL PROBLEM

This section provides useful information on the clinical application of a device that would bear
relevance to the biomedical team, not only to aid in their troubleshooting, but also for user training.

ASSESSMENT

This section explains how the device works, and what kinds of patients it is useful for. This section
also includes comprehensive diagrams of internal and external views of the devices, including
consumables that may be used with the device. This section also contains detailed descriptions of
key device components (including alarms) and includes a diagram of typical device flow (including
components and how they interact with each other, electrical current and fluid movement through
the device if relevant).

page 6   Technical Education Modules   Respiratory Support – Oxygen Therapy | Oxygen Concentrator (Canta V8-WN-NS)
MANAGEMENT

This section focuses on clinical management and provides step by step directions on how to set
the device up for a patient, followed by instructions on starting the patient on the device and
monitoring a patient whilst on the device. This section also describes how to remove the equipment
from the patient when it is no longer needed. Although a biomedical engineer or a technician will
not be responsible for providing care, understanding these steps will be useful in training and when
assessing the device.

INFECTION PREVENTION

This section lays out the basic infection prevention measures that should always be taken when
handling equipment, followed by directions for disinfecting the equipment both during and after
use. This section also describes the crucial Infection Prevention and Control steps that are
particularly relevant to biomedical engineers and technicians.

COMPLICATIONS

This section explains some of the common but serious clinical complications that relate to and can
arise from the use of the equipment (e.g., complications that will be seen or directly apply to the
patient). Biomedical engineers' and technicians' understanding of potential complications for the
patient is crucial to ensure patient safety. This section also describes common device
complications (e.g., complications that will be seen or directly apply to the device).

CARE & MAINTENANCE

This section describes where to place equipment for use, how to safely handle devices and their
consumables, whether calibration is recommended, and how to decommission the equipment.
Biomedical engineers and technicians are responsible for second-line care and maintenance to
ensure the equipment lasts to their potential lifetime; as such, this section also lists the necessary
daily, weekly, monthly and annual preventive maintenance steps required to keep the device in
good working condition. First-line care and maintenance is the responsibility of the user and is
described in the NEST-ED Clinical Modules.

TROUBLESHOOTING & REPAIR

This section describes steps that should be taken when a device malfunctions and first-line
troubleshooting efforts have failed to address the issue. This section describes tools and spare parts
that might be required to prepare for repairs and to troubleshoot failures, and provides a list of
components commonly provided with the device to ensure that all components return to the ward
post-repair. Finally, this section also explains steps for testing, repairing, and replacing specific parts
of the device.

page 7   Technical Education Modules   Respiratory Support – Oxygen Therapy | Oxygen Concentrator (Canta V8-WN-NS)

REFERENCES & ALERTS

References & alert boxes are included within each module to provide clarity on areas where
recommendations are governed by published standards, evidence, and/or expert opinion. This is
included for the dual purpose of facilitating (1) feedback and continuous improvement of NEST-ED
Technical Modules and (2) implementer review of content for incorporation in local trainings.

                                                   ALERT 0.0 Subject
 QUERY ALERT BOXES appear where there may be controversy or disagreement. In these cases, ale rt boxes
 provide background to the recommendations that are made in the body of the document. Relevant documents are
 cited and brief explanation of reasoning for current module content provided.

                                                        ALERT 0.0
 RECOMMENDATION ALERT BOXES appear where there are recommendations based largely on expert opinion or
 consensus, or to emphasize an important element of care. Relevant documents are cited and brief explanation of
 reasoning for current module content provided.

page 8   Technical Education Modules   Respiratory Support – Oxygen Therapy | Oxygen Concentrator (Canta V8-WN-NS)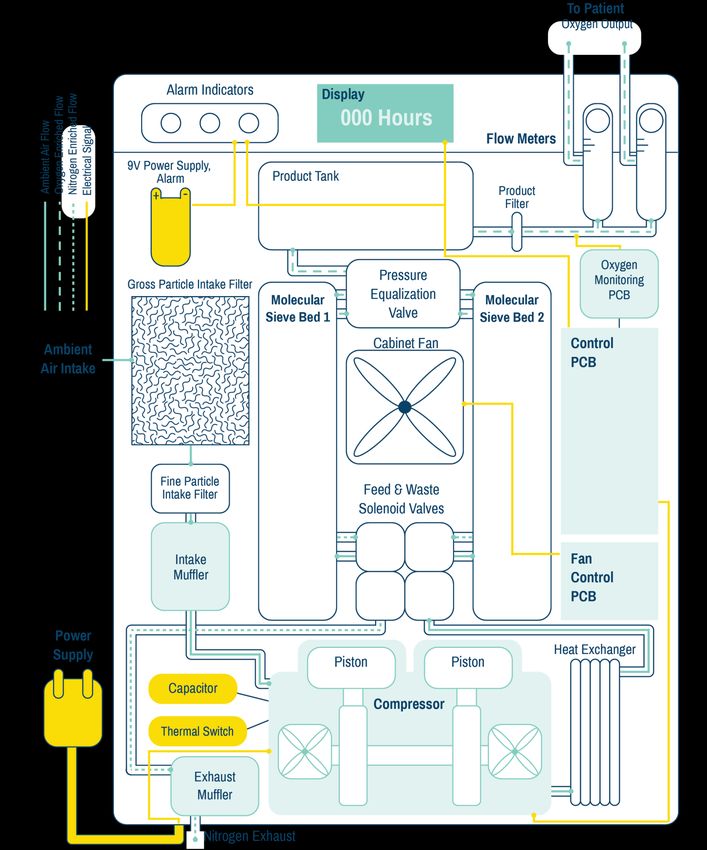
Respiratory
Support
Oxygen Therapy
Oxygen Concentrator

page 9   Technical Education Modules   Respiratory Support – Oxygen Therapy | Oxygen Concentrator (Canta V8-WN-NS)
1 Clinical Problem
Oxygen concentrators are used in multiple hospital settings. In newborn care units,
oxygen concentrators are used as standalone or partner devices to deliver oxygen
therapy.
Concentrators may be used to share oxygen between multiple patients using a flow splitter or used
with other treatment devices such as continuous positive airway pressure (CPAP) devices.
Supplemental oxygen is indicated for sick children, especially those with low blood oxygen
saturation levels (typically SpO2
Oxygen concentrators may have one or two oxygen output ports that may be used to supply
oxygen directly to one or two patients or to multiple patients at low flows using a flow splitter. Each
output port has an flowmeter that can be adjusted to regulate flow from that port. Oxygen can be
delivered using both ports simultaneously.
Oxygen concentrators may provide oxygen via two types of flow:
Intermittent/pulse flow: provides puffs of oxygen into nasal passageway at typical
breathing rates.
Continuous: provides constant oxygen delivery at a steady rate.
In intermediate care newborn units, concentrators with continuous oxygen delivery are required for
most applications.
Typically, all flowmeters on an oxygen concentrator are graduated to the maximum capacity of the
concentrator (e.g. if maximum flow capacity is 10L/min then there may be 2 flowmeters on the
device each graduated to 10L/min flow, as in 2.2). However, while both flowmeter ports may be used
simultaneously, the maximum flowrate at which the device can produce 85-95.5% oxygen remains
the same (e.g., a 10 L/min oxygen concentrator can only produce 10 L/min of oxygen at a time,
regardless of the number of ports or splitters in use). Combined flowrate from all ports during use
must not exceed the total recommended flow rate. Should the combined flowrate go over the
maximum capacity of the oxygen concentrator, the produced oxygen purity will drop, decreasing
the oxygen delivered to the patient.
(A) (B)
2.2 Sample safety labels for (A) 10 L/min and (B) 8 L/min concentrators: delivered oxygen
from all oxygen ports should not exceed maximum oxygen capacity.
Neonatal patients should reach SpO2 levels of 90–95% by 15 minutes after birth. If oxygen is needed
it is recommended to give between 0.5-1 L/min.1 Whilst on oxygen, regular monitoring should be
conducted including the use of a pulse oximeter to ensure that this saturation range is maintained
for the duration of treatment. Ideally, patients suffering from severe respiratory distress should have
continuous pulse oximetry monitoring throughout care to prevent hypo- or hyperoxia.1
HOW IT WORKS
An oxygen concentrator operates on the principle of Pressure Swing Adsorption (PSA) using a
microporous granulated molecular sieve material called zeolite. Zeolite has the property of
selectively adsorbing (trapping) nitrogen from air at high pressure and desorbing (releasing)
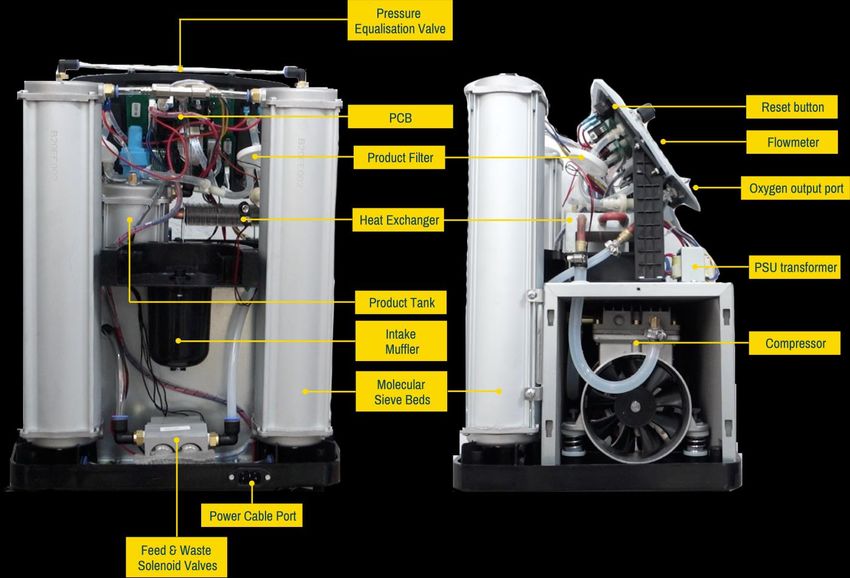
page 11 Technical Education Modules Respiratory Support – Oxygen Therapy | Oxygen Concentrator (Canta V8-WN-NS)nitrogen at low pressure hence the name pressure swing (swinging between low and high). For the purposes of an oxygen concentrator, the zeolite is contained in two cylindrical canisters called molecular sieve beds. Air at atmospheric pressure of 14.7 psi (101 kPa, 1.01 bar) is filtered and drawn into the concentrator by the cabinet fan and compressor. The compressor raises the air pressure to about 30 psi (206 kPa, 2.1 bar) and feeds it into one of the molecular sieve beds (controlled by the feed & waste valves). Nitrogen is adsorbed by the zeolite granules while oxygen is allowed to pass. The residual oxygen is collected at the molecular sieve bed outlet port into the product tank. After 10 to 15 seconds the zeolite will be saturated with nitrogen. At this point, it can no longer adsorb further and the supply of compressed air is automatically switched to the second molecular sieve bed where it undergoes the same sieving process. Concurrently, the pressure in the first molecular sieve bed is reduced to atmospheric pressure by venting it back to the atmosphere. This allows the trapped nitrogen to be released from the zeolite back to the atmosphere. By releasing nitrogen, the zeolite becomes regenerated and ready for the next cycle. By having two sieve beds a continuous supply of oxygen is ensured. There is no lag in production as the molecular sieve beds alternate between oxygen production and zeolite regeneration. Standard external and internal device components are annotated below in Figures 2.5 and 2.6. Components should be similar regardless of model. However, specific locations, visual setup and component type may vary by brand and device model. Refer to service and user manuals if model in use is different from the displayed version. page 12 Technical Education Modules Respiratory Support – Oxygen Therapy | Oxygen Concentrator (Canta V8-WN-NS)
2.4 (a) External components (front view).                      2.4 (b) Internal components (front view).

                                        2.5 Internal components (back and side view).

page 13   Technical Education Modules   Respiratory Support – Oxygen Therapy | Oxygen Concentrator (Canta V8-WN-NS)
TYPICAL DEVICE FLOW page 14 Technical Education Modules Respiratory Support – Oxygen Therapy | Oxygen Concentrator (Canta V8-WN-NS)
MAIN COMPONENTS

The following device components should be similar regardless of model. However, specific
locations, visual setup and component type may vary by brand and device model. Refer to model
service and user manuals for more device-specific information.

Compressor
Pressurises ambient air by reducing its volume. As the ambient air pressurises, heat is produced. A
typical compressor assembly is displayed in 2.6. Compressor output refers to how much
compressed air the compressor can produce. This depends upon the model of the compressor,
stroke size, bore size and cup seal condition. Some compressors may have a pressure relief valve
(an automatic, typically spring-loaded mechanism that opens when the compressor experiences
increased pressure to discharge the excess air into the atmosphere).

                                                  2.6 A typical compressor.

Starting capacitor
Starts and runs the compressor and keeps the auxiliary compressor motor coil running.

Heat exchanger
Reduces the temperature of the compressed air which has heated during the compression
process.

page 15   Technical Education Modules   Respiratory Support – Oxygen Therapy | Oxygen Concentrator (Canta V8-WN-NS)
Thermal switch
Cuts power to the compressor once the compressor running temperature exceeds maximum heat
threshold.
Control PCB
Controls the opening and closing of the solenoid valves. It also controls all electronic and electrical
components of the unit including alarms, pressure transducers and oxygen monitor circuits.
Molecular sieve beds
Canisters that contain zeolite (typically aluminum silicate), which adsorbs nitrogen from air at high
pressures. Compressed air enters the sieve beds from the compressor at high pressure which
allows the zeolite to adsorb the nitrogen in air, leaving 85-95.5% oxygen-enriched gas.
Oxygen monitoring PCB
Consists of an in-built oxygen analyser, typically ultrasonic, which monitors oxygen concentration in
produced airflow. The oxygen monitoring PCB also processes output signal of the analyser in a
pass/fail fashion.
Solenoid valves
Solenoid valves are electrically controlled valves with two main components: a solenoid (an electric
coil with a movable electromagnetic plunger) and a valve. Solenoid valves remain at their “normal”
position (open or closed) until an electric current creates a magnetic field to force the plunger up
and open or close the valve.
In oxygen concentrators, solenoid valves are used to control feed and waste processes through the
molecular sieve beds. Feed valves direct and regulate the flow of ambient air from the compressor
to the sieve beds, while waste valves direct and regulate the exhaustion of nitrogen out of the sieve
beds.
Equalisation valve
The equalisation valve plays two critical roles in the Pressure Swing Adsorption process:
1 It facilitates pressurization and nitrogen purging of the sieve under depressurizing cycle.
2 It directs some of the oxygen produced in one sieve to the other thus reducing energy
requirements and increasing efficiency.
The equalisation valve may be a solenoid or mechanical valve.
Cabinet fan
The cabinet fan pulls ambient air into the unit and circulates air throughout insides of concentrator,
cooling internal components. This component typically has its own PCB that controls power and
rate information to the fan.
page 16 Technical Education Modules Respiratory Support – Oxygen Therapy | Oxygen Concentrator (Canta V8-WN-NS)Pressure regulator Controls the oxygen pressure as it leaves the product tank. This is typically set by the manufacturer to 20 psi (138 kPa, 1.4 bar).2 Check valve Prevents backflow of oxygen after air has been processed through the sieve beds. Intake muffler Minimises noise from compressor suction as air enters compressor. Exhaust muffler Minimises noise of nitrogen-rich air exhaust and discharges this air from concentrator. Product tank Reservoir where oxygen is kept before proceeding to the outlet ports. This tank stores a small amount of oxygen that is released when the device is turned off or power is lost. Pressure relief valve Reservoir where oxygen is kept before proceeding to the outlet ports. This tank stores a small amount of oxygen that is released when the device is turned off or power is lost. Oxygen output ports Product output ports; these ports may have free flowing oxygen or require a Christmas tree adapter to be connected to allow flow. Fine particle intake filter Internal to the machine, either composed of filter paper or thick white felt filter. Filters particles from air to protect the compressor. Gross particle intake filter External to the machine, very porous and only intended to filter out large particles. Product filter Filters fine particles from product oxygen stream prior to administration to patient. Unlike other filters, intended for use of unit lifetime. page 17 Technical Education Modules Respiratory Support – Oxygen Therapy | Oxygen Concentrator (Canta V8-WN-NS)
Hour meter
Records the device’s cumulative running time.

Reset button
Circuit breaker; resets the unit after electrical overload shutdown.

Alarm battery
Provides power to audible alarm speaker to ensure alarms sound during a power outage. Typically
9V.

Alarms
Alarms may be audible, visual or both. LED indicators may illuminate to indicate low oxygen output
levels, flow restriction, high/low pressure, power supply failure, and high temperature. Some oxygen
concentrators may have specific codes that designate each failure; refer to the model-specific
user and service manual for more information.

Flowmeter and regulator knobs
Controls and displays the oxygen delivery rate to the patient(s) in L/min

3 Management
Management covers how to use the oxygen concentrator, including set up for a
patient, patient commencement, care whilst on the device and removal of the patient
from the device. These instructions are helpful for a biomedical engineer or technician
both in user training and in assessing the appropriate functionality of the device.

SETTING UP FOR A PATIENT

    1     Plug oxygen concentrator’s power cable into the oxygen concentrator (3.1a) and into the
          wall and turn on power at socket. Turn on concentrator. (3.1b)

page 18   Technical Education Modules   Respiratory Support – Oxygen Therapy | Oxygen Concentrator (Canta V8-WN-NS)
3.1 (a) Plug in the oxygen concentrator. 3.1 (b) Turn on the oxygen concentrator.
2 Set flow to desired rate. If machine has not been turned on, allow to run for five minutes or
until indicator light (3.2) shows that concentrator is providing appropriate concentration
of oxygen for treatment. Check that no alarms sound on the machine.
3 If the patient's healthcare provider has determined the patient requires humidification,
assist the healthcare worker to ensure humidifier is correctly connected to the
concentrator. (Alert 3.1)
Alert 3.1
Per WHO recommendation in WHO Oxygen Therapy for Children and WHO Technical Specifications and Guidance for Oxygen
Therapy Devices, when oxygen is delivered at higher than standard flow rates (> 1L/min for neonatal and 2L/min for infant
patients), humidification is necessary.1,2 Ultimately, the decision to humidify low flow oxygen or not is a clinical one which is
influenced by oxygen source (tank, concentrator), oxygen flow, climate, patient age, resource availability and clinical status. If
used in series with another device, humidification should be added after the device and just prior to the patient interface to
prevent moisture build-up in the ancillary device.
4 Perform hand washing protocols. Connect appropriately sized nasal prongs to oxygen
port on machine (3.3) or to humidifier (if using).
3.2 The “Low Oxygen” alarm indicates that 3.3 Connect correctly sized nasal prongs to oxygen
produced concentrations are lower than 85%. port.
page 19 Technical Education Modules Respiratory Support – Oxygen Therapy | Oxygen Concentrator (Canta V8-WN-NS)5 Test that oxygen flow has begun by placing your finger near the nasal prongs, ensuring
that flow commences. This can also be tested by submerging the nasal prongs in clean
water and checking for bubbles (3.4), also known as the “Bubble Test.” 3
3.4 Submerging the nasal prongs in water should
produce bubbles.
4 Infection Prevention
Routine and adequate cleaning of medical devices is critical to prevent hospital-
acquired infections in newborn care units.
CLINICAL INFECTION PREVENTION
1 Housing of the oxygen concentrator should be cleaned according to ward guidelines for
disinfecting surfaces.
2 Clean hands with soap and water or 70% alcohol before and after placing a patient on
oxygen or handling any tubing that will be used on a patient.
3 Ensure that all patient-related tubing or interfaces are new or has been cleaned
thoroughly and dried as per re-use guidelines. Any patient-related tubing or interfaces
must be cleaned immediately after use; If reusing, immediately begin hospital protocol for
disinfection of any patient-related tubing or interfaces. Delay in initiating cleaning of
reused medical devices can lead to the need for more intensive cleaning procedures to
remove pathogens. If not reusing, discard appropriately. (Alert 4.1)
4 Tubing should be hung to dry after disinfection and should not touch the floor or other
unsanitary surfaces whilst drying. Any item falling on the floor is contaminated and must
be thoroughly recleaned.
page 20 Technical Education Modules Respiratory Support – Oxygen Therapy | Oxygen Concentrator (Canta V8-WN-NS)Alert 4.1
Respiratory circuits and humidifiers associated with oxygen delivery are generally intended as single use devices. However, in
areas with limited resources or challenging supply chains, this equipment is often re-used. When re-processing single use
devices it is extremely important that the cleaning process is not delayed following completion of use. If equipment is not re-
processed promptly or adequately between patients, it poses a significant infection risk. Please refer to the Reference
Manual for Health Care Facilities with Limited Resources Infection Prevention and
Control, Module 64 for more detailed guidance on the re-processing of single use devices.
DISINFECTION AFTER USE
1 Turn off and unplug the oxygen concentrator. If reusing tubing, immediately begin hospital
protocol for disinfection.
2 Housing of the oxygen concentrator should be cleaned according to ward guidelines for
disinfecting surfaces. Flowmeter controls and LEDs should be cleaned using 70% alcohol
after every use. (Alert 4.2)
BMET INFECTION PREVENTION
1 Any piece of equipment used in providing patient care must be handled carefully, as it may
be contaminated and have the potential to spread infection.
2 Clean and disinfect oxygen concentrator housing and components whilst wearing PPE as
appropriate (e.g., rubber gloves, apron, face protection, etc.) before any repairs or
maintenance are made. Avoid any contact between used piece of equipment and skin,
mucosa or clothing.
3 Post-maintenance, decontaminate all tools and surfaces used with 70% alcohol or
according to manufacturer guidelines. Do not use equipment until it has fully dried following
decontamination.
Alert 4.2 Disinfecting Equipment
Disinfection of equipment should always comply with manufacturer guidelines. WHO recommends 0.5% dilution of chlorine
(0.5% or > 100ppm available sodium hypochlorite) as the standard disinfectant for materials and surfaces contaminated by
blood or body fluids.5 For metal and rubber surfaces, which may be corroded by chlorine, 70% alcohol is also commonly utilised
for low level disinfection.
Other appropriate low-level disinfectants include quaternary ammonium, improved hydrogen peroxide and Iodophor germicidal
detergent.4 Phenolic germicidal detergent is also identified but should not be used in neonatal wards since affordable, effective
alternatives are available; and, there are concerns it may cause hyperbilirubinemia and/or neurotoxicity in neonates. 6
See dedicated NEST360° module on Infection Prevention and Control for further details on risks, benefits and utilization of
chemical disinfectants. For comprehensive guidance on infection prevention and control we recommend utilising Reference
Manual for Health Care Facilities with Limited Resources Infection Prevention and Control (Caston-Gaa & Ruparelia, 2018).
page 21 Technical Education Modules Respiratory Support – Oxygen Therapy | Oxygen Concentrator (Canta V8-WN-NS)5 Complications
Equipment in newborn care units are highly specialised. Without proper knowledge
and skills, this equipment can be potentially dangerous for the infants, families and
care providers.
DEVICE COMPLICATIONS
Inadequate oxygen concentrations: if the oxygen concentrator indicates inadequate
concentrations of oxygen (Alert 5.1), oxygen concentration has dropped below 82% and
machine maintenance is needed. Replace the concentrator or switch to backup oxygen
cylinder supply if available; if not available, increase monitoring frequency to ensure
clinical stability until concentrator can be replaced or maintained.
6 Care & Maintenance
Biomedical engineers and technicians are responsible for second-line care and
maintenance to ensure equipment lasts to their potential lifetime.
POWER SOURCE
Oxygen concentrators may be powered via mains or grid power with a voltage protector in line, or
a rechargeable battery, depending on the model.
WARD LOCATION
The concentrator should be located in a clean, dry, well-ventilated space. The back of the
concentrator should be 30-35 cm away from the nearest wall to ensure that air can freely flow into
the concentrator. Ideally, the concentrator is placed close to oxygen splitters or other ancillary
equipment in use. To facilitate access, it should also be placed in a location that is easily viewed
and accessed by ward staff.
page 22 Technical Education Modules Respiratory Support – Oxygen Therapy | Oxygen Concentrator (Canta V8-WN-NS)DEVICE CALIBRATION Manufacturers do not recommend calibration for any oxygen concentrator components. DECOMMISSIONING Assuming appropriate use and consistent maintenance, an oxygen concentrator may last up to 7 years.7 Generally, it is more fiscally responsible to repair oxygen concentrators when necessary, although there are some low-cost models that may be cheaper to replace rather than repair. Most components on an oxygen concentrator can be repurposed; exceptions are typically molecular sieve beds, which will become contaminated over time with moisture in the air. page 23 Technical Education Modules Respiratory Support – Oxygen Therapy | Oxygen Concentrator (Canta V8-WN-NS)
PREVENTIVE MAINTENANCE
After Each Use
Turn off and unplug the oxygen concentrator. Use gauze and 70% alcohol or diluted chlorine
to thoroughly wipe the oxygen flowmeter controls, control panel and power button. See
Oxygen Concentrator: Disinfection After Use and Alert 4.2 for more information
Visually inspect oxygen concentrator components and location.
Weekly
Visually assess and clean the external gross particle intake filter.
Visually assess the internal fine particle intake filter. Clean or replace if needed.
See Oxygen Concentrator: Troubleshooting & Repair: Assessing, cleaning & replacing intake
filters for more detail.
Turn on and allow the oxygen concentrator to run for 15 minutes. Confirm that no alarms are
audibly or visually activated.
Document cumulative hours run and preventive maintenance actions taken.
Monthly
Perform Weekly preventive maintenance steps.
Test the power loss alarm: while the oxygen concentrator is plugged in and turned on, turn
off the power at the wall socket. An alarm should sound.
Test the oxygen concentration output at both the minimum and maximum flow range of
the oxygen concentrator using an oxygen analyser:
Remove humidifier bottle if on device. Moisture can damage the analyser.
Turn on the oxygen concentrator. Allow the concentrator to run for 5 minutes.
Connect an oxygen analyser to the outlet port and wait for reading to stabilise.
Assess concentration and output flow rate at both minimum and maximum flow rates
on all oxygen outlet ports.
If an analyser is not available, observe the ‘Low Oxygen’ LED indicator.
Visually assess the internal housing and compartments for dust. Blow clean if necessary.
Document cumulative hours run and preventive maintenance actions taken.
Quarterly
Perform Monthly preventive maintenance steps.
Audibly assess the concentrator for sounds outside of standard operation.
Measure grounding integrity and casing leakage current.
Document cumulative hours run and preventive maintenance actions taken.
Annually
Perform Quarterly preventive maintenance steps.
Confirm supply of spare power supply units, sieve beds, control PCBs, solenoid valves,
compressor rebuild kit, intake filters and power cables are adequate to support estimated
replacement for next year.
Document cumulative hours run and preventive maintenance actions taken.
page 24 Technical Education Modules Respiratory Support – Oxygen Therapy | Oxygen Concentrator (Canta V8-WN-NS)7 Troubleshooting & Repair
Biomedical engineers & technicians are responsible for providing rapid maintenance,
troubleshooting & repair support for users.
PREPARE FOR REPAIR
TOOLS ACCESSIBLE SPARE PARTS DEVICE CHECKLIST
Digital multimeter Power supply unit Oxygen concentrator
Phillips, star & flathead screwdrivers Power cable Power cable (if detachable)
Allen keys Gross & fine particle intake filters Gross particle intake filter
Adjustable wrench Control PCB Oxygen tubing or nasal prongs
Needle nose pliers Flowmeter assembly
Wire strippers Control, oxygen monitoring & fan PCB
Phase tester Solenoid valves
Oxygen analyser Starting capacitor
Compressed air blower Compressor and rebuild kit
Oscilloscope Crimp or zip ties
Permanent marker
Pressure gauge
TROUBLESHOOTING FAILURES
The oxygen concentrator is not turning on.
Probable Cause: Faulty power supply
Components to Check: Power cable continuity
Reset button/circuit breaker activation & continuity
Power switch physical integrity & continuity
Power entry module fuse(s) physical integrity & continuity
Power supply unit continuity & voltage
Control PCB physical & electrical integrity and continuity
page 25 Technical Education Modules Respiratory Support – Oxygen Therapy | Oxygen Concentrator (Canta V8-WN-NS)The concentrator turns on, but a ‘Low Oxygen Concentration’ indicator is
activated.
Probable Cause: Contaminated sieve beds, worn compressor or blocked filters leading
to low internal pressure
Components to Check: Cumulative flow delivered
Gross and fine particle intake filter condition
Sieve bed operating pressure
Compressor physical condition
Control and Oxygen Monitoring PCB physical & electrical integrity &
continuity
Solenoid valves resistance & magnetisation
The concentrator turns on, but no flow comes from the oxygen ports.
Probable Cause: Blocked oxygen port or displaced internal tubing
Components to Check: Oxygen outlet port physical condition
Internal tubing seal & placement
The concentrator turns on, but the compressor periodically shuts down.
Probable Cause: Overheated compressor or restricted airflow
Components to Check: Device placement
Fan and fan components’ functionality, physical and electrical
condition
Thermal switch continuity
Internal tubing condition
Compressor starting capacitor functionality
The concentrator turns on, but a loud popping sound is emitted from the device.
Probable Cause: Compressor relief valve release due to high system operating
pressure
Components to Check: Internal tubing condition
Sieve bed operating pressure
Solenoid valves resistance
Compressor & compressor relief valve condition
Control PCB physical & electrical integrity & continuity
The concentrator turns on, but the compressor does not start.
Probable Cause: Overheated or cold compressor
Components to Check: Internal temperature assessment
Compressor starting capacitor functionality
Internal electrical connections
Control PCB physical & electrical integrity & continuity
page 26 Technical Education Modules Respiratory Support – Oxygen Therapy | Oxygen Concentrator (Canta V8-WN-NS)Reset button trips repeatedly when power switch is ‘On’.
Probable Cause: Poor mains power quality or faulty reset button
Components to Check: Mains power quality
Internal electrical connections
Compressor electrical integrity
Control PCB electrical integrity & continuity
Reset button electrical integrity
The concentrator flow meter bead(s) fluctuate more than ¼ L/min.
Probable Cause: Leakage or loose internal connection
Components to Check: Cumulative flow delivered
Internal tubing condition
Flowmeter physical condition
Gross and fine particle intake filter condition
Sieve bed operating pressure
Compressor physical condition
Control & Oxygen Monitoring PCB physical & electrical integrity &
continuity
Solenoid valves resistance
REPAIR & REPLACE
Where technically possible and not likely to obstruct clinical care, repairs may be made within the
newborn care ward. Use discretion to determine if this is appropriate or if the device should be
removed to the biomedical workshop for more testing or repair. Always refer to the
manufacturer’s user and service manual before beginning any repair procedures.
Alert 7.1
All testing, repair and replacement steps should be conducted with the power to the device switched off and the power cable
removed from mains power, unless otherwise stated.
Testing & replacing the power supply fuses
Fuses may be located both on the oxygen concentrator housing and on the power supply cable.
Fuse integrity may be visually assessed or evaluated by testing the continuity across the fuse.
Always refer to the manufacturer specifications for replacement fuses to ensure that the device
remains electrically sound in standard operation.
Testing & replacing the power switch
Power switches should be tested in both the off and on positions to confirm functionality. In the On
position, the switch terminals should be continuous. In the Off position, the switch terminals should
show a high resistance, or OL in most multimeters.
If the switch shows continuity or discontinuity inappropriately, assess the switch for visible physical
or electrical damage. If the switch is visibly damaged or dislodged, assess whether the part can be
page 27 Technical Education Modules Respiratory Support – Oxygen Therapy | Oxygen Concentrator (Canta V8-WN-NS)repaired with glue or solder. If it cannot be easily repaired, replace the switch. Always refer to the
manufacturer specifications for replacement switches to ensure that the device remains
electrically sound in standard operation.
Testing & replacing the power supply unit or module
Testing the power supply unit cannot be completed appropriately without checking the alternating
voltage at the power supply unit. This should be completed with caution, as the power to the
device must be switched on to accurately measure the voltage delivered. If the power supply unit
or module is damaged, contact the manufacturer to request a replacement part.
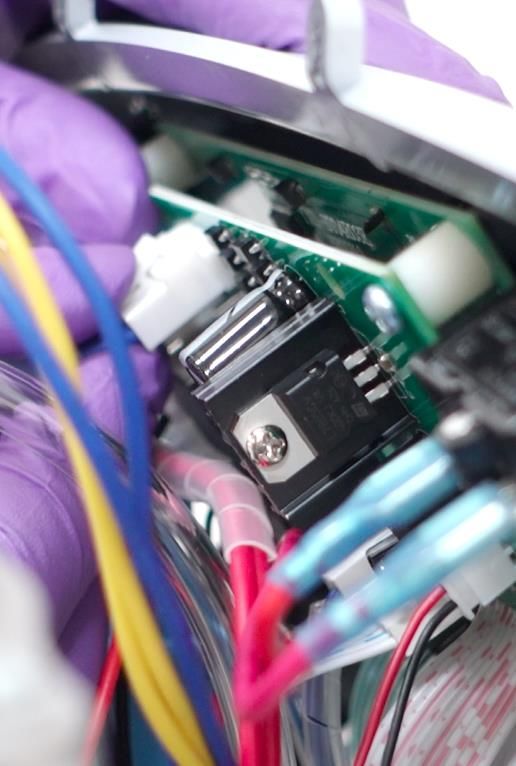
Testing & replacing control PCB and associated components
In most cases, if one element of the control PCB has malfunctioned, the entire control PCB should
be replaced. Visually assess the PCB for burnt or damaged components. (7.1 – 7.6) Internal wiring
continuity leading from the power supply to the control PCB and from the control PCB to the other
components may also be assessed for replacement. (Alert 7.2, Alert 7.3)
Alert 7.2
Printed Circuit Boards (PCBs) contain components that are sensitive to electrostatic discharge (ESD) and can damage the
board if not handled properly. As when handling any ESD-sensitive PCB, observe standard ESD safety procedures.
7.1 Unscrew the housing. 7.2 Remove the housing to access 7.3 Unscrew and slide the front
internal components. housing off of the device.
page 28 Technical Education Modules Respiratory Support – Oxygen Therapy | Oxygen Concentrator (Canta V8-WN-NS)7.4 Identify the control PCB. 7.5 If a PCB needs to be replaced, 7.6 Unscrew the circuit boards
Visually assess all PCBs for disconnect wiring. from the concentrator housing.
issues. Replace as needed.
Slide out the locking plate.
Alert 7.3
When disassembling and reassembling devices, it is critical that all parts are connected back to the sections of the circuit
board that they were initially in. For more complicated devices, it is best to take photographs of the repair process as steps are
conducted. These photos can then be used as a reference with the manufacturer’s service manual when putting the device
back together. Connecting and turning on a device in the wrong component orientation can cause permanent damage
to a device.
Assessing cumulative flow delivery
Although both oxygen flowmeters on an oxygen concentrator are graduated to the maximum
capacity of the machine and may be used simultaneously, the maximum flowrate at which the
device can produce recommended purity of oxygen remains the same (e.g., a 10 L/min oxygen
concentrator can only produce 10 L/min of oxygen at a time, regardless of the number of ports or
splitters in use). Should the combined flowrate go over the maximum capacity of the oxygen
concentrator, the produced oxygen purity will drop, decreasing the oxygen delivered to the patient.
Users should be oriented on cumulative flow and a safety label placed on the oxygen
concentrator to facilitate safe use. (7.7)
To assess the cumulative flow delivery, oxygen flow rates from all oxygen ports (in L/min) should be
summed and compared to the maximum oxygen capacity for the concentrator model (in L/min). If
this exceeds the maximum oxygen capacity, the oxygen flow rates must be decreased until their
cumulative flow is within model specifications.
Over the oxygen concentrator’s lifetime, the maximum output flow rate that can be produced whilst
retaining 90% to 95% oxygen concentrations may decrease by 1 or 2 L/min. This can be improved by
replacing or rebuilding the compressor and sieve beds but indicates that the oxygen concentrator
is nearing the end of its usable lifetime and should be considered for decommission.
page 29 Technical Education Modules Respiratory Support – Oxygen Therapy | Oxygen Concentrator (Canta V8-WN-NS)(A) (B)
7.7 Sample safety labels for (A) 10 L/min and (B) 8 L/min concentrators: delivered oxygen
from all oxygen ports should not exceed maximum oxygen capacity.
Testing & repairing the oxygen outlet ports
Over time, oxygen outlet ports may accumulate deposits or debris that block oxygen flow from the
concentrator. Ports should be visually inspected using a penlight and cleaned using ear swabs or
forceps wrapped in gauze soaked in 70% alcohol.
Testing & replacing internal tubing components
Leaks may contribute to both low operating pressure and accelerated failure of molecular sieve
beds. Internal tubing can be assessed for leaks by running oil-free, mild or diluted soapy water or
leak-testing foam along the suspected tubing, pipes and fittings during operation and checking for
bubbles or movement of the liquid.
Internal tubing may have springs in place to protect from kinks or bends. When replacing tubing,
remember to remove the springs and replace in the new tubing.
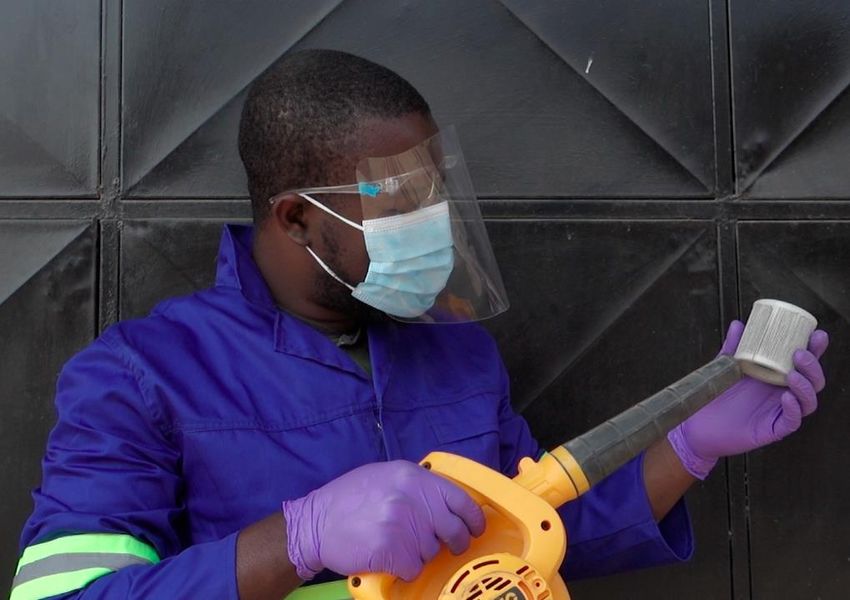
Assessing, cleaning & replacing intake filters
Frequency of maintenance increases in hot, humid and/or dusty operating environments. As the
gross (7.8) and fine (7.9) particle intake filters become clogged with dust or other debris, intake
airflow to the compressor becomes constricted and decreases the efficacy of the PSA process.
Intake filters should be assessed and cleaned regularly whilst wearing appropriate PPE (including
gloves, a face mask and safety glasses, if available). The fine particle intake filter should be
replaced after every 5 000 hours of use.
page 30 Technical Education Modules Respiratory Support – Oxygen Therapy | Oxygen Concentrator (Canta V8-WN-NS)7.8 Gross particle intake filter. 7.9 Fine particle intake filter.
Clean the gross particle intake filter:
1 Pull gross particle intake filter gently from the back of the oxygen concentrator. Replace with
spare.
2 Put the filter in warm, soapy water and swirl gently to remove debris.
3 Remove from soapy water and rinse with clean water. Place in shaded area until completely
dry. Store as spare filter until next cleaning is required.
Cleaning the fine particle intake filter:
1 Open the oxygen concentrator housing. The fine particle intake filter is internal to the device,
although the exact position varies by oxygen concentrator model.
2 Remove the fine particle intake filter. Replace with spare filter. (7.10 – 7.12)
3 Take the filter to an outside or well-ventilated area. Hold the filter firmly a distance away from
and downwind of any individuals. Use compressed air to blow dirt and debris off the filter. If
compressed air is not available, a pen or pencil may also be used to firmly strike the internal
filter. (7.13 – 7.14)
4 Dust clouds will rise off the filter. Continue striking or blowing compressed air until dust no
longer comes off and the colour has visibly lightened.
5 Assess the condition of the fine particle intake filter. If the filter is not damaged, store as spare
filter until next cleaning is required. The fine particle intake filter should be replaced after
every 5 000 hours of use.
page 31 Technical Education Modules Respiratory Support – Oxygen Therapy | Oxygen Concentrator (Canta V8-WN-NS)7.10 Remove the fine particle 7.11 Unscrew and separate the 7.12. Remove the filter paper
intake filter from the concentrator. two parts of the plastic housing for cylinder from the assembly.
the filter paper cylinder.
7.13 Wearing PPE and using compressed air, clean all components of the 7.14 Dust should blow off the filter
fine particle intake filter separately. paper.
Testing & replacing sieve beds
With lack of use or with age, the molecular sieve materials within sieve beds may become
contaminated with water molecules. This decreases the amount of open space for the nitrogen in
ambient air to bind to during PSA cycles and obstructs airflow over the molecular sieve. This
contamination decreases the efficacy of the oxygen concentrator. High operating pressure and
low oxygen concentration levels may indicate that the sieve beds have been contaminated and
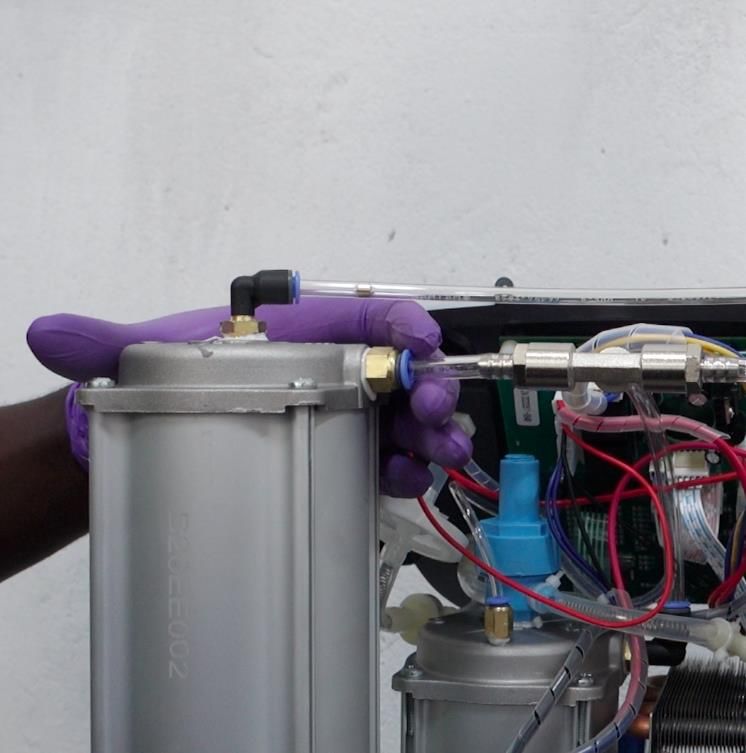
need to be replaced. (7.15 – 7.18)
Sieve beds should be replaced in pairs. While replacing, sieve bed spares should be temporarily
sealed with tape until installation is complete to prevent contamination of the molecular sieve from
the moisture in the ambient air. After installation of the spare sieve beds, careful leak testing should
be conducted to ensure that there are no small leaks that may contaminate the newly installed
sieve beds. See Oxygen Concentrator: Troubleshooting & Repair: Testing & replacing internal
tubing components for more information.
page 32 Technical Education Modules Respiratory Support – Oxygen Therapy | Oxygen Concentrator (Canta V8-WN-NS)7.15 Unscrew sieve beds for replacement. 7.16 Remove attached tubing from the sieve beds by
pressing the blue holding piece towards the sieve beds
and pulling the tubing simultaneously.
7.17 Remove sieve bed tubing from the feed & waste 7.18 Replace the sieve beds in pairs, following grooves
solenoid valves. along sieve bed housing to snap into place.
Testing & replacing the compressor and its components
Compressor output depends upon the model of the compressor, stroke size, bore size, and cup seal
condition. The cup seals form the seal between the piston and the cylinder wall. As the cup seals
wear, the compressor’s output begins to gradually decrease. This reduction in compressor output
results in less air for the sieve beds and decreases the production of oxygen. The condition of the
compressor’s cup seals, bearings, and other components can also result in a noticeably louder
running sound.
Compressor units may be serviced by replacing internal cup seals and bearings using a
compressor rebuild kit. (7.19 – 7.26) If rebuilding the compressor using a rebuild kit is not sufficient to
repair the compressor, the entire compressor unit may also be replaced.
page 33 Technical Education Modules Respiratory Support – Oxygen Therapy | Oxygen Concentrator (Canta V8-WN-NS)Alert 7.4
When reassembling the compressor after replacing the compressor kit, assemble the compressor sleeve, plates and cups
before reattaching. It is important that the compressor plates and cups have adequate purchase in the compressor sleeves; if
this is not done in the first attempt, push the compressor plate and cup through the sleeve and try again. Always nest the plate
within the cup before pushing into the compressor sleeve.
Compressor segments are directional. Always label the sides of the compressor with permanent ink to ensure the correct
pieces are installed for the correct side.
7.19 Slide panel up to access 7.20 Mark sides of the compressor. 7.21. Use a ratchet to remove the
compressor. bolts securing compressor head.
7.22 Lift off compressor head & 7.23 Turn over valve plate and 7.24. Remove compressor sleeves &
assess head gaskets for damage. assess o-rings and reeds for damage. assess for visible damage. Clean
Replace if necessary. interior with alcohol & cotton swab.
page 34 Technical Education Modules Respiratory Support – Oxygen Therapy | Oxygen Concentrator (Canta V8-WN-NS)7.25 Remove the screw holding the compressor 7.26 Check the compressor piston plates and cups for
piston plate & cup in place. Do this slowly to damage. Replace as needed.
prevent stripping the screw.
The compressor relief valve and starting capacitor may also need replacement. These parts should
be interchangeable with components of equivalent specifications, which can usually be
determined from the component housing or device service manual.
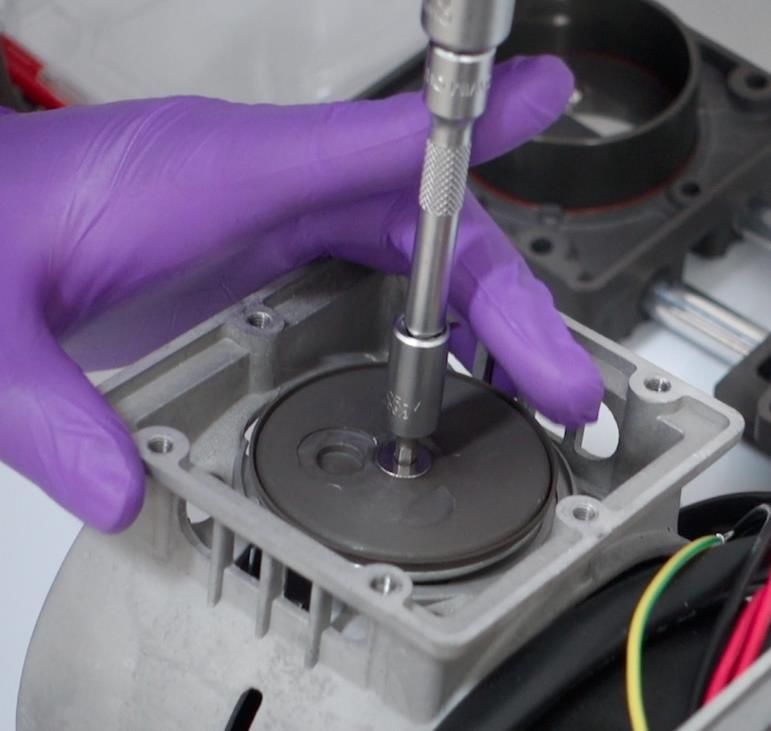
Testing & replacing solenoid valves
Solenoid valves may be tested using a multimeter or by checking the magnetisation of the coils
during operation. Valve coil resistance specifications for feed, waste and equalisation valves should
be available from the manufacturer or service manual for a specific model. Coil specifications may
vary within a model or between AC ratings.
Magnetisation can be tested by holding the metal tip of a magnetized screwdriver over the
exposed top of the valve stem in the centre of the coil. When the coil becomes energized
(magnetized) the tip of the screwdriver should be pulled down onto valve stem, indicating the valve
coil is functional.
Solenoid valves may be serviced by replacing the internal coil or the entire solenoid valve assembly.
The internal coil is directional and must be replaced in the same orientation as it was removed.
Assessing & replacing the fan
Most fan-related failures are due to physical damage to the fan itself or electrical damage to the
fan PCB. The fan can be visually assessed for repair and replacement. The most common electrical
damage to the fan PCB is the burnout of the fan transformer, which can be visually or electrically
assessed. As in most PCB-based repairs, if one element of the PCB has been damaged, the entire
PCB should be replaced.
Testing & replacing the thermal switch
The thermal switch shuts down the compressor when it exceeds a high temperature threshold. The
oxygen concentrator may keep running the fan to allow for more rapid cooling, but it will not be
able to fully turn on until cooler temperatures are reached within the concentrator. The thermal
switch may become faulty over time due to poor power quality or consistently high running
temperatures. A faulty thermal switch will prevent the compressor from running even during
page 35 Technical Education Modules Respiratory Support – Oxygen Therapy | Oxygen Concentrator (Canta V8-WN-NS)You can also read