HP Slate 21 Pro All-in-One - User Guide
←
→
Page content transcription
If your browser does not render page correctly, please read the page content below
HP Slate 21 Pro All-in-One

User Guide
© 2013 Hewlett-Packard Development
Company, L.P.

The only warranties for HP products and
services are set forth in the express
warranty statements accompanying such
products and services . Nothing herein
should be construed as constituting an
additional warranty. HP shall not be liable
for technical or editorial errors or omissions
contained herein.

Android and Google are trademarks of
Google Inc. Bluetooth is a trademark
owned by its proprietor and used by
Hewlett-Packard Company under license.
Microsoft and Windows are U.S. registered
trademarks of Microsoft Corporation.

This document contains proprietary
information that is protected by copyright.
No part of this document may be
photocopied, reproduced, or translated to
another language without the prior written
consent of Hewlett-Packard Company.

First Edition: December 2013

Document Part Number: 753317-001

Product notice

This guide describes features that are
common to most models. Some features
may not be available on your computer.
About This Guide
      This guide provides information on setting up and using the HP Slate 21 Pro All-in-One.
      WARNING! Text set off in this manner indicates that failure to follow directions could result in bodily
      harm or loss of life.
      CAUTION: Text set off in this manner indicates that failure to follow directions could result in
      damage to equipment or loss of information.
      NOTE:    Text set off in this manner provides important supplemental information.

                                                                                                                iii
iv About This Guide
Table of contents

1 Product features ............................................................................................................................................. 1
               Front components ................................................................................................................................ 2
               Rear and side components .................................................................................................................. 3
               Slate and HDMI modes ........................................................................................................................ 3
                              Slate mode ........................................................................................................................... 4
                              HDMI mode .......................................................................................................................... 4
                              Switching between Slate and HDMI modes ......................................................................... 4

2 Setting up the hardware ................................................................................................................................. 5
               Preparing for desk use ......................................................................................................................... 5
               Preparing for wall mounting .................................................................................................................. 5
               Connecting the cables .......................................................................................................................... 8
               Adjusting the tilt .................................................................................................................................. 11
               Attaching a cable lock ........................................................................................................................ 12
               Turning on the all-in-one for the first time ........................................................................................... 13
               Connecting USB devices .................................................................................................................... 14
               Using the touchscreen ........................................................................................................................ 15
                              One-finger slide ................................................................................................................. 15
                              Tapping .............................................................................................................................. 15
                              Pinching/stretching ............................................................................................................ 16
                              Rotating ............................................................................................................................. 16
                              Swipes ............................................................................................................................... 16
               Connecting to networks ...................................................................................................................... 17
                              Connecting to wireless networks ....................................................................................... 17
                              Connecting to wired networks ............................................................................................ 17
                              Using Bluetooth ................................................................................................................. 18

3 Using the Slate mode user interface ........................................................................................................... 20
               Managing files .................................................................................................................................... 21
               Cloud storage and file sharing ............................................................................................................ 21
                              Using Box.net .................................................................................................................... 21
                              Using Google Drive ............................................................................................................ 22
               Video conferencing ............................................................................................................................. 22
               Using Kingsoft Office .......................................................................................................................... 22
               Using Citrix apps ................................................................................................................................ 23
                              Citrix Receiver ................................................................................................................... 23

                                                                                                                                                                          v
GoToMeeting ..................................................................................................................... 23
GoToMyPC ........................................................................................................................ 23
GoToAssist ........................................................................................................................ 23
Mobile Device Management (MDM) ................................................................................................... 23
Using HP Classroom Manager (Student version) .............................................................................. 24
Browsing the Internet ......................................................................................................................... 24
Playing media ..................................................................................................................................... 24
Using the camera ............................................................................................................................... 25
Printing ............................................................................................................................................... 25
Printing in Browser ............................................................................................................. 26
Adjusting the Android settings ............................................................................................................ 26
Date/time settings .............................................................................................................. 26
Security settings ................................................................................................................ 26
Screen lock ....................................................................................................... 26
Encryption ......................................................................................................... 27
Sound settings ................................................................................................................... 27
Language ........................................................................................................................... 27
Updating the software ........................................................................................................ 27
Setting your language for the external keyboard ................................................................................ 28
Enabling input method editor (IME) .................................................................................................... 28
Changing the Home screen wallpaper ............................................................................................... 29
Organizing apps on the Home screen ................................................................................................ 29
Backup & reset ................................................................................................................................... 29
Backup & restore ............................................................................................................... 30
Factory data reset .............................................................................................................. 30
4 Using the On-Screen Display (OSD) menu in HDMI mode ........................................................................ 31
Power button lockout .......................................................................................................................... 32
OSD lockout ....................................................................................................................................... 32
5 Safety and maintenance guidelines ............................................................................................................ 33
Important safety information ............................................................................................................... 33
Maintenance guidelines ...................................................................................................................... 33
Cleaning the all-in-one ....................................................................................................... 34
Shipping the all-in-one ....................................................................................................... 34
6 Frequently asked questions ........................................................................................................................ 35
7 Product support ............................................................................................................................................ 36
vi8 Technical specifications .............................................................................................................................. 37
HP Slate 21 Pro All-in-One ................................................................................................................. 37
Energy saver feature .......................................................................................................................... 38
Appendix A Agency regulatory notices ......................................................................................................... 39
Federal Communications Commission notice .................................................................................... 39
Modifications ...................................................................................................................... 39
Cables ................................................................................................................................ 39
Declaration of Conformity for products marked with the FCC Logo (United States only) .................. 39
Products with wireless LAN devices ................................................................................................... 40
Brazil notice ........................................................................................................................................ 40
Canadian notices ................................................................................................................................ 40
European Union regulatory notices .................................................................................................... 41
Products with wireless functionality (EMF) ........................................................................ 41
Restrictions for product with wireless functionality ............................................................ 41
German ergonomics notice ................................................................................................................ 42
Australia and New Zealand notice ...................................................................................................... 42
Japanese notices ............................................................................................................................... 42
Wireless LAN, Wireless WAN, and Bluetooth certification markings ................................. 42
South Korean notices ......................................................................................................................... 43
Mexico notice ..................................................................................................................................... 43
Taiwan NCC notices ........................................................................................................................... 43
Wireless LAN 802.11a devices .......................................................................................... 43
Wireless LAN 802.11 devices/Bluetooth devices/Short range devices ............................. 44
Power cord set requirements ............................................................................................................. 44
Japanese power cord requirements .................................................................................. 44
Product environmental notices ........................................................................................................... 45
ENERGY STAR® qualification .......................................................................................... 45
Materials disposal .............................................................................................................. 45
Disposal of waste equipment by users in private household in the European Union ........ 46
HP recycling program ........................................................................................................ 46
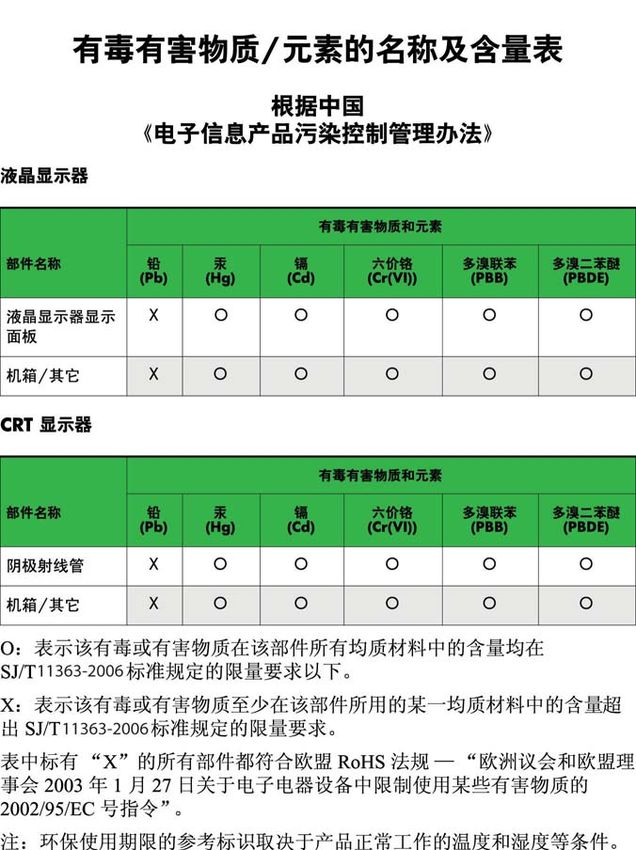
Chemical substances ......................................................................................................... 46
Restriction of Hazardous Substances (RoHS) ................................................................... 46
Turkey EEE regulation ....................................................................................................... 47
Ukraine restriction of hazardous substances ..................................................................... 47
viiviii
1   Product features

    HP Slate 21 Pro All-in-One is the commercial AndroidTM touch AiO with access to GoogleTM Play app
    store and preinstalled business apps. HP Slate 21 Pro offers quick and easy access to internet,
    Android apps and cloud with a simple, intuitive, user-friendly touch interface. It is ideal for businesses
    that require a lower cost device for accessing the Internet and apps without the need for a PC and for
    Citrix users, Kiosk usage, Small and Medium Business usage, and cloud productivity.
    The all-in-one has an active matrix, thin-film transistor (TFT) panel. Features include:
    ●    Android 4.3 operating system with multi-user support and access to Google Play app store
    ●    54.6 cm (21.5-inch) diagonal viewable area LED display with 1920 x 1080 resolution
    ●    IPS panel, 178/178 viewing angle, 1000:1 contrast ratio
    ●    Tilt capability from 15 to 70 degrees
    ●    2 point optical touchscreen that uses 3 cameras
    ●    NvidiaTegra 4 Quad Core (T40S) processor
    ●    16 GB flash memory storage
    ●    3 USB 2.0 ports
    ●    Secure Digital (SD) card reader
    ●    Embedded HP Webcam (720p HD) and microphone
    ●    Ethernet jack
    ●    HDMI In port for connecting devices such as a PC, camera, or DVD player
    ●    Switchable between Slate and HDMI modes
    ●    Combined audio out and microphone port for connecting headphones or a headset
    ●    Plug and play capability that lets the all-in-one automatically recognize hardware devices (USB
         printers not supported)
    ●    Wireless 802.11 a/b/g/n + Bluetooth 4.0
    ●    Built-in stereo speakers
    ●    Wired USB keyboard and mouse included with select models
    ●    Video Electronics Standards Association (VESA) standard mounting holes for flexible mounting
         solutions, including wall-mounting

                                                                                                                 1
Front components
Component Function
(1) Webcam Records video and captures still photographs
(2) Webcam light On: The webcam is in use
(3) Internal microphone Records sound
(4) WLAN/BT antennas (2)* Send and receive wireless signals to communicate with WLANs
(5) Speakers Produce sound
(6) Settings / Menu button Opens the Settings in Slate mode
Opens the OSD in HDMI mode
(7) Volume down / Minus button Decreases volume in Slate and HDMI modes
If the OSD menu is active in HDMI mode, press to navigate
backward through the OSD menu and decrease adjustment levels
(8) Volume up / Plus button Increases volume in Slate and HDMI modes
If the OSD menu is active in HDMI mode, press to navigate forward
through the OSD menu and increase adjustment levels
(9) Source / OK button Switches between Slate and HDMI modes
If the OSD menu is active in HDMI mode, press to select the
highlighted menu item
(10) Power button Turns the all-in-one on and off
NOTE: The webcam and internal microphone are functional only in Slate mode. They are not
functional in HDMI mode.
NOTE: To set up a WLAN and connect to the Internet, you need a broadband modem (either DSL
or cable) (purchased separately), high-speed Internet service purchased from an Internet service
provider, and a wireless router (purchased separately).
2 Chapter 1 Product features*The antennas are not visible from the outside of the all-in-one. For optimal transmission, keep the
areas immediately around the antenna free from obstructions.
Rear and side components
Component Function
(1) SD card reader Reads data from and writes data to Secure Digital (SD)
memory cards
(2) USB 2.0 connector Connects external USB devices to the all-in-one
(3) Audio-out (headphone) jack Produces sound when connected to optional powered
stereo speakers, headphones, earbuds, or a headset
(4) Power connector Connects the power cord to the all-in-one
(5) Ethernet connector Connects an Ethernet cable to the all-in-one
(6) USB 2.0 connectors Connect external USB devices to the all-in-one
(7) USB upstream connector Connects a USB cable between a PC and the all-in-one
(required for touch functionality in HDMI mode when
connected to a PC)
(8) HDMI connector Connects an HDMI device, such as a PC, camera, or DVD
player
NOTE: The side ports (SD card reader, USB 2.0 connector, and audio-out jack) are functional only
in Slate mode. They are not functional in HDMI mode.
Slate and HDMI modes
The all-in-one can operate in either Slate mode or HDMI mode.
Rear and side components 3Slate mode
In Slate mode, the all-in-one is a commercial Android device with access to over 700,000 apps, cloud
computing, and Internet access.
Slate mode requires only a power connection. For Internet or network access, you must also have a
wired (Ethernet) or wireless (Wi-Fi) connection (Refer to Connecting to networks on page 17 for
more information).
HDMI mode
In HDMI mode, the all-in-one is a standard monitor when connected to an HDMI device such as a PC,
camera, or DVD player.
HDMI mode requires a power connection and an HDMI device connection. If the all-in-one is
connected to a PC, you must also have a USB upstream cable (included) connected between the
USB upstream port on the all-in-one and a USB downstream port on the PC for touch functionality.
Switching between Slate and HDMI modes
To switch between modes, press the Source button on the front panel. After pressing the Source
button, a Mode Switch Request screen will pop up. To continue the mode switch, press the Source
button again before the Mode Switch Request screen times out. If you want to cancel the mode
switch, press the Volume down button. If you do not press one of the two buttons, the mode switch is
automatically cancelled when the Mode Switch Request screen times out.
CAUTION: The Mode Switch Request screen is warning you that you must complete any file save
or data transfer currently in progress before switching modes. If you have a storage device such as a
flash drive or external hard drive connected to one of the rear USB ports on the all-in-one, you must
complete any data transfer and save and close any open data files on the storage device before
switching modes. Otherwise, the switch will result in data loss and/or corrupted data files.
NOTE: If the HDMI source is disconnected, the all-in-one will automatically go to sleep. If you want
the all-in-one to automatically switch to Slate mode instead of going to sleep, you can change the
settings in the OSD. While in HDMI mode, press the Menu button to open the OSD, and then go to
Management > Auto-Switch Input and select On.
4 Chapter 1 Product features2 Setting up the hardware
You can install the all-in-one on a desktop or mount it to a mounting fixture such as a wall mount or
swing arm. Be sure to place the all-in-one in a convenient, well-ventilated location. Connect the
cables after you have installed the all-in-one to a mounting fixture.
To set up the all-in-one, ensure that the power is turned off to the all-in-one and all attached
accessories, and then follow the instructions below for your configuration.
Preparing for desk use
To assemble the all-in-one for desktop use:
1. Set the all-in-one face down on a table or desk covered by a clean, dry cloth.
2. Pull the stand outward.
3. Lift the all-in-one to an upright position and place on a flat, stable surface.
Preparing for wall mounting
NOTE: This all-in-one is intended to be supported by UL or CSA Listed wall mount bracket.
To attach the all-in-one to a mounting fixture:
1. Set the all-in-one face down on a flat, soft, protected table or desk surface.
Preparing for desk use 52. Lift and rotate the stand until it is positioned straight up so you can access the screw that
secures the stand to the all-in-one.
3. Remove the two screws that secure the stand to the all-in-one (1), and then lift up the bottom of
the stand slightly and remove it from the all-in one (2).
6 Chapter 2 Setting up the hardware4. Align the screw holes on the mounting fixture with the VESA holes on the back of the all-in-one,
and then insert four 10 mm screws (not provided) through the holes on the mounting fixture and
into the mounting holes on the all-in-one.
CAUTION: This all-in-one supports the VESA industry standard 100 mm mounting holes. To
attach a third-party mounting solution to the all-in-one, four 4 mm, 0.7 pitch, and 10 mm long
screws are required. Longer screws must not be used because they may damage the all-in-one.
It is important to verify that the manufacturer’s mounting solution is compliant with the VESA
standard and is rated to support the weight of the all-in-one. For best performance, it is important
to use the power and video cables provided with the all-in-one.
Preparing for wall mounting 7Connecting the cables
The cable connections required depend on whether you are using a keyboard and mouse or wired
(Ethernet) or wireless connection.
1. Place the all-in-one in a convenient, well-ventilated location.
2. Remove the rear I/O cover from the all-in-one.
3. If you want to use a wired network connection, connect an Ethernet cable to the Ethernet port on
the rear panel of the all-in-one (1), and then to an active Ethernet jack (2).
For more information, see Connecting to wired networks on page 17.
8 Chapter 2 Setting up the hardware4. If you want to use a keyboard and/or mouse, connect the keyboard and mouse to the USB ports
on the rear panel of the all-in-one after powering it on.
NOTE: You must power on the all-in-one before connecting the keyboard and mouse.
To use the keyboard and mouse in HDMI mode, they must be plugged into the USB ports on the
rear panel.
5. If you want to attach an HDMI device, connect an HDMI cable to the HDMI port on the rear panel
of the all-in-one (1), and then to an HDMI device (2).
NOTE: To use the HDMI device, you must switch to HDMI mode.
Connecting the cables 96. If you want to use the keyboard and mouse in HDMI mode or provide touch functionality to the
screen while connected to a PC in HDMI mode, connect a USB cable to the USB upstream port
on the rear panel of the all-in-one (1), and then to a USB downstream port on the PC (2).
7. Connect one end of the power cord to the AC power connector on the back of the all-in-one (1),
route the cord through the retainer clip (2), and then connect the other end to an electrical wall
outlet (3).
WARNING! To reduce the risk of electric shock or damage to the equipment:
- Plug the power cord into an AC outlet that is easily accessible at all times.
- Disconnect power from the computer by unplugging the power cord from the AC outlet.
- If provided with a 3-pin attachment plug on the power cord, plug the cord into a grounded
(earthed) 3-pin outlet. Do not disable the power cord grounding pin, for example, by attaching a
2-pin adapter. The grounding pin is an important safety feature.
For your safety, do not place anything on power cords or cables. Arrange them so that no one
may accidentally step on or trip over them. Do not pull on a cord or cable. When unplugging from
the electrical outlet, grasp the cord by the plug.
10 Chapter 2 Setting up the hardware8. Replace the cable cover on the rear of the all-in-one by sliding the tabs on the top of the cover
into the slots on the top of the cable connection recess (1) then rotate the cover down and snap
into the recess (2) so that it is securely fastened to the rear of the all-in-one.
Adjusting the tilt
For optimal viewing, adjust the screen tilt to your own preference.
1. Face the rear of the all-in-one and hold it so that you do not topple it while changing the tilt.
2. Without touching the screen, adjust the tilt by rotating the stand up and down.
Adjusting the tilt 11Attaching a cable lock
You can secure the all-in-one to a fixed object with an optional cable lock available from HP.
12 Chapter 2 Setting up the hardwareTurning on the all-in-one for the first time
NOTE: For a seamless experience, the Startup Wizard requires an internet connection. Before
powering on the all-in-one, please be prepared to establish a wired (Ethernet) or wireless (Wi-Fi)
internet connection.
After connecting the cables, press the power button on the front of the all-in-one to turn it on.
CAUTION: Burn-in image damage may occur on displays that show the same static image on
screen for a prolonged period of time.* To avoid burn-in image damage on the screen, always turn off
the all-in-one when it is not in use for a prolonged period of time. Image retention is a condition that
may occur on all LCD screens. Display with a “burned-in image” are not covered under the HP
warranty.
* A prolonged period of time is 12 consecutive hours of non-use.
When you turn on the all-in-one for the first time, the Startup Wizard will begin. Follow the instructions
in the Startup Wizard to:
● Select the appropriate language.
● Enter the network settings.
● Configure the all-in-one to be backed up automatically. HP strongly recommends that you back
up the all-in-one. In the case of hardware replacement, backups will allow you to restore your
system as seamlessly as possible.
● Set the date and time.
● Register your all-in-one with HP.
NOTE: You can modify the settings that were entered in the Startup Wizard any time by accessing
Settings from the All Apps screen, accessed using the center icon on the launch bar. For more
information on the settings in the Startup Wizard, refer to Adjusting the Android settings on page 26.
If you want to configure security settings, such as passwords, go to Settings from the All Apps screen.
After completing the Startup Wizard, the Home screen displays.
Turning on the all-in-one for the first time 13Connecting USB devices
There are two USB connectors on the rear of the all-in-one and one USB connector on the side of the
all-in-one for connecting USB devices.
NOTE: The side USB port is functional only in Slate mode. It is not functional in HDMI mode. The
rear USB ports are functional in both modes.
14 Chapter 2 Setting up the hardwareUsing the touchscreen
A touch screen device allows you to control items on the screen directly with your fingers.
TIP: On touch screen devices, you can also perform on-screen actions with a keyboard and mouse.
NOTE: If the all-in-one is connected to a PC, you must also have a USB upstream cable (included)
connected between the USB upstream port on the all-in-one and a USB downstream port on the PC
for touch functionality.
One-finger slide
The one-finger slide is mostly used to pan or scroll through lists and pages, but you can use it for
other interactions, too, such as moving an object.
● To scroll across the screen, lightly slide one finger across the screen in the direction you want to
move.
● To drag, press and hold an object, and then drag the object to move it.
Tapping
To make an on-screen selection, use the tap function. Use one finger to tap an object on the screen
to make a selection and/or to open it.
Using the touchscreen 15Pinching/stretching
Pinching and stretching allows you to zoom out or in on images or text.
● Zoom in by placing two fingers together on the display and then move your fingers apart.
● Zoom out by placing two fingers apart on the display and then move your fingers together.
Rotating
Rotating allows you to turn items such as photos.
Anchor the forefinger of your left hand on the object you want to rotate. Using your right hand, slide
your forefinger around in a sweeping motion from 12 o’clock to 3 o’clock. To reverse the rotation,
move your forefinger from 3 o’clock to 12 o’clock.
NOTE: Rotate is intended for specific apps where you can manipulate an object or image. Rotate
may not be functional for all apps.
Swipes
With swipes you can flip between screens or images.
Gently swipe your finger inward from the edge of the display onto the screen to reveal the next or
previous screen or image.
16 Chapter 2 Setting up the hardwareConnecting to networks
You can connect to networks with either a wired (Ethernet) or wireless (Wi-Fi) connection. You cannot
enable Ethernet and Wi-Fi connections at the same time.
Connecting to wireless networks
The wireless network capability of the all-in-one lets you connect the all-in-one to wireless local area
networks (commonly referred to as Wi-Fi networks, wireless LANs, or WLANs). In a WLAN, the
mobile wireless module in your all-in-one communicates with a wireless router or a wireless access
point.
NOTE: To set up a WLAN and connect to the Internet, you need a broadband modem (either DSL
or cable) (purchased separately), high-speed Internet service purchased from an Internet service
provider, and a wireless router (purchased separately).
To connect to a wireless network:
1. Select the All Apps icon from the Home screen, and then select Settings.
NOTE: The apps on the screen are arranged alphabetically.
2. Select Wi-Fi.
3. Select the ON button to turn the wireless radio on.
4. Select your WLAN from the list.
NOTE: If no WLANs are listed, you may be out of range of a wireless router or access point.
5. If the WLAN is security-enabled, you are prompted to enter a security code. Type the code, and
then:
● If proxy is not required, select Connect.
● If proxy is required, select Show advanced settings. Next to Proxy settings, select None,
and then select Manual. Manually enter the proxy settings and select Connect.
Connecting to wired networks
Use a LAN connection if you want to connect the all-in-one directly to a router in your home (instead
of working wirelessly), or if you want to connect to an existing network at your office.
Connecting to a LAN requires an 8-pin, RJ-45 network cable.
To connect to a wired network:
1. Plug the network cable into the network jack (1) on the all-in-one.
Connecting to networks 172. Plug the other end of the network cable into a network wall jack (2) or router.
NOTE: If the network cable contains noise suppression circuitry (3), which prevents
interference from TV and radio reception, orient the circuitry end of the cable toward the all-in-
one.
3. Select the All Apps icon from the Home screen, and then select Settings.
NOTE: The apps on the screen are arranged alphabetically.
4. Select Ethernet configuration.
5. Select the ON button.
6. Select Obtain IP Address Automatically (DHCP) or Configure IP Address Manually.
7. Next to Proxy settings, select None, and then select Manual.
8. Manually enter the Proxy settings.
9. Select the Save button.
Using Bluetooth
The all-in-one includes Bluetooth capability, which creates a personal area network (PAN) to connect
to other Bluetooth enabled devices such as computers, phones, printers, headsets, speakers, and
cameras. In a PAN, each device communicates directly with other devices, and devices must be
relatively close together—typically within 10 meters (approximately 33 feet) of each other.
To pair a Bluetooth device:
1. To connect to a Bluetooth device, turn on the Bluetooth device.
2. Select the All Apps icon from the Home screen, and then select Settings.
NOTE: The apps on the screen are arranged alphabetically.
3. Select Bluetooth.
4. Select the ON button.
5. Select your device name to make it visible to all nearby Bluetooth devices.
18 Chapter 2 Setting up the hardware6. To find available Bluetooth devices, select SEARCH FOR DEVICES.
7. Select the device, and follow the on-screen instructions to pair the device.
Connecting to networks 193 Using the Slate mode user interface
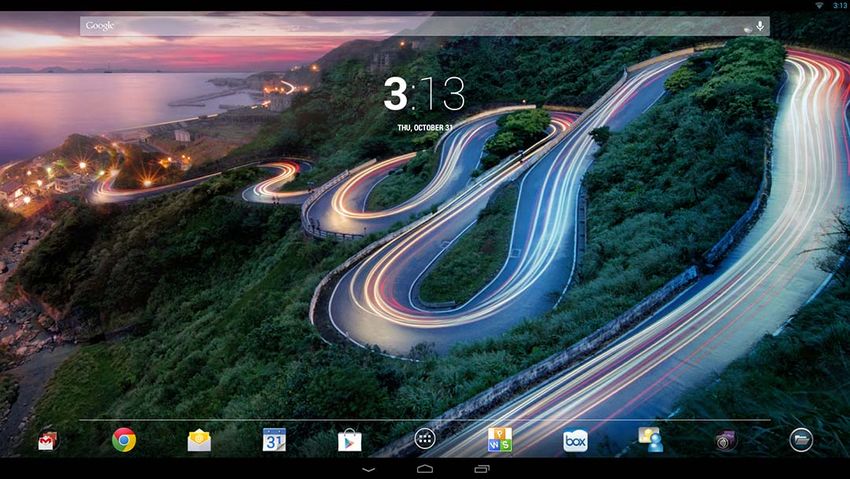
The Home screen is displayed when the all-in-one is powered on. An Android operating system uses
apps to perform most tasks.
NOTE: The user interface icons for your operating system may look different from the icons shown
in the user guide.
Google apps Kingsoft Office
Google Chrome Box
Email HP MyRoom
Google calendar Citrix apps
Google Play Store HP File Manager
All apps
The row of icons near the bottom of the screen provide quick access to popular apps.
Three navigation icons in the black area at the bottom of the screen perform the following functions:
20 Chapter 3 Using the Slate mode user interfaceReturn to the previous screen.
Return to the Home screen.
Display a list of recently opened apps.
Managing files
HP File Manager is a file management application that provides file browsing, copying, cutting,
renaming, printing and other functions on local storage/USB drives/SD Cards. If there are multiple
applications installed that can open a file, HP File Manager allows you choose which app to use.
To access File Manager:
1. Select the File Manager icon from the Home screen.
2. Select the storage device in the left navigation column to access files and folders from that
device.
Cloud storage and file sharing
Using Box.net
Box is an online file sharing and cloud content storage service that allows you to access, view, edit,
and manage files on the cloud from your all-in-one. Your all-in-one comes with Box preinstalled and
50GB of free cloud storage.
To begin using Box:
1. Select the Box icon from the Home screen.
2. Follow the on-screen instructions to register with Box.
For more information on using Box, refer to https://www.box.com/
Managing files 21Using Google Drive
With preinstalled Google Drive, you can store all your files in one place, so you can access them from
anywhere and share them with others.
To begin using Google Drive:
1. Select the All Apps icon from the Home screen, and then select the Drive icon.
NOTE: The apps on the screen are arranged alphabetically.
2. Follow the on-screen instructions.
For more information on using Google Drive, refer to https://drive.google.com.
Video conferencing
HP MyRoom is a preinstalled online meeting room. Connect with business colleagues “face to face”
and collaborate with useful tools.
To get started with HP MyRoom:
1. Select the HP MyRoom icon from the Home screen.
2. Follow the on-screen instruction to create an account (all users must have an account.
3. Once you've logged into MyRoom, add contacts by clicking on the Add Contact button, then
enter your contact's email address. After that person has accepted you as a contact, you'll be
ready to connect in MyRoom.
4. Select the question mark button and then select Documentation for detailed instructions.
NOTE: You can also video conference using SkypeTM or Google Hangouts.
Using Kingsoft Office
Kingsoft Office allows you to create, view, edit, and save all documents used by Microsoft Word,
Excel and PowerPoint. Sharing is made easy with the Email application that allows you to send
documents as attachments, and to download and edit attachments. Furthermore, you can access
Google Drive, Dropbox, Box.net and other services with WebDAV protocol.
To access Kingsoft Office:
1. Select the Kingsoft Office icon from the Home screen.
2. Use the menu icons at the top of the screen to open, create, and share files.
22 Chapter 3 Using the Slate mode user interfaceUsing Citrix apps
You can use the preinstalled Citrix apps to tun your all-in-one into a virtual desktop. Access Citrix
apps by selecting the Citrix icon on the Home screen.
Citrix Receiver
Citrix Receiver lets you access your enterprise files, applications, and desktops to help you be as
productive on the go as you are in the office.
Experience simple and consistent file and app access from all of your devices and securely share
files with anyone.
If your company doesn’t use Citrix yet, you can see what it's like by using the demo at
http://citrixcloud.net.
For more information about Citrix Receiver, go to http://citrix.com/receiver.
The following apps (GoToMeeting, GoToMyPC, and GoToAssist) are not preinstalled and must be
downloaded from Citrix.
GoToMeeting
Increase your mobility by starting and attending GoToMeeting sessions on your Android device.
GoToMeeting is the easiest and most convenient online meeting solution. Anywhere you take your
Android device, you can now attend and start GoToMeeting sessions.
GoToMyPC
GoToMyPC gives you the freedom to go anywhere you choose and connect right to your Mac or PC.
Enjoy easy remote access to your files, programs, and email and increase your productivity wherever
you go.
GoToAssist
GoToAssist allows you to provide remote technical support directly from your Android device so that
you can instantly connect to computers and solve clients’ technical issues. Once logged in, tap on the
device screen to create a support session when instructed to and have your user go to
https://www.fastsupport.com and enter the remote support ID for your support session or send them
an invitation to connect via email. Your user accepts the connection and you can begin to provide
remote support.
Mobile Device Management (MDM)
The all-in-one is Citrix Ready and supports Citrix XenMobile for manageability. XenMobile MDM
provides role-based management, configuration and security of corporate and user-owned devices,
all running on a secure, enterprise MDM architecture. Among other things, IT can enroll and manage
any device, blacklist or whitelist apps, detect jailbroken devices and do a full or selective wipe of a
device that is out of compliance.
The all-in-one can also be managed with other MDM solutions, such as IronMobile, SCCM, and
LANDesk.
To access Citrix XenMobile, select the All Apps icon from the Home screen, and then select the
Citrix XenMobile MDM icon.
For more information on XenMobile, refer to http://www.citrix.com/products/xenmobile/overview.html.
Using Citrix apps 23Using HP Classroom Manager (Student version)
The all-in-one includes HP Classroom Manager (Student version). The full HP Classroom Manager
service, comprising Tutor and Student versions, enables teachers to control student applications, web
access, and external devices; monitor student progress and activities; conserve power, exchange
files, and reduce printing costs, and more! Service sold separately.
To access HP Classroom Manager:
1. Select the All Apps icon from the Home screen, and then select the HPCM Student icon.
NOTE: The apps on the screen are arranged alphabetically.
2. Follow the on-screen instructions to sign in to your classroom.
For more information on HP Classroom Manager, refer to http://h20331.www2.hp.com/hpsub/cache/
classmanager.html.
Browsing the Internet
The all-in-one uses the Google Chrome or Browser App to browse the Internet. You must have
Internet access to browse the Internet.
NOTE: Google Chrome does not support plug-ins.
To browse the Internet:
1. Ensure that you have a live Internet connection from either a wireless network or an Ethernet
cable (not provided) plugged into the all-in-one.
2. Select the Google Chrome icon from the Home screen or select the All Apps icon from the
Home screen, and then select the Browser icon .
3. Use the browser to browse the Internet.
To clear browsing history in Google Chrome:
1. Open Google Chrome.
2. In the address bar, type chrome:history.
3. Select Clear all browsing data.
Playing media
Use the Play icon to open the app that lets you play music, videos, and view photos that you have
stored on a USB flash media device or media card. You can also access the camera using the Play
icon.
NOTE: The audio file name and the folder(s) name can be any length but cannot include special
characters or spaces in order for the file manager to recognize the audio file.
24 Chapter 3 Using the Slate mode user interfaceTo play or view your media files:
1. Insert the media device that contains your media into the SD card reader or a USB port on the
all-in-one.
2. Select the All Apps icon from the Home screen, and then select the HP Media Player icon.
NOTE: The apps on the screen are arranged alphabetically.
3. Select the icon for the media type you want to play or view.
4. Navigate to the desired media file.
5. Select the file to play it.
6. Use the controls at the bottom of the screen to stop, start, pause, change, or edit the file, as
appropriate.
NOTE: Music will continue to play unless you stop it from the music app.
Using the camera
You can use the camera to take a photo or record a video. You can preview and save the photo or
video recording.
To use the camera:
1. Select the All Apps icon from the Home screen, and then select Camera.
NOTE: The apps on the screen are arranged alphabetically.
2. Use the controls on the right side of the screen to take photos or videos.
Printing
HP ePrint provides convenience printing, and documents printed with ePrint may appear different
from the original. Style, formatting and text flow may differ slightly from the original document. For
documents requiring a higher quality (such as legal documents), HP recommends that you print from
the software application on your all-in-one where you will have more control over how your printouts
appear.
HP ePrint lets you print from virtually anywhere to an HP printer that supports ePrint. Once enabled,
ePrint assigns an email address to your printer. To print, simply send an email containing your
document to your printer’s address. For more information, visit http://www.hp.com/go/ePrintCenter for
compatibility and details.
To configure HP ePrint:
1. Select the All Apps icon on the Home screen, and then select Settings.
NOTE: The apps on the screen are arranged alphabetically.
2. Select Add account.
3. Select HP ePrint.
4. Follow the on-screen instructions.
Using the camera 25Printing in Browser
To print in Browser, select the Menu icon in the upper-right corner of the screen, and then select
Print.
Adjusting the Android settings
To configure the settings, select the All Apps icon on the Home screen, and then select Settings.
NOTE: The apps on the screen are arranged alphabetically.
Date/time settings
The date/time settings allow you to set the date and time for the all-in-one.
To set the date and time:
1. Select the All Apps icon from the Home screen, and then select Settings.
2. Select Date & time.
NOTE: You may have to scroll down the settings list to display Date & time.
3. To manually set date and time, clear the Automatic date & time box and the Automatic time
zone box.
4. Select Set date to manually set the date.
5. Select Set time to manually set the time.
Security settings
Several security settings are available for your all-in-one.
To set up security settings:
1. Select the All Apps icon from the Home screen, and then select Settings.
2. Select Security.
3. Choose the setting to configure and follow the on screen instructions.
Screen lock
You can configure the screen on the all-in-one to lock after a period of inactivity. You can choose a
specific action the user must perform to unlock the screen.
To configure the screen lock feature:
1. Select the All Apps icon from the Home screen, and then select Settings.
2. Select Security.
3. Select Screen lock.
4. Select the action required to unlock to the screen.
26 Chapter 3 Using the Slate mode user interfaceEncryption
You can encrypt your accounts, settings, downloaded apps and their data, media, and other files.
Once you encrypt your all-in-one, you need to type a numeric PIN or password to decrypt it each time
you power it on.
NOTE: The encryption process can take a long time to complete.
CAUTION: Once you set up encryption, the only way to remove it is to perform a factory data reset.
To set up encryption and a power-on password:
1. Select the All Apps icon from the Home screen, and then select Settings.
2. Select Security.
3. Select Encrypt tablet.
4. Follow the on-screen instructions.
Sound settings
The all-in-one offers DTS Sound+ that you can configure from the Settings screen.
To configure DTS Sound+ settings:
1. Select the All Apps icon from the Home screen, and then select Settings.
2. Select DTS Sound+.
3. Select the ON button to turn on DTS+ Sound.
4. Select the sound type.
Language
To change the language:
1. Select the All Apps icon from the Home screen, and then select Settings.
2. Select Language & input.
3. Select Language.
4. Select your language.
Updating the software
The all-in-one periodically checks for software updates automatically. However, you can manually
check for updates as well.
To check for system updates:
1. Select the All Apps icon from the Home screen, and then select Settings.
2. Select About tablet.
NOTE: You may have to scroll down the settings list to display About tablet.
3. Select System updates.
4. To check for updates, select the Check Now button and follow the on screen instructions.
Adjusting the Android settings 27Setting your language for the external keyboard
When setting up your all-in-one, do not connect the USB keyboard until you have reached the Slate
mode Home screen.
To set up the keyboard language:
1. Connect the keyboard to one of the USB ports on the rear panel.
2. Select the All Apps icon from the Home screen, and then select Settings.
NOTE: The apps on the screen are arranged alphabetically.
3. Select Language and Input.
4. Under Physical Keyboard, select Lite-On Technology Corp HP Android Wired Keyboard.
5. On the resulting screen, select Set up keyboard layouts.
6. Select your language.
7. Select the Home icon to return to the Home screen.
Enabling input method editor (IME)
Additional virtual and external keyboard and input methods are available for Hebrew, Arabic, Thai,
Korean, Pinyin, Chinese (ZhuYin), Chinese (ChanJie), and Japanese. To select a language:
1. Select the All Apps icon from the Home screen, and then select Settings.
NOTE: The apps on the screen are arranged alphabetically.
2. Select Language & input.
3. Under Keyboard & input methods, select More keyboards.
4. Select Default, and then select More keyboards.
5. Select the More keyboards icon.
6. On the More keyboard settings menu, under IME and keyboard settings, select Primary
IME, and then select your language.
7. Go back to the More keyboard settings menu. Under IME and keyboard settings select
Enable IME, select your secondary language(s), and then select the OK button.
Helpful hints
To switch languages on the virtual keyboard:
● Press the selected language key or EN/US (English/US) key to toggle between the selected
language and English.
● If you press and hold the language key, available languages display in a pop-up window.
Use the following key combinations to perform actions:
Key combination Behavior
Caps lock Switch from upper or lower case
28 Chapter 3 Using the Slate mode user interfaceAlt + Shift Switch among enabled IME
Ctrl + Space Switch between primary and secondary IME
To hide the virtual keyboard, click the keyboard icon
To select handwriting in virtual mode for Traditional Chinese, Simplified Chinese, Korean, and
Japanese, select the handwriting icon
Changing the Home screen wallpaper
You can choose a wallpaper from preinstalled static or animated images, or from the Gallery.
To change the wallpaper displayed on your Home screen:
1. Select the All Apps icon from the Home screen, and then select Settings.
NOTE: The apps on the screen are arranged alphabetically.
2. Select Display, and then select Wallpaper.
3. Choose your wallpaper from either Gallery, Live Wallpapers, or Wallpaper.
4. After choosing a wallpaper, select Set wallpaper.
Organizing apps on the Home screen
To add an app to the Home screen:
1. Select the All Apps icon from the Home screen.
NOTE: The apps on the screen are arranged alphabetically.
2. Touch and hold the app until the Home screen appears, slide it into place, and lift your finger.
To move an app icon to a different location on a Home screen:
1. Touch and hold the icon.
2. Slide your finger to the new position.
3. Lift your finger. The icon drops into its new position.
To remove an app from the Home screen:
1. Touch and hold the icon.
2. While holding the icon, drag it to the Remove icon at the top of the screen.
NOTE: The Remove option is only available at the top of the screen if you are touching and
holding an icon.
Backup & reset
You can configure the all-in-one to back up app data and restore backed up settings and data when
reinstalling an app.
You can erase all personal data on the all-in-one.
Changing the Home screen wallpaper 29Backup & restore
To configure backup and restore settings:
1. Select the All Apps icon from the Home screen, and then select Settings.
NOTE: The apps on the screen are arranged alphabetically.
2. Select Backup & reset.
3. Select the boxes next to the settings you want to enable.
Factory data reset
You can reset the all-in-one to its original factory data settings. This action erases all data from the
internal storage of the all-in-one.
To reset to factory data:
1. Select the All Apps icon from the Home screen, and then select Settings.
NOTE: The apps on the screen are arranged alphabetically.
2. Select Backup & reset.
3. Under Personal Data, select Factory data reset.
4. Select Reset tablet.
30 Chapter 3 Using the Slate mode user interface4 Using the On-Screen Display (OSD)
menu in HDMI mode
Use the On-Screen Display (OSD) to adjust the screen image based on your viewing preferences. To
access the OSD, do the following:
1. If the monitor is not already on, press the Power button to turn on the monitor.
2. If you are not in HDMI mode, switch to HDMI mode (see Switching between Slate and HDMI
modes on page 4 for more information).
3. To access the OSD Menu, press the Menu button on the monitor’s front panel.
4. To navigate through the OSD Menu, press the + (Plus) button on the monitor’s front panel to
scroll up, or the – (Minus) button to scroll in reverse.
5. To select an item from the OSD Menu, use the + or – buttons to scroll to and highlight your
selection, then press the OK button to select that function (the OK button may be different on
your model).
6. Adjust the item using the + or – buttons on the front panel to adjust the scale.
7. After adjusting the function, select Save and Return, or Cancel if you don’t want to save the
setting, then select Exit from the Main Menu.
NOTE: If the buttons remain untouched for 10 seconds while displaying a menu, the OSD
automatically saves all changes and exits.
The following table lists the OSD Main menu items with a brief descriptions of each item.
Icon Main Menu Description
Brightness Adjusts the brightness level of the screen. The factory default range is 90.
Contrast Adjusts the contrast level of the screen. The factory default range is 80.
Color Selects and adjusts the screen color.
Image Control Adjusts the screen image.
OSD Control Adjusts the on-screen display (OSD) controls.
Management Selects the power management, audio, and timer features of the monitor.
Volume Adjusts the volume.
Information Selects and displays important information about the monitor.
31Icon Main Menu Description
Factory Reset Returns all OSD menu settings and DDC/CI controls to the factory default settings, except
the Language.
Exit Exits the OSD menu screen.
Power button lockout
The “Power Button Lockout” feature allows you to lock the power button so that it cannot be used. To
lock the power button, press the Power button and Volume down button and Volume up button at the
same time and hold them down for 10 seconds while the monitor is powered On. Upon locking the
power button, an OSD message “Power Button Lockout” is displayed for 10 seconds. When the
power button is locked and pressed, the OSD message “Power Button Lockout” is displayed for 10
seconds.
When the power button is locked, holding down the Power button and Volume down button and
Volume up button at the same time for 10 seconds will unlock the power button functionality and turn
off the monitor. When the power button is pressed, the monitor will remain On until the button is
released. If the power button is locked and the monitor is Off, the power button will remain functional
so the monitor can be powered On.
NOTE: “Power Button Lockout” applies to both HDMI and Slate modes.
OSD lockout
The “OSD Lockout” feature allows you to lock the OSD so that the it cannot be accessed. To lock the
OSD, press the Menu button and hold it down for 10 seconds. Upon locking the OSD, an OSD
message of “OSD Lockout” is displayed for 10 seconds. When the OSD is locked and any OSD
button is pressed, the OSD message “OSD Lockout” is displayed for an additional 10 seconds. When
the OSD is locked, holding the Menu button for 10 seconds will unlock the OSD and display the Main
Menu.
NOTE: “OSD Lockout” applies to both HDMI and Slate modes.
32 Chapter 4 Using the On-Screen Display (OSD) menu in HDMI mode5 Safety and maintenance guidelines
Important safety information
A power cord is included with the all-in-one. If another cord is used, use only a power source and
connection appropriate for this all-in-one. For information on the correct power cord set to use with
the all-in-one, refer to the Power cord set requirements on page 44.
WARNING! To reduce the risk of electric shock or damage to the equipment:
• Do not disable the power cord grounding feature. The grounding plug is an important safety feature.
• Plug the power cord in a grounded (earthed) outlet that is easily accessible at all times.
• Disconnect power from the product by unplugging the power cord from the electrical outlet.
For your safety, do not place anything on power cords or cables. Arrange them so that no one may
accidentally step on or trip over them. Do not pull on a cord or cable. When unplugging from the
electrical outlet, grasp the cord by the plug.
To reduce the risk of serious injury, read the Safety and Comfort Guide. It describes proper
workstation, setup, posture, and health and work habits for computer users, and provides important
electrical and mechanical safety information. This guide is located on the Web at http://www.hp.com/
ergo and/or on the documentation CD, if one is included with the all-in-one.
CAUTION: For the protection of the all-in-one, connect all power cords for the all-in-one and its
peripheral devices to some form of surge protection device such as a power strip or Uninterruptible
Power Supply (UPS). Not all power strips provide surge protection; the power strips must be
specifically labeled as having this ability. Use a power strip whose manufacturer offers a Damage
Replacement Policy so you can replace the equipment, if surge protection fails.
Use the appropriate and correctly sized furniture designed to properly support your HP all-in-one.
WARNING! All-in-ones that are inappropriately situated on dressers, bookcases, shelves, desks,
speakers, chests, or carts may fall over and cause personal injury.
Care should be taken to route all cords and cables connected to the all-in-one so that they can not be
pulled, grabbed, or tripped over.
Maintenance guidelines
To enhance the performance and extend the life of the all-in-one:
● Do not open the all-in-one cabinet or attempt to service this product yourself. Adjust only those
controls that are covered in the operating instructions. If the all-in-one is not operating properly
or has been dropped or damaged, contact an authorized HP dealer, reseller, or service provider.
● Use only a power source and connection appropriate for this all-in-one, as indicated on the label/
back plate of the all-in-one.
● Be sure the total ampere rating of the products connected to the outlet does not exceed the
current rating of the electrical outlet, and the total ampere rating of the products connected to the
cord does not exceed the rating of the cord. Look on the power label to determine the ampere
rating (AMPS or A) for each device.
Important safety information 33You can also read