Building a Bat House Wisconsin Department of Natural Resources Bureau of Endangered Resources
←
→
Page content transcription
If your browser does not render page correctly, please read the page content below

Building a Bat House
  Wisconsin Department of Natural Resources
       Bureau of Endangered Resources

           Wisconsin Bat Monitoring Program
           http://wiatri.net/inventory/bats
B UILDING A B AT H OUSE

Why Build a Bat House?

       Many people do not want bats roosting in their homes, but often still want bats around.
What’s a good way to encourage bats to remain in the area before they have been excluded
from homes? Build a bat house!

        Bats are an integral part of the ecosystem and can act as organic pest control.
Encouraging bats to take up habitation on your property can help reduce forest and garden as
well as human-disease carrying pest populations. Bats have voracious appetites, and a single bat
can eat thousands of insects every night.

         Building a bat house is a great way to help these threatened animals. Because of their
slow reproductive rates and longevity, bats of all species are at risk of population decline.
Habitat loss, pesticides and an invasive fungus that is associated with White-Nose Syndrome
are all negatively impacting bat populations. Providing alternative roosting habitat with your bat
house can help lessen the impacts of these threats. While you’re creating habitat, you can also
contribute to monitoring of bat health and status. Little is known about bats in general, and any
information about them can provide knowledge about how to help conserve bats.

        Once you’ve built your bat house, identified suitable habitat to install it, and it is
successfully inhabited, join WDNR’s roost monitoring project. Through this project you can let
bat researchers know about what kinds of bats inhabit your bat house, and how many bats you
get each year. You can also report on the best methods and locations for encouraging bats to
occupy your bat house.

        There are no known methods for attracting bats; you can only encourage them by
creating suitable roosting habitat. Following the instructions in this handbook on building,
placement and upkeep will help you increase your chances of having bats roost in your bat
house and encourage them to return year after year.

                                                2
B UILDING A B AT H OUSE

Building Instructions
This guide gives you information about what supplies and materials to use and where to get
them. It also includes instructions on key specifications for the bat house such as bat house
design, location and mounting. Wisconsin’s bats have preferred habitats, and you may be able
to tailor the specifications of your bat house to encourage one species or another.

Bat House Design
In order for a bat house to successfully encourage bats to reside in your roost, research has
shown that a few key characteristics are necessary while choosing a design for your bat house.

-The most successful bat houses are at least two feet tall, 14 or more inches wide, and are open
at the bottom. The opening prevents buildup of guano and parasites, and lessens the need for
routine cleaning.

-Bats will use both single- and multi-chambered bat houses;
however a multi-chamber house improves the ability of the bats
to regulate their temperature. A single chamber bat house will
often not accumulate large numbers of bats that multiple
chambered houses. When building a multiple chambered house,
make sure there is space on top of the baffles for the bats to
move around the house and regulate their temperature.

-Make sure the interior wood is sufficiently rough for the bats
to hang on. Wood that is too smooth may cause the bats to slip
and fall. Avoid using a plastic or wire mesh: The mesh and
staples can degrade over time and start peeling off the bat
house. This can trap and entangle bats. Wire mesh is too sharp
and may tear the wings.

-Bats need a “landing pad” on the bottom of the bat house. Build your bat house so that
approximately 4 inches of roughened wood extends from the bottom on the back of the bat
house. This allows the bats to land and climb up into their roosting chamber.

-Add a vent to each side and a small slit vent to the front of the house to allow air flow. This
prevents the bat house from overheating.

                                                 3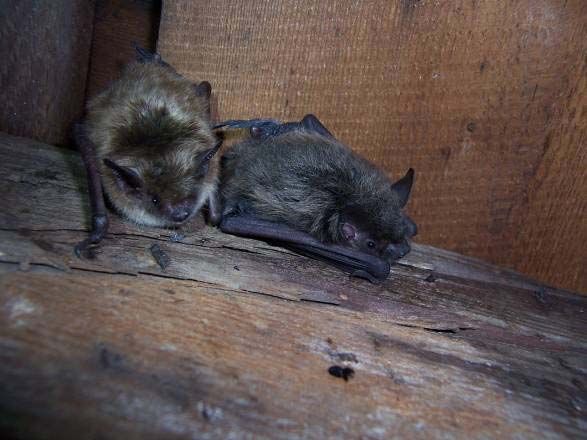
B UILDING A B AT H OUSE

-Bats don’t like drafty homes, so when building your bat house, it
is crucial that you caulk all seams to prevent water as well as cold
and warm air drafts from entering the structure.

-Included in this handbook are several simple designs for bat
houses. For additional information, Bat Conservation International
offers a Bat House Builder’s Handbook with additional designs
and advice.

What Materials to Use and Where to Get Them
Bat houses can be built of very simple materials.

-The best wood to use to build your bat house is naturally weather resistant wood like cedar,
rough-sawed black locust, white oak or old barn wood. These still need to be treated with paint
on the outside, but the wood will last much longer than softer wood such as pine or plywood.

-As a last resort, half-inch exterior grade plywood can be used for the front and back and one-
inch for the sides. Do not use treated lumber as it often contains chemicals that are toxic to bats.

-Avoid using recycled materials as they might have been treated, and can also be toxic to bats.
Avoid Kilz® primer, as bats tend to avoid it.

-Common building materials and tools will be needed such as screws, drill, table saw, utility
knife, clamps and measuring tape.

- Grooves should be added horizontally every 1/4 to 1/2 inch on interior wood surfaces to allow
the bats to hang. Grooves should be ¼ mm to ½ mm deep. Use a utility knife to score the
surface.

-Wood treatment supplies: Because of Wisconsin’s climate, a coat of primer followed by a coat
of dark (dark brown or black), non-toxic, water-based exterior paint or stain should be added to
the outside of the box to prevent deterioration, and help it heat up during the day.

-Use non-toxic, paintable, exterior-grade caulk on all seams to prevent water and drafty air from
getting into the bat house. Latex caulk is easiest to use. Caulking helps the bat house retain heat
and also prevents warping and future leaks.

                                                 4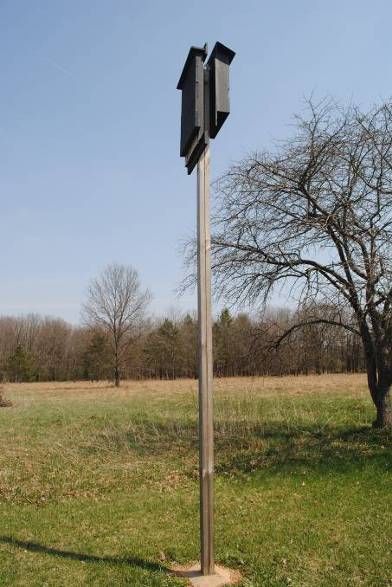
B UILDING A B AT H OUSE

Tailoring Your Bat House to Specific Species
Wisconsin has four species of bats that may roost in your bat house: the little brown bat, the big
brown bat, the Eastern pipistrelle and the Northern long-eared bat. The first two species are far
more likely to be found roosting in bat houses than the latter two.

                         If you were considering putting up multiple bat houses around your
                         property, you may want paint one house a dark color and leave the
                         other a lighter color. Big brown bats tend to like cooler temperatures
                         than Little brown bats so leaving one bat house a lighter color would
                         ensure a cooler roosting environment. Having multiple houses also
                         allows bats to shift roosts depending on temperature changes
                         throughout the summer.
                         In order to encourage nursery colonies to roost in a bat house, the
                         house must be large enough to accommodate many individuals. Make
                         your bat house about 24 inches to make it preferable to large quantities
                         of bats.

Where to Put Your Bat House
Where you place your bat house is the most important factor determining how successful you
are at encouraging bats to use the site.

-Bats like it hot (90 F°-100 F°), so put your bat house where it will receive large amounts of
sunlight. Orientate the house in a south to southeast facing direction to capture as much mid-
day sun as possible. Six hours of direct sunlight a day is ideal. If two bat houses are being
installed back to back, place one facing south and one facing north or one facing east and one
west to allow for varying temperatures.

-Bats are associated with water, especially maternity colonies, so putting your bat house within
a quarter mile of a water source such as creek, pond, river, lake or stream, is a great way to
encourage bats to take up residence.

-The best habitat for many species contains lots of diversity. Place your bat house in an area
with a mixed agriculture/forest/urban landscape.

-Mount your bat house away from trees to discourage predation and allow for flyways. Place it
about 10-15 feet away from trees, but keep it sheltered from winds. Do not place on top of a hill
where it may be subject to excessive winds.
-Reduce tall vegetation (shrubs and bushes) below the base of your bat house.

                                                5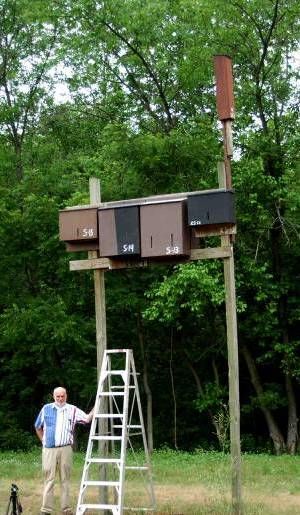
B UILDING A B AT H OUSE

Mounting Your Bat House
                                                             The best place to mount a bat
                                                             house is on a tall pole, or on the
                                                             side of a building.

                                                             -Bat houses on the side of a
                                                             building heat up more quickly than
                                                             those on poles.

                                                             -Mount boxes anywhere from 8 to
                                                             20 feet above the ground.

                                                             -Avoid mounting the box on a tree
                                                             because tree locations are too
                                                             shaded, and allow predators to
                                                             easily prey on the bats in the box.

-Avoid shiny objects underneath the roost (on the ground). If you want to collect guano for your
garden, use a non-reflective tray.

-Two houses can also be mounted back to back on a pole, and the space
in between can be used as a roost.
Yearly Maintenance
A bat house that is built correctly requires minimal maintenance, but
should be checked yearly for any problems or unwanted guests.

-Any maintenance should be done in the months when bats are not
present (November to early March).

-Check for any cracks, warps, leaks or exposed unpainted wood on the
house, that may need minor repairs.

-Make sure you don’t have any unwanted guests like paper wasps or mud daubers. If you find
them, use a stick or pole to scrape the nest out of the box.

-Check for any buildup of guano and clean it out with a stick or pole.

                                                6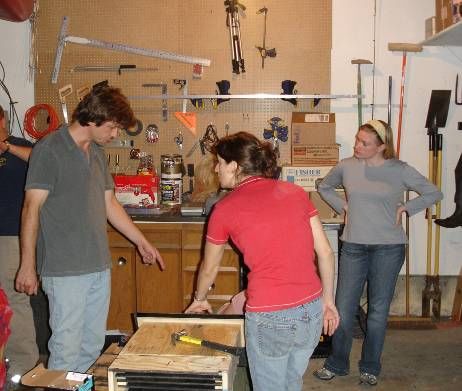
B UILDING A B AT H OUSE

Collecting Data on Your Bat Residents
You’ve now successfully built and mounted your bat house. The information you can gather
from your bat house will provide critical long term monitoring data for bat studies in the state.
Wisconsin Department of Natural Resources has created a bat roost monitoring program
throughout the state. To join in the advancement of our knowledge of Wisconsin bats, contact
Wisconsin DNR bat monitoring program and sign up today. Roost monitoring entails counting
bats as they exit your bat roost just a few times per year.

                                               The Health of You and the Bats
                                               As you observe the bats inhabiting your bat houses,
                                               keep in mind the safety of both you and the bats
                                               living in your bat house. When observing the bats,
                                               limit your disturbance; do not shine bright
                                               flashlights into the house to count them, and do not
                                               attempt to move the bat house once it has bats
                                               living in it.
                                                Sometimes people get colonies of bats that live in
                                                their attics or other buildings. When young bats
                                                start to fly on their own in mid-to-late summer,
they can sometimes get lost and find their way into your living space. If this happens, wait for
the bat to land, and use a shoebox to cover the bat and release it outside. You can also open a
window, close the room off and wait for the bat to leave on its own. Never use your bare hands
to pick up a bat because it may bite. If it is absolutely necessary to pick up a bat, always use
leather gloves.
While rare, there are several diseases that may be transmitted by bats, and should be kept in
mind when entertaining your bat guests.
Rabies: Although the incidence of rabies in bats is low (less than 0.5%), you should still take
precautions if you find a bat flying during the day, or see other abnormal behavior from a bat. If
you wake to find a bat flying in your room, or if you find a bat flying in someone else’s room
while they are sleeping, it is best to get the bat tested to make sure that if bitten, the person will
not contract rabies. See CDC recommendations at http://www.cdc.gov/rabies/bats/index.html

Histoplasmosis: Histoplasmosis is caused by a fungus which grows best on organic matter such
as bat guano in warm wet conditions. The fungus causes a respiratory infection, but is rarely
fatal if left untreated. Symptoms of Histoplasmosis are often flu-like with fever, cough and
fatigue. In Wisconsin Histoplasmosis may be contracted in places like attics where many bats
roost, and there is little airflow. Avoid areas where there are large accumulations of bat guano,
but if you must enter such as area, use a respirator and other protective equipment to prevent
contraction of the disease. The accumulations of guano that occur under your bat houses are
unlikely to contain the fungus that causes Histoplasmosis.

                                                  7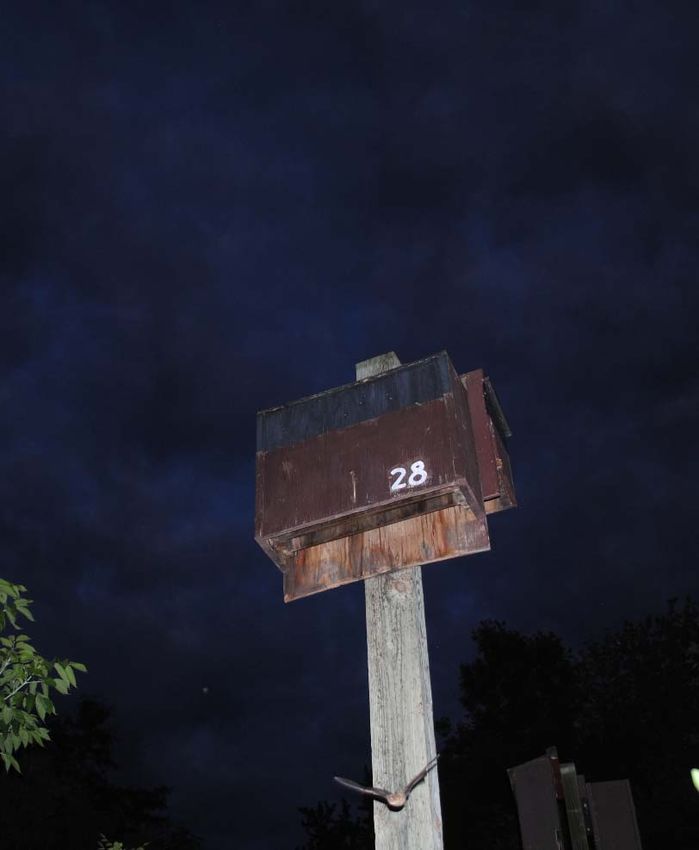
B UILDING A B AT H OUSE

WDNR’s bat monitoring program also keeps track of dead and sick bats. If you see either dead
or sick bats, visit the Wisconsin bat monitoring website to report the occurrence.

Organize a Bat House Building Party
You will be able to produce many more bat houses if you
create a system that mass produces different parts of the
bat house. Plus it’s fun to work with family and friends.
Donate extra bat houses to friends, family and places like
nature centers and schools or sell the remaining houses as
a fundraiser for your local group.

Can’t Get Bats to Live in Your Bat House?
There are multiple reasons why a bat house doesn’t have
bats living in it, although it may take up to 2 to 3 years for bats to start roosting in your bat
house. Have patience before you consider moving it. For information on common problems see
Bat Conservation and Management’s website at: http://www.batmanagement.com/Batcentral/
batboxes/whyfail.html

Useful Websites:
Wisconsin Bat Monitoring Website: http://wiatri.net/inventory/bats
Bat Conservation International: www.batcon.org
USFWS White Nose Syndrome: http://www.fws.gov/northeast/white_nose.html

Credits
Information for this handbook was adapted from:
Tuttle, M. D., D. L. Hensley. The Bat House Builder’s Handbook. Austin: University of Texas
Press, 1994. 34 Pp.

Discussions with Kent Borcherding, Hazel Green Wisconsin

                                                8
B UILDING A B AT H OUSE

Single Chamber Bat Box                                                    on the back wall.
                                                                          3. Apply 2 coats of black, water-based stain to interior
                                                                          surfaces. Do not use paint as it will fill the grooves.
Materials Needed:
See Diagram for Measurements                                              4. Drill pilot holes and screw back (B) to side and top
                                                                          spacers, caulking wherever wood meets wood.
One lb. 1 5/8” coated deck or exterior grade screws
20-25 1 ¼” coated deck or exterior grade screws                           5. Drill pilot holes and screw front (A) to sides and top
One quart black, water-based stain, exterior grade
                                                                          spacers. Again, caulking all seams.

One quart water-based primer, exterior grade                              6. Caulk, then drill pilot holes and screw roof (C) to front
                                                                          (A), back (B) and side and top spacers. Sand if necessary to
One quart flat water based paint or stain, exterior grade                 make sure angles match.
One tube of paintable exterior grade caulk
                                                                          7. Use a utility knife to cut a line on underside of roof to
One 1” x 2” x 8’ (¾” x 1 3/4” finished) cedar or pine furring strip       act as a drip edge
for spacers
                                                                          8. Attach mounts to back of box, making sure there is ½-
                                                                          3/4” between the box and the mounts using spacers
Suggested Wood
                                                                          9. Prime the exterior of the house
We suggest using rough-sawed black locust, white oak, cedar or
old barn wood because the bat house will last longer using these          Paint the exterior with 2 coats of paint. Stain the landing pad
naturally decay-resistant materials                                       on back wall (B) to make sure no paint fills the grooves.

Optional Materials
Black asphalt shingles
Roofing nails
1 sheet (4x4) exterior grade plywood

Recommended tools
Drill (1/8” size for pilot holes)
Table saw
Drill bit
Paint brush
Caulk gun
Utility knife
Tape measure

Construction Procedure:
1. Mark wood and cut out all parts as per diagram on pages
3 and 4.                                                                                       Single chamber box on left
2. Roughen interior and landing surfaces (B) with a utility
knife, cutting horizontal lines ½” apart, 1/16” to 1/32” deep

                                                                      9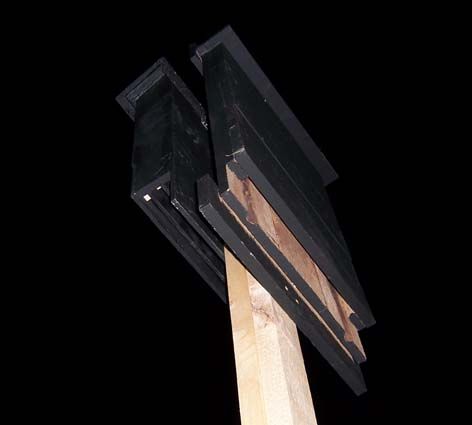
B UILDING A B AT H OUSE

          10
B UILDING A B AT H OUSE
If decay-resistant wood such as cedar or black locust is not available, a 4’ x 4’ piece of exterior-grade plywood may
be used
Roof
Front Panel
Back Panel
11B UILDING A B AT H OUSE
Spacers for front and back of bat house, spacers for between mounts and bat house
12B UILDING A B AT H OUSE
Bat Nursery House 1/16” to 1/32” deep.
3. Apply two coats of black, water-based stain to interior
surfaces. Do not use paint, as it will fill grooves.
Materials Needed (makes 2)
(See diagram)
4. Screw back (E) to sides (2 Ds), caulking whenever wood
meets wood. Drill pilot holes so the wood does not crack.
½ sheet (4’ x 4’) ½” cdx (outdoor grade) plywood
5. Drill pilot holes, caulk and use screws to attach 5” &
½ sheet (4’ x 4’) 3/8” cdx (outdoor grade) plywood 10” (I, J) spacers to inside corners as per drawings.
Two pieces 1” x 6” (3/4” x 5 ½” finished) x 8’ pine or cedar
6. Place a partition on, to within a ½” of roof. Place 20”
One lb. 1 5/8” coated deck or exterior grade screws spacers (H) on partition (G), screw and caulk to first spacers
20-25 1 ¼” coated deck or exterior grade screws (through partition). Be careful not to block the vents.
One quart black, water-based stain, exterior grade
7. Repeat step 4 for remaining partitions (G) and spacers
One quart water-based primer, exterior grade (H).
Two quarts flat water based paint or stain, exterior grade 8. Caulk first and then screw front piece (B, C) to sides (Ds).
One tube of paintable exterior grade caulk Be sure top angles match (sand if necessary). Leave a ½” vent
space between top and bottom front pieces. A bar clamp may
be useful if sides have flared out during construction.
Suggested Wood
9. Attach roof supports (K) to the top inside of front (B) and
We suggest using rough-sawed black locust, white oak, cedar or old back (E) pieces. Be careful that screws do not protrude into
barn wood because the bat house will last longer using these roosting chambers.
naturally decay-resistant materials
10. Caulk around all top surfaces, sanding first if necessary to
ensure a good tight fit.
Optional materials
11. Screw roof (A) to side (D) and roof supports (K). Caulk
Black asphalt shingles
all outside seams to properly seal roosting chamber.
12-20 7/8” roofing nails
12. Cut a line on underside of roof to act as a drip edge
13. Attach mounts to back of box, making sure there is ½-
Recommended tools 3/4” between box and mounts
Drill (1/8” for pilot holes)
14. Prime the exterior of the house.
Table saw
Paint exterior with two coats. Be sure to use stain on the
Drill bit landing surface on back wall (E) and not paint as paint will fill
Paint brush the grooves.
Caulk gun
Utility knife Construction without Vent
Tape measure 1. Do not cut vent on side pieces (D)
Spacers on back wall will be one 20 inch piece (H) instead of
Construction procedure Maternity roost on right one 10 inch (I) and one 5 inch (J).
1. Measure and mark all wood as per cutting diagrams on
pages 3-4. Cut out all parts.
2. In order to roughen interior and landing surfaces, score Plans adapted from Bat Conservation International’s Nursery House Design
inside back wall (E), and partitions (G) with a utility knife or a and discussions with Kent Borcherding
sharp object. Space grooves ½” apart, cutting
13B UILDING A B AT H OUSE
Bat Nursery House
14B UILDING A B AT H OUSE
Bat Nursery House
15B UILDING A B AT H OUSE
Bat Nursery House
Roost
Roost
Roost
Roost
Roost
Roost
16B UILDING A B AT H OUSE
Bat Nursery House back mounts
17B UILDING A B AT H OUSE
Rocket Box Construction procedure
1. Measure, mark and cut all wood as per cutting diagrams
Materials needed 2. Cut angles on 4” x 4” post so bats have surface to roost
on. We suggest 40˚ for top angle, and 60˚ angles into the post
12-16’ of 4”x 4” rough cut post (if you can’t get 12-16’, use 4’ (the post is easier to manipulate and cut if it is shorter)
of 4” x 4” and brace it to 2 pieces of 2” x 4” mounted together)
3. Screw ¾” spacers to 4 x 4 post
½” thick outdoor grade plywood
Exterior grade caulk 4. Drill one ¾” hole into one side for vent and attach screen
so animals other than bats do not get in
Exterior grade non-toxic, water-based black or brown paint
5. Drill pilot holes so wood does not crack, and attach sides
Water-based primer to each other and to wood post.
Coated deck or exterior grade screws
6. Drill pilot holes and attach roof boards with screws
7. Caulk all seams
Suggested Wood
8. Prime the exterior of the house
We suggest using rough-sawed black locust, white oak, cedar
or old barn wood because the bat house will last longer using Paint exterior with two coats
these naturally decay-resistant materials
Recommended tools
Table saw and/or jig saw
Drill (1/8” size for pilot
holes)
Phillips bit for drill
Measuring tape
Caulk gun
Paintbrush
Bat houses built and monitored by Kent Borcherding for Yellowstone Lake State Park
18B UILDING A B AT H OUSE
Rocket Box
3/4” gap
19B UILDING A B AT H OUSE
Possible Mounting Option with Maternity Boxes
20B UILDING A B AT H OUSE
Bats roosting in a bat house
Bat houses on south side of a building
Bat houses on a pole
21You can also read