Equinox Pro Operation Manual - Microprojects
←
→
Page content transcription
If your browser does not render page correctly, please read the page content below
Equinox Pro
                     Operation Manual

Microprojects
Equinox Pro v7.2.2
October 2014

                                        Equinox Pro 1
Contents
Copyright...................................................................................................... 4
Install Location.............................................................................................. 4
Registration................................................................................................... 4
Initial Setup................................................................................................... 5
    AstroPlanner.............................................................................................................................. 6
    Starmap Pro................................................................................................................................ 6
    Stark Lab’s PHD........................................................................................................................ 6
Filter Preferences......................................................................................... 7
Fonts and Color Preferences........................................................................ 9
Info Panel Preferences............................................................................... 10
Telescope Preferences............................................................................... 11
Myth/Misc Preferences............................................................................... 12
    Show When Inactive................................................................................................................ 12
    Miscellaneous.......................................................................................................................... 12
Shortcuts Preferences................................................................................ 13
Control Panels............................................................................................ 14
Menus......................................................................................................... 15
    Equinox Pro Menu................................................................................................................... 15
    File Menu................................................................................................................................. 15
    Edit menu................................................................................................................................. 16
    Setup menu............................................................................................................................... 16
    View Menu............................................................................................................................... 17
    Show Menu.............................................................................................................................. 17
    Windows Menu........................................................................................................................ 18
    Connect Menu.......................................................................................................................... 18
    Focuser Menu ....................................................................................................................... 19
Sky Window................................................................................................ 20
Scope View Window................................................................................... 21
Solar System Window................................................................................. 22
Tonight Window.......................................................................................... 23
Telescope Control .................................................................................... 24
    LX200 Protocol........................................................................................................................ 24
    Temma II Protocol................................................................................................................... 25
    NexStar/SynScan Protocol....................................................................................................... 25
    Sky Commander / Losmandy DSC Protocol / ServoCat......................................................... 25
    Astro-Physics Protocol............................................................................................................ 26
    Ultima 2000 Protocol............................................................................................................... 26
    Gemini Protocol....................................................................................................................... 26
    iOptron Protocol....................................................................................................................... 27
    iOptron iEQ45 / ZEQ25 Protocol............................................................................................ 27
    Remote Control ....................................................................................................................... 28
    Scope Align Panel ................................................................................................................... 28

                                                                                                                                      Equinox Pro 2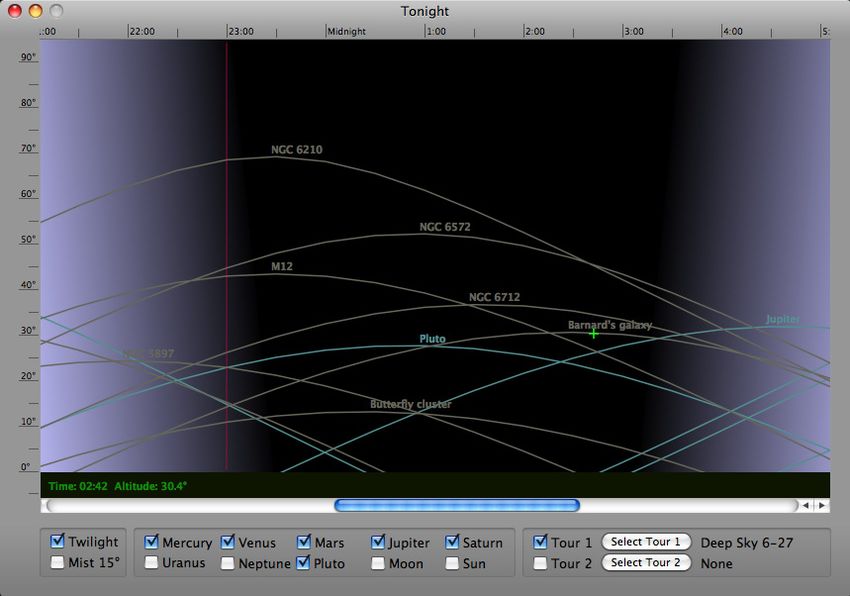
Webcam Control ...................................................................................... 29
Canon Control .......................................................................................... 31
SBIG SG-4 ................................................................................................ 33
SBIG AllSky ............................................................................................... 34
Optec Focuser ........................................................................................... 35
Robo-Focus Focuser.................................................................................. 37
JMI Smart Focus......................................................................................... 38
MoonLite Focuser....................................................................................... 39
FCUSB Focuser.......................................................................................... 39
Tour/Custom Filter...................................................................................... 40
    Custom Deep Sky Filters......................................................................................................... 41
Custom Horizon.......................................................................................... 42
Photo Horizon ........................................................................................... 42
Photographs............................................................................................... 43
Database.................................................................................................... 43
Toolbar........................................................................................................ 44
Voice Commands........................................................................................ 44
    Scope position from AppleScript............................................................................................. 44
Dome Control.............................................................................................. 45
    Control Board .......................................................................................................................... 46
    Board Initialization.................................................................................................................. 47
    Calibration................................................................................................................................ 47
    Dome/Mount Parameters......................................................................................................... 48
    Track/Sync/Home.................................................................................................................... 49
    Notes........................................................................................................................................ 49
    Dome Diagram......................................................................................................................... 50
    Dome Rotation Sensor............................................................................................................. 51
Digital Dome Works.................................................................................... 52
    DDW Dome/Mount Parameters............................................................................................... 53
Photograph Copyrights............................................................................... 54
Credits........................................................................................................ 55
    Beta Testing and Suggestions.................................................................................................. 55
    Localization.............................................................................................................................. 55
Contacting Microprojects............................................................................ 55

                                                                                                                                         Equinox Pro 3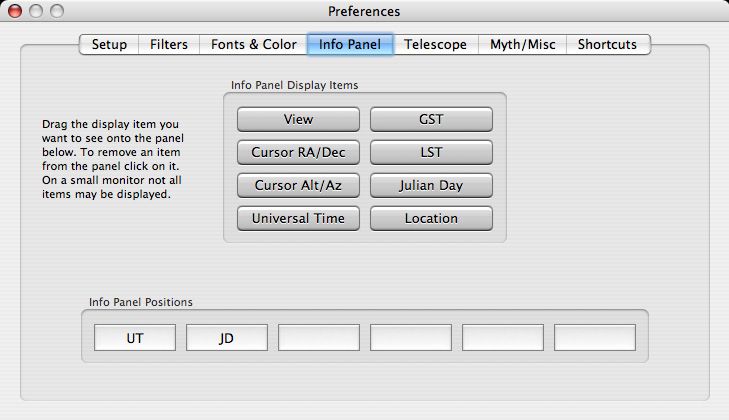
Copyright
    © Copyright 2014 Microprojects. All rights reserved.

The Equinox Pro shareware installer may be distributed electronically or on any media free of charge.
Your Equinox Pro registration code can not be distributed in any form. Equinox Pro requires OS 10.7
or later.
Mac, the Mac Logo and the Universal Logo are trademarks of Apple Computer, Inc., registered in the U.S. and other countries.
Canon is a registered trademark of Canon Inc. SBIG is a trademark of Santa Barbara Instrument Group, Inc.

The Jupiter movie was created by Blair Thornton from an image map created and used with permission by Björn Jónsson.

The ‘L9’ moon image reproduced by the kind permission of UC Regents/Lick Observatory. The deep sky images are reproduced
with the kind permission of the National Optical Astronomy Observatory/Association of Universities for Research in Astronomy/
National Science Foundation.

The Digitized Sky Survey was produced at the Space Telescope Science Institute (STScI) under U.S. Government grant NAG
W-2166. The images of these surveys are based on photographic data obtained using the Oschin Schmidt Telescope on Palomar
Mountain and the UK Schmidt Telescope. The plates were processed into the present compressed digital form with the permission of
these institutions. ESO Digitized Sky Survey is copyrighted by the Space Telescope Science Institute (full copyright information at:
http://archive.eso.org/dss/dss-copyrights.html). Microprojects acknowledges the use of NASA’s SkyView facility (http://skyview.gsfc.
nasa.gov) located at NASA Goddard Space Flight Center.”

Equinox makes use of the Sesame service and SIMBAD database, operated at CDS, Strasbourg, France, and the facilities of the
Canadian Astronomy Data Centre operated by the National Research Council of Canada with the support of the Canadian Space
Agency.

The constellation mythological forms are copyright the Space Telescope Science Institute (STScI) and used with permission.

Microprojects does not assume any liability arising out of the application or use of Equinox Pro
software or any product described herein.

Install Location
The Equinox Pro application is normally installed in the Applications folder. However, you can move
it anywhere you like or create an alias to put it on the Dock.

When Equinox Pro is installed it creates a folder called Equinox Pro in the ~/Library/Application
Support folder. Inside the Equinox Pro folder are other folders named Build Data, Database, Misc,
Photos and Tour. This is also the location of this manual. Any mention of folders in this manual refers
to these folders. If you want to access these folders from another location make an alias of the Equi-
nox Pro folder and then place the alias where you want it.

The ~/Library folder is hidden. You can access it by going to your home directory, holding down the
option key, selecting the Go menu and then selecting the Library menu item.

Registration
Once Equinox Pro is installed on your Mac you have 30 days to try it out. All the features of Equinox
Pro are available during this trial period. After 30 days you will not be able to run Equinox Pro until
you register.

                                                                                                                           Equinox Pro 4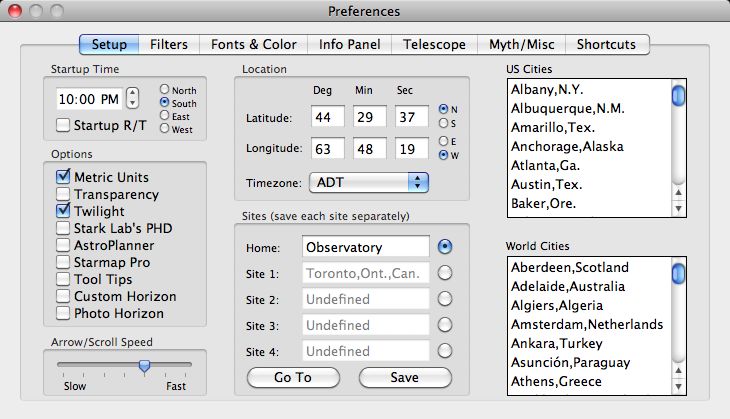
Initial Setup
When Equinox Pro launches for the first time it builds the database, establishes the default prefer-
ences and sets up the Home location according to the Mac location information.

The first thing you should do is go to the Preferences panel and set up your observing site information
(Preference panel/Setup tab). You can open the Preferences panel from the Equinox Pro menu or with
command+comma. Equinox Pro always starts up at the current date, start up time and Home loca-
tion, so these are the values you should enter first. Select the Home radio button and enter the name
you want to use for your Home location. If you know your latitude and longitude you can enter that
directly or you can select a city from the cities lists. Once all the location information is entered hit
the Save button. If you have other sites, select another site with the radio buttons, make your entries
and save. You can delete a site by selecting it with its radio button, deleting the name and hitting the
Save button.

If you wish to go to a location but not save it as one of your site locations, unselect the site radio but-
tons by clicking on the currently selected button. All the site names will become disabled. Click on a
city or enter a new latitude and longitude and hit the Go To button.

From this Setup tab you can also establish what clock time Equinox Pro will use at start up. If you
check Startup R/T Equinox Pro will start up at the current Mac clock time. You can also select a
startup direction for the sky display. The options available are Metric Units (or Imperial), do you want
the control panels to be transparent or solid, display twilight and daylight shadings or remain dark
regardless of the time, enable communication with AstroPlanner, Starmap (iPhone/iPad) or Stark-
Labs PHD and whether or not to see the tool tips. Select Custom Horizon if you want to use your own
horizon shape or Photo Horizon if you have created a panorama image of your horizon (see the Photo
Horizon section of this manual for information).

                                                                                                     Equinox Pro 5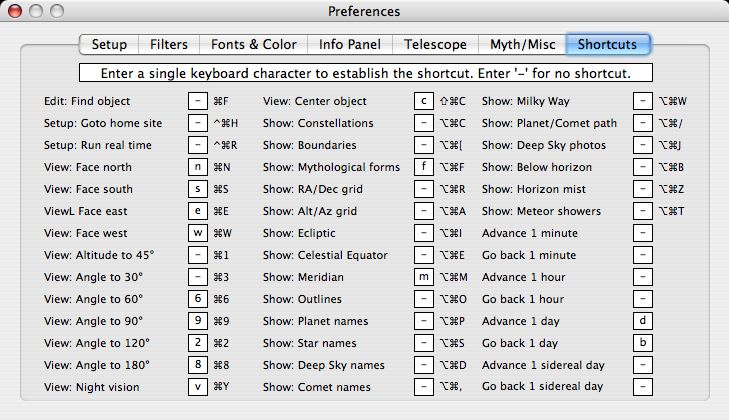
Equinox Pro displays will scroll with mouse scroll wheels/gestures or you can use the arrow keys on
the keyboard. The Arrow/Scroll Speed setting adjusts how fast the scroll wheel/gestures or arrow keys
will scroll the display. If you use the scroll wheel/gestures or arrow keys with the option key, up/down
motion will change the viewing angle and left/right motion will change the time.

   AstroPlanner

Equinox Pro and AstroPlanner (www.ilangainc.com/astroplanner/) can talk to each other. To enable
communication you must check the AstroPlanner option checkbox in Equinox Pro and select Equinox
in AstroPlanner’s External preferences.

You can add Equinox Pro objects to AstroPlanner’s plan by using the caps lock key and then clicking
on objects in the sky display. If you command+click on an object, and AstroPlanner is connected to
a telescope, AstroPlanner will slew to that object. AstroPlanner can also send objects to Equinox Pro
to view and control. This gives both applications access to each other’s database and telescope control
capabilities. The Equinox Pro tour function can read AstroPlanner exported Plan Text Files. For more
information see the AstroPlanner manual.

   Starmap Pro

This checkbox allows the Starmap Pro application to connect to Equinox Pro. If you want to block
this application from communicating with Equinox Pro uncheck this box.

The iPhone/iPad application Starmap Pro (www.star-map.fr/) can communicate with Equinox Pro
over a network connection. You can sync the two sky displays and if Equinox Pro is connected to a
telescope you can slew your scope or goto an object from controls in Starmap Pro. See the Starmap
Pro manual for more information.

   Stark Lab’s PHD

This checkbox allows Stark Lab’s PHD application to connect to Equinox Pro. If you want to block
this application from communicating with Equinox Pro uncheck this box.

Stark-Labs PHD application (www.stark-labs.com/phdguiding.html) can autoguide your scope by
using the Equinox Pro scope connection. This can be with a GPUSB device, pulse guide commands
(LX200 GPS) or slew control. PHD can use cameras that Equinox Pro can not, and Equinox Pro can
connect to telescopes that PHD can not. PHD takes the images, calibrates and calculates the scope
corrections necessary to autoguide. Those corrections are sent to Equinox Pro which moves the
scope.

                                                                                                 Equinox Pro 6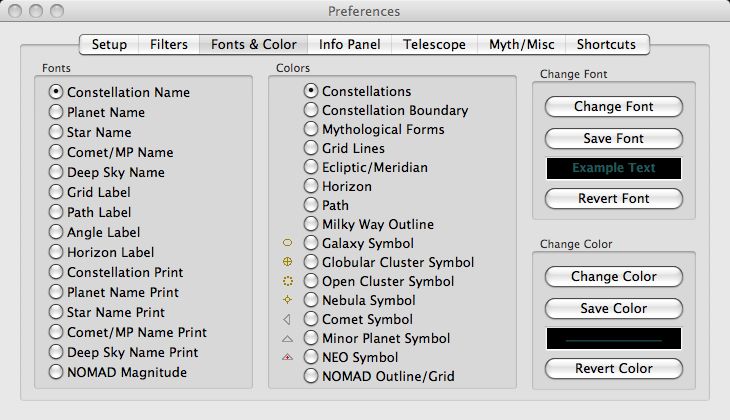
Filter Preferences
The filter preference panel controls what you see in the main sky display and Scope View window
and how you see it. If an object is fainter than the magnitude limit set for that type of object then that
object is not displayed.

You can control how stars are displayed by altering their brightness and color saturation. You can
also shift the magnitude (which is different than brightness), turn off anti-aliasing and identify double
stars (easy and advanced), variable stars and stars with planets. The Catalog checkboxes allow you to
identify Gemini (G), Meade LX200 (M) and NexStar (N) alignment stars. This makes aligning your
scope much easier when you can find the stars that each mount recognizes for alignment.

Deep sky objects can be filtered by type (Show open cluster, galaxy, etc.), several common catalog
lists, custom lists, Messier objects and a Best and Advanced list. The Other checkbox includes all
objects that are not in any catalog. All filters are additive, so if you select Best, Messier and Arp all
the objects in those three lists will be shown. The Name, Messier and NGC boxes control what single
ID is shown in the windows and printouts. Name is the first preference, then Messier and NGC last.

The Custom Filter selection allows you to use custom lists. You can generate those lists in a text
editor or with the Equinox Pro Tour function (see the Tour section of this manual). You can create as
many custom lists as you want. This is especially useful for generating club observing lists.

If you select Planet Path (from the Show menu or Path toolbar item), planets, comets and minor
planets will plot their path when you click on them in the sky display. The path settings here adjust
how long a plot is generated (days) and what percent of the path is in the future. If the number of days
duration is set to one day or less the path marks time, otherwise the path marks the date.

                                                                                                   Equinox Pro 7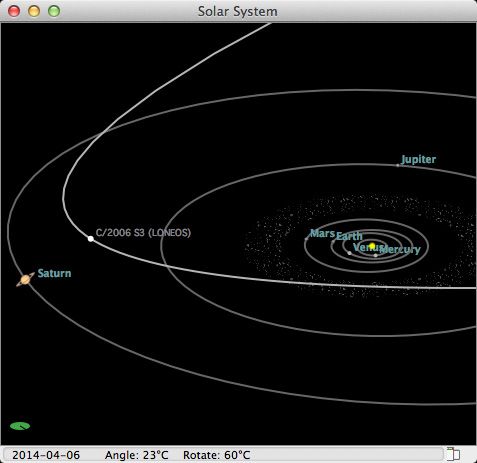
Comets, minor planets and near earth objects (NEO) can be filtered by magnitude or not displayed at
all by unchecking the appropriate checkbox. If you check the NEO checkbox the minor planet that is
closest to the Earth will be displayed and circled in red, regardless of its magnitude. You can locate
this object by requesting a Find for “NEO”. The comet and minor planet database can be automati-
cally updated over the internet from the Minor Planet Center (MPC) with the Update Comets/MP
menu item in the Equinox Pro menu.

The Minor Planet Center database contains a limited number of minor planets (only those that are
currently in opposition) and it is not updated often (the NEO database is updated daily). If you require
a much larger and more accurate database of minor planets you can use the MPCORB database
instead.

In Equinox Pro you can select one of the Process MPCORB database items in the Equinox Pro menu.
That will download the MPCORB data file and build a new minor planet database. Processing this
file will take a minute or more. The MPCORB data file is updated by the MPC daily.

This database contains about 500,000 minor planets! Of these about 250,000 are numbered minor
planets. You can select to process just the numbered minor planets in the database or you can process
the full file. If all those minor planets were displayed at once in the sky display all you would see is
a solid white screen. For this reason the sky display will only show minor planets that are magnitude
16 or brighter (set from the Filter tab Magnitude Limit slider control) and a smaller triangle symbol is
used. However, the Scope View window can show all the minor planets within its field of view. If you
set the SV Magnitude Limit slider all the way right to 24 you will have access to all the processed
minor planets. The Find dialogue also searches the entire MPCORB database, not just those minor
planets visible in the sky display.

For most users processing just the numbered minor planets is sufficient. The other minor planets are
very faint and probably not observable without a very large scope or CCD image. About 100,000 of
those un-numbered minor planets are “1-opposition” minor planets. The orbit calculation of these
minor planets is unreliable except near the observation epoch and the magnitudes are not accurate
and sometimes not recorded at all. For this reason those minor planets are displayed in yellow.

If you want to go back to the Minor Planet Center database simply select the Update Comets/MP
menu item.

Advanced:
If you want a more complete and up to date minor planet database but you do not want to process the
500,000 records in the MPCORB file you can take records from the MPCORB file and paste them
into the Soft00Bright.txt file. This allows you to selectively put bright minor planets back into the
standard database even though they are not in opposition. Note that if you do add or replace records
in the Soft00Bright file you can not use the Update Comets/MP menu item. You have to go to the
Database folder and trash the MinorPlanets.mpj file. This will force Equinox Pro to rebuild the minor
planet database the next time it launches.

                                                                                                 Equinox Pro 8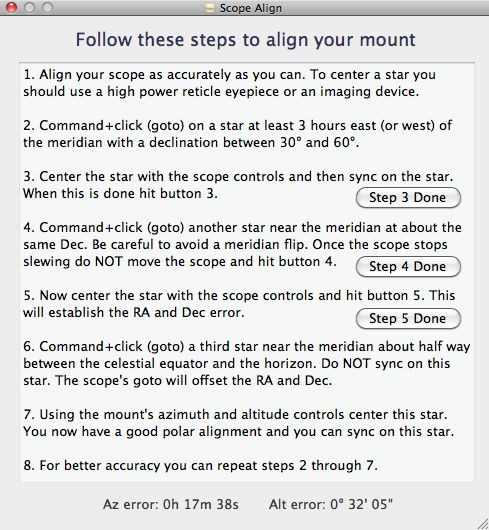
Fonts and Color Preferences
Equinox Pro allows you to alter virtually all aspects of the sky display. With this preference panel you
can change fonts, text size and color, line colors and object symbol colors. The printouts can also have
fonts and text sizes that are different from the screen.

To change a font, first select an item in the Fonts box. Then hit the Change Font button. This will
display the font pallet where you can change font, size, style and color. Next hit the Save Font button.
Your changes will be displayed in the Example Text area and saved as a preference. Your can repeat
these steps as often as you wish. If you want to go back to the default values hit the Revert Font
button.

Colors for lines and symbols can be changed in a similar way. Select the item you wish to change in
the Colors box. The Change Color button will display the Color Picker. Change the color and then hit
the Save Color button. A line in the new color will be displayed and saved as a preference. You can
change the color back to the default value with the Revert Color button.

If you want to print the constellation mythological forms you can adjust how dark they print by
changing the color here. Change the color to black for a black printout. Lighter colors will print the
images as various shades of gray.

                                                                                                  Equinox Pro 9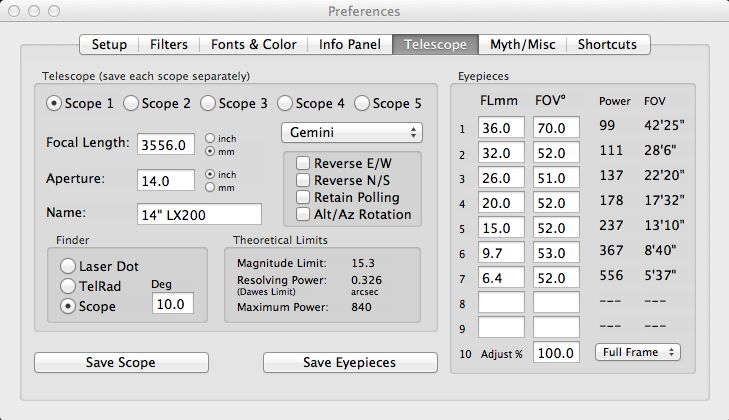
Info Panel Preferences
The Info Panel is the display at the bottom of the main sky display. The date and time is always
displayed first. You can then select what information you want to be displayed after the date and time.

To add items to the bottom panel, drag the item you want from the Display Items selection onto one of
the outlines in the Panel Positions strip. A small monitor may not be able to display all your choices.
If so, items to the right will be dropped. To remove an item click on it in the Panel Positions strip.

The View information will list the azimuth and altitude of the center of the screen as well as the
viewing angle (corner to corner).

Cursor RA/Dec and Cursor Alt/Az displays an update of the current cursor location in the sky dis-
play. Both of these items require considerable processing, so normally you would use these only when
needed.

Universal Time displays the UTC time as date, hour, minute and second.

GST and LST display the Greenwich and local sidereal times as hour, minute and second. Julian Day
displays the Julian day number with 5 decimal places.

Location displays your current site’s latitude and longitude.

                                                                                                Equinox Pro 10
Telescope Preferences
From this preference tab you can configure up to five different telescopes and ten eyepieces. This
information is used by the Scope View window and telescope connections. You can also use this
preference to “try out” different telescopes and eyepieces.
Once you configure the information for a particular telescope, hit the Save Scope button before you
select another telescope or leave the display. Otherwise your data will be lost. To remove a scope
enter a focal length of 0 and hit the Save Scope button.
The telescope protocol popup button establishes what type of communication will be used if you at-
tempt to connect Equinox Pro to your telescope. The protocol establishes the serial format, baud rate
and other communication requirements. Many brands of telescopes emulate either LX200 or NexStar
protocols, so you should select the protocol your telescope mount uses, not necessarily the brand of
your telescope. See the Telescope Connection section of this manual for more information.
The Reverse E/W and N/S checkboxes allow you to orient the Scope View window to the visual
orientation seen in your scope. Check Retain Polling if you want to maintain the polling and slewing
control of your scope when the Scope View window has been closed. Alt/Az Rotation will rotate the
Scope View display the way the sky is viewed with an Alt/Az mount.
Most eyepieces will list their field of view (FOV). However, if you don’t know what the field of view
is for a particular eyepiece, 50° is a good guess. After you enter all your eyepieces be sure to hit the
Save Eyepieces button before you leave this display.
Eyepiece 10 is reserved for webcam or DSLR use. Eyepiece 10 allows you to adjust the frame outline
to match your camera and optics. The adjust percent scales the Scope View window field of view so
that you can match the outline to your images exactly. Shift+drag will rotate the outline.
Equinox Pro 11Myth/Misc Preferences
From this preference tab you can select what constellation mythological forms to display. Show All
will display all the listed constellations. If you wish to display or print just one or a selection of con-
stellations uncheck the Show All box and select the constellations you want from the list.
The mythological images are from the 17th century Uranographicarum star atlas by Johannis Heve-
lius and were created by the Space Telescope Science Institute. As the STScI creates more images
they will be added to new versions of Equinox Pro.
Show When Inactive
Depending on what other applications you are running along with Equinox Pro, you may want to see
some Equinox Pro windows even when another application is active. These preferences allow you to
control what windows and panels will remain visible if Equinox Pro becomes inactive.
Miscellaneous
The red cursor option turns the sky view target cursor red, rather than green. This is useful if you use
Rubylith for night vision rather than the night vision gamma control.
If you are trying to learn (or teach) the constellations it is often helpful to see the constellation lines
but not display the names.
Equinox Pro 12Shortcuts Preferences
Shorcuts allow you to perform frequently used operations with a single key. All the listed opera-
tions can be performed from menus or control panels, but for the things that you do the most often
shortcuts can be a faster way to do them.
There are several built-in shorcuts already. For example, the arrow keys to scroll the display or the ‘+’
and ‘-’ keys to zoom the display, but here you can establish your own key preferences for the opera-
tions listed. Note, however, that there are more opertions listed than there are keys so you can not
assign keys to everything. If you should duplicate a key you will hear a beep and the character will
not be entered. If you want to remove a shortcut enter a ‘-’ character.
Equinox Pro 13Control Panels
There are two panels to control the sky display, one for direction and one for time. You can access
these panels from the Windows menu or from the toolbar.
The Direction panel gives you a circular slider to control your
azimuth direction, as well as north, south, east and west buttons.
You can also use the View menu keyboard shortcuts to change
the sky display’s azimuth. Sliders control altitude and view angle.
View menu keyboard shortcuts give you a selection of altitude
and viewing angle shortcuts.
The scroll wheel on a MightyMouse, the Magic Mouse, the
Magic Trackpad and the keyboard arrow keys also give you
direction control. Left, right, up and down motion and arrow
keys move the sky display accordingly. If you hold down the
option key up/down motion zooms the display in and out. The
viewing angle ranges from 5° to 180° degrees (corner to corner).
The View menu also allows you to select 360° which displays a
circular sky showing the entire visible sky.
The Time panel allows you to change the time by increments of a second, 30 seconds, minute, half
an hour, hour and day. You can enter a date and time in the Date Picker or enter a Julian Day number.
Because the Date Picker does not have era control, if you want to go back in time past the Gregorian
calendar (prior to October 15, 1582) or B.C.E. you must enter that date as a Julian Day number. The
Date Picker will get very confused and display the wrong date - ignore it. The date and time in the
sky display Info panel will be correct. OS X limits the date range to ±10,000 years.
The R/T button sets the time to the current clock date
and time. The S/T button resets the date and time to the
start up date and time. Either button is a convenient way
to get back to the current date if you have made signifi-
cant date changes.
The SD arrow control allows you to change the time by
one sidereal day. This is very useful if you want to see
how planets, comets and minor planets move day by day
with a stationary star background.
The indicator level represents twilight with each bar equal to 1° of the sun’s altitude below the ho-
rizon. If no bars are lighted there is no twilight and the sun is 18° or more below the horizon - the
astronomical twilight limit. Green bars indicate good viewing except for the most critical observa-
tions (sun 13° below horizon or more). Yellow bars indicate the sun is less than 13° below the horizon
and significant twilight may exists. Red bars indicate the sun is less than 6° below the horizon - the
civil twilight limit.
Equinox Pro 14Menus
Equinox Pro Menu
Preferences brings up the Preferences panel. Use the
Reset Preferences with caution. It will reset ALL
your preferences to default values.
The Registration Panel allows you to enter your
name and registration code. You can change your
name at any time. Once you register Equinox Pro
your registered name and code will be shown, as
well as the installation date and the number of times
you have used Equinox Pro. Registration Site and
Microprojects Site take you to the respective pages
at the Microprojects web site.
Rebuild Database will rebuild the star, deep sky,
comet, minor planet and city lists database. Use this
only if you have modified one of these databases.
Update Comets/MP will go to the Minor Planet
Center (MPC), download the current comet, minor
planet and NEO files and rebuild the Equinox Pro
database for those objects. See the Filter preference
for information about the MPCORB database. Hold
down the option key to switch MP databases with-
out downloading a new copy of the database.
Version check allows you to see if there is a more
recent version of Equinox Pro available.
File Menu
Open Photo allows you to open and display any pho-
tograph on you computer. However, it is designed to
display the photos in the Equinox Pro Photos folder.
Open Tour will open a tour file that you have created
and allow you to move around the tour. Create Tour/
Filter starts the tour file creation process. See the Tour
section of this manual for more information about
tours and custom filters.
If you have created one or more custom horizon files
the Build Custom Horizon command will build the
database for those files. You can save the current date
and time to your iCal calendar with Save Event item.
Equinox Pro 15Edit menu
The Copy command will copy the sky display and put it onto the
clipboard. You can also copy just a section of the sky display. Hold
down the shift key and drag a copy marquee around the area you wish
to copy. Then use the Copy command to copy just that area.
The Find Object command displays the Find panel (see below). See the
Voice commands section of this manual for the Voice Commands item.
Show All is a quick way to bypass all the deep sky filters and see all
the objects in the database. The sky display will get very crowded.
The Save/Restore SV position allows you to save and restore whatever
position is currently displayed in the Scope View window. The Reset
command clears any manual position adjustments in the SV window.
In the Find Panel you can enter the name of a planet, star (name,
B/F designation or SAO number), comet, minor planet, deep
sky object (name, Messier or ID), constellation and RA and Dec
coordinates (hh:mm.m:+dd:mm.m or hh:mm:ss.s:+dd:mm:ss.s). If
you are entering J2000 coordinates start off with “J:”. The entire
database will be searched when you hit the return key. A mes-
sage will indicate whether the object has been found, filtered out,
below the horizon (if Below Horizon is not selected) or simply
not found. If the object is found you can Center the object in the
sky display, Track the object in the Scope View window or do
both with the Track & Center button.
You can enter a partial search string (minimum of three characters) and all the objects that contain
those characters will be listed in the pull down menu. You can then select the object you want from
the list. The escape key will close the Find Panel. If the object is not in the database the selected
SIMBAD server (CFA: USA, CDC: France) or Sesame server (CADC: Canada) will be searched over
the internet. The data is saved in a file in the Misc folder so the object can then be accessed from this
file later without an internet connection.
Setup menu
All the sites that you have defined in the Preference panel will be
available in this menu. Undefined site locations will be disabled.
Photo Horizon Adjust dislays an adjustment panel for horizon
photos. See the Photo Horizon section for information.
Run Real Time changes the time to the Mac clock time and up-
dates the sky display once a minute. Run Set Time starts at the cur-
rent sky display time but advances the time once a minute. Startup
Date/Time resets the time to the current date and startup time.
Equinox Pro 16View Menu
Most of the items in the View menu control the direction and view
angle of the sky display and can be used in conjunction with the Direc-
tion panel and scroll wheel/arrow keys.
The Angle 360° item is only available from this menu. It displays a
circular image of the entire sky that is above the horizon.
The Center Object item will alter the altitude and azimuth of the sky
display to center the currently selected object. Track Object will track
the object in the Scope View window and slew your scope if connected.
Night Vision alters the screen gamma so that only red is displayed. This
is very useful if you are outside at night observing and you are using
Equinox Pro. However, no screen display will preserve your night vision
entirely so under these conditions you might want to also lower your
screen brightness and not stare at the screen for long periods.
The Binocular, DSLR Lens and Angle submenus allow you to see a
shaded outline in the sky display that shows the field of view of various
binoculars, digital lenses (assumes 3:2 aspect ratio) and angles. You can
click and drag the outline around in the sky display. The Finder item in
the Angle menu will display an outline that matches your finder scope.
Show Menu
All of the Show menu items can be selected here, from the
listed keyboard shortcuts or from toolbar items. Most items are
obvious but a few need some explanation.
Outlines display the boundaries of galaxies and nebula in the
Scope View window for about 100 objects selected from the
best and advanced lists. The faint outer boundary of the object
would be visible in CCD images and very large telescopes.
The middle boundary would be faint but visible with moderate
scopes. The bright inner boundary should be visible with most
scopes.
The Planet/Comet Path item turns on the path plotting func-
tion. A plot of the time-varying position of any selected planet,
comet or minor planet will be displayed in the sky display and
the Scope View window. The total duration of the plot, in days,
as well as the percent of the path that extends into the future
can be adjusted from the Filter preference panel.
Below Horizon allows you to see the sky that extends below
your location’s horizon. This can be useful for finding out what
will rise soon, or just set, or for finding objects that are cur-
rently below the horizon.
Equinox Pro 17Horizon mist displays a “mist” graphic that extends 15° above the horizon. This is normally consid-
ered the low limit for telescope viewing of objects.
Meteor Showers identifies the shower radiant point and flashes “meteors” across the screen during the
time of a meteor shower.
Windows Menu
The Direction and Time Panel items display (or hide) the
corresponding control panels. The Info Panel item displays
(or hides) the information panel that appears when you click
on an object. If the panel is not displayed the object name is
displayed in the Sky window title.
The other items display (or hide) the main Sky Window, Scope
View, Solar System windows, and the Tonight window. See
other sections of this manual for information about these
windows.
Connect Menu
All the telescopes that you have defined in the Preference panel
will be displayed. Scope 1 will have the keyboard shortcut, so
define your primary telescope first. However, all the scopes in this
menu will be disabled unless Equinox Pro can find a serial port.
Use the Keyspan High Speed or FTDI USB/Serial adaptor if you
want Equinox Pro to connect to your telescope.
The Serial Port menu will display all the serial ports available for
scope connection. You can select the port your telescope is con-
nected to or you can select Scan and have Equinox Pro hunt for
your scope by scanning all the ports.
When you select a telescope from this menu Equinox Pro will use
the protocol you have defined for that scope and try to open up
communication with your telescope. If the connection is successful
the Scope View window will be opened and the scope’s location
will be updated at the selected Poll Rate. Serial communication
is very slow and can disrupt interaction with the Equinox Pro
displays and controls, so you may wish to slow down the poll rate
somewhat. If you are using LX200, Temma, Gemini, NexStar or
iOptron protocols a separate control panel will be opened that
offers slew commands and other controls (see the Scope Control
section of this manual).
Equinox Pro 18If you do not want the Scope View window open while you are using your telescope, close the
window with the red close button in the window title. The telescope polling and control will stop.
To reopen the window use the Scope View item in the Windows menu. If you wish to hide the Scope
View window but retain polling and goto capability you can minimize the window or select Retain
Polling in the Telescope preference and close the window.
If you have the SkyFi or StarSeek WiFi device
select the WiFi menu item after you have
connected to the device’s ad hoc network
with AirPort. This will dispaly a panel that
allows you to enter the device’s ip address and
port number. Note that this just tells Equinox
Pro what those values are, it does not change
them in the device. You also need to configure the baud rate, parity, data size and stop bits that your
telescope requires from the device’s web connection. Once the connection is made you can connect to
your telescope. If the WiFi connection is active any USB/Serial devices listed in the Serial Port menu
will not be used.
If Equinox Pro can not connect to your telescope for some reason an alert message will be displayed.
If this happens, make sure your USB/Serial adaptor driver has been installed correctly and is up to
date. Make sure you have defined the correct protocol for your telescope. Have you connected the
USB/Serial adaptor to the correct port on your telescope (in many cases this is the port on the hand
controller, not the “PC” port on the mount itself)? Do you have the correct manufacturer’s PC cable?
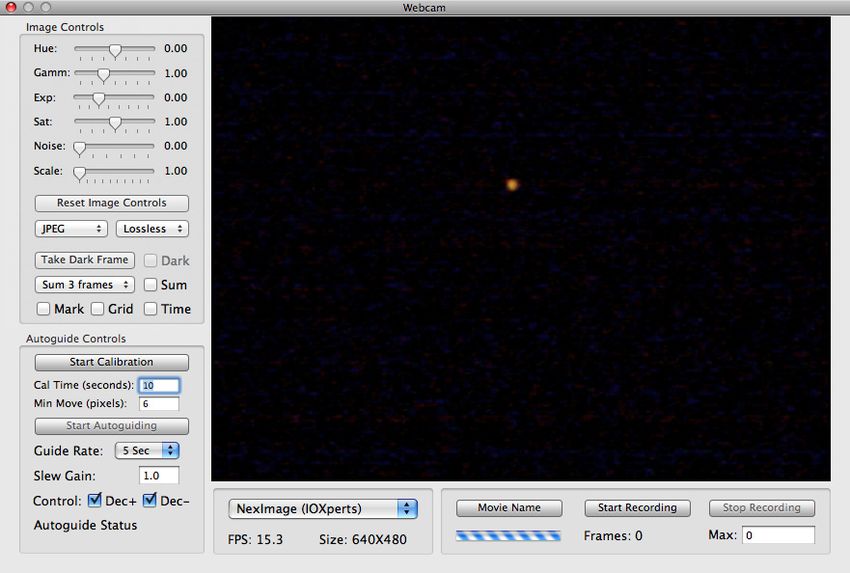
The Webcam menu will open the webcam window. See the Webcam section of this manual for
information on imaging with a webcam. The Canon menu will connect to a Canon EOS or Rebel
DSLR camera. See the Canon section of this manual for more information.
Using a DSLR camera for imaging through your telescope is quite esay to do but there is no way to
autoguide your scope. And because DSLR cameras are less sensitive than a CCD camera you need
longer exposures so acurate guiding is even more important. The solution is to use a webcam on a
guide scope or off-axis guider.
The GPUSB menu will attempt to connect to Shoestring Astronomy’s GPUSB device. This device is
used to autoguide with your webcam by using the autoguide port on your scope’s mount instead of
using the scope’s slew commands. Slew commands are designed to, well, slew your scope - not au-
toguide. With the GPUSB device you can acheive much more accurate autogiding with your webcam
and the webcam guide functions in Equinox Pro. See the Canon section of this manual about using
the DSUSB device for long exposures
The Santa Barbara Instrument Group (SBIG) SG-4 and AllSky devices use a CCD camera. See the
the SG-4 and AllSky sections of this manual for more information.
Focuser Menu
The Focuser menu allows you to connect to an Optec, Robo-Focus, JMI
Smart Focus, MoonLite or FCUSB focuser. All of these focusers require
a USB/Serial adaptor (except the FCUSB) and the appropriate cable.
These focusers are discussed in other sections of this manual.
Equinox Pro 19Sky Window
The sky window is the primary display for Equinox Pro. From this window you can see all stars to
6th magnitude, deep sky objects and their photos, comets and minor planets, constellations and all the
other items in the Show menu. You can also control many aspects of Equinox Pro directly from this
window.
The scroll wheel, Magic Mouse, Track Pad and arrow keys, control panels and menu items allow you
to move around the display. Hold down the option key and the scroll wheel/arrow keys will zoom in
and out and change the time. The ‘+’ and ‘-’ keys can also be used to zoom the display or pinch with
a Track Pad. Click on an object and an information panel will open. Select Below Horizon and the
horizon becomes transparent, allowing you to see everything that is below the horizon. Watch the sun
set and see a red glow turn to twilight to a dark sky.
The cursor can be used for several different pur-
poses. A simple click will bring up an information
panel with data about the clicked object. However,
the option and shift keys can also be used for
other functions. A context menu (right click or
control+click) identifies these other functions.
Track Object (command+click) will open the Scope
View window and, if you are connected to a telescope, slew the scope to the clicked object. Option +
drag produces an angular separation calculation. Dragging alone will move the sky around with the
cursor. Shift + drag creates a copy marquee. If you double-click on an object the Filters preference
panel will open.
If you select Planet/Comet path from the Show menu, any planet, comet or minor planet that you
click on will display its path over time. You can adjust the path duration and what percent of the path
extends into the future from the Filters preference.
The Filter preferences allow you to control everything that appears in the sky window. You can limit
the magnitude of stars, comets and deep sky objects, change the brightness and color of the stars and
select what type of deep sky objects appear by means of selection lists. You can identify double stars
from two lists, variable stars and stars with planets.
From the Setup preferences you can elect to show twilight or not and control the transparency of
control panels. From the Fonts and Colors preference you can change the font, text size and color of
all text labels. Every line and grid can be any color you like. The sky window can appear any way
you want it to.
There are situations where you might not want the Sky Window to be displayed. For example, if you
are using a webcam or the telescope controls the sky display can be a distracting background. If you
close the Sky Window with the red close button (top left in the title bar) or from the Windows menu
the window will remain closed. To redisplay the window select the Sky Window from the Windows
menu.
Equinox Pro 20Scope View Window
The Scope View window allows you to simulate what you can see through a telescope with stars
down to 12th magnitude (from the Hipparcos/Tycho-2 catalog). The circular outline defines the field
of view for the selected telescope and eyepiece or the power you have selected. The bottom panel
displays the current power, field of view and location (RA and Dec). You can shift the display with a
scroll wheel or arrow keys. The orientation of the display is by RA and Dec.
All the controls for the Scope View window are contained in a drawer. Here
you can select any telescope and eyepiece you have defined in the Telescope
preferences or you can simply use the slider to adjust power. The display
will be reversed N/S and E/W according to your scope definition.
The Digital Sky Survey, ESO and SkyView internet sites can be accessed
with the controls in the DSS box. The popup menu gives you a choice of
DSS image sources - not all sources contain images for all areas of the sky.
The DSS and ESO sites have a 1° field of view limit but the SkyView site
has no limit. You can cache the images if you wish by checking the Cache
checkbox. If you make a request and that image has been cached the cached
image will be displayed without internet access (much faster).
The NOMAD (Naval Observatory Merged Astrometric Dataset) controls
allow you to download and overlay the star or DSS display with reference
magnitudes or display the data as stars. This not only displays more stars
(down to 18th magnitude) but it can be very useful as a visual aid for vari-
able star, minor planet and comet magnitude estimates.
You can use the Scope View window to see the rings of Saturn and its satel-
lites, monitor the progress of a Mercury transit or watch a solar eclipse. If
you click on a star, deep sky object or satellite the Information panel for that
object will open. You can also command+click on any object in the Scope
View window and that object will be centered in the window and, if you are
connected to a telescope, the scope will move to that object. If you click on
the moon image various features will be labeled (the scope must have Rev
N/S and E/W turned off).
If you are connected to a telescope the LED button in the bottom panel will turn green and blink
every time the scope’s location is polled. If a communication error occurs the LED will turn red. If
the scope is slewing, the button turns yellow (not all telescopes report slewing conditions). Hitting the
keyboard space bar will halt slewing. If you are not connected to a telescope the LED is gray.
There are situations where you might not want the Scope View Window to be displayed even though
you are connected to a telescope. If you close the Scope View Window with the red close button or
from the Windows menu the window will remain closed. Telescope goto and polling will stop (unless
you have selected Retain Polling in the telescope preferences). Scope polling is very CPU intensive
so unless you need it closing the Scope View window is an easy way to improve display response. To
redisplay the window and resume scope control select Scope View from the Windows menu. If you
minimize the Scope View Window polling and scope control is retained.
Equinox Pro 21Solar System Window
The Solar System window plots the orbits of the planets in three dimensions. From this window you
can zoom in and out, rotate around the sun and change the angle of the orbital planes. It takes a bit of
practice to “see” the orbits in three dimensions.
You can click and drag the cursor inside the window to position the orbits. The
zoom control will zoom from the center of the window. A double-click will
recenter the sun.
The control drawer gives you zoom, angle and rotate slider controls. You can
also change these controls with a scroll wheel or arrow keys. Switch between
zoom, angle and rotation with up/down, left/right and option keys. The arrow
keys make fine adjustments only. The Date box allows you to increment the
time by 1, 5, 10 or 20 days or simply enter a new time in the Date Picker.
One of the most useful features of the Solar System window is its ability to plot
the orbit of comets and minor planets in relationship with the planetary orbits.
Click on a comet or minor planet in the sky display and its orbit will be plotted
in the Solar System window. By adjusting the rotation and angle of the display
you can see how its orbit intersects with the orbits of the planets.
Note: the planet images are much larger than their actual size in relation to their orbit size.
Equinox Pro 22Tonight Window
The Tonight window plots the altitude of selected objects for the current night. It can also display the
twilight range and a 15° mist. If you are going to observe or image objects the clearest view is usually
when the object is at its highest point. This window shows you the altitude of selected objects for 24
hours, centered at midnight local time. This plot tells you how high up in the sky an object is at the
corresponding time but it does not tell you where it is in the sky.
You can select planets, the moon and sun. You can also select two different tour files which, of course,
can contain any number of objects of any type that are in the Equinox Pro database. Normally you
would create new tour files that contain the objects you want to observe for the current evening.
The planet plots use the font and color preference for planet names. Tour one uses the font and color
of deep sky names and tour two uses the font and color of comet names. The intent is that you can
create tour one with deep sky objects and use tour two for everything else (comets, minor planets and
stars), but you can put whatever you like into either tour file.
If you click in the plot area a green marker is displayed and the time and altitude of that location is
drawn in the horizon area of the plot. If you click in the horizon area the current marker and text are
cleared. A vertical red line indicates the current Equinox Pro time.
The twilight shading represents astronomical twilight where complete darkness occurs once the sun
is 18° below the horizon. If you wish to see civil twilight (sun 6° below horizon) turn off the twilight
checkbox, hold down the option key and then select twilight again.
Equinox Pro 23Telescope Control
Equinox Pro can connect to a variety of telescopes, using several different serial communication
protocols. If your telescope is a Meade LX200 or emulates LX200 protocol, supports just the basic
Meade commands, is a Celestron NexStar, emulates NexStar protocols, has a Takahashi Temma
II mount, is a Astro-Physics mount or uses the Gemini controller, Equinox Pro should be able to
connect to your scope. The LX200, Meade Basic, NexStar, Temma II, iOptron iEQ45/ZEQ25 and
Gemini mounts have control panels.
The connection to all telescopes is done with a USB/Serial adaptor. The Keyspan HS and FTDI
adaptors have proven to be very reliable. You also need a cable that runs from the DB9 connector on
the adaptor to the serial RS-232 port on your scope. For most scopes this connector is located on the
hand controller. Most telescope companies sell a cable that is designed to work with their scopes -
they are all different so you do need the right cable.
Once you have your Mac connected to the USB/Serial adaptor, and the adaptor connected to your
scope, you are ready to connect Equinox Pro and your telescope. For most telescopes it is best to
follow the scopes startup and alignment procedure before you connect to Equinox Pro. The exception
is Temma II - you will need Equinox Pro to synchronize your scope.
Select your telescope from the Connect menu. If you have several serial ports (multiple USB/Serial
adaptors) the connection will be faster if you first select the serial port your scope is connected to
from the Connect menu Serial Port selection.
If the connection fails for some reason an alert message will be issued. Otherwise the Scope View
window will open if it is not already open and the gray LED will turn green. The LED will blink
each time the scope is polled for it location. If your scope uses LX200, NexStar, iOptron, Gemini or
Temma II protocol a control panel will also open.
LX200 Protocol
After connecting Equinox Pro knows where your scope is, but it does not have a “tracking object”.
You should command + click on some star, the star the scope was aligned to or one close by. Once
the scope stops slewing to the star center the star with the slew commands either in the LX200 con-
trol panel or with the hand controller. Once the star is centered in the scope hit the Sync button. This
will align your Scope and Equinox Pro. You can use this Sync button often - any time you need to
recenter a new object. To move to a new object command+click on it in the Equinox Pro sky display.
The LX200 control panel allows you to slew
the scope, control the slew button action (hold
down or push On push Off), pulse the slew
(context menu with On/Off selected) and
control the Meade microfocuser. You can park
the scope (which does an automatic discon-
nect) and change the communication baud rate
(LX200 GPS only). The store command is for
equatorial fork mounts . It moves the OTA
aligned to the forks. Note that not all scopes
support all the LX200 commands.
Equinox Pro 24Temma II Protocol
Most Temma mounts need Equinox Pro to become synchronized. You should first align the mount
with the alignment scope or the method described in the Temma manual. Manually move the scope
to an alignment star and center it. Connect to your scope and command+click on the alignment star
in the main sky display to tell Equinox Pro the sync star’s location. Tell the mount on what side of
the mount the scope OTA is on (East or West), the tracking rate to use and the voltage you are using.
Now you can hit the Star button in the Sync box. The mount should now be ready for use. You can
also sync the mount by pointing the scope straight up and hitting the Zenith button in the Sync box.
Once the mount is synchronized you can
slew to new objects by command+clicking
on them in the Equinox Pro sky display.
You can also use the slew control buttons
in the control panel. The Lock checkbox
controls how the slew buttons work. The
slow speed settings set the slow slew
speed to percent values of sidereal speed.
You can resync the scope at any time. Go
to a new object (command+click), manu-
ally center it and then hit the Star button.
NexStar/SynScan Protocol
Celestron NexStar scoes should use the NexStar protocol and SynScan mounts should select the
SynScan protocol. You align your scope manually as instructed in the telescope’s manual, then con-
nect to Equinox Pro. You can move from one object to the next by command+clicking on the object
in the Equinox Pro sky display.
NexStar scopes do not have slew commands but by taking
over the tracking control slew commands can be simulated.
Slew command speeds use the hand controller’s speeds 1,
3, 5, 7. Hold down the option key with a slew button and
speeds 2, 4, 6 and 8 will be used. The Sync button can be
used to precisely synchronize your scope and Equinox Pro
once you have centered on an object.
SynScan mounts do not support the NexStar Sync com-
mand but Equinox Pro simulates this if you goto within 10
degrees from the previous goto. This is useful if you are
hunting for a faint object. Goto, center and sync on a nearby
star, then goto the faint object. If you hold down the option key and hit Sync the offsets will be reset
to zero. If a sync is in effect the Sync button will say “Synced”.
Sky Commander / Losmandy DSC Protocol / ServoCat
The Sky Commander protocol will display where the scope is pointing in the SV window and with
the sky display finder marker. A goto command will set special object 99 to the desired RA and Dec.
Equinox Pro 25You can also read