Foreign Languages and Special Characters in REDCap
←
→
Page content transcription
If your browser does not render page correctly, please read the page content below
Version Date February 1, 2022

Foreign Languages and Special Characters in REDCap
REDCap allows special characters and foreign languages for surveys or forms. However, importing or
exporting data dictionaries or data with special characters can be difficult due to the default encoding in
Microsoft Excel. This document will help you develop surveys and import and export data when special
characters or foreign languages are used.

Multi-Language Management Module
REDCap introduced a Multi-Language Management module in Version 12.0.0. This module streamlines
research conducted in multiple languages by providing a framework to create and display multiple
display languages for surveys, forms, and communications with participants. This module does not
translate any content and does not check for the accuracy of translations; it provides a platform for the
inclusion of translations and allows participants and researchers to select their preferred display
language.

Translating content in the Multi-Language Management Module:
    1. Build your project in your default language (e.g. English). This includes all instruments and may
        include other features, depending on your project design, such as survey settings, alerts and
        notifications, missing data codes, etc.
    2. Navigate to the Multi-Language Management module available in the left-hand menu.
            a. This module is only available to users who have the “Project Design and Setup” privilege
                 in the user rights table.
            b. Note: When using this module, changes are not automatically saved. When there are
                 unsaved changes, there is a yellow “Save Changes” button at the top of the page and a
                 yellow line down the left-hand side of the page. Make sure to save your changes often;
                 you can use CTRL-S as a shortcut on PCs or Command-S on Macs.

    3. On the “Languages” tab, add all languages that will be included in your survey. This includes
       your default language.
Version Date February 1, 2022
a. When adding a language, you will be prompted to add a “Language ID.” You are
encouraged to use the established ISO codes for this code.
b. Set your default language in the “Default” column and activate all languages that need
to be activated in the “Active” column. If a language is not activated, it will not appear
as an option for display.
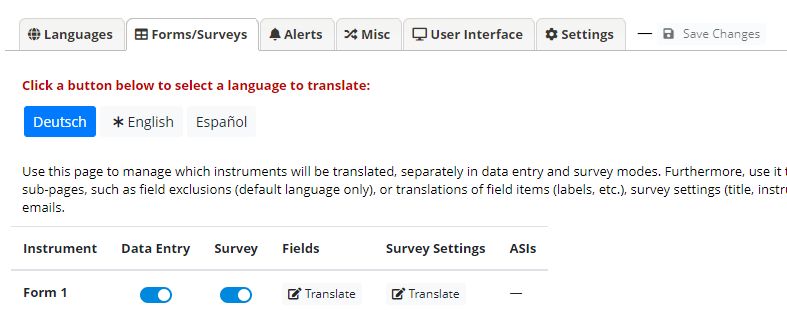
4. Once languages are added on the “Languages” tab, you can provide translations for the content
that needs to be translated. The tabs at the top of the page and icons next to each language
correspond to content that can be translated. This includes instrument questions, as well as
other instructive text, such as the “Submit” button for surveys.
a. Forms/Surveys – Where translations for instruments, survey settings, and Automatic
Survey Invitations are included. Each language, except the default language (marked
with an *) needs to be translated. Additionally, each language you want available as a
selection for a data entry form and/or survey must be activated in the correct
column(s), including the default language.
b. Alerts – Where translations for communications included in the “Alerts & Notifications”
module are included.
c. Misc. – Where translations for miscellaneous items are included. This tab will only be
populated with content to translate if a “miscellaneous” feature that may be translated
has been enabled, such as missing data codes.
d. User Interface – Where translations for various user interface features are included,
such as “Next Page” and “Previous Page” survey buttons, validation error messages, and
locking/unlocking text.
e. Settings – These are settings for the Multi-Language Management module.
5. When translating content in any category, you must select the language you want to translate.
Untranslated content will be shown with a red box next to it.Version Date February 1, 2022
After an instrument question is translated, check the box next to the variable name to indicate
the translation is complete.
Translated content that is not an instrument question will automatically turn from red to green
when text is included in the provided space.
Reminder: REDCap does not check the accuracy of translations.
Selecting Display Language
When a participant loads a survey, they will be able to select their preferred language at the top of the
survey page. They can also change this at any time during the survey by clicking the globe icon next to
their current display language.Version Date February 1, 2022 REDCap users entering data on data entry forms can select their preferred language from the dropdown menu in the top right corner of the page. For longitudinal studies, you can also include a language preference question that will set a default language for additional surveys, Automatic Survey Invitations, and alerts. To include a language preference question in your study, include a multiple choice question (radio button or drop-down list) where the codes correspond with the language IDs established in Step 3a above.
Version Date February 1, 2022

Making Changes to Projects in Production
Changes can be made to anything in the Multi-Language Management module after a project has been
moved to production. Before any changes can be made, you must move the project to Draft Mode on
the “Online Designer” page.

Multi-Language Action Tags
There are several new action tags specific to studies being conducted in multiple languages. These can
be explored and added to fields and instruments on the “Online Designer” page.

Exporting Data Collected with the Multi-Language Management Module
You don’t need to do anything special! With the Multi-Language Management module, all data for a
field will be stored in the same column, regardless of the display language the participant or REDCap
user was viewing when they completed the instrument.

Additional Information:
   • Translations are within project. If you have multiple projects that will utilize the same
        questionnaires and need the same translations, translations must be provided for each project.
   • At this time, translations cannot be provided for the answers in the “Yes-No” or “True-False”
        question types. If you need questions with these answer options in an instrument that will be
        translated, use a radio button question instead. Remember: the default coding for these
        questions is 1 = yes or true and 0 = no or false. Including the same coding schema is advised.
   • REDCap does not automatically provide translations or check the accuracy of translations.

Special Characters
Online Designer
Any character that can be entered into a field label, field note, answer choice, etc. will be displayed
properly in the REDCap system. Similarly, if survey participants use special characters in their answers in
a text or notes box, REDCap will display and store those characters properly.

Data Dictionary
If you prefer to build surveys or forms using the Data Dictionary upload, ensuring that special characters
appear correctly can be trickier. Microsoft Excel saves all files with ANSI encoding, but UTF-8 encoding is
necessary to display all special characters appropriately. Instead of Microsoft Excel, LibreOffice can be
used to build the surveys or forms in the Data Dictionary. LibreOffice allows UTF-8 encoding. Some
things to keep in mind when using the Data Dictionary to build projects with special characters:
      • Always set encoding to UTF-8.
      • Always save as a CSV file.

At this time, data dictionaries cannot be used to provide translations in the Multi-Language
Management module.
Version Date February 1, 2022
Importing Data with Special Characters
Importing existing data that contains special characters also requires using LibreOffice or another
software with UTF-8 encoding. Follow the instructions for importing existing data, using LibreOffice
instead of Microsoft Excel. Again, make sure:
• Encoding is always set to UTF-8.
• The file is always saved as a CSV file.
Downloading CSV Files
• Data Dictionaries or data with special characters will automatically export in a CSV file with UTF-
8 encoding.You can also read