FULL AWNING MANUAL Product No. OFA003 - Opus Camper
←
→
Page content transcription
If your browser does not render page correctly, please read the page content below
FULL AWNING MANUAL
       Product No. OFA003

          OFA003-UM-0517-Rev.B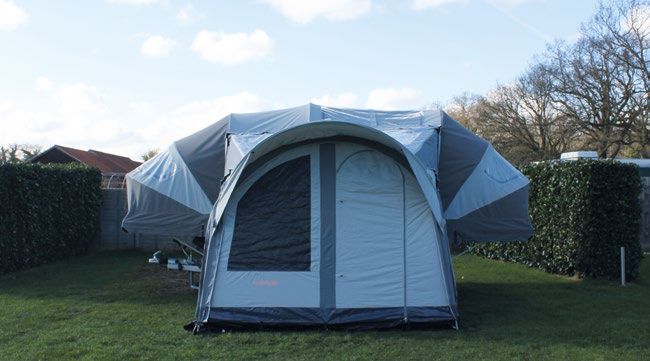
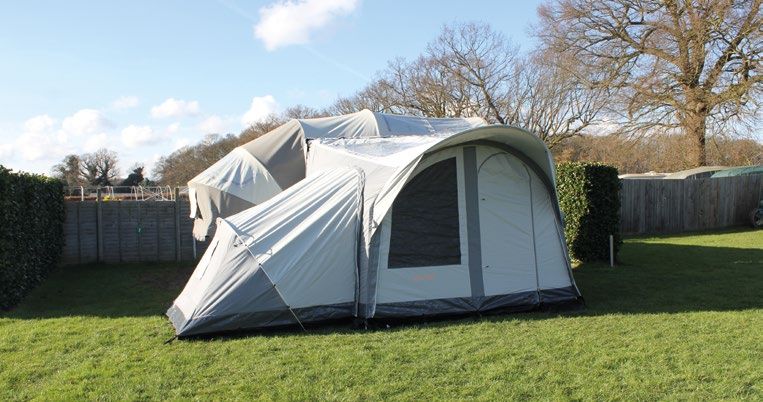
FULL AWNING.

    IMPORTANT! PLEASE READ THIS GUIDE THOROUGHLY BEFORE ATTEMPTING FIRST SETUP.

    PARTS REFERENCE:

      1.   Main Awning Section                              7.   Side Extension Pod Flexible Pole (x2)
      2.   Side Extension Pod                               8.   Guy Ropes
      3.   Front Hoop Pole Half (x2)                        9.   Guy Ropes Anchor Points
      4.   Front Hoop Pole Connecting Sections (x2)        10.   Telescopic Roof Poles with ‘C’ Clips
      5.   Front Canopy                                    11.   Inner Tent (x2)
      6.   Front Canopy Flexible Pole                      12.   Near Side (Door Side) Side Skirt

                                            4                          6

                                                                                             5

                                                                                                 3

                    2

                                                                                         1

                                       7

    CHECKING YOUR OPUS® AWNING:

    It is essential to check your awning thoroughly to ensure all parts are present before each trip.

    The awning bag contains:

              • OPUS® Awning main body with side pods (x2) attached
              • Inner tents for side pods (x2)
              • Front skirt
              • Ground Sheet
              • Segmented strung pole with open ends (x2)
              • Segmented strung pole with fitted end caps (x1)
              • Bag containing guy ropes and tent pegs

1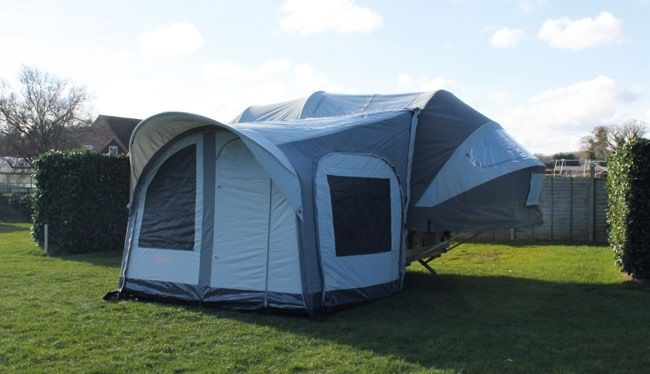
Take the awning out of it’s bag and lay it on a clean surface, if you are doing this outside we would
suggest using a ground sheet.

The awning comes packed with the side panels and side pods already attached. Detach the two
side pods from the main awning by unzipping; these can be identified by the coloured ventilation
panel on the pods and place these to one side for now.

Thoroughly check the main body of the awning canvas, the side pods canvas, the front skirt
canvas and the ground sheet for any signs of damage. Check you have the required quantity of
guy ropes and tent pegs.

The next step is to check the pole bag. Lay the poles out and verify that you have the correct
number of each type of pole and that there has been no damage to the poles.

The poles are numbered:

          • Pole 12 (x3) - These have ‘C’ clips on both ends.
          • Pole 13 (x1) - This has an end cap on both ends.
          • Pole 14 (x2) - These have a ‘C’ clip on one end and an end cap on the other.
          • Pole 15 (pole not numbered) - Bottom half of front poles - telescopic (x2)
          • Pole 16 (pole not numbered) - Connecting curves (x2)

                                         12
                                                      12
                                                              13

                                         16

                                                 14            12

                           15

                                                                      14

                                                 15

SETTING UP YOUR OPUS® AWNING

Setting up the OPUS® awning is easiest when being completed by two or more people. To set up
your OPUS® awning you will need the following equipment:

          • A peg hammer/mallet (depending on ground surface)
          • Peg puller
          • Step/double step

                                                                                                        2
STEP BY STEP GUIDE:

    PART 1: ATTACHING THE AWNING TO THE OPUS®

    1. Ensure your OPUS® Camper is level by adjusting the four corner steadies.
    NB: Your OPUS® needs to be level (horizontal) and not just level to the ground as the ground surface may not be flat.
    You can simply verify this by eye or you may want to use a spirit level to achieve perfect results.

    2. Lay down the groundsheet on the door side of the OPUS® and peg it down using the pegs
    provided.
    NB: The groundsheet serves as a surface to help set up the awning as well as a floor when the awning set up is
    complete. After use, ensure the ground sheet is adequately cleaned and dried to avoid damage or mould.

    3. Organise the poles by their numbers.
    NB: Poles of the same numbers have similar ends, follow the pole guide on Page 2.

    4. Unfold the main awning and remove all 3 side panels and both extension side pods to reduce
    weight and ease steps 5 and 6. Locate the 3 main zips on the main awning body that connect the
    awning to the OPUS® tent, these are distinguishable by the velcro strips adjacent to the zips.
    NB: Disconnecting the panels and side pods is only essential for the first set up to ensure ease of use. After a few times
    of setting the OPUS® awning up or once comfortable with the set up process the awning can be set up and taken
    down with the panels and side pods attached.

    5. The 3 individual zips should be zipped into the corresponding zips on the OPUS® tent.
    NB: To make this step easier the three middle poles 3, 4 & 5 of the OPUS® Camper itself can be retracted temporarily
    to lower the height of the top zip for easy reach, a step or double step may also be necessary to help you reach.

    6. As the 3 sides are being zipped on, ensure the velcro on the tent and awning are also being
    connected properly.
    NB: Once this step is completed, if you retracted poles 3, 4 & 5 for the previous step, these can now be extended back
    to their fully tensioned position.

      1.                                         2.                                         3.

      4.                                         5.                                         6.

3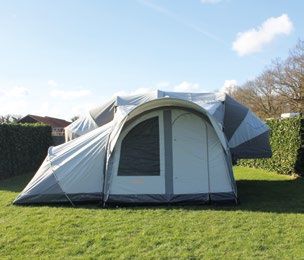
PART 2: ASSEMBLING THE CENTRAL AWNING SECTION

7. Lay down the two halves of the ‘connecting curves’ and fit together. Then connect the ‘bottom
half of front poles (telescopic)’ to the ‘connecting curves’ to create a single full ‘front hoop’ pole.
NB: The connections are made by a retained pin in the poles, which locks to a corresponding hole in the receiving ends
of the corresponding pole.

8. The now complete ‘front hoop’ pole can now be attached to the front of the main awning;
this is done on the inside of the awning with the aid of the velcro straps which run around the
periphery of the front panel.

9. Using poles 13 (x1) and 14 (x2); create an inverted U-shape by clipping the ‘C’ clips on the pole
14’s to either end of pole 13.
NB: This supports the rear of the awning placing less stress on the OPUS® tent.

10. Connect one end of each of the pole 12s (x3) that make up the roof supports to pole 13.
These should hang freely ready to be connected to the front ‘hoop pole’ at a later stage.

11. With the inverted U-shaped poles inside the awning canvas, extend both pole 14’s by releasing
the grey clamps so that pole 13 is parallel to the top zip and extended to the entire width of the
awning, which attaches the top of the awning to the top of the OPUS® tent.
NB: For telescopic poles with one end on the ground it is easier to hold the lower pole down and extend/retract the
top pole to make the necessary adjustments. These can be further extended during final adjustments if necessary.

12. Stand these poles against the OPUS® Camper and tent so they are flat against the side of the
OPUS®.

  7.                                        8.                                        9.

 10.                                        11.                                     12 .

13. Connect the middle pole 12 (currently attached to the centre of pole 13) to the centre of the
‘front hoop’. Extend pole so it spans the length of the canvas without being over-tensioned.

                                                                                                                         4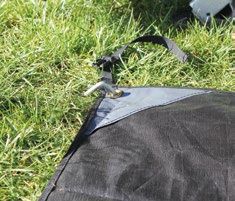
14. Connect the left pole 12 (currently attached to the left of pole 13) to the left of the ‘front
    hoop’. Extend pole so it spans the length of the canvas without being over-tensioned.
    NB: The position of the pole 12’s connection to the ‘front hoop’ pole will be defined by the velcro straps which secure
    the pole 12’s to the awning canvas.

    15. Connect the right pole 12 (currently attached to the right of pole 13) to the right of the ‘front
    hoop’. Extend pole so it spans the length of the canvas without being over-tensioned.
    NB: The position of the pole 12’s connection to the ‘front hoop’ pole will be defined by the velcro straps which secure
    the pole 12’s to the awning canvas.

    16. Re-attach the removed panels (front and sides), zip these back into the main awning.

    17. Once the poles have all been linked their lengths can be adjusted as necessary using the grey
    clips to fully tension the awning canvas.
    NB: Ensure all awning doors are closed at this point to ensure doors are not pulled too far apart which will prevent
    closing.

     13-15.                                     16.                                        17.

     18.

    18. The front skirt can now be zipped in. This is first zipped on to the bottom of the OPUS® tent at
    the front, then zipped at the sides in to the awning canvas; fully enclosing the awning.
    NB: If the front panel of the OPUS® is to be taken out or has been taken out; the skirt can be fitted to the OPUS® via
    the awning channel on the Camper.

    19. Peg down the awning using the pegging D rings on the base periphery of the canvas.
    NB: Peg the awning down fully so its base is flat to the ground to prevent draughts.

    20. There are straps with buckles along the base of the main awning canvas that connect the
    bottom corners to one another. Clipping these together will further secure the awning canvas to
    the poles and increase tension.
    NB: Once these have been adjusted correctly first time they can be left buckled on to make subsequent set ups easier
    and faster: only minimal adjustments will be required each time you set up, if at all.

5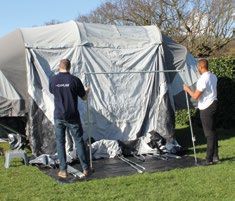
21. There are ‘guy rope’ points on the exterior of the awning to provide further tension and
additional securing points, especially useful in inclement weather.

22. Set up the awning front canopy by assembling the ‘segmented strung pole with fitted end
caps’ and feeding it through the pocket sewn into the canopy. Then insert each end into the
eyelets for the canopy to take shape.
NB: ALWAYS push the strung poles when feeding them, pulling will cause them to separate.
NB2: A small amount of effort is required to make this connection; this is necessary to create the required tension on
the canopy. The required amount of force will not result in any damage or issues.

 19.                                        20.                                       21.

 22.

PART 3: ASSEMBLING A SIDE POD

23. If unzipped, zip the side pods onto the main awning.

24. From the outside of the side pod, assemble the ‘segmented strung pole with open end’ and
feed it into the channel across the central seam of the side pod on the outside of the canvas, the
poles are retained into the pod by a pin at either end. Insert the pins into the open ends of the
pole for the side pod to take shape. Then use the clips on the outside of the canvas to connect the
rest of the side pod to the pole.
NB: A smooth curve around the mid-section of the side pod should be achieved.

25. Pull the corners of the side pod outwards to create some tension along the bottom edges.
Then peg the corners down using the metal D-rings.
NB: You can also secure the pod using additional peg points in-between the corner peg points.

26. The side pods also have guy rope points to provide further tension and additional securing
points, especially useful in inclement weather.
NB: The guy ropes can be set up to make tensioning easy by pulling on the sliders to keep the ropes taught.

                                                                                                                         6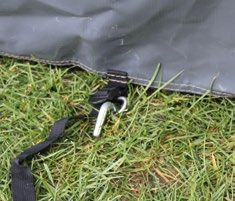
27. From the inside of the side pod the inner tent with sewn in groundsheet can then be
    suspended within the pod by attaching the plastic buckles to create a fully enclosed
    room/sleeping area.
    NB: The central buckle on the side pods and inner tents are colour coded for ease of attachment.

    CONFIGURATIONS

    Like the rest of the OPUS® the OPUS® awning is designed to be modular. All panels can be
    attached or removed easily by the use of zips. The OPUS® awning can be assembled in the
    following configurations:

               1. Central Section with Left Side Pod & Right Side Pod (with or without inner tents)
               2. Central Section with Left Side Pod (with or without inner tents)
               3. Central Section with Right Side Pod (with or without inner tents)
               4. Central Section with no Side Pods

7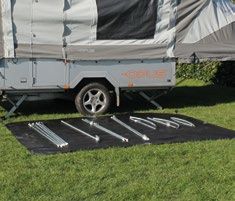
The side and front panels of the central section of the awning can be added or removed regardless
of whether or not the side pods are fitted, thanks to each side having the ability to accept two
zips. This means you can have side pods attached, and the panel fitted providing complete privacy
within the side pod. Alternatively you can have some or all panels and side pods removed leaving
the OPUS® awning acting like an outdoor windbreak or a large gazebo.

The front panel of the OPUS® Camper itself can also be added or removed as you wish, opening
the space up so the central section of the awning and the OPUS® itself become part of the same
room.

NB: When removing the OPUS® front panel please take care to ensure the panel does not snag as you slide it out of
the awning channel, where the tent meets the trailer body.

Photographs and diagrams are for illustration purposes only and may not be the exact revision of your awning
and/or side pods; the overall fit and general procedure however remains the same.

Actual product may vary and any specifications are subject to change without prior notice.

CARE & MAINTENANCE FOR YOUR OPUS® AWNING

• Keep the awning well ventilated to avoid condensation/moisture. More information can be found
on Page 38 of the Owner’s Handbook. Please note the presence of condensation/moisture is not a
sign of damage/failure and can easily occur depending on weather conditions.

• Do not use open flames or cook inside the awning.

• Ensure the ground surface that the awning is being set up on is clear from debris, sharp objects
and is as even as possible; always use the groundsheet as the base for the awning, especially
during set up to avoid damage.

• Regularly check the seams of the awning and if required apply some seam sealer such as Kampa
Seam Sealer or a suitable alternative. Follow the individual products instructions and allow to fully
dry before storage.

• Always carry a suitable tent/awning repair kit with your awning to help in emergencies.

• Never force the zips of the awning to open or close; inspect for the issue and rectify as necessary.

• Ensure the zips are used and cared for properly, if needed a zip lubricant can be used to allow for
smooth operation.

                                                                                                                    8
• Regularly check the buckles, straps, clips, pole-pins, strings etc. on the awning and ensure they
    are packed with care to avoid damage to them or the awning.

    • If the awning becomes damaged; we recommend bringing it to us where we can assess the
    repair needed (or a suitable professional) to carry out the repair.

    • Small rips and tears can be repaired using the appropriate repair kit and procedure and do not
    require a professional or return to us for repair.

    • Clean the awning with warm water and a soft sponge (without a scourer), this is best done
    when the awning is set up to allow access to all of its sections; leave to completely dry before
    packing.

    • When cleaning the awning do not apply unnecessary pressure that could result in damage to the
    awning.

    • Do not use washing up liquid, detergent or anything stronger as this could adversely affect the
    awnings material or result in some damage.

    • If needed a suitable tent cleaner such as Fenwicks Cleaner for awnings and tents can be used;
    follow the products instructions and ensure the awning is thoroughly dried before packing away.

    • The awning is NOT machine washable.

    • Reproof the awning as needed to help with water runoff; this can be done using suitable
    products such as Grangers Fabsil Waterproofer. Follow the products instructions and allow to fully
    dry before packing away the awning.

    • It maybe necessary to reproof the awning if certain cleaning products/procedures have been
    performed on the awning to maintain its water repellent finish/waterproofing.

    • Regularly inspect the awning for rips, tears and damages.

    • Always push and not pull on the tent poles particularly the strung flexible poles.

    • Care must be taken to avoid excessive bending, kinking or breaking of the poles.

    • Keep the groundsheet as clean as possible to avoid the awning from becoming dirty. It is
    advisable to clean the groundsheet after every use and always follow the campsite rules and
    guidance on the use of groundsheets.

    SPECIALIST PRODUCTS FOR YOUR OPUS® AWNING

              1. Kampa Seam Sealer
              2. Grangers Fabsil Waterproofer
              3. Fenwicks Cleaner for Awning
                 and Tents
              4. Zip Lubricant
              5. Leisurewize Frame Mate
                 Pole Tensioner
                                                             1.                  2.                    3.

9
IMPORTANT! READ THE INSTRUCTIONS ON THE SPECIALIST PRODUCTS, TAKE EXTRA CARE
AS APPROPRIATE WITH THE PRODUCTS TO AVOID HAZARDS SUCH AS FIRE & INHALING.
STORAGE OF YOUR OPUS® AWNING
• Do not store the pole bag vertically, this can damage the plastic catches/clips on the ends of the
poles. Always ensure the pole bag is stored horizontally and away from any items that could cause
damage.
• The awning should be stored dried, preferably without mud/dirt. If it must be packed down wet/
damp open it up to dry as soon as possible (within 24 hours) and ensure it is fully dried before
being stored.
• This is important to avoid mildew, mould and irreversible damage to the awning.
• Avoid packing the awning with leaves, stones and debris in it.
• To prevent permanent creases, fold/roll your awning a different way after each time the awning
is used.
• Clean and dry BOTH sides of the groundsheet.
• Store the poles in a manner such that they wont be kinked, bent or broken.
• Allow the poles to dry before storing to prevent rust.
• Keep the guy ropes and pegs as clean as possible and store in the provided bag to avoid
introducing dirt or damaging the awning.
• Pack the awning neatly and as compact as possible, this is usually achieved by rolling or
methodical folds letting out as much air as possible as you pack.
• Depending on your payload and distribution the awning may be stored as a whole inside the
OPUS® with the supplied bag or may need to be split into manageable sizes for the cupboards,
take care not to snag the awning on furniture edges or items inside your OPUS® Camper.
• When storing keep away from sunlight, water exposure and dirt. Keep in a dry environment.
• If the awning is to be stored in the OPUS® for an extended period of time ensure the Camper is
packed down correctly and dry. Taking care to ensure no water ingress or condensation can occur
in the Camper. This is very important for the longevity of the awning as well as the main tent of
the Camper.
10General Enquiries: enquiries@opuscamper.co.uk Marketing Enquiries: marketing@opuscamper.co.uk Warranty Enquiries: warranty@opuscamper.co.uk www.opuscamper.com 01473 601200 OPUS® Terms & Conditions and Warranty information can be found online at: www.opuscamper.co.uk/terms-conditions.html Photographs and diagrams are for illustration purposes only. Actual product may vary and any specifications are subject to change without prior notice. All information correct at time of print. Purple Line Ltd 2017. UK Patent No. 2500946A REVISION NUMBER: OFA003-UM-0517-Rev.B
You can also read