Getting started with Parent accounts - Launceston College
←
→
Page content transcription
If your browser does not render page correctly, please read the page content below
Getting started with Parent accounts
What is Class Charts for parents?
Depending on how your school has set up our system, you will be able to use Class
Charts to keep track of your child’s behaviour, view attendance records, access their
weekly timetable, view assigned homework tasks, track scheduled detentions, create
wellbeing submissions and view announcements from their school.

If you have more than one child, you can access Class Charts information about your
children from a single, centralised parent account.

Class Charts for parents can be accessed via our website, or through our iOS and
Android apps.

You should have received a
Parent code from your
school, which will look similar
to the example code shown
on the right.

This code is used to set up
your Class Charts parent
account, which is covered on
the next page.

                                                                                        2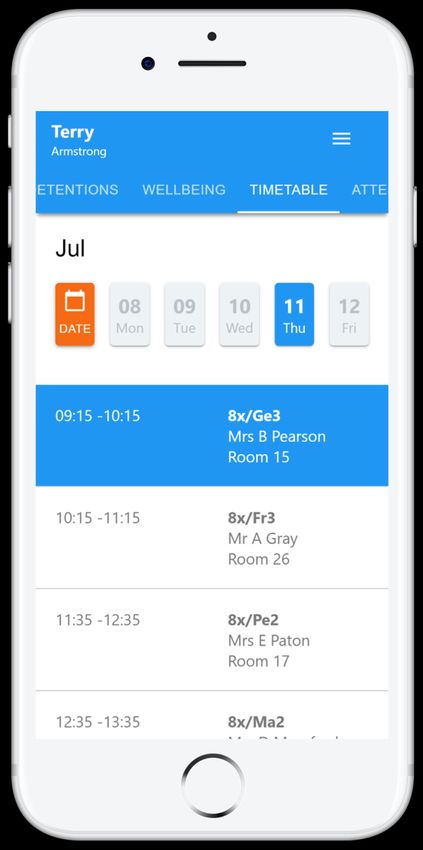
Signing up to Class Charts
1. Select Sign up from the main
page and fill in the form
provided. Enter your parent
code into the Access code field.

Please note: Your Access Code
is not the same as your
password. The access code is
only needed for the initial sign
up.

2. Click on the Sign up
button below the form.

3. Confirm the pupil’s date of
birth when prompted. Click on
the Date of Birth field and use
the date picker to enter the
correct date.

4. A confirmation
message will appear,
indicating that the sign up
process is complete.
Verify your email address
to continue.
                                   3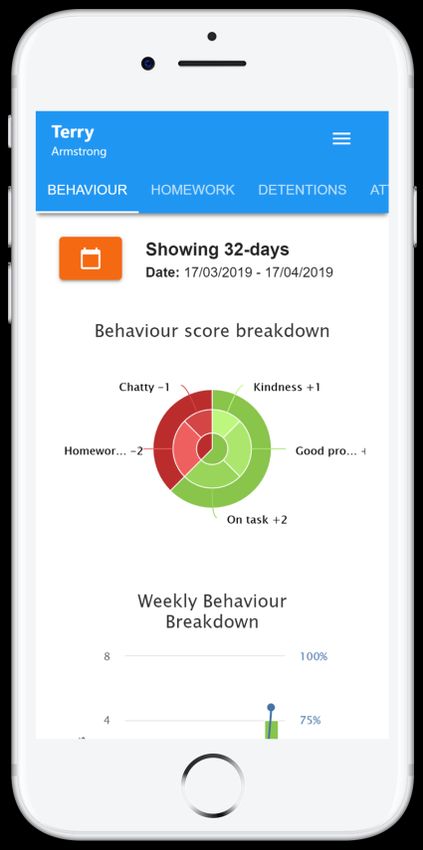
Behaviour
If your school has decided to share
behaviour information with parents,
you will see the Behaviour tab when
viewing pupils from that school.

Selecting this tab will display multiple
graphs which represent an overview
of your child’s achievement and
behaviour data within a customisable
timeframe.

By default, the displayed date range
is 31 days To view a different range
of behaviour data, click on the Date
button to select from the available
presets or create your own custom
date range.

Below these graphs you can find a
list of behaviour activity relating to
your child. These display the
behaviour that was awarded, when it
was awarded, who awarded the
behaviour, the lesson the behaviour
was awarded in, and how many
points the award is worth.

The level of detail within each
behaviour award depends on the
settings that your school has
enabled.

                                           4
Homework
If your school has decided to share
homework tasks with parents, you
will see the Homework tab when
viewing pupils from that school.

Selecting this tab will display a list of
homework tasks which your child
has been assigned to.

To change the date range for
displayed homework tasks, click on
the Date button to select from the
available presets or create your own
custom date range.

To display tasks in the order they
were set, click on the Issue Date
button

To display tasks in the order they
are expected to be handed in, click
on the Due date button.

To view a homework task
in more detail, click on the
expand icon in the bottom
right hand corner of the
homework tile.

A popup will appear that
contains the a description
of the homework task, the
estimated completion
time and any links or
attachments that may
have been included.

                                            6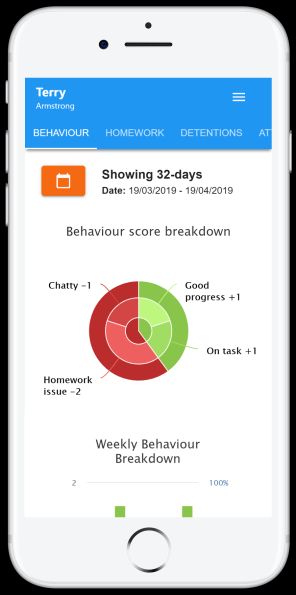
Homework status categories
To-Do: These are homework
tasks that have not been
ticked as completed by your
child and have not been
marked by their teacher.

Completed: These are
homework tasks that have been
ticked as completed by your
child but have not been marked
by their teacher.

Late: These are homework
tasks that have been
handed in past the deadline.

Not submitted: These are
homework tasks that were not
handed in on time.

Submitted: These are
homework tasks that have
been handed in on time.

                                 7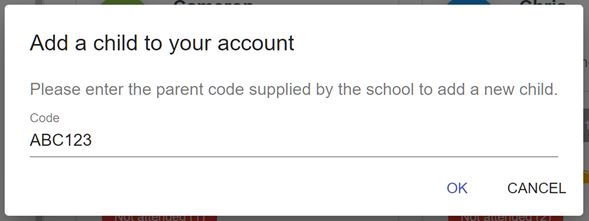
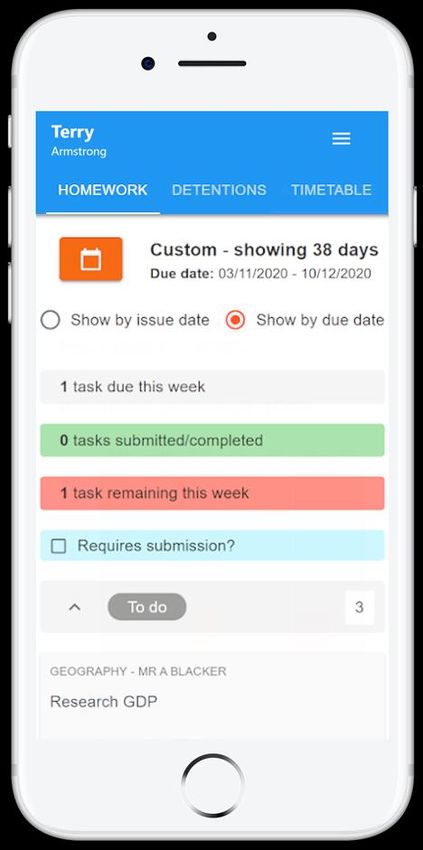
Keeping track of homework
As your child is assigned homework
tasks, you may want track of how they
are progressing for the current week.

The three banners above the
homework status categories count the
number of homework tasks that are
due this week, how many of those
tasks your child has completed and
how many tasks they still need to
complete.

To only see homework tasks that
require an attachment submission,
tick the checkbox labelled Requires
submission.

If you are viewing the Homework tab via a desktop or laptop, expanding a homework
status category will display a table overview of each homework task for the selected date
range.

                                                                                       8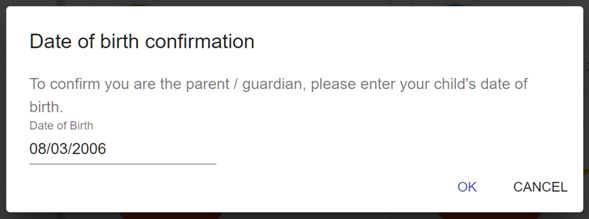
Homework attachment
submissions

For certain homework
tasks, your child may be
asked to upload their work
as an attachment. If your
school has allowed it, you
will be able to upload
homework attachments on
your child’s behalf.

When viewing a homework
task in more detail, you will
see the Upload attachment
button if your child’s
teacher is expecting their
work to be uploaded.

To submit a homework
attachment, click on the
Upload attachment button
and select the files of your
choice. Successfully
uploaded files will then
appear above the button.

If your child’s teacher leaves
feedback on one of their
homework attachments, you
will see a Feedback icon
appear on the associated
homework task.

                                 9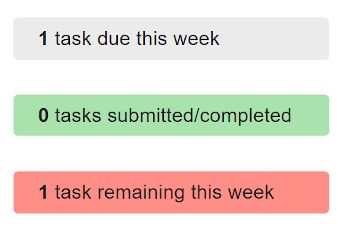
Timetable
If your school has decided to share timetable data with parents, you will see the
Timetable tab when viewing pupils from that school.

Selecting this tab will
present you with your
child’s timetable for the
current day. This
includes the time of
each lesson, the lesson
name, the teacher’s
name and the room
where the lesson will
take place.

Your child’s current
lesson will be
highlighted in blue, as
shown on the right.

To view timetable data
for another day of the
week, click on one of
the other displayed
dates along the top of
the timetable.

To change the displayed
week, click on the Date
button and select a date
from the week of your
choice.

                                                                                    14
Logging in to Class Charts
Once you have signed up to Class Charts, you can log back into your parent account at
any time.
1. Select Log In from the main
page and enter your email
address and password into
the fields provided.
2. Click on the Log in button to
begin accessing your Class
Charts parent account.
If you would like stay logged in
when you close the Class Charts
app, tick the checkbox labelled
Remember me.
If you have forgotten your
password, click on the Forgot
your password link. You will be
prompted to confirm your email
address so that a password
reset email can be sent.
24Adding additional pupils
Once you have set up your Class Charts parent account, you can add additional children
to the same account. To add another child to your account, please follow the steps
below:
1. Click on Add Pupil
button in the left hand
side navigation menu.
2. Enter the Parent
Access Code that was
provided to you by
your school.
3. Enter your child’s
date of birth when
prompted.
4. A confirmation
message will appear
and the child will be
added to the left
hand side navigation
menu.
25Adding additional pupils (app)
You are also able to add additional children through the Class Charts Parent app. To
add another child to your account via the app, please follow the steps below:
1. Click on the Pupil icon
in the bottom right hand
corner of the app and
select Add pupil.
2. Enter the Parent
Access Code that was
provided to you by
your school.
3. Enter your child’s
date of birth when
prompted.
4. A confirmation
message will appear
and the child will be
added to the pupil
icon popup.
26Switching between pupils
If multiple children have been set up on your Class Charts parent account, you are able
to switch between them and view child specific data at any time.
To switch between pupils on the
desktop view, click on their name in
the left hand side menu.
Their individual pupil dashboard will
open on the first entry in the list. You
can then switch between tab
categories by clicking on the available
icons in the list.
You can check to see which pupil is
currently selected by looking for the
orange tab highlighting their name in
the left hand side menu.
To switch between children on the
mobile app, click on the Pupil icon in
the bottom right hand corner of the
app and select the child of your
choice.
Their individual pupil dashboard will
open, allowing you to swipe between
their available tabs.
27Account settings
If you’re using the desktop view, you
can access the account settings menu
through the Settings button in the top
right hand corner of the page.
If you’re using the mobile app, these
options can be accessed through the
three lines menu in the top right hand
corner.
The Change password page allows
you to enter a new password for your
Class Charts parent account.
The new password must be a
minimum of 8 characters long, but
we also recommend including an
uppercase letter, a lowercase letter, a
number and a symbol.
The Account details page allows you to
change the displayed name on your
Class Charts parent account and the
email address used to log in and
receive notifications.
If you no longer wish to use your Class
Charts parent account, click on the
Delete Account option to permanently
delete it. Should you change your
mind, you will need to sign up again
using the parent code provided to you
by your school.
28FAQs & Troubleshooting
“I don’t have a parent code!”
Please contact your school and ask for a new parent code.
“I can’t log in! “
Please check your inbox. Have you ever had emails from Class Charts? If not, your
email address could be misspelt.
“It says I don’t have an account!”
Please make sure that you have successfully tried signing up with your parental access
code before attempting to log in.
“My password is incorrect!”
Please use the “Forgot your password” link to reset your password.
“I’m not seeing ____!”
This quick start guide provides information on all of our modules. If you are not seeing
a module mentioned in this guide, your school may not have decided to purchase /
enable that module.
“I would like to know more about your privacy policy“
We store your data securely in the UK.
Your email address is used for account login and shared with the school so that they
can send notifications and assist with account login problems.
We will not share your data with any other parties and never use it for marketing
purposes.
For more detailed information please click here:
https://www.edukey.co.uk/edukey-terms-conditions/
29You can also read