HR & Performance Management Guide - For HR module of the Bromcom MIS - Bromcom ...
←
→
Page content transcription
If your browser does not render page correctly, please read the page content below

HR & Performance Management
Guide
For HR module of the Bromcom MIS

Contents
Introduction ............................................................................................................................................................... 1
   Roles & Permissions ................................................................................................................................................ 2
   Access Levels and Permissions ................................................................................................................................. 2
   Line Management & Staff Units .............................................................................................................................. 5
      Line Management ............................................................................................................................................... 5
      Staff Units ........................................................................................................................................................... 8
   Manage Approval Process ..................................................................................................................................... 10
   School Objectives .................................................................................................................................................. 12
   My Profile ............................................................................................................................................................. 13
      Basic Information.............................................................................................................................................. 13
      My Team .......................................................................................................................................................... 15
      Contact Information ......................................................................................................................................... 16
      Vehicles ............................................................................................................................................................ 16
      Banking............................................................................................................................................................. 16
      Qualifications.................................................................................................................................................... 16
      Documents ....................................................................................................................................................... 17
      Absences & Leave Requests .............................................................................................................................. 18
      Claims ............................................................................................................................................................... 19
      Request Alerts - Requester ............................................................................................................................... 23
      Requests Non-Approval .................................................................................................................................... 23
      Request Alerts - Approver ................................................................................................................................. 25
      Requests for Approval ...................................................................................................................................... 25
   Copyright .............................................................................................................................................................. 27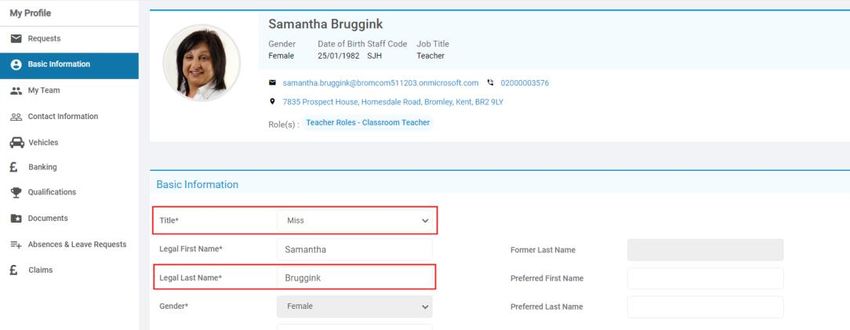
Introduction
HR & Performance Management allows schools to create and track their Staff members’ Objectives, link those
Objectives to School Objectives and manage HR processes such as Leave Requests or Expenses Claims.

Users can also track Review or Appraisal Meetings and keep any notes or important documentation that is created.

Any Continued Professional Development that Staff members go on can also be added to the system and used as
evidence of progress against Objectives.

The Performance Management area also includes the ability to create the Organisational Structure of your school, so
schools can easily create Line Management and direct report relationships between Staff members.

                                                                                                              1
                                                                     HR & Performance Management Guide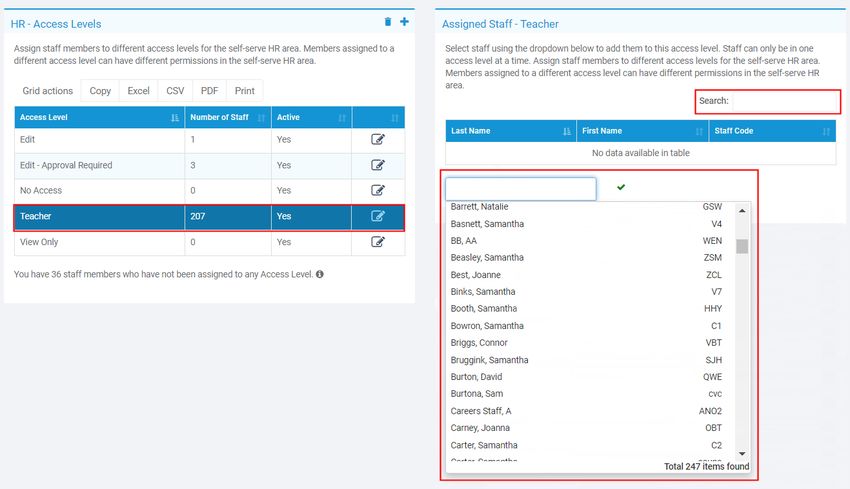
Roles & Permissions
Config > Setup > Roles & Permissions

Access for your HR Administrator for the HR & Performance Management pages is set under Roles & Permissions,
from within the Administration module.

Access Levels and Permissions
Modules > Administration > HR & Performance Management > Access Levels and Permissions

The Access Levels and Permissions page allows Access Levels to be created for Staff giving Permissions as to what
they can and cannot see or do on the Staff page. To add a new Access Level click on the + icon top right. It will also
show the number of Staff members not assigned to an Access Level, move the mouse pointer over the i Information
icon to see a list of those Staff members.

Enter a Name for the Access Level and a Description, the toggle button will show Active by default, change this if you
do not want this Access Level to be Active at this moment. When finished click the Next button.

                                                                                                                 2
                                                                       HR & Performance Management Guide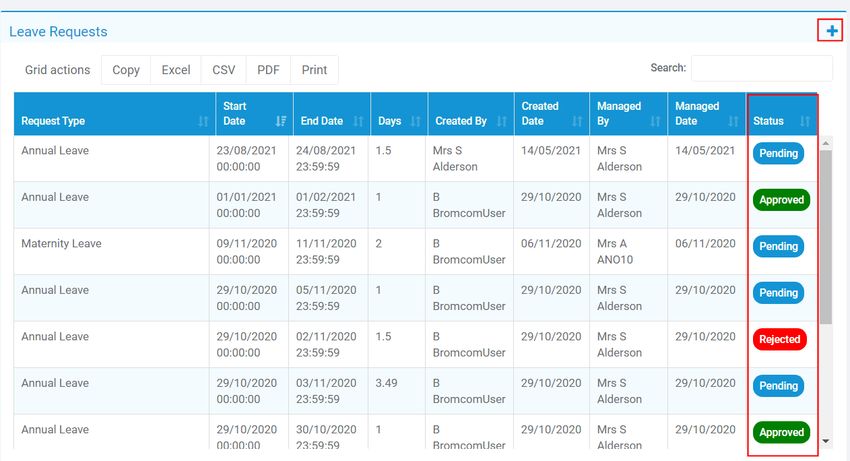
Access Levels can be created for the Basic Information, Contact Information, Vehicles, Banking, Qualifications,
Documents and Requests & Claims sections of the Staff page. The Access can be set for when a member of Staff is
viewing their own details or the details of other members of Staff by using the When Viewing Themselves or When
Viewing Others toggle button. This page will allow the HR Admin to decide which members of Staff have Access, to
ensure that no one is able to Edit or view information they are not supposed to.
Click on the Down Arrow to the right of the Permissions to set the Permission Level. A dropdown list will be displayed
with options to:
View Only – the User can see the option but cannot make changes
Edit - the User can see the option and can Edit it
Edit – Approval Required - the User can Edit the option but the change will require Approval
No Access - the User will not see this option
Not Permitted - the User is not Permitted to Add/Edit this option
Permitted – Requires Approval the User is Permitted to Add/Edit this option but the change will require
Approval
Permitted - the User is Permitted to Add/Edit this option
Note: The Permission Options will vary depending on the Access Level selected.
When the Edit option is selected a further two options are added to make this a Required Field and to make
Documentation Required, tick the relevant boxes to make the options mandatory.
Move across the tabs setting the Access Permissions for the required areas and when finished click the Finish button
to save your changes.
To Edit these options double click on the Access Level to open the page again or click on the Pencil icon on the right
of the row.
If the When Viewing for Others toggle is selected the options are set in the same way, based on the Staff Units that
have been created.
3
HR & Performance Management Guide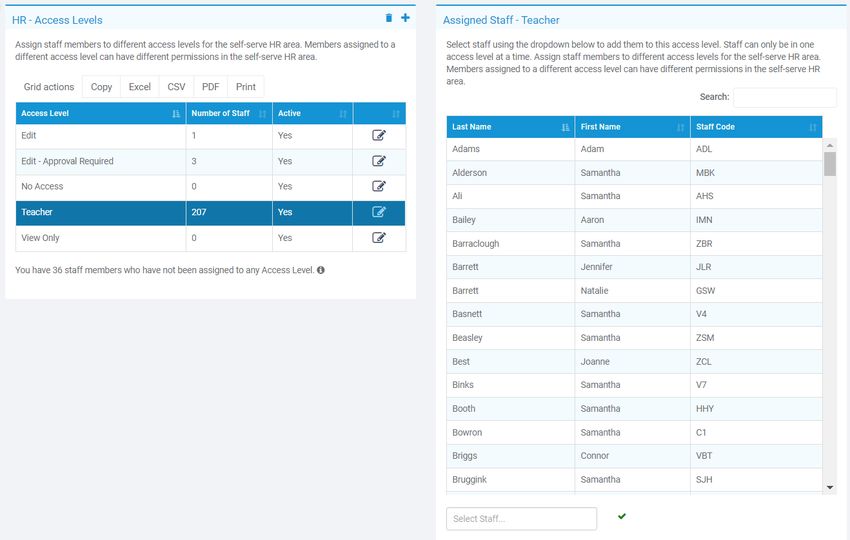
Now the Access Level has been created Staff will have to be added to it. To do this find the Access Level just created
and click on it, a new page Assigned Staff (with the name of the Access Level) will be displayed on the right. Use the
Search option or click in the empty field for a dropdown list to make your selections and click on the Green Tick icon
to Save.

The Staff will now show as added and if you look at the Access Level it will now display the number of Staff Assigned
to it. Additional Staff can be added at any time in the same way.

Note: A member of Staff can only be in one Access Level, if you add them to a second Access Level they will be
removed from the first.

                                                                                                                 4
                                                                       HR & Performance Management Guide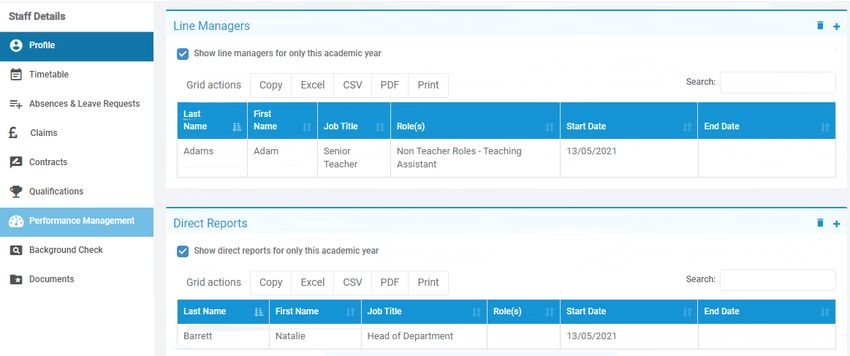
Line Management & Staff Units
Modules > Administration > HR & Performance Management > Line Management & Staff Units

Both the Line Management and Staff Units are maintained on this page.

Line Management
Line Managers and Direct Reports can be added here without having to open each Member of Staff page individually.
Select the Member of Staff from the dropdown list and click to highlight, then click on the + icon top right this will give
the option for Line Manager or Direct Report. The option to Edit will only apply once the Member of Staff has been
Assigned a Line Manager.

Selecting the Line Manager option will open a pop-up, select from the Staff Member dropdown list and click Save.

                                                                                                                      5
                                                                          HR & Performance Management Guide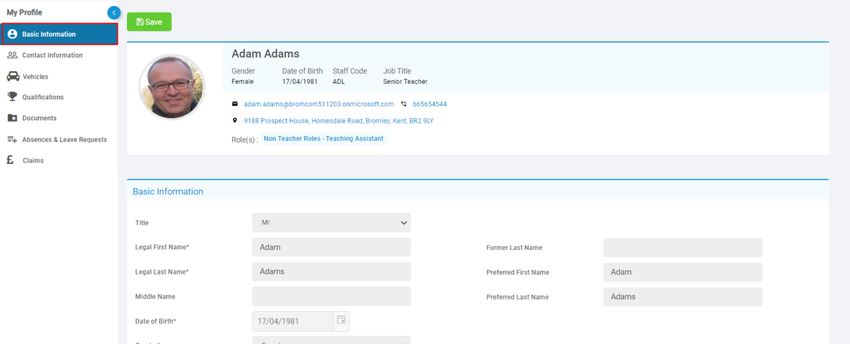
Selecting the Direct Report option will open a pop-up, select from the Staff Member dropdown list and click Save.

Double click on the Staff Name to Edit.

A pop-up will allow the Start and End Dates to be Edited.

Clicking on the right pointing arrow to the left of the Name, will change the direction of the arrow and display the
Direct Report information.

                                                                                                               6
                                                                      HR & Performance Management Guide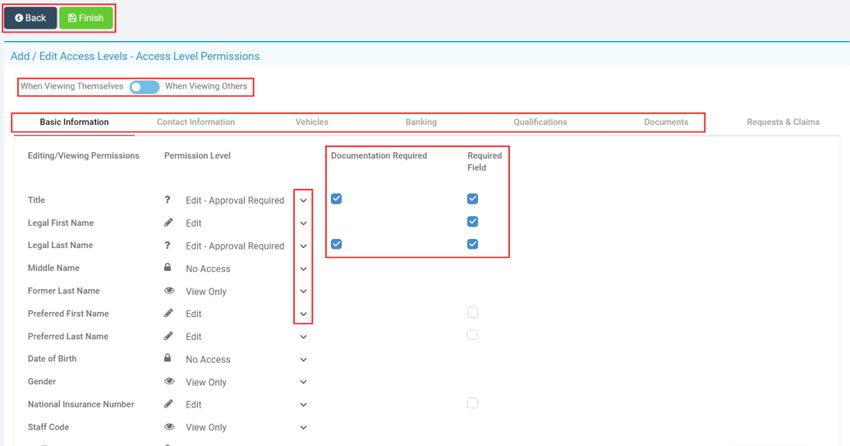
Double click on the Direct Line Staff member to open the pop-up to Edit the Start or End Dates.

Clicking on the Staff Name will open the Profile page for that member of Staff, where the options just entered can be
viewed under the Performance Management tab. The following is for Samantha Alderson.

                                                                                                                7
                                                                      HR & Performance Management Guide
Staff Units
Staff Units give the option for HR processes to be applied to groups of Staff. The Line Management Structure table
shows which Unit that member of Staff is in.

A new Staff Unit can be added by clicking on the + icon top right.

Enter the Unit Name, then select the Staff from the Add group by role dropdown list or the Individual Staff dropdown
list, when complete click the Green Tick icon to add the Staff.

The added Staff Names will now be displayed with the option to Add more or Delete, click Save when finished.

                                                                                                               8
                                                                      HR & Performance Management Guide
Note: A member of Staff can only be in one Staff Unit, if you add them to a second Staff Unit they will need to be
removed from the first.
When complete the Staff Unit will be listed with the Number of Staff displayed in the column. Double click to Edit the
list or change the Unit Name or highlight and select the Bin icon to Delete.
9
HR & Performance Management GuideManage Approval Process
Modules > Administration > HR & Performance Management > Manage Approval Processes
This page allows you to setup and manage the Approval Process for the Staff Self Service pages found under their
Profile. Select the Request Type from the dropdown list that will need Approval, (depending on the Permissions set
under the Access Levels and Permissions section).
The Approval Alerts options are ticked by default and will send an e-mail to the Work e-mail and a Bromcom System
Alert to both the Approvers and the Requesters.
Note: If more than one Approval is required, Alerts are only sent once the previous Approval has been completed.
For example if three levels of Approval are required the third Approver will would only receive an Alert once the first
and second Approvals have been completed. If the first Approval is Rejected the second and third Approver will
receive no Alert, as there would be nothing further to Approve.
Select the Staff Unit, these would have been created under the Line Management and Staff Units section. Next select
the Request Type. Finally select who can Approve the Request, this might be one member of Staff or several. For
example for a simple Change Details Request you might have Specific Person Approve the Changes.
10
HR & Performance Management GuideFor an Annual Leave Request you might have a Manager and a Manager’s Manager, Approve the Request. Click on
the Add Approval Step button and add additional Staff.
For an Additional Hours Request you might have a Manager, a Manager’s Manager and a Specific Person, Approve
the Request. Click on the Add Approval Step button and add additional Staff.
For an Expense Claim Request you might have a Manager and a Specific Person, Approve the Request. Click on the
Add Approval Step button and add additional Staff.
To Remove any of the options added click on the X to the right.
Note: Once a Manager or Manager’s Manager has been selected the option will be removed from the list. This
prevents a process being created where Managers need to approve the same thing twice.
11
HR & Performance Management GuideSchool Objectives
Modules > Administration > HR & Performance Management > School Objectives
This page allows you to setup and manage your School Objectives, setting School-wide Objectives or to help set Staff
Objectives and Track Performance Management. To Add a new Objective click on the New button.
Add the Objective information and click Save.
The School Objective has now been added.
The Schools Objective can now be added to the Staff Objectives. To do this go to Staff > Select Staff Members > View
> Performance Management > Staff Objectives and select the + icon top right. The School Objective will be listed
here.
12
HR & Performance Management GuideMy Profile
Click on Image top right of page > My Profile
This is where Staff can see information and make changes or requests based on the Access Permissions given under
Modules > Administration > HR & Performance Management > Access Levels and Permissions.
Note: If a User does not have Permissions set to see anything on the Basic Info, My Team, Contacts, Banking or
Vehicles tabs they will not be displayed. The Qualifications, Documents, Absences & Leave Requests and Claims tabs
will always be displayed. If a User has Permissions set but there is no data for that section the tab will be displayed
with a message that there is no data available.
If the User has been given Permission to Add new the + icon will be displayed, for Editing the Pencil icon and to Delete
the Bin icon. A Field that cannot be edited will be greyed out. The following sections are based on different Permissions
given to the User.
Basic Information
The Basic Information tab opens by default and displays the Staff Basic Information.
Enter any changes and click on the Save button, changes cannot be made to greyed out fields. When making changes
if the Required Documents option has been selected, you will be asked to upload the relevant supporting Documents.
13
HR & Performance Management GuideFor example changing to a married name.
On saving the change, if the Documents Required option was set in the Configurations, you will be asked for the
relevant proof, select the Upload New Document button and Upload & Save. A message will be given after saving.
14
HR & Performance Management GuideMy Team
The My Team tab displays, sections for the Names of your Manager, Department Colleagues and My Direct Report.
If there is a View button to the right you can click on this to open a new browser page displaying the Profile page of
that person. Clicking on any of the other available tabs will display that information.
Note: What you will be able to see on these pages depends on the Access Level Permissions set for the When Viewing
Others option on the Access Levels and Permissions page.
15
HR & Performance Management GuideContact Information
The Contact Information tab displays the Emergency Contact Information. In this example the option to Add a new
Contact or Edit an existing Contact are the only options available and the changes do not have to be Approved. Move
pointer over section to be amended, which will highlight and display the options.
Vehicles
The Vehicles tab displays the Vehicle Information. In this example the member of Staff has the options to Add a new
Vehicle and Delete or Edit existing ones and the changes do not have to be Approved. Move pointer over section to
be amended, which will display the options.
Banking
The Banking tab displays the Banking Information. In this example the member of Staff has the option to Edit existing
details and the changes do not have to be Approved. Move pointer over section to be amended, which will highlight
and display the options.
Qualifications
The Qualifications tab displays the Qualifications information. In this example the member of Staff only has the option
to View the information.
16
HR & Performance Management GuideDouble clicking on a Qualification will display more details, still in View Only.
Documents
The Documents tab displays any added Documents. In this example the member of Staff can Download an existing or
Upload a new Document, but does not have the option to Delete a Document or to Remove an Important Flag.
The Search option is available to Search for a specific Document and the View can be selected from the Document
Type dropdown and the Status dropdown which will display either All Documents or Important Documents.
Clicking the Download icon will download the Document to your downloads area. Clicking the Add new Document
icon will open the Add Document section.
Document Type - is selected from the dropdown list
Important - if ticked marks the Status of the Document as Important
17
HR & Performance Management GuideWhen finished click the Upload & Save button.
Note: The Document Types are created in the Lookup Tables, Config > Administration > Lookup Tables > Document
Types.
Absences & Leave Requests
The Absences & Leave Request tab has two sections Absences, which gives a View Only list of Absences and if the
Include Trainings box is ticked Training Days as well and the Leave Request section.
The Leave Request section displays the Requested Leave and the Status of that Request.
To Request Leave click on the + icon top right to open the Add/Edit Leave Request pop-up, enter the details and click
the Save button.
18
HR & Performance Management GuideThe Request will now show as Pending under the Status column. A Pending Request (that is not a past Date) can be
edited by double clicking on the row.
Claims
The Claims tab gives the option to make a Claim for Expenses or Additional Hours. Click the Dustbin icon to Remove
Expense Claims or Additional Hours, there will be a Warning Message select Cancel or Proceed, click the + icon to
Add Expense Claims or Additional Hours.
Note: Claims with a past date cannot be Deleted or Edited.
Click on the + icon top right to make an Expense Claim. When adding an Expense Claim there are two sections to the
Claim, the Summary of Claim and Lines. The main details are added under the Summary of Claim section and the
actual amounts claimed for under the Lines section.
19
HR & Performance Management GuideClick to add a New Line then enter the details of the Claim, if there is more than one amount to be claimed for, add
another Line, select from the Group and Type dropdown lists for Claim Groups and Types, click on the Line to view
the Details. If you have any documents or receipts etc., these can be added by clicking the Browse button and
uploading the files, once Uploaded they will be displayed in the File(s) attached table with the options to Delete or
Download to the right, when finished click Save.
20
HR & Performance Management GuideWhen making a Claim for Mileage the Vehicle information will be displayed for the claimant, if the Vehicle information
has not been entered for that member of Staff a Message will be given asking for it to be added. This is done in the
Vehicle section of the Staff Profile.
Once saved the Expense Claim will be listed in the Expense Claim table as Pending. To view or Edit the Details of the
Claim double click on the Claim row.
To Claim for Additional Hours click the + icon top right.
21
HR & Performance Management GuideUse the dropdown list to add the Details.
The Claim will now be displayed as Pending.
22
HR & Performance Management GuideRequest Alerts - Requester
When a Request has been made, if the Approval Alerts options under the Manage Approval Processes section are
Active, an Alert and e-mail will be sent to you, confirming the type of Request you have sent.
When the Request has been completed an Alert and e-mail will be sent to you, confirming the outcome of the
Request.
Requests Non-Approval
The Requests tab displays the Requests you have made, the results of the Requests. If you have not been listed to
Approve Requests the Inbox and the Completed sections will remain empty. By default the Requests page will open
on the Inbox.
The Sent section will display a list of Requests you have sent for changes to your Information or Claims.
23
HR & Performance Management GuideClick on a row to open it and view the Request details.
The status of the Requests will be updated here to show those Pending, Approved or Rejected.
You can also see how far your Claim has progressed, by clicking on the row and looking at the table top right will show
the latest activity.
24
HR & Performance Management GuideRequest Alerts - Approver
When a Request has been made, if the Approval Alerts options under the Manage Approval Processes section are
Active, an Alert and e-mail will be sent to you, confirming the type of Request that has been made for Approval. There
will also be a reminder on your Profile Image as to how many Requests you have outstanding under the My Profile
section.
The number of Requests will also be displayed on the My Profile page.
Note: The number of Requests shown will increase and decrease as they are received and completed.
Requests for Approval
If you are a one of the people listed to Approve Requests under the Manage Approval Process section a list of
Requests made by other members of Staff for Approval will be displayed under the Inbox section. Displaying the type
of Request and the Name of the Staff member.
Click on the row to view the details of the Request and select the Approve or the Reject button. A Comment will have
to be added if the Request is being Rejected. Any uploaded support Documents can also be viewed.
Additional Messages can be added by typing in the Comment box and clicking the Post button, these will be visible to
all those Approving and the Requester and will display under the Approve and Reject buttons.
25
HR & Performance Management GuideOnce done the Request will be moved from the Inbox section to the Completed section. The status will be displayed,
if the Request needs to be Approved by more than one person it will still show as Pending.
When clicking on the row the table top right will also be updated.
Once the Request has been approved by all, it will show as Approved.
26
HR & Performance Management GuideCopyright
This document and the software described in it are copyrighted with all rights reserved. Under copyright laws, neither
the documentation nor the software may be reproduced, copied, translated, or reduced to any electronic medium or
machine-readable form, without prior written consent from Bromcom Computers Plc. Failure to comply with this
condition may result in prosecution.
This computer program is the intellectual property of Bromcom Computers Plc. The program is protected under
copyright law and is licensed for use only by the user who has subscribed as a customer of Bromcom Computers Plc.
Sale, lease, hire rental or re-assignment to, or by, a third party without the prior and written permission of Bromcom
Computers is prohibited.
Disclaimer: Bromcom's policy is one of constant development and improvement. We reserve the right to alter, modify,
correct and upgrade our software programs and publications without notice and without incurring liability.
Copyright:
Bromcom Computers Plc
Rutland House,
44 Masons Hill
Bromley
Kent
BR2 9JG
United Kingdom
Web: www.bromcom.com (Main Site)
https://support.bromcom.com (Users Site)
Tel: (Helpdesk) +44 (0) 20 8290 7177Note: To
October 2021
27
HR & Performance Management GuideYou can also read